AWS Security Blog
How to automate incident response in the AWS Cloud for EC2 instances
One of the security epics core to the AWS Cloud Adoption Framework (AWS CAF) is a focus on incident response and preparedness to address unauthorized activity. Multiple methods exist in Amazon Web Services (AWS) for automating classic incident response techniques, and the AWS Security Incident Response Guide outlines many of these methods. This post demonstrates one specific method for instantaneous response and acquisition of infrastructure data from Amazon Elastic Compute Cloud (Amazon EC2) instances.
Incident response starts with detection, progresses to investigation, and then follows with remediation. This process is no different in AWS. AWS services such as Amazon GuardDuty, Amazon Macie, and Amazon Inspector provide detection capabilities. Amazon Detective assists with investigation, including tracking and gathering information. Then, after your security organization decides to take action, pre-planned and pre-provisioned runbooks enable faster action towards a resolution. One principle outlined in the incident response whitepaper and the AWS Well-Architected Framework is the notion of pre-provisioning systems and policies to allow you to react quickly to an incident response event. The solution I present here provides a pre-provisioned architecture for an incident response system that you can use to respond to a suspect EC2 instance.
Infrastructure overview
The architecture that I outline in this blog post automates these standard actions on a suspect compute instance:
- Capture all the persistent disks.
- Capture the instance state at the time the incident response mechanism is started.
- Isolate the instance and protect against accidental instance termination.
- Perform operating system–level information gathering, such as memory captures and other parameters.
- Notify the administrator of these actions.
The solution in this blog post accomplishes these tasks through the following logical flow of AWS services, illustrated in Figure 1.
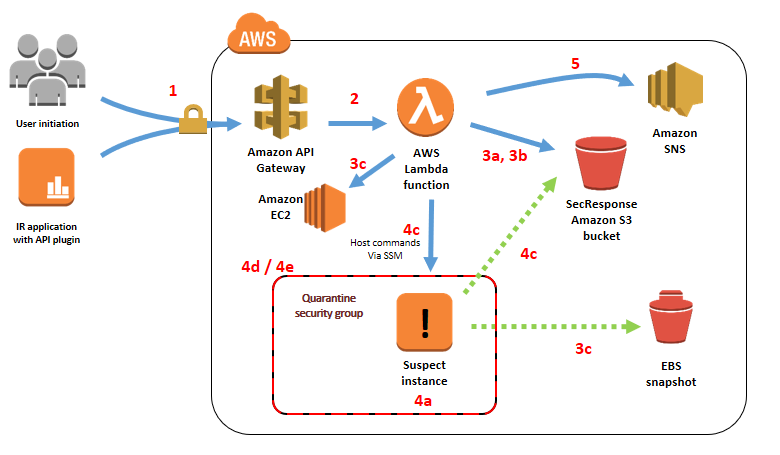
Figure 1: Infrastructure deployed by the accompanying AWS CloudFormation template and associated task flow when invoking the main API
- A user or application calls an API with an EC2 instance ID to start data collection.
- Amazon API Gateway initiates the core logic of the process by instantiating an AWS Lambda function.
- The Lambda function performs the following data gathering steps before making any changes to the infrastructure:
- Save instance metadata to the SecResponse Amazon Simple Storage Service (Amazon S3) bucket.
- Save a snapshot of the instance console to the SecResponse S3 bucket.
- Initiate an Amazon Elastic Block Store (Amazon EBS) snapshot of all persistent block storage volumes.
- The Lambda function then modifies the infrastructure to continue gathering information, by doing the following steps:
- Set the Amazon EC2 termination protection flag on the instance.
- Remove any existing EC2 instance profile from the instance.
- If the instance is managed by AWS Systems Manager:
- Attach an EC2 instance profile with minimal privileges for operating system–level information gathering.
- Perform operating system–level information gathering actions through Systems Manager on the EC2 instance.
- Remove the instance profile after Systems Manager has completed its actions.
- Create a quarantine security group that lacks both ingress and egress rules.
- Move the instance into the created quarantine security group for isolation.
- Send an administrative notification through the configured Amazon Simple Notification Service (Amazon SNS) topic.
Solution features
By using the mechanisms outlined in this post to codify your incident response runbooks, you can see the following benefits to your incident response plan.
Preparation for incident response before an incident occurs
Both the AWS CAF and Well-Architected Framework recommend that customers formulate known procedures for incident response, and test those runbooks before an incident. Testing these processes before an event occurs decreases the time it takes you to respond in a production environment. The sample infrastructure shown in this post demonstrates how you can standardize those procedures.
Consistent incident response artifact gathering
Codifying your processes into set code and infrastructure prepares you for the need to collect data, but also standardizes the collection process into a repeatable and auditable sequence of What information was collected when and how. This reduces the likelihood of missing data for future investigations.
Walkthrough: Deploying infrastructure and starting the process
To implement the solution outlined in this post, you first need to deploy the infrastructure, and then start the data collection process by issuing an API call.
The code example in this blog post requires that you provision an AWS CloudFormation stack, which creates an S3 bucket for storing your event artifacts and a serverless API that uses API Gateway and Lambda. You then execute a query against this API to take action on a target EC2 instance.
The infrastructure deployed by the AWS CloudFormation stack is a set of AWS components as depicted previously in Figure 1. The stack includes all the services and configurations to deploy the demo. It doesn’t include a target EC2 instance that you can use to test the mechanism used in this post.
Cost
The cost for this demo is minimal because the base infrastructure is completely serverless. With AWS, you only pay for the infrastructure that you use, so the single API call issued in this demo costs fractions of a cent. Artifact storage costs will incur S3 storage prices, and Amazon EC2 snapshots will be stored at their respective prices.
Deploy the AWS CloudFormation stack
In future posts and updates, we will show how to set up this security response mechanism inside a separate account designated for security, but for the purposes of this post, your demo stack must reside in the same AWS account as the target instance that you set up in the next section.
First, start by deploying the AWS CloudFormation template to provision the infrastructure.
To deploy this template in the us-east-1 region
- Choose the Launch Stack button to open the AWS CloudFormation console pre-loaded with the template:

- (Optional) In the AWS CloudFormation console, on the Specify Details page, customize the stack name.
- For the LambdaS3BucketLocation and LambdaZipFileName fields, leave the default values for the purposes of this blog. Customizing this field allows you to customize this code example for your own purposes and store it in an S3 bucket of your choosing.
- Customize the S3BucketName field. This needs to be a globally unique S3 bucket name. This bucket is where gathered artifacts are stored for the demo in this blog. You must customize it beyond the default value for the template to instantiate properly.
- (Optional) Customize the SNSTopicName field. This name provides a meaningful label for the SNS topic that notifies the administrator of the actions that were performed.
- Choose Next to configure the stack options and leave all default settings in place.
- Choose Next to review and scroll to the bottom of the page. Select all three check boxes under the Capabilities and Transforms section, next to each of the three acknowledgements:
- I acknowledge that AWS CloudFormation might create IAM resources.
- I acknowledge that AWS CloudFormation might create IAM resources with custom names.
- I acknowledge that AWS CloudFormation might require the following capability: CAPABILITY_AUTO_EXPAND.
- Choose Create Stack.
Set up a target EC2 instance
In order to demonstrate the functionality of this mechanism, you need a target host. Provision any EC2 instance in your account to act as a target for the security response mechanism to act upon for information collection and quarantine. To optimize affordability and demonstrate full functionality, I recommend choosing a small instance size (for example, t2.nano) and optionally joining the instance into Systems Manager for the ability to later execute Run Command API queries. For more details on configuring Systems Manager, refer to the AWS Systems Manager User Guide.
Retrieve required information for system initiation
The entire security response mechanism triggers through an API call. To successfully initiate this call, you first need to gather the API URI and key information.
To find the API URI and key information
- Navigate to the AWS CloudFormation console and choose the stack that you’ve instantiated.
- Choose the Outputs tab and save the value for the key APIBaseURI. This is the base URI for the API Gateway. It will resemble https://abcdefgh12.execute-api.us-east-1.amazonaws.com.
- Next, navigate to the API Gateway console and choose the API with the name SecurityResponse.
- Choose API Keys, and then choose the only key present.
- Next to the API key field, choose Show to reveal the key, and then save this value to a notepad for later use.
(Optional) Configure administrative notification through the created SNS topic
One aspect of this mechanism is that it sends notifications through SNS topics. You can optionally subscribe your email or another notification pipeline mechanism to the created SNS topic in order to receive notifications on actions taken by the system.
Initiate the security response mechanism
Note that, in this demo code, you’re using a simple API key for limiting access to API Gateway. In production applications, you would use an authentication mechanism such as Amazon Cognito to control access to your API.
To kick off the security response mechanism, initiate a REST API query against the API that was created in the AWS CloudFormation template. You first create this API call by using a curl command to be run from a Linux system.
To create the API initiation curl command
- Copy the following example curl command.
curl -v -X POST -i -H "x-api-key: 012345ABCDefGHIjkLMS20tGRJ7othuyag" https://abcdefghi.execute-api.us-east-1.amazonaws.com/DEMO/secresponse -d '{ "instance_id":"i-123457890" }' - Replace the placeholder API key specified in the x-api-key HTTP header with your API key.
- Replace the example URI path with your API’s specific URI. To create the full URI, concatenate the base URI listed in the AWS CloudFormation output you gathered previously with the API call path, which is /DEMO/secresponse. This full URI for your specific API call should closely resemble this sample URI path: https://abcdefghi.execute-api.us-east-1.amazonaws.com/DEMO/secresponse
- Replace the value associated with the key instance_id with the instance ID of the target EC2 instance you created.
Because this mechanism initiates through a simple API call, you can easily integrate it with existing workflow management systems. This allows for complex data collection and forensic procedures to be integrated with existing incident response workflows.
Review the gathered data
Note that the following items were uploaded as objects in the security response S3 bucket:
- A console screenshot, as shown in Figure 2.
- (If Systems Manager is configured) stdout information from the commands that were run on the host operating system.
- Instance metadata in JSON form.
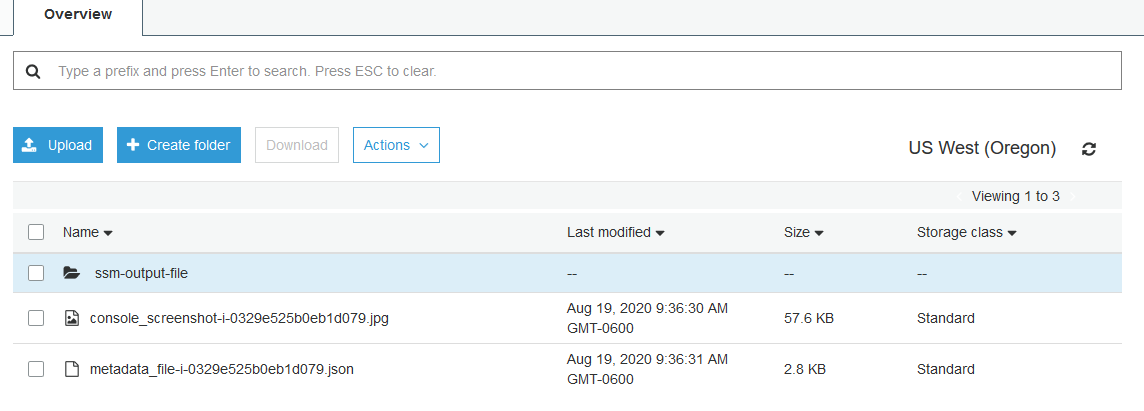
Figure 2: Example outputs from a successful completion of this blog post’s mechanism
Additionally, if you load the Amazon EC2 console and scroll down to Elastic Block Store, you can see that EBS snapshots are present for all persistent disks as shown in Figure 3.

Figure 3: Evidence of an EBS snapshot from a successful run
You can also verify that the previously outlined security controls are in place by viewing the instance in the Amazon EC2 console. You should see the removal of AWS Identity and Access Management (IAM) roles from the target EC2 instances and that the instance has been placed into network isolation through a newly created quarantine security group.
Note that for the purposes of this demo, all information that you gathered is stored in the same AWS account as the workload. As a best practice, many AWS customers choose instead to store this information in an AWS account that’s specifically designated for incident response and analysis. A dedicated account provides clear isolation of function and restriction of access. Using AWS Organizations service control policies (SCPs) and IAM permissions, your security team can limit access to adhere to security policy, legal guidance, and compliance regulations.
Clean up and delete artifacts
To clean up the artifacts from the solution in this post, first delete all information in your security response S3 bucket. Then delete the CloudFormation stack that was provisioned at the start of this process in order to clean up all remaining infrastructure.
Conclusion
Placing workloads in the AWS Cloud allows for pre-provisioned and explicitly defined incident response runbooks to be codified and quickly executed on suspect EC2 instances. This enables you to gather data in minutes that previously took hours or even days using manual processes.
If you have feedback about this post, submit comments in the Comments section below. If you have questions about this post, start a new thread on the Amazon EC2 forum or contact AWS Support.
Want more AWS Security how-to content, news, and feature announcements? Follow us on Twitter.