AWS Partner Network (APN) Blog
Exposing Private APIs Across AWS Accounts Only for Authorized Access Methods
By Néstor Gándara, Sr. Partner Solutions Architect at AWS
By Chandra Venkata Atchut Narayanarao, Sr. Cloud Transformation Architect at Virtusa
By Piyush Agarwal, Sr. Cloud Transformation Architect at Virtusa
 |
Virtusa recently received a requirement to make an application programming interface (API) accessible across another Amazon Web Services (AWS) account.
The API was an internal-only API hosted in a private subnet, and could be accessed only from within the network. The requirement also stipulated Virtusa make only a few read-only (Get) methods accessible, and not all the methods from the API.
There are a few options to access a private API across AWS accounts:
- Enable virtual private cloud (VPC) peering between the accounts. This is the simplest way but provides access to everything between the accounts.
- Use a VPC private link. Another simple method, but it exposes all methods (Get, Put, and Post) and has no authentication in place.
- Deploy a public load balancer and provide an access list for the source IP addresses using a web application firewall. This exposes all of the methods (Get, Put, and Post).
Virtusa is an AWS Premier Consulting Partner with seven AWS Competencies in areas like DevOps, Data & Analytics, and SaaS. This post will explain how Virtusa assessed the customer’s challenges and provide a detailed walkthrough of the solution.
Solution Overview
Virtusa addressed the customer’s challenge by designing a solution that uses Amazon API Gateway with AWS Identity and Access Management (IAM) authentication.
Only authorized methods will be provided access to the API from other AWS accounts.
AWS IAM roles and policies offer flexible, robust, and fully managed access controls, without writing any code. IAM roles and policies can be used to control who can create and manage your APIs, in addition to who can invoke them.
In this case, IAM authentication is used to invoke the API. An Amazon Elastic Compute Cloud (Amazon EC2) role that is approved in the Amazon API Gateway Resource Policy can only invoke this API endpoint. There is no defined authentication in place for the actual legacy API, and the IAM authorization on Amazon API Gateway was leveraged.

Figure 1 – Solution architecture.
The solution is a highly available system with multi-zone deployment on both API servers and the database using Amazon Relational Database Service (Amazon RDS). In Figure 1, blue lines indicate internal flow of data, and red lines indicate external flow of data.
AWS services used for internal data flows include Amazon EC2, AWS Auto Scaling, Amazon RDS, and Application Load Balancer with an Amazon Route 53 corporate network level delegation.
Additional AWS services used for external system access are Amazon API Gateway, Amazon Virtual Private Cloud (VPC), and Network Load Balancer.
Setup Instructions
To set up access to your API from other AWS accounts while restricting it to only authorized methods, follow these steps:
- Set up the API
- Set up Network Load Balancer
- Create an Amazon VPC link
- Configure Amazon API Gateway
- Deploy the API
- Define the Resource Policy
Step 1: Set Up the API
To get started, pick an API to configure for internal-only access within the AWS account and the corporate data center through AWS Direct Connect or AWS Virtual Private Network (AWS VPN). The API can be without an authentication in-place (legacy) for which we can leverage the IAM authentication on Amazon API Gateway.
Configure the API with an Auto Scaling group across two AWS Availability Zones, an Amazon RDS database instance deployed in multiple Availability Zones, and an internal Application Load Balancer registered under Amazon Route 53 as api.internal.com.
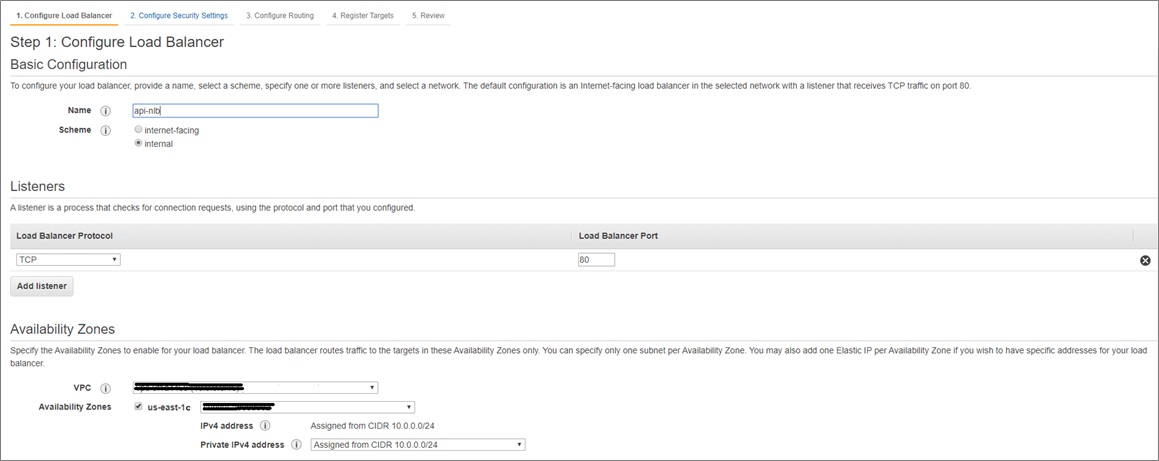
Figure 2 – Configure the API.
Step 2: Set Up Network Load Balancer
Next, select an internal Network Load Balancer. While setting up routing for this, register the EC2 instances that host the target group’s API.
Configure the Network Load Balancer by using the same VPC and subnets as the EC2 instances hosting the API. Next, review your Network Load Balancer settings and confirm it to be created.
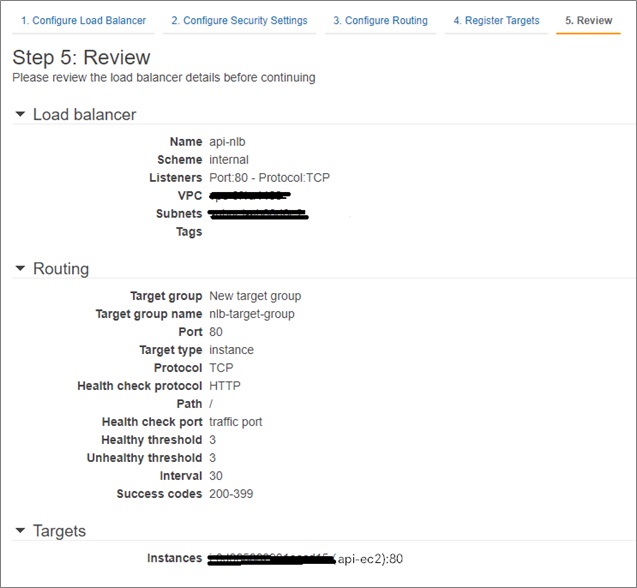
Figure 3 – Configure Network Load Balancer.
Step 3: Create Amazon VPC Link
Create an Amazon VPC link that maps the Network Load Balancer created in the previous step. To do this, navigate to Amazon API Gateway Service, and select VPC Links from the menu on the left.
In the Create a VPC link screen, select VPC Link for REST APIs. Under VPC Link details, name the link. Under Target NLB, choose the Network Load Balancer you just created. Then select the Create button.
At first, the status indicates Pending; when the status changes to Available, you can continue on.
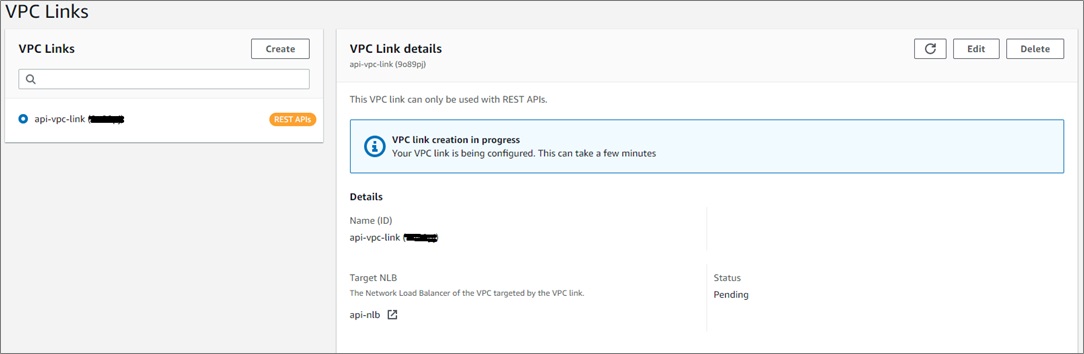
Figure 4 – VPC link status.
Step 4: Configure Amazon API Gateway
Now, create an API under the Amazon API Gateway service. Under the Choose an API type screen, select the REST API option, followed by the Build button. Do not choose the REST API (private) option, as it can be accessed only from within the VPC.
In the next screen that appears, select REST in the protocol, then New API and Name the API.
As the Endpoint Type, select either Regional or Edge-optimized. This setting controls whether the API is deployed only within the Region or to Amazon CloudFront to enable cached responses.
We chose edge-optimized to enable the cached responses. Edge-optimized APIs are endpoints that are accessed through a CloudFront distribution that’s created and managed by Amazon API Gateway. Previously, edge-optimized APIs were the default option for creating APIs with Amazon API Gateway.
Do not choose Private as the Endpoint Type because it makes the API private again and, to access it, you’ll need to create a VPC endpoint in the external AWS account, and configure that VPC endpoint while creating your API.
Once the API is created, create a new resource under root using Actions > Create Resource. Name your resource under Resource Name, and specify the method you want to publish under Resource Path.

Figure 5 – Create a new resource under root.
In the next window, select the resource you just created and create a Get Method with VPC Link as the Integration type.
Select the VPC link you created. Enter the internal API endpoint in the Endpoint URL, along with the method endpoint you want to publish. Then select Save.

Figure 6 – Choose the integration point for your new method.
Select the Get resource you previously created and select Method Request to change the Authentication type. Also, enter the Query String parameters if you have any.

Figure 7 – Enter the Query String parameters.
In the same screen, select Integration Request to add the Query String parameters if there is a parameter mapped in the Method Request.
Next, select Method Response to configure the response headers and body if there are any additional specifications to your API response. This step is optional.

Figure 8 – Configure Method Response headers and body.
The final configuration of the API method should look like this:

Figure 9 – Final configuration of Method Response.
Step 5: Deploy the API
In the Amazon API Gateway window, select Action > Deploy API. For the Deployment stage, select New Stage, name the stage, and select the Deploy button.
The following figure shows the confirmation page for the API deployed for final usage:
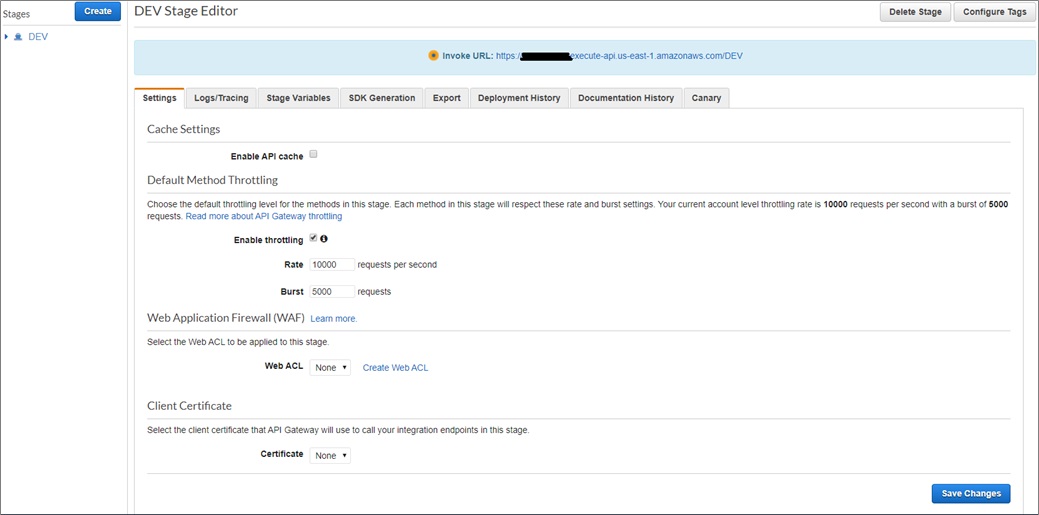
Figure 10 – API Endpoint after deployment.
Step 6: Define the Resource Policy
On the left side menu under your API name, find the Resource Policy option. Select the option to provide access for Roles/Users from a certain AWS account.
Select the AWS Account Access list button at the bottom of the Resource Policy page to auto-generate sample policy.
Update the resource policy with the destination AWS account number, user/EC2 role, your Amazon API Gateway Amazon Resource Name (ARN), and Stage. Then select Save.
Testing
To test the API, select the Test option available in the Amazon API Gateway edit mode. Provide the required parameters and headers you configured during the API creation, and then select Test.

Figure 11 – Test output.
Additional Configuration and Testing
You can also configure a user-friendly name for the endpoint by using a Custom Domain Name for the API Gateway. In our example, we used https://api.external.com for our API.
You can test the Amazon API Gateway endpoint using the Postman tool. Create AWS IAM user keys access listed as in the resource policy, and use them as the AWS Signature of the Postman for credentials.
The remainder of Postman testing is the same as testing any other API, except that it calls the Get method with the required URL query string parameters and other headers configured.
Conclusion
There are many ways to expose APIs across AWS accounts, but the challenge given to Virtusa was that the API was a legacy API without any authentication built in. It should not go public, and only defined methods needed to be exposed. Finally, from a security perspective, only approved roles needed to have access.
.

.
Virtusa – AWS Partner Spotlight
Virtusa is an AWS Premier Consulting Partner and global provider of digital business strategy, engineering, and IT services and solutions. Virtusa accelerates clients’ cloud adoption through technical, training, and GTM investments.
Contact Virtusa | Partner Overview
*Already worked with Virtusa? Rate the Partner
*To review an AWS Partner, you must be a customer that has worked with them directly on a project.