AWS for M&E Blog
Secure media streaming with private networking using AWS Media Services
Introduction
Many organizations are seeking ways to control and secure their live media streams, which often contain sensitive information or intellectual property, within their corporate networks. At the same time, companies also want the flexibility to grant controlled access to these private streams. Accessing media services, or media assets stored in Amazon Simple Storage Service (S3), directly does not provide the access control mechanisms required by some customers. Moreover, internet facing services like Amazon CloudFront distribute these streams over the public internet to satisfy certain requirements such as low-latency delivery.
This blog post describes how to set up a streaming solution leveraging Amazon API Gateway and AWS Elemental MediaLive in conjunction with VPC Endpoints and AWS Client VPN. This combination allows restriction of private streams exclusively to a customer’s corporate network, with the ability to implement custom access control mechanisms, reducing any exposure to the public internet.
Solution overview
AWS helps broadcasters and content owners automate their media supply chain, streamline content distribution, and broadcast live content cost-effectively to a global audience. With AWS, you have the flexibility to scale your infrastructure as needed while only paying for the resources you use. This empowers you to build highly available and budget-friendly solutions for live video streaming. Additionally, many customers express the need to enhance control and privacy for their internal content, while still granting access to employees and third parties. This includes scenarios like internal conferences, or sharing test footage of new products, movies, and games.
This implementation offers a modification to the Live Streaming on AWS solution. While similar, it provides additional security measures to manage stream access and keep those streams within a private IP network, and does not use the public internet for media asset delivery.
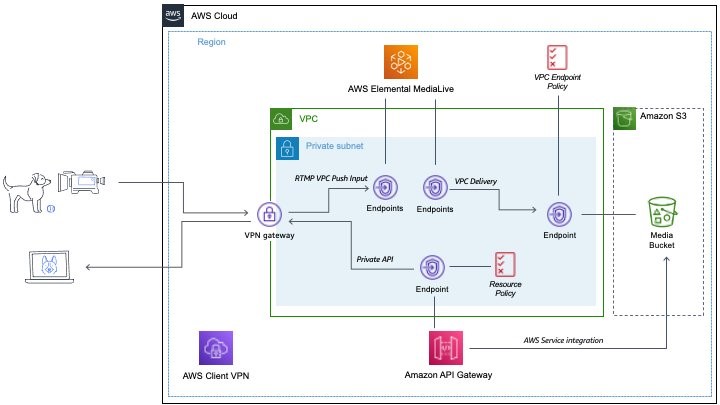
Figure 1: solution overview showing flow of the media stream through private connectivity
You can set up this solution specifically for a live event. When streaming concludes, you can decommission the infrastructure to ensure you’re only charged for what you’ve used. Alternatively, you can repurpose this solution for other streaming events, but we recommend implementing automation to manage the infrastructure efficiently. Another option is to maintain it as a mechanism for ingesting media and broadcasting it on demand after conversion.
Solution features
- Automatically configures Virtual Private Clouds (VPCs) with private subnets and VPC Endpoints for controlled connectivity.
- Creates a MediaLive channel connected to an Amazon S3 bucket to encode and originate content for adaptive bitrate streaming across multiple screens via HTTP Live Streaming (HLS).
- Creates and deploys an API Gateway to provide an elastic, highly available, private delivery mechanism. Amazon Cognito or AWS Lambda authorizers can also be added if an additional authentication layer is a requirement.
- Builds an embedded video player app for testing purposes in a browser.
- Creates a ClientVPN endpoint as a mechanism to access the private network components on AWS and enables the testing of streaming from and to a specific machine. However, if you have an existing site-to-site VPN or AWS Direct Connect, they can also be used. AWS Elemental MediaConnect can also be used as a connectivity option, as it provides additional stream encryption mechanisms.
Solution implementation
AWS CDK structure
AWS CDK is an open-source software development framework that lets you define your cloud application resources using familiar programming languages. For hands-on experience, please visit the AWS CDK introduction workshop.
For this project, we make use of the Python version of the AWS CDK. We will create a Python app using the AWS CDK, which abstracts the AWS CloudFormation stack and resource creation. The CDK has been created using a top-level and nested stack concept to allow for scoping of resources:
- Root stack: this is our top-level stack, which initiates the deployment of the nested stacks.
- Gateway nested stack: this contains the API Gateway definition
- IAM nested stack: holds the roles and policies required to deploy and run the solution.
- MediaLive nested stack: contains the definition of our MediaLive channel and other components of the media infrastructure to stream MP4 files.
- Network nested stack: contains the definition of the private networking components.
- Storage nested stack: contains the resource definition for the private streaming bucket.
Deploy the solution
Prerequisites
For this deployment, you should have:
- An AWS account with permissions to deploy to and view CloudFormation templates, modify VPC configurations, view and list API Gateway, and make changes to MediaLive channel and stream settings.
- Complete the AWS CDK Getting Started guide for Python, including CDK Bootstrapping.
- Install the AWS CLI and set up your AWS credentials for command-line use with appropriate permissions to deploy to CloudFormation – or, you can use the AWS Tools for PowerShell and set up your AWS credentials for PowerShell
- A streaming source that is supported by MediaLive. In this tutorial, we use our webcam streaming through OBS Studio using RTMP push protocol.
- Download the AWS Client VPN software, ensuring you have necessary permissions or authorization from your organization to set up a new VPN connection on your client device.
CDK deployment
-
- Copy the sample code to your environment:
git clone https://github.com/aws-samples/protected-streaming-aws-medialive - Move into the new directory that has just been created:
cd protected-streaming-aws-medialive - Follow this guide to generate certificates and upload them to AWS Certificate Manager to set up mutual authentication between your client device and the AWS VPN endpoint. Ensure you capture the ARNs of the certificates you upload. Certificate ARNs will follow the format:
arn:aws:acm:<region>:<account-id>:certificate/<certificate-id> - Open up the
protected-streaming-aws-medialive/cdk/app.pyfile in your favorite code editor, and modify themy_client_vpn_cert_paramandmy_server_vpn_cert_paramlines to add in your ARNs from the certificates you just uploaded to ACM. - Make sure to activate the virtualenv environment and install the dependencies from,
protected-streaming-aws-medialive/cdkusingpip install -r requirements.txt - Run
cdk synthto synthesize the CloudFormation template for the code. - Run
cdk deployto deploy the stack and its resources into your account. The stack takes about 10 minutes to deploy, so this is a good time to go stretch your legs or grab a coffee. - Once the CDK has finished deploying the resources, navigate to the CloudFormation console via your browser. You should see the following stacks have been successfully been created:
- Copy the sample code to your environment:
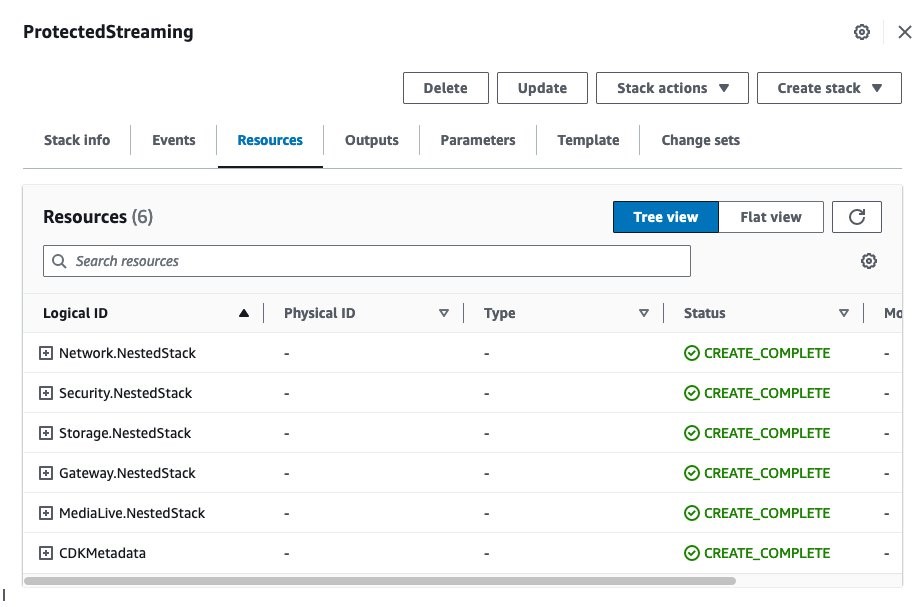
Figure 2: CloudFormation output will look like this once all the CDK stacks have been deployed
- Next, navigate to the VPC dashboard in your region, and on the left-hand side menu, select Client VPN endpoints. Select the radio button for the Client VPN endpoint, and choose Download client configuration.
- Open the
downloaded-client-config.ovpnfile in your favorite editor and follow option 1 in this guide to add the path to the local client certificate information to enable the mutual authentication.
NOTE: Do not connect to the ClientVPN yet as this will prevent you from configuring the next few steps. Connection to the ClientVPN will occur for the testing phase. - Navigate to the API Gateway console and find a new API called
Protected Media Streaming. Make a note of this Protected Stream API ID, you’ll need this later on. - Navigate to the MediaLive console and then click on Inputs in the left-hand navigation bar. Select the
protected_stream_input. Make a note of the first URL listed under Endpoints, which will have the following format:rtmp://xx.xx.xx.xx:1935:protected_stream_app/protected_stream_appinst1
Deploy the video player
Back in our local repository, let’s deploy the video player, which will be embedded into the browser and display live stream footage.
- Navigate to the video player directory
cd videoplayer
- Still in your virtual environment, install the Node dependencies with
npm install
- Build the video player code
npm run build
- Copy the video player and all node modules to the Amazon S3 bucket created by the CDK deployment. The
MediaBucketNameproperty can be found in the CloudFormation outputs for the nested storage stack.aws s3 cp dist/ s3://<MediaBucketName> --recursiveaws s3 cp node_modules/ s3://<MediaBucketName>/node_modules/ --recursive
Test the solution
The stack does not start your channel automatically. Navigate to MediaLive in the AWS Console and click the Channels link in the left-hand navigation bar. Select protected_stream_channel and click the Start button.
NOTE: Remember to stop your channel when you are done testing to avoid unwanted charges.
Set up the private stream input
For this tutorial, we walk through how to stream from your webcam to the MediaLive channel, and view it from your browser using API Gateway. The traffic will flow through the private connectivity we deployed through the CDK. We use OBS Studio software for this demo, but you can use any software or stream that can be configured for RTMP Push.
First, we need to connect to our ClientVPN:
- Using the AWS ClientVPN software, follow the instructions for your client device OS to add a new profile using the
downloaded-client-config.ovpndownloaded and edited in the previous steps. - Connect to the VPN.
- Update your local DNS settings, instructions here for macOS or Windows to use the Amazon DNS server in your VPC at
10.0.0.2
Next, we want to configure OBS to stream our webcam:
- In OBS, navigate to Settings, and select Stream. Choose Custom from the drop down list.
- For the server address, add in the RTMP address details we captured earlier from the MediaLive input under Destination A. Add everything up until first path, such as
rtmp://xx.xx.xx.xx:1935/protected_stream_app/ - Add the application instance name
protected_stream_appinst1for the primary MediaLive pipeline as the stream key in the field below. - Your OBS settings should look something like this:

- Select
ApplyandOKand return to the main OBS landing console. - Next, we create our video source. Under
Sourcesselect the+to add a new source, and chooseVideo Capture Device

- Choose a name, select
OKand choose a device to capture a video input. - Once done, you should see your video device on the OBS landing page. The final step here is to select
Start Streaming. This will connect to the MediaLive endpoint via the VPN and start to push your video content from your device, for us to receive on the other side through API Gateway.
Connect to private API to view the stream output
Now that we have a live video stream, we want to connect to our private network through the ClientVPN so we can stream it.
- Using the
Protected StreamAPI ID you captured earlier, invoke the API using this format:
https://{restapi-id}.execute-api.{region}.amazonaws.com/prod/index.html
- You should now be streaming media content privately. To confirm, disconnect from the ClientVPN and refresh your browser.
Additional security measures to move to least privilege
The Amazon S3 bucket that stores the video content is a primary component of this solution. The current implementation of the design applies some flexible policies to allow for testing and implementation in your accounts. If you do plan to deploy this architecture into a production environment, we recommend some additional tuning and scoping down of the S3 bucket policy to control the origin of the data as well as where the data can be distributed.
- Restrict the
MediaBucketNameto only allow actions on that bucket originating from the VPC endpoint. This would be done on theMediaLiveAccessPolicy. You can use this userguide to achieve this and tailor for your environment. - Further restrict permissions and scope down so that the only principal that can write to the S3 bucket is the role used by MediaLive. Equally, scope down which principals can get the objects from the S3 bucket so that only the role used by API Gateway can do so. You can access guidance related to scoping down the bucket policy here.
Cleanup
Once you are done testing, you should consider destroying the resources created as part of this walkthrough to save on costs.
- Navigate to the MediaLive console and stop the channel.
- In your terminal, run
cdk destroy. This will start the process to remove the CloudFormation stacks that have been created.
NOTE: Also make sure to update your local DNS settings to no longer use the Amazon DNS in your VPC.
Conclusion
In this blog post, we demonstrated how to deploy a solution that creates a secure streaming network using AWS Elemental MediaLive, combined with private networking architectures. This allows customers to have more control and flexibility in protecting their streams from traversing the public internet, all while adding extra layers of authentication. This addresses customer requests for a method to deliver highly sensitive streaming content with reduced exposure to security risks.
As a next step in this solution, customers may want to explore networking options like AWS Direct Connect or AWS Site-to-Site VPN. This way, they can avoid the need for employees or third parties to install ClientVPN software on their devices to access a private stream.
For more information about AWS Media Services and how they can assist you in creating and delivering video content, visit Media Services on AWS.