AWS Messaging Blog
Tracking email engagement with AWS Analytics services
Update: July 26, 2023 – This blog has now a script to automate its deployment. You can find it in this Github repository.
Email at scale is one of the most valuable forms of reaching and engaging with customers, but creating the most engaging email content means frequent tracking, monitoring, and analyzing bounces, complaints, opens, and clicks. Managing your reputation as a sender and understanding user engagement have never been more important and play a crucial role in email deliverability and inbox placement.
Amazon Simple Email Service (Amazon SES) is a cost-effective, flexible, and scalable email service that enables customers to send mail from within any application. You can configure Amazon SES quickly to support several email use cases, including transactional, marketing, or mass email communications. An additional benefit of using Amazon SES is event publishing which enables you to track your email sending, feedback, and user engagement at a granular level. AWS also offers analytics tools like Amazon Athena and Amazon QuickSight, which can be connected to SES for even deeper insights capabilities.
In this post, we will walk you through how to create an end-to-end solution for event analysis and how to build custom dashboards to analyze SES utilization, user engagement, and sender reputation.
Prerequisites
- The solution presented in this blog requires the following prerequisites to be satisfied before continuing:
- An AWS Account that provides access to AWS services.
- An AWS Identity and Access Management (IAM) user with the permissions to create an IAM role and policies, and create stacks in AWS CloudFormation.
- An Amazon Simple Email Service (Amazon SES) verified identity. You can create and verify a sending identity by following the steps described in the documentation.
- Your Amazon SES account is out of the sandbox.
- Use a region where AWS Glue DataBrew is available.
Solution Overview
The Figure below describes the architecture diagram for the proposed solution.
- Amazon SES publishes email sending events to Amazon Kinesis Data Firehose using a default configuration set.
- Amazon Kinesis Data Firehose Delivery Stream stores event data in an Amazon Simple Storage Service (Amazon S3) bucket, known as the Destination bucket.
- AWS Glue DataBrew processes and transforms event data in the Destination bucket. It applies the transformations defined in a recipe to the source dataset and stores the output using a different prefix (‘/partitioned’) within the same bucket. Output objects are stored in the Apache Parquet format and partitioned.
- An AWS Lambda function copies the resulting output objects to the Aggregation bucket. The Lambda function is invoked asynchronously via Amazon S3 event notifications when objects are created in the Destination bucket.
- An AWS Glue crawler runs periodically over the event data stored in the Aggregation bucket to determine its schema and update the table partitions in the AWS Glue Data Catalog.
- Amazon Athena queries the event data table registered in the AWS Glue Data Catalog using standard SQL.
- Amazon QuickSight dashboards allow visualizing event data in an interactive way via its integration with Amazon Athena data sources.
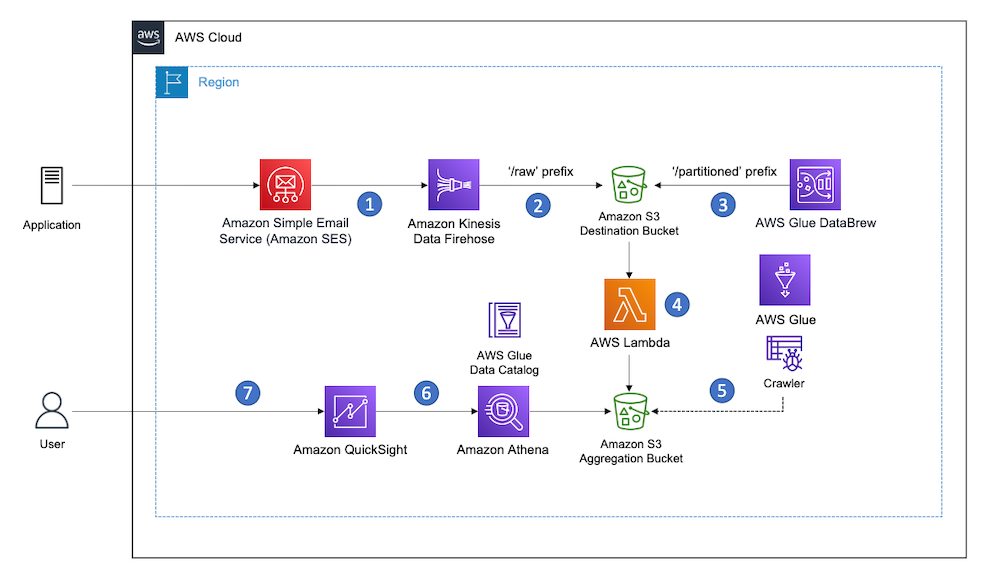
Figure 1. Serverless architecture for processing Amazon SES Email Sending Events at scale
Solution Deployment
After all the prerequisites listed above are met, the sequence of steps required to deploy the solution is summarized as follows:
- Deploy the CloudFormation template in your desired AWS Region.
- Configure your Amazon SES verified identity.
- Send emails via the Amazon SES API or the Amazon SES Simple Mail Transfer Protocol (SMTP) interface.
- Configure AWS Glue DataBrew to transform the source dataset as required.
- Create an Amazon QuickSight dashboard to visualize email sending events.
Step 1: Deploy the CloudFormation template in your desired AWS Region
The serverless pipeline described in this post is available as a CloudFormation template at this link.
To deploy the template using the CloudFormation console:
- Browse to this URL – make sure to switch to desired AWS Region using the navigation bar.
- In the Stack name section, enter a name for the Stack.
- Choose Create Stack.
This template will deploy the required resources to implement the serverless pipeline. The deployment takes less than 5 minutes to complete.
Step 2: Configure your Amazon SES verified identity
Amazon SES leverages configuration sets to define groups of rules that you can apply to your verified identities. In this case, the CloudFormation template deployed in the previous step defines a configuration set that uses an event destination based on Amazon Kinesis Data Firehose. In this step you are going to configure your verified identity to use the configuration set “SESConfigurationSet” by default.
Open the Amazon SES console.
- In the navigation pane, under Configuration, choose Verified identities.
- In the Identity column, select the verified identity that you want to edit.
- On the identity’s detail page, select the Configuration set tab and then choose Edit.
- In the Default configuration set page, check the Assign a default configuration set box.
- For the Default configuration set dropdown, choose SESConfigurationSet.
Step 3: Send emails via the Amazon SES API or the Amazon SES Simple Mail Transfer Protocol (SMTP) interface
To test the pipeline, you can start sending emails using the Amazon SES API or the SMTP interface. During Step 2 you have associated the SESConfigurationSet as the default configuration set for the verified identity. As a result, all the emails you are going to send from the verified identity will generate email sending events that will flow through the Amazon Kinesis Data Firehose Delivery Stream and persisted in the Amazon S3 Destination bucket under the ‘/raw’ prefix.
As an alternative to the Amazon SES API or the SMTP interface, it is possible to quickly send test emails using the Amazon SES mailbox simulator:
- Open the Amazon SES console.
- In the navigation pane, under Configuration, choose Verified identities.
- In the Identity column, select the verified identity that you want to send a test email from.
- Choose Send Test Email.
- On the Send test email page, for From-address enter the desired value, for example sender.
- For Scenario, choose the email sending scenario that you want to simulate, for example Success Delivery.
- For Subject, enter the desired email subject.
- For Body, type an optional body text.
- For Configuration set, you can leave the field empty if you have associated a default configuration set to this identify in Step 2. Choose the SESConfigurationSet otherwise.
- Choose Send test email to send the email.
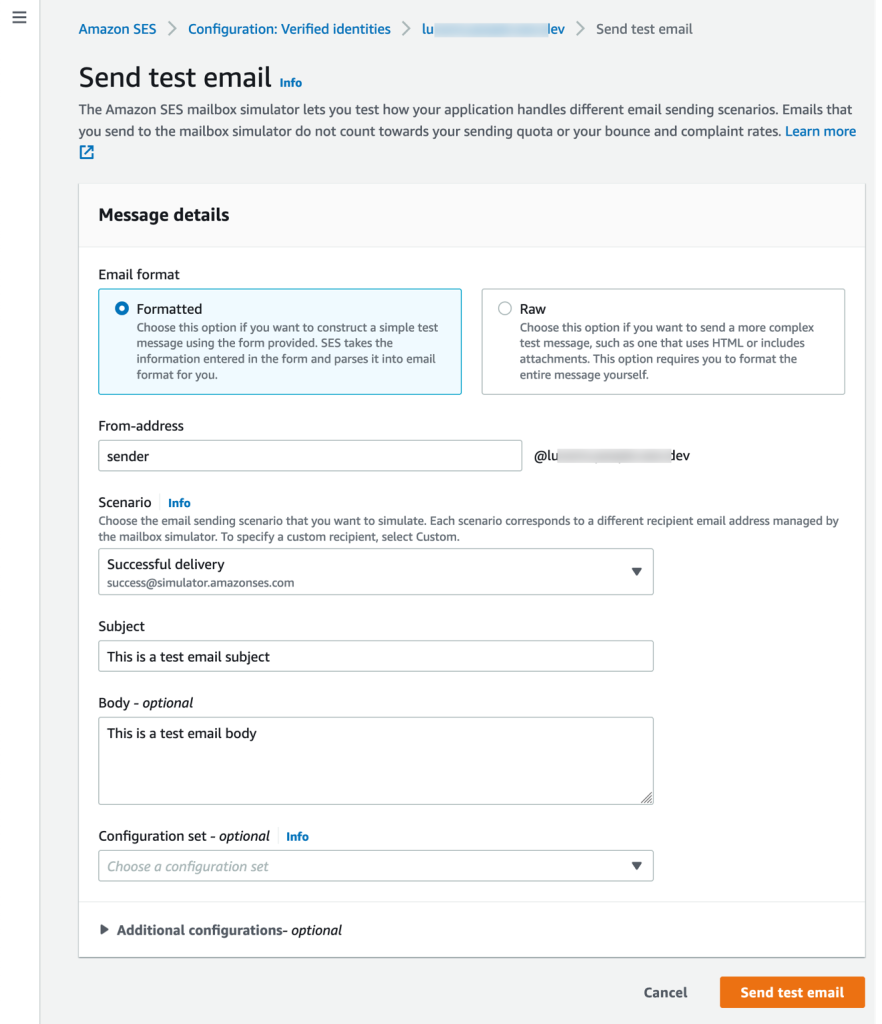
Figure 2. Sending a test email using the Amazon SES mailbox simulator
The Amazon Kinesis Data Firehose Delivery Stream has been configured to buffer data for up to 5 MiB or 60 seconds before delivering it to the Amazon S3 Destination bucket. To verify that the delivery is working as expected, wait for 60 seconds and then:
- Open the Amazon S3 console.
- In the navigation pane, choose Buckets.
- Choose the bucket named <ACCOUNT-ID>-<REGION>-ses-events-destination (replace <ACCOUNT-ID> and <REGION> based on your actual environment).
- Navigate to the ‘/raw‘ prefix and verify it contains some compressed objects (the number of objects depends on the volume of email sending events triggered).
As part of this blog post, we are providing you with sample email sending events that will be used to populate the Amazon QuickSight dashboard in Step 5. You can use AWS CloudShell in your own AWS account to run the command below and synchronize the sample events to your Amazon S3 bucket:
aws s3 sync s3://ses-blog-assets/sample-ses-email-events/ s3://<ACCOUNT-ID>-<REGION>-ses-events-destination/
Remember to replace <ACCOUNT-ID> and <REGION> based on your actual environment.
Step 4: Configure AWS Glue DataBrew to transform the source dataset as required
In this step we will go over the configuration of DataBrew, a visual data preparation tool, to clean and prepare the data for analysis in QuickSight. The CloudFormation template you deployed in previous steps already created a DataBrew dataset for you. In this step, you will import a DataBrew recipe that contains the transformations necessary to analyze the SES email sending events, and then create a DataBrew job to process the data.
- Upload a DataBrew recipe
To upload a recipe, you should follow the steps below:- Download this JSON file that contains the recipe.
- Navigate to the DataBrew console, on the left panel choose Recipes.
- In the Recipes console, on the top left choose Upload recipe.
- For Recipe name provide the following ses-clean-recipe.
- For Upload recipe choose Upload and select the file you downloaded in Step 1.
- Choose Create and publish recipe.
- Create and Schedule a DataBrew job
Create a job to apply the recipe you created above on the dataset and configure it to output a parquet file. To do that, complete the following steps:
- In the DataBrew console, at top right of the project editor, choose the Create job button.
- For Job name, enter ses-event-transformed.
- In the Job Input section, for Choose dataset choose the dataset named SESDataBrewDataset. Select the recipe imported in the previous step.
- For output choose Amazon S3.
- For File type, choose PARQUET and compression as GZIP.
- For S3 location provide the following S3 Bucket that has been created for you by the CloudFormation template: ‘s3://<ACCOUNT-ID>-<REGION>-ses-events-destination/partitioned/‘ (replace <ACCOUNT-ID> and <REGION> based on your environment).
- Choose Settings. For File output storage choose Replace output files for each job run. For Custom partition by column values choose Enabled, and on Columns to partition by add the following: year, month, day, hour (in this order). Choose Save.
- Expand the Associated schedules section, choose Create new schedule and create a schedule that runs every hour and every day. Choose Add.
- Under Permissions, for Role name, choose an existing role or create a new one.
- Choose Create and run job.
- Navigate to the Jobs page and wait for the ses-event-transformed job to complete.
- Choose the Destination link to navigate to Amazon S3 to access the job output.
You have now created a DataBrew job that would transform your dataset based on the recipe you created above.
The SESDataBrewDataset dataset has been created to fetch only the email sending events generated in the past 1 hour to allow for a more efficient differential processing. At the end of each job execution, a Lambda function copies the latest transformed data to the Aggregation bucket named <ACCOUNT-ID>-<REGION>-ses-events-destination-aggregated. Every hour, an AWS Glue crawler scans the Aggregation bucket to update the Glue Catalog accordingly. Before moving to the next Step, either wait for the next scheduled crawler run or browse to the AWS Glue console and run the crawler called SESEventDataCrawler manually.
Step 5: Create an Amazon QuickSight dashboard to visualize email sending events
Now that your cleaned dataset is ready, you are ready to deploy your dashboard. For this blog post we are providing you with a sample QuickSight dashboard. Follow the steps below to deploy it as is. However, if you would like to have a custom dashboard with your own metrics and KPIs and want to use your BI tool of choice, you can leverage the output of the DataBrew job that is stored in S3 to build your own analysis and deploy it in a dashboard.
To deploy the sample dashboard, you first need to create a QuickSight data source, a QuickSight dataset and then a QuickSight dashboard. These resources are going to be deployed using the AWS CLI. You can use AWS CloudShell in your own AWS account to run the commands below. Remember to replace <ACCOUNT-ID> and <REGION> in the following commands based on your actual environment.
- Create a QuickSight data source
-
- Download this JSON file which contains the data source definition.
- Open the file and change the following:
- Principal: the QuickSight users authorized to use the dataset. You can use the procedure described in the documentation to retrieve the QuickSight Principal ARN.
- Apply the command below to create the data source.
aws quicksight create-data-source --aws-account-id <ACCOUNT-ID> --cli-input-json file://create-data-source.json --region <REGION>- Record the data source ARN.
-
- Create a QuickSight dataset
-
- Download this JSON file which contains the dataset definition.
- Open the file and change the following:
- DataSourceArn: data source ARN from Step a.
- ImportMode: if you use QuickSight Enterprise, you can use SPICE. Otherwise, use DIRECT_QUERY.
- Principal: the list of QuickSight users ARNs authorized to use the dataset.
- Apply the command below to create the data source
aws quicksight create-data-set --aws-account-id <ACCOUNT-ID> --cli-input-json file://create-dataset.json --region <REGION>- Record the dataset ARN
-
- Create the Quicksight Dashboard
-
- Download this JSON file which contains the dataset definition.
- Open the file and change the following:
- Principal: the list of QuickSight users ARNs authorized to view the dashboard.
- DataSetArn: Dataset ARN from Step b.
- Apply the command below to create the data source.
aws quicksight create-dashboard --aws-account-id <ACCOUNT-ID> --cli-input-json file://create-dashboard.json --region <REGION> -
After completing the three steps above, you will see a dashboard like the one below populated with your own data.
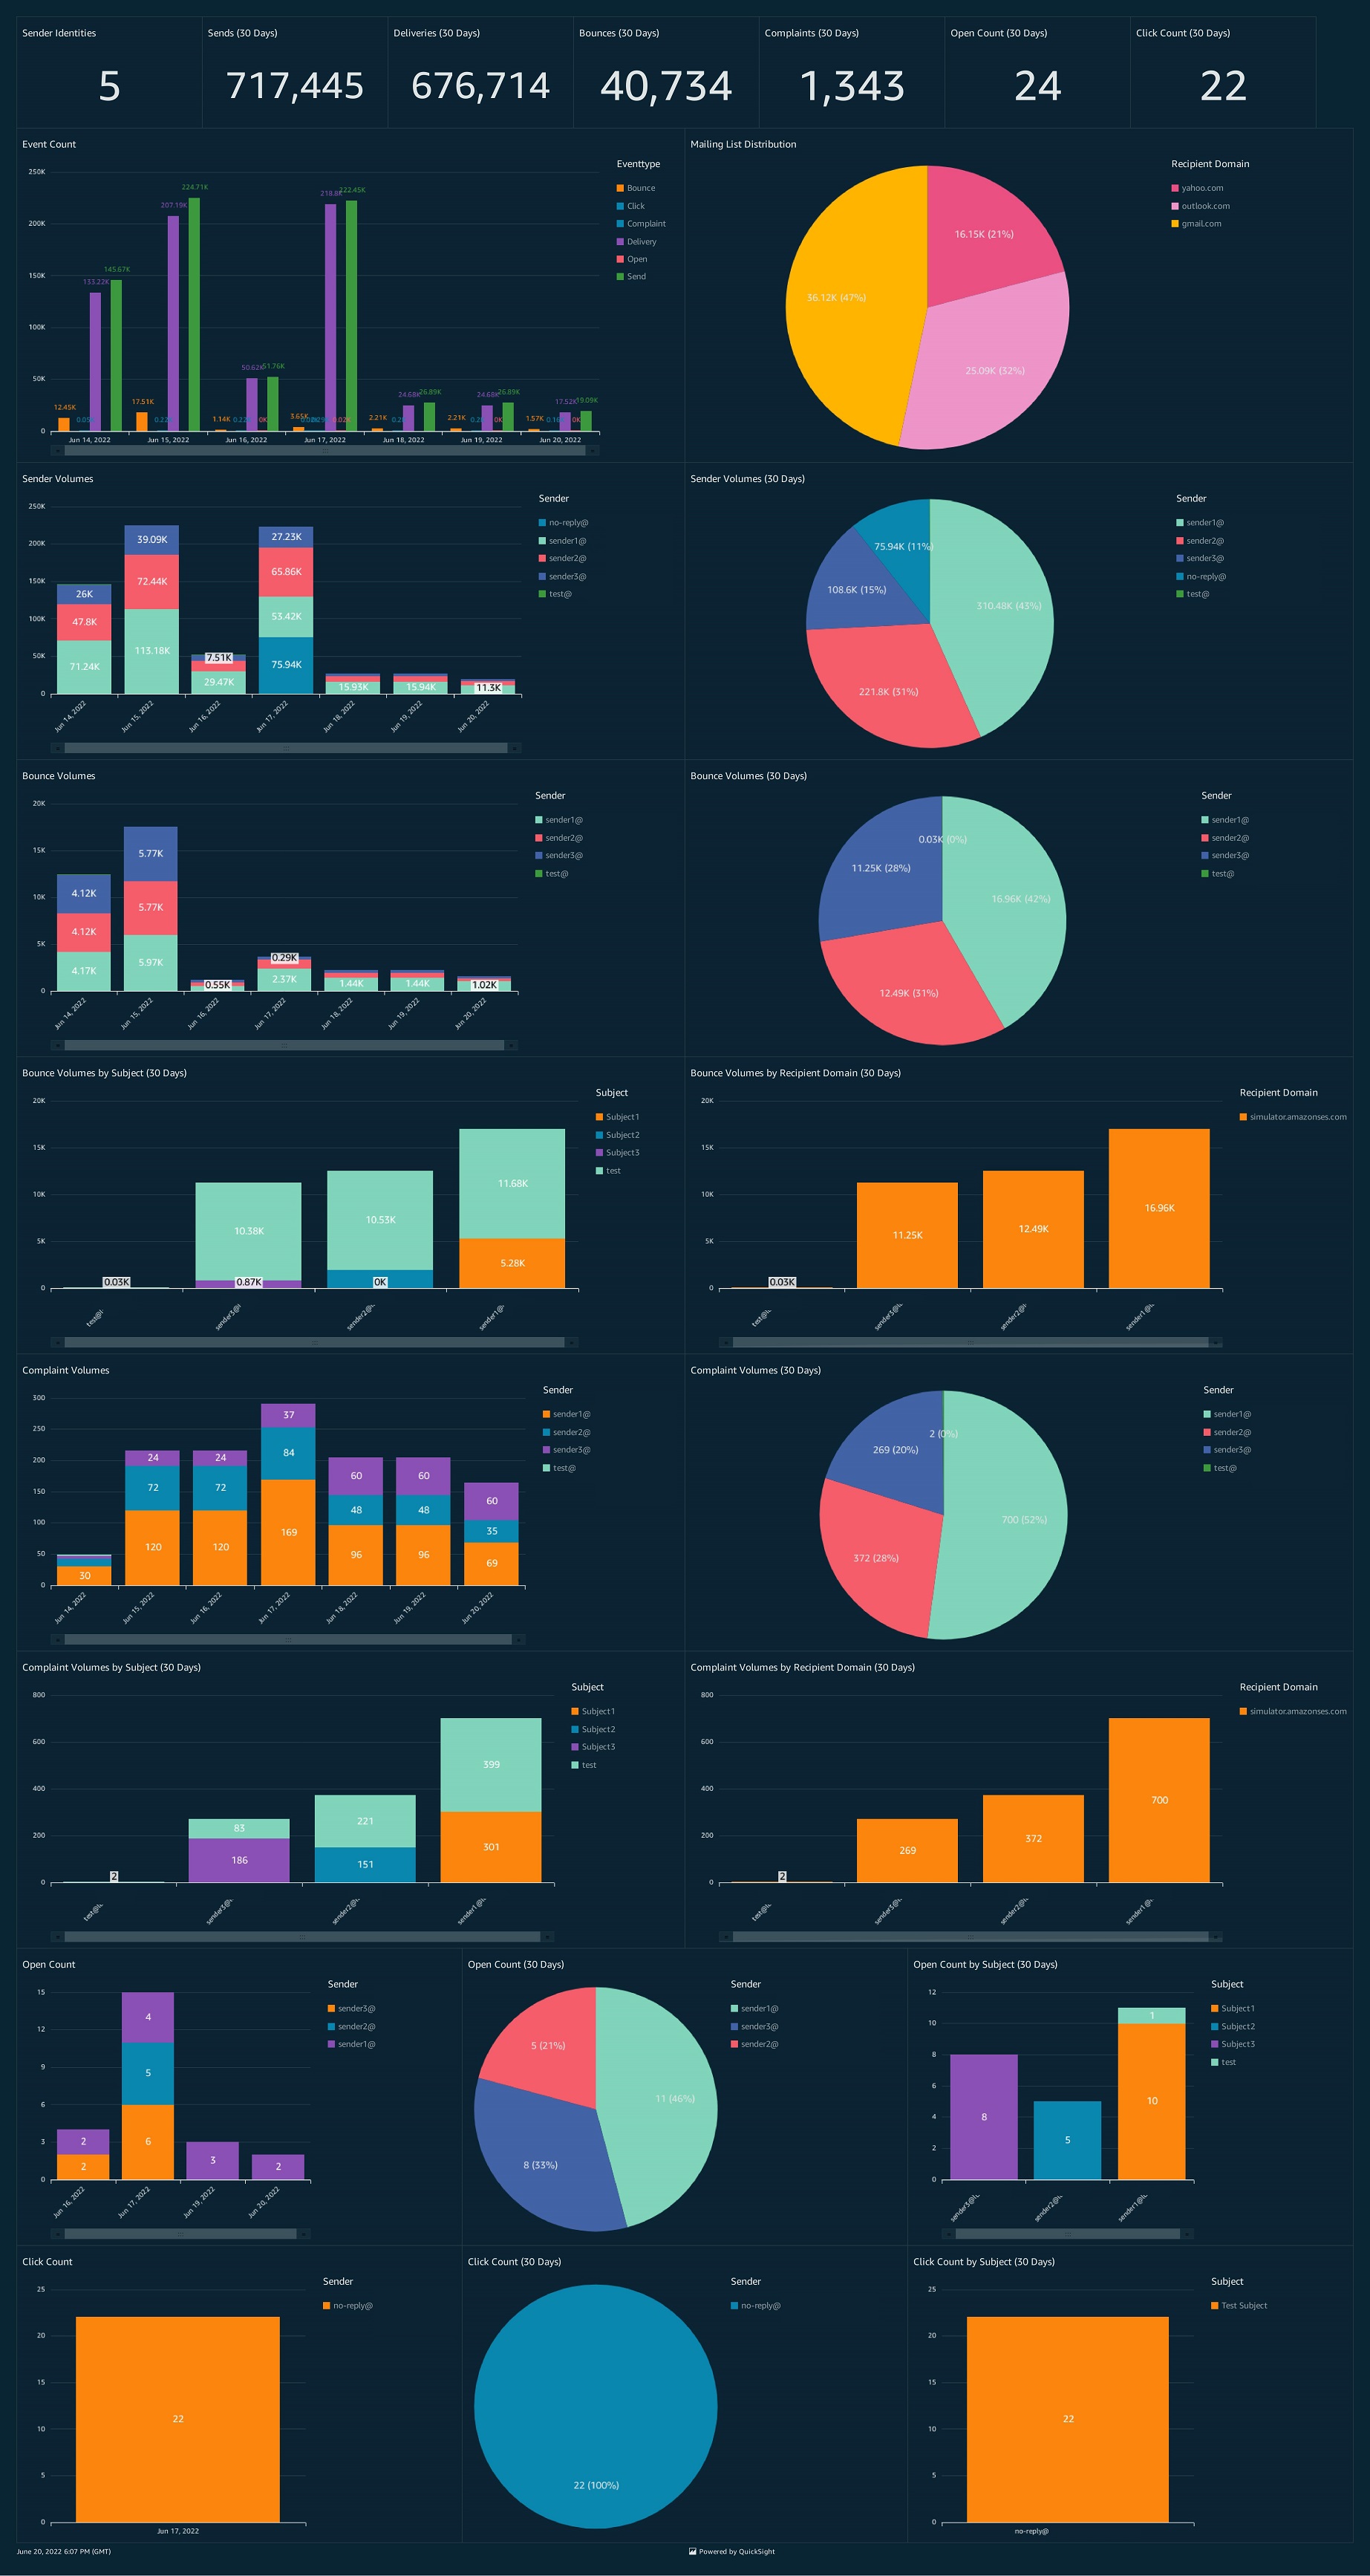
Figure 3. The sample QuickSight dashboard visualizing SES Email Sending Events
Cleaning up
You should have now successfully produced a first analysis of your Amazon SES email sending events. To avoid incurring any extra charges, remember to delete any resources created manually following the instructions in this blog post and delete the CloudFormation stack that you deployed.
Conclusion
In this blog post we showed you how you can collect your SES email sending events through Firehose, prepare them with DataBrew and visualize them with QuickSight. This solution provides you with a starting point that you can customize at your will to meet your organization requirements. This solution is set to run on a scheduled basis, every hour, making it easier for you to leverage incremental data processing.
You can also augment your event data with your business data by joining them through DataBrew. Finally, you can also leverage Amazon AppFlow (a SaaS integration service) with DataBrew to easily integrate data from third party solutions that you are already using.
About the Authors

Luca Iannario is a Sr. Solutions Architect at AWS within the Public Sector team in EMEA. He works with customers of all sizes across Government, Education, Healthcare and NPO verticals, helps them deploying AWS Services securely at scale and facilitates their cloud adoption journey. His goal is to build better societies by bringing the benefits of the cloud to all citizens. In his spare time, Luca enjoys traveling and watching movies.

Lotfi Mouhib is a Senior Solutions Architect working for the Public Sector team with Amazon Web Services. He helps public sector customers across EMEA realize their ideas, build new services, and innovate for citizens. In his spare time, Lotfi enjoys cycling and running

Justin Morris is a Email Deliverability Manager for the Simple Email Service team. With over 10 years of experience in the IT industry, he has developed a natural talent for diagnosing and resolving customer issues and continuously looks for growth opportunities to learn new technologies and services.