AWS Public Sector Blog
Automatically extracting email attachment data to reduce costs and save time for local public health departments

Local public health departments must notify public health agencies, like state health departments or the Centers for Disease Control and Prevention (CDC), of reportable conditions. Depending on the condition, the state or local health department may reach out to the patient or healthcare system to perform a case interview, initiate contact tracing, release medical countermeasures from the Strategic National Stockpile, or take other public health actions.
Historically, these departments receive various types of reports of healthcare conditions through email, in addition to more traditional methods such as mail, fax, or phone calls. In many cases, the number of reports received by email can range in several thousands per year depending on the size and location of the department. Data from the reports is often manually entered into electronic systems used for disease surveillance and case management. This data is then transmitted to the public health agency for compliance with reporting requirements.
Local health departments can dramatically reduce the time and costs associated with manually processing email attachments and improve processing efficiency using automation.
In this blog post, we provide a reference architecture on Amazon Web Services (AWS) and an AWS CloudFormation template to create an automated email attachment ingestion, storage, and processing solution powered by artificial intelligence (AI) and machine learning (ML) services from AWS.
Reference architecture for AI/ML powered email attachment processing solution
The reference architecture in the following Figure 1 illustrates some of the foundational components of an AI and ML powered email attachment processing solution using AWS services.
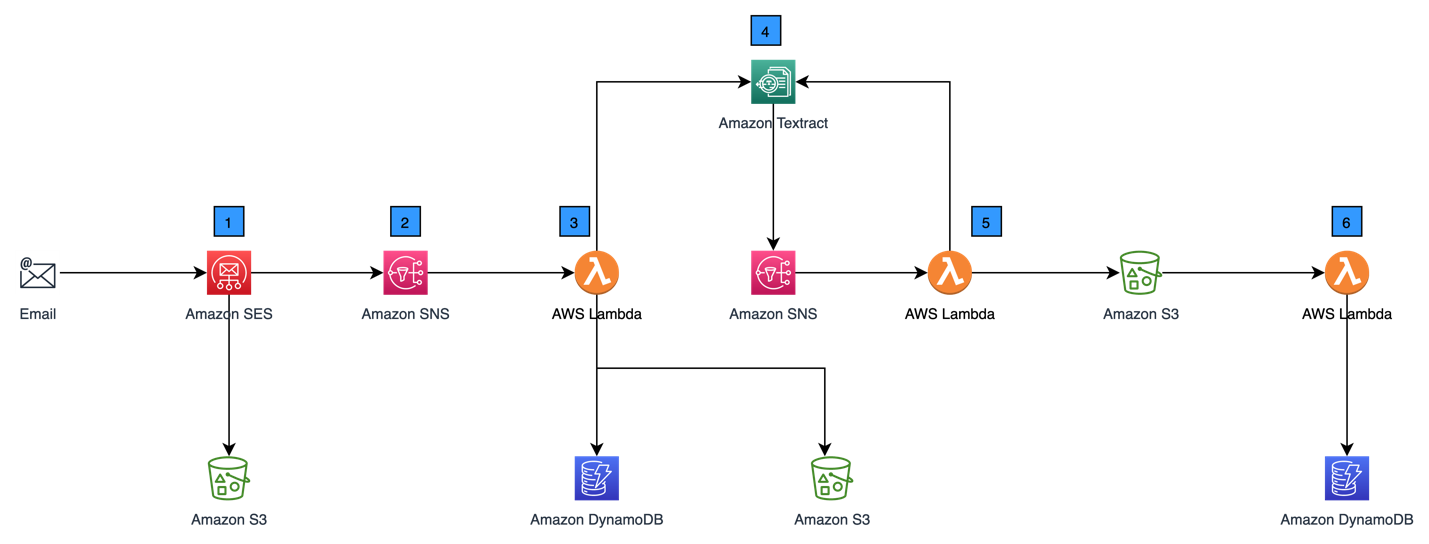
Figure 1. Sample AWS reference architecture for extracting email attachment data using machine learning, described in detail in the following section.
The following section describes the architecture components labelled in Figure 1 and how each service functions within the solution.
1. Emails with attachments sent to healthcare facilities are received by Amazon Simple Email Service (Amazon SES) and stored in Amazon Simple Storage Service (Amazon S3) in their raw format.
2. Amazon SES is configured to create a notification to an Amazon Simple Notification Service (Amazon SNS) topic when an email is received. Amazon SNS is set up to trigger an AWS Lambda.
3. The Lambda function performs three main activities:
a. It processes the raw text of emails received, and extracts and saves attachments in another Amazon S3 bucket.
b. It stores metadata about the emails received in an Amazon DynamoDB table.
c. It calls an Amazon Textract asynchronous API to process the attachments.
4. The Lambda function’s call to Amazon Textract is made asynchronously so that Lambda does not have to wait until the result of the operation to complete processing. This is especially useful for processing multi-page documents, which may take time, thereby avoiding Lambda timeout issues. The response to the asynchronous operation is a job identifier (JobId). The Amazon Textract asynchronous API is configured to send a notification to Amazon SNS when the processing of attachments is completed.
5. The notification to Amazon SNS triggers a Lambda function that uses the JobId to retrieve processed content from Amazon Textract and save the results to Amazon S3.
6. Finally, a Lambda function is used to process the results from the Amazon S3 bucket and upload the data (e.g., raw data, key/value pairs, and table values) to the Amazon DynamoDB table. Applications in healthcare facilities can use this data to extract required and relevant information and submit this information to public health agencies.
Solution deployment
Local health departments can deploy this solution with the following steps:
Prerequisites
For this walkthrough, you need the following:
- An AWS account
- AWS console access to launch AWS CloudFormation templates
- An Amazon Route 53 domain created and registered, with a mail exchange record (MX record) attached to the domain’s DNS configuration. Learn how to create and register a domain with Route 53 and how to configure an MX record.
Step 1: Set up a virtual private cloud (VPC) and related resources
1. Log into the AWS account via the AWS Management Console as an administrator.
2. Navigate to the GitHub repo for the template.
3. Choose Raw. Open the context (right-click) menu and then choose Save as. Save the file on your local machine as “textract-demo-vpc.yaml”.
4. Open the AWS console, and create a CloudFormation stack using the saved file.
a. Note the default value for the CIDR Parameter is 10.0.0.0/16. You can change it as needed.

Figure 2. The CloudFormation stack successfully created. This creates a VPC and other network resources.
5. Once the stack creation process completes, you can check the VPC with public and private subnets across two Availability Zones, route tables, VPC endpoints, network address translation (NAT) gateway, and internet gateway in the VPC console.

Figure 3. Find the details of the VPC you created in the VPC dashboard under Your VPCs.
Step 2: Set up customer managed key
1. Navigate to the GitHub repo for the template.
2. Choose Raw. Open the context (right-click) menu and then choose Save as. Save the file on your local machine as “textract-demo-cmk.yaml”.
3. Open the AWS console, and create a CloudFormation stack using the saved file.

Figure 4. CloudFormation stack successfully created. This creates AWS KMS customer managed keys.
4. Once the stack creation process completes, you can check the details of the new customer managed key in the AWS Key Management Service (AWS KMS) dashboard.

Figure 5. AWS KMS customer managed key listed in the AWS KMS dashboard.
Step 3: Set up receipt rule for email receiving in Amazon SES, the Amazon S3 Bucket to save received emails, and the Amazon SNS topic for notifying about emails saved to the Amazon S3 Bucket
1. Navigate to the GitHub repo for the template.
2. Choose Raw. Open the context (right-click) menu and then choose Save as. Save the file on your local machine as “textract-demo-incoming.yaml”.
3. Open the AWS console, and create a CloudFormation stack using the saved file.
a. Choose the email Address for EmailID Parameter in the Specify stack details screen to which the emails will be sent.

Figure 6. CloudFormation stack successfully created. This creates Amazon SES receipt rules, an Amazon S3 bucket, and an Amazon SNS topic.
4. Once the stack creation process completes, you can check the receipt rules in the Amazon SES dashboard under All rule sets in Configuration Email receiving.

Figure 7. Rules set in the Amazon SES dashboard.
Step 4: Set up multiple Lambda functions to extract the attachment from the raw emails, call Amazon Textract APIs to extract the content from those attachments, and save extracted results to Amazon DynamoDB
1. Navigate to the GitHub repo for the template.
2. Choose Raw. Open the context (right-click) menu and then choose Save as. Save the file on your local machine as “textract-demo-functions.yaml”.
3. Open the AWS console, and create a CloudFormation stack using the saved file.

Figure 8. CloudFormation stack successfully created. This creates Lambda functions, DynamoDB tables, Amazon SNS topics, Amazon S3 Buckets, and AWS IAM roles.
4. Once the stack creation process completes, you can check the Lambda functions, DynamoDB tables, Amazon SNS topics, Amazon S3 buckets, and the required AWS Identity and Access Management (IAM) roles within each services’ respective dashboard in the AWS Management Console.

Figure 9. Lambda functions listed in the Lambda console.

Figure 10. DynamoDB tables listed in the Amazon DynamoDB console.
After deploying these four CloudFormation stacks, activate the Email Receiving Rule in Amazon SES with the following steps:
1. Login into the Amazon SES Console.
2. On the left navigation panel, choose Email Receiving.
3. Select the checkbox for the rule “Textract-demo-incoming-rule-set” and choose Set as active.
4. Notice that this changes the status to “Active.”

Figure 11. The Email receiving rules set in Amazon SES with status changed to Active.
Step 5: Test the solution
Once you launch the CloudFormation templates and activate the receipt rule in Amazon SES, you can test the end-to-end flow of this solution. To test each component, complete the following high-level steps:
1. Send an email with an attachment to the email address configured in Step 3.
2. Navigate to the Amazon S3 dashboard and verify the raw email is uploaded to the Amazon S3 Bucket – textract-demo-rawemails-XXXXXXXXXXXX (XXXXX will be the account number into which the solution is deployed).
3. Verify the extracted attachments from the raw email are uploaded to the textract-demo-attachments- XXXXXXXXXXXX.
4. Verify the Amazon Textract output data (e.g., rawdata, keyvalues, tablesvalues) is uploaded to textract-demo-output- XXXXXXXXXXXX.
5. Review the data in below DynamoDB tables:
a. textract-demo-functions-EmailsDynamoTable – The metadata of the email
b. textract-demo-functions-RawdataDynamoTable – The raw data of the document
c. textract-demo-functions-KeyValuesDynamoTable – The key values pairs of the document
d. textract-demo-functions-TableValuesDynamoTable – The table values pairs of the document
Sending an email with attachment
In real-world situations, when a local health department receives a lab report from a laboratory, the department must manually enter the data into electronic systems used for disease surveillance and case management. The following steps can set up this solution to help automate this manual data entry. Find the sample document we use in this walkthrough in the GitHub repo.
To send an email, complete the following steps:
1. Download the file from the GitHub repo.
2. Attach the file to an email and send it to email address configured in Step 3.
Amazon SES receives the email that was sent, and as an email receiver, Amazon SES handles underlying mail-receiving operations, such as communicating with other mail servers, scanning for spam and viruses, and accepting mail for recipients in your domain. Processing on the received email is determined by the instructions specified in the Amazon SES email receiving rule. In this solution, we have a receipt rule which will deliver the incoming mail to an Amazon S3 bucket (textract-demo-rawemails-XXXXXXXXXXXX) and publish it to an Amazon SNS topic (textract-demo-incoming-email-received).
Verify the raw email is uploaded to Amazon S3 bucket

Figure 12. Raw email uploaded to Amazon S3 bucket in the Amazon S3 dashboard.
The Amazon SNS topic triggers the Lambda function (textract-demo-functions-EmailParsing), which extracts the attachments from the email, uploads them to an Amazon S3 Bucket (textract-demo-attachments- XXXXXXXXXXXX), copies the metadata to DynamoDB Table, and sends the document to Amazon Textract.
Verify the extracted attachments from the raw email in the Amazon S3 bucket (textract-demo-attachments- XXXXXXXXXXXX). Refer here on how to access an objects from the Amazon S3 console.

Figure 13. Attachments from email are uploaded to the Amazon S3 Bucket.
Verify the metadata of the email in Amazon DynamoDB table. Metadata contains information about the name of the documents attached in the email, source of the email by whom it was received, subject of the email, and the time when it was received.
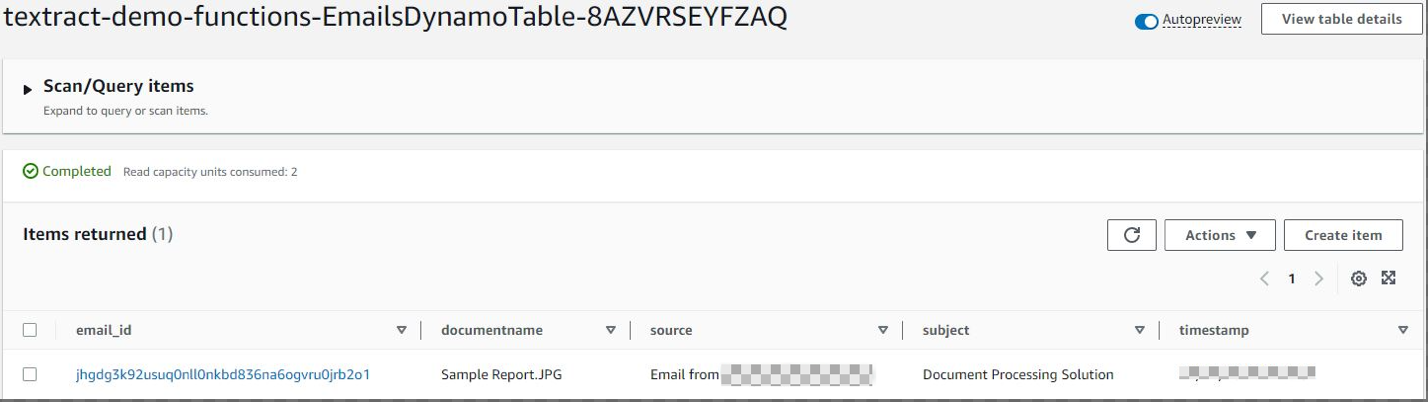
Figure 14. DynamoDB table for emails metadata information.
The Lambda function (textract-demo-functions-callback) reads the response data, key values, and table values from Amazon Textract and uploads them to an Amazon S3 bucket (textract-demo-output- XXXXXXXXXXXX).
Verify the Amazon Textract output data for the documents in the Amazon S3 bucket (textract-demo-output- XXXXXXXXXXXX). Refer here on how to access an objects from the Amazon S3 console.

Figure 15. Output data from Amazon Textract are uploaded to Amazon S3 Bucket.
The Lambda function (textract-demo-functions-DDData) processes the response from the Amazon S3 bucket (textract-demo-output- XXXXXXXXXXXX) and uploads the data to the DynamoDB tables.
Verify the output data in DynamoDB Tables. Refer here on how to read data from Amazon DynamoDB table.
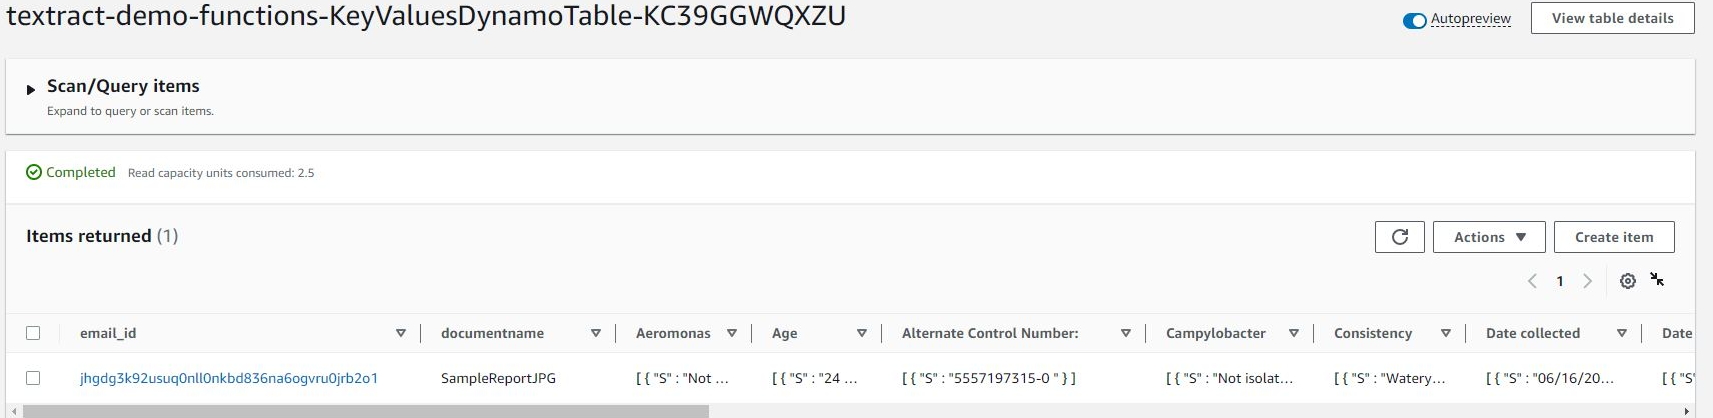
Figure 16. DynamoDB table for key values information from Amazon Textract.

Figure 17. DynamoDB table for table values information from Amazon Textract.

Figure 18. DynamoDB table for raw data information from Amazon Textract.
Local public health departments can automatically update the electronic systems used for disease surveillance and case management using the data in DynamoDB.
Learn more about machine learning for public sector organizations
In this blog post, we discussed how local health departments can use AWS to automate the ingestion, storage, and processing of email attachments with AI and ML services from AWS. These departments can use this solution to automate the update of electronic systems used for disease surveillance and case management, which in turn can improve the efficiency of compliance with regulatory requirements.
Contact the public sector team directly to learn more about how to set up this solution, or reach out to your AWS account team to engage on a proof of concept of this solution for your organization.
Learn more about how state and local governments are making a difference with cost-effective, scalable, secure, and flexible AWS Cloud infrastructure at the AWS Cloud for State and Local Governments main page.
Read related stories on the AWS Public Sector Blog:
- Improving the customer experience for high-traffic public services: An architecture guidance
- How government agencies can vet external data in minutes with data interchange zones
- How to improve government customer experience by building a modern serverless web application in AWS GovCloud (US)
- Supporting state agencies with Medicaid unwinding outreach: Creating a multi-lingual two-way messaging system
Subscribe to the AWS Public Sector Blog newsletter to get the latest in AWS tools, solutions, and innovations from the public sector delivered to your inbox, or contact us.
Please take a few minutes to share insights regarding your experience with the AWS Public Sector Blog in this survey, and we’ll use feedback from the survey to create more content aligned with the preferences of our readers.