AWS Compute Blog
Decoupled Serverless Scheduler To Run HPC Applications At Scale on EC2
This post is written by Ludvig Nordstrom and Mark Duffield | on November 27, 2019
In this blog post, we dive in to a cloud native approach for running HPC applications at scale on EC2 Spot Instances, using a decoupled serverless scheduler. This architecture is ideal for many workloads in the HPC and EDA industries, and can be used for any batch job workload.
At the end of this blog post, you will have two takeaways.
- A highly scalable environment that can run on hundreds of thousands of cores across EC2 Spot Instances.
- A fully serverless architecture for job orchestration.
We discuss deploying and running a pre-built serverless job scheduler that can run both Windows and Linux applications using any executable file format for your application. This environment provides high performance, scalability, cost efficiency, and fault tolerance. We introduce best practices and benefits to creating this environment, and cover the architecture, running jobs, and integration in to existing environments.
quick note about the term cloud native: we use the term loosely in this blog. Here, cloud native means we use AWS Services (to include serverless and microservices) to build out our compute environment, instead of a traditional lift-and-shift method.
Let’s get started!
Solution overview
This blog goes over the deployment process, which leverages AWS CloudFormation. This allows you to use infrastructure as code to automatically build out your environment. There are two parts to the solution: the Serverless Scheduler and Resource Automation. Below are quick summaries of each part of the solutions.
Part 1 – The serverless scheduler
This first part of the blog builds out a serverless workflow to get jobs from SQS and run them across EC2 instances. The CloudFormation template being used for Part 1 is serverless-scheduler-app.template, and here is the Reference Architecture:


Figure 1: Serverless Scheduler Reference Architecture (grayed-out area is covered in Part 2).
Read the GitHub Repo if you want to look at the Step Functions workflow contained in preceding images. The walkthrough explains how the serverless application retrieves and runs jobs on its worker, updates DynamoDB job monitoring table, and manages the worker for its lifetime.
Part 2 – Resource automation with serverless scheduler
This part of the solution relies on the serverless scheduler built in Part 1 to run jobs on EC2. Part 2 simplifies submitting and monitoring jobs, and retrieving results for users. Jobs are spread across our cost-optimized Spot Instances. AWS Autoscaling automatically scales up the compute resources when jobs are submitted, then terminates them when jobs are finished. Both of these save you money.
The CloudFormation template used in Part 2 is resource-automation.template. Building on Figure 1, the additional resources launched with Part 2 are noted in the following image, they are an S3 Bucket, AWS Autoscaling Group, and two Lambda functions.

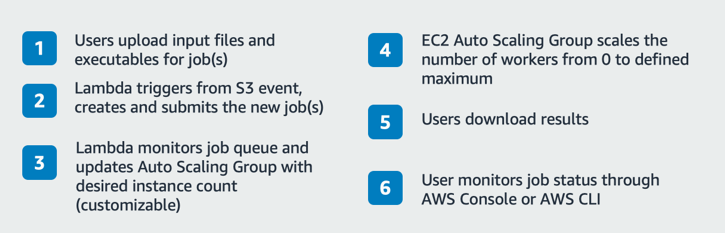
Figure 2: Resource Automation using Serverless Scheduler
Introduction to decoupled serverless scheduling
HPC schedulers traditionally run in a classic master and worker node configuration. A scheduler on the master node orchestrates jobs on worker nodes. This design has been successful for decades, however many powerful schedulers are evolving to meet the demands of HPC workloads. This scheduler design evolved from a necessity to run orchestration logic on one machine, but there are now options to decouple this logic.
What are the possible benefits that decoupling this logic could bring? First, we avoid a number of shortfalls in the environment such as the need for all worker nodes to communicate with a single master node. This single source of communication limits scalability and creates a single point of failure. When we split the scheduler into decoupled components both these issues disappear.
Second, in an effort to work around these pain points, traditional schedulers had to create extremely complex logic to manage all workers concurrently in a single application. This stifled the ability to customize and improve the code – restricting changes to be made by the software provider’s engineering teams.
Serverless services, such as AWS Step Functions and AWS Lambda fix these major issues. They allow you to decouple the scheduling logic to have a one-to-one mapping with each worker, and instead share an Amazon Simple Queue Service (SQS) job queue. We define our scheduling workflow in AWS Step Functions. Then the workflow scales out to potentially thousands of “state machines.” These state machines act as wrappers around each worker node and manage each worker node individually. Our code is less complex because we only consider one worker and its job.
We illustrate the differences between a traditional shared scheduler and decoupled serverless scheduler in Figures 3 and 4.

Figure 3: Traditional Scheduler Model
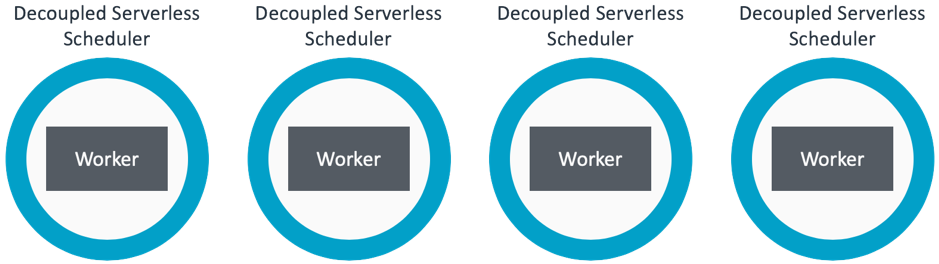
Figure 4: Decoupled Serverless Scheduler on each instance
Each decoupled serverless scheduler will:
- Retrieve and pass jobs to its worker
- Monitor its workers health and take action if needed
- Confirm job success by checking output logs and retry jobs if needed
- Terminate the worker when job queue is empty just before also terminating itself
With this new scheduler model, there are many benefits. Decoupling schedulers into smaller schedulers increases fault tolerance because any issue only affects one worker. Additionally, each scheduler consists of independent AWS Lambda functions, which maintains the state on separate hardware and builds retry logic into the service. Scalability also increases, because jobs are not dependent on a master node, which enables the geographic distribution of jobs. This geographic distribution allows you to optimize use of low-cost Spot Instances. Also, when decoupling the scheduler, workflow complexity decreases and you can customize scheduler logic. You can leverage lower latency job monitoring and customize automated responses to job events as they happen.
Benefits
- Fully managed – With Part 2, Resource Automation deployed, resources for a job are managed. When a job is submitted, resources launch and run the job. When the job is done, worker nodes automatically shut down. This prevents you from incurring continuous costs.
- Performance – Your application runs on EC2, which means you can choose any of the high performance instance types. Input files are automatically copied from Amazon S3 into local Amazon EC2 Instance Store for high performance storage during execution. Result files are automatically moved to S3 after each job finishes.
- Scalability – A worker node combined with a scheduler state machine become a stateless entity. You can spin up as many of these entities as you want, and point them to an SQS queue. You can even distribute worker and state machine pairs across multiple AWS regions. These two components paired with fully managed services optimize your architecture for scalability to meet your desired number of workers.
- Fault Tolerance –The solution is completely decoupled, which means each worker has its own state machine that handles scheduling for that worker. Likewise, each state machine is decoupled into Lambda functions that make up your state machine. Additionally, the scheduler workflow includes a Lambda function that confirms each successful job or resubmits jobs.
- Cost Efficiency – This fault tolerant environment is perfect for EC2 Spot Instances. This means you can save up to 90% on your workloads compared to On-Demand Instance pricing. The scheduler workflow ensures little to no idle time of workers by closely monitoring and sending new jobs as jobs finish. Because the scheduler is serverless, you only incur costs for the resources required to launch and run jobs. Once the job is complete, all are terminated automatically.
- Agility – You can use AWS fully managed Developer Tools to quickly release changes and customize workflows. The reduced complexity of a decoupled scheduling workflow means that you don’t have to spend time managing a scheduling environment, and can instead focus on your applications.
Part 1 – serverless scheduler as a standalone solution
If you use the serverless scheduler as a standalone solution, you can build clusters and leverage shared storage such as FSx for Lustre, EFS, or S3. Additionally, you can use AWS CloudFormation or to deploy more complex compute architectures that suit your application. So, the EC2 Instances that run the serverless scheduler can be launched in any number of ways. The scheduler only requires the instance id and the SQS job queue name.
Submitting Jobs Directly to serverless scheduler
The severless scheduler app is a fully built AWS Step Function workflow to pull jobs from an SQS queue and run them on an EC2 Instance. The jobs submitted to SQS consist of an AWS Systems Manager Run Command, and work with any SSM Document and command that you chose for your jobs. Examples of SSM Run Commands are ShellScript and PowerShell. Feel free to read more about Running Commands Using Systems Manager Run Command.
The following code shows the format of a job submitted to SQS in JSON.
Any EC2 Instance associated with a serverless scheduler it receives jobs picked up from a designated SQS queue until the queue is empty. Then, the EC2 resource automatically terminates. If the job fails, it retries until it reaches the specified number of times in the job definition. You can include a specific string value so that the scheduler searches for job execution outputs and confirms the successful completions of jobs.
Tagging EC2 workers to get a serverless scheduler state machine
In Part 1 of the deployment, you must manage your EC2 Instance launch and termination. When launching an EC2 Instance, tag it with a specific tag key that triggers a state machine to manage that instance. The tag value is the name of the SQS queue that you want your state machine to poll jobs from.
In the following example, “my-scheduler-cloudformation-stack-name” is the tag key that serverless scheduler app will for with any new EC2 instance that starts. Next, “my-sqs-job-queue-name” is the default job queue created with the scheduler. But, you can change this to any queue name you want to retrieve jobs from when an instance is launched.
{"my-scheduler-cloudformation-stack-name":"my-sqs-job-queue-name"}
Monitor jobs in DynamoDB
You can monitor job status in the following DynamoDB. In the table you can find job_id, commands sent to Amazon EC2, job status, job output logs from Amazon EC2, and retries among other things.

Alternatively, you can query DynamoDB for a given job_id via the AWS Command Line Interface:
Using the “job_success_string” parameter
For the prior DynamoDB table, we submitted two identical jobs using an example script that you can also use. The command sent to the instance is “echo Hello World.” The output from this job should be “Hello World.” We also specified three allowed job retries. In the following image, there are two jobs in SQS queue before they ran. Look closely at the different “job_success_strings” for each and the identical command sent to both:

From the image we see that Job2 was successful and Job1 retried three times before permanently labelled as failed. We forced this outcome to demonstrate how the job success string works by submitting Job1 with “job_success_string” as “Hello EVERYONE”, as that will not be in the job output “Hello World.” In “Job2” we set “job_success_string” as “Hello” because we knew this string will be in the output log.
Job outputs commonly have text that only appears if job succeeded. You can also add this text yourself in your executable file. With “job_success_string,” you can confirm a job’s successful output, and use it to identify a certain value that you are looking for across jobs.
Part 2 – Resource Automation with the serverless scheduler
The additional services we deploy in Part 2 integrate with existing architectures to launch resources for your serverless scheduler. These services allow you to submit jobs simply by uploading input files and executable files to an S3 bucket.
Likewise, these additional resources can use any executable file format you want, including proprietary application level scripts. The solution automates everything else. This includes creating and submitting jobs to SQS job queue, spinning up compute resources when new jobs come in, and taking them back down when there are no jobs to run. When jobs are done, result files are copied to S3 for the user to retrieve. Similar to Part 1, you can still view the DynamoDB table for job status.
This architecture makes it easy to scale out to different teams and departments, and you can submit potentially hundreds of thousands of jobs while you remain in control of resources and cost.
Deeper Look at the S3 Architecture
The following diagram shows how you can submit jobs, monitor progress, and retrieve results. To submit jobs, upload all the needed input files and an executable script to S3. The suffix of the executable file (uploaded last) triggers an S3 event to start the process, and this suffix is configurable.
The S3 key of the executable file acts as the job id, and is kept as a reference to that job in DynamoDB. The Lambda (#2 in diagram below) uses the S3 key of the executable to create three SSM Run Commands.
- Synchronize all files in the same S3 folder to a working directory on the EC2 Instance.
- Run the executable file on EC2 Instances within a specified working directory.
- Synchronize the EC2 Instances working directory back to the S3 bucket where newly generated result files are included.
This Lambda (#2) then places the job on the SQS queue using the schedulers JSON formatted job definition seen above.
IMPORTANT: Each set of job files should be given a unique job folder in S3 or more files than needed might be moved to the EC2 Instance.

Figure 5: Resource Automation using Serverless Scheduler – A deeper look
EC2 and Step Functions workflow use the Lambda function (#3 in prior diagram) and the Auto Scaling group to scale out based on the number of jobs in the queue to a maximum number of workers (plus state machine), as defined in the Auto Scaling Group. When the job queue is empty, the number of running instances scale down to 0 as they finish their remaining jobs.
Process Submitting Jobs and Retrieving Results
- Seen in1, upload input file(s) and an executable file into a unique job folder in S3 (such as /year/month/day/jobid/~job-files). Upload the executable file last because it automatically starts the job. You can also use a script to upload multiple files at a time but each job will need a unique directory. There are many ways to make S3 buckets available to users including AWS Storage Gateway, AWS Transfer for SFTP, AWS DataSync, the AWS Console or any one of the AWS SDKs leveraging S3 API calls.
- You can monitor job status by accessing the DynamoDB table directly via the AWS Management Console or use the AWS CLI to call DynamoDB via an API call.
- Seen in step 5, you can retrieve result files for jobs from the same S3 directory where you left the input files. The DynamoDB table confirms when jobs are done. The SQS output queue can be used by applications that must automatically poll and retrieve results.
You no longer need to create or access compute nodes as compute resources. These automatically scale up from zero when jobs come in, and then back down to zero when jobs are finished.
Deployment
Read the “Deployment” section in the GitHub Repo for full deployment instructions and running an example case. You can click links below to deploy Part 1 & 2 of the solution.
| Region | serverless-scheduler-app.template | resource-management.template |
| eu-north-1 |  |
|
| ap-south-1 | |
|
| eu-west-3 | |
|
| eu-west-2 | |
|
| eu-west-1 | |
|
| ap-northeast-3 | |
|
| ap-northeast-2 | |
|
| ap-northeast-1 | |
|
| sa-east-1 | |
|
| ca-central-1 | |
|
| ap-southeast-1 | |
|
| ap-southeast-2 | |
|
| eu-central-1 | |
|
| us-east-1 | |
|
| us-east-2 | |
|
| us-west-1 | |
|
| us-west-2 | |
|
Additional Points on Usage Patterns
- While the two solutions in this blog are aimed at HPC applications, they can be used to run any batch jobs. Many customers that run large data processing batch jobs in their data lakes could use the serverless scheduler.
- You can build pipelines of different applications when the output of one job triggers another to do something else – an example being pre-processing, meshing, simulation, post-processing. You simply deploy the Resource Automation template several times, and tailor it so that the output bucket for one step is the input bucket for the next step.
- You might look to use the “job_success_string” parameter for iteration/verification used in cases where a shot-gun approach is needed to run thousands of jobs, and only one has a chance of producing the right result. In this case the “job_success_string” would identify the successful job from potentially hundreds of thousands pushed to SQS job queue.
Scale-out across teams and departments
Because all services used are serverless, you can deploy as many run environments as needed without increasing overall costs. Serverless workloads only accumulate cost when the services are used. So, you could deploy ten job environments and run one job in each, and your costs would be the same if you had one job environment running ten jobs.
All you need is an S3 bucket to upload jobs to and an associated AMI that has the right applications and license configuration. Because a job configuration is passed to the scheduler at each job start, you can add new teams by creating an S3 bucket and pointing S3 events to a default Lambda function that pulls configurations for each job start.
Setup CI/CD pipeline to start continuous improvement of scheduler
If you are advanced, we encourage you to clone the git repo and customize this solution. The serverless scheduler is less complex than other schedulers, because you only think about one worker and the process of one job’s run.
Ways you could tailor this solution:
- Add intelligent job scheduling using AWS Sagemaker – It is hard to find data as ready for ML as log data because every job you run has different run times and resource consumption. So, you could tailor this solution to predict the best instance to use with ML when workloads are submitted.
- Add Custom Licensing Checkout Logic – Simply add one Lambda function to your Step Functions workflow to make an API call a license server before continuing with one or more jobs. You can start a new worker when you have a license checked out or if a license is not available then the instance can terminate to remove any costs waiting for licenses.
- Add Custom Metrics to DynamoDB – You can easily add metrics to DynamoDB because the solution already has baseline logging and monitoring capabilities.
- Run on other AWS Services – There is a Lambda function in the Step Functions workflow called “Start_Job”. You can tailor this Lambda to run your jobs on AWS Sagemaker, AWS EMR, AWS EKS or AWS ECS instead of EC2.
Conclusion
Although HPC workloads and EDA flows may still be dependent on current scheduling technologies, we illustrated the possibilities of decoupling your workloads from your existing shared scheduling environments. This post went deep into decoupled serverless scheduling, and we understand that it is difficult to unwind decades of dependencies. However, leveraging numerous AWS Services encourages you to think completely differently about running workloads.
But more importantly, it encourages you to Think Big. With this solution you can get up and running quickly, fail fast, and iterate. You can do this while scaling to your required number of resources, when you want them, and only pay for what you use.
Serverless computing catalyzes change across all industries, but that change is not obvious in the HPC and EDA industries. This solution is an opportunity for customers to take advantage of the nearly limitless capacity that AWS.
Please reach out with questions about HPC and EDA on AWS. You now have the architecture and the instructions to build your Serverless Decoupled Scheduling environment. Go build!
About the Authors and Contributors
Authors

Ludvig Nordstrom is a Senior Solutions Architect at AWS

Mark Duffield is a Tech Lead in Semiconductors at AWS
Contributors

Steve Engledow is a Senior Solutions Builder at AWS

Arun Thomas is a Senior Solutions Builder at AWS