AWS for Games Blog
Creating Servers for Multiplayer Mobile Games with Just a Few Lines of JavaScript

![]()
Multiplayer servers are hard
Traditionally, developing a custom game server is a pretty arduous task. Putting a server together requires a lot of knowledge about networking systems, backend development and server operations. This can be tough on smaller teams who may not have the resources required to develop this type of system. And, when you just want to get on with creating a great game, dedicating a lot of time and money to getting a game server running is work that could be better spent on building features for your players.
Wait, no, multiplayer servers are easy
Does it have to be so complicated, especially when your gameplay server needs are pretty light? Well, as it turns out, no. I’m going show you how I developed a competitive two-player racing game in just a few hours using Amazon GameLift Realtime Servers.
GameLift Realtime Servers help developers quickly create and update affordable game servers with a few lines of JavaScript. It’s a great choice for games that don’t need a lot of backend horsepower, and is designed with mobile, turn-based, and messaging games in mind.
The idea is that you can create custom game logic without having to build a server. All you need to do is create a script (using JavaScript) to implement callbacks that deal with communication between players and changes in game state. Some examples include handling when a player joins the game, or sends a new message to other players. You upload the script to the GameLift service and then integrate a simple .Net SDK into your game client to talk to the server. GameLift does all the work to get the client and server talking to each other, provides a simple API to send messages back and forth between the two, and deals with all of the server hosting, scaling, and other operational stuff so you don’t have to. You really just focus on your game code.
It all started with a frog jump
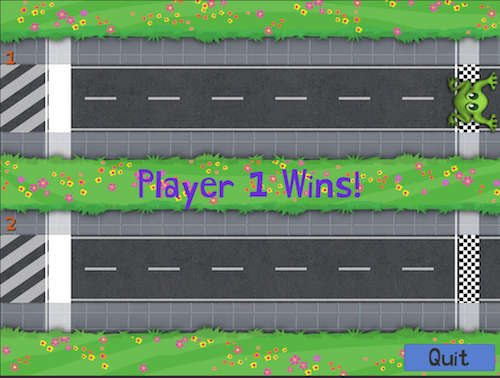
I thought a simple one-click competitive racing game would be a great way to try out GameLift Realtime Servers, but I needed a theme. As a kid growing up in California, every year we’d head out to a crazy event in Angels Camp where people would try to get frogs to jump as far as possible. And we’ve all heard of that classic arcade game with jumping frogs and some really nasty turtles. So, welcome to the development of:
![]()
The object of game is pretty simple: two players, each controlling a frog with their space bar, try to get to the finish line first. But this isn’t a contest of who can hit their space bar the fastest! You have to wait until the frog has completed its hop before you hit the space bar again, or the frog will get annoyed and stay put for a while when it lands. This means the winner isn’t determined by the fastest internet connection or who can mash the button the fastest.

I developed the game client in Unity on Windows, and it should be possible to build using the personal edition of Unity. All of the techniques discussed here should work on any service that can run a .Net runtime. Let us know on the forums if you run in to any issues running this sample or setting up your own projects.
There are a few things you’ll need to follow along with the steps in this article:
- An AWS account with access to GameLift, IAM and Amazon Cognito
- Download the Realtime Servers SDK from the getting started page
- Microsoft Visual Studio Community
- Unity (this can be installed with Microsoft Visual Studio)
![]()
Step One: Prepare GameLift
The easiest way to start a new project is to get GameLift to host a script for you and allocate the compute power for your servers. The compute power is called a fleet, which is a collection of Amazon EC2 virtual machines that will run your game servers.
We’ll start by creating the most minimal script that GameLift Realtime Servers can run. You can find an example script on this page. Using your favorite code editor, create a new file called MegaFrogRaceServer.js, paste the example script into the document and save it. Next, pack up the script into a zip file. For this example, make sure that you don’t put the script in to a sub-folder. I did this in Windows by right-clicking on the JavaScript file and hitting Send to… compressed (zipped) folder. I called my zip file MegaFrogRaceServer.zip.
I should note that the previous step of creating the zip file solves a “chicken/egg” problem. You need a script to set up GameLift and all the associated services to test your game, but you haven’t actually developed a script yet. So instead, we create a placeholder that will be replaced later with our real code.
Next you’ll upload the script to GameLift and then use it to create a fleet:
- Go to the Amazon GameLift console.
- In the upper right corner of the console, select the region where you’d like to host your game servers. You’ll need to create your script container and fleet in this region.
- If not already in the dashboard, choose Take me to the dashboard.
- Select the menu that currently says Dashboard. Under the Scripts menu, select Create script.
- In the Create script form, give the script a name, and a version number. I used MegaFrogRaceServer and set the version number to 1.00.
- If needed, change the Script type to Zip file. (The form defaults to User Storage, an option we won’t use here that lets you upload a script from an Amazon S3 bucket).
- Select Choose File and browse for the zip file we created earlier and select it.
- Chose submit to create a script container.
Now that the script is ready, we can create a fleet of Realtime servers:
- From the Amazon GameLift menu, select Create fleet.
- In the Create fleet form, enter a fleet name and leave the fleet type as On-Demand. (For the purposes of this demo it doesn’t matter, but spot instances can save you a fair amount of money when your game gets popular. You can learn more about them here.)
- Change the Binary type to Script.
- Select the script container we created above.
- The rest of the fleet details section can be left blank.
- Choose an instance type. For our demo, the c4.large is fine, and it’s in the free tier so that’s great!
- In Process management, we need to tell GameLift which script file to run when starting a server. The zip file you uploaded can have several files (and in fact, later it will), so you’ll need to specify your main script file. Enter the name of the JavaScript file we created above, MegaFrogRaceServer.js.
- Leave the Launch parameters empty and keep Concurrent processes set to 1.
- Be sure to click the green check box on the right to add the configuration. (I was fooled at first, the green checkbox made me think everything was ok!)

- Leave everything else in the Create fleet form at default and choose Initialize fleet.
- You’ll get a success message and see the fleet details, including the new fleet’s status. It will take a few minutes for the fleet to activate. In the meantime you have everything you need to complete the tasks in step two.
Step 2: The glue between your game and GameLift
Ok, this next step is the most involved besides creating your actual game. We are going to create a client service that talks to GameLift and joins games, starts new game sessions, etc. It’s called a client service, because it’s a web service that your game client communicates with directly. Though it’s possible to integrate the GameLift SDK directly into your game client, it’s not the best practice. Primarily this is because there is no way to secure these calls when they come from outside of your control. Also, you’d need to update the game client when security keys change or expire. So, for our demo, we will create a small client service, using an AWS Lambda to run the service and Amazon Cognito to secure it.
Though this example is somewhat of a toy implementation, it will point you in the right direction for making a more feature-rich client service.
The first task is to create the Lambda function. An AWS Lambda function is code that runs on AWS servers without you needing to manage any of those servers:
- Go to the Lambda console and choose Create Function.
- Select Author from scratch.
- Let’s name the function ConnectClientToServer.
- Use Node.js 12.x (This is current as of the publishing of this article, available Node.js versions may change in the future).
- Under Permissions, expand Choose or create an execution role and make sure that Create a new role with basic Lambda permissions is selected.
- Choose Create function.
- You’re now in the Lambda editor. You’ll need to make sure that the function can access the GameLift API. Select the Permissions tab.
- The the newly created role for the function will be listed the the Execution role section. It will be something like “ConnectClientToServer-role-abc1defg”. Choose the link for the role name.
- The IAM page for the role opens in a new window or tab. In the Permissions tab you’ll see a list of policies. There will be one already there called “AWSLambdaBasicExecutionRole…” which we will leave alone. We need to create a second policy to allow access to the GameLift API.
- Choose Attach policies. I suggest opening the link in a new window or tab, as we’ll need to return to this page later.
- Choose Create policy.
- Use the visual editor. (I could just provide a template to add as JSON, but I think it’s interesting to see the different APIs available and how they are built.)
- Select Choose a service.
- Search for GameLift and select it. Actions will be populated. These are the actions we will be calling in GameLift from our client service Lambda.
- Under Access level, expand Read and select DescribeGameSessions and SearchGameSessions.
- Expand “Write”, and select CreateGameSession and CreatePlayerSession.

- This is the minimum set of functions we’ll need to make a client service. These functions allow us to find game sessions to join, create new game sessions, and join them. Though we don’t need to use any more functions for the demo, take a look at the available functions and you may get some ideas to expand your client service.
- Choose Review policy and give this policy a name like GameLiftClientServicePolicy. When you’re done, choose Create policy.
- Now, go back to the IAM role Permissions page. Choose Attach policies, find our new GameLiftClientServicePolicy, select and choose Attach policy. Now the function will be able to call all the GameLift APIs we selected.
- Now we just to add the code for our Lambda function. Go back to the Lambda editing page and paste the following code into the Function code window, replacing any code that might already be there. You can also find this code in the AWS folder of the code sample, which is linked to later in the article.
const AWS = require('aws-sdk');
const GameLift = new AWS.GameLift({region: 'us-east-1'});

const MegaFrogRaceFleetID = "fleet-00aaaa00-a000-00a0-00a0-aa00a000aa0a";

exports.handler = async (event, context) => {
    let response;
    let gameSessions;

    // find any sessions that have available players
    await GameLift.searchGameSessions({
        FleetId: MegaFrogRaceFleetID,
        FilterExpression: "hasAvailablePlayerSessions=true"
    }).promise().then(data => {
        gameSessions = data.GameSessions;
    }).catch(err => {
        response = err;
    });

    // if the response object has any value at any point before the end of
    // the function that indicates a failure condition so return the response
    if(response != null)
    {
        return response;
    }

    // if there are no sessions, then we need to create a game session
    let selectedGameSession;
    if(gameSessions.length == 0)
    {
        console.log("No game session detected, creating a new one");
        await GameLift.createGameSession({
            MaximumPlayerSessionCount: 2,   // only two players allowed per game
            FleetId: MegaFrogRaceFleetID
        }).promise().then(data => {
            selectedGameSession = data.GameSession;
        }).catch(err => {
           response = err;
        });

        if(response != null)
        {
            return response;
        }
    }
    else
    {
        // we grab the first session we find and join it
        selectedGameSession = gameSessions[0];
        console.log("Game session exists, will join session ", selectedGameSession.GameSessionId);
    }

    // there isn't a logical way selectedGameSession could be null at this point
    // but it's worth checking for in case other logic is added
    if(selectedGameSession != null)
    {
        // now we have a game session one way or the other, create a session for this player
        await GameLift.createPlayerSession({
            GameSessionId : selectedGameSession.GameSessionId ,
            PlayerId: context.awsRequestId
        }).promise().then(data => {
            console.log("Created player session ID: ", data.PlayerSession.PlayerSessionId);
            response = data.PlayerSession;
        }).catch(err => {
           response = err;
        });

    }
    else
    {
        response = {
          statusCode: 500,
          body: JSON.stringify({
              message: "Unable to find game session, check GameLift API status"
          })
        };
    }

    return response;
};
- You’ll now need to grab the fleet ID for the fleet we created back in the GameLift console. You’ll find the fleet ID in either the dashboard or the fleet detail UI. Copy the fleet ID and replace the MegaFrogRaceFleetID constant value in the Lambda script with your own fleet ID.
- If you are not using GameLift in the us-east-1 region, be sure to change the region in the third line where the GameLift client is initialized.
- Choose Save and then your client service is ready to run.
- Optional: Choose Test to run the function and create a game session. In the Configure test event dialog, create a new event called “emptysession” and delete the key values so you just have a pair of braces:
{}and then select Create. Then choose Test again. Hopefully the function will succeed. You can expand the Execution result details. If the function succeeded, the function result will show the newly created GameLift session information. If the function failed, you will be able to see any error messages and have the option to select Logs if you need a deeper dive in to the problem with the execution.
This client service is about as simple as it gets. The player has no choice which game they will join. The the client service searches for any existing game sessions. If a game session exists and it has an opening, the player is joined to that game and the game will start. If no game sessions exist with an opening, a new game session is created and the player is joined to the new game. Once the player is joined to a game, the Lambda function returns the information needed to connect the client to the Realtime Server instance.
The second task is to make the client service callable from the game client. For this demo, we want to require that game client requests be authenticated. I’m going to show how this is done with Amazon Cognito. You’ll use a feature called “unauthenticated identity,” which means that any client with the right information can call our Lambda function. Amazon Cognito is a preferred method of giving clients access to AWS resources without entering credentials; the alternative is to distribute a key to a limited IAM role, which is a more brittle and error prone process requiring game client updates when keys expire. Enabling Amazon Cognito’s “unauthenticated identity” will also make it easy for you to, at a later point, require clients to log in via that service to take advantage of player identities and matchmake based on that identity.
- Open a new window or tab and go to the Amazon Cognito console.
- Choose Manage Identity Pools.
- Choose Create new identity pool.
- Give the pool a useful name like “MegaFrogRaceAnonPool”.
- Under Unauthenticated identities, select Enable access to unauthenticated identities.
- Ignore the section on Authentication providers, as we’ll be letting all clients to connect without logging in. This would be the place to start when you’re ready to add full authentication.
- Choose Create Pool.
- Choose View Details to expand it.
- Find the role summary Your unauthenticated identities would like access to Cognito, and choose View Policy Document. Then choose Edit.
- Replace what’s in the text box with the following BUT DON’T CLICK ALLOW YET! You can also find this code in the AWS folder of the code sample, which is linked to later in the article.
{
    "Version": "2012-10-17",
    "Statement": [
        {
            "Sid": "Invoke",
            "Effect": "Allow",
            "Action": [
                "lambda:InvokeFunction"
            ],
            "Resource": "arn:aws:lambda:us-east-1:123456789123:function:ConnectClientToServer"
        },
        {
            "Effect": "Allow",
            "Action": [
                "mobileanalytics:PutEvents",
                "cognito-sync:*"
            ],
            "Resource": [
                "*"
            ]
        }
    ]
}- Return to the AWS Lambda Console. Open the “ConnectClientToServer” Lambda function we created earlier. In the top right corner of the page you’ll see its ARN (Amazon Resource Name) which will look something like
arn:aws:lambda:us-east-1:123456789123:function:ConnectClientToServer
Select the box icon to copy the ARN value.
- Switch back to the Cognito policy document and replace the first “Resource” placeholder ARN value (in quotes) with the copied Lambda ARN value.
- Now choose Allow.
- Amazon Cognito provides sample code that needs to be added to our game client so that it can get access as an unauthenticated user. Use the Platform dropdown to switch to .Net. Keep this page open, you’ll need this source code in a little bit.
Step 3: Getting the clients and servers talking
The next task is the fun part where we get the client and server talking! We’ll work with my game project, available on GitHub. You’ll need to do a bit of work to get the client running.
- Get the MegaFrogRace game project from GitHub.
- Get these components and unzip them as needed:
- Follow the instructions in the GameLift Realtime Client SDK to build the SDK. Be sure to target .Net 4.5 to ensure compatibility with Unity. If you don’t have the correct targeting pack installed, you need to run the Visual Studio installer and install the correct pack.
- Open the project in Unity and ignore any errors about missing references for now.
- Go to the Assets menu and select Import Package->Custom Package… and select the Lambda package from the AWS Mobile SDK for Unity for import. Note that the Lambda package contains the necessary Cognito dll’s so there’s no need to also import the Cognito package.
- Create a new asset folder in the project called Plugins if it doesn’t already exist. Drag the following libraries from the Realtime Client SDK build folder in to the new folder:
- GameScaleRealTimeClientSDKNet45.dll
- Google.Protobuf.dll
- Log4net.dll
- SuperSocket.ClientEngine.dll
- WebSocket4Net.dll
- Follow the instructions found at the DOTween website to add DOTween to your project. I just put the DOTween folder in the Assets folder.
- Remember when I said to keep the Amazon Cognito sample code open? Find the line in the script file RTSClient.cs which creates the CognitoAWSCredentials and replace the identity pool ID with the one found in your Amazon Cognito sample code. Also, if you didn’t create your AWS resources in the us-east-1 region, you’ll also need to update the AWS region in three places to match the region where you created the identity.

- Select File->Build Settings and add both of the scenes included in the project to the Scenes In Build panel. You can add them by dragging the scene icons from the Project window in the Assets/Scenes folder.
- Select Edit->Project Settings and select Input Manager. Expand Axes and set the Size to whatever it is set to plus 2 (in my case I set it to 20.) Rename the two added inputs to HopP1 and HopP2. Set the “Positive Button” for HopP1 to space and for HopP2 to right shift. It should look like this:
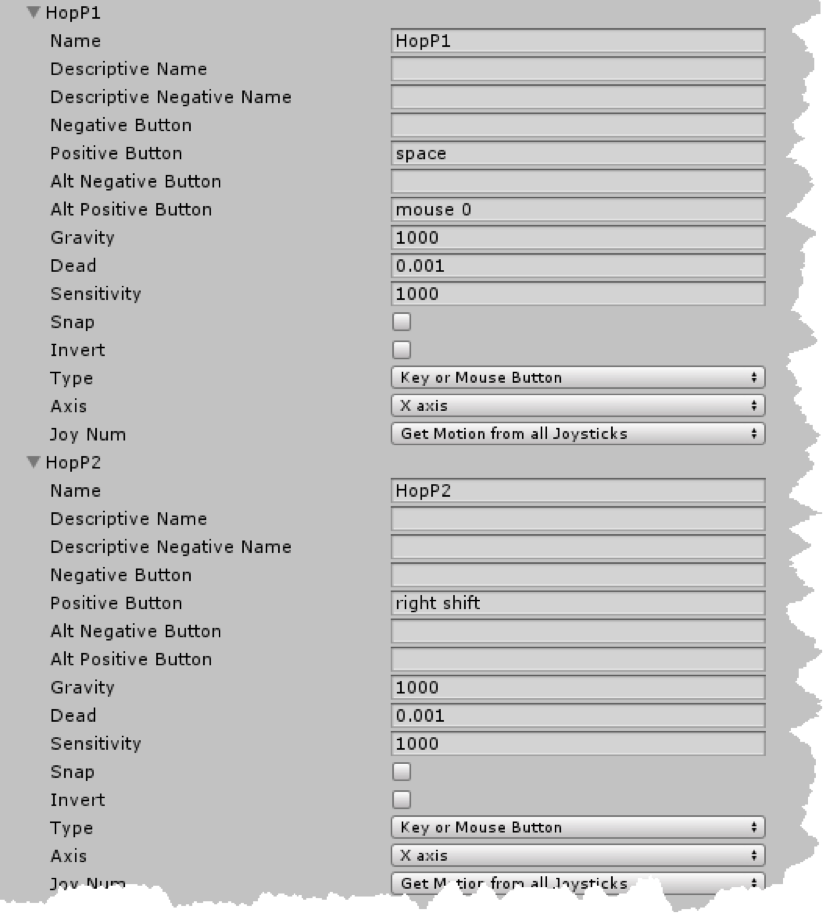
- At this point you’ll be able to run the client in the editor and build standalone clients. Be sure to start the game by running the title scene. You’ll be able to run the Local Multiplayer version of the game right now. Space bar and the right shift key will control the frogs.
Finally, we need to update our server script, which is uploaded to Amazon GameLift and deployed to your fleet. As a first step, we uploaded a minimal script. Now we need to update it with the Mega Frog Race server script that works with our new game client. The script file is included in the game project files you downloaded from GitHub.
- Find the MegaFrogRaceServer.js script file, located in the ServerApp folder of the MegaFrogRace game project.
- You’ll notice in the code there is a dependency on gameloop.js. Download this file from here: https://github.com/tangmi/node-gameloop/blob/master/lib/gameloop.js and place it in the same directory as the MegaFrogRaceServer.js file.
- Zip up both files, again making sure they are in the root of the zip file, not in a folder.
- In the GameLift console, go to the Scripts page. Locate the script container we created earlier and choose the script ID.
- In the Script detail page, select the Actions drop down and choose Edit script.
- Change the script type to Zip File and browse to find the zip file containing the new scripts.
- Submit the updated script. Once submitted, GameLift will deploy the script to our fleet (this can take a few moments).
That’s it! Now you’re ready to start playing Mega Frog Race in multiplayer mode with servers hosted on GameLift. You can run two game clients on the same machine for testing, or run them on two different computers if you have them. Have fun!
Further information
Amazon GameLift Realtime Servers Documentation
Need help or want to chat? Visit the Amazon GameLift forum.
Check out the Amazon GameLift page for more information on all the services GameLift offers.
To see what else Amazon GameTech offers for your games, head to the Amazon GameTech home page and check out the products and solutions we offer.
Notes on developing the client and server
If this is your first time working on a multiplayer game, it’s worth some extra information about the process I used to develop Mega Frog Race as a client server game. Even though the Realtime Servers will make your development life easier, you need to alter your mindset from single-player development. Specifically, you have to think about what code runs on the client, what code runs on the server, and the best way divvy up that work and abstract those differences.
To simplify this, the first thing I did was implement the game with local multiplayer, where two players control the game on the same machine. This allowed experimentation with the game logic without having to worry about a separate server component. It also gave me an understanding of what logic would need to go on to the server and what could stay on the client.
From the beginning I used an architecture that allows the primary game logic to run somewhere other than my local machine. The typical model for this would have:
- A game controller which handles all the graphics and input.
- A game client which arbitrates data between the game controller and the simulation.
- The simulation which runs the game loop and determines the state of the game based on player input and game rules.
I developed a simulation that runs in the Unity game client in C#. This allowed me to quickly prototype how I wanted the game to work and tune the gameplay. As a bonus, the game now has a “living room mode” where people can play the game sitting next to each other. If you look at the RTSClient class, you can see the simulation code at the bottom of the file. Also, in the game controller handlers like HopButtonPressed, the handler checks to see if the simulation is running locally or remotely.
Now, I’ll admit, having the handlers check if the simulation is local is more brittle than I would like. The game is so tiny I can (just barely) get away with this as it made the example code easier to follow. An even better architecture would be creating an abstract notion of a game client and then concrete implementations for the Realtime server and local simulation separately. You would then instantiate whichever you needed when the game started. If you’re not writing sample code, I’d recommend this. Here’s a diagram of what that would look like:
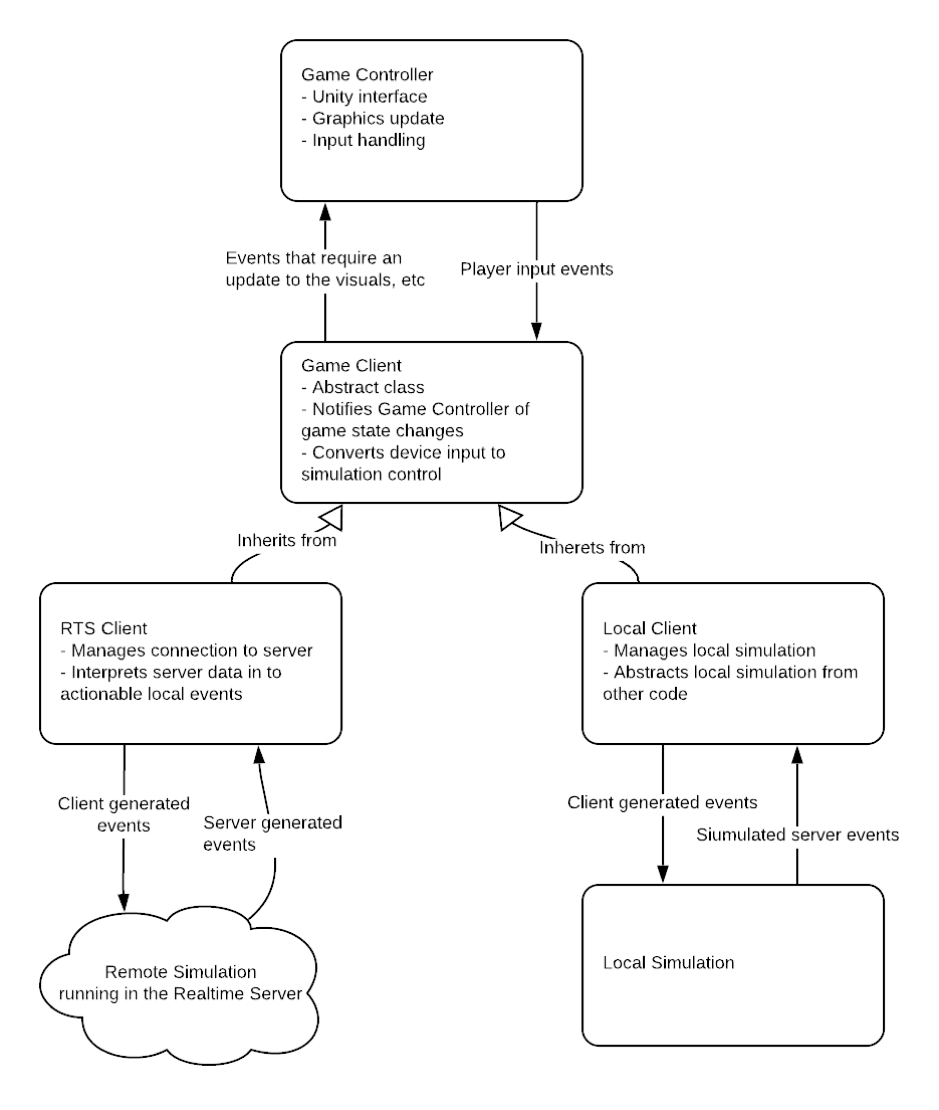
This architecture is more maintainable as you can add new types of clients when the need arises, and it will make it easier to test different components of your game in isolation.
Once I’d finished writing and testing the local simulation, it was an easy job to translate the game logic to work with the Realtime Server. You can see the code in the LocalSimUpdate and LocalSimHopPressed RTSClient is almost the same as the fGameLoop and ProcessHop functions in the server script.
Lastly, it’s important to keep in mind that there could be a delay between when events are triggered on the client and when they appear on the server and vice versa. This should influence your game design decisions. Think about what it means if it takes one second between the player hitting a button, the server acting on that button press and then sending back data to update the client state. Interpolation will become a key tool you use to smooth over these types of issues.
Notes on Debugging the Server
The best way to debug the server is to use copious amounts of console.log() statements in your server code and examine the log files. Examining the log files requires opening an SSH session with the server that is running. Here is how I did this in Windows:
- Install the AWS CLI tool from https://aws.amazon.com/cli/ and be sure to follow the installation and configuration steps the in the “getting started” guide.
- Run the following command (replace the fleet ID and region with your own, and the fleet ID can be obtained from the GameLift console). This will give the server access to ports used by SSH:
aws gamelift update-fleet-port-settings --fleet-id "fleet-a1b23c45-a123-1ab2-123a-1ab2c3d4ef561" --inbound-permission-authorizations "FromPort=22,ToPort=22,IpRange=0.0.0.0/0,Protocol=TCP" --region us-east-1
- Get a list of server instances (in our case there will be only one) with this command, again using your own fleet ID:
aws gamelift describe-instances --fleet-id fleet-a1b23c45-a123-1ab2-123a-1ab2c3d4ef561
- Use the fleet instance ID from the previous command along with your fleet and region ID in the following command:
aws gamelift get-instance-access --fleet-id fleet-a1b23c45-a123-1ab2-123a-1ab2c3d4ef561 --instance-id i-0ab1c234de5fg678d --region us-east-1 > Secret.Txt
- That command created a file with two pieces of information we need to start an SSH session, the IP address of the server and the private key to access the server. Open the file Secret.txt in a text editor (I suggest Notepad++ for its ability to handle different line ending and special character replacement)
- Copy the value of the Secret key between the quotes and create a new document in Notepad++.
- Go to the search menu and select Replace
- Change the search mode to Extended (\n\r…
- Set Find What to \\n (yes, two backslashes!)
- Set Replace With to \n (one backslash)
- Select Replace All and this will convert all the text \n’s from the JSON file to newline characters
- Save the new file with the file name MySecret.pem
- Now we need an SSH tool. I used PuTTY. Download and install it.
- Run Puttygen
- Select Load
- Change file types to “All *.*”
- Select the MySecret.pem file
- Save the private key and call it MySecret.ppk
- Run PuTTY
- In the session field put the IP address from the Secret.txt file
- In connection/data change the username to “gl-user-remote”
- In connection/SSH/Auth use the “private key file for authentication” field to browse to the MySecret.ppk file
- Go back to connection and type a name in “Saved Sessions” and then save (you’ll thank me as you’ll now be able to load that connection and reconnect without all the configuration next time!)
- Click Open and answer “yes” if you’re asked about caching the key
- You’re now in your servers Amazon Linux shell
- Type
cd /local/game/logs
- Type
ls –al
and you should see the server scripts as well as log files and you’ll see a list of folders with numbers. These numbers are the process ID’s of the various servers that are running or have run. Find the folder with the time stamp closest to when you started your game. Change directories in to that folder.
- Type
ls –al
and you should see a list of log files starting with “server.log”. Look for the most recent time stamp.
- You can open the latest log file by typing
less [log-file-name]
and then use the space bar to page through the log
- You can also use the tail command if you’d like to watch the output of the server while it runs. Just type
tail [log-file-name]
- If your server is stuck in a loop or if you have a “zombie game session” which didn’t ever get terminated by your server script you can kill the process by typing
sudo killall -9 node
and the game session and server processes will be automatically restarted.