Artificial Intelligence
Hosting YOLOv8 PyTorch models on Amazon SageMaker Endpoints
Deploying models at scale can be a cumbersome task for many data scientists and machine learning engineers. However, Amazon SageMaker endpoints provide a simple solution for deploying and scaling your machine learning (ML) model inferences. Our last blog post and GitHub repo on hosting a YOLOv5 TensorFlowModel on Amazon SageMaker Endpoints sparked a lot of interest from our readers. Many readers were also interested in learning how to host the YOLOv5 model using PyTorch. To address this issue and with the recent release of the YOLOv8 model from Ultralytics, we present this post on how to host a YOLOv8 PyTorchModel on SageMaker endpoints. The YOLOv8 model, distributed under the GNU GPL3 license, is a popular object detection model known for its runtime efficiency as well as detection accuracy. Amazon SageMaker endpoints provide an easily scalable and cost-optimized solution for model deployment.
Solution overview
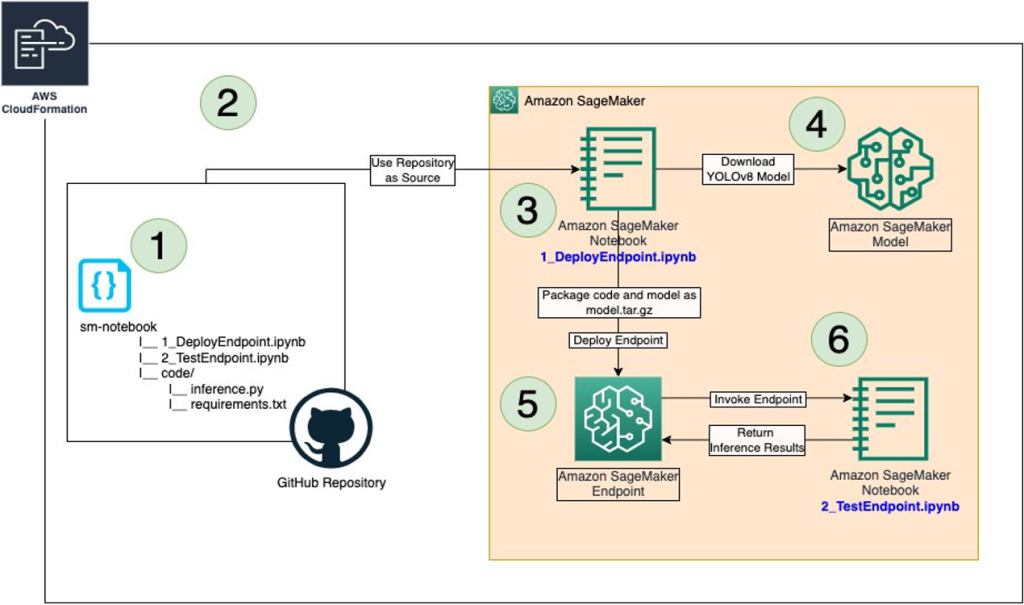
The following image outlines the AWS services used to host the YOLOv8 model using a SageMaker endpoint and invoke the endpoint as a user. The solution uses AWS CloudFormation to automate the creation of a SageMaker instance and clone our GitHub repository to the instance. The SageMaker notebook accesses and downloads a YOLOv8 PyTorch model and stores the custom inference code along with the model in an Amazon Simple Storage Service (Amazon S3) bucket. The steps within the notebook highlight the creation of the SageMaker endpoint that hosts the YOLOv8 PyTorch model and the custom inference code. The notebook also demonstrates how to test the endpoint and plot the results. The solution consists of the following steps:
- We have created a GitHub repository with two notebooks
1_DeployEndpoint.ipynband2_TestEndpoint.ipynb, under thesm-notebook/directory. - AWS CloudFormation template runs, creates a SageMaker Notebook instance, and then clones the GitHub repository.
- The notebook
1_DeployEndpoint.ipynbis used to download the YOLOv8 model. - The YOLOv8 model and inference code are stored as
model.tar.gzin Amazon S3. - A SageMaker endpoint is created by hosting the
model.tar.gz. - The notebook
2_TestEndpoint.ipynbis used to test the endpoint and gather results.
Prerequisites
AWS Account with AWS Identity and Access Management (IAM) roles that provides access to:
- AWS CloudFormation
- Amazon SageMaker
- Amazon S3
1. Host YOLOv8 on a SageMaker endpoint
Ultralytics has multiple YOLOv8 models with different capabilities. They are subdivided into the following:
- Object Detection (
yolov8l.pt, yolov8m.pt, yolov8n.pt, yolov8s.pt, yolov8x.pt, yolov8x6.pt) - Segmentation (
yolov8l-seg.pt, yolov8m-seg.pt, yolov8n-seg.pt, yolov8s-seg.pt, yolov8x-seg.pt) - Classification (
yolov8l-cls.pt, yolov8m-cls.pt, yolov8n-cls.pt, yolov8s-cls.pt, yolov8x-cls.pt)
In this blog, we focus on object detection using yolov8l.pt PyTorch model. In order to host the YOLOv8 model and the custom inference code on SageMaker endpoint, they need to be compressed together into a single model.tar.gz with the following structure:
model.tar.gz
        ├─ code/
        │    ├── inference.py
        │    └── requirements.txt
        └── yolov8l.pt
The model weights yolov8l.pt file must be outside the code/ directory and the main inference python script inference.py, which contains the functions needed for loading the model, parsing the input, running the inference, and post-processing the output, should reside under code/ directory. Further details on inference.py are presented in the following section.
1.1. Custom inference code
Depending on your pipeline and code workflow, inputs to and outputs from SageMaker endpoints can vary. In this post, we present a workflow for passing a numpy array to the endpoint and processing. However, the inputs to the endpoint can be json or text as well. Depending on your workflow, you must modify the functions in inference.py to accommodate different inputs and outputs. In addition, with the recent release of YOLOv8, the Ultralytics team released their Python API, which allows us to install the YOLO library directly through requirements.txt and import the model in inference.py.
1.1.1. Contents of code/inference.py:
import numpy as np
import torch, os, json, io, cv2, time
from ultralytics import YOLO

def model_fn(model_dir):
    print("Executing model_fn from inference.py ...")
    env = os.environ
    model = YOLO("/opt/ml/model/code/" + env['YOLOV8_MODEL'])
    return model

def input_fn(request_body, request_content_type):
    print("Executing input_fn from inference.py ...")
    if request_content_type:
        jpg_original = np.load(io.BytesIO(request_body),
                               allow_pickle=True)
        jpg_as_np = np.frombuffer(jpg_original,
		                          dtype=np.uint8)
        img = cv2.imdecode(jpg_as_np, flags=-1)
    else:
        raise Exception("Unsupported content type: " + request_content_type)
    return img

def predict_fn(input_data, model):
    print("Executing predict_fn from inference.py ...")
    device = torch.device('cuda' if torch.cuda.is_available() else 'cpu')
    model.to(device)
    with torch.no_grad():
        result = model(input_data)
    return result

def output_fn(prediction_output, content_type):
    print("Executing output_fn from inference.py ...")
    infer = {}
    for result in prediction_output:
        if result.boxes:
            infer['boxes'] = result.boxes.numpy().data.tolist()
        if result.masks:
            infer['masks'] = result.masks.numpy().data.tolist()
        if result.probs:
            infer['probs'] = result.probs.numpy().data.tolist()
    return json.dumps(infer)
1.1.2. Contents of code/requirements.txt:
Once all the file contents for model.tar.gz are finalized, run the following command to create a tar ball:
$ tar -czvf model.tar.gz code/ yolov8l.pt1.2. Host model.tar.gz to SageMaker endpoint:
This involves a few steps wherein the model.tar.gz is first uploaded to the S3 bucket. The uploaded artifact is used to create a SageMaker PyTorchModel. And finally, this PyTorchModel is used to deploy the model to a SageMaker Endpoint.
1.2.1. Upload model and inference code to S3:
from sagemaker import s3

bucket = "s3://NAME_OF_BUCKET"
prefix = "yolov8/demo-custom-endpoint"
model_data = s3.S3Uploader.upload("model.tar.gz", bucket + "/" + prefix)
1.2.2. Create SageMaker PyTorchModel:
from sagemaker.pytorch import PyTorchModel

model_name = 'yolov8l.pt'

model = PyTorchModel(entry_point='inference.py',
                     model_data=model_data,
                     framework_version='1.12',
                     py_version='py38',
                     role=role,
                     env={'TS_MAX_RESPONSE_SIZE':'20000000', 'YOLOV8_MODEL': model_name},
                     sagemaker_session=sess)
1.2.3. Compile and host the model to an endpoint:
from sagemaker.deserializers import JSONDeserializer

INSTANCE_TYPE = 'ml.m5.4xlarge'
ENDPOINT_NAME = 'yolov8-pytorch-' + str(datetime.utcnow().strftime('%Y-%m-%d-%H-%M-%S-%f'))

predictor = model.deploy(initial_instance_count=1,
                         instance_type=INSTANCE_TYPE,
                         deserializer=JSONDeserializer(),
                         endpoint_name=ENDPOINT_NAME)
2. Test the SageMaker endpoint
Once the endpoint is successfully hosted, it can be used to run inference. In this step, we will first read an image, convert it to bytes and run inference by passing the bytes as an input to the endpoint. The results generated would have either bounding boxes or masks or confidence scores based on the type of YOLOv8 model used for hosting. The output can be plotted accordingly.
2.1.1. Generate inference results and plot output:
import cv2, random
import numpy as np
import matplotlib.pyplot as plt

orig_image = cv2.imread('bus.jpg')

image_height, image_width, _ = orig_image.shape
model_height, model_width = 300, 300
x_ratio = image_width/model_width
y_ratio = image_height/model_height

resized_image = cv2.resize(orig_image, (model_height, model_width))
payload = cv2.imencode('.jpg', resized_image)[1].tobytes()
result = predictor.predict(payload)

if 'boxes' in result:
    for idx,(x1,y1,x2,y2,conf,lbl) in enumerate(result['boxes']):
        # Draw Bounding Boxes
        x1, x2 = int(x_ratio*x1), int(x_ratio*x2)
        y1, y2 = int(y_ratio*y1), int(y_ratio*y2)
        color = (random.randint(10,255), random.randint(10,255), random.randint(10,255))
        cv2.rectangle(orig_image, (x1,y1), (x2,y2), color, 4)
        cv2.putText(orig_image, f"Class: {int(lbl)}", (x1,y1-40), cv2.FONT_HERSHEY_SIMPLEX, 1, color, 2, cv2.LINE_AA)
        cv2.putText(orig_image, f"Conf: {int(conf*100)}", (x1,y1-10), cv2.FONT_HERSHEY_SIMPLEX, 1, color, 2, cv2.LINE_AA)
        if 'masks' in result:
            # Draw Masks
            mask = cv2.resize(np.asarray(result['masks'][idx]), dsize=(image_width, image_height), interpolation=cv2.INTER_CUBIC)
            for c in range(3):
                orig_image[:,:,c] = np.where(mask>0.5, orig_image[:,:,c]*(0.5)+0.5*color[c], orig_image[:,:,c])

if 'probs' in result:
    # Find Class
    lbl = result['probs'].index(max(result['probs']))
    color = (random.randint(10,255), random.randint(10,255), random.randint(10,255))
    cv2.putText(orig_image, f"Class: {int(lbl)}", (20,20), cv2.FONT_HERSHEY_SIMPLEX, 1, color, 2, cv2.LINE_AA)

plt.imshow(cv2.cvtColor(orig_image, cv2.COLOR_BGR2RGB))
plt.show()
2.1.2. Results:
The output of object detection and segmentation YOLOv8 models is shown in the following images:

3. Clean up
Deleting the CloudFormation stack would remove all the resources that were originally created. However, the CloudFormation is not currently configured to automatically remove the endpoint, endpoint configuration, and the model. If the hosted endpoint is not being used, it is a good practice to remove it to save costs. It can be done as follows:
import boto3

sm_client = boto3.client(service_name="sagemaker")

response = sm_client.describe_endpoint_config(EndpointConfigName=endpoint_name)
print(response)
endpoint_config_name = response['EndpointConfigName']

# Delete Endpoint
sm_client.delete_endpoint(EndpointName=endpoint_name)

# Delete Endpoint Configuration
sm_client.delete_endpoint_config(EndpointConfigName=endpoint_config_name)

# Delete Model
for prod_var in response['ProductionVariants']:
    model_name = prod_var['ModelName']
    sm_client.delete_model(ModelName=model_name)
Conclusion
In this post, we demonstrated how to host a pre-trained YOLOv8 PyTorchModel on a SageMaker endpoint and test the inference results by invoking the endpoint. The detailed code is available on GitHub, and the template CloudFormation stack is available on GitHub as well.
To learn more about SageMaker endpoints, please check out Create your endpoint and deploy your model and Use PyTorch with Amazon SageMaker, which highlights using PyTorchModel on SageMaker. The process can be automated using CloudFormation support for SageMaker.
About the authors
 Kevin Song is a Data Scientist at AWS Professional Services. He holds a PhD in Biophysics and has more than five years of industry experience in building computer vision and machine learning solutions.
 Romil Shah is an IoT Edge Data Scientist at AWS Professional Services. Romil has more than six years of industry experience in computer vision, machine learning, and IoT edge devices. He is involved in helping customers optimize and deploy their machine learning models for edge devices in an industrial setup.