AWS for M&E Blog
Quickly create a live streaming channel with AWS Elemental MediaLive Workflow Wizard
There is a growing need for organizations of all types, as well as individuals, to stream video to mobile viewers or a website. AWS Elemental MediaLive offers an automated Workflow Wizard to help create a live streaming workflow in just a few clicks. Now educators, marketers, internal corporate communications teams, and others can easily share video content at scale without having deep knowledge of video streaming technologies.

Using the AWS Elemental MediaLive Workflow Wizard, you don’t have to be an expert in video processing or have previous experience with AWS Media Services to get started. This post provides step-by-step guidance to quickly configure an end-to-end live streaming channel using the new AWS Elemental MediaLive Workflow Wizard.
Prerequisites
You need an AWS account that has permissions to access the following services:
- AWS Elemental MediaLive
- AWS Elemental MediaPackage
- Amazon CloudFront
- AWS CloudFormation
- Amazon Simple Storage Service (Amazon S3)
- AWS Identity and Access Management (AWS IAM)
Get Started
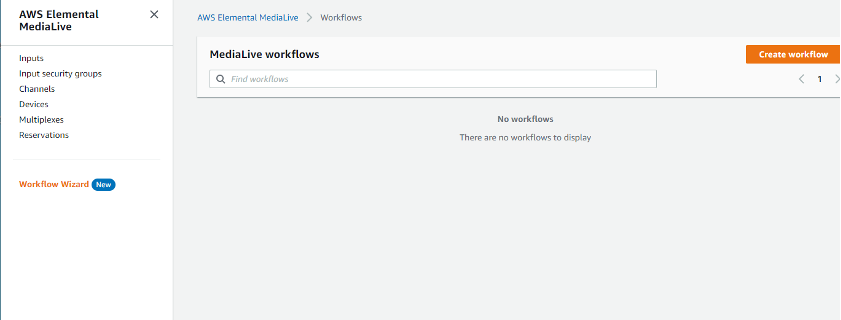
- Open the AWS Management Console.
a. If you are unfamiliar with the console, here is a getting started guide. - Log in using your user credentials.
- Locate, or search for, “MediaLive” and open it.
- At the top left of the service screen is a menu, indicated by three lines, click the menu.
- Then navigate to Workflow Wizard.
- Within the Workflow Wizard, click on the Create workflow button to start setup.
Create MediaLive Workflow
Overview:
Step 1 – Enter basic details about your workflow
Step 2 – Choose a video source type
Step 3 – Add video outputs
Step 4 – Review and create resources
Step 5 – Provide a video source
Step 6 – Stream video
Step 1 – Enter basic details about your workflow
- Enter a Workflow name.
a. this example uses the name LiveChan1. - Select SINGLE_PIPELINE from the MediaLive channel class.
- If this is your first time creating a MediaLive channel, you need to create a role for MediaLive to run under:
a. Select the Create role from template radio button.
b. Review the permissions to be granted to this role.
c. Click on the Create IAM role button.
If a MediaLive role already exists:
a. Select the Use existing role radio button.
b. Choose MediaLiveAccessRole or the name of your MediaLive role
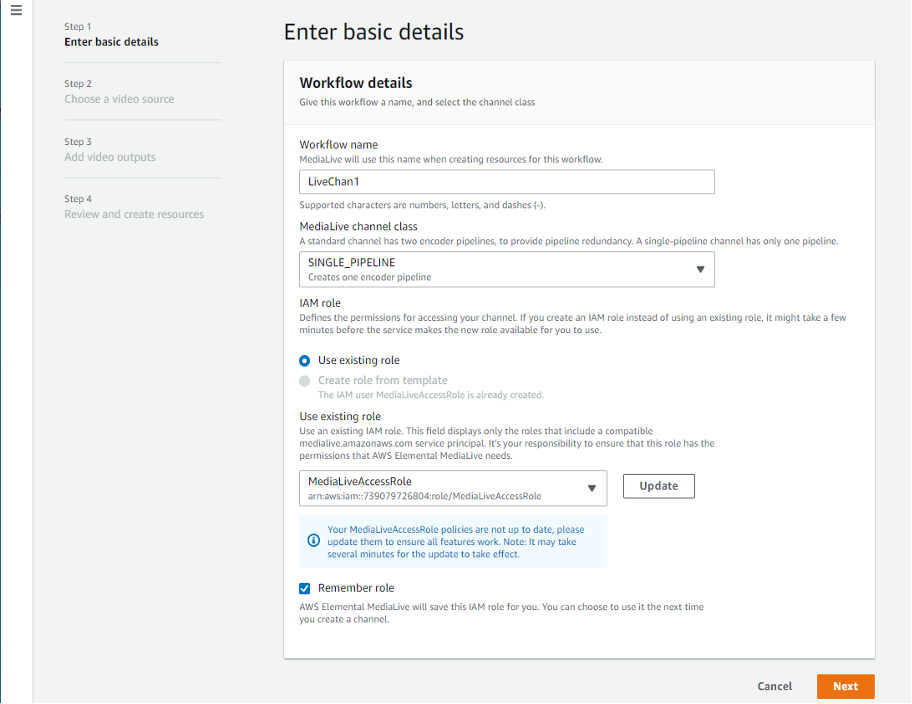
Basic Workflow Details
4. Then click the orange Next button.
Step 2 – Choose a video source
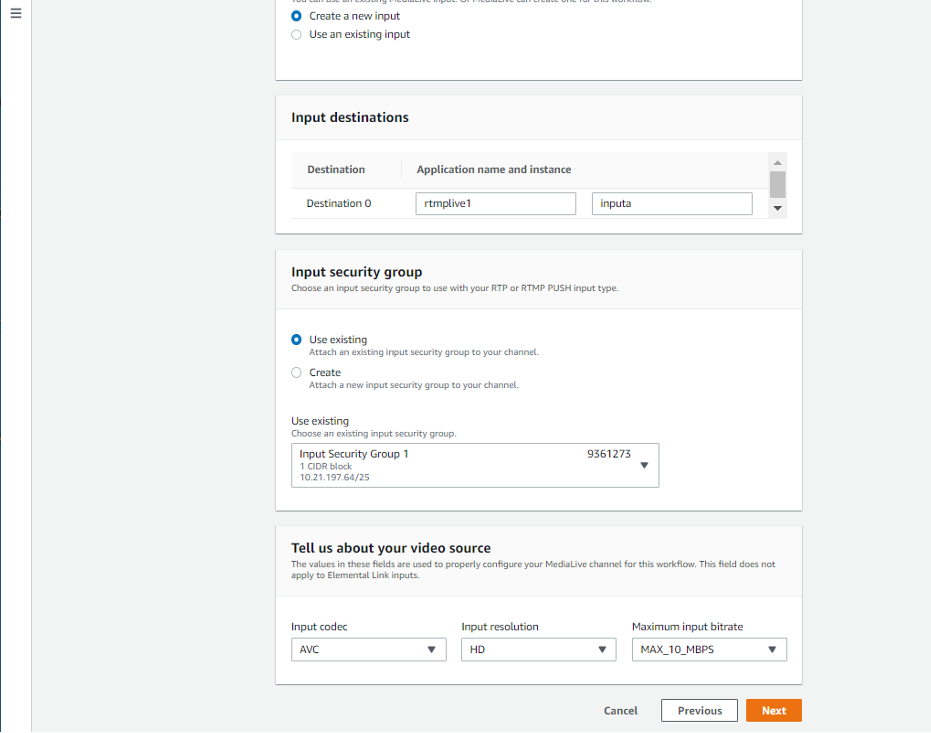
In this step, the input source for the MediaLive channel is configured. The AWS Elemental MediaLive Workflow Wizard offers a choice of inputs between RTMP, Elemental Link, AWS Elemental MediaConnect, or MP4. We use RTMP in this example. Many applications and devices support the RTMP stream format such as: OBS (Open Broadcaster Software), Zixi OnAir, Wirecast, Xsplit, Teradek, Epiphan, GoPro. In this example, we load OBS to a laptop using a built-in webcam as the video source for this channel. This software can be downloaded here https://obsproject.com/download.
- Select the RTMP (push) radio button.
- Leave the Create a new input radio button selected.
- Add an RTMP Application name and Application instance to append to the channel.
a. This demo uses rtmplive1 and inputa for these parameters. - Select Create for an Input security group.
a. This section provides network security parameters for the video source. In our case, it is the IP address of the laptop running the OBS software. To determine the IP address of the laptop, you can use a service online like http://checkip.amazonaws.com to return your IP address in a web browser. Enter only this address using CIDR notation format (example: xxx.xxx.xxx.xxx/32) then click on the Create input security group button. - Leave the Input codec and Input resolution as default values.
- Select MAX_10_MBPS from the Maximum Input bitrate dropdown list.
- Click on the orange Next button.
Choose Video Source
Step 3 – Add video outputs
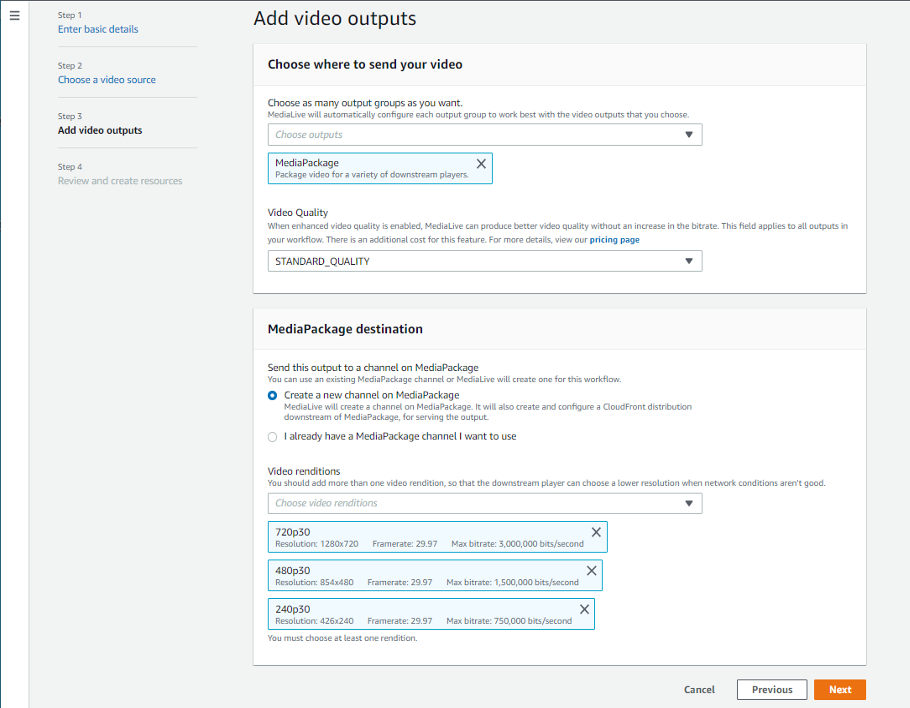
The Workflow Wizard offers the ability to choose from several different output types: stream origination, using AWS Elemental MediaPackage or AWS Elemental MediaStore; in addition to direct streaming to social media platforms such as Facebook, YouTube, or Twitter. In this example, we use MediaPackage for the output type and stream origination.
Here we decide which output resolutions and bitrates to create to serve to our viewers. HTTP Live Streaming (HLS) is an Adaptive Bit Rate (ABR) protocol that creates multiple versions of a stream, with different bitrates, that a video player can transition between based on network bandwidth. This example uses three renditions in an ABR set: low, medium, and high bitrate video streams. The Workflow Wizard offers a selection of some common renditions.
Note: each rendition can later be modified after the streaming channel is created.
- Select MediaPackage from the Choose outputs dropdown list.
- Leave the Video Quality dropdown list set at STANDARD_QUALITY.
- Leave the Create a new channel on MediaPackage radio button selected.
- In the Video renditions list click on the X to delete the top rendition, 720p60.
- Then click on the orange Next radio button.
Video Outputs
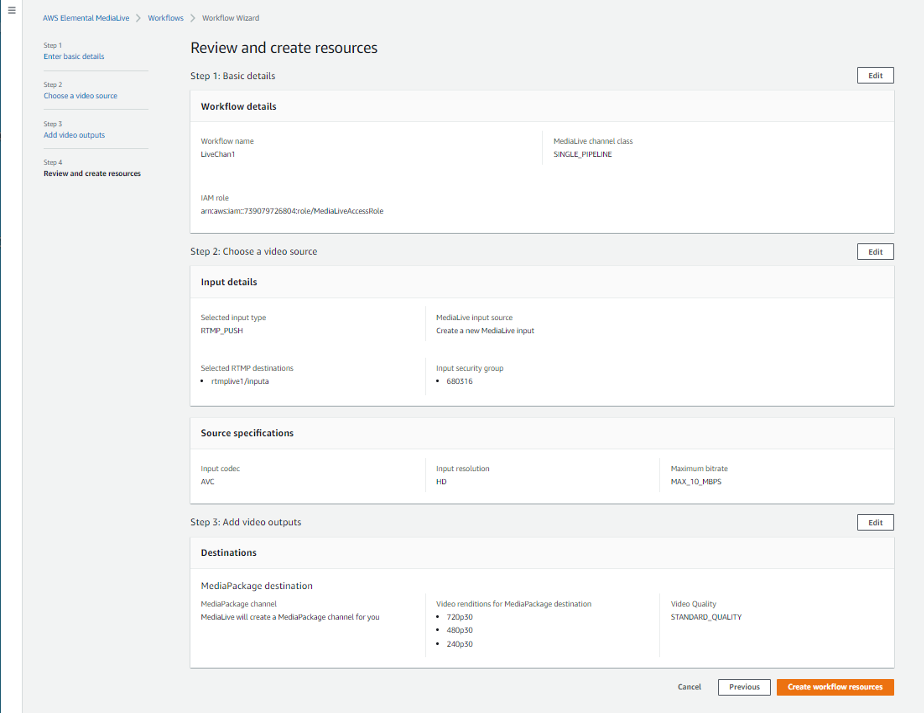
Step 4 – Review and create resources
Review the settings for each of the proceeding steps. If you find an error, or want to change something, you can click on the Edit button for the corresponding step and make the desired changes. If you are satisfied with the selections click on the orange Create workflow resources button.
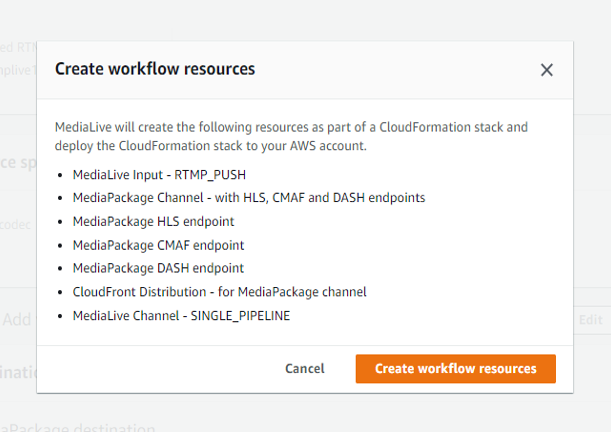
Review Workflow Resources
Then select Create workflow resources button on the verification screen.
Create Workflow
Once the Workflow creation has finished the following screen is displayed.
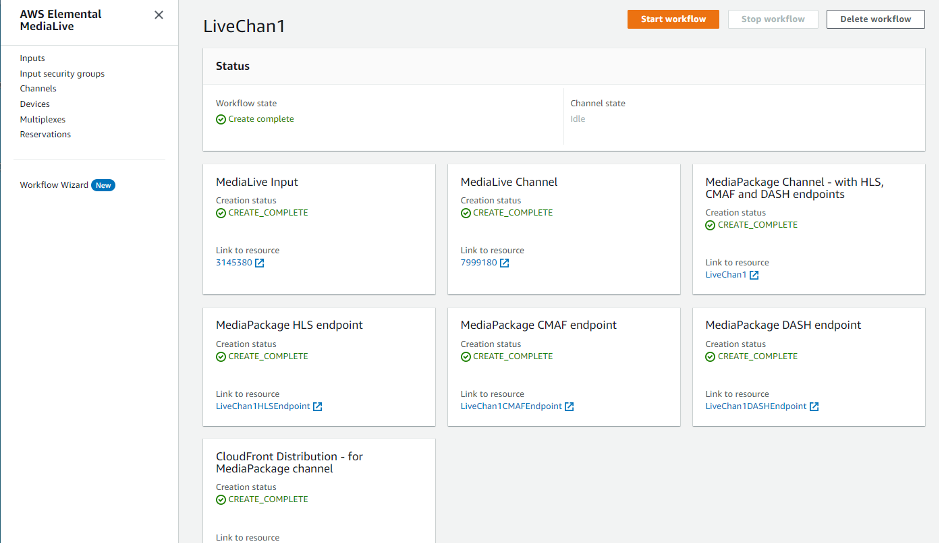
LiveChan1 Workflow
The Start workflow button turns orange when the channel is ready. We return to this page later to start the channel in Step 6.
Note: If you get a CREATE_FAILED error message in the Create workflow resources step, click on the workflow name (in this example LiveChan1) to determine what failed and apply corrective action then try again. It is common that new AWS accounts without a history of service usage may discover a CREATE_FAILED error message when using AWS Media Services for the first time. AWS Media Services usage may be restricted until the AWS account has accrued initial usage on other services such as Amazon Elastic Compute Cloud
Step 5 – Provision a video source
Once the stream channel workflow is created, we use the MediaLive Input information that it creates for the OBS application. In the MediaLive Workflow, find the tile named MediaLive Input and click on the Link to resource ID.
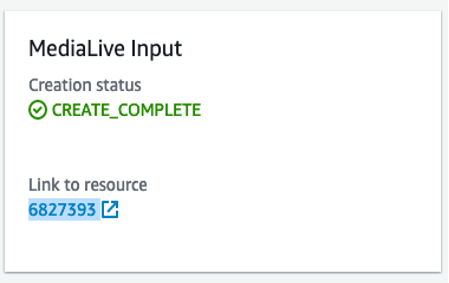
MediaLive Input
In the screen that opens, locate the URL for the RTMP Endpoint. This is the network address to be used by the OBS application to send video to your new channel:

LiveChan1 MediaLive Input
As mentioned in “Step 2 Choose a video source,” there are several tools you can use to provide a video source to the streaming channel. This example uses OBS, an open-source software-based encoder that runs on laptops. OBS can send an RTMP stream to the AWS Elemental MediaLive Input we just created.
- Download, install, and open OBS

OBS Main Screen
- Click + under Sources to add Video Capture Device. Select the PC Camera as Device. Then click OK.
- Select Settings button on lower right, select Video menu and configure the Output resolution to 1280×720, 30fps.
- In the Stream Menu, copy and paste the info from the MediaLive RTMP input.
Note: We separate the MediaLive Input into two entries for OBS
· Server Field: rtmp://23.32.38.100/rtmplive1/
· Stream Key Field: inputa
OBS Stream Menu
- Select Output Menu, set Video Bitrate to 3000 kps, Audio Bitrate to 192.

OBS Output menu
Step 6 – Stream video
Return to the browser page that has the AWS Elemental MediaLive console and in the LiveChan1 Workflow view and click on the orange Start workflow button. Workflows typically take 1-5 minutes to start.
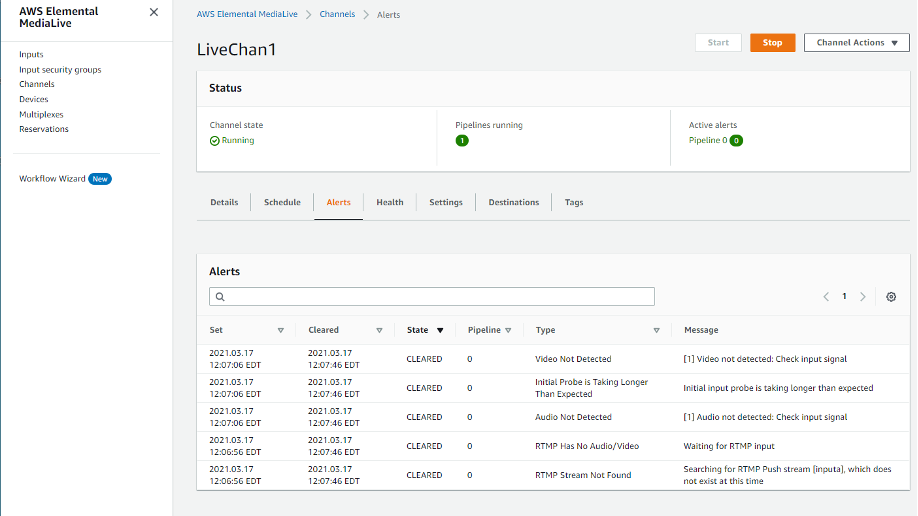
If you want to validate the workflow is running, click on the Link to resource in the MediaLive Channel box. This brings up the LiveChan1 MediaLive console. Confirm that the Pipeline Running is shown as Green. Note: The Active Alerts are Red and several alerts may be listed until the OBS RTMP video source is started and sending live video.
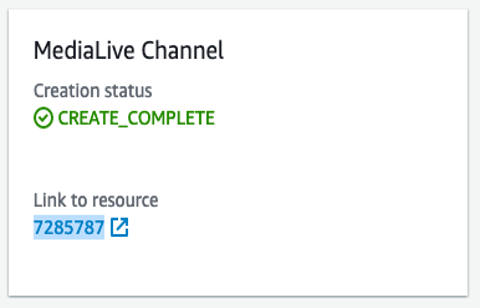
Link to MediaLive Channel
MediaLive Channel
Once the channel has started, you can begin to stream from the laptop with OBS. Click the Start Streaming button on the bottom right. Verify that the RTMP stream is running.
Note: Some corporate networks block port 1935. If you are having problems connecting try connecting from non-corporate network or disconnect and close any VPN software.
Returning to the MediaLive LiveChan1 top-level Workflow Wizard console, you can STOP and START the streaming channel with the Stop Channel and Start Channel buttons.
AWS Elemental MediaLive Workflow Wizard results
The output of this MediaLive Workflow Wizard is a live streaming channel deploying AWS Elemental MediaLive, AWS Elemental MediaPackage, and Amazon CloudFront. Using OBS software on a laptop, the laptop camera output is sent to the MediaLive channel using RTMP protocol.

MediaLive provides an ABR HLS stream, with three (3) rendition, to AWS Elemental MediaPackage. There are three different MediaPackage endpoints created: HLS, DASH, and CMAF. Each provides Just-in-Time (JIT) packaging of the live stream, based on each of the ABR protocols. Amazon CloudFront requests live content from these endpoints, based on the request received from client player devices used by viewers of the stream.
Accessing the live stream
Client devices can now access the live stream by requesting one of the Amazon CloudFront-based URLs associated with the different ABR protocols. Here is how to request the HLS stream (similar procedures may be used for the DASH and CMAF streams).
- Viewing the MediaLive Workflows screen, select the LiveChan1 workflow and you will see all the components created by the Channel Wizard.
- Select the link in the MediaPackage HLS Endpoint box.

Link to MediaPackage HLS Endpoint
- Click Play on the Playback Preview box and you should see your video from the OBS streaming software.
- The box in the top right lists two URLs. Copy the CloudFront URL (ending with index.m3u8) and paste it into a video player on a web or mobile device (Safari and Microsoft Edge play HLS streams, just enter the link to the index.m3u8 file in the address bar). This is the URL that viewers of your stream need to pull down to see the live stream created with this workflow. Be careful not to provide the Endpoint URL, which is the output from AWS Elemental MediaPackage to Amazon CloudFront.

HLS Endpoint
The MediaLive Workflow Wizard results in an AWS CloudFormation Template used to build the live streaming channel. This Template can be used to quickly create additional channels, with identical configurations to the original channel. A future post will review using the AWS CloudFormation template created by the MediaLive Workflow Wizard, and detail the use of other inputs and outputs to a Workflow.
AWS offers a complementary tool that can be used for monitoring multiple live streaming channels, built with AWS Media Services. The Media Service Application Monitor (MSAM) provides a visual map of AWS Media Services for each live streaming channel created.
Clean up
When not using the MediaLive streaming channel, remember to stop the MediaLive Workflow. This stops the channel from incurring costs when inactive. To stop the channel, navigate to the MediaLive Workflow Wizard panel, select the LiveChan1 Workflow and click the Stop Workflow button. The streaming channel may be restarted at any time by selecting Start Workflow in the Workflow console. Additionally, be sure to stop the OBS output on the laptop when not using the application as a live video source.
Summary
The AWS Elemental MediaLive Workflow Wizard helps to facilitate creating end-to-end live streaming channels, using fully managed AWS Media Services, with just a few steps. The Workflow Wizard enables fast setup and automated provisioning of live video streams consumable by mobile devices and web applications, and can also deliver streams direct to social media outlets.
AWS provides a growing number of services designed to assist in the building of media-related workflows. If you would like to explore additional applications for video streaming, processing, and delivery using AWS Services, visit Media Services on AWS.
If you have questions, feedback, or would like to get involved in discussions with other community members, visit the AWS Developer Forums: Media Services.