AWS Public Sector Blog
How to migrate on-premises workloads with AWS Application Migration Service
Often public sector customers like state and local government agencies can lack cloud skilled IT staff and are seeking guidance on how to move their workload from an on-premises data center to Amazon Web Services (AWS). In April 2021, AWS launched AWS Application Migration Service (AWS MGN), a highly automated lift-and-shift (rehost) solution that simplifies, expedites, and reduces the cost of migrating applications to AWS. It enables companies to lift-and-shift a large number of physical, virtual, or cloud servers without compatibility issues, performance disruption, or long cutover windows. AWS MGN is based on CloudEndure Migration and improves on it by integrating with the AWS management console. For public sector customers, this provides an integrated solution with security and flexibility. MGN provides the flexibility to operate from within the AWS Management Console, control permissions and access using AWS identity and access management (IAM), and monitor AWS MGN using Amazon CloudWatch and AWS CloudTrail.
Lift-and-shift (also known as “rehost”) is a common approach for migrating to AWS, whereby you move a workload from on premise with little or no modification. In a large legacy migration scenario where the organization is looking to scale its migration quickly to meet a business case, we find that the majority of applications are rehosted when moving to the cloud, to minimize risk and speed up time to production. GE Oil & Gas, for instance, found that even without implementing any cloud optimizations, it could save roughly 30 percent of its costs by rehosting.
AWS MGN is a highly automated lift-and-shift solution, which works by replicating your on-premises (physical or virtual) and/or cloud servers (referred to as “source servers”) into your AWS account. When you’re ready, AWS MGN automatically converts and launches your servers on AWS so you can quickly benefit from the cost savings, productivity, resilience, and agility of the cloud. Once your applications are running on AWS, you can leverage AWS services and capabilities to quickly and easily replatform or refactor those applications.
This guide teaches you how to migrate a content management system platform (CMS), based on an example with WordPress, running on a simulated on-premises environment to AWS Cloud, using AWS Application Migration Service (MGN).
Migrate your on-premises workload walkthrough
In this walkthrough, the example WordPress blog is currently running as a two-tier stack in a simulated on-premises data center. The frontend uses Apache Server running on Ubuntu 16.04 LTS and the backend is supported by a mySQL server running on Ubuntu 16.04 LTS. All systems are hosted on a virtualized platform in a simulated data center.
The key steps of this migration process are:
- Create IAM user for AWS Replication Agent
- Create the Replication Settings template in the AWS MGN Console
- Install the AWS Replication Agents on source servers
- Configure the Launch Settings in the AWS MGN console
- Launch the test instances
- Launch the cutover instances
- Finalize cutover
Prerequisites
For this walkthrough, complete the following prerequisites:
- Have an AWS account
- Have a clear understanding of Amazon Virtual Private Cloud (Amazon VPC)
- Create the virtual networking environment for the purpose of this walkthrough as shown in Figure 1:
- Create Amazon VPC, MGN-Demo VPC.
- Create three subnets in the MGN-Demo VPC, Staging Area Subnet, Migrated Resources Public Subnet and Migrated Resource Private Subnet
- Create Internet gateway and attach it to the MGN-Demo VPC
- Create two Route tables, Public-MGN-Demo-RouteTable and Private-MGN-Demo-RouteTable
- Add internet route to the Public-MGN-Demo-RouteTable (Destination 0.0.0.0/0 with Internet gateway as target)
- Associate the Staging Area Subnet and Migrated Resources Public Subnet with the Public-MGN-Demo-RouteTable
- And associate the Migrated resource private subnet with the Private-MGN-Demo-RouteTable
- Launch an Amazon Elastic Compute Cloud (Amazon EC2) instance as a Bastion host in the Migrated Resources Public Subnet
- Create two security group, Public-MGN-Demo-SG and Private-MGN-Demo-SG
- Add inbound rules for HTTP and HTTPS ports from anywhere (0.0.0.0/0), and SSH port from the Bastion host public IP address to the Public-MGN-Demo-SG.
- Add inbound rules for MYSQL ports from Public-MGN-Demo-SG security group to the Private-MGN-Demo-SG and SSH port from the Bastion host private IP address.
- AWS MGN requires network connectivity to and from your on-premises environment and within your Amazon VPC. For more information on the detailed network connectivity requirement, check the Network Requirement Guide.

Figure 1 – AWS MGN migration architectural diagram.
Create IAM user for AWS Replication Agent
You need AWS credentials to use AWS MGN. Create an AWS Identity and Access Management (IAM) user and assign the proper permission policy to the user. Obtain an Access Key ID and Secret Access Key, which you would need to enter during the AWS replication agent installation on the source servers. Follow the steps found in generating the required AWS credentials.
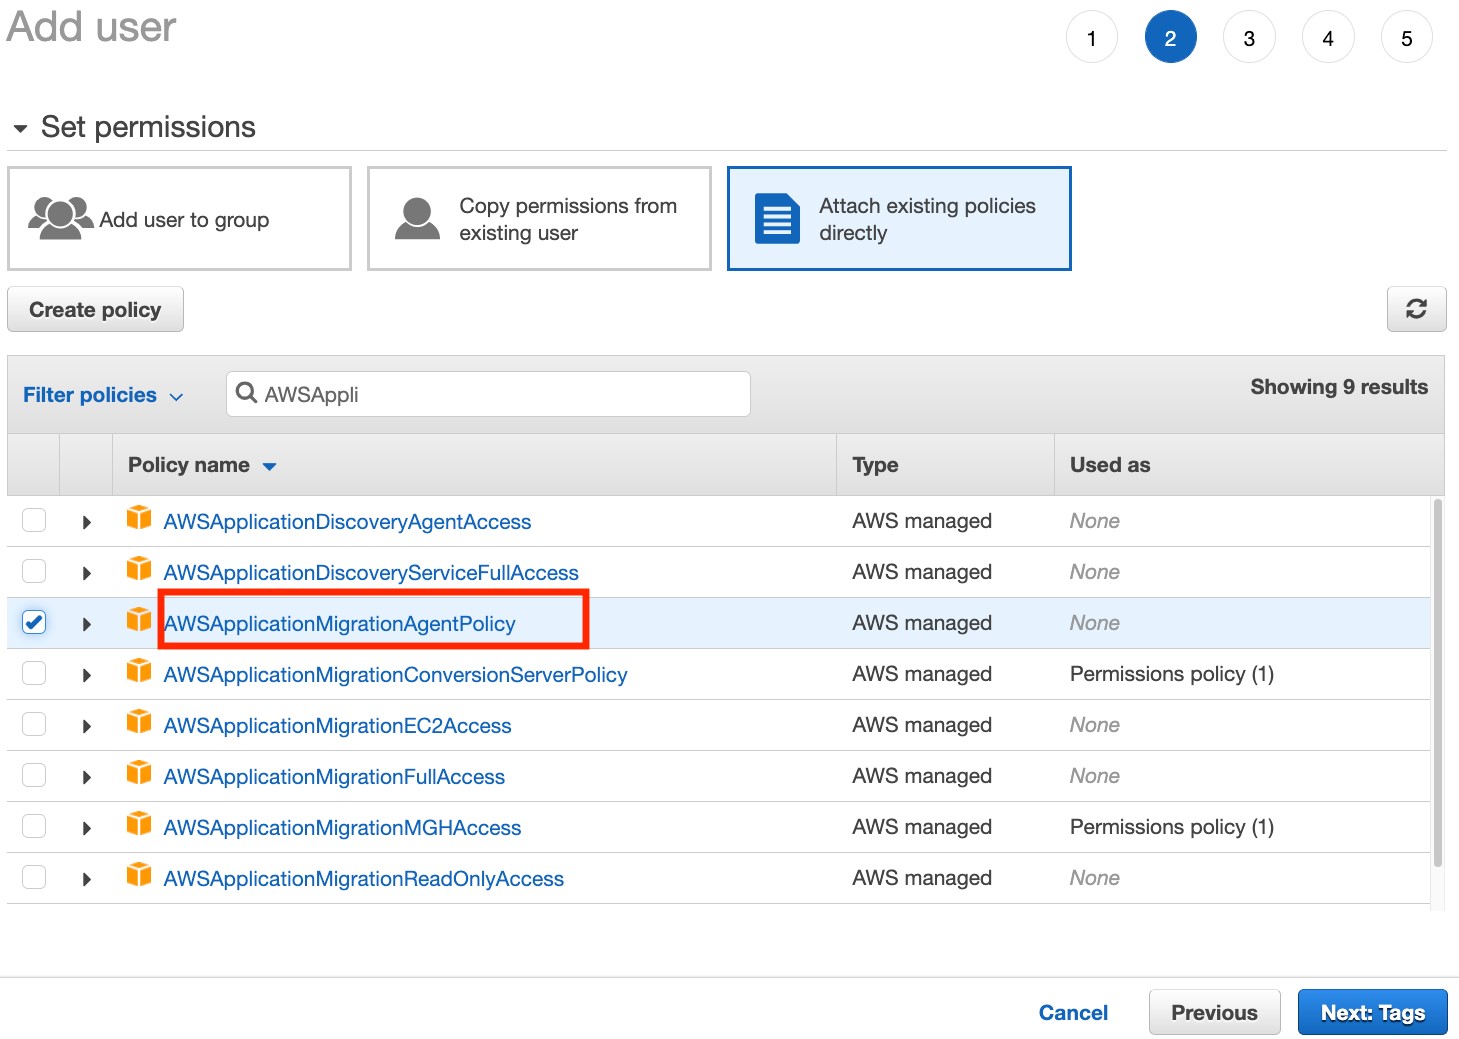 Figure 2 – Creating an IAM User and attaching policy.
Create the replication settings template
To migrate your servers from on-premises or another cloud service provider, create your replication settings to initialize the service for the first time in the AWS MGN console. You can access AWS MGN through the AWS console.
And, follow this guide for first time setup.
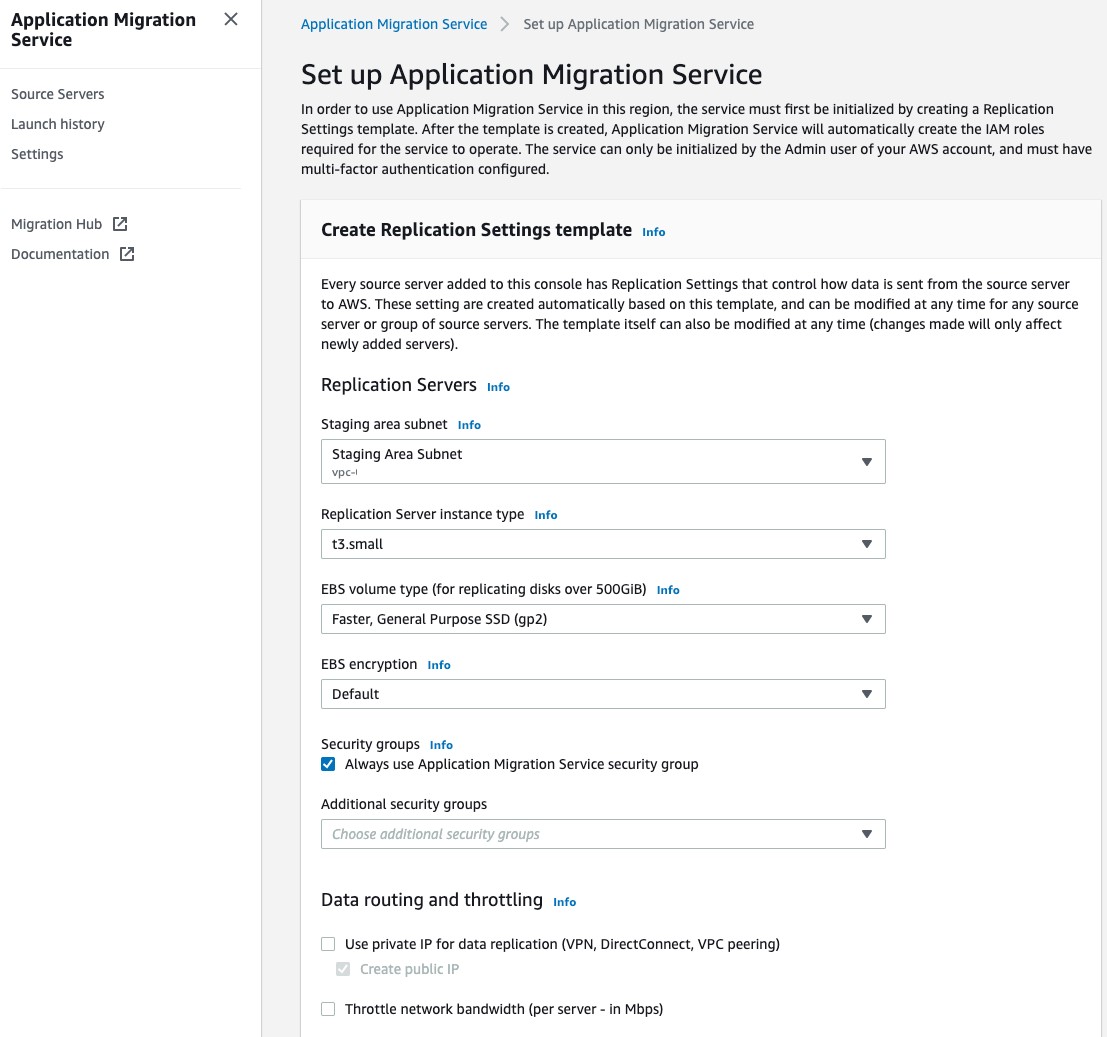 Figure 3 – Creating the MGN replication setting template.
Install the AWS replication agents
After AWS MGN has been initialized with the creation of the replication settings template, and you have generated the required AWS credentials with the necessary permission, now install the AWS replication agent on the source servers on-premises. There are separate installation instructions for Linux and Windows operating systems:
For the illustration, both source servers are running on Ubuntu 16.04 LTS. The Linux installation steps are as follows:
1. Download the agent installer.
wget -O ./aws-replication-installer-init.py https://aws-application-migration-service-us-east-2.s3.amazonaws.com/latest/linux/aws-replication-installer-init.py
Remember to replace the region with the AWS Region into which you are replicating; in this walkthrough the replication is set to us-east-2.
2. Once you download the agent installer, run the installation script.
sudo python3 aws-replication-installer-init.py
3. The installer prompts you to enter your AWS Region Name, the AWS Access Key ID, and AWS Secret Access Key. Use the Access Key and Secret Access Key that you saved earlier.
4. Once you have entered the credentials, the installer identifies the volumes for replication, and prompts you to choose the disks to replicate, press enter.

Figure 4 – MGN replication agent installation.
Repeat the same AWS replication agent installation process on all source servers.
After installing the AWS replication agent on the source servers, return to the AWS MGN console to validate the source servers in the console. Please note that the source servers are added to the AWS MGN console by installing the AWS replication agent on the source servers.
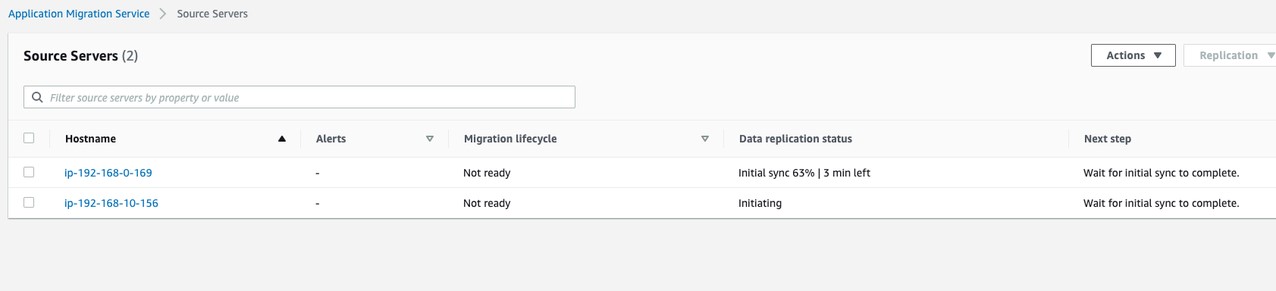
Figure 5 – Validating agent installation in MGN console.
After the initial sync is complete, the migration lifecycle displays Ready for testing and the data replication status displays as Healthy.
 Figure 6 – Source servers ready for testing in MGN console.
Configure the launch settings
Prior to testing or cutting over an instance, configure the launch settings. The launch settings are a set of instructions that determine how a test or cutover instance is launched for each source server in AWS.
Launch settings are comprised of two sections: general launch settings and Amazon EC2 launch templates.
Select each server, and select the tab for Launch Settings to edit the launch settings.
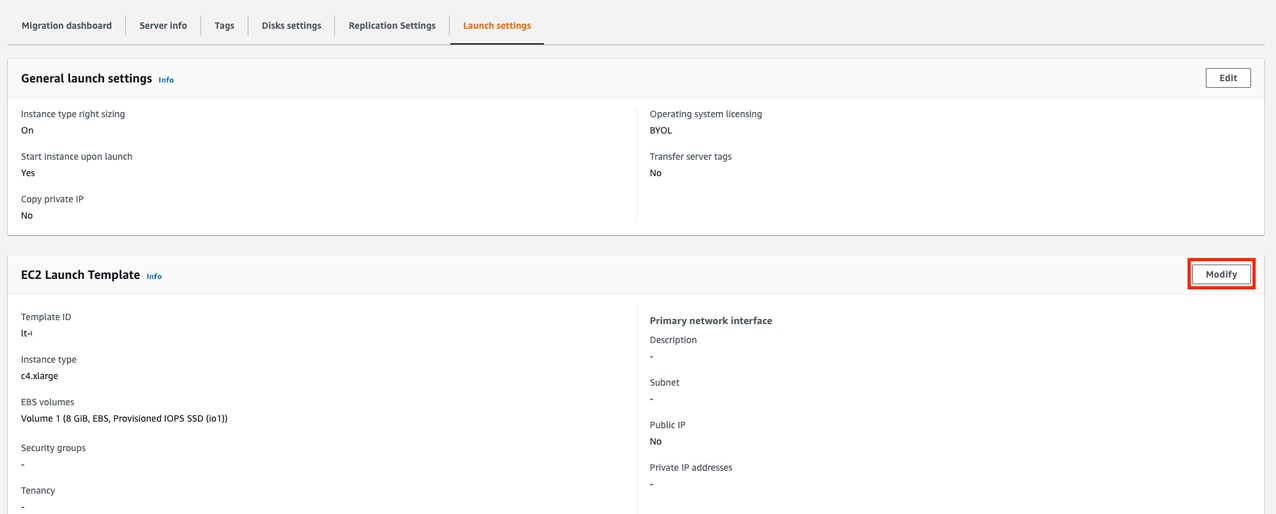
Figure 7 – Configuring launch settings for each source server in MGN console.
For this walkthrough, we will keep the default settings for the general launch settings. And, we will be making changes to the Amazon EC2 launch template, to place the App Server and DB Server in the right subnets, which you have created with the necessary security groups.
Amazon EC2 launch template modification for the App Server (source server):
Starting with the App Server, select modify in the Amazon EC2 Launch template window.
This would launch a new window for the Amazon EC2 Launch templates. Add a description for the Template version description.
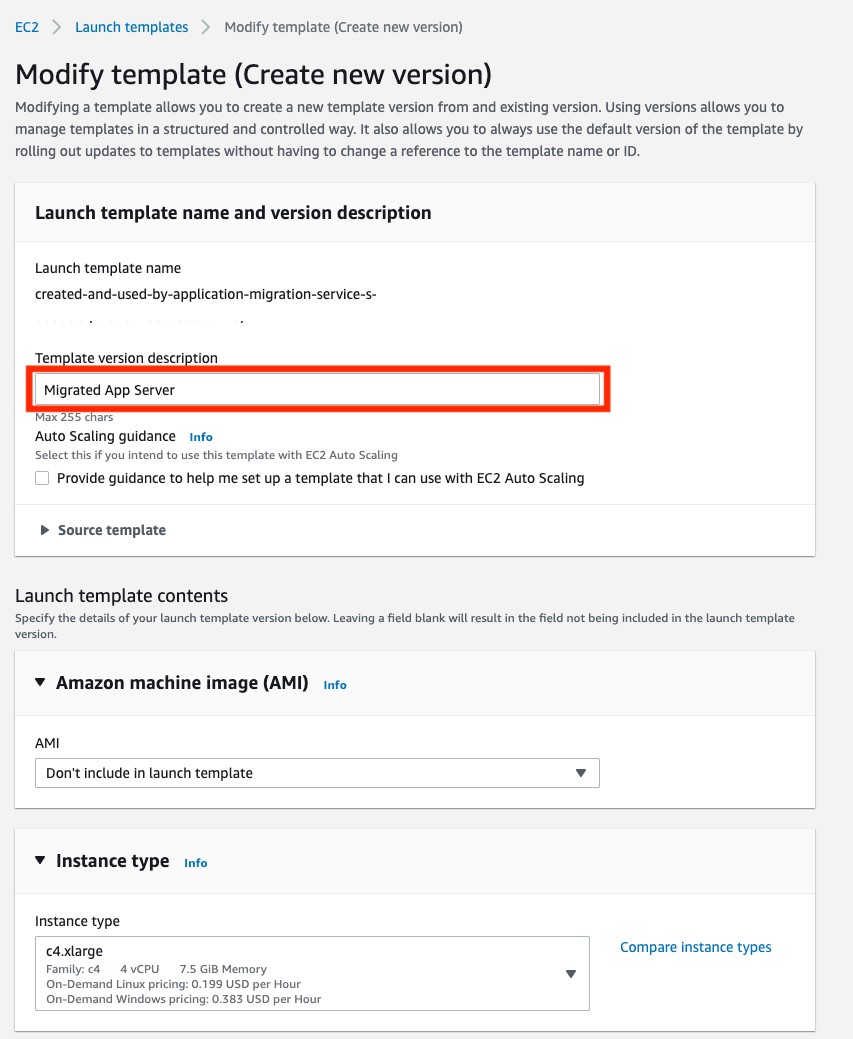
Figure 8 – Modifying Amazon EC2 launch template.
Navigate down to Network Interfaces. Under Subnet, choose the respective subnet, Migrated Resources Public Subnet for the app server, the Public-MGN-Demo-SG for Security groups, and select Enable under Auto-assign public IP for the public facing app server. Once done, select Create template version.
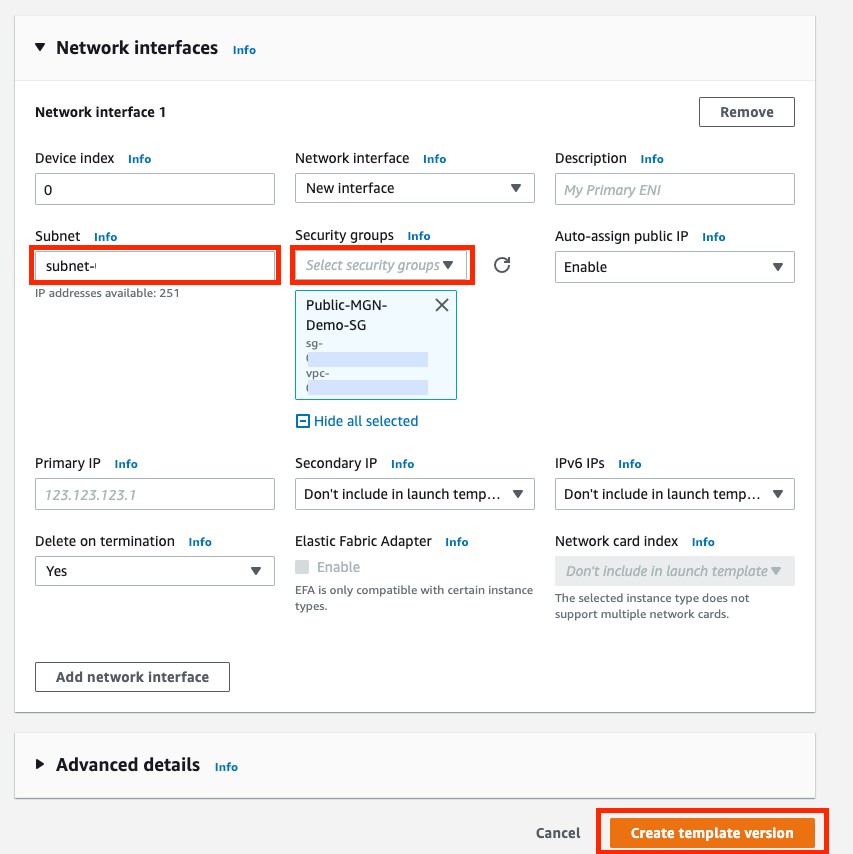
Figure 9 – Modifying Amazon EC2 launch template network interfaces for Source Server migration.
This launches a new window that shows you have successfully modified the EC2 Launch Template. Now, you would go ahead to change the default version that the EC2 launch template would use, select View Launch Template.

Figure 10 – The successfully modified Amazon EC2 Launch template window.
In the Launch template window that shows up, select the launch template ID, and select Actions in the top right corner, and then select the Set default version.
Hint: If you have more than one launch template ID, and you do not know the right one, return to the MGN console, select the right Source Server, under its Launch Settings, you would find the right Launch template ID.

Figure 11 – Updating and setting a new default launch template version.
The Set default version dialog box appears; select the Template version you just created and set as default version.
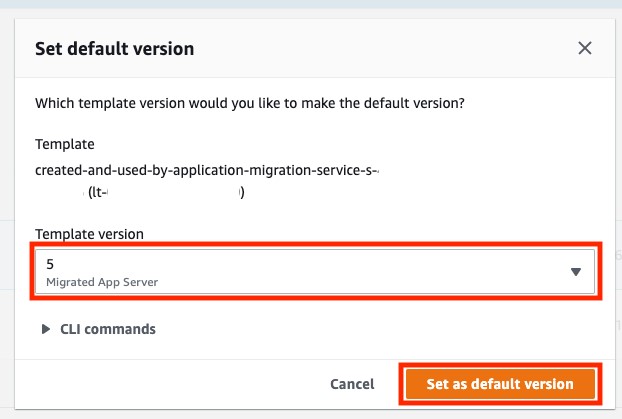
Figure 12 – Setting a new default launch template version.
Return to the AWS MGN console and select the source server for the app server. Under launch settings, find the updated Amazon EC2 Launch Settings.
 Figure 13 – Updated Amazon EC2 launch template in MGN console.
Amazon EC2 launch template modification for the DB Server (source server):
Repeat steps 1-9 to configure the launch settings for the DB Server.
1. Return to the MGN console and select the source server for the DB Server
2. Select the Launch Settings tab
3. Select Modify under the EC2 Launch Template
4. Add a description for the Template Version description
5. Navigate to Network Interfaces:
a. Under Subnet, choose the respective subnet, Migrated resource private subnet for the DB Server,
b. The Private-MGN-Demo-SG for Security groups
c. And leave the auto-assign public IP as disabled for the DB Server in a private subnet.
d. Once done, select Create template version.
6. On the successfully modified Amazon EC2 Launch Template page, select View Launch Template.
7. In the Launch template window, select the launch template ID for the DB Server, and select Actions in the top right corner, and then click on the Set default version.
8. The Set default version window dialog box appears. Select the Template version you just created and set as default version.
9. Return to the AWS MGN console. Select the source server for the DB Server; under launch settings find the updated EC2 Launch Settings.
Launch the test instances
Now, that you configured the launch settings for each source server, you are ready to launch the servers as test instances. Best practice is to test instances before cutover.
On the MGN console page, make sure that your source servers are ready for testing by looking at the following indicators as shown in Figure 14. The source servers are Healthy and Ready for testing.
 Figure 14 – Source servers in healthy and ready for testing state.
Check the boxes to the left of each server that you want to launch a Test Instance.
Select Test and Cutover in the top right corner, then select Launch test instances.
 Figure 15 – Launching a test instance in MGN console.
Select Launch in the Launch test instances dialog box.
 Figure 16 – Launch test instance window.
This takes you back to the MGN console page with the source servers. Make sure that the Migration lifecycle indicates that Test in progress, then select View job details in the top right corner to view the MGN job log details.

Figure 17 – MGN console migration lifecycle status.
Check the job status as it changes from Started to Completed. You can also view the job logs for more details.
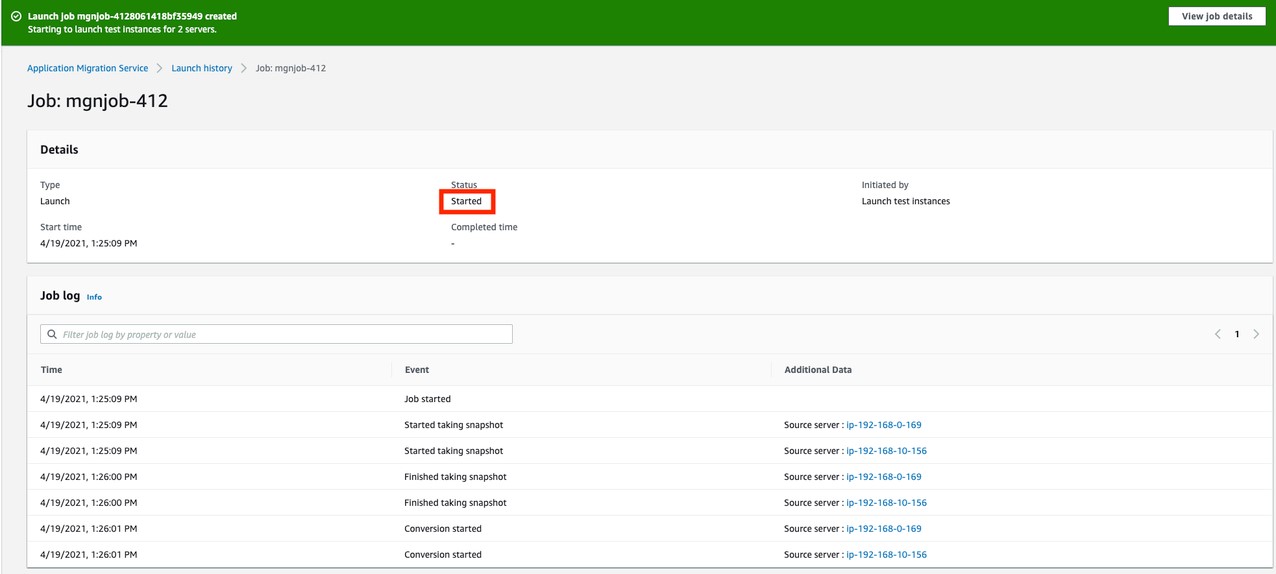
Figure 18 – MGN console job log.
Once completed, return to the MGN console Source Server page. Now the Alerts show up as Launched.
 Figure 19 – MGN console launched server alert.
Making configuration updates to the WordPress App Server with the new DB Server host:
- On the MGN console, select the test DB source server to access the Migration Dashboard.
- Under Lifecycle, select View in Amazon EC2 console to see the Amazon EC2 page.
- Obtain the private IP address for the DB Server; you will be updating the WordPress app server configuration file with this information.
- Return to the MGN console, select the test app source server to access the Migration Dashboard.
- Under Lifecycle, select View in Amazon EC2 console to see the Amazon EC2 page.
- Obtain the public IP address.
- Login to the test app server for WordPress, and update the database connection string:
sudo vi /var/www/html/wp-config.php
- In the wp-config.php file, update the test DB Server IP address.

Figure 20 – Changing the database host in wp-config.php.
Updating grant privileges in mySQL database:
Update your grant privileges in mySQL database for the test app server to assess the test database.
- Login to the database using the root password:
sudo mysql -u root -p
- Grant all privilege on the mySQL database for WordPress user. Replace DB_NAME with database name, DB_HOST with database IP address, and DB_PASSWORD with the password for the database.
GRANT ALL PRIVILEGES ON '<DB_NAME>'@'<DB_HOST>' IDENTIFIED BY 'DB_PASSWORD';
- Flush privileges to reload the grant tables.
FLUSH PRIVILEGES;
exit

Figure 21 – Updating grant privileges in database.
Launch the app in a web browser using the public IP address of the test app server.
 Figure 22 – Launched test server webpage in browser.
With a successfully launched application in the web browser, you can select Mark as “Ready for Cutover”. Cutover.
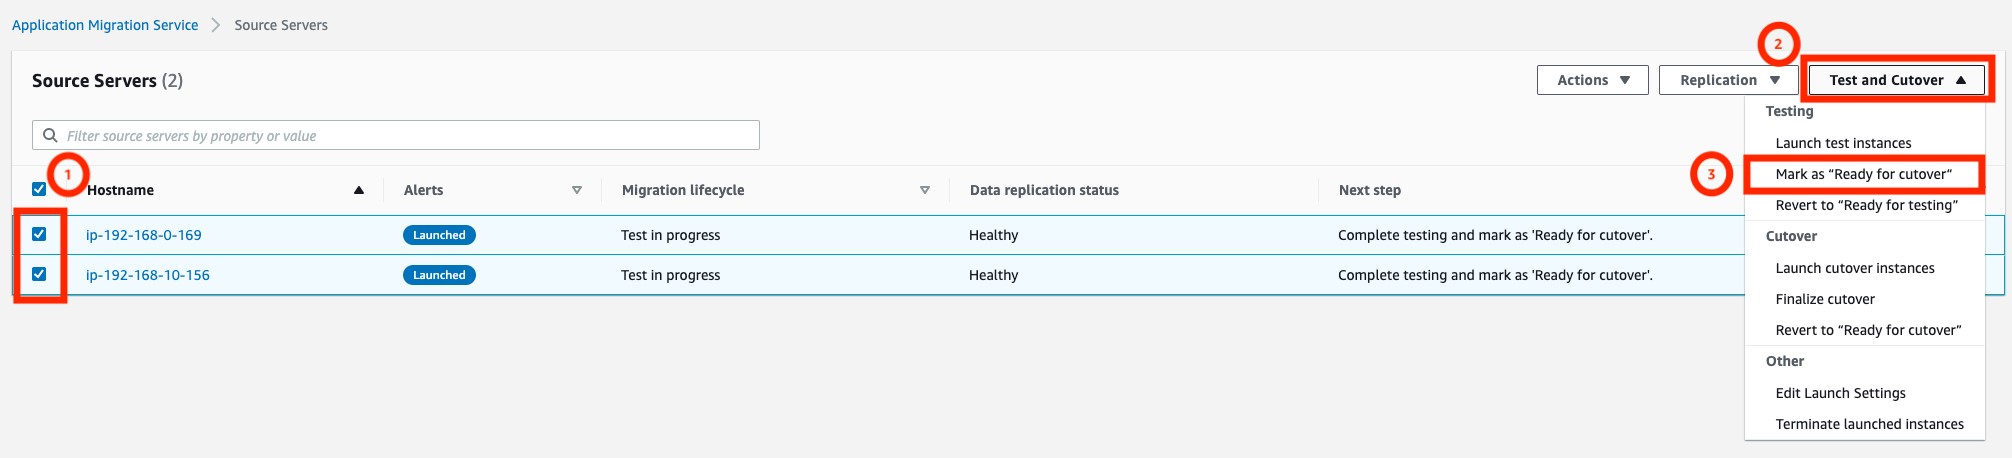 Figure 23 – How to select servers and mark them as “Ready for cutover:” check the boxes next to the server hostname; select the “Test and Cutover” dropdown menu, and then from the dropdown, select “Mark as ‘Ready for Cutover.’”
When the “Mark servers as ready for cutover” dialog box appears, choose continue. The source servers show up as ready for cutover in the MGN console.
Launch the cutover instances
After completing the testing of all the source servers, you are ready for cutover. Prior to launching cutover instances, ensure that the source servers are listed as Ready for cutover under Migration lifecycle and Healthy under Data replication status.
Once confirmed, check all source servers to be cutover, and then select Launch Cutover instances from the Test and Cutover dropdown menu.
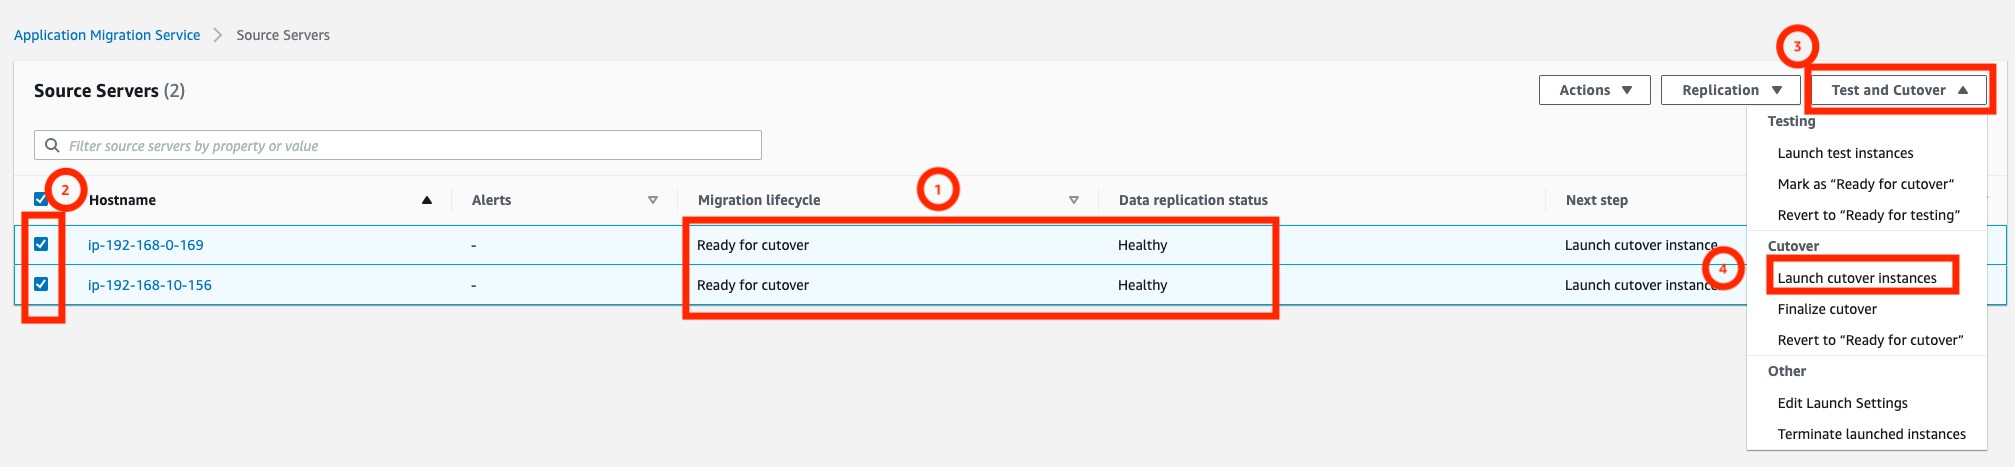 Figure 24 – Launching cutover instances.
The Launch cutover instances dialog box appears. Choose Launch to start the cutover.
On the MGN console, the source servers show up as Cutover in progress. Select view job details in the top right corner of the page to view the job details.
 Figure 25 – Cutover in progress.
 Figure 26 – Job details of cutover.
Once the job is completed, return to the MGN console page. The Alerts show up as Launched.
 Figure 27 – Launched cutover instance.
Follow the same steps for ‘Making configuration updates to the WordPress App Server with the new DB Server host’ and “Updating grant privileges in mySQL database’.
 Figure 28 – The migration dashboard.
 Figure 29 – The Amazon EC2 console.
Once you’re finished with the updates to the app and DB Servers, and connectivity is confirmed using a web browser to launch the application, and all other performance test has been performed, you can now make changes to the DNS records to point to the new app server.
 Figure 30 – Launched cutover server webpage in browser.
Finalize cutover
Now that you have successfully performed a cutover, you can finalize the cutover. This changes the source servers Migration Lifecycle status to Cutover complete. In addition, this terminates the Replication Server and all data replication is stopped and discarded.
In the MGN console, select the boxes next to the source servers that you want to finalize cutover. Select Finalize cutover from the pull down menu under Test and Cutover.
 Figure 31 – Finalize cutover.
When the Finalize cutover dialog box appears, choose Finalize. This changes the source servers Migration Lifecycle status to Cutover complete.
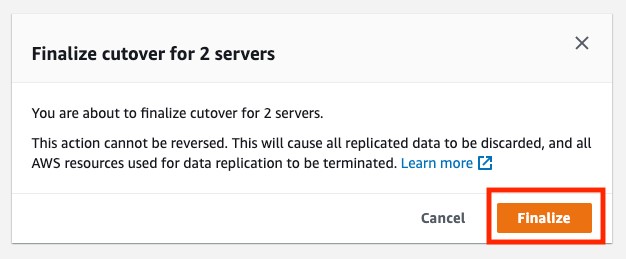
Figure 32 – Finalize the cutover for selected servers.
 Figure 33 – Cutover complete.
For cleanup, mark the source servers as archived. Archiving prevents the servers from being shown in the servers list page.
In the MGN console, check the boxes next to the source servers that you want to mark as archive, archiving servers prevents them from being shown in the servers list page. Select Mark as archived from the dropdown menu for Actions.
 Figure 34 – Mark as archived.
When the Archive Dialog box appears, choose Archive.
 Figure 35 – Archive dialog box.
The source servers are now archived and removed from the MGN console page.
Cleaning up
To avoid incurring future charges, delete the resources that we have created during the walkthrough and remove credentials created:
- Terminate the launched instances in MGN console
- Delete Amazon VPC and all associated resources
- Delete IAM User created for the AWS replication agent
Summary
You have now successfully migrated a content management system platform from on-premises (Simulated Cloud environment) to AWS using AWS Application Migration Service (MGN). Further modernization efforts can be performed in the AWS Cloud environment, by introducing auto-scaling and load balancing to the application layer to provide high availability; offload your media content to Amazon Simple Storage Service (Amazon S3); improve end-user experience with a content delivery network, Amazon CloudFront; secure your website using AWS Certificate Manager; and replatforming the Amazon EC2 based mySQL Database to Amazon Relational Database Service (Amazon RDS).
Get started on your migration journey with AWS Application Migration Service (MGN). Do you have questions about if MGN is a good fit for your organization’s needs? Reach out to us.
Subscribe to the AWS Public Sector Blog newsletter to get the latest in AWS tools, solutions, and innovations from the public sector delivered to your inbox, or contact us.