Business Productivity
Providing anonymity on customer service calls using Amazon Chime Proxy Phone Sessions
| August 2025: This feature is no longer available. For similar options please see Building a PSTN call forwarding solution with the Amazon Chime SDK & Two-way SMS messaging in AWS End User Messaging SMS. |
If you’re a company that provides customer service via phone where you engage a specialist for consultation with a customer, you are connecting two individuals for a limited amount of time. Unless you use masked phone numbers to connect those individuals, they may be required to share their personal phone numbers. We hear customers say that one issue they see with this approach is that it doesn’t provide customers with anonymity which brokers a sense of privacy and security. So, one of the features you can offer using Amazon Chime is anonymity by providing proxy phone numbers to connect these individuals. Baking in anonymity in your customer service calls can help you earn trust with your customers by providing privacy, and protecting your employees.
In this blog post, we demonstrate how you can leverage Amazon Chime’s proxy phone sessions to provide anonymity by using an example of a plumbing company connecting a customer with their plumber using proxy phone numbers. You can learn more about Amazon proxy phone sessions in a previous blog post about masking user phone numbers. Additionally, we extend the use case to see how you can use Amazon Chime’s native integrations with AWS services to record the phone calls made during a proxy phone session, subject to compliance with applicable legal requirements. Phone recordings can be important to a company to ensure that there is a record of the call for quality assurance and dispute resolution. Companies can also run sentiment analysis on the recorded phone calls using Amazon Transcribe and Amazon Comprehend for additional service quality analysis.
Note: Deploying this demo and receiving traffic from the demo created in this post can incur AWS charges.
Solution architecture
The following architecture diagram shows the steps to set up the demo application for creating Amazon Chime proxy phone sessions. In Step 1, you launch an AWS CloudFormation template to set up an Amazon Chime Voice Connector in your AWS account. Then, you can optionally launch another AWS CloudFormation template to enable recording on your Amazon Chime Voice Connector. In Step 2, you use the Serverless framework to deploy the demo application backend in AWS. Finally, in Step 3, you can deploy the frontend React application locally to test functionality.
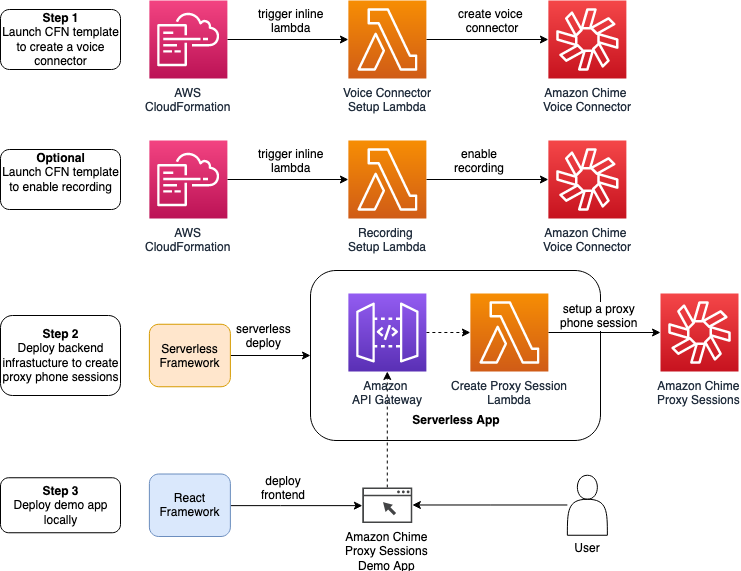
Amazon Chime Voice Connector Proxy Sessions Demo App Architecture
Pre-requisites
- Read the AWS whitepaper on the Amazon Chime Voice Connector.
- Read the blog post on Amazon Chime proxy phone sessions.
- Read documentation on how to set up an AWS account with administrator permissions.
- Use this solution in the AWS Regions of North Virginia (us-east-1) or Oregon (us-west-2).
- Install AWS CLI and npm in your workspace.
Tutorial
This solution uses Amazon Chime SDK, AWS CloudFormation, AWS Lambda, and the Serverless framework. The high-level steps are as follows:
- Create an Amazon Chime Voice Connector in your AWS account using an AWS CloudFormation template.
- Deploy a demo app in your AWS account using the Serverless framework.
- Deploy an AWS CloudFormation template to enable recording on the Amazon Chime Voice Connector you created in Step 1.
- Optionally explore additional use-cases such as speech analytics provided in another solution.
Deploy an Amazon Chime Voice Connector
This section explains how to set up an Amazon Chime Voice Connector to integrate your SIP-compatible voice infrastructure with Amazon Chime for making SIP voice calls. In order to create a streamlined and a repeatable experience, I have provided an AWS CloudFormation template to set up your Amazon Chime Voice Connector.
- Sign in to the AWS Management Console with your primary account and switch to the US east (N. Virginia) Region. Note: The AWS CloudFormation template in this section needs to be launched in US east (N. Virginia) Region.
- Download the AWS CloudFormation template for setting up an Amazon Chime Voice Connector.
- Under Services, navigate to AWS CloudFormation, and choose Create New Stack > With new resources (standard).
- Under Specify template, choose the upload a template radio button, and upload the file you downloaded in step 2. Choose Next.
- On the Specify Details page, enter the following information:
- Stack name – The name of the stack for creating an Amazon Chime Voice Connector. Enter ‘voice-connector-stack-01’.
- Region – The AWS Region where you want to create an Amazon Chime Voice Connector. Choose between N. Virginia (us-east-1) or Oregon (us-west-2).
- VoiceConnectorName – Enter the name of the Amazon Chime Voice Connector to be created in this process
- EnableEncryption – Choose if you want to enable encryption for the Amazon Chime Voice Connector
- The following image shows the Specify Details page.

- Choose Next, and then Next on the Configure stack options page.
- On the Review page, check the I acknowledge that AWS CloudFormation might create IAM resources check box, and then click Create.

Creating the stack generates 3 outputs,voiceconnectorName, voiceconnectorId, and OutboundHostName, as shown in the following image. Have these values ready for the next step.

Set up a proxy phone session app
This section explains how to set up a proxy phone session app using a fictional example to see how a proxy phone session can be set up in the real world. AnyCompany Plumbing is a fictional company which provides plumbing repair, sewer and drain services, and water damage cleanup services to customers. You deploy a sample app called Puppies Plumbing Inc to schedule calls with plumbing professionals for consultation. When you set up a consultation with a plumbing professional, the app sets up a proxy phone session between you and the professional, and presents an anonymous phone number for the conversation. Once you dial the anonymous phone number, you are connected to an available plumbing specialist without revealing your real phone number.
This demo uses the Serverless framework to deploy a simple web application in AWS. The application is served through an endpoint on Amazon API Gateway, calls are made to the Amazon Chime proxy phone session APIs using AWS Lambda, and the frontend is written using the React framework.
Backend deployment
1. Clone the project from GitHub.
git clone https://github.com/aws-samples/amazon-chime-proxy-sessions-demo.git
2. Create environment variables in your backend configuration by running the following commands. This file contains configuration about your Amazon Chime Voice Connector
$ cd chimeproxy-backend
$ touch .env
3. Enter the following information in the .env file using a text editor of your choice. Note: Refer to the env_sample for format.
VOICE_CONNECTOR_ID=<Enter the AWS Chime voice connector ID created in Step 1>
USER_NUMBER=<Enter US phone number 1 to test (eg. +12052051001)>
PROVIDER_NUMBER=<Enter US phone number 2 to test (eg. +12052051000)>
EXPIRY_MINUTES= <Enter proxy session expiry time in minutes (1-720)>
Note: Make sure you enter valid US phone numbers you have access to in USER_NUMBER and PROVIDER_NUMBER. This allows you to test the proxy sessions functionality.
4. Deploy the Serverless backend for the demo app by running the following commands.
$ npm install
$ export AWS_ACCESS_KEY_ID=<your-key-here>
$ export AWS_SECRET_ACCESS_KEY=<your-secret-key-here>
$ export AWS_DEFAULT_REGION=<region-where-you-installed-voice-connector>
$ serverless deploy --region <region-where-you-installed-voice-connector>
The output should look like this:

5. Copy the API Gateway endpoint URL. It should be in the following form: https://********.execute-api.us-east-1.amazonaws.com/dev/
Frontend deployment
In this section, you learn how to set up a simple web app written in the React framework in your local environment. Once you set up this app locally, you are able to set up an Amazon Chime proxy phone session.
1. Create environment variables in your frontend configuration by running the following commands
cd ../chimeproxy-frontend && touch .env
2. You should now have an .env file in your chimeproxy-frontend folder. Now, you can use any code editor of your choice to enter the API Gateway URL you copied from backend section in the .env file. Note: Refer to the env_sample for format.
REACT_APP_API_URL=<YOUR API GW URL> (eg. https://hn4cq*****.execute-api.us-east-1.amazonaws.com/dev/)
3. Once the configuration for your frontend is entered, you can run the following commands in the chimeproxy-frontend folder to set up your frontend server locally.
npm install
yarn start
4. Open your browser and navigate to http://localhost:3000 to start testing

5. Click on “Set Up Proxy Phone Session” to set up a proxy phone session between the 2 phone numbers you provided in the backend section.

Record proxy session phone calls for quality assurance
Disclaimer: You and your end users understand that recording Amazon Chime Voice Connector calls maybe be subject to laws or regulations regarding the recording of telephone calls and other electronic communications, and that it is your and your end users’ responsibility to comply with all applicable laws regarding the recording, including properly notifying all participants in a recorded session or to a recorded communication that the session or communication is being recorded and obtain their consent.
If you are a service provider, where you want to the additional functionality of proxy phone sessions as a part of your service, you may also want to record phone sessions between the service provider and customers. These call recordings can provide a variety of benefits such as gathering call quality metrics, providing business protection during disputes, individual feedback for service providers, and analyzing calls with speech analytics.
Once you’ve figured out the legal requirements regarding the recording notice and consent in your solution, you can use Amazon Chime Voice Connector to record phone calls made during a proxy phone session, and send them to Amazon Kinesis Video Streams for processing.
You can use the following AWS CloudFormation template to set up recording on your Amazon Chime Voice Connector.
- Sign in to the AWS Management Console with your primary account and switch to the US east (N. Virginia) Region.
- Download the AWS CloudFormation template for setting up recording on an Amazon Chime Voice Connector.
- Under Services, navigate to AWS CloudFormation, and choose Create New Stack > With new resources (standard).
- Under Specify template, choose the upload a template radio button, and upload the file you downloaded in step 2. Choose Next.
- On the Specify Details page, enter the following information:
- Stack name – The name of the stack for creating an Amazon Chime Voice Connector. Enter
AWSChimevoiceconnectorRecordingSetup. - Data Retention Hours -Sets the data retention period for media streaming from the Amazon Chime Voice Connector to Amazon Kinesis. (up to 7 days, i.e 168 hours)
- Region – Enter the Region where you want to enable Amazon Chime Voice Connector recording. Choose between N. Virginia (us-east-1) or Oregon (us-west-2).
- StreamingNotificationTarget – Choose the notification target after media streaming is enabled for sending to Amazon Kinesis. Choose between Amazon EventBridge, Amazon SNS, or Amazon SQS.
- voiceconnectorId– Enter the Amazon Chime Voice Connector Id from the previous section where you created a new Amazon Chime Voice Connector Id for your AWS account
- Stack name – The name of the stack for creating an Amazon Chime Voice Connector. Enter
- The following image shows the Specify Details page.

Add speech analytics to recorded audio
Once you have recordings of audio calls between service providers and customers, you can use AWS services like Amazon Transcribe to transcribe recorded audio to text, and Amazon Comprehend to analyze customer sentiment. You can refer the GitHub repository for AI-powered Speech Analytics with Amazon Chime Voice Connector to understand how you can start generating transcripts, in addition to sentiment analysis for your recorded proxy phone sessions.
Clean up
Please delete all the AWS resources created as a part of this set up to avoid incurring any charges.
To remove AWS resources created in your account due to this exercise, you can perform the following steps:
- Go to the AWS CloudFormation console, and delete the stack created for setting up the Amazon Chime Voice Connector
- To delete the backend resources created for this exercise, navigate to the folder where you have cloned the repository and run the following commands:
$ cd chimeproxy-backend
$ serverless remove --region <region-where-you-installed-voice-connector>
Conclusion
Companies can earn trust with their customers by providing anonymity in their customer service calls, with added benefits of employee protection, and recording for quality assurance. In this blog post, you learned how to use Amazon Chime Voice Connector to create proxy phone sessions between two parties to provide anonymity. You also learned how to set up recording of these phone sessions so that you can conduct analysis on these phone calls.
As a next step, you can explore how you can solve similar problems around caller anonymity in your business using Amazon Chime. Proxy phone sessions are available in the US east (N. Virginia) Region and US-West (Oregon) Regions, at low pay-as-you go pricing. To get started with proxy number sessions, read our developer guide.