Artificial Intelligence
Deliver personalized customer support experiences with Amazon Connect, Amazon Lex, and Salesforce
The last year has made delivering high-quality customer contact center support extremely challenging. Consumers have increasingly abandoned brick-and-mortar retail shopping and traditional banking in favor of digitally enabled experiences, which brings unprecedented call volumes to contact centers. In many cases, call center staff are also working remotely, which makes it even more difficult to meet the scaling demand for agent resources. As a result, callers have to wait a long time in queues (with a 34% increase in hold times for customer service calls), no matter how complex or simple their inquiry is. When they get to speak with an agent, most often they go through a scripted conversation where they have to repeat information (reason for calling, identify themselves, and so on) that they might have already provided.
One way to reduce wait times and achieve a better customer experience is to use call center automation in combination with personalization. Using a bot to receive and answer calls means that customers don’t have to wait in the queue. They can immediately perform trivial tasks, such as asking for information, updating account details, booking appointments, approving payments, and more. Because the bot has more context for identifying customers, it can skip unnecessary questions, use more relevant information, and deliver a quicker and frictionless customer experience. In addition, treating customers as individuals through a personalized contact center experience can have a positive impact on your brand and customer loyalty.
In this post, we show how you can integrate Amazon Connect, Amazon Lex, and Salesforce to deliver exceptional customer experiences. We cover the following scenarios:
- Customer lookup – When a customer calls the contact center, it fetches customer attributes from Salesforce and delivers a personalized greeting message for existing customers
- Customer creation – If the customer record doesn’t exist, collect the essential information and create a new customer record
- Customer updates – If the customer record does exist, update new details for the same customer
- Schedule appointment – Make an appointment for the customer
Overview of Solution
This solution uses the following services:
- Amazon Connect – An omnichannel cloud contact center service
- AWS Lambda – A serverless compute service
- Amazon Lex – Automatic speech recognition engine (ASR) and natural language understanding (NLU)
- Salesforce – Specifically, a Salesforce account with customer records
- AWS Secret Manager – A service to rotate, manage, and retrieve database credentials, API keys, and other secrets
The following diagram illustrates our solution architecture.

The sequence consists of the following steps:
- A customer calls the contact center and the call is sent to the Amazon Connect Interactive Voice Response (IVR) system.
- The IVR initiates a Lambda function, which gets the Salesforce credentials from Secrets Manager and performs the customer lookup using a phone number. If the record exists, the function fetches the customer attributes and passes it to Amazon Lex.
- Amazon Connect captures the customer’s input and passes it to Amazon Lex along with the customer attributes fetched in Step 2.
- Amazon Lex classifies the intent based on customer input.
- If the customer wants to book an appointment, Amazon Lex initiates a Lambda function for fulfillment and schedules the appointment in Salesforce.
The following screenshots show the Salesforce records for the customer visit updated after the customer call.

Design Considerations and Benefits
In this design, Amazon Connect invokes Lambda to perform a lookup with Salesforce to check if the customer record exists before invoking Amazon Lex. This way, Amazon Connect can control the flow of the call and decide whether it needs to send the call to other flows, trigger other Lambda functions, or invoke Amazon Lex to fulfill the caller’s intent.
For example, if it can’t find the customer record, it may play a prompt stating that the customer might need to go to a website and create their identity first and then route the call to the different bot to help them, or trigger a different workflow that routes the call to an agent who can help with that.
Additionally, Amazon Connect can pass customer details in session attributes to Amazon Lex so that it can drive a personalized customer experience.
Prerequisites
For this walkthrough, you should have the following:
- An AWS account
- An existing Amazon Connect instance
- Access to AWS services:
- AWS Identity and Access Management (IAM), with access to create policies and roles
- Amazon CloudFront, with access to create a distribution
- AWS CloudFormation to run the stack
- A Salesforce account with API access enabled.
- An IAM access key and secret access key credentials to access your instance quick connects using the APIs
Salesforce Setup
In case you have no access to a Salesforce account, you can sign up for a free development account. Please be aware that API access is not available for all Salesforce CRM editions per default. Additional information about Salesforce CRM editions with API access can be found here: Salesforce editions with API access.
The Salesforce CRM integration used in this solution makes use of the OAuth 2.0 Username-Password Flow. This authentication method requires a Connected App and an API user to be created in Salesforce CRM.
The user security token is required when using the username-password flow with an API as done in this example.
Please note the consumerkey, consumersecret, password, securitytoken, username and endpoint values which you will be asked to provide during the following walkthrough.
Walkthrough overview
These instructions assume a general working knowledge of Amazon Connect and AWS CloudFormation. For details on how to perform basic administration tasks with either, see the following:
Deploy the CloudFormation template
AWS CloudFormation automatically creates the necessary IAM roles for the Lambda function salesforceintegration, which can create, update, and delete customer records and schedule appointments.
Choose Launch Stack to create a stack called SalesforceIntegration:
![]()
Select Next to continue with the default parameters in step 1: Specify template.
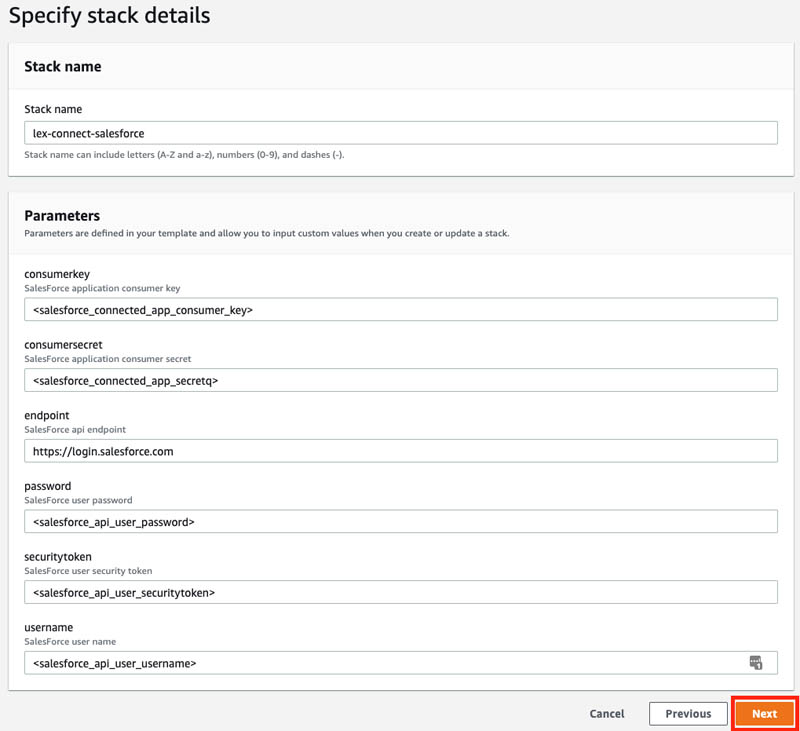
The following parameters need to be specified in step 2: Specify stack details section of the CloudFormation Create Stack process:
consumerkeyconsumersecretpasswordsecuritytokenusernameendpoint
consumerkey and consumersecretare parameters that identify the Salesforce Connected App.
user, password and securitytoken are related to the Salesforce API user.
endpoint specifies the Salesforce CRM OAuth2 login URL. The value https://login.salesforce.com is compatible with the use of a Salesforce CRM development test account.
Fill in the required parameters as shown in the following screenshot and select Next to continue with the stack creation.
No additional steps are required in step 3: Configure stack options. Select Next to continue to step 4: Review.
Review the stack configuration in the last step, scroll down to the bottom of the page and select the CAPABILITY_IAM permission check box as shown in the following screenshot.

Select Create stack to start the stack creation process.
Give Amazon Connect Access to the Lambda function
To grant the Amazon Connect instance permission to invoke the Lambda function previously created, complete the following steps. For additional information, see the Amazon Connect Administrator guide.
- On the Amazon Connect console, under Routing in the navigation pane, choose Contact flows.
- Navigate to the Lambda section of the page.
- On the Function menu, choose the
salesforceintegrationfunction. - Choose +Add AWS Lambda function.
Import and configure the Amazon Connect contact flow
The Salesforce_Integration contact flow performs the following functions:
- Send the customer phone number to Lambda
- Receive the customer type (new or existing) from the Lambda function
- If the customer type is new, create the customer identity in Salesforce
- If the customer type exists, ask the intent
For this post, we configure the flow to schedule an appointment, but will expand to more complex intents in future posts.
To set up the contact flow, complete the following steps:
- Download the contact flow called Salesforce_Integration.
- On the Amazon Connect console, under Routing in the navigation pane, choose Contact flows.
- Choose Create contact flow.
- On the drop-down menu, choose Import Flow.
- Choose Select to import the downloaded file from Step 1.
- Choose the header for the first Invoke AWS Lambda function . Then choose the salesforceintegration function on the drop-down menu or enter the ARN for the function.
The follow screenshot shows the imported contact flow in the Amazon Connect console.

Testing the solution
To test the proposed solution, first you have to create a new Business Account in Salesforce and associate it with the phone number you will be calling from. An introduction of how to create a new business account with a phone-number can be found here.
The phone number must be specified in the international format (including the +) to be compatible with Amazon Connect.
The following screenshot shows you the creation of a new Business account in Salesforce.

The salesforceintegration Lambda function queries Salesforce based on the incoming phone number and returns the associated account name. If this value has not been set, Null will be returned instead.
In the Amazon Connect console on the left-hand side choose Routing > Phone Numbers.
Click on the phone number: Under Contact flow / IVR select Salesforce Integration and Save.
Call into the Contact Flow from the same phone number you stored into the Salesforce record to listen to the personalized greeting and proceed with the appointment booking.
Clean up
To avoid incurring future charges, remove all the resources you created by deleting the CloudFormation stack.
Conclusion
In this post, we implemented a solution that integrates Salesforce with Lambda functions that perform the following actions:
- Performs a data dip into Salesforce
- Queries Salesforce and fetches customer attributes
- Schedules an appointment for the customer if the record is found
This is a basic demonstration. You can enhance the solution by adding different scenarios as needed based on your organization’s requirements.
With Amazon Connect, you only pay for what you use. There are no required upfront payments, long-term commitments, or minimum monthly fees. The price metrics for these new capabilities are detailed on Amazon Connect pricing.
If you need help with adding any of these Amazon Connect capabilities to your contact flows, reach out to one of the dozens of Amazon Connect partners available worldwide.
About the Authors
 David Dornseifer is a Blockchain Architect with the Amazon ProServe Blockchain team. He focuses on helping customers design, deploy and scale end-to-end Blockchain solutions in production on AWS. He is also passionate about Machine Learning, particularly Conversational AI, and the question of how these emerging technologies can be connected to provide the best solution for the challenges customers face.
 Harry Doukas is a Senior Conversational AI Consultant with the Amazon ProServe Natural Language AI team. He focuses on helping customers design, deploy and scale end-to-end Conversational AI solutions in production on AWS. He is also passionate about improving customer experience and drive business outcomes by leveraging data.
 Dipkumar Mehta is a Senior Conversational AI Consultant with the Amazon ProServe Natural Language AI team. He focuses on helping customers design, deploy and scale end-to-end Conversational AI solutions in production on AWS. He is also passionate about improving customer experience and drive business outcomes by leveraging data.