AWS Public Sector Blog
Getting started with healthcare data lakes: A deeper dive on Amazon Cognito
In my last post on getting started building a data lake for healthcare with Amazon Web Services (AWS), we built a solution that used the basics of Amazon Cognito for authentication, endpoints provided by Amazon API Gateway, processing in AWS Lambda, and storage in both Amazon Simple Storage Service (Amazon S3) and Amazon DynamoDB.
In this blog post, I focus on improving our security posture by incorporating the relatively new Attribute Based Access Control (ABAC) feature of Amazon Cognito to both streamline and improve the granularity of access control.
Code samples are provided through the Git repo. The repository has gone through significant modifications since the last update, and I walk through other changes and design decisions in future articles.
A brief overview of OAuth 2.0 and OpenID Connect
Before discussing how Amazon Cognito works, I want to start with the two most important underlying protocols: OAuth 2.0 and OpenID Connect (OIDC). These are robust protocols, so I only cover the basics.
OAuth 2.0 is a means to provide limited delegated authorization (AuthZ) to access resources on behalf of a resource owner. As an example, say we have Service-1 which holds resources (typically data) on behalf of a resource owner (typically a user). If Service-2 requires access to the resources within Service-1 to perform a function, it can establish a relationship with Service-1 with a defined scope of access. When Service-2 then wants access to resources for a specific resource owner, it directs the owner back to Service-1 which informs the owner of the scope being requested and allows the owner to approve or reject consent.
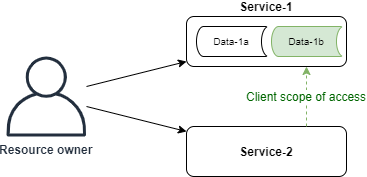
Figure 1. The scope of access between Service-1 and Service-2.
The benefits of this are immediately apparent: Service-2 (the client) never gets access to the owner credentials for Service-1, the scope of the resources it can access are limited and approved by the owner, and Service-2’s access can be later revoked at any time.
Under OAuth terminology, Service-1 is operating as both a “resource server” (holder of resources) and an “authorization server” (granter of access to the resource server and facilitator of user consent), while Service-2 is operating as a “client”.
OIDC builds on the delegated authorization provided by OAuth by providing an additional layer to facilitate authentication (AuthC) between the resource owner and the client. In OIDC, after the client successfully requests access from an authorization server, it further receives an ID token that contains claims (key-value pairs) such as who the user is, who issued the token, who the token is intended for, the expiration date, and user attributes such as email address; these tokens are formatted as JSON Web Tokens (JWT).
The most prevalent use of these protocols in the healthcare space is SMART on FHIR, which further builds on OIDC in detailing how FHIR-specific entities are to be included and how applications such as electronic health records (EHRs) are to process and respond to such requests.
Amazon Cognito components overview
The most fundamental component is the user pool. This is a repository of users which can be stored directly in Amazon Cognito, or federated through a third-party identity provider (IdP) such as Amazon, Google, or Facebook. This is where administrators can manage things like user attributes (ex. username, password, email, etc.), user policies (ex. password strength, allow self sign-up, MFA, etc.), and triggers on workflows (ex. define an auth challenge such as CAPTCHAs or dynamic challenge questions).
The user pool is accessed through one or more app clients (aka “user pool clients”). Each app client is customized on parameters like which scopes (user attributes or resources) it is allowed to read or write, what OAuth flows are allowed, how long issued tokens are valid for, and so on.
To obtain AWS credentials, we use identity pools. The identity pool provides a means to federate with IdPs—such as Amazon Cognito user pools—and issue temporary, limited-privilege AWS credentials—as defined in AWS Identity and Access Management (IAM)—to access other AWS services.
Reviewing previous posts in this series
In the last blog of this series, I showed you how to implement a very simple AuthC and AuthZ scheme using one of the common Amazon Cognito scenarios. I established a user pool, an app client for the user pool, and an API Gateway HTTP endpoint using a JWT authorizer that was configured to validate from the ID token that the “Issuer” (where the token originated) was my user pool and the “audience” (who received the token) was my app client.

Figure 2. The prior architecture with simple AuthZ that we created in the last blog post in this series.
While this approach provides solid AuthC, our AuthZ is limited to only validating that the user is in the user pool and that the token was issued to the client app. One further enhancement could be to further narrow AuthZ to the HTTP API route based on the scope(s) permitted to the client app, though in my case this has limited value since I do not have multiple client apps for the same user pool.
What other options are available
While the built-in API Gateway AuthZ determines if the caller is permitted to access the route (effectively the operation), it can often be required to consider both the route/operation and the data with which it is being called. The common solution to this is to build additional authorization logic within the backend resources using the claims in the caller token; this however adds more moving parts to maintain and can quickly spiral as our number of services and endpoints grow. Another option is to use a custom Lambda authorizer, but that would only move the issue and further lose the benefits that the JWT authorizer already provides.
What I would like to do is utilize the rich and fine-grained access control capabilities of IAM by leveraging identity pools. This is especially true with the recent addition to identity pools of attribute based access control (ABAC). By doing so, I can keep my AuthZ far more streamlined and with a great degree of centralized control.
The common Amazon Cognito scenario for this has the user exchange the ID token received from the user pool client app for AWS credentials from an identity pool. The user would then use the AWS credentials to directly access AWS resources.

Figure 3. User providing JWT to get AWS credentials for direct resource access.
While this is sufficient for cases where the user is directly accessing services such as Amazon S3 or Amazon DynamoDB, it is not always suitable to more complex cases that may be better handled through the capabilities provided by an API Gateway.
One option for initial consideration is using IAM authorization with the API Gateway where the user would call the HTTP endpoint using their AWS credentials; in my case however, this does not provide any additional benefit from other AuthZ mechanisms since any backend services are called by the role assumed by the API Gateway, not the caller’s. To illustrate, we can think of AuthZ as a “chain” where each “link” is usually a different role and is assessed independently.
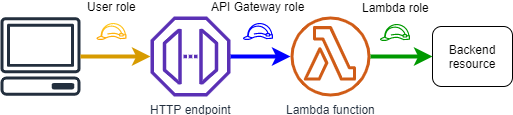
Figure 4. The chain of access in which each “link” is unique and assessed independently.
Even where WebSocket API’s allow for the backend Lambda to be invoked with the caller credentials, we still require AuthZ logic within the Lambda itself.

Figure 5. The chain of access reusing the user role, but still requiring a new role for Lambda.
Another pattern, not quite so common, can come in handy to accomplish what I am looking for. When the user calls an HTTP API using JWT authentication with an ID token, this token is passed to the backing service; from there it can be exchanged for AWS credentials associated with the user, assuming their role when calling further services.
 Figure 6. Utilizing the user role within the Lambda.
This pattern allows for additional granularity into the roles. Beyond the simple cases of controlling direct access to resources like S3 and DynamoDB, it could combined with other solutions such as serverless tokenization.
The scenario I will walk you through covers the following requirements:
- Data stored in the data lake is being provided directly by external users;
- Each user is associated to one specific institute and can be assigned read privileges, write privileges, or both;
- Users may only access data from their institute; and
- Users are to go through an API Gateway instead accessing resources like S3 directly.
Prerequisites
To deploy this project you will need:
- An AWS account with adequate permissions. If you do not have an AWS account, create and activate one
- The AWS CLI
- Basic knowledge of Python scripting. The scripts used for both coding and deployment are in Python and we use “boto3“, the AWS SDK for Python.
Environment setup
As with the prior blog posts in this series, I will be using AWS Cloud9 as my development environment.
1. Setup Cloud9 as per the “Creating an EC2 Environment” instructions.
2. Clone the Git repository:
git clone -b blog_3 https://github.com/aws-samples/hcls-data-lake.git
3. Switch to the new ‘hcls-data-lake’ directory and then configure the Cloud9 environment
sh cloud9_init.sh
4. Deploy the services. Replace “$MY_STACK_NAME” with a name of your choice. This will take several minutes to complete.
python deploy_services.py -s $MY_STACK_NAME
This blog post only covers a small sub-segment of the files that cover the AuthC and AuthZ features.
Walkthrough
Defining our policy in the Amazon Cognito artifacts
In order to use ABAC, a few additions are needed from my previous Amazon Cognito artifacts, primarily found within our auth_service package folder.
First, within the auth_stack.yml file, which is the CloudFormation template for the auth service, there is the following UserPool resource:
  UserPool:
    Type: AWS::Cognito::UserPool
    Properties:
      AdminCreateUserConfig:
        AllowAdminCreateUserOnly: true
      UserPoolName: !Sub ${AWS::StackName}-UserPool
      UsernameAttributes: [email]
      Schema:
      - Name: read
        AttributeDataType: String
        Mutable: true
        Required: false # Does not support required custom attributes
      - Name: write
        AttributeDataType: String
        Mutable: true
        Required: false
The main addition of note here are the two schema attributes to hold custom “read” and “write” attributes that are used to store the user institute for a simple AuthZ scheme.
Also from the auth_stack.yml file is the definition for an IAM role which uses ABAC to determine GET and PUT access to objects within the data lake based on specific tags.
AuthorizedRole:
    Type: AWS::IAM::Role
    Properties:
      # The trust relationship which allows this role to be assumed based on Cognito user attributes
      AssumeRolePolicyDocument:
        Version: 2012-10-17
        Statement:
          - Effect: Allow
            Principal:
              Federated: cognito-identity.amazonaws.com
            Action: ['sts:AssumeRoleWithWebIdentity','sts:TagSession']
            Condition:
              StringEquals:
                "cognito-identity.amazonaws.com:aud": !Ref IdentityPool
              ForAnyValue:StringLike:
                "cognito-identity.amazonaws.com:amr": authenticated

      # What this role can actually do
      Policies:
        - PolicyName: !Sub ${AWS::StackName}-AuthorizedPolicy
          PolicyDocument:
            Version: 2012-10-17
            Statement:
              - Effect: Allow
                Action: ["mobileanalytics:PutEvents","cognito-sync:*","cognito-identity:*"]
                Resource: "*"

                # Get is restricted to the specific bucket and must have a tag matching the custom 'read' attribute for the user
              - Effect: "Allow"
                Action: ['s3:GetObject']
                Resource:
                  Fn::Join: ["", ["arn:aws:s3:::", Fn::ImportValue: !Sub "${CoreStack}-Bucket", "/*"]]
                Condition:
                  StringEquals:
                    "s3:ExistingObjectTag/source": "${aws:PrincipalTag/read}"

                # Put is restricted to the specific bucket and must have a tag matching the custom 'write' attribute for the user
              - Effect: "Allow"
                Action: ['s3:PutObject','s3:PutObjectTagging']
                Resource:
                  Fn::Join: ["", ["arn:aws:s3:::", Fn::ImportValue: !Sub "${CoreStack}-Bucket", "/*"]]
                Condition:
                  StringEquals:
                    "s3:RequestObjectTag/source": "${aws:PrincipalTag/write}"
The main takeaways are the conditions where GET is allowed when the institute specified in the user ‘read’ attribute matches the ‘source’ tag on an object, and PUT is only allowed when the object ‘source’ tag is defined and it matches the user ‘write’ attribute.
At the time of this writing, CloudFormation does not yet support the SetPrincipalTagAttributeMap action to add the custom attributes (aka PrincipalTags) to the Amazon Cognito Identity Pool users. This is instead done via script, as shown in our auth_setup.py file:
  cid = boto3.client('cognito-identity')
  response = cid.set_principal_tag_attribute_map(
    IdentityPoolId=identity_pool_id,
    IdentityProviderName=cognito_endpoint+"/"+user_pool_id,
    PrincipalTags={
      'read': 'custom:read',
      'write': 'custom:write'
    }
  )
Using user credentials for access
The AuthZ rules defined in Amazon Cognito are then leveraged in the ingest_er7_lamba function, which sits behind an API Gateway, in order to restrict what can be performed.
The lambda function is able to retrieve the passed in ID token and associated claims (custom attributes):
def lambda_handler(event, context):
  idToken = event['headers']['authorization']
  claims = event['requestContext']['authorizer']['jwt']['claims']
  source = claims.get('custom:write','')
After processing has been completed, and the message is to be stored in S3, the user credentials can then be retrieved and the source institute can be used as an object tag. To highlight the most pertinent code snippets:
1. Add the source institute into the tag definition:
tags = 'source={}&state={}'.format(source, state)2. Exchange the user’s ID Token for AWS credentials:
credentials = __get_credentials(
    os.environ['user_pool_id'],
    os.environ['identity_pool_id'],
    os.environ['cognito_endpoint'],
    idToken
  )

…

def __get_credentials(userPoolId, identityPoolId, cognitoEndpoint, idToken):
  # Get the identity pool ID of the user
  idId = cognito_identity.get_id(
    IdentityPoolId=identityPoolId,
    Logins={
        cognitoEndpoint+"/"+userPoolId: idToken
    }
  )['IdentityId']

  # Get credentials
  response = cognito_identity.get_credentials_for_identity(
    IdentityId=idId,
    Logins={
        cognitoEndpoint+"/"+userPoolId: idToken
    }
  )
  return (response['Credentials'])
3. Create an S3 client using the AWS credentials to assume the user’s permissions:
client = __get_client('s3', credentials) # Client with user credentials

…

def __get_client(service, credentials):
  client = boto3.client(
    service,
    aws_access_key_id=credentials['AccessKeyId'],
    aws_secret_access_key=credentials['SecretKey'],
    aws_session_token=credentials['SessionToken']
  )
  return client
4. Use the S3 client to store the object with the associated tag definition:
client.put_object(
    Bucket=os.environ['bucket_name'],
    Key=key,
    Body=msg,
    ContentType="text/plain; charset=utf-8",
    Tagging=tags
  )
Testing it out
Within the code cloned from the Git repo is a test_services.py script which contains code to create a few sample users with differing access and attempts to send several HL7v2 messages to our “ingest” function through our API Gateway. We should see results where some messages were successfully stored, where some were denied due to inadequate authorization, and some where they were denied for being duplicates.
python test_services.py -s $MY_STACK_NAME
Clean up
As deploying this project creates multiple CloudFormation stacks, the scripts also include convenience functionality to delete them. Note that they also delete any objects placed in the buckets that were created as part of the stacks.
python deploy_services.py -s $MY_STACK_NAME -d
Summary and next steps
In this blog post, I focused on the keys to the front door of the data lake. By adopting Attribute Based Access Control and a centralized access policy, administration and maintenance can be greatly simplified for improved scalability.
For the next steps in this series I walk through some of the other features recently added, such as the utilization of Amazon Simple Notification Service (SNS) for service decoupling, AWS Step Functions for orchestration, AWS CloudFormation cross-stack references, and overall data lake design patterns.
Subscribe to the AWS Public Sector Blog newsletter to get the latest in AWS tools, solutions, and innovations from the public sector delivered to your inbox or contact us.
The AWS Public Sector Blog needs your help. Please take a few minutes to share insights regarding your experience with the AWS Public Sector Blog in this survey, and we’ll use feedback from the survey to create more content aligned with the preferences of our readers.