Artificial Intelligence
Designing human review workflows with Amazon Translate and Amazon Augmented AI
The world is becoming smaller as many businesses and organizations expand globally. As businesses expand their reach to wider audiences across different linguistic groups, their need for interoperability with multiple languages increases exponentially. Most of the industry work is manual, slow, and expensive human effort, with many industry verticals struggling to find a scalable, reliable, and cost-effective solution. Amazon Translate is a neural machine translation service that delivers fast, high-quality, and affordable language translation. Amazon Translate provides high quality on-demand and batch translation capabilities across more than 2970 language pairs, while decreasing your translation costs.
Amazon Translate is constantly learning and evolving to provide exceptional output. In domain-sensitive applications such as legal, medical, construction, and engineering, you can always improve translation quality by using Amazon Translate custom terminology. This is a great approach for most use cases, but some outliers might require light post-editing by human teams. The post-editing process can help you better understand the needs of your customers by capturing the nuances of local language that can get lost in translation. Human translators armed with machine translation can help you localize more content, faster, more affordably and into more languages.
For such businesses and organizations that want to augment the output of Amazon Translate (and other Amazon AI services) with human intelligence, Amazon Augmented AI (Amazon A2I) provides a managed approach to do so. Amazon A2I brings human review to all developers, which removes the undifferentiated heavy lifting associated with building human review systems or managing large numbers of human reviewers.
This post showcases how you can use Amazon A2I and Amazon Translate to create a human review workflow that allows your private workforce to effectively review, correct, and tag the documents translated by Amazon Translate, at scale.
Solution overview
The following diagram illustrates the solution architecture.
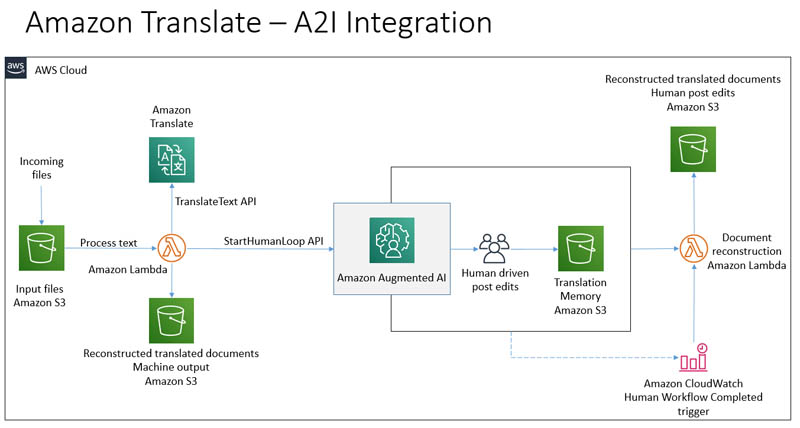
In this use case, you process text files and attempt to convert incoming files from English to Spanish. The files are dropped on an Amazon S3 bucket in the /source folder, which triggers an AWS Lambda function, TA2I-S3Notification, through event notifications.
The function downloads the object and splits it into sentences. It then calls the TranslateText API for each sentence and uses the corresponding output to create an array of source and translated sentence pairs. The function reassembles the output of Amazon Translate to create an unedited machine output in the machine_output/ folder. It creates a humanLoopInput JSON object, which has all the data necessary for Amazon A2I to render the post-edit UX and seek human input to edit each translated sentence. The function then calls the StartHumanLoop API to trigger a human loop.
When a human loop request is received, Amazon A2I takes care of assigning the task to a human worker from the pre-configured teams. The team member can sign into the labeling portal using securely vended credentials. Amazon A2I uses Amazon Cognito to provide user authentication.
Upon signing in, you’re presented with a custom UI where you can review the original text side-by-side with the machine output, at a sentence level. When you’re finished with the review and submit the task, Amazon A2I creates a JSON file that contains the input data and human-edited changes. Because you capture this at a sentence level, over time, you can save this collection of JSON output as your domain-specific translation memory, thus building a valuable asset. Amazon A2I also fires an Amazon CloudWatch event, SageMaker A2I HumanLoop Status Change, for every change in status for the human review task.
The solution ties this event to another Lambda function, TA2I-HumanWorkflowCompleted, which reassembles the document using the human edits to create a final version. This version is saved in the /post_edits folder.
The solution offers a serverless, pay-as-you-go approach to translate text documents and provides human teams a chance to edit the machine output to augment the translation quality, while helping you build a translation memory asset. Each component used in this solution is highly available and scalable, which allows you to focus on adding value to your businesses and solving your machine translation needs.
Prerequisites
This post requires that you have an AWS account with appropriate AWS Identity and Access Management (IAM) permissions to launch the CloudFormation template.
Deploying your solution
The solution uses a mix of CloudFormation stack deployment and manual creation of resources.
- Creating an IAM role – To create a human review workflow, you need to provide an IAM role that grants Amazon A2I permission to access Amazon S3 for reading objects to render in a human task UI and for writing the results of the human review. This role also needs an attached trust policy to give Amazon SageMaker permission to assume the role. This allows Amazon A2I to perform actions in accordance with the permissions that you attach to the role. For more information and example policies that you can modify and attach to the role you use to create a flow definition, see Enable Flow Definition Creation.
- Creating an S3 bucket – The human review workflow that you define later in this post needs to have an S3 bucket that it can write the results to. The Lambda function picks up the results and collates them for further use and record-keeping. For instructions on creating a bucket, see Create a Bucket. Capture the name of the S3 bucket and save it to use later in this walkthrough.
Step 1: Creating a private work team
A work team is a group of people that you select to review your documents. You can create a work team from a workforce, which is made up of Amazon Mechanical Turk workers, vendor-managed workers, or your own private workers that you invite to work on your tasks. Whichever workforce type you choose, Amazon A2I takes care of sending tasks to workers. For this post, you create a work team using a private workforce and add yourself to the team to preview the Amazon A2I workflow.
You can use the Labeling workforces page on the Amazon SageMaker console to create and manage your private workforce. When following the instructions, you can create a private workforce by entering worker emails or importing a pre-existing workforce from an Amazon Cognito user pool.
If you already have a work team for Amazon SageMaker Ground Truth, you can use the same work team with Amazon A2I and skip to the next step.
To create your private work team, complete the following steps:
- On the Amazon SageMaker console, choose Labeling workforces.
- On the Private tab, choose Create private team.

- Choose Invite new workers by email.
- For Email addresses, enter your worker email addresses.You can enter a list of up to 50 email addresses, separated by commas, into the Email addresses box. For this post, enter your email address to work on your document-processing tasks.
- Enter an organization name and contact email.
- Choose Create private team.
 After you create the private team, you get an email invitation. The following screenshot shows an example email:

- Choose the link in the email and change your password.You’re now registered as a verified worker for this team. Your one-person team is now ready, and you can create a human review workflow.
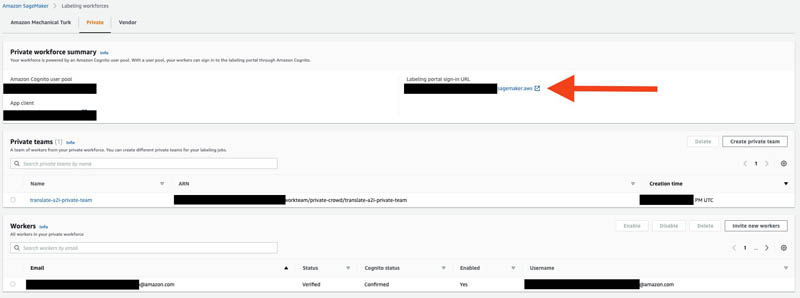
- On the Private tab, choose the link for Labeling Portal Sign-in URL and log in using the credentials generated in the previous step.
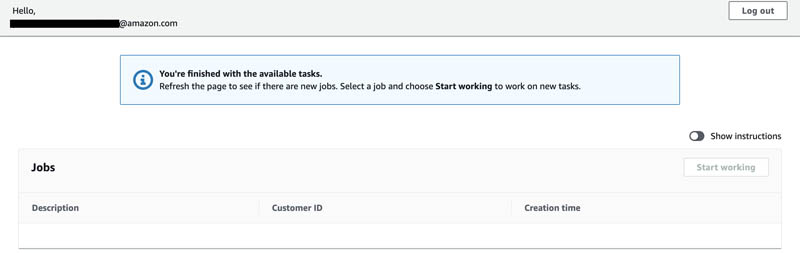
You should see a page similar to the following screenshot.
Step 2: Creating a worker task template
You can use a worker template to customize the interface and instructions that your workers see when working on your tasks. To create a worker task template, complete the following steps:
- On the Amazon SageMaker console, choose Worker task templates.This post uses Region US East (N. Virginia), but you can use your preferred Region. For more information about Region availability for Amazon Augmented AI and Amazon Translate, see Region Table.
- Choose Create template.

- For Template name, enter
translate-a2i-template.

- In the Template editor field, copy and paste the following code from the GitHub repo.

- Choose Create.
Step 3: Creating a human review workflow
Human review workflows allow human reviewers to step in and audit the translations on an ongoing basis. To create a human review workflow, complete the following steps:
- On the Amazon SageMaker console, choose Human review workflows.
- Choose Create human review workflow.

- In the Workflow settings section, for Name, enter a unique workflow name; for example,
translate-a2i-hrw. - For S3 bucket, enter the S3 bucket where you want to store the human review results.
For this post, use the same bucket that you created in the preceding steps, but add a prefix of
/tms. For example, if you created a bucket calledtranslate-a2i-output, enter the paths3://translate-a2i-output/tms. This subfolder contains the translation memory of all the human review workflow jobs that you create. - For IAM role, choose Create a new role from the drop-down menu.

Amazon A2I can create a role for you automatically. - For S3 buckets you specify, select Specific S3 buckets.
- Enter the name of the S3 bucket you created earlier.
- Choose Create.

You see a confirmation when role creation is complete, and your role is now pre-populated in the IAM role drop-down menu.

- For Task type, select Custom

- In the Worker task template section, choose translate-a2i-template from the drop-down menu.
- For Task description, briefly describe the task for your workers.

- In the Workers section, for Worker types, select
- From the drop-down menu, choose translate-a2i-private-team.
- Choose Create.

You see a confirmation when the human review workflow creation is complete.
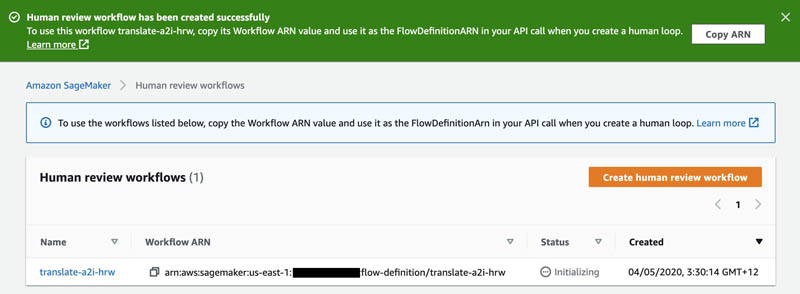
Copy the workflow ARN and save it. You need this in the upcoming steps. You also need to keep the Amazon Augmented AI worker portal (created in Step 1) open and ready after this step.
Step 4: Deploying the CloudFormation stack
You now use a CloudFormation stack to deploy the solution. The stack creates the rest of the necessary resources, including the following:
- Required Lambda functions:
- TA2I-S3Notification – Triggered when a .txt file is dropped in the S3 folder under the
source/subfolder. - TA2I-HumanWorkflowCompleted – Triggered when there is a status change on the human review workflow.
- TA2I-S3Notification – Triggered when a .txt file is dropped in the S3 folder under the
- The Amazon CloudWatch Events rule that triggers
TA2I-HumanWorkflowCompleted. - The notification configuration tying up the S3 bucket and
TA2I-S3NotificationLambda function. You achieve this by creating a CloudFormation custom resource. - Required IAM roles and policies for interacting AI services in a scoped-down manner.
- Launch the CloudFormation script to deploy the stack required for running the entire flow:

This creates the remaining elements necessary for running your human review workflow for the translations. - For the stack, populate the parameters as follows:
- For the human review workflow to use, enter the workflow definition ARN from earlier.
- For the S3 bucket to use, enter the name of the S3 bucket that you created earlier.
- Choose the defaults in the stack deployment wizard.
- On the Review page, in the Capabilities and transforms section, select the three check boxes.
- Choose Create Stack.

You need to confirm that the stack was deployed successfully on your account. You can do so on the CloudFormation console and looking for the stack name Translate-A2I.
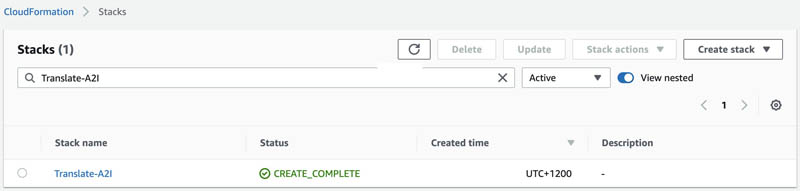
When the status of the stack has changed to CREATE_COMPLETE, you can move on to the next step.
Step 5: Testing the flow
To test the entire flow, complete the following steps:
- On the Amazon S3 console, navigate to the S3 bucket.This post uses a bucket named
translate-a2i-output, but your bucket name should be the same as the one you created as a prerequisite, and entered as a parameter when deploying your CloudFormation Stack.

- Create a new folder named
source. - Select the encryption setting of your choice.This is the prefix that Amazon S3 monitors for triggering the
TA2I-S3Notificationfunction.

- Create a new text file on your computer using your preferred text editor and enter the following text from the novel War and Peace:
- Save this file as
flow_test.txt. - Choose Upload.
- Upload
flow_test.txtto thesourcefolder you created earlier.

- Navigate to the Amazon A2I Workforces page.
- Choose the Private tab.

- Go to the Amazon A2I worker portal.
- Select Human review task in the jobs listed.
- Choose Start working.

You should see a page as shown in the following screenshot. For verification purposes of this walkthrough, edit the text in at least one of the text boxes.

- Navigate to your S3 bucket. A file titled
PO-flow_test.txtshould be in thepost_editsfolder. - Download this file and open the contents in your preferred text editor.
You should see the following text.

Cost
With Amazon Translate and Amazon A2I, you pay-as-you-go based on the number of characters of text that you processed and for each human-reviewed object. The cost to run this example is less than $1. Please refer to the pricing page for Amazon Translate and Amazon A2I for actual costs.
Cleaning up
To avoid incurring future charges, delete the resources when not in use.
Conclusion
This post demonstrated how you can now use Amazon A2I to build human review workflows for translations done using Amazon Translate. This allows you to create review workflows for the critical documents you need to translate using your own private workforce, and provides increased accuracy and context. This approach also allows you to capture the translation memory your human team creates, which can be a valuable intellectual property asset.
For the code base in this walkthrough, see the GitHub repo. For a Jupyter notebook with this proof of concept, see the GitHub repo. For information about integrating Amazon Textract with Amazon A2I, see Using Amazon Textract with Amazon Augmented AI for processing critical documents.
About the authors
 Mayank Thakkar is a Sr. Solutions Architect in the Global Healthcare and Life Sciences team at AWS, specializing in building serverless, artificial intelligence, and machine learning-based solutions. At AWS, he works closely with global pharma companies to build cutting-edge solutions focused on solving real-world industry problems. Apart from work, Mayank, along with his wife, is busy raising two energetic and mischievous boys, Aaryan (6) and Kiaan (4), while trying to keep the house from burning down or getting flooded!
 Purnesh Tripathi is an Associate Solutions Architect at Amazon Web Services. He was a data scientist in his previous life, and is passionate about the benefits that machine learning and artificial intelligence bring to a business. He works with independent software vendors and startups in New Zealand to help them innovate faster using AWS.