AWS for M&E Blog
How-to: Build a video-chat application for live streams using AWS Amplify and AWS Media Services
In this post, we are going to build a video-chat web application. For front-end hosting and backend resources, we’ll use AWS services like AWS Amplify, a set of tools and services that help front-end web and mobile developers build scalable full stack applications. And by using AWS Cloud Development Kit (AWS CDK), an open-source software development framework, we are going to provision AWS Media Services to create broadcast channels for live events. Customers can use this reference architecture to create an interactive application with chat elements, video, and authentication where the most important thing is the scalability and design of a serverless application. For example, a webinars, masterclasses, selling e-commerce products, tournaments, and betting.
Overview
For the front end, we are going to create a React application hosted by AWS Amplify Console—a fully managed service for deploying and hosting static web applications globally—and use AWS Amplify libraries and UI components. To add authentication to the users, we’ll use the Amazon Cognito user pool and app client created within the AWS Amplify project. Amazon Cognito lets you add user sign-up, sign-in, and access control to your web and mobile apps quickly and easily.
For the backend services, we will use AWS AppSync, a fully managed service that makes it easy to develop GraphQL APIs by handling the heavy lifting of securely connecting to data sources like Amazon DynamoDB, Amazon Aurora, Amazon OpenSearch Service, AWS Lambda, and other AWS services. We can use AWS Management Console—a single web interface that brings everything users need to access and manage the cloud on AWS—to create the backend with a couple of clicks. In this post, we will use the Amplify Command Line Interface (Amplify CLI) to automatically generate the API and client-side code for our React application.
Using the AWS AppSync GraphQL client, our application can connect to the AWS AppSync near-real-time endpoint (wss://) and use the AWS AppSync WebSocket client for the subscriptions created for our data: Channels and Messages. Whenever data changes on our application’s backend, our application’s front end will be notified with the data to update the user interface automatically. For our chat application, we are going to create four subscriptions: onCreateMessage, onCreateChannel, onUpdateChannel, and onDeleteChannel.
We will also use AWS Media Services to create live video streaming. To do this, we will use AWS CDK, which helps users define their cloud application resources using familiar programming languages. For this project, we are going to use the first language supported for developing AWS CDK applications: TypeScript.
To create live outputs for broadcast and streaming delivery, we will use the near-real-time video service AWS Elemental MediaLive. This service helps users create high-quality video streams for delivery to broadcast televisions and internet-connected multiscreen devices, like connected TVs, tablets, smartphones, and set-top boxes.
We will also use AWS Elemental MediaStore, an AWS storage service for storing and delivering video assets for live streaming media workflows. Using this video origination and storage service, we’ll gain high performance and virtually immediate consistency for live origination.
The following diagram represents the architecture for this video-chat application, illustrating how Media Services on AWS are delivered by Amazon CloudFront, a fast content delivery network service. This will improve the user experience by delivering video with low latency. The front-end application has the player configured to stream video channels with a chat panel by its side.
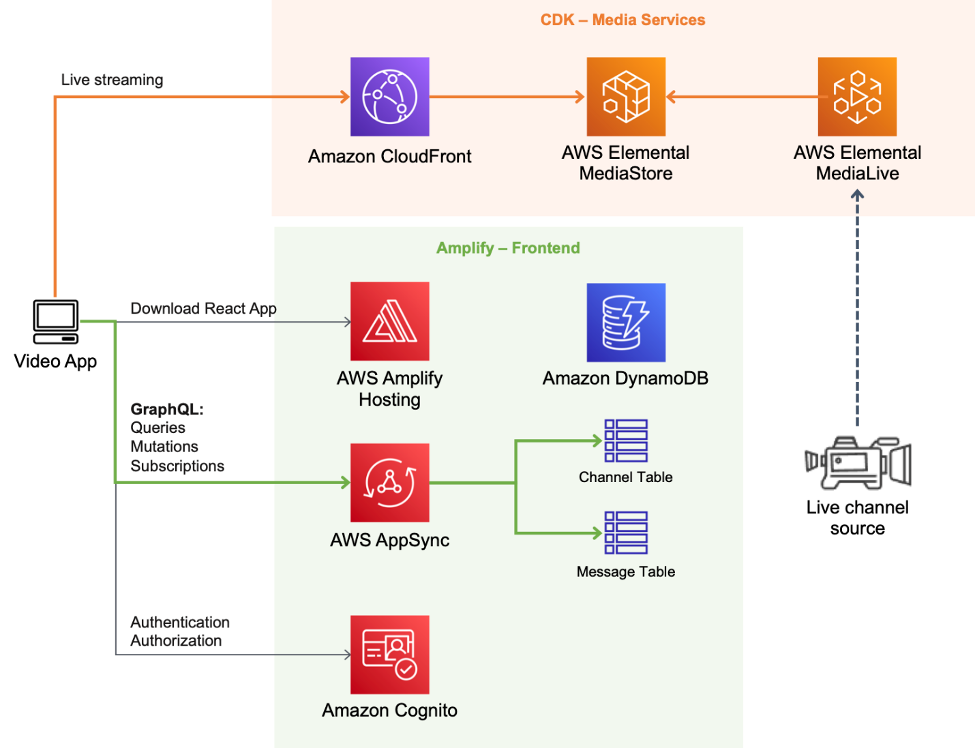
Architecture Overview
Prerequisites
- An AWS Account.
- Work in your local environment or your AWS Cloud9 integrated development environment with the following tools configured:
Directions
Creating the front-end application using AWS Amplify
In this section, we describe the steps that we need to follow to create the front-end services, using AWS Amplify tools and services to build the React application.
Step 1: Create and initialize the AWS Amplify project
1. Create the React application, and install dependencies.
npx create-react-app amplify-video-frontend
cd amplify-video-frontend
npm install aws-amplify aws-amplify-react @aws-amplify/ui-react @material-ui/core @material-ui/icons video.js
2. Initialize the AWS Amplify project with the following configurations:
amplify init3. Enter a name for the project: amplifyvideofrontend
4. Project information
5. Name: amplifyvideofrontend
6. Environment: dev
7. Default editor: Visual Studio Code
8. App type: javascript
9. JavaScript framework: react
10. Source Directory Path: src
11. Distribution Directory Path: build
12. Build Command: npm run-script build
13. Start Command: npm run-script start
14. Initialize the project with the above configuration? (Y/N): Yes
15. Use default provider: awscloudformation
16. Do you want to use an AWS profile? Yes
17. Please choose the profile you want to use: default (Choose your profile using AWS IAM credentials.)
Step 2: Add authentication
1. Add authentication, using Amazon Cognito as the main authentication provider. Use the default configuration as follows:
amplify add auth2. Do you want to use the default authentication and security configuration? Default configuration
3. How do you want users to be able to sign in? Username
4. Do you want to configure advanced settings? No, I am done.
5. To deploy the services, execute the following command:
amplify push6. Are you sure you want to continue? Yes
Step 3: Add API (GraphQL)
1. Add an AWS AppSync GraphQL API using an Amazon Cognito user pool for the API authentication.
$  Please select from one of the below mentioned services: GraphQL
$  Provide API name: amplifyvideofrontend
$  Choose the default authorization type for the API Amazon Cognito user pool: Use a Cognito user pool configured as a part of this project.
$  Do you want to configure advanced settings for the GraphQL API? No, I am done.
$  Do you have an annotated GraphQL schema? No
$  Choose a schema template: Single object with fields (e.g., “Todo” with ID, name, description)
$  Do you want to edit the schema now? Yes
2. Edit the schema by opening the new schema.graphql file in your editor. Replace it with the following schema:
type Channel @model {
  id: ID!
  name: String!
  url: String!
  createdAt: String
  messages: [Message] @connection(keyName: "byChannel", fields: ["id"])
}

enum ModelSortDirection {
  ASC
  DESC
}

type Message @model(subscriptions: null)
@key(name: "byChannel", fields: ["channelId", "createdAt"], queryField: "listMessagesByChannel")
{
  id: ID!
  channelId: ID!
  username: String!
  content: String!
  createdAt: String
  channel: Channel @connection(fields: ["channelId"], sortField: "createdAt")
}

type Subscription {
  onCreateMessage(channelId: ID): Message @aws_subscribe(mutations: ["createMessage"])
}
Step 4: Create/replace React application files
1. Update the following files in your React application.
2. Create the following files in your React application.
Step 5: Add hosting
1. For this exercise, we are going to choose manual deployments so that you can publish your web app to the AWS Amplify Console without connecting a Git provider.
amplify add hosting- Select the plugin module to execute: Hosting through Amplify Console (Managed hosting with custom domains, Continuous deployment)
- Choose a type: Manual deployment
2. Deploy the application by running the following command to build the scripts:
amplify publish- Are you sure you want to continue? Yes
Create the CDK for AWS Media Services
Step 1: Create and initialize the AWS CDK project
1. Create and initialize the AWS CDK project.
mkdir cdk-media-services
cd cdk-media-services
cdk init -l typescript
Install the npm modules
npm install @aws-cdk/aws-medialive @aws-cdk/aws-mediastore @aws-cdk/aws-cloudfront @aws-cdk/aws-iam
Step 2: Add services to the stack
1. Update the following files:
2. Update the following file, and replace it with your own data for AWS account identifier and AWS Region. (You can also modify the media identifier, stream key, and origin access for the live media input.)
Step 3: Deploy the stack services
1. Using your AWS CLI credentials for your environment, deploy the AWS CDK stack resources with the following command.
# build the AWS CDK app
npm run build
# deploy it
cdk deploy
This process takes a couple of minutes to finish. At the end, you can find the Media Services on AWS data required to connect and stream live video. You can use Open Broadcaster Software or another streaming application.
Outputs:
- CdkMediaServicesStack.DataEndpoint
- CdkMediaServicesStack.MediaLiveEndpoint
- CdkMediaServicesStack.MediaLiveInputID
- CdkMediaServicesStack.PlaybackURL
Note: Make sure your AWS Elemental MediaLive resource is in Running state.
Once you are streaming live video, you can go back to your AWS Amplify application and add channel streaming using the PlaybackURL from the previous output.
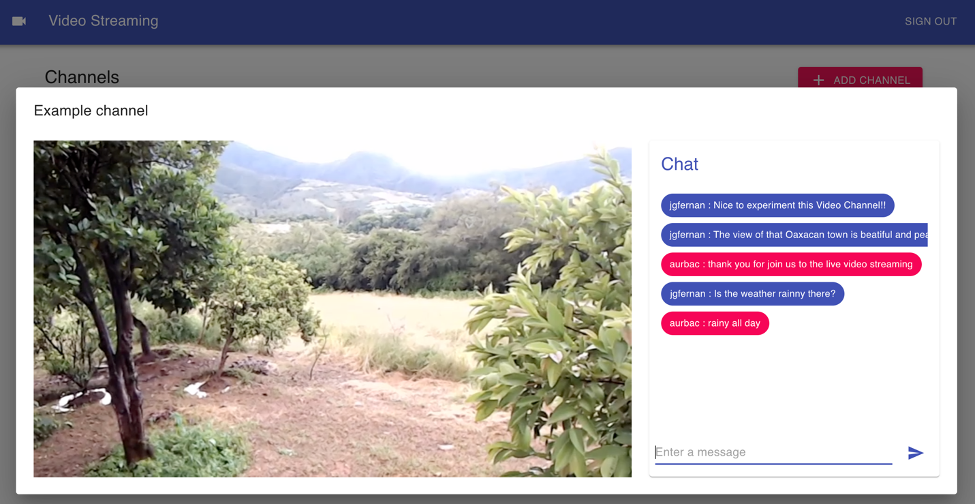
Application running and streaming a view of Oaxacan town
Clean up
To avoid incurring future charges, delete the resources by deleting the AWS CloudFormation stack generated by the CDK.
Run the amplify delete command on Amplify CLI to delete all the resources tied to the project from the cloud, and delete the AWS AppSync API using Amplify CLI or the graphical user interface console.
Conclusion
In this post, we described how to use an AWS CDK for AWS Media Services to simplify the implementation of live streaming infrastructure and to integrate AWS AppSync for interactions with the audience. By using the chat application alongside AWS AppSync, we created a GraphQL mutation payload that was sent to AWS AppSync using an API destination without the need to write a Lambda function or specific code that would need to be maintained.
Updates or changes could easily be implemented with your infrastructure-as-code tool of choice. This serverless architecture uses AWS Amplify—which makes it easy for developers to add location functionality to applications without compromising data security and user privacy—alongside AWS Amplify, Amazon Cognito, AWS AppSync, and the AWS CDK for AWS Media Services. Working together, these services and tools provide an effective and simple solution that you can use to manage and seamlessly push data changes and events from your cloud backend all the way to thousands of connected front-end web and mobile clients with built-in WebSocket connection management. Using flexible serverless technologies, your application can scale automatically according to demand.
AWS offers the most purpose-built services for direct-to-consumer (D2C) & streaming to help companies reliably deliver, monetize, and support live and on-demand media over the internet, and bring unparalleled experiences to screens everywhere. Explore https://aws.amazon.com/media/direct-to-consumer-d2c-streaming/ to learn more.
If you have questions, feedback, or would like to get involved in discussions with other community members, visit the AWS Developer Forums: Media Services.