AWS Database Blog
Building a data discovery solution with Amundsen and Amazon Neptune
This blog post was last reviewed or updated May, 2022.
September 8, 2021: Amazon Elasticsearch Service has been renamed to Amazon OpenSearch Service. See details.
In this post, we discuss the need for a metadata and data lineage tool and the problems it solves, how to rapidly deploy it in the language you prefer using the AWS Cloud Development Kit (AWS CDK), as well as getting your first loads of metadata into the tool.
Modern data stacks involve ingesting from a wide variety of sources, undergoing multiple layers of transformations, and then surfacing insights through an array of visualizations and reports. This is similar to how traditional data stacks were built; involving more than just a single source—although certainly the challenge has grown over time. To provide a concrete example we introduce Amundsen, an open source tool for data discovery and metadata, and show a sample application in a fictional company whose datasets we ingest and make queryable.
A common challenge in both small and large enterprises is that it’s becoming increasingly difficult to find the right report that answers a particular business question. Furthermore, the lineage of that report’s data as well as the accuracy of it is often a mystery. It’s the famous “can I trust this data?” question.
The birth of Amundsen
To answer this ever-increasing sprawl of data sources, a new range of open-source metadata and lineage tools, led by Amundsen, has sprung up that provide business users the ability to easily trace data lineage from source to dashboard. They often involve purpose-built databases such as graph and search, and the need for integrations with a variety of source systems to allow for metadata loading and parsing.
The challenge is that deploying and maintaining open-source tooling can be complex, with the need to run ops on new styles of databases that folks may not have expertise in. Enter Amazon Neptune, a fully managed database, and Amazon Elasticsearch Service (Amazon ES), a fully managed search cluster. But we also need jobs to run on a regular basis to crawl through the various data sources and databases within the organization and load that into Amundsen, because it can provide this rich source of metadata for your organization. We run this as Amazon CloudWatch events triggered by AWS Fargate tasks, which we discuss later in this post.
Solution overview
In this section, we break the solution down into manageable chunks that we can later deploy via the AWS CDK. First, we’re dealing with databases, so we host them in an Amazon Virtual Private Cloud (Amazon VPC). Then we have a source system, a fictional application database hosted in Amazon Relational Database Service (Amazon RDS) for PostgreSQL. In a typical enterprise environment, analytical queries made on that data are copied across to a data warehouse, in this case Amazon Redshift. We use federated queries to gain access to Amazon RDS for PostgreSQL from Amazon Redshift. This concludes our core business stack.
From here, we move on to the Amundsen deployment and then look at the data loaders. For Amundsen, we need a Neptune cluster, an Elasticsearch cluster, and three Fargate containers (frontend UI, metadata API, and search API). From there, we need to load Amundsen with the metadata from our datastores within our fictional company. We do this with Fargate tasks triggered on a regular basis from CloudWatch events to capture any changes or updates in our data stores.
To summarize, we deploy the following:
- VPC stack
- Amazon RDS for PostgreSQL
- Amazon Redshift cluster
- Bastion host
- Amundsen
- Databuilder for Amundsen
Architecture overview
Our architecture is comprised of several components: the initial data loader, Amundsen Databuilder, Amundsen UI and services, and supporting AWS services (see the following diagram).
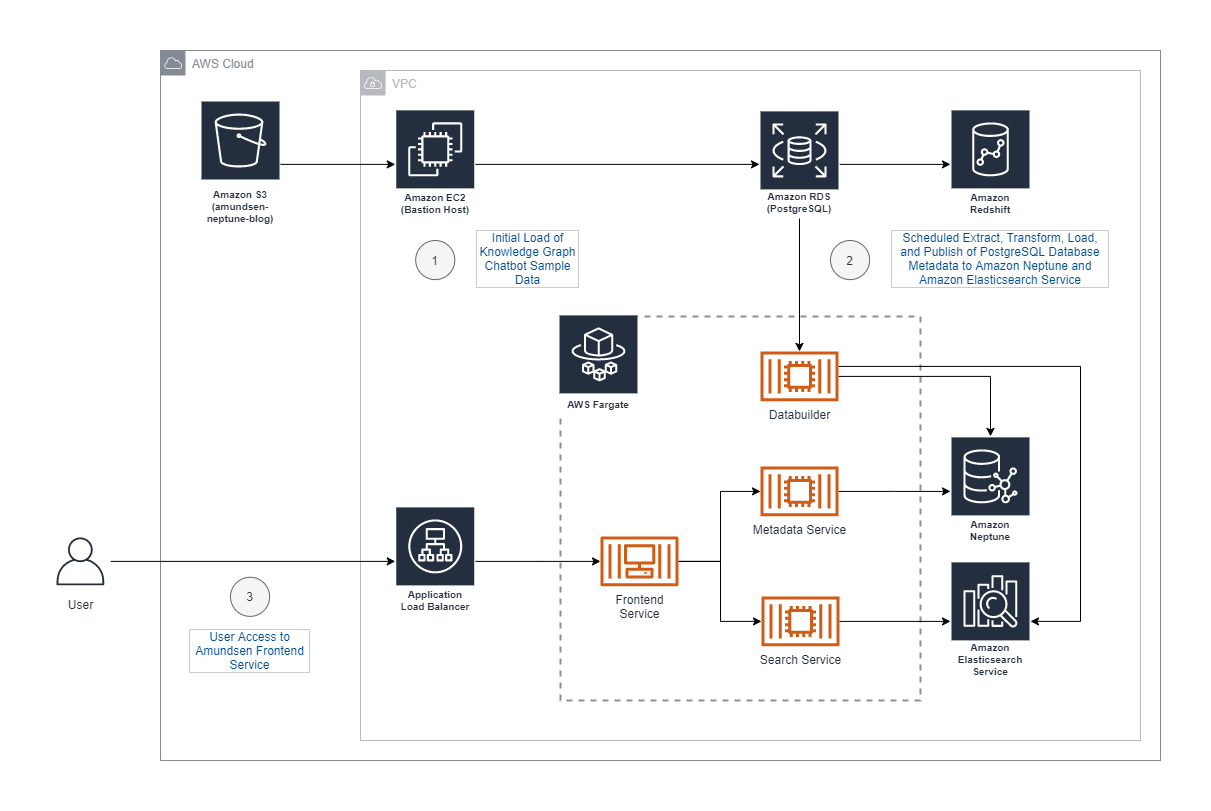
The estimated cost per day is approximately $20 USD and more details on Neptune pricing can be found here. Make sure that you delete the stacks when you’re done, and check and delete any orphaned infrastructure such as databases to avoid ongoing charges.
AWS CDK for infrastructure as code
We can achieve rapid deployment via the AWS CDK, which is a new way to deploy infrastructure as code in a programming language that is familiar to the developer with specific modules for Neptune, Amazon ES, Fargate, Application Load Balancer, and many other AWS resources.
Prerequisites
To get started, you need an AWS account, preferably free from any production workloads. You also need an AWS Identity and Access Management (IAM) role to deploy with from an AWS Cloud9 integrated development environment (IDE), or an IAM user with admin permissions, because the stacks we’re deploying with require significant access.
Important: You must increase the size of the EBS volume attached to your Cloud9 instance as the default size (10GB) is not enough. Follow the instructions on the Cloud9 documentation to resize your EBS volume to at least 30GB.
Once we have that in place, it’s time to get ready to deploy.
Service-linked role
Amazon ES uses IAM service-linked roles. A service-linked role is a unique type of IAM role that is linked directly to Amazon ES. Service-linked roles are predefined by Amazon ES and include all the permissions that the service requires to call other AWS services on your behalf. To create a service-linked role for Amazon ES, issue the following command:
AWS Cloud9
AWS Cloud9 is a cloud-based IDE that lets you write, run, and debug your code with just a browser. AWS Cloud9 comes preconfigured with many of the dependencies we require for this blog post, such as git, npm, and AWS CDK.
Create an AWS Cloud9 environment from the AWS console. Provide the required name, and leave the remaining default values. After your environment is created, you should have access to a terminal window.
From the terminal window, let’s clone the GitHub repo:
The following sections describe the resources created by the respective stacks. By default, the AWS CDK prompts the user to deploy changes. If you want to skip confirmations, add the following command line option to the AWS CDK commands provided:
Stack deployment
Now onto the fun part, where we begin rolling out our infrastructure with six stacks in total to deploy. These resources can come with considerable hourly charges, so you should delete these stacks upon completion—especially if this is coming out of your personal account.
VPC stack
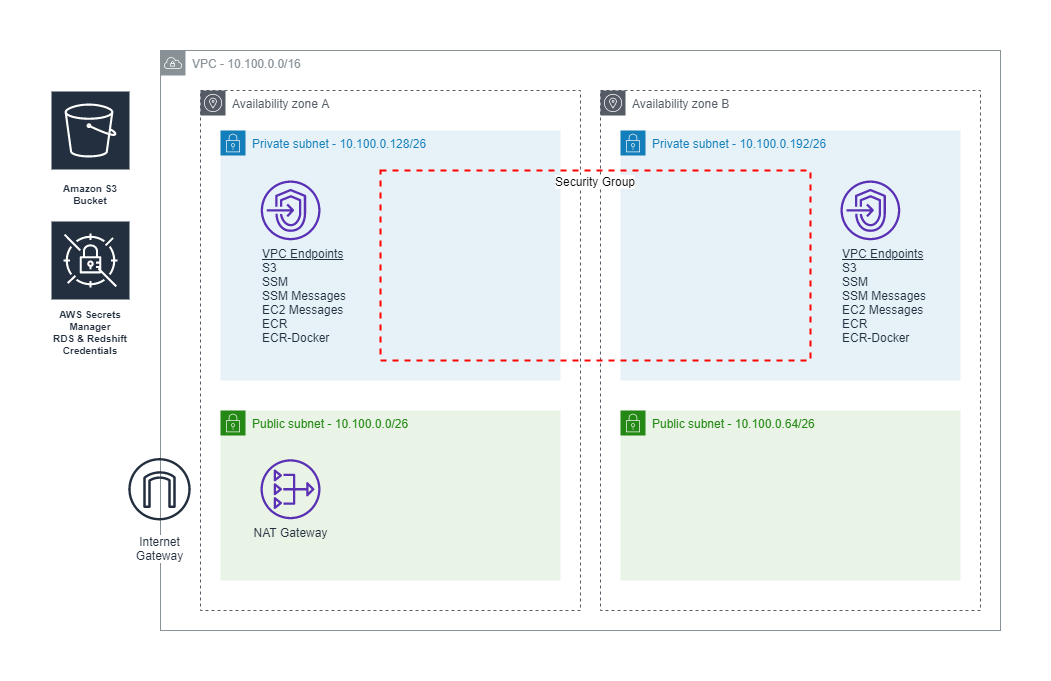
The VPC stack creates a VPC with a CIDR block specified in the vpc-cidr context variable declared in the file cdk.json. The default CIDR block is 10.100.0.0/16. This stack creates two public and two private subnets. Access to the internet is enabled with an Internet gateway as well as a NAT gateway for private subnets. For production workloads, consider increasing the number of NAT gateways to two instead of the default one. To allow access via AWS Systems Manager Session Manager, VPC endpoints are created for AWS Systems Manager, Systems Manager messages, and Amazon Elastic Compute Cloud (Amazon EC2) messages. To keep network traffic on the Amazon backbone, VPC endpoints are created for Amazon Simple Storage Service (Amazon S3), as well as access to Amazon Elastic Container Registry (Amazon ECR). A security group is created, which allows traffic from the VPC CIDR block to individual services ports. To eliminate the need to specify passwords and risk exposure of database credentials, we use AWS Secrets Manager to create separate credentials for Amazon RDS and Amazon Redshift, with passwords automatically generated. Lastly, an S3 bucket is created to be used by our Amundsen Databuilder. The following diagram illustrates this architecture.
To deploy the VPC stack, run the following command:
Amazon RDS stack
To simulate a real-world customer environment, our Amazon RDS stack creates an RDS instance. This database is loaded with sample data from an existing Neptune sample project: Knowledge Graph Chatbot Full Stack Application Example.
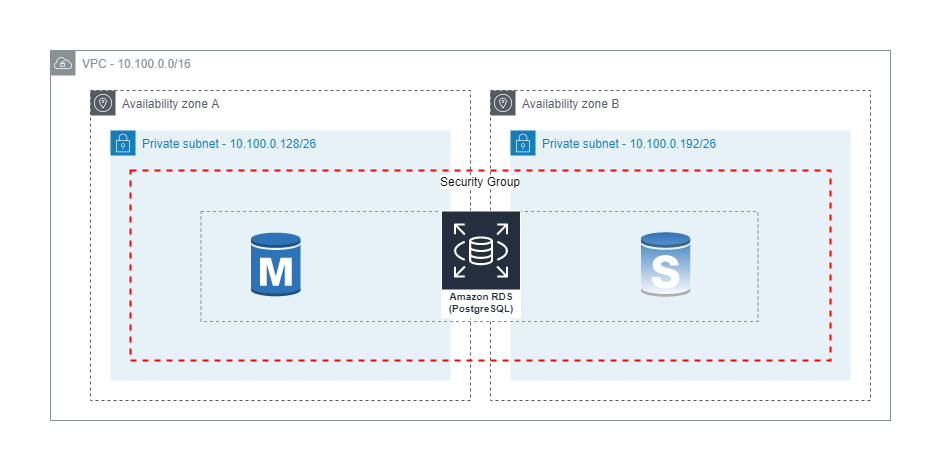
A single t3.medium RDS for PostgreSQL DB instance is created as part of the Amazon RDS stack. In a production environment, we recommend using a Multi-AZ configuration with an m5 or m6g instance type. The DB instance is created with a default database schema, default port, and associated with the credentials created in Secrets Manager by our VPC stack. The default values are defined as context variables in the file cdk.json. Context variables are rds-database (default database schema), and rds-port (default port). Our DB instance is associated with a DB subnet group, which is associated with the private subnets created by our VPC stack, and supports high availability across Availability Zones if we choose to enable Multi-AZ. The following diagram depicts a potential secondary instance and read replica. We use the security group created by our VPC stack to limit inbound TCP network traffic to the default port of 5432 from IP addresses in our VPC CIDR block 10.100.0.0/16.
To deploy the Amazon RDS stack, run the following command:
Amazon Redshift stack
Most customers use Amazon Redshift for online analytical processing (OLAP) and business intelligence (BI) applications. We use Amazon Redshift federated queries to run queries against our Amazon RDS database, and create tables from the results in Amazon Redshift. Our goal is to build a representative dataset to catalog with our Amundsen Databuilder.
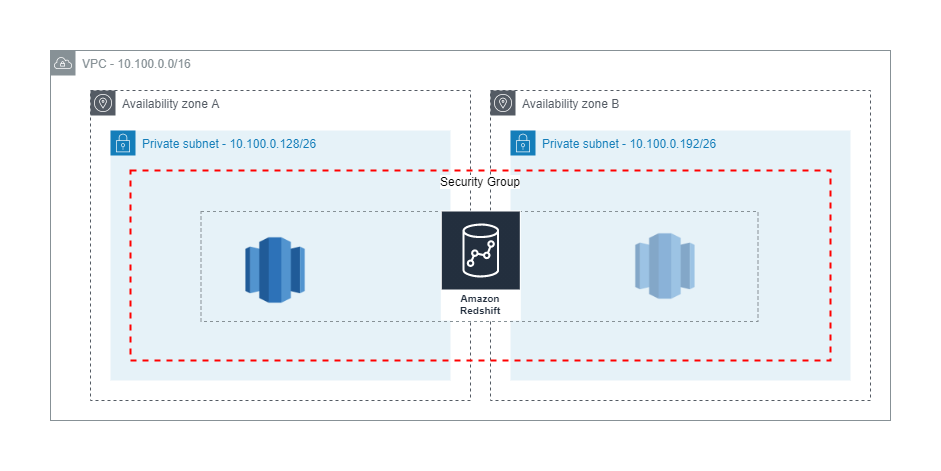
Our Amazon Redshift stack creates a single-node Amazon Redshift cluster in the VPC created by our VPC stack. The cluster is deployed in our private subnets, and uses the security groups created by our VPC stack. A role is created using the least privilege principle, allowing access to only the Amazon RDS and Amazon Redshift secrets created by our VPC stack. In a production environment, a multi-node cluster is recommended. The following diagram includes an optional secondary node. The security group created by our VPC stack is used to limit inbound TCP network traffic to the default port of 5439 from IP addresses in our VPC CIDR block 10.100.0.0/16.
To deploy the Amazon Redshift stack, run the following command:
Bastion stack
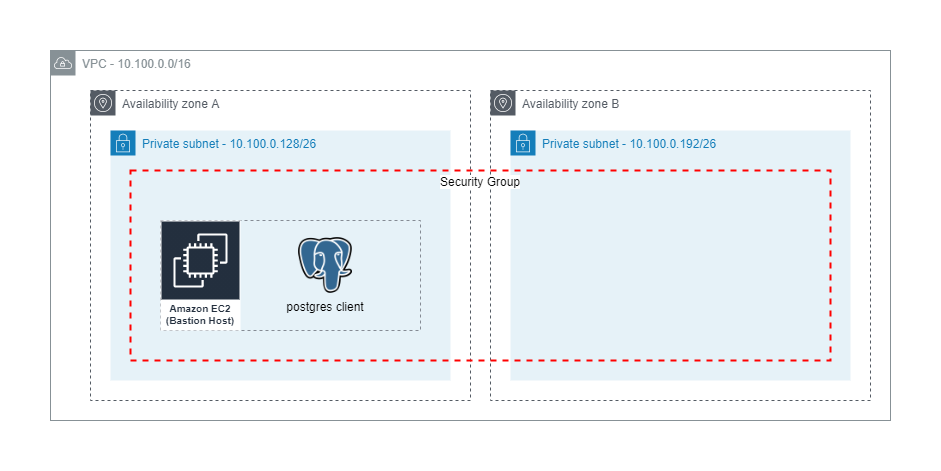
A bastion host (Linux) is created, which we use to connect to other instances and services in the previously created VPC. The operating system is Amazon Linux 2 with the latest Systems Manager agent installed. We apply least privilege principles, and only associate the managed policies AmazonS3FullAccess and SecretsManagerReadWrite. A custom policy is applied to the bastion host, which allows IAM database authentication to our Neptune cluster for Databuilder testing. The bastion host has no inbound access allowed, and access is limited to Session Manager, which is a recommended best practice. The following diagram illustrates this architecture.
The bastion host stack runs several commands during the first boot cycle when the EC2 instance is launched. These commands install the necessary packages and dependencies, and prepare our environment with sample chatbot data via a series of steps. The load steps are depicted in the following diagram.
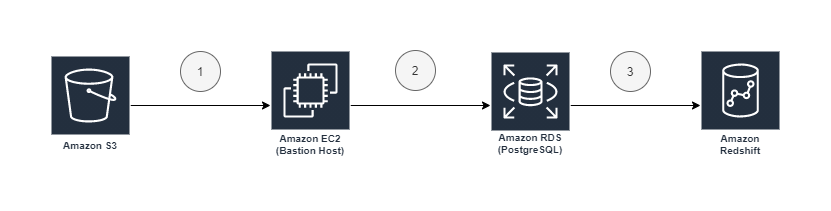
Step 1 copies a PostgreSQL (PG) dump file from the S3 bucket amundsen-neptune-blog to local storage on our bastion host. Step 2 uses the locally installed postgres pg_restore tool to restore the dump file to our RDS instance. Step 3 creates a federated query external schema chatbot_external in Amazon Redshift, and aggregates data from our RDS instance into a new table chatbot_dw.author_summary in Amazon Redshift.
To deploy the bastion stack, run the following command:
Amundsen stack
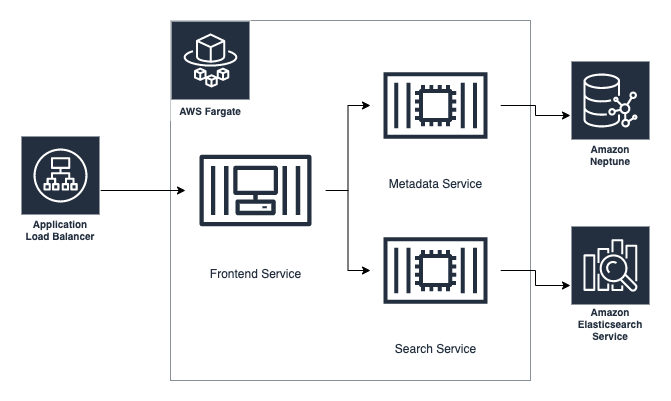
The Amundsen stack is where the data discovery tool is hosted. For state, we use an Amazon Elasticsearch Service cluster and Neptune graph database. Amazon Elasticsearch Service is fronted by a search service in the form of an API hosted on Fargate. Likewise, our graph database hosted on Neptune is fronted by a metadata service, which again is an API hosted on Fargate. The two containers deployed on Fargate are joined by a third container, a frontend service that contains the main application code. To access the frontend from the internet, an application load balancer is in front of it. The following diagram illustrates how this all fits together.
Frontend service
Amundsen’s frontend is a flask app hosted on the default port 5000.
We need to set some environment variables in order for the containers to talk to one another and the Neptune and Elasticsearch clusters:
Next, we set up the search service.
Search service
The search service is a flask API specified via swagger documents that talks to Amazon ES. It requires the following environment variables:
We specify the Amazon ES endpoint, the port, and the client type of ELASTICSEARCH.
Metadata service
Similar to the search service, the metadata service requires the following environment variables:
The use of Boto3 requires you to set an AWS Region. We need to specify an S3 bucket due to Neptune’s bulk data loader. The proxy client is Neptune, with a port of 8182, and the proxy host has the prefix as wss:// and the suffix of the port as /gremlin.
Elasticsearch and Neptune clusters
We do fairly standard deployment configurations for Amazon ES and Neptune—using a t3.small and t3.medium, respectively—but we highly recommend R5 instance types with Multi-AZ enabled in production settings.
To deploy the Amundsen stack, run the following command:
The Amundsen frontend hostname will be output to multiple places. First, the AWS CDK console output will include the following:
As well, the associated CloudFormation stack Amundsen-Blog-Amundsen-Stack will have a key-value pair output with the key amundsenfrontendhostname. The Amundsen frontend hostname should be accessible over HTTP.
Databuilder stack
We modified the existing postgres extractor and Neptune sample loader scripts from the Amundsen GitHub repo. Our Databuilder stack depends on a Docker image created with the Dockerfile in /lib/databuilders/postgres/. This containerized Python script is added to a scheduled Fargate task. The following diagram details the Amundsen Databuilder flow.

The flow has the following steps:
- The containerized Python script is pulled from Amazon ECR and run every 5 minutes with the Fargate task definition and associated environment variables set during deployment of the AWS CDK stack.
- The Python script runs the Postgres extractor to retrieve table and column information from the
chatbotschema in our Postgres database. - The node and relationship files are written to an S3 bucket created by our VPC stack.
- The Neptune bulk loader is used to load the nodes and edges.
- The Amazon ES index is updated with the searchable data, such as table and column names.
To deploy the Databuilder stack, run the following command:
The Databuilder task run every 5 minutes, so be patient after the initial stack deployment before opening the Amundsen frontend in your browser.
The dataset
As previously mentioned, our example dataset is from another post: Supercharge your knowledge graph using Amazon Neptune, Amazon Comprehend, and Amazon Lex. This dataset consists of data extracted from the AWS Database Blog for Neptune. To create this data, posts were scraped from the website to create a semi-structured representation of a blog, each of which contains the following attributes:
- Post – The post information such as URL, title, and date posted
- Author – The author of the post, including the author’s name
- Tag – The tags applied to the post
When we connect these entities, we get the following domain model.
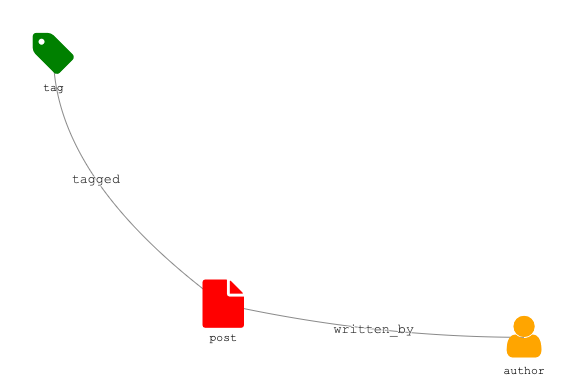
From this domain model, we created a relational database schema consisting of five tables:
PostsPost_tagsTagsAuthorsPost_authors
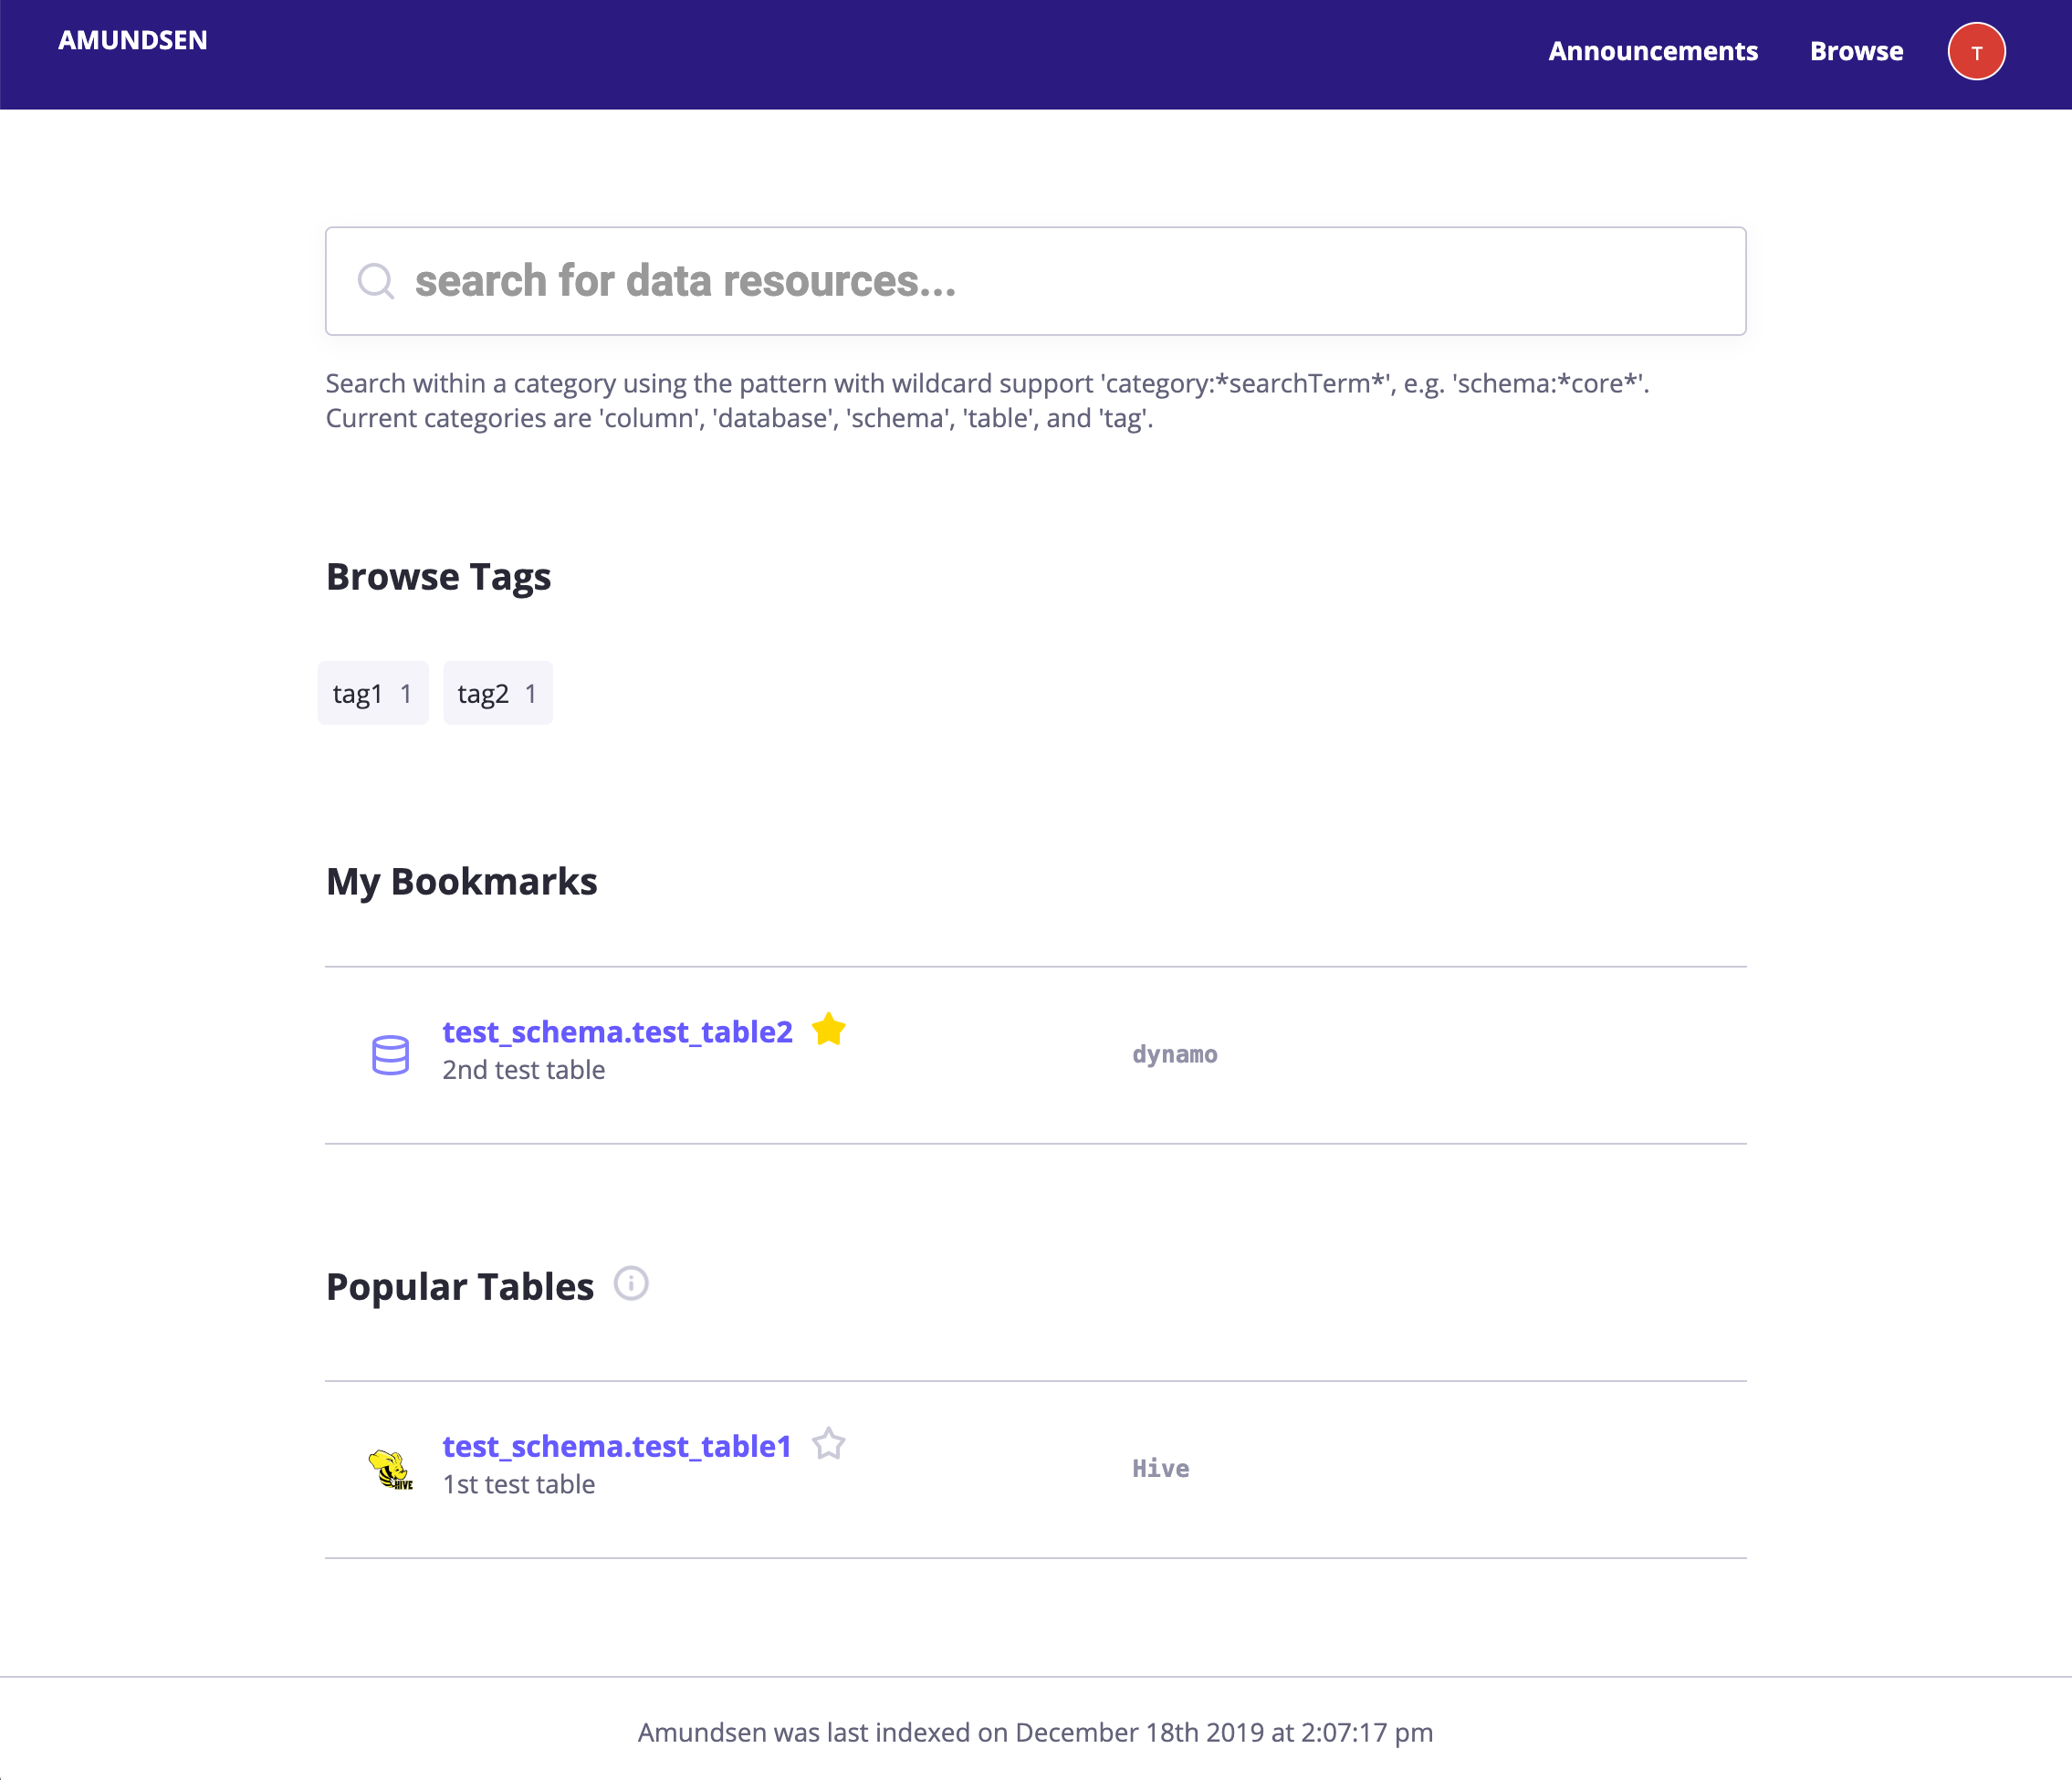
Blog data was then loaded into this database, and after a short while it’s available for searching via the Amundsen console. In the following screenshot, we try it out using the keyword “chatbot.”
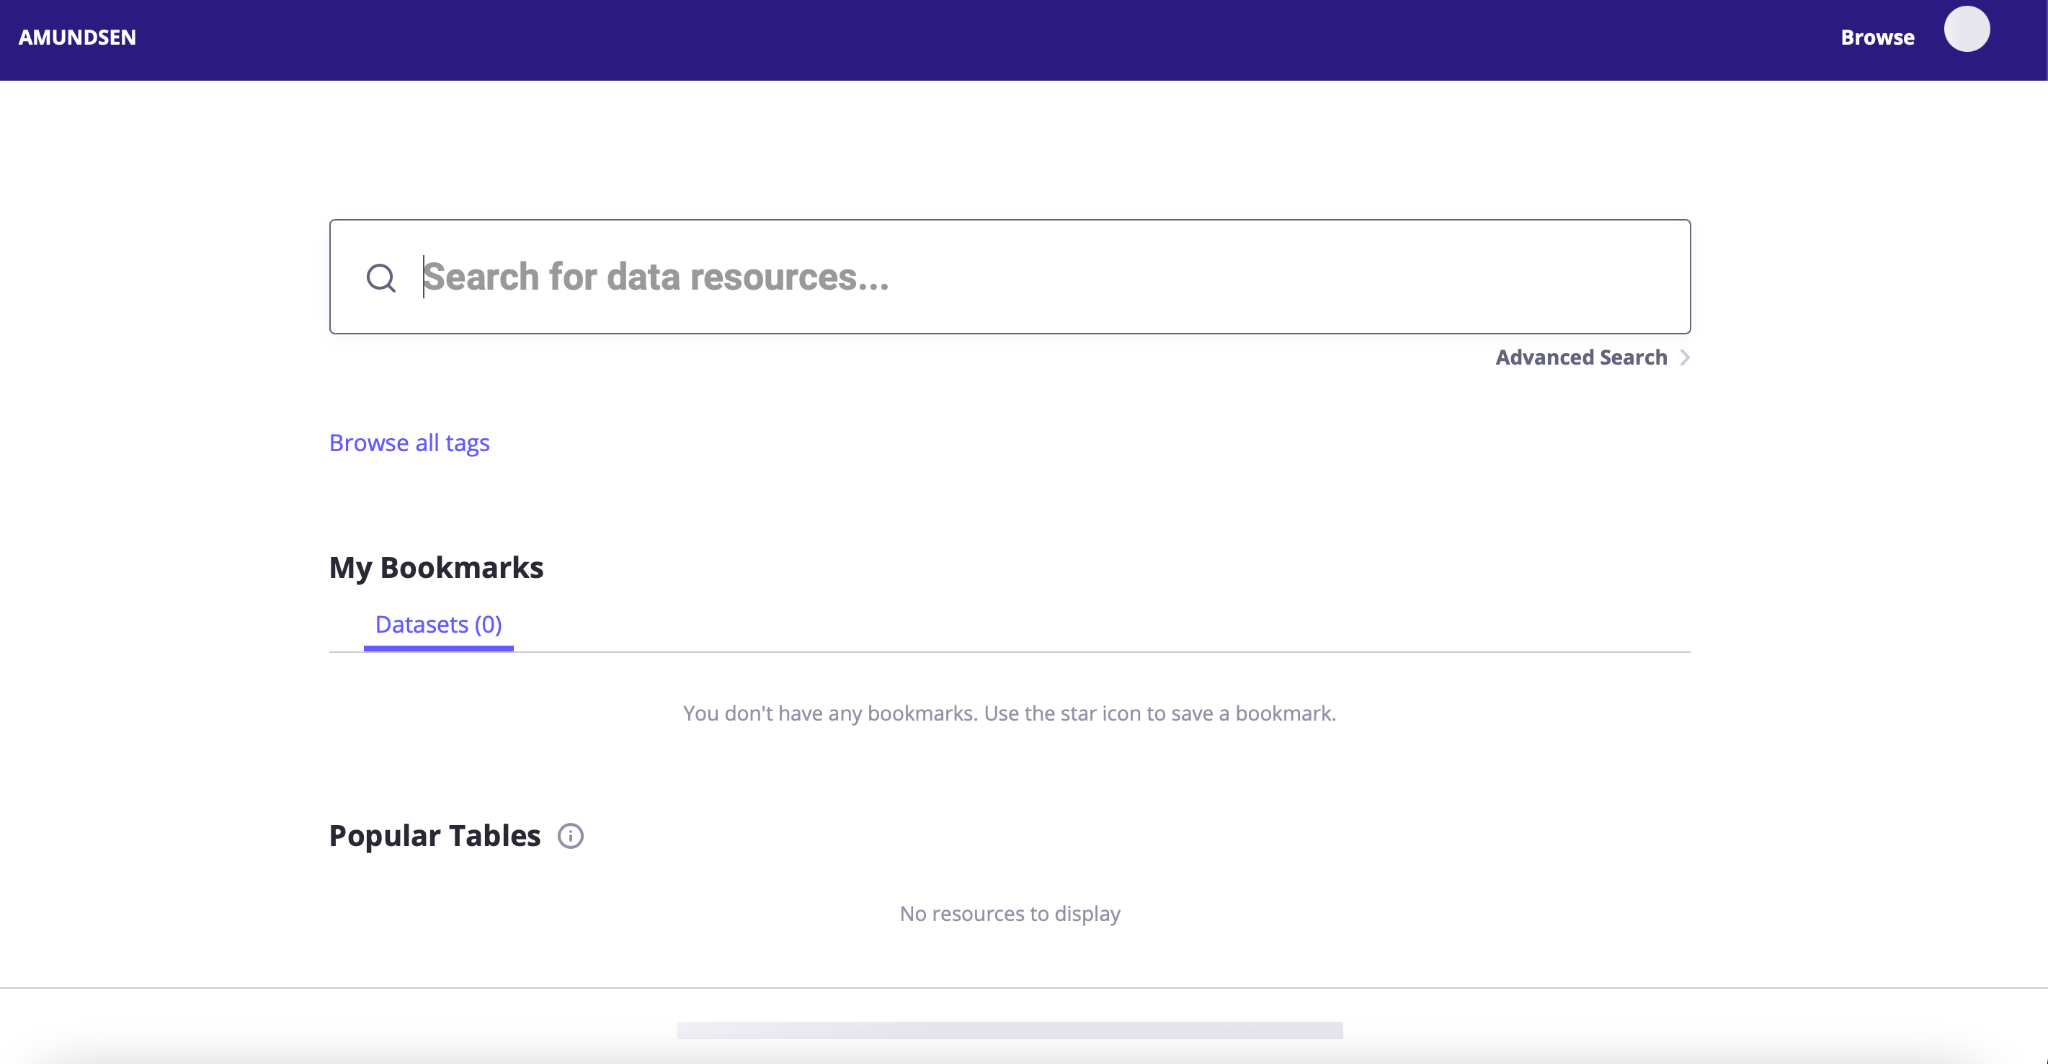
You should get something like the following as a response.

You can explore this list of tables to look at the column names and add descriptions to them.
Clean up
To clean up, you must remove your Amazon Redshift cluster manually. Refer to Deleting a cluster for more information.
Then you can simply run the following command:
However, certain AWS resources aren’t completely deleted by the AWS CDK destroy command. For example, you need to delete the Amazon ECR repository via console or the AWS Command Line Interface (AWS CLI).
Don’t forget to also delete your Cloud9 environment if you no longer need it.
Conclusion
In this post, we used an application database in the form of postgres as a source, imported the data into Amazon Redshift, and extracted the metadata out of the two and imported them into Amundsen. From there we explored those tables and columns using the Amundsen frontend. This is just scratching the surface of the capabilities of this tool.
We hope you have enjoyed this post as much as we have putting it together. Amundsen is a great new project for solving the data democratization challenge within an enterprise. We hope this also gives you a bit of context as to how graph databases can solve some interesting problems in a much more elegant way than traditional relational database management services, and perhaps inspire you to use them more!
About the Author
 Peter Hanssens is an AWS Hero, Solutions Architect, and Founder of Cloud Shuttle, a community-focused cloud consultancy. He counts his major interests on the intersection between serverless and data engineering. Peter is a community leader—he has led the Sydney Serverless community for the past 3 years and has also built out data engineering communities in Melbourne, Sydney, and Brisbane. He’s passionate about helping others learn and grow their careers through shared experiences. Peter ran the first-ever ServerlessDays in Australia in 2019, and in 2020 he organized AWS Serverless Community Day ANZ, ServerlessDays ANZ, and DataEngBytes, a community-built data engineering conference.
 Don Simpson is a Principal Solutions Architect at Amazon Web Services. Since the age of 12, Don has been completely immersed in realizing his dreams with code. Don’s journey to AWS involved multiple startups he co-founded, and thought leadership in the area of knowledge graphs, link analysis, discourse analysis, and real-time analytics. Don enjoys working with customers to design well-architected solutions to help achieve their desired business outcomes. @don__simpson