In today’s landscape of one-on-one customer interactions for placing orders, the prevailing practice continues to rely on human attendants, even in settings like drive-thru coffee shops and fast-food establishments. This traditional approach poses several challenges: it heavily depends on manual processes, struggles to efficiently scale with increasing customer demands, introduces the potential for human errors, and operates within specific hours of availability. Additionally, in competitive markets, businesses adhering solely to manual processes might find it challenging to deliver efficient and competitive service. Despite technological advancements, the human-centric model remains deeply ingrained in order processing, leading to these limitations.
The prospect of utilizing technology for one-on-one order processing assistance has been available for some time. However, existing solutions can often fall into two categories: rule-based systems that demand substantial time and effort for setup and upkeep, or rigid systems that lack the flexibility required for human-like interactions with customers. As a result, businesses and organizations face challenges in swiftly and efficiently implementing such solutions. Fortunately, with the advent of generative AI and large language models (LLMs), it’s now possible to create automated systems that can handle natural language efficiently, and with an accelerated on-ramping timeline.
Amazon Bedrock is a fully managed service that offers a choice of high-performing foundation models (FMs) from leading AI companies like AI21 Labs, Anthropic, Cohere, Meta, Stability AI, and Amazon via a single API, along with a broad set of capabilities you need to build generative AI applications with security, privacy, and responsible AI. In addition to Amazon Bedrock, you can use other AWS services like Amazon SageMaker JumpStart and Amazon Lex to create fully automated and easily adaptable generative AI order processing agents.
In this post, we show you how to build a speech-capable order processing agent using Amazon Lex, Amazon Bedrock, and AWS Lambda.
Solution overview
The following diagram illustrates our solution architecture.
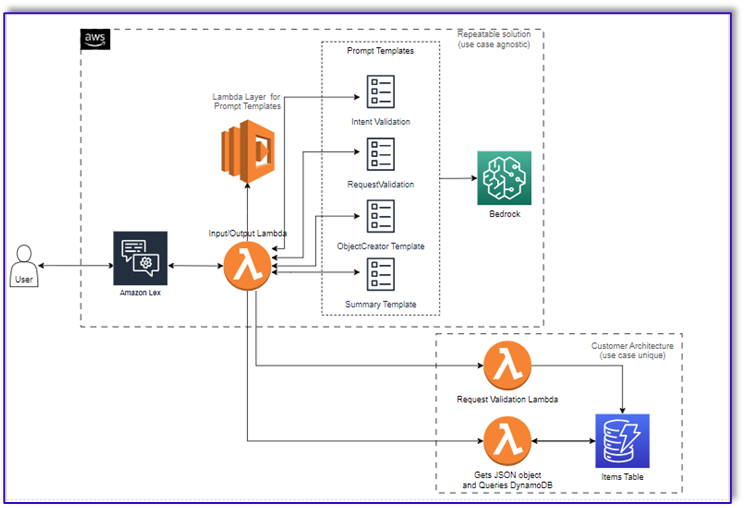
The workflow consists of the following steps:
- A customer places the order using Amazon Lex.
- The Amazon Lex bot interprets the customer’s intents and triggers a
DialogCodeHook.
- A Lambda function pulls the appropriate prompt template from the Lambda layer and formats model prompts by adding the customer input in the associated prompt template.
- The
RequestValidation prompt verifies the order with the menu item and lets the customer know via Amazon Lex if there’s something they want to order that isn’t part of the menu and will provide recommendations. The prompt also performs a preliminary validation for order completeness.
- The
ObjectCreator prompt converts the natural language requests into a data structure (JSON format).
- The customer validator Lambda function verifies the required attributes for the order and confirms if all necessary information is present to process the order.
- A customer Lambda function takes the data structure as an input for processing the order and passes the order total back to the orchestrating Lambda function.
- The orchestrating Lambda function calls the Amazon Bedrock LLM endpoint to generate a final order summary including the order total from the customer database system (for example, Amazon DynamoDB).
- The order summary is communicated back to the customer via Amazon Lex. After the customer confirms the order, the order will be processed.
Prerequisites
This post assumes that you have an active AWS account and familiarity with the following concepts and services:
Also, in order to access Amazon Bedrock from the Lambda functions, you need to make sure the Lambda runtime has the following libraries:
- boto3>=1.28.57
- awscli>=1.29.57
- botocore>=1.31.57
This can be done with a Lambda layer or by using a specific AMI with the required libraries.
Furthermore, these libraries are required when calling the Amazon Bedrock API from Amazon SageMaker Studio. This can be done by running a cell with the following code:
%pip install --no-build-isolation --force-reinstall \
"boto3>=1.28.57" \
"awscli>=1.29.57" \
"botocore>=1.31.57"
Finally, you create the following policy and later attach it to any role accessing Amazon Bedrock:
{
    "Version": "2012-10-17",
    "Statement": [
        {
            "Sid": "Statement1",
            "Effect": "Allow",
            "Action": "bedrock:*",
            "Resource": "*"
        }
    ]
}
Create a DynamoDB table
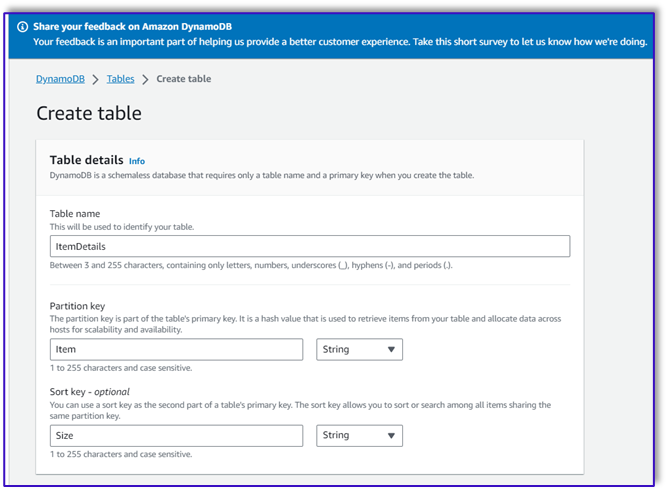
In our specific scenario, we’ve created a DynamoDB table as our customer database system, but you could also use Amazon Relational Database Service (Amazon RDS). Complete the following steps to provision your DynamoDB table (or customize the settings as needed for your use case):
- On the DynamoDB console, choose Tables in the navigation pane.
- Choose Create table.

- For Table name, enter a name (for example,
ItemDetails).
- For Partition key, enter a key (for this post, we use
Item).
- For Sort key, enter a key (for this post, we use
Size).
- Choose Create table.
Now you can load the data into the DynamoDB table. For this post, we use a CSV file. You can load the data to the DynamoDB table using Python code in a SageMaker notebook.
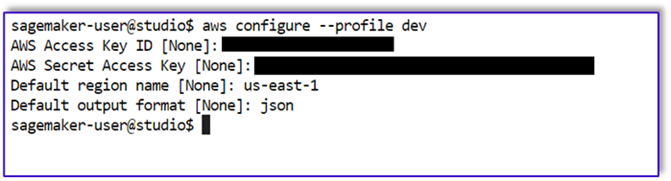
First, we need to set up a profile named dev.
- Open a new terminal in SageMaker Studio and run the following command:
aws configure --profile dev
This command will prompt you to enter your AWS access key ID, secret access key, default AWS Region, and output format.
- Return to the SageMaker notebook and write a Python code to set up a connection to DynamoDB using the Boto3 library in Python. This code snippet creates a session using a specific AWS profile named dev and then creates a DynamoDB client using that session. The following is the code sample to load the data:
%pip install boto3
import boto3
import csv

# Create a session using a profile named 'dev'
session = boto3.Session(profile_name='dev')

# Create a DynamoDB resource using the session
dynamodb = session.resource('dynamodb')

# Specify your DynamoDB table name
table_name = 'your_table_name'
table = dynamodb.Table(table_name)

# Specify the path to your CSV file
csv_file_path = 'path/to/your/file.csv'

# Read CSV file and put items into DynamoDB
with open(csv_file_path, 'r', encoding='utf-8-sig') as csvfile:
    csvreader = csv.reader(csvfile)

    # Skip the header row
    next(csvreader, None)

    for row in csvreader:
        # Extract values from the CSV row
        item = {
            'Item': row[0],  # Adjust the index based on your CSV structure
            'Size': row[1],
            'Price': row[2]
        }

        # Put item into DynamoDB
        response = table.put_item(Item=item)

        print(f"Item added: {response}")
print(f"CSV data has been loaded into the DynamoDB table: {table_name}")
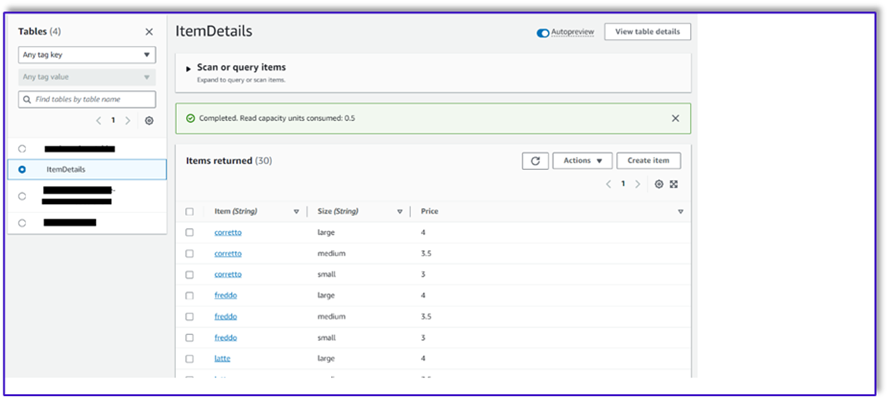
Alternatively, you can use NoSQL Workbench or other tools to quickly load the data to your DynamoDB table.
The following is a screenshot after the sample data is inserted into the table.
Create templates in a SageMaker notebook using the Amazon Bedrock invocation API
To create our prompt template for this use case, we use Amazon Bedrock. You can access Amazon Bedrock from the AWS Management Console and via API invocations. In our case, we access Amazon Bedrock via API from the convenience of a SageMaker Studio notebook to create not only our prompt template, but our complete API invocation code that we can later use on our Lambda function.
- On the SageMaker console, access an existing SageMaker Studio domain or create a new one to access Amazon Bedrock from a SageMaker notebook.
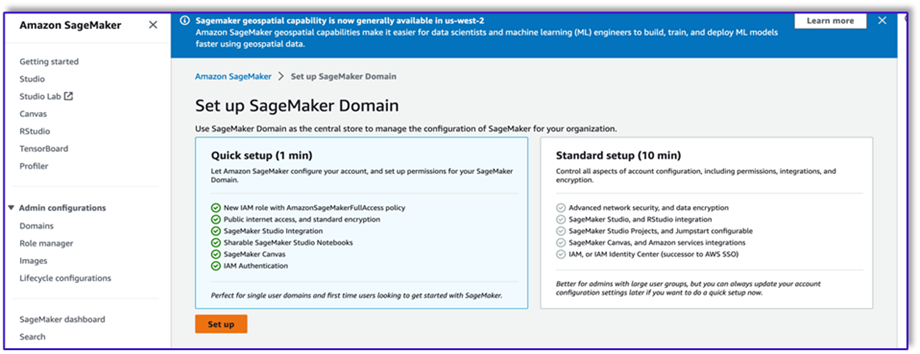
- After you create the SageMaker domain and user, choose the user and choose Launch and Studio. This will open a JupyterLab environment.
- When the JupyterLab environment is ready, open a new notebook and begin importing the necessary libraries.
There are many FMs available via the Amazon Bedrock Python SDK. In this case, we use Claude V2, a powerful foundational model developed by Anthropic.
The order processing agent needs a few different templates. This can change depending on the use case, but we have designed a general workflow that can apply to multiple settings. For this use case, the Amazon Bedrock LLM template will accomplish the following:
- Validate the customer intent
- Validate the request
- Create the order data structure
- Pass a summary of the order to the customer
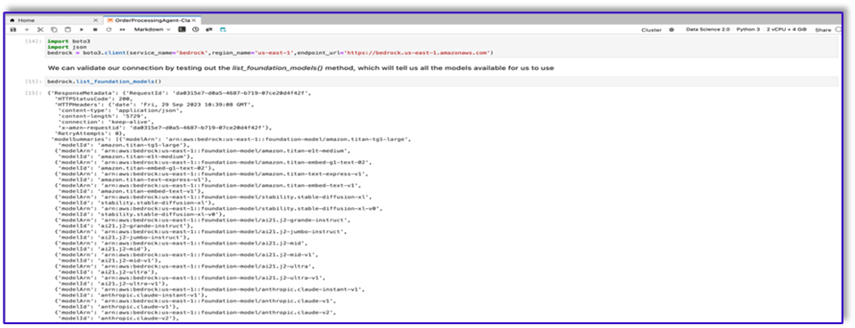
- To invoke the model, create a bedrock-runtime object from Boto3.

#Model api request parameters
modelId = 'anthropic.claude-v2' # change this to use a different version from the model provider
accept = 'application/json'
contentType = 'application/json'

import boto3
import json
bedrock = boto3.client(service_name='bedrock-runtime')
Let’s start by working on the intent validator prompt template. This is an iterative process, but thanks to Anthropic’s prompt engineering guide, you can quickly create a prompt that can accomplish the task.
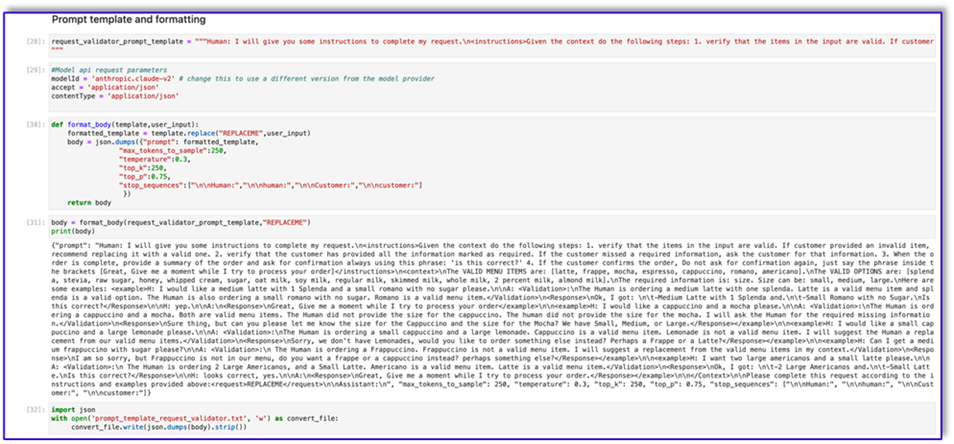
- Create the first prompt template along with a utility function that will help prepare the body for the API invocations.
The following is the code for prompt_template_intent_validator.txt:
"{\"prompt\": \"Human: I will give you some instructions to complete my request.\\n<instructions>Given the Conversation between Human and Assistant, you need to identify the intent that the human wants to accomplish and respond appropriately. The valid intents are: Greeting,Place Order, Complain, Speak to Someone. Always put your response to the Human within the Response tags. Also add an XML tag to your output identifying the human intent.\\nHere are some examples:\\n<example><Conversation> H: hi there.\\n\\nA: Hi, how can I help you today?\\n\\nH: Yes. I would like a medium mocha please</Conversation>\\n\\nA:<intent>Place Order</intent><Response>\\nGot it.</Response></example>\\n<example><Conversation> H: hello\\n\\nA: Hi, how can I help you today?\\n\\nH: my coffee does not taste well can you please re-make it?</Conversation>\\n\\nA:<intent>Complain</intent><Response>\\nOh, I am sorry to hear that. Let me get someone to help you.</Response></example>\\n<example><Conversation> H: hi\\n\\nA: Hi, how can I help you today?\\n\\nH: I would like to speak to someone else please</Conversation>\\n\\nA:<intent>Speak to Someone</intent><Response>\\nSure, let me get someone to help you.</Response></example>\\n<example><Conversation> H: howdy\\n\\nA: Hi, how can I help you today?\\n\\nH:can I get a large americano with sugar and 2 mochas with no whipped cream</Conversation>\\n\\nA:<intent>Place Order</intent><Response>\\nSure thing! Please give me a moment.</Response></example>\\n<example><Conversation> H: hi\\n\\n</Conversation>\\n\\nA:<intent>Greeting</intent><Response>\\nHi there, how can I help you today?</Response></example>\\n</instructions>\\n\\nPlease complete this request according to the instructions and examples provided above:<request><Conversation>REPLACEME</Conversation></request>\\n\\nAssistant:\\n\", \"max_tokens_to_sample\": 250, \"temperature\": 1, \"top_k\": 250, \"top_p\": 0.75, \"stop_sequences\": [\"\\n\\nHuman:\", \"\\n\\nhuman:\", \"\\n\\nCustomer:\", \"\\n\\ncustomer:\"]}"
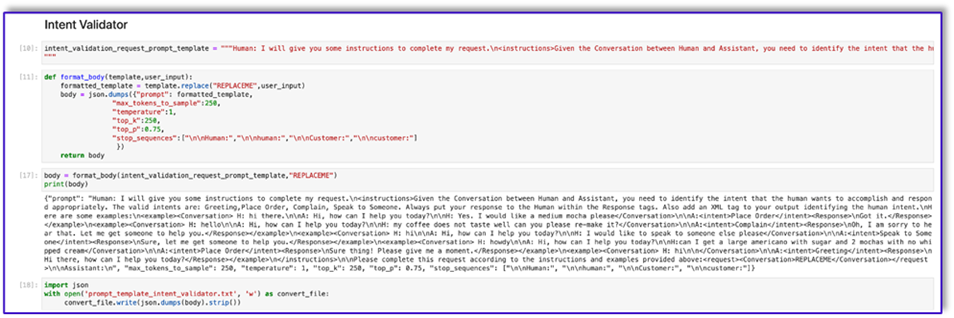
- Save this template into a file in order to upload to Amazon S3 and call from the Lambda function when needed. Save the templates as JSON serialized strings in a text file. The previous screenshot shows the code sample to accomplish this as well.
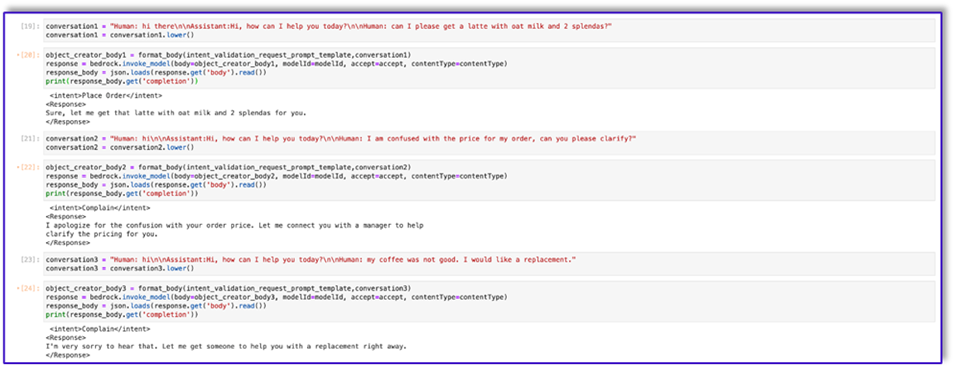
- Repeat the same steps with the other templates.
The following are some screenshots of the other templates and the results when calling Amazon Bedrock with some of them.
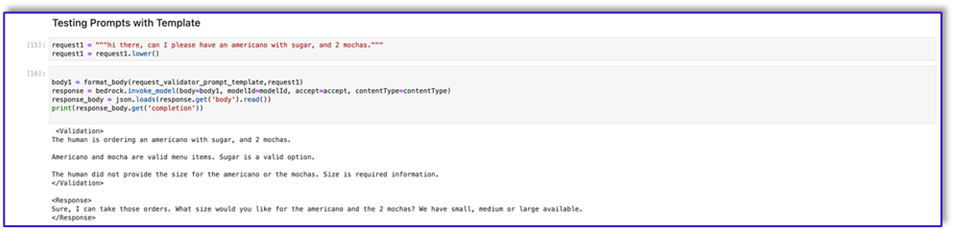
The following is the code for prompt_template_request_validator.txt:
"{\"prompt\": \"Human: I will give you some instructions to complete my request.\\n<instructions>Given the context do the following steps: 1. verify that the items in the input are valid. If customer provided an invalid item, recommend replacing it with a valid one. 2. verify that the customer has provided all the information marked as required. If the customer missed a required information, ask the customer for that information. 3. When the order is complete, provide a summary of the order and ask for confirmation always using this phrase: 'is this correct?' 4. If the customer confirms the order, Do not ask for confirmation again, just say the phrase inside the brackets [Great, Give me a moment while I try to process your order]</instructions>\\n<context>\\nThe VALID MENU ITEMS are: [latte, frappe, mocha, espresso, cappuccino, romano, americano].\\nThe VALID OPTIONS are: [splenda, stevia, raw sugar, honey, whipped cream, sugar, oat milk, soy milk, regular milk, skimmed milk, whole milk, 2 percent milk, almond milk].\\nThe required information is: size. Size can be: small, medium, large.\\nHere are some examples: <example>H: I would like a medium latte with 1 Splenda and a small romano with no sugar please.\\n\\nA: <Validation>:\\nThe Human is ordering a medium latte with one splenda. Latte is a valid menu item and splenda is a valid option. The Human is also ordering a small romano with no sugar. Romano is a valid menu item.</Validation>\\n<Response>\\nOk, I got: \\n\\t-Medium Latte with 1 Splenda and.\\n\\t-Small Romano with no Sugar.\\nIs this correct?</Response>\\n\\nH: yep.\\n\\nA:\\n<Response>\\nGreat, Give me a moment while I try to process your order</example>\\n\\n<example>H: I would like a cappuccino and a mocha please.\\n\\nA: <Validation>:\\nThe Human is ordering a cappuccino and a mocha. Both are valid menu items. The Human did not provide the size for the cappuccino. The human did not provide the size for the mocha. I will ask the Human for the required missing information.</Validation>\\n<Response>\\nSure thing, but can you please let me know the size for the Cappuccino and the size for the Mocha? We have Small, Medium, or Large.</Response></example>\\n\\n<example>H: I would like a small cappuccino and a large lemonade please.\\n\\nA: <Validation>:\\nThe Human is ordering a small cappuccino and a large lemonade. Cappuccino is a valid menu item. Lemonade is not a valid menu item. I will suggest the Human a replacement from our valid menu items.</Validation>\\n<Response>\\nSorry, we don't have Lemonades, would you like to order something else instead? Perhaps a Frappe or a Latte?</Response></example>\\n\\n<example>H: Can I get a medium frappuccino with sugar please?\\n\\nA: <Validation>:\\n The Human is ordering a Frappuccino. Frappuccino is not a valid menu item. I will suggest a replacement from the valid menu items in my context.</Validation>\\n<Response>\\nI am so sorry, but Frappuccino is not in our menu, do you want a frappe or a cappuccino instead? perhaps something else?</Response></example>\\n\\n<example>H: I want two large americanos and a small latte please.\\n\\nA: <Validation>:\\n The Human is ordering 2 Large Americanos, and a Small Latte. Americano is a valid menu item. Latte is a valid menu item.</Validation>\\n<Response>\\nOk, I got: \\n\\t-2 Large Americanos and.\\n\\t-Small Latte.\\nIs this correct?</Response>\\n\\nH: looks correct, yes.\\n\\nA:\\n<Response>\\nGreat, Give me a moment while I try to process your order.</Response></example>\\n\\n</Context>\\n\\nPlease complete this request according to the instructions and examples provided above:<request>REPLACEME</request>\\n\\nAssistant:\\n\", \"max_tokens_to_sample\": 250, \"temperature\": 0.3, \"top_k\": 250, \"top_p\": 0.75, \"stop_sequences\": [\"\\n\\nHuman:\", \"\\n\\nhuman:\", \"\\n\\nCustomer:\", \"\\n\\ncustomer:\"]}"
The following is our response from Amazon Bedrock using this template.
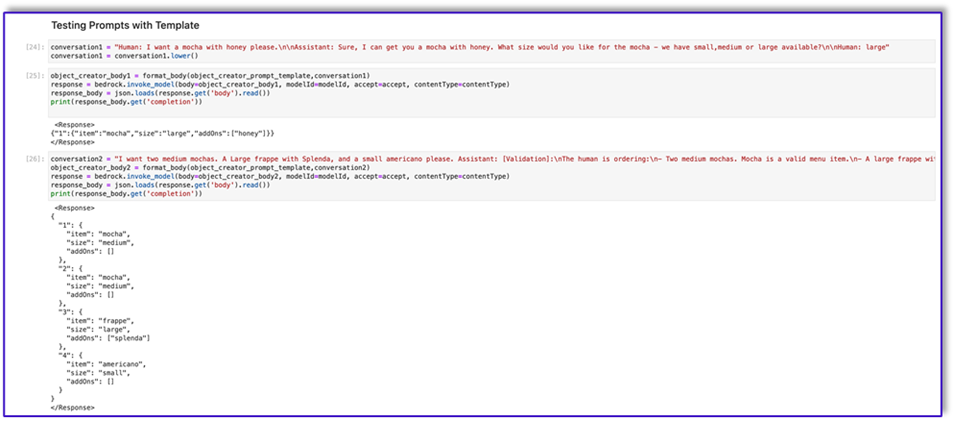
The following is the code for prompt_template_object_creator.txt:
"{\"prompt\": \"Human: I will give you some instructions to complete my request.\\n<instructions>Given the Conversation between Human and Assistant, you need to create a json object in Response with the appropriate attributes.\\nHere are some examples:\\n<example><Conversation> H: I want a latte.\\n\\nA:\\nCan I have the size?\\n\\nH: Medium.\\n\\nA: So, a medium latte.\\nIs this Correct?\\n\\nH: Yes.</Conversation>\\n\\nA:<Response>{\\\"1\\\":{\\\"item\\\":\\\"latte\\\",\\\"size\\\":\\\"medium\\\",\\\"addOns\\\":[]}}</Response></example>\\n<example><Conversation> H: I want a large frappe and 2 small americanos with sugar.\\n\\nA: Okay, let me confirm:\\n\\n1 large frappe\\n\\n2 small americanos with sugar\\n\\nIs this correct?\\n\\nH: Yes.</Conversation>\\n\\nA:<Response>{\\\"1\\\":{\\\"item\\\":\\\"frappe\\\",\\\"size\\\":\\\"large\\\",\\\"addOns\\\":[]},\\\"2\\\":{\\\"item\\\":\\\"americano\\\",\\\"size\\\":\\\"small\\\",\\\"addOns\\\":[\\\"sugar\\\"]},\\\"3\\\":{\\\"item\\\":\\\"americano\\\",\\\"size\\\":\\\"small\\\",\\\"addOns\\\":[\\\"sugar\\\"]}}</Response>\\n</example>\\n<example><Conversation> H: I want a medium americano.\\n\\nA: Okay, let me confirm:\\n\\n1 medium americano\\n\\nIs this correct?\\n\\nH: Yes.</Conversation>\\n\\nA:<Response>{\\\"1\\\":{\\\"item\\\":\\\"americano\\\",\\\"size\\\":\\\"medium\\\",\\\"addOns\\\":[]}}</Response></example>\\n<example><Conversation> H: I want a large latte with oatmilk.\\n\\nA: Okay, let me confirm:\\n\\nLarge latte with oatmilk\\n\\nIs this correct?\\n\\nH: Yes.</Conversation>\\n\\nA:<Response>{\\\"1\\\":{\\\"item\\\":\\\"latte\\\",\\\"size\\\":\\\"large\\\",\\\"addOns\\\":[\\\"oatmilk\\\"]}}</Response></example>\\n<example><Conversation> H: I want a small mocha with no whipped cream please.\\n\\nA: Okay, let me confirm:\\n\\nSmall mocha with no whipped cream\\n\\nIs this correct?\\n\\nH: Yes.</Conversation>\\n\\nA:<Response>{\\\"1\\\":{\\\"item\\\":\\\"mocha\\\",\\\"size\\\":\\\"small\\\",\\\"addOns\\\":[\\\"no whipped cream\\\"]}}</Response>\\n\\n</example></instructions>\\n\\nPlease complete this request according to the instructions and examples provided above:<request><Conversation>REPLACEME</Conversation></request>\\n\\nAssistant:\\n\", \"max_tokens_to_sample\": 250, \"temperature\": 0.3, \"top_k\": 250, \"top_p\": 0.75, \"stop_sequences\": [\"\\n\\nHuman:\", \"\\n\\nhuman:\", \"\\n\\nCustomer:\", \"\\n\\ncustomer:\"]}"

The following is the code for prompt_template_order_summary.txt:
"{\"prompt\": \"Human: I will give you some instructions to complete my request.\\n<instructions>Given the Conversation between Human and Assistant, you need to create a summary of the order with bullet points and include the order total.\\nHere are some examples:\\n<example><Conversation> H: I want a large frappe and 2 small americanos with sugar.\\n\\nA: Okay, let me confirm:\\n\\n1 large frappe\\n\\n2 small americanos with sugar\\n\\nIs this correct?\\n\\nH: Yes.</Conversation>\\n\\n<OrderTotal>10.50</OrderTotal>\\n\\nA:<Response>\\nHere is a summary of your order along with the total:\\n\\n1 large frappe\\n\\n2 small americanos with sugar.\\nYour Order total is $10.50</Response></example>\\n<example><Conversation> H: I want a medium americano.\\n\\nA: Okay, let me confirm:\\n\\n1 medium americano\\n\\nIs this correct?\\n\\nH: Yes.</Conversation>\\n\\n<OrderTotal>3.50</OrderTotal>\\n\\nA:<Response>\\nHere is a summary of your order along with the total:\\n\\n1 medium americano.\\nYour Order total is $3.50</Response></example>\\n<example><Conversation> H: I want a large latte with oat milk.\\n\\nA: Okay, let me confirm:\\n\\nLarge latte with oat milk\\n\\nIs this correct?\\n\\nH: Yes.</Conversation>\\n\\n<OrderTotal>6.75</OrderTotal>\\n\\nA:<Response>\\nHere is a summary of your order along with the total:\\n\\nLarge latte with oat milk.\\nYour Order total is $6.75</Response></example>\\n<example><Conversation> H: I want a small mocha with no whipped cream please.\\n\\nA: Okay, let me confirm:\\n\\nSmall mocha with no whipped cream\\n\\nIs this correct?\\n\\nH: Yes.</Conversation>\\n\\n<OrderTotal>4.25</OrderTotal>\\n\\nA:<Response>\\nHere is a summary of your order along with the total:\\n\\nSmall mocha with no whipped cream.\\nYour Order total is $6.75</Response>\\n\\n</example>\\n</instructions>\\n\\nPlease complete this request according to the instructions and examples provided above:<request><Conversation>REPLACEME</Conversation>\\n\\n<OrderTotal>REPLACETOTAL</OrderTotal></request>\\n\\nAssistant:\\n\", \"max_tokens_to_sample\": 250, \"temperature\": 0.3, \"top_k\": 250, \"top_p\": 0.75, \"stop_sequences\": [\"\\n\\nHuman:\", \"\\n\\nhuman:\", \"\\n\\nCustomer:\", \"\\n\\ncustomer:\", \"[Conversation]\"]}"
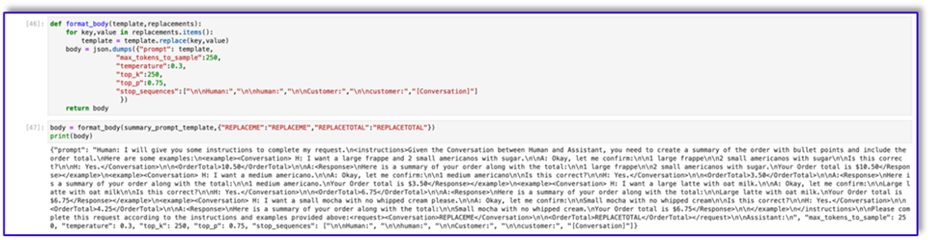
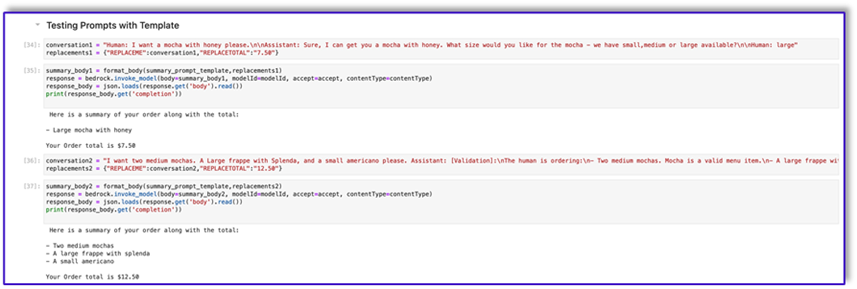
As you can see, we have used our prompt templates to validate menu items, identify missing required information, create a data structure, and summarize the order. The foundational models available on Amazon Bedrock are very powerful, so you could accomplish even more tasks via these templates.
You have completed engineering the prompts and saved the templates to text files. You can now begin creating the Amazon Lex bot and the associated Lambda functions.
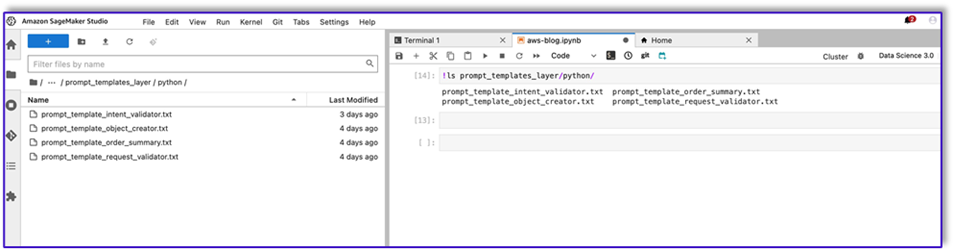
Create a Lambda layer with the prompt templates
Complete the following steps to create your Lambda layer:
- In SageMaker Studio, create a new folder with a subfolder named
python.
- Copy your prompt files to the
python folder.
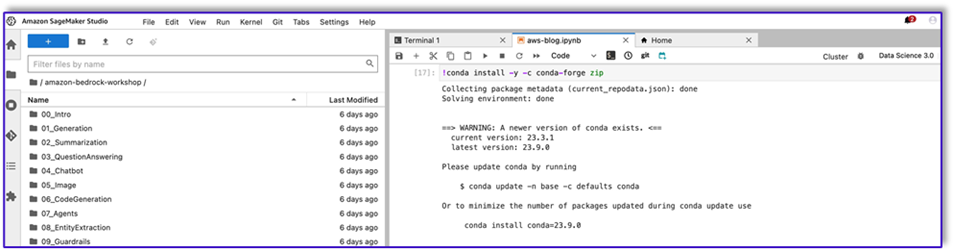
- You can add the ZIP library to your notebook instance by running the following command.
!conda install -y -c conda-forge zip
- Now, run the following command to create the ZIP file for uploading to the Lambda layer.
!zip -r prompt_templates_layer.zip prompt_templates_layer/.
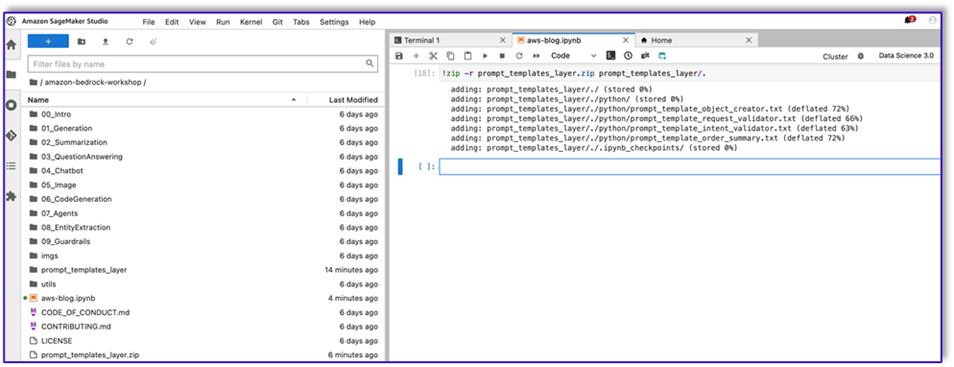
- After you create the ZIP file, you can download the file. Go to Lambda, create a new layer by uploading the file directly or by uploading to Amazon S3 first.
- Then attach this new layer to the orchestration Lambda function.
Now your prompt template files are locally stored in your Lambda runtime environment. This will speed up the process during your bot runs.
Create a Lambda layer with the required libraries
Complete the following steps to create your Lambda layer with the required librarues:
- Open an AWS Cloud9 instance environment, create a folder with a subfolder called
python.
- Open a terminal inside the
python folder.
- Run the following commands from the terminal:
pip install “boto3>=1.28.57” -t .
pip install “awscli>=1.29.57" -t .
pip install “botocore>=1.31.57” -t .
- Run
cd .. and position yourself inside your new folder where you also have the python subfolder.
- Run the following command:
- After you create the ZIP file, you can download the file. Go to Lambda, create a new layer by uploading the file directly or by uploading to Amazon S3 first.
- Then attach this new layer to the orchestration Lambda function.
Create the bot in Amazon Lex v2
For this use case, we build an Amazon Lex bot that can provide an input/output interface for the architecture in order to call Amazon Bedrock using voice or text from any interface. Because the LLM will handle the conversation piece of this order processing agent, and Lambda will orchestrate the workflow, you can create a bot with three intents and no slots.
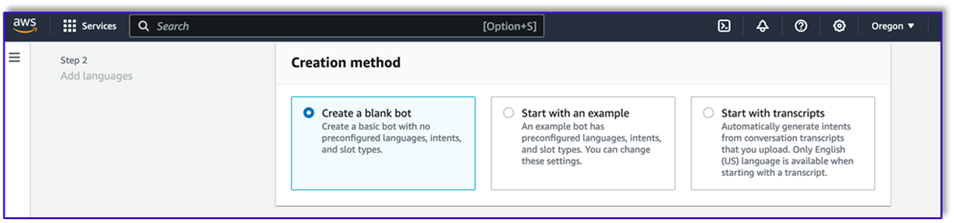
- On the Amazon Lex console, create a new bot with the method Create a blank bot.
Now you can add an intent with any appropriate initial utterance for the end-users to start the conversation with the bot. We use simple greetings and add an initial bot response so end-users can provide their requests. When creating the bot, make sure to use a Lambda code hook with the intents; this will trigger a Lambda function that will orchestrate the workflow between the customer, Amazon Lex, and the LLM.
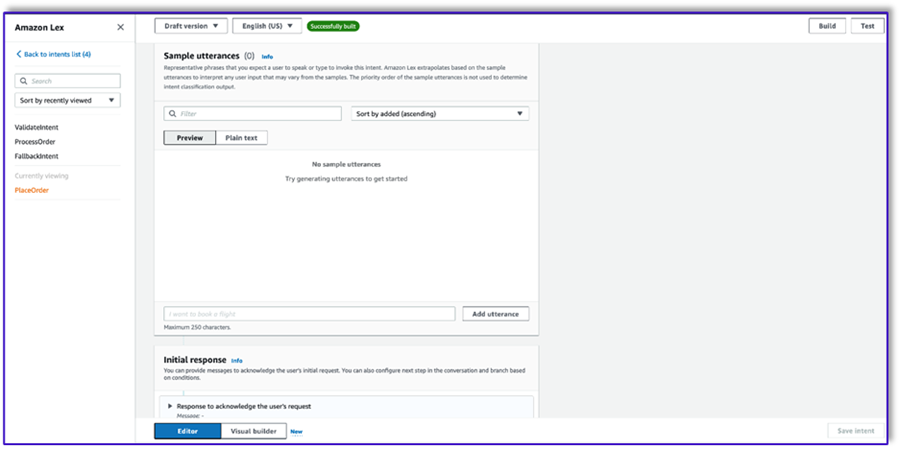
- Add your first intent, which triggers the workflow and uses the intent validation prompt template to call Amazon Bedrock and identify what the customer is trying to accomplish. Add a few simple utterances for end-users to start conversation.
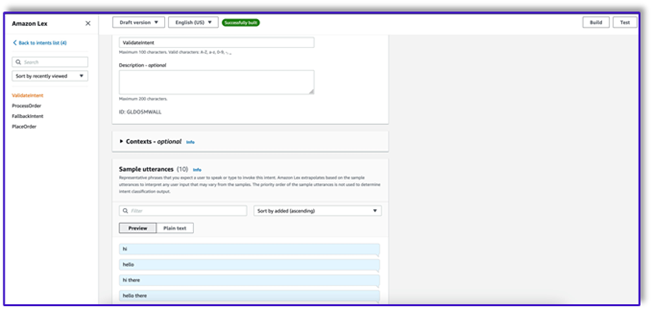
You don’t need to use any slots or initial reading in any of the bot intents. In fact, you don’t need to add utterances to the second or third intents. That is because the LLM will guide Lambda throughout the process.
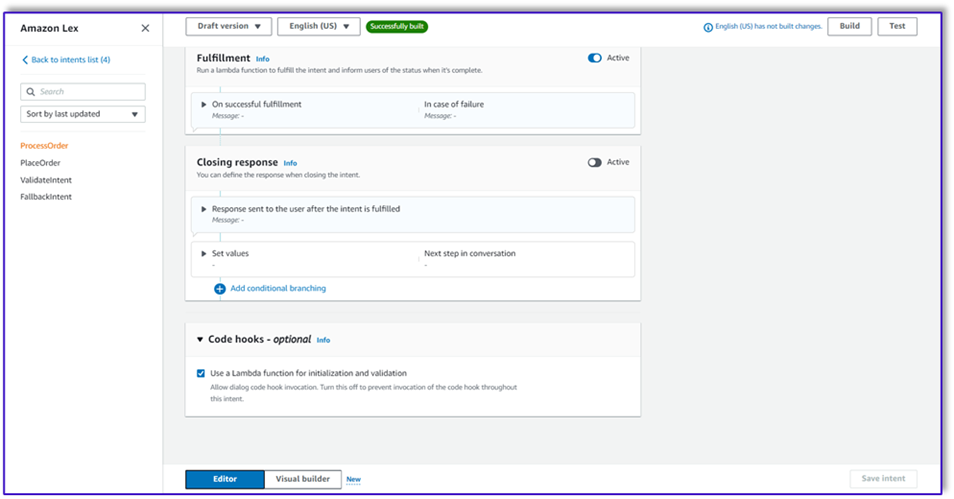
- Add a confirmation prompt. You can customize this message in the Lambda function later.
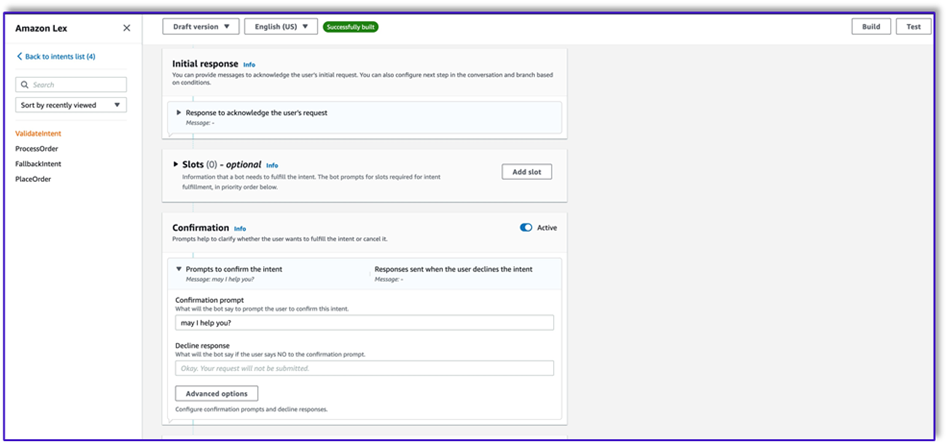
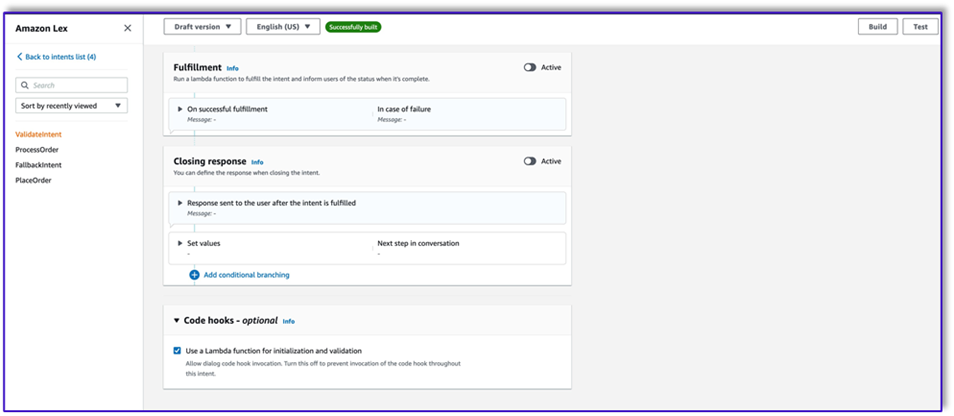
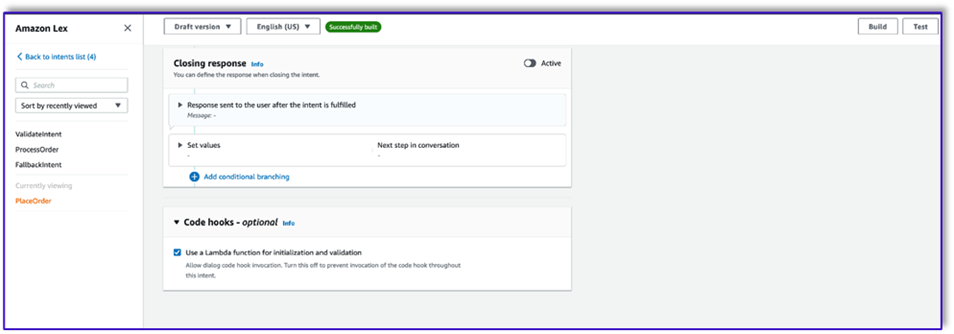
- Under Code hooks, select Use a Lambda function for initialization and validation.
- Create a second intent with no utterance and no initial response. This is the
PlaceOrder intent.
When the LLM identifies that the customer is trying to place an order, the Lambda function will trigger this intent and validate the customer request against the menu, and make sure that no required information is missing. Remember that all of this is on the prompt templates, so you can adapt this workflow for any use case by changing the prompt templates.
- Don’t add any slots, but add a confirmation prompt and decline response.
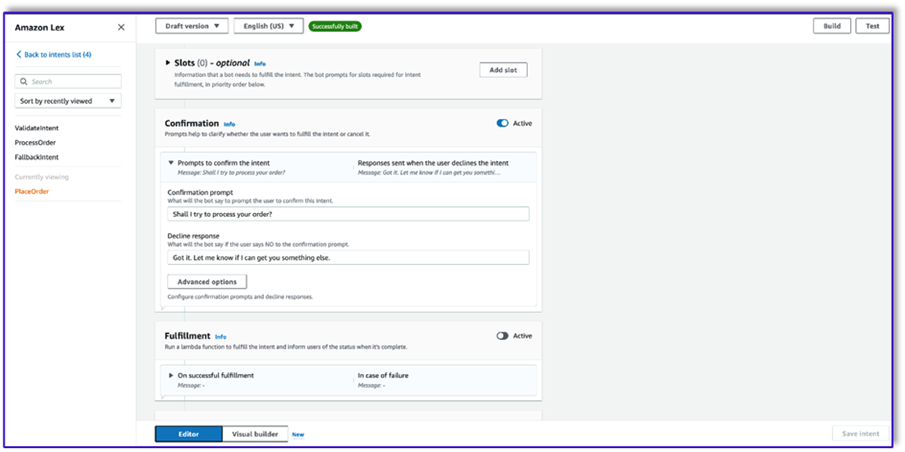
- Select Use a Lambda function for initialization and validation.
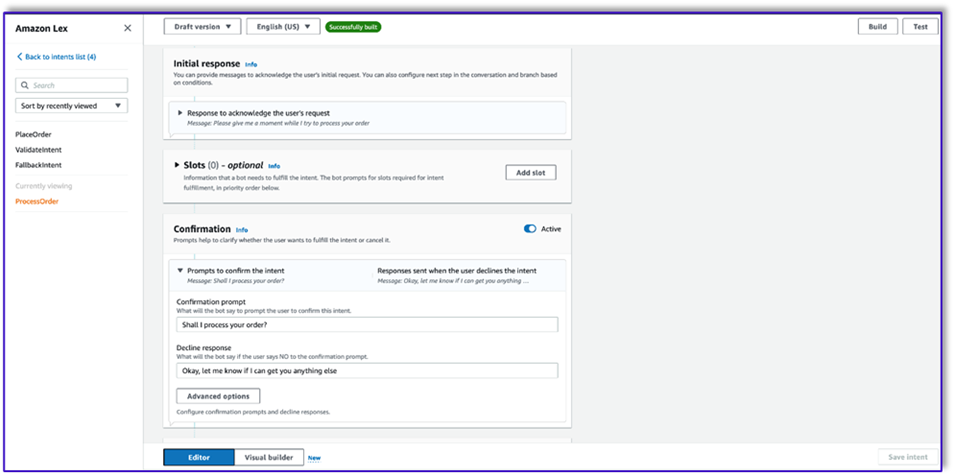
- Create a third intent named
ProcessOrder with no sample utterances and no slots.
- Add an initial response, a confirmation prompt, and a decline response.
After the LLM has validated the customer request, the Lambda function triggers the third and last intent to process the order. Here, Lambda will use the object creator template to generate the order JSON data structure to query the DynamoDB table, and then use the order summary template to summarize the whole order along with the total so Amazon Lex can pass it to the customer.
- Select Use a Lambda function for initialization and validation. This can use any Lambda function to process the order after the customer has given the final confirmation.
- After you create all three intents, go to the Visual builder for the
ValidateIntent, add a go-to intent step, and connect the output of the positive confirmation to that step.
- After you add the go-to intent, edit it and choose the PlaceOrder intent as the intent name.
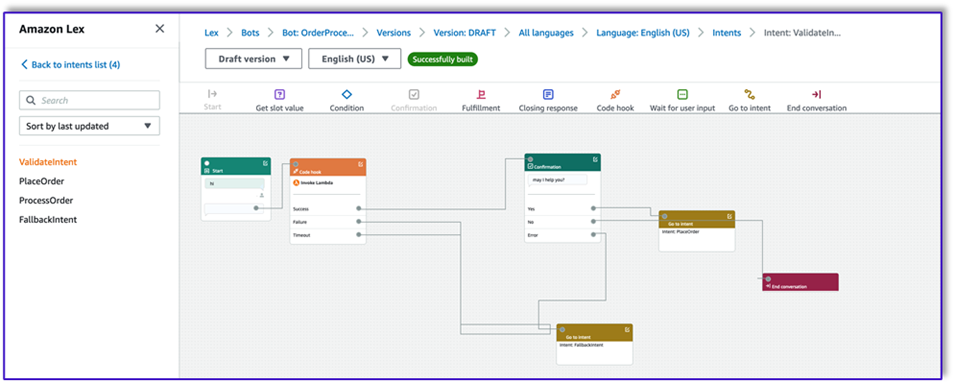
- Similarly, to go the Visual builder for the
PlaceOrder intent and connect the output of the positive confirmation to the ProcessOrder go-to intent. No editing is required for the ProcessOrder intent.
- You now need to create the Lambda function that orchestrates Amazon Lex and calls the DynamoDB table, as detailed in the following section.
Create a Lambda function to orchestrate the Amazon Lex bot
You can now build the Lambda function that orchestrates the Amazon Lex bot and workflow. Complete the following steps:
- Create a Lambda function with the standard execution policy and let Lambda create a role for you.
- In the code window of your function, add a few utility functions that will help: format the prompts by adding the lex context to the template, call the Amazon Bedrock LLM API, extract the desired text from the responses, and more. See the following code:
import json
import re
import boto3
import logging

logger = logging.getLogger()
logger.setLevel(logging.DEBUG)

bedrock = boto3.client(service_name='bedrock-runtime')
def CreatingCustomPromptFromLambdaLayer(object_key,replace_items):

    folder_path = '/opt/order_processing_agent_prompt_templates/python/'
    try:
        file_path = folder_path + object_key
        with open(file_path, "r") as file1:
            raw_template = file1.read()
            # Modify the template with the custom input prompt
            #template['inputs'][0].insert(1, {"role": "user", "content": '### Input:\n' + user_request})
            for key,value in replace_items.items():
                value = json.dumps(json.dumps(value).replace('"','')).replace('"','')
                raw_template = raw_template.replace(key,value)
            modified_prompt = raw_template

            return modified_prompt
    except Exception as e:
        return {
            'statusCode': 500,
            'body': f'An error occurred: {str(e)}'
        }
def CreatingCustomPrompt(object_key,replace_items):
    logger.debug('replace_items is: {}'.format(replace_items))
    #retrieve user request from intent_request
    #we first propmt the model with current order

    bucket_name = 'your-bucket-name'

    #object_key = 'prompt_template_order_processing.txt'
    try:
        s3 = boto3.client('s3')
        # Retrieve the existing template from S3
        response = s3.get_object(Bucket=bucket_name, Key=object_key)
        raw_template = response['Body'].read().decode('utf-8')
        raw_template = json.loads(raw_template)
        logger.debug('raw template is {}'.format(raw_template))
        #template_json = json.loads(raw_template)
        #logger.debug('template_json is {}'.format(template_json))
        #template = json.dumps(template_json)
        #logger.debug('template is {}'.format(template))

        # Modify the template with the custom input prompt
        #template['inputs'][0].insert(1, {"role": "user", "content": '### Input:\n' + user_request})
        for key,value in replace_items.items():
            raw_template = raw_template.replace(key,value)
            logger.debug("Replacing: {} \nwith: {}".format(key,value))
        modified_prompt = json.dumps(raw_template)
        logger.debug("Modified template: {}".format(modified_prompt))
        logger.debug("Modified template type is: {}".format(print(type(modified_prompt))))

        #modified_template_json = json.loads(modified_prompt)
        #logger.debug("Modified template json: {}".format(modified_template_json))

        return modified_prompt
    except Exception as e:
        return {
            'statusCode': 500,
            'body': f'An error occurred: {str(e)}'
        }

def validate_intent(intent_request):
    logger.debug('starting validate_intent: {}'.format(intent_request))
    #retrieve user request from intent_request
    user_request = 'Human: ' + intent_request['inputTranscript'].lower()
    #getting current context variable
    current_session_attributes =  intent_request['sessionState']['sessionAttributes']
    if len(current_session_attributes) > 0:
        full_context = current_session_attributes['fullContext'] + '\\n\\n' + user_request
        dialog_context = current_session_attributes['dialogContext'] + '\\n\\n' + user_request
    else:
        full_context = user_request
        dialog_context = user_request
    #Preparing validation prompt by adding context to prompt template
    object_key = 'prompt_template_intent_validator.txt'
    #replace_items = {"REPLACEME":full_context}
    #replace_items = {"REPLACEME":dialog_context}
    replace_items = {"REPLACEME":dialog_context}
    #validation_prompt = CreatingCustomPrompt(object_key,replace_items)
    validation_prompt = CreatingCustomPromptFromLambdaLayer(object_key,replace_items)

    #Prompting model for request validation
    intent_validation_completion = prompt_bedrock(validation_prompt)
    intent_validation_completion = re.sub(r'[\"]','',intent_validation_completion)

    #extracting response from response completion and removing some special characters
    validation_response = extract_response(intent_validation_completion)
    validation_intent = extract_intent(intent_validation_completion)


    #business logic depending on intents
    if validation_intent == 'Place Order':
        return validate_request(intent_request)
    elif validation_intent in ['Complain','Speak to Someone']:
        ##adding session attributes to keep current context
        full_context = full_context + '\\n\\n' + intent_validation_completion
        dialog_context = dialog_context + '\\n\\nAssistant: ' + validation_response
        intent_request['sessionState']['sessionAttributes']['fullContext'] = full_context
        intent_request['sessionState']['sessionAttributes']['dialogContext'] = dialog_context
        intent_request['sessionState']['sessionAttributes']['customerIntent'] = validation_intent
        return close(intent_request['sessionState']['sessionAttributes'],intent_request['sessionState']['intent']['name'],'Fulfilled','Close',validation_response)
    if validation_intent == 'Greeting':
        ##adding session attributes to keep current context
        full_context = full_context + '\\n\\n' + intent_validation_completion
        dialog_context = dialog_context + '\\n\\nAssistant: ' + validation_response
        intent_request['sessionState']['sessionAttributes']['fullContext'] = full_context
        intent_request['sessionState']['sessionAttributes']['dialogContext'] = dialog_context
        intent_request['sessionState']['sessionAttributes']['customerIntent'] = validation_intent
        return close(intent_request['sessionState']['sessionAttributes'],intent_request['sessionState']['intent']['name'],'InProgress','ConfirmIntent',validation_response)

def validate_request(intent_request):
    logger.debug('starting validate_request: {}'.format(intent_request))
    #retrieve user request from intent_request
    user_request = 'Human: ' + intent_request['inputTranscript'].lower()
    #getting current context variable
    current_session_attributes =  intent_request['sessionState']['sessionAttributes']
    if len(current_session_attributes) > 0:
        full_context = current_session_attributes['fullContext'] + '\\n\\n' + user_request
        dialog_context = current_session_attributes['dialogContext'] + '\\n\\n' + user_request
    else:
        full_context = user_request
        dialog_context = user_request

    #Preparing validation prompt by adding context to prompt template
    object_key = 'prompt_template_request_validator.txt'
    replace_items = {"REPLACEME":dialog_context}
    #validation_prompt = CreatingCustomPrompt(object_key,replace_items)
    validation_prompt = CreatingCustomPromptFromLambdaLayer(object_key,replace_items)

    #Prompting model for request validation
    request_validation_completion = prompt_bedrock(validation_prompt)
    request_validation_completion = re.sub(r'[\"]','',request_validation_completion)

    #extracting response from response completion and removing some special characters
    validation_response = extract_response(request_validation_completion)

    ##adding session attributes to keep current context
    full_context = full_context + '\\n\\n' + request_validation_completion
    dialog_context = dialog_context + '\\n\\nAssistant: ' + validation_response
    intent_request['sessionState']['sessionAttributes']['fullContext'] = full_context
    intent_request['sessionState']['sessionAttributes']['dialogContext'] = dialog_context

    return close(intent_request['sessionState']['sessionAttributes'],'PlaceOrder','InProgress','ConfirmIntent',validation_response)

def process_order(intent_request):
    logger.debug('starting process_order: {}'.format(intent_request))

     #retrieve user request from intent_request
    user_request = 'Human: ' + intent_request['inputTranscript'].lower()
    #getting current context variable
    current_session_attributes =  intent_request['sessionState']['sessionAttributes']
    if len(current_session_attributes) > 0:
        full_context = current_session_attributes['fullContext'] + '\\n\\n' + user_request
        dialog_context = current_session_attributes['dialogContext'] + '\\n\\n' + user_request
    else:
        full_context = user_request
        dialog_context = user_request
    #   Preparing object creator prompt by adding context to prompt template
    object_key = 'prompt_template_object_creator.txt'
    replace_items = {"REPLACEME":dialog_context}
    #object_creator_prompt = CreatingCustomPrompt(object_key,replace_items)
    object_creator_prompt = CreatingCustomPromptFromLambdaLayer(object_key,replace_items)
    #Prompting model for object creation
    object_creation_completion = prompt_bedrock(object_creator_prompt)
    #extracting response from response completion
    object_creation_response = extract_response(object_creation_completion)
    inputParams = json.loads(object_creation_response)
    inputParams = json.dumps(json.dumps(inputParams))
    logger.debug('inputParams is: {}'.format(inputParams))
    client = boto3.client('lambda')
    response = client.invoke(FunctionName = 'arn:aws:lambda:us-east-1:<AccountNumber>:function:aws-blog-order-validator',InvocationType = 'RequestResponse',Payload = inputParams)
    responseFromChild = json.load(response['Payload'])
    validationResult = responseFromChild['statusCode']
    if validationResult == 205:
        order_validation_error = responseFromChild['validator_response']
        return close(intent_request['sessionState']['sessionAttributes'],'PlaceOrder','InProgress','ConfirmIntent',order_validation_error)
    #invokes Order Processing lambda to query DynamoDB table and returns order total
    response = client.invoke(FunctionName = 'arn:aws:lambda:us-east-1: <AccountNumber>:function:aws-blog-order-processing',InvocationType = 'RequestResponse',Payload = inputParams)
    responseFromChild = json.load(response['Payload'])
    orderTotal = responseFromChild['body']
    ###Prompting the model to summarize the order along with order total
    object_key = 'prompt_template_order_summary.txt'
    replace_items = {"REPLACEME":dialog_context,"REPLACETOTAL":orderTotal}
    #order_summary_prompt = CreatingCustomPrompt(object_key,replace_items)
    order_summary_prompt = CreatingCustomPromptFromLambdaLayer(object_key,replace_items)
    order_summary_completion = prompt_bedrock(order_summary_prompt)
    #extracting response from response completion
    order_summary_response = extract_response(order_summary_completion)
    order_summary_response = order_summary_response + '. Shall I finalize processing your order?'
    ##adding session attributes to keep current context
    full_context = full_context + '\\n\\n' + order_summary_completion
    dialog_context = dialog_context + '\\n\\nAssistant: ' + order_summary_response
    intent_request['sessionState']['sessionAttributes']['fullContext'] = full_context
    intent_request['sessionState']['sessionAttributes']['dialogContext'] = dialog_context
    return close(intent_request['sessionState']['sessionAttributes'],'ProcessOrder','InProgress','ConfirmIntent',order_summary_response)


""" --- Main handler and Workflow functions --- """

def lambda_handler(event, context):
    """
    Route the incoming request based on intent.
    The JSON body of the request is provided in the event slot.
    """
    logger.debug('event is: {}'.format(event))

    return dispatch(event)

def dispatch(intent_request):
    """
    Called when the user specifies an intent for this bot. If intent is not valid then returns error name
    """
    logger.debug('intent_request is: {}'.format(intent_request))
    intent_name = intent_request['sessionState']['intent']['name']
    confirmation_state = intent_request['sessionState']['intent']['confirmationState']
    # Dispatch to your bot's intent handlers
    if intent_name == 'ValidateIntent' and confirmation_state == 'None':
        return validate_intent(intent_request)
    if intent_name == 'PlaceOrder' and confirmation_state == 'None':
        return validate_request(intent_request)
    elif intent_name == 'PlaceOrder' and confirmation_state == 'Confirmed':
        return process_order(intent_request)
    elif intent_name == 'PlaceOrder' and confirmation_state == 'Denied':
        return close(intent_request['sessionState']['sessionAttributes'],intent_request['sessionState']['intent']['name'],'Fulfilled','Close','Got it. Let me know if I can help you with something else.')
    elif intent_name == 'PlaceOrder' and confirmation_state not in ['Denied','Confirmed','None']:
        return close(intent_request['sessionState']['sessionAttributes'],intent_request['sessionState']['intent']['name'],'Fulfilled','Close','Sorry. I am having trouble completing the request. Let me get someone to help you.')
        logger.debug('exiting intent {} here'.format(intent_request['sessionState']['intent']['name']))
    elif intent_name == 'ProcessOrder' and confirmation_state == 'None':
        return validate_request(intent_request)
    elif intent_name == 'ProcessOrder' and confirmation_state == 'Confirmed':
        return close(intent_request['sessionState']['sessionAttributes'],intent_request['sessionState']['intent']['name'],'Fulfilled','Close','Perfect! Your order has been processed. Please proceed to payment.')
    elif intent_name == 'ProcessOrder' and confirmation_state == 'Denied':
        return close(intent_request['sessionState']['sessionAttributes'],intent_request['sessionState']['intent']['name'],'Fulfilled','Close','Got it. Let me know if I can help you with something else.')
    elif intent_name == 'ProcessOrder' and confirmation_state not in ['Denied','Confirmed','None']:
        return close(intent_request['sessionState']['sessionAttributes'],intent_request['sessionState']['intent']['name'],'Fulfilled','Close','Sorry. I am having trouble completing the request. Let me get someone to help you.')
        logger.debug('exiting intent {} here'.format(intent_request['sessionState']['intent']['name']))
    raise Exception('Intent with name ' + intent_name + ' not supported')

def prompt_bedrock(formatted_template):
    logger.debug('prompt bedrock input is:'.format(formatted_template))
    body = json.loads(formatted_template)

    modelId = 'anthropic.claude-v2' # change this to use a different version from the model provider
    accept = 'application/json'
    contentType = 'application/json'

    response = bedrock.invoke_model(body=body, modelId=modelId, accept=accept, contentType=contentType)
    response_body = json.loads(response.get('body').read())
    response_completion = response_body.get('completion')
    logger.debug('response is: {}'.format(response_completion))

    #print_ww(response_body.get('completion'))
    #print(response_body.get('results')[0].get('outputText'))
    return response_completion

#function to extract text between the <Response> and </Response> tags within model completion
def extract_response(response_completion):

    if '<Response>' in response_completion:
        customer_response = response_completion.replace('<Response>','||').replace('</Response>','').split('||')[1]

        logger.debug('modified response is: {}'.format(response_completion))

        return customer_response
    else:

        logger.debug('modified response is: {}'.format(response_completion))

        return response_completion

#function to extract text between the <Response> and </Response> tags within model completion
def extract_intent(response_completion):
    if '<intent>' in response_completion:
        customer_intent = response_completion.replace('<intent>','||').replace('</intent>','||').split('||')[1]
        return customer_intent
    else:
        return customer_intent

def close(session_attributes, intent, fulfillment_state, action_type, message):
    #This function prepares the response in the appropiate format for Lex V2

    response = {
        "sessionState": {
            "sessionAttributes":session_attributes,
            "dialogAction": {
                "type": action_type
            },
            "intent": {
                "name":intent,
                "state":fulfillment_state

            },

            },
        "messages":
            [{
                "contentType":"PlainText",
                "content":message,
            }]
            ,

    }
    return response
- Attach the Lambda layer you created earlier to this function.
- Additionally, attach the layer to the prompt templates you created.
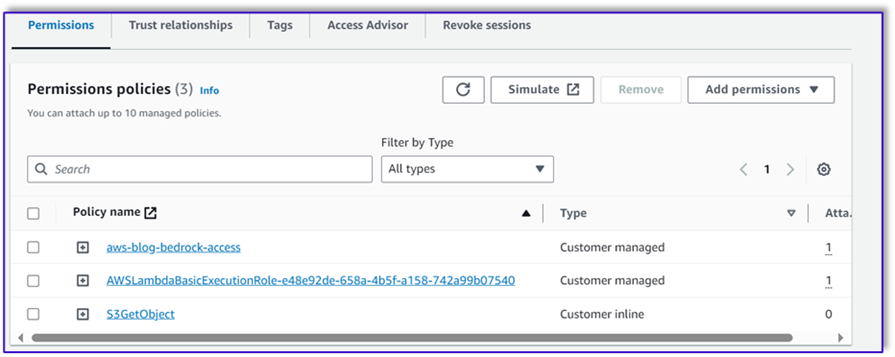
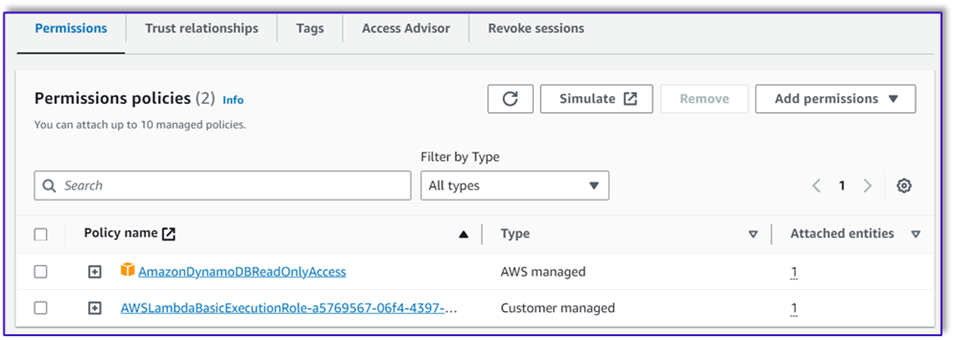
- In the Lambda execution role, attach the policy to access Amazon Bedrock, which was created earlier.

The Lambda execution role should have the following permissions.
Attach the Orchestration Lambda function to the Amazon Lex bot
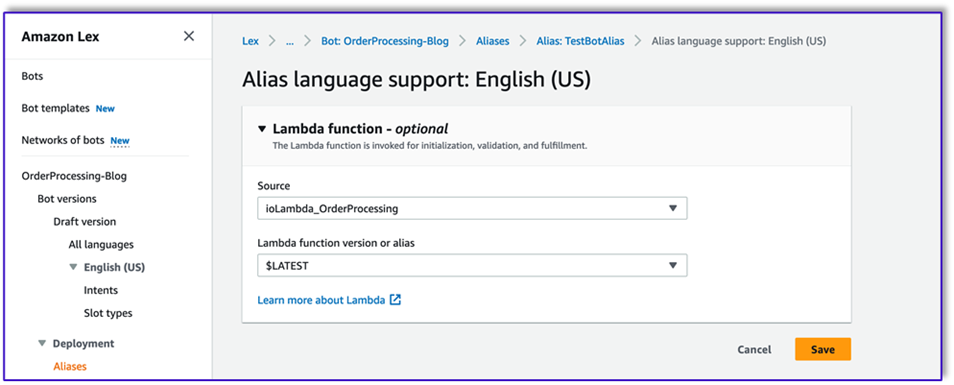
- After you create the function in the previous section, return to the Amazon Lex console and navigate to your bot.
- Under Languages in the navigation pane, choose English.
- For Source, choose your order processing bot.
- For Lambda function version or alias, choose $LATEST.
- Choose Save.
Create assisting Lambda functions
Complete the following steps to create additional Lambda functions:
- Create a Lambda function to query the DynamoDB table that you created earlier:
import json
import boto3
import logging

logger = logging.getLogger()
logger.setLevel(logging.DEBUG)
# Initialize the DynamoDB client
dynamodb = boto3.resource('dynamodb')
table = dynamodb.Table('your-table-name')

def calculate_grand_total(input_data):
    # Initialize the total price
    total_price = 0

    try:
        # Loop through each item in the input JSON
        for item_id, item_data in input_data.items():
            item_name = item_data['item'].lower()  # Convert item name to lowercase
            item_size = item_data['size'].lower()  # Convert item size to lowercase

            # Query the DynamoDB table for the item based on Item and Size
            response = table.get_item(
                Key={'Item': item_name,
                    'Size': item_size}
            )

            # Check if the item was found in the table
            if 'Item' in response:
                item = response['Item']
                price = float(item['Price'])
                total_price += price  # Add the item's price to the total

        return total_price
    except Exception as e:
        raise Exception('An error occurred: {}'.format(str(e)))

def lambda_handler(event, context):
    try:

        # Parse the input JSON from the Lambda event
        input_json = json.loads(event)

        # Calculate the grand total
        grand_total = calculate_grand_total(input_json)

        # Return the grand total in the response
        return {'statusCode': 200,'body': json.dumps(grand_total)}
    except Exception as e:
        return {
            'statusCode': 500,
            'body': json.dumps('An error occurred: {}'.format(str(e)))
- Navigate to the Configuration tab in the Lambda function and choose Permissions.
- Attach a resource-based policy statement allowing the order processing Lambda function to invoke this function.
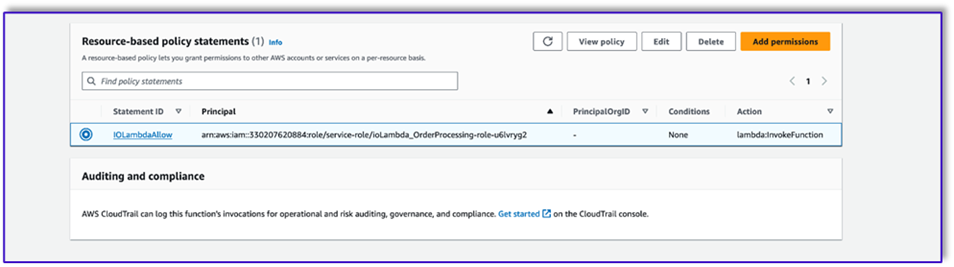
- Navigate to the IAM execution role for this Lambda function and add a policy to access the DynamoDB table.
- Create another Lambda function to validate if all required attributes were passed from the customer. In the following example, we validate if the size attribute is captured for an order:
import json
import logging

logger = logging.getLogger()
logger.setLevel(logging.DEBUG)

def lambda_handler(event, context):
    # Define customer orders from the input event
    customer_orders = json.loads(event)

    # Initialize a list to collect error messages
    order_errors = {}
    missing_size = []
    error_messages = []
    # Iterate through each order in customer_orders
    for order_id, order in customer_orders.items():
        if "size" not in order or order["size"] == "":
            missing_size.append(order['item'])
            order_errors['size'] = missing_size
    if order_errors:
        items_missing_size = order_errors['size']
        error_message = f"could you please provide the size for the following items: {', '.join(items_missing_size)}?"
        error_messages.append(error_message)

    # Prepare the response message
    if error_messages:
        response_message = "\n".join(error_messages)
        return {
        'statusCode': 205,
        'validator_response': response_message
            }
    else:
        response_message = "Order is validated successfully"
        return {
        'statusCode': 200,
        'validator_response': response_message
        }
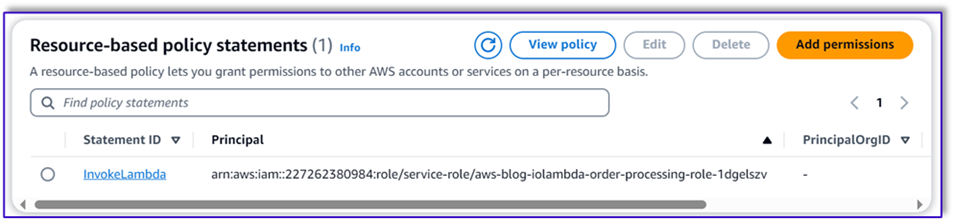
- Navigate to the Configuration tab in the Lambda function and choose Permissions.
- Attach a resource-based policy statement allowing the order processing Lambda function to invoke this function.
Test the solution
Now we can test the solution with example orders that customers place via Amazon Lex.
For our first example, the customer asked for a frappuccino, which is not on the menu. The model validates with the help of order validator template and suggests some recommendations based on the menu. After the customer confirms their order, they are notified of the order total and order summary. The order will be processed based on the customer’s final confirmation.
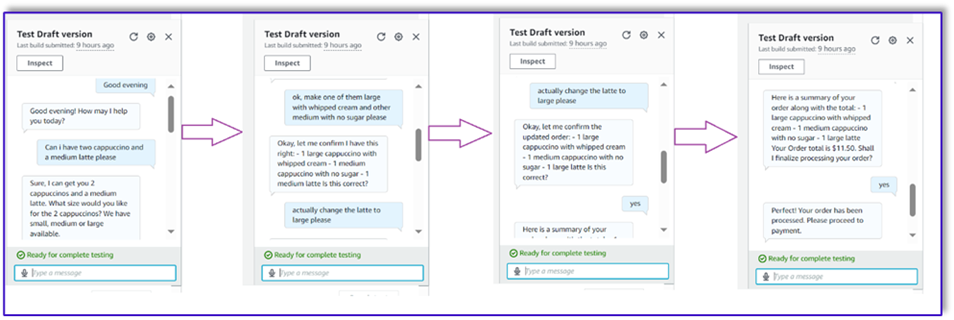
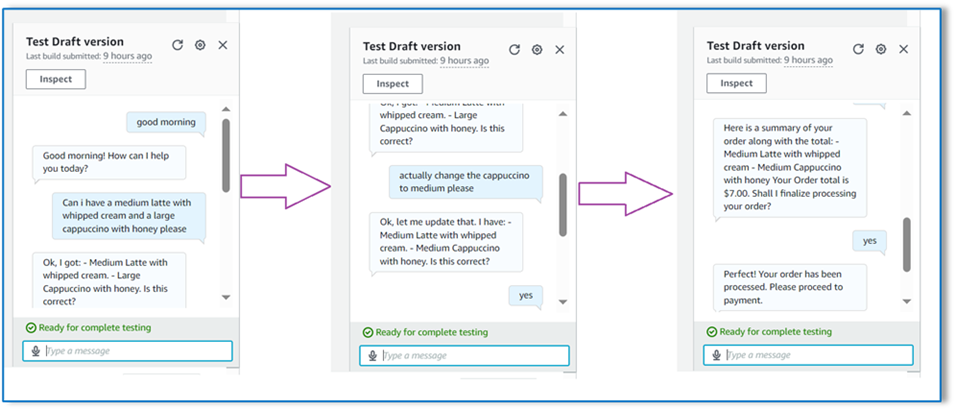
In our next example, the customer is ordering for large cappuccino and then modifying the size from large to medium. The model captures all necessary changes and requests the customer to confirm the order. The model presents the order total and order summary, and processes the order based on the customer’s final confirmation.
For our final example, the customer placed an order for multiple items and the size is missing for a couple of items. The model and Lambda function will verify if all required attributes are present to process the order and then ask the customer to provide the missing information. After the customer provides the missing information (in this case, the size of the coffee), they’re shown the order total and order summary. The order will be processed based on the customer’s final confirmation.
LLM limitations
LLM outputs are stochastic by nature, which means that the results from our LLM can vary in format, or even in the form of untruthful content (hallucinations). Therefore, developers need to rely on a good error handling logic throughout their code in order to handle these scenarios and avoid a degraded end-user experience.
Clean up
If you no longer need this solution, you can delete the following resources:
- Lambda functions
- Amazon Lex box
- DynamoDB table
- S3 bucket
Additionally, shut down the SageMaker Studio instance if the application is no longer required.
Cost assessment
For pricing information for the main services used by this solution, see the following:
Note that you can use Claude v2 without the need for provisioning, so overall costs remain at a minimum. To further reduce costs, you can configure the DynamoDB table with the on-demand setting.
Conclusion
This post demonstrated how to build a speech-enabled AI order processing agent using Amazon Lex, Amazon Bedrock, and other AWS services. We showed how prompt engineering with a powerful generative AI model like Claude can enable robust natural language understanding and conversation flows for order processing without the need for extensive training data.
The solution architecture uses serverless components like Lambda, Amazon S3, and DynamoDB to enable a flexible and scalable implementation. Storing the prompt templates in Amazon S3 allows you to customize the solution for different use cases.
Next steps could include expanding the agent’s capabilities to handle a wider range of customer requests and edge cases. The prompt templates provide a way to iteratively improve the agent’s skills. Additional customizations could involve integrating the order data with backend systems like inventory, CRM, or POS. Lastly, the agent could be made available across various customer touchpoints like mobile apps, drive-thru, kiosks, and more using the multi-channel capabilities of Amazon Lex.
To learn more, refer to the following related resources:
- Deploying and managing multi-channel bots:
- Prompt engineering for Claude and other models:
- Serverless architectural patterns for scalable AI assistants:
About the Authors
 Moumita Dutta is a Partner Solution Architect at Amazon Web Services. In her role, she collaborates closely with partners to develop scalable and reusable assets that streamline cloud deployments and enhance operational efficiency. She is a member of AI/ML community and a Generative AI expert at AWS. In her leisure, she enjoys gardening and cycling.
 Fernando Lammoglia is a Partner Solutions Architect at Amazon Web Services, working closely with AWS partners in spearheading the development and adoption of cutting-edge AI solutions across business units. A strategic leader with expertise in cloud architecture, generative AI, machine learning, and data analytics. He specializes in executing go-to-market strategies and delivering impactful AI solutions aligned with organizational goals. On his free time he loves to spend time with his family and travel to other countries.
 Mitul Patel is a Senior Solution Architect at Amazon Web Services. In his role as a cloud technology enabler, he works with customers to understand their goals and challenges, and provides prescriptive guidance to achieve their objective with AWS offerings. He is a member of AI/ML community and a Generative AI ambassador at AWS. In his free time, he enjoys hiking and playing soccer.