AWS Public Sector Blog
Building a multilingual contact center for Medicaid agencies on AWS
 One of the biggest constraints in providing equitable access to care is the language barrier between providers and the patients they serve. For Medicaid agency call centers, there aren’t enough agents to support communication in all the languages requested by a state government.
Some states want to support nearly 20 languages in the call center but have agents who speak only two or three languages. The traditional approach of recording voices is expensive and also hampers the state’s ability to quickly change the messaging as appropriate for each member’s concerns. Relying on manual methods to record and create content in different languages can hinder the timeliness of implementation. The translation services offered in several Medicaid agency call centers add several hours of wait time for those seeking care.
However, there’s a simple alternative. Agencies can use artificial intelligence (AI) and omnichannel contact center solutions from Amazon Web Services (AWS) to create a multilingual contact center that helps break down the language barrier between Medicaid members and call center agents.
In this post, we will explore how to build a multilingual contact center that can provide near real-time assistance for a non-English-speaking constituent from an English-speaking agent.
Solution overview
This walkthrough depicts an AWS Cloud-based solution that supports public sector organizations in providing near real-time translation chat support through Amazon Connect, Amazon Transcribe, and serverless code through AWS Lambda. Translations that would take hours to complete manually are performed in moments and read back, in life-like speech, and in a member’s chosen language through Amazon Polly. Figure 1 is an architectural diagram of the solution.
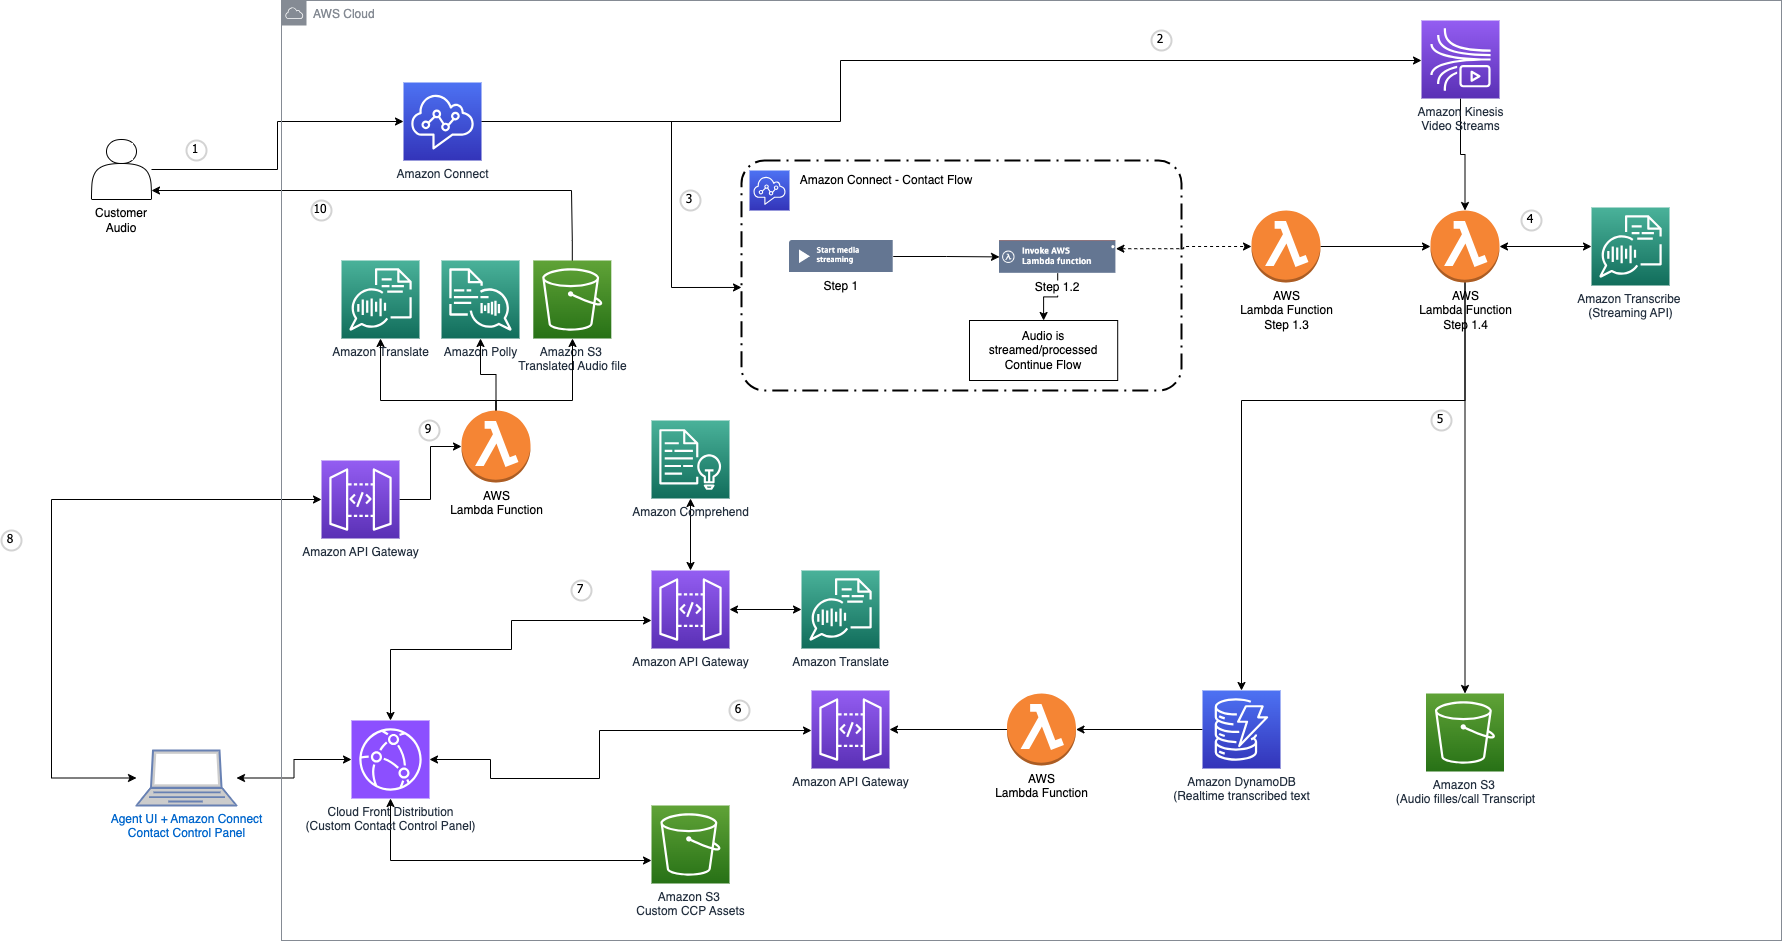
Figure 1. Technical architecture of the multilingual contact center solution described in this post. The major components are Amazon Connect, Amazon Translate, Amazon Polly, AWS Lambda, Amazon DynamaDB, Amazon S3, Amazon Kinesis, Amazon Cloudfront, Amazon API Gateway and Amazon Transcribe.
- The constituent calls the main contact center number. The greeting prompts the caller to select a language. The caller is asked to speak in the language of their choice.
- The constituent’s voice is streamed near real time using Amazon Kinesis Data Streams.
- Amazon Connect contact flow triggers a Lambda function to convert voice to text.
- Amazon Transcribe is used to transcribe the constituent’s spoken words into text.
- Transcribed text is stored in Amazon Simple Storage Service (Amazon S3) and Amazon DynamoDB.
- Amazon Connect Contact Control Panel (CCP) gets the transcribed text printed in the window.
- The transcribed text is translated to English using Amazon Translate and displayed in the CCP.
- The agent reviews the text and types the response in the CCP.
- Amazon Translate is used to convert the English text written by the agent into the language chosen by the constituent. Amazon Polly is used to create a voice file for the translated text.
- The translated voice is played back to the constituent as a response to the question they asked.
Solution walkthrough: Building a multilingual contact center for Medicaid agencies
The steps below will guide you through the process of deploying a multilingual contact center. Section 1 will set up the foundation infrastructure needed to support the solution while Section 2 will walkthrough the steps to configure the Amazon Connect instance. Section 3 walks through testing the deployed solution.
Prerequisites
- Have an AWS account
- Have an understanding of Amazon Connect, Lambda, and AWS Identity and Access Management (IAM)
- Have permissions to create and modify Lambda functions
- Configure an Amazon Connect instance for inbound and outbound calls, and claim a phone number after you create your instance. The Get started with Amazon Connect documentation (the first two steps) provides valuable background knowledge for this process.
- Turn on data streaming on the Amazon Connect instance.
- Turn on live media streaming on the Amazon Connect instance
Section 1: Deploy AWS CloudFormation templates
- Navigate to the GitHub repo.
a. Clone the repo
b. Navigate to the repository folder on your local machine
i. Create a .zip of the following files/folders:
1. cloudformation/asset.7b1f3c122a53128c55239bc2e97800299bcce83e3fb7394b79ed0b35af5757ee/mlcc-transcribe-polly.p
c. Create a new Amazon S3 bucket and upload the folders named CloudFormation and CCP from the cloned repo. - Navigate to the CloudFormation dashboard within the AWS console and create a CloudFormation stack using the file named “MultiLingualCC.yaml.” The following parameters are needed to be provided for the stack to launch.
a. Stack name – The stack name is an identifier that helps you find a particular stack from a list of stacks. A stack name can contain only alphanumeric characters (case-sensitive) and hyphens. It must start with an alphabetic character and can’t be longer than 128 characters.
b. Amazon Connect instance arn
c. Call audio bucket name – Enter the (globally unique) name you would like to use for the Amazon S3 bucket where you will store the audio files and the sample contact flow. This template will fail to deploy if the bucket name you choose is currently in use.
d. Website bucket name – Enter the (globally unique) name you would like to use for the Amazon S3 bucket where you will store the website assets and the sample contact flow. This template will fail to deploy if the bucket name you choose is currently in use.
e. Resources bucket – This is the bucket you created in step 1c.
f. audioFilePrefix – The Amazon S3 prefix where the audio files will be saved (must end in “/”).
g. CloudFront Price Class – Specify the CloudFront price class. See pricing details for more information.
h. Compute type – Specify whether to use AWS Fargate or Lambda for transcribing call audio to text. The solution, by default, uses a Lambda function to transcribe call audio consumed from Amazon Kinesis Video Streams. Lambda has a maximum run time of 15 minutes per invocation, whereas Fargate has no such limits and can run as long as the call is connected.
i. rawAudioUploadPrefix – The Amazon S3 prefix where raw/wav (audio/L16; mono; 8 kHz) audio recordings may be uploaded if you want to process an audio file compared to making a phone call and streaming from Kinesis Video Streams. This parameter is used for testing or for real-time transcription of audio files. This will only work with single-channel files (mono).
j. sessionDuration – The maximum duration of the role session (in seconds). You can give a value from 900 seconds (15 minutes) to 3,600 seconds (1 hour). This is the maximum call duration before the customer interaction must be processed. - Create the stack.
- After the stack is successfully launched, note the following outputs. It could take a few minutes for the stack to launch the solution.
a. cloudfrontEndpoint – This is the CloudFront URL you will use to access the agent portal. You can find this in the Output tab for the stack. - Create a lambda layer by cloning and following the instruction in the repo.
a. Docker install is needed to run through the instructions in this step. Please ignore warnings/errors that show up while running the commands in the repo.
b. This step will create the lambda layer that you can add to your Lambda Function in your AWS account. - Add the layer to the lambda function named mlcc-Transcribe-Polly.
a. Use the “Specify arn” option to choose the layer you deployed in step 5.
Section 2: Configuring Amazon Connect instance
- Log in to the Amazon Connect instance using the admin user you created while launching the instance.
- Select the telephone number you claimed and assign the contact flow “mlccKvsStream,” as shown in Figure 2.

Figure 2: Screenshot of Amazon Connect contact flow assignment.
- Use the CloudFront URL noted in Section 1, step 4a to access the agent CCP.
- Call the claimed telephone number and choose the language.
- As you speak, note the agent CCP update with transcribed text in English.
- As an agent, type the response and select Submit.
- Observe the text translated to the language you chose and delivered back to you on the call using voice.
Conclusion
This walkthrough deploys a multilingual contact center that allows callers to talk in their preferred language without requiring the state to hire agents to cover all the languages.
AWS is ready to support Medicaid agencies. Contact the AWS Public Sector Team to learn more.
Health and human services agencies across the country are using the power of AWS to unlock their data, improve citizen experience, and deliver better outcomes. Learn more at Health and Human Services Cloud Resources. Learn how governments use AWS to innovate for their constituents, design engaging constituent experiences, and more by visiting the AWS Cloud for State and Local Governments hub.