Networking & Content Delivery
Application Load Balancer-type Target Group for Network Load Balancer
Application Load Balancer (ALB) is a fully managed layer 7 load balancing service that load balances incoming traffic across multiple targets, such as Amazon EC2 instances. ALB supports advanced request routing features based on parameters like HTTP headers and methods, query string, host and path based routing. ALB also offloads important capabilities including TLS termination, HTTP/2 and AWS Web Application Firewall (WAF) integration.
Network Load Balancer (NLB) operates at layer 4 load balancing both TCP and UDP traffic. It supports AWS PrivateLink and provides a static IP per Availability Zone that can be used by applications as the load balancer front-end IP. Network Load Balancer is capable of handling millions of requests per second while maintaining ultra-low latencies.
While an ALB scales automatically, the IP addresses of the load balancer are dynamic in nature. To utilize NLB features like PrivateLink integration and Static IP on ALB, we published a blog post that provides a detailed workaround for our customers. Using this solution, customers can leverage AWS Lambda functions to register ALB IP addresses as NLB targets. As these IP addresses change, the solution updates the NLB target IPs to ensure it has the updated ALB IP addresses. Although this workaround works well, it leaves our customers with more code and services to manage.
New – Application Load Balancer-type Target Group for Network Load Balancer
Today, we are launching ALB as a Target of NLB to simplify this process. This new feature allows AWS customers to directly register an ALB as an NLB target, eliminating the need to actively manage changing ALB IP addresses. This is achieved by making use of a newly introduced Application Load Balancer-type target group for NLB. You can now easily combine the benefits of NLB, including PrivateLink and zonal static IP addresses, with the advanced routing offered by ALB to load balance traffic to your applications.
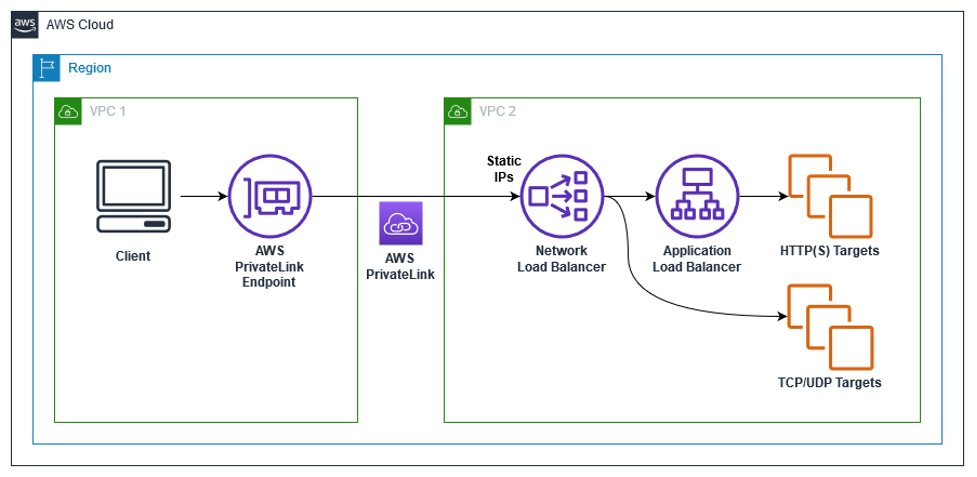
Figure 1: ALB as a Target of NLB high level architecture diagram. Use Cases – PrivateLink, Static IP & Multi-Protocol Connections
This feature allows a Network Load Balancer to accept and route TCP connections to the Application Load Balancer. Here are some common use cases for the ALB as a target of NLB feature:
- AWS PrivateLink for ALB – This allows customers to utilize PrivateLink on NLB and route this traffic to a target ALB to utilize the layer 7 benefits.
- Static NLB IP Addresses for ALB – With one static IP per Availability Zone on NLB, you get full control over your IP addresses. This enables various use cases as follows:
- Allow-listing of IP addresses for firewall rules.
- Pointing a DNS Zone apex to an application fronted by an ALB. Utilizing ALB as a target of NLB, a DNS A-record type can be used to resolve your zone apex to the NLB static IP addresses.
- When legacy clients cannot utilize DNS resulting in a need for hard-coded IP addresses.
- Similar to Classic Load Balancer (CLB), you can combine the benefits of NLB and ALB into a single load balancing endpoint. This is useful for applications utilizing multi-protocol connections, for example, multimedia services utilizing HTTP for signaling and RTP for streaming.
Deploying the ALB as a Target of NLB PrivateLink use case
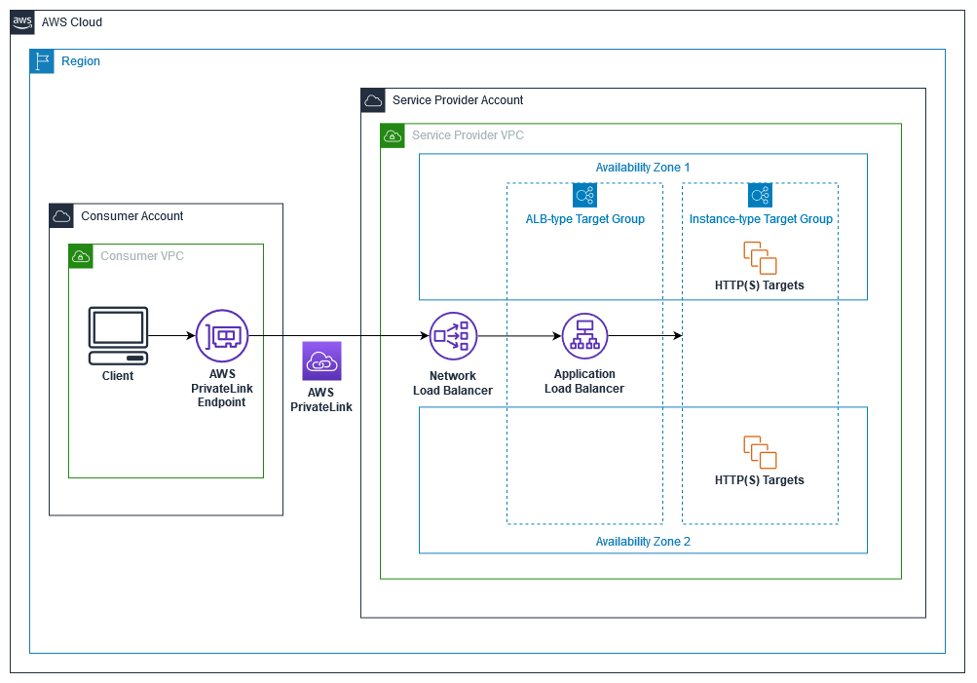
Figure 2: ALB as a Target of NLB detailed architecture diagram – PrivateLink Use Case
Pre-requisites:
Before we get into the setup, you need to make sure the following prerequisites are met:
- An internal or internet-facing ALB
- A target group for the ALB to forward to. Target Group configured as either an Instance, IP, or Lambda target type.
- Test the ALB and Target Group setup before continuing with the following steps. This link to Create an Application Load Balancer guides you through configuring an ALB and Target Group.
- Configure your ALB Security Group as described here.
Creating a Network Load Balancer and ALB-type Target Group
You can create a Network Load Balancer and target group using the AWS Management Console or AWS Command Line Interface (CLI). In this blog post, we’ll do it by using the AWS Console.
- Create a new target group by opening up the Amazon EC2 console (in the same region) and selecting Target Groups, then clicking on Create Target Group. Choose a target type of Application Load Balancer as shown in figure 3 below.
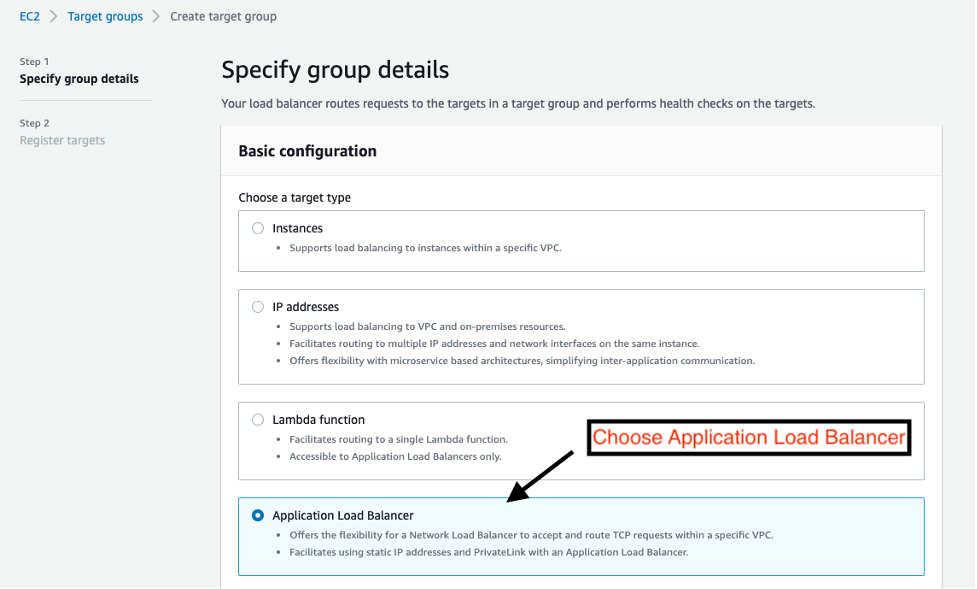
Figure 3: Create Application Load Balancer-type Target Group
- Next as shown in figure 4, enter a name for the target group and configure the appropriate target port. The ALB-type target group port must match the ALB listener port. Select the same VPC as your ALB.

Figure 4: Specifying Application Load Balancer-type Target Group details
- Under Health checks, as shown in figure 5, you can choose HTTP or HTTPS as the health check protocol. Health checks are sent to the Application Load Balancer and forwarded to its targets using the specified port, protocol, and ping path. Ensure that your Application Load Balancer can receive these health checks by having a listener with a port and protocol that matches the health check port and protocol. For Advanced health check settings, you cannot modify Unhealthy threshold, Timeout, Interval, and Success codes.

Figure 5: Configure Application Load Balancer-type Target Group Health Check information
- Select the Application Load Balancer from the dropdown menu in figure 6. When selecting the ALB from the dropdown, make sure the ALB-type target group and ALB listener ports match. Click Create.
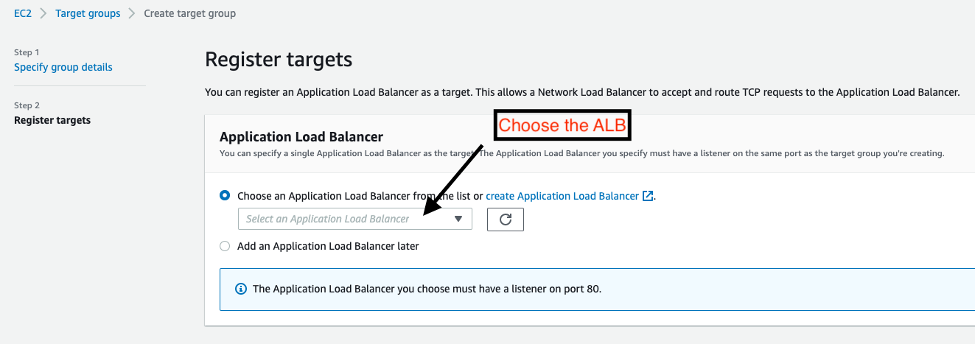
Figure 6: Register Application Load Balancer Target
- Create a Network Load Balancer by opening up the Amazon EC2 console, selecting Load Balancers, and clicking on Create Load Balancer.
- Choose Network Load Balancer and click on Create, then enter the details as shown in figure 7. Enter an NLB name, select the same VPC as your ALB and confirm the NLB subnets match with your ALB. Choose TCP listener on any desired listener port, then select to forward to your previously created ALB-type target group created.

Figure 7: Create Network Load Balancer
The state of your new Load Balancer starts as “provisioning” and will switch to “active”.
Enabling PrivateLink for ALB
Once you have successfully created your NLB and registered your ALB as a target, requests over AWS PrivateLink to the NLB will be forwarded to the ALB. Let’s enable PrivateLink on the NLB:
- Open the Amazon EC2 console and on the navigation pane, under LOAD BALANCING, choose Load Balancers.
- Select your NLB and choose the Integrated services tab as shown in figure 8 below.

Figure 8: Create AWS PrivateLink Endpoint Service
- Click the “Create Endpoint Service” option and follow the steps to configure the endpoint service for your NLB. For more information, please visit our documentation.
- Consumers of the PrivateLink Endpoint Service can create an Interface VPC endpoint for the service you created. For more information, please visit our documentation.
Scaling, Performance Testing, and Monitoring
Elastic Load Balancers automatically scale in response to incoming traffic load. They scale up aggressively and down conservatively. Over the years, we have worked to optimize ALB scaling to ensure it scales within minutes. As seen in this Network Load Balancer – Effortless Scaling to Millions of Requests per Second blog post, NLB was built for speed and is able to handle millions of requests per second immediately after creation.
For backend applications, we recommend using AWS Auto Scaling Groups and provisioning enough capacity in each Availability Zone to allow for a consistent user experience if an Availability Zone were to fail. As Elastic Load Balancing uses DNS to decide where clients should send traffic, sending traffic directly to an IP, or ignoring DNS TTLs, can lead to errors. We recommend customers use Amazon Route53’s Alias record type, create a CNAME to your load balancer’s full DNS name, or for the DNS zone apex where you’re unable to utilize Route53, create DNS A-records to the static IP addresses on your NLB.
We also recommend performance tests before deploying this new feature to production. By default NLB and ALB publishes Amazon CloudWatch metrics for analyzing load balancer and target response times. You can check out the Distributed Load Testing on AWS Solution from the AWS Solutions Library for running your load tests. It’s deployed using the provided AWS CloudFormation template, and creates a simple UI hosted on Amazon CloudFront to configure load tests.
Things to know
There are a few things to keep in mind when making use of this feature:
- TLS listeners on Network Load Balancers cannot forward to ALB-type target groups. If you have a use case to terminate TLS, we recommend using HTTPS listeners on your ALB.
- You are only able to configure a single ALB in an ALB-type target group for NLB.
- The communication between an NLB and ALB only happens over IPv4 even though you can configure dualstack scheme for your ALB.
- You are unable to delete an ALB while it’s registered behind an NLB. The ALB will first have to be removed from the ALB Target Group to break the dependency.
- We strongly recommend that ALB target Availability Zones match those enabled for your NLB to optimize availability, scaling, and performance.
- ALB (Internet-facing or internal) and NLB (Internet-facing or internal) must be in the same VPC and same account when using the ALB-type target group.
- If ALB (Internet-facing or internal) and NLB (Internet-facing or internal) are in different accounts or different VPC’s, then please refer to the AWS Lambda based solution described here.
- We recommend that you keep the cross-zone load balancing attribute on NLB disabled (default option) for better performance and to prevent cross-zone data transfer charges.
Conclusion
In this blog post we introduced a new feature allowing AWS customers to register their Application Load Balancer behind a Network Load Balancer, by making use of a new Application Load Balancer-type target group. We discuss various use cases and how customers can implement Application Load Balancer as a target of Network Load Balancer. With this new feature, we expect customers to successfully extend important Network Load Balancer features to their Application Load Balancers. To get started on this feature, please visit this page.
See the documentation to learn more about Elastic Load Balancing. If you have questions about this post, start a new thread on the Amazon EC2 Forum or contact AWS Support.

Rohit Aswani
Rohit is a Specialist Solutions Architect focused on Networking at AWS, where he helps customers build and design scalable, highly-available, secure, resilient and cost effective networks. He holds a MS in Telecommunication Systems Management from Northeastern University, specializing in Computer Networking.

Eugene Wiehahn
Eugene is a Sr. Solutions Architect at AWS based in Chicago. Originally from Cape Town, South Africa, he works with AWS customers to architect solutions aimed at achieving their desired business outcomes. In his spare time you can catch him spending time with his wife and daughter – this usually means having a braai and eating too much biltong.