AWS Partner Network (APN) Blog
Building an Intelligent Contact Center with Zendesk and Amazon Connect
By Joe Norman, Partner Solutions Architect at AWS
By Vish Kale, Sr. Partner Solutions Architect, Contact Center at AWS
By Lauren Hakim, Product Marketing Manager at Zendesk
 |
 |
Zendesk and VoiceFoundry released the Amazon Connect app on the Zendesk Marketplace earlier this year as part of a broader vision for the intelligent contact center of the future.
The Amazon Connect app for Zendesk combines Amazon Connect’s highly scalable, pay-as-you-go, advanced contact center capabilities with Zendesk’s sophisticated ticketing and customer support system.
The app also provides customers with access to the entire suite of artificial intelligence (AI) and machine learning (ML) services from Amazon Web Services (AWS).
Zendesk is an AWS Advanced Technology Partner and a leader in the 2020 Gartner Magic Quadrant for the CRM Customer Engagement Center. Zendesk’s service-first CRM software is designed to foster better customer relationships.
VoiceFoundry is an AWS Advanced Consulting Partner and Amazon Connect Delivery Partner. Consultants at VoiceFoundry developed the Amazon Connect application for Zendesk.
In this post, we’ll explore the Amazon Connect app for Zendesk, how to deploy it in your own Zendesk and AWS accounts in minutes, and the functionality the app provides your customers, support agents, and administrators.
We’ll also go through an optional section that outlines how you can use some of the data generated by the app to gather business intelligence (BI) insights with Amazon Athena and Amazon QuickSight.
Architecture Overview
The Amazon Connect app for Zendesk is an integration authored by VoiceFoundry and published in the Zendesk Marketplace. There are two sides to the application: the application in your Zendesk account, and the deployment in your AWS account.
The figure below gives a simplified overview of the application, including the optional components we’ll walk through at the end of this post.
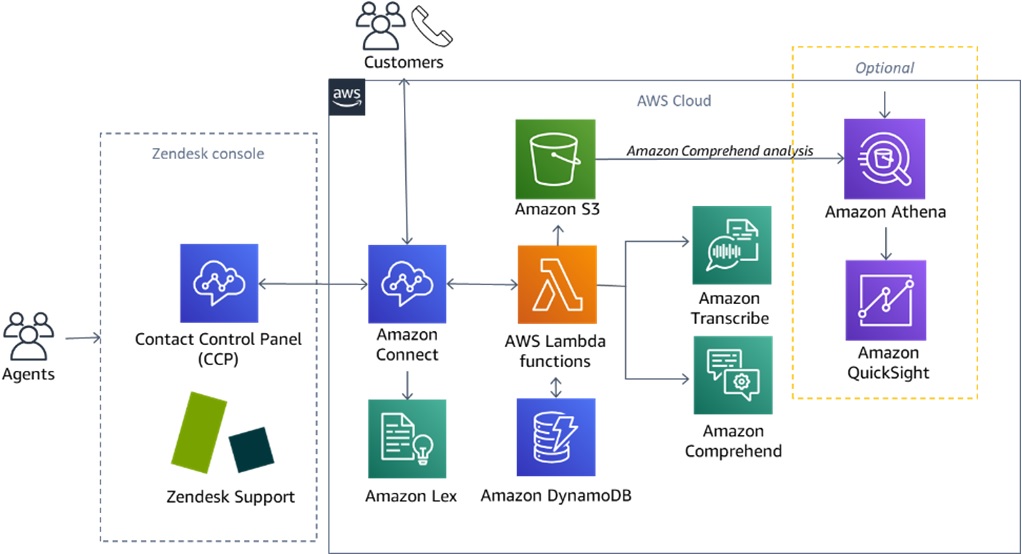
Figure 1 – Diagram of Amazon Connect app for Zendesk and optional BI pipeline.
How it Works
Starting at the top of the diagram in Figure 1, end customers call into the contact center and enter an Amazon Connect contact flow. An Amazon Lex bot powers the interactive voice response (IVR) of the contact flow, recognizing the customer’s intent from responses to prompts.
A series of AWS Lambda functions handle the programmatic logic at various stages in the contact flow. One such Lambda function queries the Zendesk Support API to look up any user information on the customer based on the phone number. If it finds an existing user, it allows the Amazon Lex bot to speak to the customer by name.
It can also see any open tickets in Zendesk associated with the identified user. This insight allows Amazon Lex to ask customers if they are calling regarding the open tickets. This way, customers are not forced to repeat themselves or feel as though they’re starting each call from square one.
If the contact flow routes the customer to speak to an agent, the agent will see the call interface in the Zendesk Support console. The Amazon Connect Contact Control Panel (CCP) appears within the same window via iframe, allowing the agent to simultaneously see the ongoing call details, as well as the current and past tickets documenting the issues and resolution.
For this stage of the integration, Amazon Connect pipes the call audio to Amazon Kinesis Video Streams.
Next, a Lambda function receives the call audio from Kinesis Video Streams and feeds it to Amazon Transcribe, sending back the call transcription to the agent in real-time.
Another function sends that transcription to Amazon Comprehend to analyze topics and sentiment. These both appear to the agent in a side panel during the call, and are embedded into the Zendesk Support ticket.
Finally, the call audio log and analyses from Amazon Transcribe and Amazon Comprehend are saved to an Amazon Simple Storage Service (Amazon S3) bucket.
Behind the scenes, the app leverages Amazon DynamoDB to keep track of WebSocket connections, transcript segments, and other pieces of data to manage state between the different pieces of the application.
The goal here is for the agents to have full context about the customer and the conversations, so they can address issues promptly and with minimal friction.
Optional: Business Intelligence with QuickSight
The right side of the diagram in Figure 1 shows an optional piece of the architecture that’s not included in the installation instructions for the Amazon Connect app for Zendesk.
We’ll use Amazon Athena to query the Amazon Comprehend data in place in the S3 bucket created by the Offline Transcribe and Comprehend stack. Athena allows us to get the data into a usable structure from its original nested JSON format.
Amazon QuickSight is then able to use the views we create in Athena as data sources for visualizations.
Installing the Amazon Connect app for Zendesk
VoiceFoundry has included in-depth instructions for installing and configuring the Amazon Connect app for Zendesk, so we’ll cover it at a high level here and point you to the full instructions later in this post.
First, there are a few prerequisites to take care of before installing the app.
Prerequisites
The items below are not covered by the instructions with the app, so you’ll need to take care of them before you can proceed.
Amazon Connect Deployment
You’ll need to set up Amazon Connect in your own AWS account before starting the instructions that come with the Amazon Connect app in the Zendesk Marketplace.
AWS provides plenty of documentation to help you get started. The instructions only assume you have Amazon Connect deployed in your preferred region and have at least one phone number, admin, and agent. You don’t need to do any deeper config before starting the Amazon Connect app for Zendesk instructions.
Zendesk Account
To deploy the app in Zendesk, you’ll need a Zendesk Talk – Partner Edition subscription. You can try it out as part of a free trial. To complete the steps required in the instructions, you’ll need admin rights to the Zendesk account.
AWS IAM Role
The deployment of the app includes launching AWS CloudFormation stacks, and the service needs access to launch all of the resources in those stacks. You can achieve this by invoking CloudFormation while logged in as a user with an Administrator IAM role.
By default, CloudFormation will have the same access rights as the user who invokes it. Alternatively, you can review the resources in the CloudFormation templates included in the app landing page, and create a new AWS Identity and Access Management (IAM) role with permission to deploy those resources.
You can then specify that new role as the service role for AWS CloudFormation.
Installing the App
The first stop for installing the app is the Zendesk Marketplace page. Figure 2 shows the How to install tab of the app’s landing page.
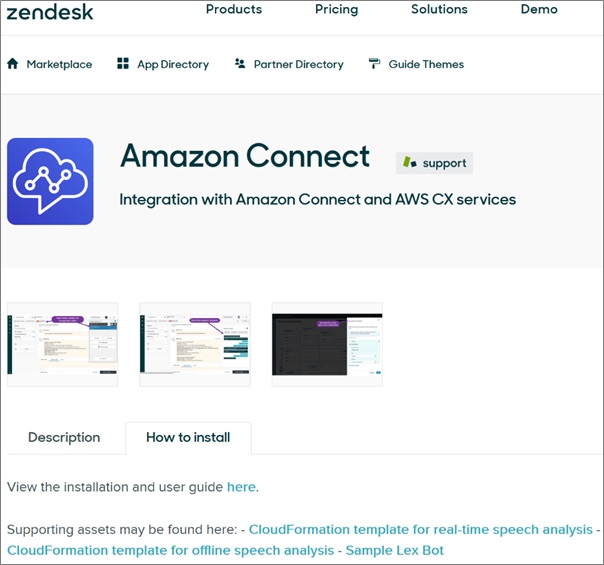
Figure 2 – Amazon Connect app for Zendesk in Zendesk Marketplace.
On this tab, you’ll see four artifacts:
- Installation and user guide: This is the main set of instructions you’ll need to follow to successfully deploy the app. These tell you when to use the other artifacts.
- CloudFormation template for real-time speech analysis: This template is also linked in the installation and user guide and deploys most of the resources you’ll need on the AWS side. It includes sample contact flows using both DTMF (for example, “for billing, press 1”) and Amazon Lex. Make sure you deploy it in the same region as your Amazon Connect deployment.
- CloudFormation template for offline speech analysis: This is optional and creates a copy of the Amazon Transcribe and Amazon Comprehend outputs in an S3 bucket. It makes these from the audio recording output post-call, rather than from the real-time audio stream output the agent sees. For the optional section of this post, you will need to set this up.
- Sample Lex Bot: For real-time speech, if you choose to use Amazon Lex for your contact flows, you’ll need this sample bot, or a bot of your own making. This file is also linked in the main instructions.
Go through the instructions in the installation and user guide. It will tell you when to press the Install button in the Zendesk Marketplace, and configure things in Zendesk and when to jump into the AWS console and deploy templates.
When you configure your contact flows, you’ll have the option to either use touch tones or IVR. The latter uses an Amazon Lex bot and is the more interesting and expandable option long term, but either choice is fine.
Using the App
Most of the action happens in the Zendesk Support console, from the customer support agent’s point of view. Here, you can see the Amazon Connect CCP within Zendesk’s web interface, along with support ticket information.

Figure 3 – Zendesk Support interface with CCP in an iframe.
Agent working hours and routing is controlled in Amazon Connect, and customer data is maintained in Zendesk. The two work together seamlessly to create a unified interface for the agent to support customers.
Once our example customer, Joe Consumer, calls in to customer support, he’ll go through a series of prompts in the contact flow and have his answers analyzed by the Amazon Lex bot. Eventually, the call will be routed to the agent.
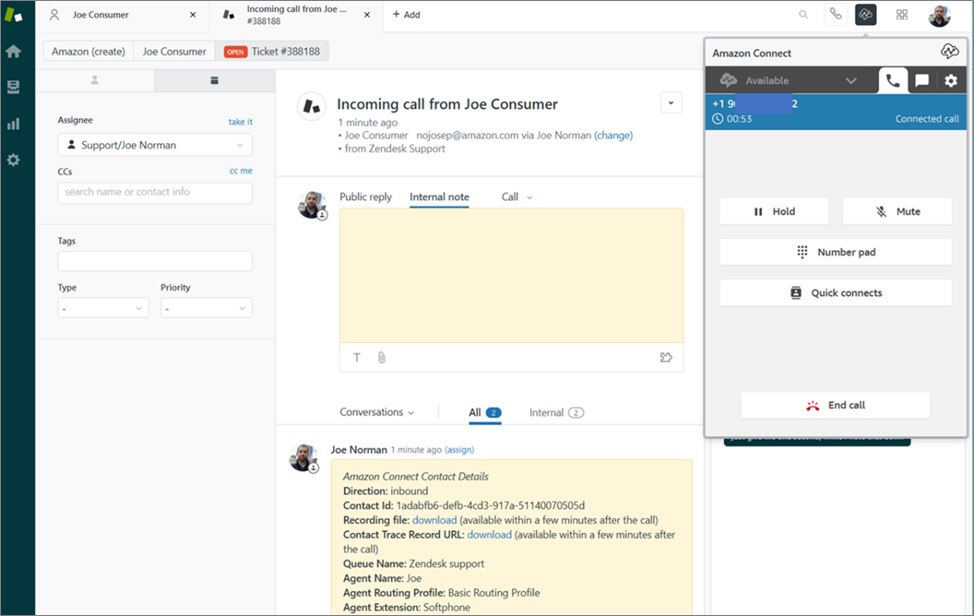
Figure 4 – The app starts a ticket automatically once the agent and customer connect.
Figure 4 above shows the CCP and Zendesk interfaces update once a call with a customer is connected. The app automatically starts a new ticket, adds call data to the ticket, and presents the agent with a button in the top left to instantly view contact information and ticket history for the caller.
The app also shows a side panel giving the agent real-time access to the transcript generated by Amazon Transcribe, as well as a topic list and sentiment analysis from Amazon Comprehend.

Figure 5 – Amazon Connect side panel currently showing real-time transcription of the call.
After the call ends, the app loads all of the Amazon Transcribe and Amazon Comprehend data into a Zendesk ticket, with download links for these analyses and the call audio file. Any notes the agent typed in the CCP during the call are also added to the ticket automatically.
Optional: Visualize Data with QuickSight and Athena
If you launched the “CloudFormation template for offline speech analysis,” each call your agents receive through Amazon Connect will create Amazon Transcribe and Amazon Comprehend analyses and place them into S3 buckets.
There are many possible uses for these downstream, and we’ll explore a very simple one here. We’ll be querying the data in place with Athena and then building a visualization for it with QuickSight.
To get started, you’ll need to complete at least one call through the Amazon Connect on Zendesk app. After that’s done, continue below to see how to set up Athena and QuickSight.
Create Tables and Views in Amazon Athena
Amazon Athena allows you to query data stored in S3 without copying it elsewhere. To do that, we’ll first have to define the structure of the data as it sits in the S3 bucket, so Athena can properly query against it.
The offline speech analysis output stored in your bucket after each call combines multiple Amazon Comprehend outputs into a single JSON document and has the following structure:
We’ve left out the details of the entities section and the sections after phrases, as we’ll be focusing on phrases for the rest of this post.
You can explore the file structure yourself by downloading one of the output files from the S3 bucket and see what other information is available in it, or refer to Figure 6 below to see a representation of entity data as it’s shown in the app.

Figure 6 – The Amazon Comprehend tab of the side panel shows entities and key phrases for the call.
With the structure above in mind, we need to use SQL in Athena to create the metadata to describe the structure, and then output it to an external table. We’ll run the SQL statement below to do that.
For a deep dive into working with nested JSONs with Athena, see Analyze and visualize nested JSON data with Amazon Athena and Amazon QuickSight, from the AWS Big Data Blog.
Replace “[YOUR-S3-BUCKET]” with the bucket name of the Amazon Comprehend output bucket created the offlinetnc.yaml CloudFormation stack. If you look at your buckets, the bucket name of the one you want should end with “.tnc.bucketcomprehend.”
Run this query in Athena to create a new table with one row for each call that’s been analyzed by Amazon Comprehend.
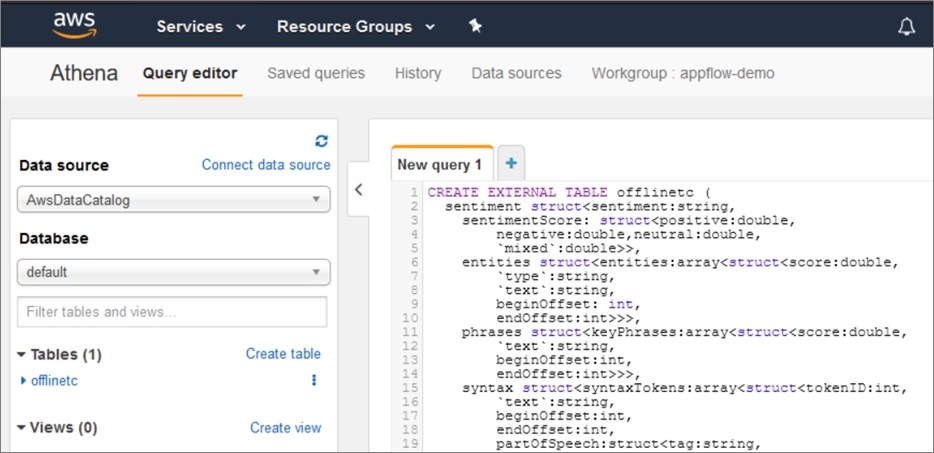
Figure 7 – Run the query above in Athena’s query editor to create the offlincetc table.
After you run the query, your screen in the AWS console should look like the image in Figure 7. On the left side, you’ll see the table offlinetc.
If you preview that table, you’ll see that each row contains the nested JSON file for a single call’s analysis. That nested JSON isn’t quite usable yet for what we plan to do in QuickSight. We’re going to need to flatten it a bit into a view that has the data we want in a form QuickSight can visualize.
The SQL statement below uses “UNNEST” to break out the phrases.keyPhrases array from the output JSON into individual elements. Once that’s done, we are able to make a table with each occurrence of each phrase taking up a single row in a view.
Run this query in Athena to create the phrase_view, as shown in Figure 8 below. This view is what we’ll use with QuickSight for the sample visualization in the next section.
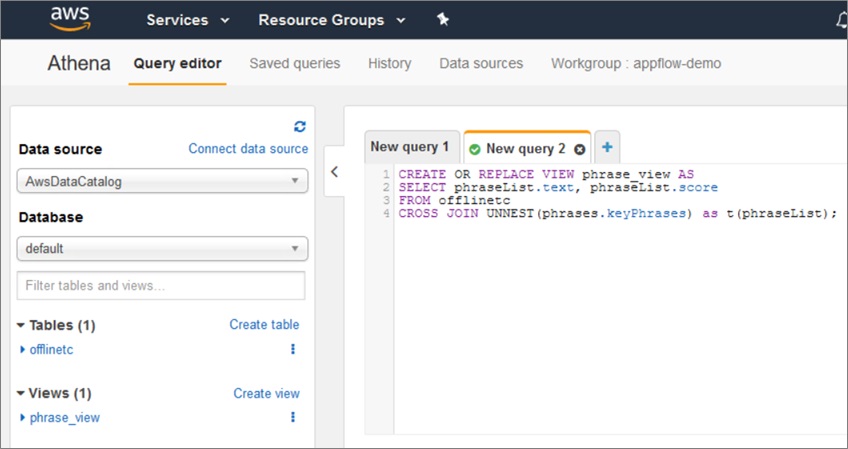
Figure 8 – Run the SQL statement shown above to create phrase_view.
Visualize the Data in Amazon QuickSight
Amazon QuickSight allows you to create interactive visualizations and dashboards. We’ll be keeping things very simple and making a single quick visualization for demonstration purposes.
First, in QuickSight, go to Data Sets and create a new data set. Choose Athena as your data source. Name it anything you want, and choose any Athena workgroup you want in the modal that appears and click Create data source.
In the next page of the modal, choose the same database that appears on the left-hand side within the Athena section of the console you were in earlier. In our examples, this was default, but it’s possible you used something else.
For tables, be sure to select “phrase_view” to get the flattened key phrases view you created in Athena.

Figure 9 – Choose phrase_view as the table to visualize.
Choose to directly query your data, and go to visualize.
Now, you are able to make QuickSight visualizations against the text and scores for key phrases that appear in your Amazon Comprehend analysis of your call audio.
For this data, a word cloud or tree map probably makes sense. A word cloud will list the phrases that appear and change each phrase’s relative font size based on its frequency.
Under Visual types, choose Word Cloud. Then, under Fields list, drag text over to the Group by box and drag it again over to the Size box.
In Size, change it to Aggregate: Count to make sure it’s sizing based on the number of times the phrase appears. Figure 10 shows what our screen looks like after going through these steps.

Figure 10 – Amazon QuickSight word cloud visualization of the Amazon Comprehend key phrases data.
Over the course of time, a visualization like this could show you trending phrases in customer support calls that point you to larger issues that need to be addressed.
This is a quick demo of a QuickSight visualization of this data. To get more complex data to work with, it may make sense to query the entire ticket in Zendesk using the Zendesk Support API.
Conclusion
The Amazon Connect app for Zendesk brings together a wide set of capabilities and unlocks endless possibilities for you to empower your agents and better engage your customers through the contact center experience.
VoiceFoundry regularly updates the app with new functionality as we learn more about how customers are using it and what functionality will help them. By combining the powers of Amazon Connect and Zendesk, businesses can build a more intelligent contact center and, most importantly, a more unified and personal customer experience.
.

.
Zendesk – AWS Partner Spotlight
Zendesk is an AWS Advanced Technology Partner and service-first CRM company that builds software designed to improve customer relationships.
Contact Zendesk | Partner Overview
*Already worked with Zendesk? Rate the Partner
*To review an AWS Partner, you must be a customer that has worked with them directly on a project.