Category: AWS Lambda
Creating an Enterprise Scheduler Using AWS Lambda and Tagging
Co-authored by Felix Candelario and Benjamin F., AWS Solutions Architects
Many companies are looking to optimize their AWS usage and lower operational costs. While production environments are typically well-governed and reach optimal use through services such as Auto Scaling, sometimes development and testing need a different approach.
There are a number of ways to schedule resources to start or stop based on time of day (Auto Scaling Scheduled Scaling, for example); however, some companies are looking to hand over control of the schedule to the resource owner, without reassigning the burden of creating the scheduling infrastructure.
In this post, we discuss a proposed method for running an enterprise scheduler that queries running resources for a specific tag; the tag controls when resources should be switched on or off. Control over this tag can be handed to the resource owner, thereby providing a very simple method to govern the on/off schedule of a resource based on a weekly cycle.
Resource owners only need to describe the schedule they wish to enforce in human-friendly syntax and apply that in the form of a tag on their resources. The enterprise scheduler runs periodically using AWS Lambda, scans resources for the schedule tag, parses the schedule syntax, and then issue an On or Off command per the schedule that's assigned to each resource individually.
Lambda function schedule
To enable the enterprise scheduler, a Lambda function should be added and run on a schedule. The function describes EC2 instances within the same region, and determines if there are any On or Off operations to be executed. We recommend configuring the function to run every 10 minutes. By default, the function determines On/Off actions from the last 12 minutes.
Controlling this behavior is done in two parts:
- The Lambda function schedule
- The max_delta parameter
The function schedule controls how often the function is invoked and begins to search for On/Off actions to perform. The max_delta parameter controls the time window in which to search for individual schedule tags on resources. For example, you may choose to run the function every 20 minutes, and then set max_delta to 22 minutes. It is necessary to keep the max_delta value slightly higher than the rate which the function is invoked so as not to miss any On/Off actions. We recommend setting it two minutes above the function invocation rate.
Required IAM permissions
The Lambda function requires permissions to query the resource tags using DescribeInstances, and then to act on them, with either a StartInstances or StopInstances API operation call.
Install the scheduler
The following procedures walk you through creating the function and validation.
Modify the code
- Copy the Enterprise Scheduler Lambda function code to your computer from the following code example:
from __future__ import print_function # Python 2/3 compatibility
import boto3
import datetime
import sys

def lambda_handler(event, context):
    schedule_tag = 'EntScheduler'
    max_delta = 12
    now = datetime.datetime.now()
    ec2 = boto3.resource('ec2')
    client = boto3.client('ec2')
    scheduled_instances = []
    processed_instances = []
    #filter for instances with the correct tag
    instances = ec2.instances.filter(Filters=[{'Name': 'tag-key', 'Values':[schedule_tag]}])
    #grab the scheduler string
    for instance in instances:
        for tag in instance.tags:
            if tag['Key'] == schedule_tag:
                scheduled_instances.append({'instance':instance, 'schedule':tag['Value']})

    def parse_schedule(instance_hold):
        day = now.strftime('%a').lower()
        current_time = datetime.datetime.strptime(now.strftime("%H%M"), "%H%M")
        instance_hold['disabled'] = False
        #parse the schedule string into seperate tokens
        tokenized_schedule = instance_hold['schedule'].split(';')
        #make sure the schedule string contains either 4 or 5 parameters.
        if len(tokenized_schedule) < 4:
            instance_hold['disabled'] = True
            sys.exit('Schedule string improperly formed. Fewer than 4 tokens specified.')
        if len(tokenized_schedule) > 6:
            instance_hold['disabled'] = True
            sys.exit('Schedule string improperly formed. Greater than 5 tokens specified.')
        #check to make sure today is the day to execute an on action
        if day in tokenized_schedule[0]:
            try:
                #check to make sure 24 hour string parses correctly
                scheduled_time_for_on = datetime.datetime.strptime(tokenized_schedule[1], "%H%M")
                #as long as not outside of the window of execution
                delta = scheduled_time_for_on - current_time
                margin = datetime.timedelta(minutes=max_delta)
                if(current_time - margin <= scheduled_time_for_on <= current_time):
                    instance_hold['on'] = True
                else:
                    instance_hold['on'] = False
            except Exception as e:
                print(e)
                instance_hold['disabled'] = True
                sys.exit('Time string for the on action improperly formed. Ensure in HHMM format.')
        else:
            instance_hold['on'] = False

        #check to make sure today is the day to execute an off action
        if day in tokenized_schedule[2]:
            try:
                #check to make sure 24 hour string parses correctly
                scheduled_time_for_off = datetime.datetime.strptime(tokenized_schedule[3], "%H%M")
                delta = scheduled_time_for_off - current_time
                margin = datetime.timedelta(minutes=max_delta)
                if(current_time - margin <= scheduled_time_for_off <= current_time):
                   instance_hold['off'] = True
                else:
                    instance_hold['off'] = False
            except Exception as e:
                print(e)
                instance_hold['disabled'] = True
                sys.exit('Time string for the on action improperly formed. Ensure in HHMM format.')
        else:
            instance_hold['off'] = False

        #check for disabled string
        if len(tokenized_schedule) > 4:
            if 'disable' in tokenized_schedule[4]:
                instance_hold['disabled'] = True
        return instance_hold

    for instance_hold in scheduled_instances:
        processed_instances.append(parse_schedule(instance_hold))

    for instance_hold in processed_instances:
        if(instance_hold['disabled']==False):
            if(instance_hold['off']==True and instance_hold['on']==True):
                print('Both on and off actions specified for this time window. Doing nothing.')
            if(instance_hold['off']==True and instance_hold['on']==False):
                print('Turning instance off: ' + instance_hold['instance'].id + ' ' + instance_hold['instance'].instance_type)
                client.stop_instances(InstanceIds=[instance_hold['instance'].id])
            if(instance_hold['off']==False and instance_hold['on']==True):
                print('Turning instance on: ' + instance_hold['instance'].id + ' ' + instance_hold['instance'].instance_type)
                client.start_instances(InstanceIds=[instance_hold['instance'].id])
            if(instance_hold['off']==False and instance_hold['on']==False):
                print('No action on instance: ' + instance_hold['instance'].id + ' ' + instance_hold['instance'].instance_type)
        else:
print('Schedule disabled: ' + instance_hold['instance'].id + ' ' + instance_hold['instance'].instance_type)- Edit the local copy of the code on your computer using a text editor, and make the following optional changes:
- Optional: Edit the _schedule_tag_ parameter if you will be using a custom tag for setting up resource schedules. By default, the value is: EntScheduler.
-
Optional: Set _max_delta_ to a value that is two minutes higher than the rate of invocation that will be used. By default, the value is 12 mins.
-
Save the local copy of the code with the changes made above and name it enterprise_scheduler.py.
Create the Lambda function
- Open the Lambda console and choose Create a Lambda function.
- Choose Next to skip a blueprint selection.
- Choose Next to skip creation of a trigger at this time.
- Enter a function name and note it for later use. For example: enterprise_scheduler_function.
- For Runtime, choose Python 2.7.
- For Code entry type, choose Edit code inline.
- Paste the function code from the local version of the scheduler that was saved in the previous section (enterprise_scheduler.py).
- For Handler, enter enterprise_scheduler.lambda_handler .
- For Role selection, choose Create a custom role.
A window pops up displaying the IAM form for creating a new IAM execution role for Lambda.
Add an IAM role
- In the IAM window, for Role name, enter ent_scheduler_execution_role (or similar text).
- Choose View Policy Document, Edit the policy, OK (to confirm that you've read the documentation).
- Replace the contents of the default policy with the following:
 {
  "Version": "2012-10-17",
  "Statement": [
    {
      "Sid": "Stmt1469047780000",
      "Effect": "Allow",
      "Action": [
        "ec2:DescribeInstances",
        "ec2:StartInstances",
        "ec2:StopInstances"
      ],
      "Resource": [
        "*"
      ]
    },
    {
      "Sid": "Stmt1469047825000",
      "Effect": "Allow",
      "Action": [
        "logs:CreateLogGroup",
        "logs:CreateLogStream",
        "logs:PutLogEvents"
      ],
      "Resource": [
        "arn:aws:logs:*:*:*"
      ]
    }
  ]
}- Choose Allow to save the policy and close the window.
- For Timeout, enter 5 minutes.
- Choose Next.
- Review the configuration and choose Create Function.
Add an event schedule
- Choose Triggers, Add trigger.
- Click on the box and choose CloudWatch Events – Schedule.
- For Schedule expression, enter the rate at which you would like the enterprise scheduler to be invoked. We recommend a value of "rate(10 minutes)".
At this point, a tagged Amazon EC2 instance in the region where the Lambda function is running is either turned on or off, based on its schedule.
Enabling the scheduler on a resource
Assigning a schedule to a resource using a tag requires following these guidelines:
- The resource tag must match the tag named in the Lambda function. You can modify the schedule_tag parameter to choose a tag name such as YourCompanyName Scheduler.
- The scheduler works on a weekly basis (7 days of the week), and you may specify up to 1 set hour for turning the resource On or Off. For each day that's set in the On or Off section, the same hour is used.
- The current time is interpreted by the function using UTC, therefor the schedule tag should use the UTC time for turning instances both On and Off.
- Use the following scheduler syntax in the Lambda function:
Days-for-On;Hour-for-On;Days-for-Off;Hour-for-off;Optional-Disable;
- The Days values should be noted with the first 3 letters of the day. Accepted values are: mon, tue, wed, thu, fri, sat, sun. Multiple days can be specified with comma separation and order is ignored.
- The Hour value should be noted in 24H format HHMM.
- Optional-Disable states that this tag will be ignored by the function, allowing the user to keep the configuration and have the scheduler skip over this resource temporarily. Note: The function can be configured to disregard Optional-Disable based on company policy.
Here are some examples of scheduler syntax:
-
mon,tue,wed,thu,fri,sat,sun;0830;mon,tue,wed,thu,fri,sat,sun;1700;
Resource would be turned on at 8:30 am UTC daily and turned off at 5:00 pm UTC daily. -
mon;0700;fri;1800;
Resource would be turned on at 7:00 am on Mondays and turned off at 6:00 pm UTC on Fridays. -
wed,thu,fri;2100;thu,fri,sat;0500;
Resource would be turned on at 9:00 pm UTC on Wednesdays, Thursdays, and Fridays, and turned off at 5:00 am UTC on Thursdays, Fridays, and Saturdays. -
wed,thu,fri;2100;thu,fri,sat;0500;disable;
Resource would be left untouched and the schedule ignored due to the disable option.
Conclusion
This method of scheduling resource use is simple and can support several use cases, such as shutting down labs for evenings and weekends. Even this small optimization can result in significant savings when you consider that a typical workday is 8 out of 24 hours. Unlike on-premises resources, AWS resources can be managed by a quick API call.
If you have questions or suggestions, please comment below.
Analyzing Genomics Data at Scale using R, AWS Lambda, and Amazon API Gateway
This is a guest post by Anish Kejariwal, Director of Engineering for Station X
![]()
Station X has built the GenePool web platform for real time management, visualization, and understanding of clinical and genomic data at scale. As part of the GenePool analytics engine, R is used to calculate statistics that help scientists search for patterns in their genomic data. Scaling R using traditional methods has been challenging since GenePool calculates statistics for tens of thousands of genes, and millions of variants in real time.
In this post, I walk you through the process of creating a Python AWS Lambda package that bundles R, show you how to execute Lambda via Amazon API Gateway, and explain how this serverless microservices architecture has enabled GenePool to scale R dynamically to analyze genomics data in real time.
Station X’s GenePool platform
GenePool is an enterprise-level customizable and extensible platform for biomarker discovery, translational research, and clinical genomics. GenePool can be used to analyze all of the common genomic data types, including gene expression levels, sequence variations, copy number, and DNA methylation data. These analyses can be applied to both customer data and GenePool’s reference library, which includes The Cancer Genome Atlas (TCGA), among other large projects.
GenePool is built upon AWS and is designed for storing, analyzing, and managing patient data in a HIPAA-compliant environment. To comply with HIPAA, Station X has signed a Business Associate Agreement (BAA) with AWS to ensure that protected health information (PHI) is adequately protected. Only the HIPAA-eligible services defined in the AWS BAA can be used to process, store, and transmit personally-identifiable patient data.
AWS Lambda and Amazon API Gateway are not currently HIPAA-eligible services, so we implement a process to de-identify all data to be analyzed using our described workflow. To use these services, I’ll explain how PHI data is de-identified to maintain BAA compliance.
Survival analysis background
GenePool provides a number of statistical analyses, one of which is the survival analysis. Survival analysis is a class of statistical methods that models the association of a variable with the time it takes for an event to occur, such as failure of a cancer patients’ response to therapeutic treatment. The most widely used statistical method for survival analysis is the Cox proportional-hazards regression model. We will show how GenePool uses the R function coxph to provide survival analysis statistics for every gene (~20k) in the genome, in order to calculate the significance of an association of a gene’s expression level with the time to outcome event.
Decision to use AWS Lambda with Amazon API Gateway
Calculating survival statistics on every gene is an example of an “embarrassingly parallel” problem. SparkR on Amazon EMR is one possible implementation solution, but Lambda provides significant advantages for GenePool in this use case: as scientists run analyses in GenePool, Lambda is able to scale up dynamically in real time and meet the spike in requests to calculate statistics on tens of thousands of genes, and millions of variants. In addition, you do not have to pay for idle compute time with Lambda and you do not have to manage servers.
When executing Lambda functions, you have a choice of executing them directly, or using API Gateway. Station X chose API Gateway because it provides a REST API (our preferred approach for integration with services), has built in request throttling, and supports robust error handling via HTTP status codes.
Solution walkthrough
Using R in Lambda requires building a zip package that contains C shared libraries. You compile these on an Amazon Linux instance to ensure compatibility with the Lambda environment. You also write a Lambda handler in Python that dynamically loads the R shared libraries and interfaces with R via rpy2, a Python package. You then execute the function via API Gateway.
All of this code is also available in the Lambda R Survival Statistics GitHub repository.
Step 1: Compile R and all dependencies for Amazon Linux
To start, you need an instance running the same version of Amazon Linux as used by Lambda. You can find the AMI version listed in Lambda Execution Environment and Available Libraries. Because you are only using this instance to build the package for Lambda, a t2.micro is sufficient.
Here is a sample command to launch an instance in US East (N. Virginia):
aws ec2 run-instances \
    --image-id ami-60b6c60a \
    --count 1 \
    --instance-type t2.medium \
    --key-name YourKeyPair \
    --security-group-ids sg-xxxxxxxx \
    --subnet-id subnet-xxxxxxxx
After you have launched your instance, SSH into it. For more information, see Getting Started with Amazon EC2 Linux Instances.
After you have connected to the instance, configure the AWS CLI with your security credentials. This is necessary because you will be copying the Lambda package to Amazon S3. For more information, see Configuring the AWS Command Line Interface.
aws configureNow, execute the following commands to install everything required for R, Python, and rpy2.
# First, make sure everything is up-to-date:
sudo yum -y update
sudo yum -y upgrade

# install everything
# readline is needed for rpy2, and fortran is needed for R
sudo yum install -y python27-devel python27-pip gcc gcc-c++ readline-devel libgfortran.x86_64 R.x86_64

# install the R survival package
wget https://cran.r-project.org/src/contrib/Archive/survival/survival_2.39-4.tar.gz
sudo R CMD INSTALL survival_2.39-4.tar.gz
Step 2: Install rpy2
Next, use virtualenv to manage all of the Python dependencies, so that you can package them easily. After you create your virtual environment, install rpy2.
virtualenv ~/env && source ~/env/bin/activate

pip install rpy2
Step 3: Package R and rpy2 for Lambda
R is located at /usr/bin/R, and is simply a shell script wrapper. Looking at the shell script, there are two important things to understand for packaging:
- R_HOME_DIR is /usr/lib64/R
- The actual R binary is located at: /usr/lib64/R/bin/exec/R
You need everything in /usr/lib64/R, as well as all the shared libraries for the R binary. The shared libraries can be found via:
ldd /usr/lib64/R/bin/exec/RYou need all the shared libraries that were not already on the box before you installed R, plus liblapack (as we learned through trial and error).
# create a directory called lambda for the package
mkdir $HOME/lambda && cd $HOME/lambda

# copy R
cp -r /usr/lib64/R/* $HOME/lambda/

# Use ldd on R executable to find shared libraries, and copy all of the ones that were not already on the box
cp /usr/lib64/R/lib/libR.so $HOME/lambda/lib/
cp /usr/lib64/libgomp.so.1 $HOME/lambda/lib/
cp /usr/lib64/libblas.so.3 $HOME/lambda/lib/
cp /usr/lib64/libgfortran.so.3 $HOME/lambda/lib/
cp /usr/lib64/libquadmath.so.0 $HOME/lambda/lib/

# Also grab this one
cp /usr/lib64/liblapack.so.3 $HOME/lambda/lib/

# copy R executable to root of package
cp $HOME/lambda/bin/exec/R $HOME/lambda
Step 4: Add the libraries from the Python virtual environment
Use the following commands to add the libraries. You could copy all of $VIRTUAL_ENV/lib/python2.7/site-packages/ but for this walkthrough, take the essentials only.
cp -r $VIRTUAL_ENV/lib64/python2.7/site-packages/* $HOME/lambda
# Essential packages only
cp -r $VIRTUAL_ENV/lib/python2.7/site-packages/singledispatch* $HOME/lambda
Step 5: Write a handler in Python to calculate survival statistics via R
In $HOME/lambda, create a file called handler.py as shown below (as mentioned previously, this code is available on GitHub).
There are a few important things to make note of in the code:
- You need to load all shared libraries and set the R environment variables before you can import rpy2.
- To optimize performance, the code has been designed so that each request can support the expression values of multiple genes. For example, to calculate the statistics for 20 K genes, we are able to make 100 requests each with 20 genes. This helps minimize latency by reducing the number of requests.
- Log messages to Amazon CloudWatch by using the Python logging module, which will add a timestamp for each log entry.
import ctypes
import json
import os

# use python logging module to log to CloudWatch
# http://docs.aws.amazon.com/lambda/latest/dg/python-logging.html

import logging
logging.getLogger().setLevel(logging.DEBUG)

# must load all shared libraries and set the R environment variables before you can import rpy2

# # load R shared libraries from lib dir

for file in os.listdir('lib'):
    if os.path.isfile(os.path.join('lib', file)):
        ctypes.cdll.LoadLibrary(os.path.join('lib', file))

# set R environment variables

os.environ["R_HOME"] = os.getcwd()
os.environ["R_LIBS"] = os.path.join(os.getcwd(), 'site-library')

# import rpy2

import rpy2
from rpy2 import robjects

from rpy2.robjects import r

def calculate_survival_stats(times, events, values_by_record):
    """
    @param times: time elapsed before the event occurs, or when subject is censored
    @param events: 1 indicates event was observed; 0 indicates event did not occur
    @param values_by_record: two dimensional double array.  Each row is the predictor values for a record (ex: gene)
    @return: array where each element contains the hazard ratio and pvalue for the record
    """

    # flatten values of two dimensional array for use by R
    # in R, matrices are simply an array where you specify number of columns per row

    flattened_values = [y for row in values_by_record for y in row]
    t = robjects.FloatVector(times)
    e = robjects.IntVector(events)
    v = robjects.FloatVector(flattened_values)

    # convert flattened values into an R matrix

    m = robjects.r['matrix'](v, nrow=len(values_by_record), byrow=True)

    #load R library

    r('library(survival)')

    # assign variables in R

    r.assign('valuesMatrix', m)
    r.assign('numSamples', len(times))
    r.assign('times', t)
    r.assign('events', e)

    # calculate statistics by applying coxph to each record's values

    logging.debug('Calculating stats')
    r("""res <- apply(valuesMatrix,1, function(values) {
      coxlist = try(coxph(Surv(times,events)~values + cluster(1:numSamples[1])))
      return(c(summary(coxlist)$coefficients[2], summary(coxlist)$coefficients[6]))
      })""")
    logging.debug('Done calculating stats')

    # convert results

    r_res = robjects.r['res']
    res_iter = iter(r_res)
    results = []
    for hazard in res_iter:
        pval = next(res_iter)
        results.append({'hazard': hazard, 'pval': pval})
    return results

def lambda_handler(event, context):
    times = event['times']
    events = event['events']

    # support receiving values (ex: expression) for multiple records (ex: genes)

    values_by_record = event['values_by_record']
    logging.info('Number of samples: {0}'.format(len(times)))
    logging.info('Number of genes/variants: {0}'.format(len(values_by_record)))

    try:
        stats_list = calculate_survival_stats(times, events, values_by_record)
    except rpy2.rinterface.RRuntimeError, e:
        logging.error('Payload: {0}'.format(event))
        logging.error('Error: {0}'.format(e.message))

        # generate a JSON error response that API Gateway will parse and associate with a HTTP Status Code

        error = {}
        error['errorType'] = 'StatisticsError'
        error['httpStatus'] = 400
        error['request_id'] = context.aws_request_id
        error['message'] = e.message.replace('\n', ' ') # convert multi-line message into single line
        raise Exception(json.dumps(error))
    res = {}
    res['statistics_list'] = stats_list
    return res
Step 6: Create the package for Lambda
Use the following commands to create the package:
cd $HOME/lambda
zip -r9 $HOME/lambda_r_survival.zip *
# copy to s3
aws s3 cp $HOME/lambda_r_survival.zip s3://<your-s3-bucket>
Step 7: Test Lambda package on another EC2 instance
As in step 1, start up a new EC2 t2.micro instance and SSH to it. As before, be sure to configure AWS CLI with your security credentials.
Then unpack the Lambda package and set some R environment variables so you can test things.
aws s3 cp s3://<your-s3-bucket>/lambda_r_survival.zip .
unzip lambda_r_survival.zip
export R_HOME=$HOME
export LD_LIBRARY_PATH=$HOME/lib
Now test the handler by putting the following code in a new file called test_handler.py (this code is also available on GitHub).
import handler
import unittest

class SurvivalHandlerTest(unittest.TestCase):
    def test_survival_stats(self):
        times = [4.638356164, 4.331506849, 4.142465753, 4.712328767, 4.076712329, 4.704109589, 4.630136986, 3.863013699, 5.778082192, 5.306849315, 6.065753425, 5.767123288, 5.953424658, 5.684931507, 6.167123288, 5.457534247, 4.298630137, 4.287671233, 4.928767123, 4.931506849, 5.446575342, 5.295890411, 9.342465753, 5.95890411, 8.610958904, 3.246575342, 8.591780822, 6.693150685, 0.254794521, 7.81369863, 8.882191781, 4.010958904, 5.58630137, 7.416438356, 7.750684932, 7.293150685, 6.893150685, 7.860273973, 2.597260274, 7.430136986, 12.10136986, 12.14520548, 11.73424658, 12.14794521, 11.30136986, 12.16986301, 9.402739726, 11.09315068, 10.36712329, 10.03835616, 5.506849315, 1.37260274, 6.890410959, 9.97260274, 10.12876712, 9.443835616, 6.923287671, 5.517808219, 4.652054795, 5.309589041, 11.95890411, 10.21643836, 8.745205479, 3.523287671, 1.630136986, 4.087671233, 6.876712329, 6.739726027, 5.317808219, 4.180821918, 4.02739726, 5.424657534, 4.501369863, 8.526027397, 1.389041096, 7.235616438, 1.849315068, 5.167123288, 1.290410959, 11.17534247, 0.939726027, 0.367123288, 11.12328767, 10.82191781, 4.205479452, 7.279452055, 9.208219178, 5.619178082, 3.093150685, 9.131506849, 10.32876712, 9.953424658, 9.994520548, 9.608219178, 8.909589041, 9.279452055, 7.304109589, 8.060273973, 8.093150685, 8.312328767, 7.97260274, 0.78630137, 0.597260274, 3.81369863, 1.268493151, 3.835616438, 2.950684932, 8.671232877, 8.917808219, 8.791780822, 5.898630137, 1.279452055, 3.005479452, 4.843835616, 6.238356164, 5.164383562, 4.55890411, 5.84109589, 5.468493151, 4.909589041, 3.832876712, 8.430136986, 7.791780822, 3.367123288, 7.460273973, 7.605479452, 7.169863014, 0.161643836, 1.430136986, 5.569863014, 6.257534247, 5.079452055, 4.726027397, 3.863013699, 4.857534247, 3.139726027]

        events = [0, 0, 0, 0, 0, 0, 0, 0, 0, 0, 0, 0, 0, 0, 0, 0, 0, 0, 0, 0, 0, 0, 0, 0, 0, 1, 0, 1, 1, 0, 0, 0, 0, 0, 0, 0, 0, 0, 0, 0, 0, 0, 0, 0, 0, 0, 0, 0, 0, 0, 0, 0, 1, 0, 0, 0, 0, 0, 0, 0, 0, 0, 0, 0, 1, 1, 0, 0, 0, 1, 0, 1, 1, 0, 1, 0, 1, 1, 1, 0, 1, 1, 0, 0, 0, 0, 0, 0, 1, 0, 0, 0, 0, 0, 0, 0, 0, 0, 0, 0, 0, 1, 1, 1, 1, 0, 1, 0, 0, 0, 0, 1, 0, 0, 0, 0, 0, 0, 0, 0, 0, 0, 0, 1, 0, 0, 0, 1, 1, 0, 0, 0, 1, 0, 0, 0]

        predictor_values = [6.20684480226827, 3.20690674515886, 0.979896435651624, 11.2658574924525, 2.84228777849127, 5.28955162693772, 11.4946326381005, 32.2839192709712, 31.9587971221759, 15.5092044077945, 17.3313542688733, 23.0916782450709, 21.615914667679, 16.8388670997496, 7.16106269156295, 19.5941345251978, 2.95022582776833, 3.72486367005869, 27.8714606235475, 5.79353268854366, 10.8543205617944, 8.33718317212276, 8.54915876555219, 1.15201260454495, 1.58465100154883, 14.2500537880492, 1.43757261517753, 3.70485535084333, 5.82845024031615, 52.710274723687, 3.67852162691948, 0.923697012806148, 8.02644710140789, 9.71669553654854, 2.98229349980929, 8.66844422528818, 39.1305644805833, 12.3733519649876, 15.0889564765008, 18.1900372095169, 38.7059092082392, 10.3257903971892, 0.601690793821173, 2.08056970689632, 6.28612807776514, 10.5226180420163, 25.0146913978932, 7.37156805651407, 4.84403308162777, 13.2683731528648, 3.00149702535328, 13.7356129723804, 12.60785785915, 12.3442627221716, 2.83154572391329, 7.45862918010557, 6.45244123285159, 27.8652289705856, 12.7146092880982, 15.970797750862, 11.5643513218214, 9.23675971554499, 42.5550503730632, 10.838734628583, 34.9481207060481, 12.3494932612122, 34.1777026690947, 12.4543781921956, 7.63588482898268, 22.1968995958946, 28.5619330841864, 19.6749664316186, 25.6836593916572, 30.0390866740329, 10.0963283883627, 26.9121864181023, 44.7754867240884, 24.7088428954796, 11.93794427821, 4.42348558472551, 14.6659134525814, 38.1873090478504, 18.5821411156051, 16.9447829868588, 12.8581195432229, 0.330491627947204, 1.11077808211899, 7.34518564185823, 44.0348521700236, 10.2469102231837, 6.42466533567732, 4.30841802714224, 7.86522606430801, 6.91244772436417, 32.7549054691372, 30.609136082726, 31.6538981532932, 28.8484915444612, 6.73798926424405, 9.20506845339816, 6.96569368635659, 30.010711578906, 66.4559889462629, 55.7262425828117, 13.8383046586689, 9.02844750113206, 16.0575996672542, 2.75431670527343, 7.73229651483174, 0.314096764153486, 6.3796340636411, 6.19888231947652, 8.50773626310158, 8.17003714776602, 1.7022377394155, 2.54803316986572, 10.6387329814921, 4.16644939773153, 3.38945499777335, 9.79919581900252, 4.85817119867753, 18.5326183391172, 20.4274929494887, 48.5142850973116, 62.3393690012863, 6.05430979930315, 11.3201640323061, 49.7707747961335, 31.7284095600361, 4.00134321586944, 14.3260255593491, 44.5189580861748, 25.5398539079413, 45.3180619182823, 15.7880882467983, 2.83980706238194]

        # simulate passing in predictor (expression) values for two records (genes) by creating 2D array where both

        # rows have the same values

        values_by_record = [predictor_values, predictor_values]

        results = handler.calculate_survival_stats(times, events, values_by_record)

        for result in results:
            self.assertEquals(result['hazard'], 1.0461031177542928)
            self.assertEquals(result['pval'], 5.643821021250606e-05)

if __name__ == "__main__":
    unittest.main()
Now, execute it to verify all tests pass successfully:
python ./test_handler.py.
----------------------------------------------------------------------
# Ran 1 test in 0.056s
# OKStep 8: Deploy the Lambda function
Michael Raposa recently wrote the Extracting Video Metadata using AWS Lambda and Mediainfo post which describes how to deploy a Lambda function. Follow the instructions in Step 4: Deploy the Lambda function.
When configuring the Lambda function, specify the handler as handler.lambda_handler, set the memory to the maximum size of 1536 MB (greater memory allocation in Lambda is correlated with greater compute power), and set the timeout to 30s (the max for API Gateway).
For more information about deploying Lambda functions, see Creating a Deployment Package (Python).
Step 9: Deploy the API Gateway
For more information, see Make Synchronous Calls to Lambda Functions in the Amazon API Gateway Developer Guide.
Step 10: Configure API Gateway to map Lambda errors to a 400 HTTP status code
You may have noticed that if you encounter an error in the Lambda handler while calculating the statistics, it throws an exception with a custom error object serialized as a JSON string.
In API Gateway, you will map this a 400 HTTP status code so that GenePool can handle this error, log it, and report a friendly message to the user that there was an error. Reporting a friendly error message is important since it enables GenePool to remind the researchers that they need to have a sufficient number of samples with events in order to calculate statistical significance.
A recent post, Error Handling Patterns in Amazon API Gateway and AWS Lambda, explained how to map error strings to a HTTP status code, but you’ll go through the details for this specific string.
- Open up the Post method in your API gateway and do the following:
- Choose Method Response and add a 400 error.
- In the Post method, choose Integration Response , 400.
- For Selection pattern , enter .*”httpStatus”: 400,.*.
- Choose Save.
- Choose Body Mapping Templates.
- For Content type , enter “application/json”.
- For Mapping template , enter the following code:
#set ($errorMessageObj = $util.parseJson($input.path('$.errorMessage')))
{
  "code" : $errorMessageObj.httpStatus,
  "message" : "$errorMessageObj.message",
  "request-id" : "$errorMessageObj.request_id"
}
Finally Choose Save and re-deploy the API.
Step 11: Calculate survival statistics
To demonstrate a survival analysis, this walkthrough looks at the RNA-seq expression counts data from the breast cancer cohort of TCGA. There are 1218 patients in this cohort, and you will look at the 480 patients who have primary tumor samples, were diagnosed after 2009 (to ensure non-biased collection of samples from living and deceased patients), and have been monitored for recurrence of breast cancer.
GenePool calculates the survival statistics on all 20k genes in the genome but for this post, you just look at the MKI67 and APOE genes. MKI67 is a known biomarker for breast cancer recurrence ( PMC3669503) and is one of the genes used in a commercial available diagnostic test that predicts the likelihood of breast cancer recurrence ( PMC3396611, PMC3669503). In contrast, APOE is unrelated to breast cancer and is instead linked to Alzheimer’s disease and cardiovascular disease. We expect MKI67 to have a significant p-value showing association to recurrence of breast cancer, and we expect APOE to not have a significant p-value.
Call API Gateway via curl with a payload that includes the following parameters:
- events – An outcome event indicating whether the patient had a recurrence of breast cancer (1=true, 0=has not had recurrence for the duration of the study).
- times – The number of days until recurrence of cancer (the event) occurs, or the number of days on the study without recurrence.
- values_by_record – A two dimensional array, where each row represents a gene’s normalized expression value in each patient. The first row represents MKI67 and the second row represents APOE.
Execute the following curl command (the curl command is also available on GitHub as a shell script called testapigateway.sh).
curl -H "Content-Type: application/json" -X POST -d "{ \
\"events\": [0, 0, 0, 0, 0, 0, 0, 1, 0, 0, 0, 0, 0, 0, 0, 0, 1, 0, 0, 0, 0, 0, 0, 1, 0, 0, 0, 0, 0, 0, 0, 0, 0, 0, 0, 1, 0, 0, 0, 0, 0, 0, 1, 0, 0, 0, 0, 0, 0, 0, 1, 1, 0, 0, 0, 0, 0, 0, 0, 0, 0, 0, 0, 0, 0, 0, 0, 0, 0, 0, 0, 0, 1, 0, 0, 0, 0, 0, 0, 0, 0, 0, 0, 0, 0, 0, 0, 0, 0, 0, 0, 0, 0, 0, 0, 0, 0, 0, 0, 0, 0, 0, 0, 0, 0, 0, 0, 0, 0, 0, 0, 0, 0, 0, 0, 0, 0, 0, 0, 0, 0, 0, 0, 0, 0, 0, 0, 0, 0, 0, 0, 0, 0, 0, 0, 0, 0, 0, 0, 0, 0, 0, 0, 0, 0, 0, 0, 0, 0, 0, 0, 1, 0, 0, 0, 0, 0, 0, 0, 0, 0, 0, 0, 0, 0, 0, 0, 0, 0, 0, 0, 0, 0, 0, 0, 0, 0, 0, 0, 0, 0, 0, 0, 0, 0, 0, 0, 0, 0, 0, 0, 0, 0, 0, 0, 1, 0, 0, 0, 0, 0, 0, 0, 0, 0, 0, 0, 0, 0, 0, 0, 0, 0, 0, 0, 0, 0, 0, 1, 0, 0, 0, 0, 0, 0, 0, 0, 0, 0, 0, 0, 0, 0, 0, 1, 0, 0, 0, 0, 0, 0, 0, 0, 0, 0, 0, 0, 0, 0, 0, 0, 0, 0, 0, 0, 0, 0, 0, 0, 1, 0, 0, 0, 0, 0, 0, 0, 0, 0, 0, 0, 0, 0, 0, 0, 0, 0, 0, 0, 0, 0, 0, 0, 0, 0, 0, 0, 0, 0, 0, 0, 0, 0, 0, 0, 0, 0, 0, 0, 1, 0, 0, 0, 0, 1, 0, 0, 0, 0, 0, 0, 0, 0, 0, 0, 0, 1, 0, 0, 0, 0, 0, 0, 0, 0, 0, 0, 0, 0, 1, 0, 0, 0, 0, 0, 0, 1, 0, 0, 0, 0, 0, 0, 0, 0, 0, 0, 0, 0, 0, 0, 0, 0, 0, 0, 0, 1, 0, 0, 0, 0, 0, 0, 0, 0, 0, 1, 0, 0, 0, 0, 0, 0, 1, 0, 0, 0, 0, 0, 0, 0, 0, 0, 0, 0, 0, 0, 0, 0, 0, 0, 0, 0, 0, 1, 0, 0, 0, 0, 0, 0, 0, 0, 0, 0, 0, 0, 0, 0, 0, 0, 0, 0, 0, 0, 0, 0, 0, 0, 0, 0, 0, 0, 0, 0, 0, 1, 0, 0, 0, 0, 0, 0, 0, 1, 0, 0, 0, 0, 0, 1, 0, 0, 0, 0, 0, 0, 0, 0, 0, 0, 0, 0, 0, 0, 0, 0, 0, 0, 1, 0, 0, 0, 0, 0, 0, 0, 0, 0, 0, 0, 0, 0, 0, 0, 0, 0, 0, 0, 0], \
\"times\": [1612, 1474, 348, 1477, 1471, 303, 554, 559, 1474, 714, 528, 683, 616, 584, 595, 501, 1290, 523, 552, 322, 1102, 1206, 996, 802, 1546, 222, 742, 648, 706, 820, 643, 666, 1043, 931, 965, 556, 765, 718, 899, 954, 738, 722, 291, 661, 627, 679, 345, 322, 313, 343, 174, 419, 364, 454, 418, 446, 441, 644, 545, 448, 368, 326, 336, 313, 285, 317, 266, 585, 698, 677, 1005, 588, 237, 987, 197, 496, 451, 675, 734, 762, 456, 504, 602, 471, 707, 754, 890, 511, 588, 455, 348, 417, 530, 568, 413, 373, 51, 250, 1, 614, 34, 40, 70, 10, 10, 7, 10, 303, 224, 227, 5, 10, 10, 10, 196, 172, 242, 213, 231, 218, 210, 214, 10, 11, 10, 10, 10, 16, 163, 10, 375, 9, 10, 10, 10, 10, 162, 170, 350, 172, 475, 989, 78, 1001, 584, 1161, 1198, 1233, 1742, 1013, 1185, 301, 78, 178, 170, 728, 759, 1001, 149, 652, 1093, 856, 795, 1120, 1119, 612, 320, 635, 567, 715, 293, 160, 295, 574, 662, 287, 0, 363, 358, 358, 385, 358, 0, 385, 385, 385, 385, 1476, 382, 370, 411, 383, 0, 383, 393, 136, 380, 375, 332, 345, 343, 5, 366, 317, 375, 394, 375, 616, 381, 376, 394, 470, 513, 508, 1, 297, 747, 439, 1034, 394, 396, 380, 408, 1728, 635, 403, 626, 425, 431, 410, 643, 584, 431, 532, 431, 1688, 480, 552, 575, 366, 1448, 426, 577, 611, 612, 611, 590, 620, 639, 371, 405, 447, 565, 541, 509, 783, 727, 839, 552, 446, 522, 463, 448, 664, 441, 606, 538, 1682, 499, 482, 496, 506, 395, 461, 1309, 503, 466, 472, 302, 433, 430, 530, 488, 409, 397, 439, 1461, 499, 410, 519, 49, 307, 398, 381, 373, 1015, 563, 659, 492, 21, 767, 275, 626, 336, 1210, 595, 1732, 428, 1563, 501, 1133, 675, 659, 337, 1523, 1604, 597, 1051, 1325, 252, 931, 1208, 1062, 1179, 1043, 538, 1059, 1000, 1120, 443, 1039, 1101, 1112, 1203, 1266, 1088, 90, 786, 576, 300, 755, 860, 1063, 78, 186, 92, 339, 1467, 1369, 976, 34, 1419, 200, 647, 1417, 1449, 790, 975, 1285, 1148, 1189, 1167, 1248, 1269, 1239, 1232, 305, 21, 1186, 59, 217, 747, 375, 524, 288, 1158, 1001, 918, 926, 727, 725, 812, 24, 785, 803, 847, 371, 554, 575, 403, 504, 477, 703, 562, 207, 575, 187, 424, 320, 439, 607, 788, 672, 1035, 532, 533, 715, 463, 510, 760, 952, 1010, 412, 551, 360, 352, 646, 402, 216, 404, 323, 759, 996, 889, 762, 519, 258, 447, 440, 450, 677, 80, 489, 477, 192, 441, 594, 376, 596, 532, 681, 681, 64, 1219, 1062, 1106, 878, 752, 679, 620, 812, 1275, 1301, 792, 528, 428, 858, 600, 1220, 275, 5, 8, 302, 572, 562, 641, 629, 586, 421, 574, 529, 525, 424, 518, 116, 347, 1611, 883, 467, 488], \
\"values_by_record\": [ \
[2.412601542531451, 0.016614713850896357, 0.4054379748118846, -0.8920520866328855, -2.244443123683136, 0.02914634565951651, 1.5195821051444676, 1.5927834276655395, 1.0653158843596753, 0.3793614060177867, 2.521766340816188, 0.3175277214425974, -0.6632711549073212, 2.4601253888073815, 2.1640004204061705, -3.318044982124254, 1.9669273951529405, 2.6817307322085915, 0.39164275305922297, 2.439645274005191, 1.296241451223713, 0.9917634020740747, -0.0019491491920806188, 3.444477788283977, 1.9048662437389499, -0.3008711940415052, 0.6790654967778672, -1.1483276530734987, -1.7069411009655162, -0.6477854569540853, -0.6762456348357226, 2.2078711408183755, 0.7300733338055279, -0.26742973217402966, 2.6471751149242437, 1.1876766323417711, 2.1628709337954777, -0.11422774437106935, -0.7560684212614373, 0.7432287295252089, 2.772398369235506, 2.3927667084595527, 1.0798212609741762, 3.4387324522091585, 1.9836691172969088, 1.3826100185487746, -0.21862066744723957, 1.7720265464002525, 0.6103744915379287, 0.01217129019514936, -0.5803614374171678, 0.3561150879634862, -0.5437397620074926, 1.0210785056292226, 0.11750969980403138, -0.7348379491400607, 2.0919105340620043, 1.4610373834717618, 0.8095746430473361, 0.3359695285043548, 1.0147451163700012, -1.9345863928292335, -3.2191283434834244, 2.01457644562511, 2.3967439763786955, 1.0611876415985313, 1.3797198926669514, 0.40857626296473526, 0.6080130468133842, 0.3042265790643356, 2.0, -1.8630407867794, 0.4358201368273262, -1.376418839596451, -0.24572541653357263, 0.5141289024986383, 0.8771816760640575, -2.216485614353596, 0.2971136255032771, 1.1067362205975195, -1.6948772572224906, 1.0331751499629171, 0.16349873228287956, 0.5069166099627985, -1.5298405245559705, -0.9391247506029844, 0.5710543206801059, 0.40907494217245716, -0.18976831718683226, 0.6235219022334146, 0.5983592787716827, 0.3898060929560399, -1.2215946029005382, 0.7160313373763258, 1.5466749367408734, 0.5625529341560198, 0.4818410960401405, 1.562863895158343, 1.3879197506661467, 0.5068754522799518, 1.6977133042359513, -0.742857813302269, -0.208743467884093, 0.0873914168142966, 1.0280473848763325, 1.1189382708398328, 0.8107367028815068, 1.8374403568957298, 2.1969199720308614, 2.899719115216542, 1.340072687571817, 2.4726720728080296, 0.9206821544462835, 2.306472427067418, 0.9722785043563678, 1.6638689497519723, 2.6958582756091882, 0.904266717878479, 0.7347826472293819, -0.0031374750188567628, -0.40711085458529767, -0.8358113681068322, 0.9103051182367585, 0.7684136158814636, 2.1159089681461536, 1.9390651202358982, 0.3731641605160612, -0.6729849682643843, 0.2451307781951317, 0.6557604767361525, 0.6222573678032501, -0.3241586564109311, 1.5305393178061648, -0.3050114558873956, -0.31435045542503826, 2.6681898001907554, 0.6871275587211826, 1.2124356521355357, 2.5180135944763475, -0.21930280439875383, -1.554449697935381, 1.1176208002654384, 0.6177260491786858, -0.985898119869793, -0.35541783996723103, -2.081464991313069, 0.2516073071208551, -0.15330296517699085, 1.4985351570849377, -1.2765845217000444, -0.6094839234793307, 1.4503798800710412, -0.90276002395561, 0.17627536433060645, 1.0184773919272763, 1.6002250731331014, 0.9261572712880278, 2.2530424349758493, 1.161743846245622, 0.30033151534947927, 0.8947591258719435, 1.0870479715575478, 1.8256669352041826, -2.195495691477794, -0.7818269177414181, -0.30341756632174804, 2.0572290446016943, -1.358140682397937, 2.829445873636269, 0.03753477891457593, -1.1802344281973822, 0.2531627093841665, -0.28591181081736844, -0.5386464067180903, -1.9657143341158354, 0.40016669553877326, 1.9142070668676776, 2.0428232139415843, 0.508472619934073, -0.912175822151079, 1.3495481798533928, 1.4959083110385643, 2.68825261311192, 1.3570394359718696, 2.179240604756477, 1.8328870659451524, 0.670778467245403, 0.01902474593358953, 2.49738397361742, 2.275420256642059, 1.3790876318117489, 0.7704501861475689, -1.6717435390094255, 2.3827107413060764, 2.1997241667096397, 2.0875349294232795, 0.26595323071202903, 0.7802880726175367, 1.9611682445062926, 1.287336517093276, -0.7493144692321899, 2.2557338703906744, 1.4287405982260835, 1.7620171513073974, 2.487909399037532, 1.776006479030453, 1.3976319125286958, 0.7781411526229925, 1.108982458165324, 0.672084480767101, 2.2344406340576595, 0.6456773914147079, 1.091369219940594, 1.536962639655046, 3.1380905057735298, 1.606262350057571, 3.2478213118872867, 3.4936101260593446, 0.22753892402329712, -0.08564373629332457, 0.2862375793963233, 1.4456088725796297, 0.8180035790856642, 3.2365586112984066, 3.4941337120451106, 0.7563709933387993, 0.5881984535714145, 0.4581803528447593, 3.166821223121991, -0.0692652228744162, 0.17796821417643358, 2.387546336306032, 1.6788728109233273, 0.8992294925473293, 0.9132874008373096, -1.32600375760415, 1.463035179846903, 2.3784346757297126, 1.2610297343103778, 0.3167310113189337, 0.30290755685604137, -0.20753322736934965, -1.657853865208076, 2.2402291064822286, 1.0151883535751491, 1.8749595135974289, 2.948296548250626, -1.530263306417344, -0.15225138447756867, -2.0112272554232544, 0.04879171879269284, -2.6937272664931164, -0.34690600754488093, 0.648418163704005, 0.8764672711518564, 0.7622674244917202, 1.2054405160276518, 0.7628582620941899, 0.658687125576497, -0.12137375959555889, 1.1163818071181846, 1.7802854785066222, 0.9819143477899911, 2.4621207262947333, 3.5120349750565674, 0.9918412470688572, 1.5514148379674375, 0.1945391244805421, 1.8157566356396369, 1.4773545290521994, 1.6272083709210918, 1.9918135810320519, -0.4342554148229852, -0.03465129068366908, 0.580630607305197, -1.4746414863839625, 0.6732235835431528, 2.19196884398003, 1.662817310789404, 0.43382562455224954, 1.4262335018001109, -1.46527887076681, 2.8248326168838807, 0.7948820550606479, 2.4996517764832467, -0.1769461529828473, -0.22598471588282906, -0.017970030715820883, 2.369697997751398, 0.936444168225926, 0.031565315123380296, 1.2405135488957344, 0.7356932502962718, -0.1760026493424523, 1.733657629576275, -1.4265604730967565, -0.6311420497461036, -1.2340830321376646, -1.0214417222461105, 0.26578501684982836, -0.5537693713710886, 1.5942730883079845, 1.4424338264831784, 1.810648655432435, 1.3494434439057117, -1.0557622065033516, 0.8997116487010159, 1.5225331635304884, 1.8533349048267973, -2.3354285298137527, 0.36617139951786476, -0.9769955085081844, 2.4986473366770694, -0.3146722788845632, 2.0461295265327335, -0.5045051977735713, 1.947715227611462, 1.0037459410062808, -0.44639621037896016, 0.055437562477373595, -0.284936507864212, -1.9068905956085187, 1.5947784599418087, 0.14802950632309828, 0.7516889320772326, 1.4133601717606945, 0.7577894592474157, 1.2751261769808755, 1.63435052768332, 2.394433268018043, 2.256815533736992, 2.5670938670371837, 1.1220258048007634, 0.18355272146032917, 1.8887818432936436, 0.8183365501908587, 0.43273271586639633, -0.06476542356835673, -0.852813335933124, 0.981236950154616, 0.5825636777816643, 0.6661326084969453, -0.10369130304222567, -5.799518101479611, 1.4447816812009537, -0.20394651840678468, 0.663239106964897, 1.3185241726455326, 0.5006210059276087, 2.262511941389721, 0.3925755616350638, 1.5291674774185238, 0.6599891967856382, 0.7458905653298066, 1.5387582143608833, -0.646005974604747, 1.0426270419730557, 0.18036780896250634, 2.692351859161971, 1.226927805116229, 1.9493862337619885, -0.2131295000074799, 1.6129691443908216, 0.002911595419903261, 3.438034788869173, 1.9780733464462956, 2.3355146415562804, 1.1933349775526845, 0.023954732151722554, 2.256031748020345, 1.1270242371273027, 0.4799196759188076, 0.1892173426002545, 1.564548926098672, 1.2352841137711372, 0.6674347008723814, -2.080285983050407, 1.3266924151697772, -0.3944656111755647, -0.21580550124665024, 0.6778396057737752, -1.3479048752543685, 1.0011007804669514, 0.34195835152939935, -1.6491925352181382, 0.44961813142832713, 1.3064653117785086, 0.6150317165753704, 0.2317367993440069, -1.1520467843352848, 0.5147582405025012, 1.5450055480570686, 0.15351614554061957, 0.4328677523069901, 2.516848068138332, 1.2951043068116523, 2.918872578925869, 2.3332996167895477, 0.9200877294695495, 0.9227270189689034, 2.0624653109154165, 2.3603402274138467, 1.838942169165541, -0.5464314211979289, 1.4946251092270786, -0.3327583079502486, 0.1466864323352697, 0.6355069175278558, 1.734500275685519, 0.6093502752021898, 1.195550809117807, 1.4141277772475092, -2.2407578801923362, -3.793369731194077, 0.03785012094414411, 0.7991553593319181, -1.8158715375954098, 0.14429842872001528, 0.08531048046346143, 0.6714951225811601, 0.8450992421497521, -0.60543027837991, 0.9696657745626586, 0.1818011247159598, -0.9307867119546803, -0.06834729635317939, 0.22804237025511848, 0.19100704763200885, 0.9339914588443639, 1.3755825124905068, -3.2461944533820137, -0.5387692187035336, 1.1479844116697835, 0.7864963171599397, -0.12365013487156976, -0.13532172009445761, 1.140713080225825, 1.5347817093992164, 0.9693336539277587, -0.9954247481902089, 0.8862987197226789, -0.4131250162251335, 0.8041547332751113, -1.708537185839689, -0.689765412838823, 0.9919198092931693, -2.041111535369152, 0.4461139031454157, 0.9693744103738654, 0.7453354194320542, -0.2024398811028397, -1.2226427553389263, -1.8803343674147095, -2.7353388964678733, 0.47048014679070055, -0.0233504872773807, 1.7326415661713102, -0.40164629437360294, -1.0349080504499624, 0.6023014684636618, -1.7699998513601118, -0.14769896184593376, 1.5510833529347576, 1.4128055458196045, 1.4868508951672483, 0.16135424414710556, 3.6023493885688014, 3.5737924899268916, 0.2310091829582356, 0.5167070067534801, 0.9127004734724986, 1.4914729306117278, 0.7393984700224914, 0.8135159066842782, 1.024453043724539, -2.1405486738766877, -0.14766985935310759, -3.61692426518065, 0.36825169114215117, 0.4568802175872538], \
[1.6704713304455294, 3.159988190461045, 2.340006377623566, 3.9644241115089343, 5.328414972809336, 1.9367218940969106, 2.25554234895134, 1.4379857666815268, 1.8562357840713766, -1.24891010843535, 0.08381646115661351, 2.8995706549873717, 0.22622930382712822, 0.21187616836259968, -0.16198171893472904, 0.08412358880357111, 1.12717377375864, 0.3285993270659136, 3.2648164561461153, 3.762989395547266, 3.386670025548094, 1.4658173074873433, 4.238602518973069, 3.045829274529215, 3.7680315009908965, 2.0575305043645473, 0.553308858486539, 2.312500197230173, 0.6741136130945868, 5.049379576986841, 2.9307086542639555, 3.6174706576282625, 1.0082641079062875, 1.594410501967969, 1.938285058211009, 1.7539577119968524, 1.6160792256761283, 0.3417416409515372, 3.6362056024035083, 0.02101690204902947, 0.24031586490060472, 1.1143337084801115, 2.2372537948354907, 1.953517041096194, 1.407957388842696, 1.9937529528890232, 3.52501560044462, 2.50029864623316, 1.4301380667084944, 2.4290760948092025, 0.4057911159652222, 3.7200284787255526, 2.5570956180077964, 3.499673082170066, 1.313683464137966, 2.2733016626576874, 1.9846178570844353, 2.246114989936884, 3.0119369433216874, 4.369101872946371, 2.3797755757358448, 2.1804283482152442, 3.7132273274867247, 3.6500511295410916, 3.6298449663187067, 2.939746739566939, 3.587349229908655, 1.7925523298784438, 1.0451951271192383, 1.6321348974391339, 2.158750417384716, 3.5975039748140594, 7.375836440221156, 4.381419234470218, 3.4620183525815387, 2.161050541254868, 3.3650393500708926, 3.849928562317386, 5.382852682245547, 4.153545903585824, 2.598350525411564, 4.348713252460572, 4.108665406906843, 2.3639878465529156, 2.104942081593292, 3.460073261931276, 1.0741868953404858, 2.7574999111695715, 3.685297850053805, 2.6247042776916647, 4.614068788765452, 0.4014673709743932, 4.0278601315261495, 3.4895542906180004, 3.9251270645532657, 2.2639169121480522, 1.5364710646674118, 0.6369599108242348, 1.7808711857780681, 2.5634308992643193, 3.618529341430786, 1.4426701771637482, 2.4457365614838134, 3.0531610733156236, 2.8865894124981955, 0.4605287745277792, 2.894245535894668, 3.286732742738015, 2.6379375787018073, 1.4131398402865423, 1.9587952981823988, 2.0823994499981686, 3.45739117896343, 0.8958265086154834, 2.027413102879704, 2.8877435287026807, 0.5760918788625111, 1.7918340503131232, 3.510356399387203, 2.0734770570967327, 0.720626902428219, 3.3792545784023558, 0.996397013633972, 1.7279393183769127, 0.9698326386992207, 1.6951895261206917, 0.5404679605892736, 1.9376110720934585, 1.8589237073936775, 1.5448777349711833, 0.3850921874397623, 1.7924955507058498, 1.4344156167739688, 2.7013283507782972, 0.19593360951588795, 2.019214563152102, 0.17851249727903604, 2.639210061805974, -1.0076517225610366, 1.0534202164616382, 0.8504777736986219, 0.11925836575441202, 4.899898085302185, 3.0684643299439087, 2.854626188941572, 1.5387963913251272, 3.030526599921126, 2.8250989406046534, 1.2847351855013003, 3.0141766130008505, 1.8349882880464867, 3.9252399054874103, 3.5189849441796666, 1.6166176097716791, 2.5904071063597027, 1.701752189172253, 1.107379316849866, 1.4410368536718507, 1.4133678511985925, 1.9641755020111995, 1.9197873615260155, 2.0752098179637133, 2.8501145134116013, 2.911402042343265, 0.6215287764897905, 3.86365861676924, 4.684840558653652, 2.871091789562181, 3.695536841625499, 5.083141595748681, 3.9372946818984125, 3.0597566360443977, 3.2360572389931477, 3.945648404214638, 4.42420701735067, 2.463489672719469, 4.045877291218625, 1.5640768840492294, 0.04434357739621766, 1.5092414444889088, 1.79663387399925, 3.1263258985390876, 3.2126582518663716, 2.459667667543067, 4.037544726776108, 3.664724025240943, 1.5528970995881104, 2.237777672300301, 0.5514114531820856, 2.5871004532003035, 1.7344819501780493, 1.615505006830871, 1.5190331367445413, 2.742927815449703, 3.19925029741949, 0.330759367843857, 3.87082436690653, 1.5899264179091899, 3.460575514257627, 2.5876726654816045, 2.0283214239407763, -0.5128537029487571, 1.2369683820875983, 1.8800314001283438, 2.643391903390737, 1.2426448453628973, -0.4096295374344839, 0.14926096956438045, 2.517489471352004, 3.817612984503247, 1.916509252505364, 1.2016338611696504, 2.706673199159004, 1.4991847515010257, 3.9212718833950713, 2.2840571479017644, 0.2737558303063931, 1.4592864115795168, 1.5976217274408688, 2.7430519021487307, 4.803339493132165, 3.6003624640631617, 3.782377285205959, 0.7099140701798576, 1.428460455428971, 1.6412489692790082, 2.491181025956078, 2.450976442320324, 0.03170885972733806, 1.2689573194633486, 1.5427430697843767, 2.687068617338535, -0.4017238260036282, 1.5639559948794342, -1.4469331465771138, 1.9616262812808238, 1.652589426941692, 2.13311936589406, -0.7021100842428091, -0.27284634536487895, 2.8792914197157167, 1.0982491323523889, -0.07924126488275673, 2.3527062707491195, 1.3568070032894246, 1.8750664868700755, -0.9971947418188875, 0.8589950374986918, 2.043287766734007, -0.3478308792528842, -1.1362545696742825, 1.3290231735209757, 2.6732299293996675, 2.0418797228624803, 0.6118216037311993, 2.550592292679245, 1.6403127747455417, 2.4049537185498138, 0.3440361963880604, 0.1407731069663864, 0.19884396731015727, 0.42718658194496006, 1.109371854770749, 1.543018750022123, 2.2103018408547226, 2.9145203961892077, 2.1939582441849548, 1.6591580131490682, 3.452593878397933, -0.03352880642185798, 1.7345793808887808, 2.6571863101733944, 1.3707286027718721, -0.8724501052320336, 2.6905410558655385, 1.0576566749253238, 1.952781275787613, 1.164707292171293, 1.9183262929609974, 3.6445046253249074, 4.0152211032628955, -0.03360536989610435, 0.14511462680703208, 2.0888243762633896, 0.4937672202313897, 2.627603978896652, 0.942456516979368, 1.3502435100953705, 1.8890048665087318, 3.4203006126834907, 0.8665153903646765, 2.631939417529219, 2.3230437178783716, 0.2660018975366608, 1.9244820166273724, 2.0279815215633783, 2.60778259199033, 0.6531839919298439, 5.192009530764258, 2.0551128743781155, 2.891742579287859, 1.3795776569139215, 1.3234813356519248, 1.789343921063843, 1.6881915407366952, 1.4221006938170886, -0.7069917562820128, 0.3192327064024925, 0.935645258311534, 0.5821093099942745, 1.4339160061536989, 1.600125076650803, 3.5448749369214254, 0.7967164016112567, 1.8192912605202545, -1.2845509974685263, 3.0572333300808374, 3.782780794550579, 2.550507507195409, 2.1951995126341517, 1.6341434967522204, 1.8562427129248584, 3.2427472743379058, 2.841489847761947, 3.6753170750353386, 2.787993580203497, 0.7103688826762787, 2.125303596531457, 1.9054543634929995, 2.595758101652853, 0.63917979805192, 1.6633014490504858, 4.220950684506446, 3.3009386430039767, 2.978925505355472, 2.38805352206876, 2.8122007163781455, 0.6533567830800804, 2.1346130384221897, 2.245707588103929, 0.18815878860267404, 1.752815422084788, 1.1167180320151204, 1.4040152926055203, 3.0057975338857625, -0.06220791528464952, 1.3315026463521022, -0.49943423799508196, 2.535873662789586, 0.8601624340562459, -0.0909558383265722, 0.09336682165345259, 2.8531207891481873, 3.458363845406289, -0.701824685341732, 1.4663649385697135, -2.2044359535928244, 0.8297336461195807, 2.788966965446297, 2.3349163213670368, 3.1838960987848233, 2.697449675535281, 3.2551891332177325, 2.2729581924130158, 0.24003404353821933, 0.3149884381362583, 2.63608143273795, 0.5555729242330639, 0.594140542902006, 2.4433646151991106, 1.419407789976178, 1.8623199674052997, 2.106480387090755, 2.5903486529518243, 2.471198292950145, 2.4319350243942432, 3.1300579562449227, 3.750578008705957, 4.398056896269931, -1.1008129789567191, 4.495981778342889, 4.0977642426781395, 3.045741873213133, 0.42975747226711397, 2.7379678790311743, 5.111192628536639, 1.4919068317081576, 4.624674840065157, 1.8105244151338287, 2.0490930877725666, -0.40393151738728045, 2.3115407470598806, 2.400583802969347, 0.7913583859058609, 2.7153505160855014, 1.1496648513758492, 2.1742306211309983, 2.4807354597745177, 3.535214673883271, 2.3586624006610806, 0.8191292381675156, 2.2715253569897262, 1.0856568169279628, 4.128309136887884, 4.508894612468121, 5.314538431468624, 2.162518015072938, 3.4571901593497087, 0.5441652214303733, 3.5506587582358824, 2.8230937388287374, 3.9074747206048834, 2.8338930684325816, 2.610352454856933, 4.24311184729494, 2.0294250884624563, 3.6141700346081733, 3.714507729951815, 2.0349843266731558, 1.9540592114650697, 5.397909882447605, 4.473836000248404, 2.713879590167562, 2.6160917902726215, 2.1649791788375103, 3.9516892254941065, 3.989629410321167, 4.225414965909247, 5.482378051633866, 3.1624700076237144, 2.4130018041799564, 4.087678545546435, 3.5749320799323274, 2.176811387027552, 3.2837356017470887, 2.266030990471093, 5.5461554227234835, 3.4190301033530908, 3.6916994903735048, 4.935104197773169, 2.0453837806048827, 2.10229430407366, 2.412200847109309, 1.8640937264074988, 2.3653662471968078, 2.9774748032842044, 2.1400687505035534, 3.509259945363062, 2.8485319564116747, 4.873728142231623, 3.8728419602087008, 1.9403982648515958, 4.4346698967120926, 3.066743960613489, 3.1594287789705375, 6.082051357350795, 3.1211364375016344, 2.3632733613636048, 0.9396834806879836, 1.759554461092187, 3.2177935952040113, 2.8751287842511775, 3.693356053167752, 3.1532554130485333, 3.1251152639945703, 1.6264375927180037, 2.36120100191225, 4.331341595758887, 2.738423921891778, 1.9510148094358866, 2.8626815648725215, 3.6704805719072136, 3.3062871281413386, 2.25607833109347, 2.194500499441923, 2.3282208093399457, 4.5013690895756895, 2.7242657318673453, 2.4076391452489876, 3.3468458276329622] \
] }" https://<endpoint>/<api-name> | python -m json.tool
Output:
{
    "statistics_list": [
        {
            "hazard": 1.3926333898762577,
            "pval": 0.005922935208231839
        },
        {
            "hazard": 0.957292958555334,
            "pval": 0.7976137866147548
        }
    ]
}
Results
The first row in the response corresponds to the MKI67 gene, and the second row corresponds to the APOE gene. The p-value for MKI67 is 5.92E-3, indicating that the gene is significantly associated with recurrence of breast cancer. In addition, the hazard ratio is greater than 1 indicating a higher risk of recurrence. In contrast, as expected, APOE has an insignificant p-value and a hazard ratio close to 1.
While this result is expected and confirms what is known in the literature, this example shows running analyses in GenePool, such as the survival analysis, can enable scientists to discover novel biomarkers predictive of survival. Lambda and API Gateway have enabled GenePool to calculate statistics in real time on all 20K genes in the genome, as well as millions of variants.
When a user submits an analysis, GenePool’s Analytics Engine (running on Amazon EC2) queries the GenePool database to get the appropriate genomic data for the requested patient samples. It then creates a large number of threads in order to execute API Gateway concurrently at scale, then maps the statistics results back to the corresponding genes and variants specific to the scientist’s requested analysis.
GenePool presents the results in the GenePool web UI. Here is an example of a GenePool visualization that plots the hazard ratio vs. the log of the p-value for all 20K genes. You can see that MKI67 has a higher hazard ratio and more significant p-value than APOE.

When calculating the survival statistics on all 20K genes, GenePool concurrently submits 100 requests of 20 genes each to API Gateway and Lambda. Each request takes about 2 seconds to execute, meaning that the survival statistics are calculated on all 20K genes in 20 seconds. These performance numbers are impressive especially considering that by using Lambda and API Gateway, Station X does not have to pay for idle compute costs, does not have to manage servers, and can scale dynamically as scientists run analyses in GenePool.
Confidentiality
As a reminder, earlier in this post I mentioned that the AWS Business Associate Agreement (BAA) specifies that Lambda and API Gateway cannot be used to store and transmit PHI data. GenePool’s Analytics Engine is built on Amazon EC2 instances that are BAA compliant (Dedicated Instances, encrypted, etc.), and these are the only servers that store and manage patient data.
As you can see from above, when the Analytics Engine calls API Gateway, the patient data has been de-identified so that the patient name, ID, and sample ID are never transmitted. Instead, API Gateway and Lambda only receive the event, time-to-event, and expression values. As an extra precaution, GenePool never submits the gene name for the corresponding expression values. This ensures that we are able to use Lambda and API Gateway to calculate survival statistics while still complying with the AWS BAA and HIPAA.
Conclusion
In this post, I showed you how to build a Python-based Lambda package that includes R and rpy2. I also showed how GenePool uses Lambda in conjunction with API Gateway to scale R dynamically and dramatically improve the performance of calculating survival analysis statistics in real time on large scale cohorts, while not having to manage servers or pay for idle costs.
Finally, I demonstrated that calculating statistics at scale in real time in GenePool is enabling clinicians and researchers to identify key genes and variants associated with clinical outcomes, allowing them to monitor disease progression and discover new treatment options for patients.
If you have questions or suggestions, please comment below.
Thanks to Mia Champion, PhD , AWS Technical Business Development Manager, Scientific Computing who also contributed to this blog article.
Build a Serverless, Private URL Shortener

Stephan Hadinger
Sr Mgr, Solutions Architecture
As a solutions architect, I often need to send large files to customers, such as architecture diagrams and service presentations. To avoid sending heavy attachments in email, I first upload the content on Amazon S3, then send a pre-signed URL to allow the customer to securely download the content. However, S3 pre-signed URLs are generally over 250 characters and may be split in several lines by email clients. It’s more convenient and user-friendly to generate a shortened URL. As this content is often confidential, I tend to avoid using public URL shortener services. This is when I realized it was super easy to build a private one.
In this post, you’ll see how to build your own private URL shortener using a serverless architecture, which leaves you with full control over your application while leveraging managed AWS services like AWS Lambda, AWS API Gateway, and S3. Because you don’t need to manage your own servers anymore, it’s easy to build applications that are natively scalable, secure, resilient, and very cost effective.
The following graphic shows the admin page.

This next graphic shows a generated short URL ready to copy and paste.

Using the redirection engine
It’s a little known feature: S3 can act as a redirection engine.
First, you need to activate “website hosting” on your S3 bucket. Then you create an empty object for each short URL (a random 5-character ID) and attach the “website redirect” metadata with the target (long) URL. When the end user hits the short URL, S3 automatically responds with a HTTP redirect to the target (long) URL, without you needing any code. For more information, see Configuring a Web Page Redirect.
To avoid proliferation of these redirect objects, you can enable a lifecycle policy to automatically delete objects, for example, after 7 days.
Creating an admin page
In order to create redirection objects, you need a simple admin page: a static HTML page hosted in S3 and built with jquery. When you choose Shorten , it triggers a POST request to API Gateway, which securely invokes a Lambda function (~70 lines of code) after validating all parameters. The code in Lambda simply stores an empty object in S3 with a random 7-character name, and assigns the metadata for the HTTP redirect.
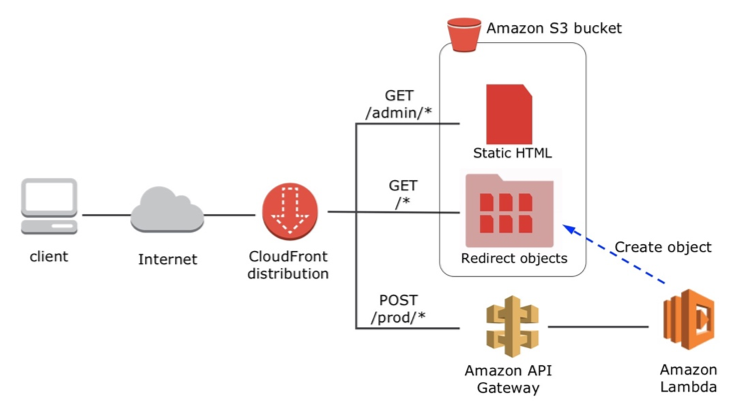
Using Amazon CloudFront to wrap everything together
To avoid CORS configuration and have a simple friendly domain name, wrap all pieces behind a single Amazon CloudFront distribution as shown in the diagram below. There are three CloudFront actions:
- All requests for the “/admin/” prefix serve static HTML files from S3.
- All requests for the “/prod/” prefix are sent to API Gateway.
- All other requests are served from S3 from a specific folder named “u” that stores all redirection objects.
Here’s a diagram of the process.
Build your own – a step by step guide
The CloudFormation template below creates all components for the URL shortener: S3 bucket, Lambda functions, API Gateway API operation, and Amazon CloudFront distribution.
![]()
- Choose Next and enter the following parameters:
- For Stack name , enter “URLShortener”.
- For S3BucketName , enter the name of your new S3 bucket or leave this field blank to have a name automatically generated.
- For URLExpiration , enter 7 (the number of days before the short URLs are automatically deleted).
- Choose Next , Next , Acknowledge the creation of IAM resources , and then Create.
- The stack takes ~20 minutes to complete. Choose the CloudFormation Outputs tab. The ConnectURL field shows the URL to be used.

Note: the template creates three Lambda functions: The LambdaShortener-xxx function contains the main code and the other two functions, LambdaURLtoDomain-xxx and LambdaS3Copy-xxx, are helper functions used as CloudFormation custom resources.
Architecture and cost considerations
Using a full serverless application has several benefits: the application is natively multi-AZ and automatically scales whether you have one request per month or tens per second.
Now evaluate the cost of the URL shortener for a simple scenario: You create 1000 short URLs per month and each is viewed by 1000 users – i.e., 1 million requests per month. Here is a cost estimate for the Oregon region split by services:
- –Lambda: 1000 invocation each of less than 1 second – less than $0.003 / month
- –API Gateway: 1000 API calls – less than $0.004 / month
- –S3: storage cost is negligible, cost for 1 million GET is $0.04 / month
- –Amazon CloudFront: bandwidth cost is negligible, cost for 1 million GET is $0.075 / month
The overall cost is less than 12 cents per month.
What next?
This simple version is the starting point to your creativity. There are many ways you can improve this simple version, for example:
- Set up your own custom DNS domain name. Leverage services like AWS Route 53 and AWS Certificate Manager to set up your own CloudFront custom domain name and SSL Certificate.
- Analyze logs: Amazon CloudFront already provides report and analytics tools. If you want to use alternative tools, activate Logging in your CloudFront distribution and feed logs to your favorite analytics tool or serverless data-store like Amazon DynamoDB or Amazon ElasticSearch Service.
- Set up access control to the admin page: use serverless solutions like Amazon Cognito or use Custom Authorizers in API Gateway
Please send us your comments and ideas.
Create and Deploy a Chat Bot to AWS Lambda in Five Minutes
This is a guest post by Gojko Adzic, creator of ClaudiaJS
The new Claudia.JS Bot Builder project helps JavaScript developers to easily create chat-bots for Facebook, Telegram, Skype, and Slack, and deploy them to AWS Lambda and Amazon API Gateway in minutes.
The key idea behind this project is to remove all the boilerplate code and common infrastructure tasks, so you can focus on writing the really important part of the bot — your business workflows. Everything else is handled by the Claudia Bot Builder.
The Claudia Bot Builder library simplifies messaging workflows, automatically sets up the correct web hooks, and guides you through configuration steps, so you don’t have to research individual implementation protocols. It automatically converts the incoming messages from various platforms into a common format, so you can handle them easily. It also automatically packages the responses into the correct templates, so you do not have to worry about different message response formats. This means that you can write and deploy a single bot with just a few lines of code, and operate it on various bot platforms using AWS Lambda. Check out the two-minute video Create chat-bots easily using Claudia Bot Builder to see how easy it is to set up a bot on AWS using the new tool.
Here’s a simple example:
Prerequisites
The Claudia Bot Builder works with the Node.JS 4.3.2 AWS Lambda installation. It requires using the Claudia.JS deployment tool, which you can install using NPM:
npm install claudia -gIf you already have Claudia installed, make sure it’s up to date. The Claudia Bot Builder support requires version 1.4.0 or later.
Creating a simple text bot
First, create an empty folder, and a new NPM project inside it. Make sure to give it a descriptive name:
npm initThen, add the claudia-bot-builder library as a project dependency:
npm install claudia-bot-builder -SFor this particular bot, generate some dynamic content using the huh excuse generator. Add that as a project dependency:
npm install huh -SNow create the bot. Create a file called bot.js and paste the following content:
var botBuilder = require('claudia-bot-builder'),
    excuse = require('huh');

module.exports = botBuilder(function (request) {
  return 'Thanks for sending ' + request.text  +
      '. Your message is very important to us, but ' +
      excuse.get();
});
That’s pretty much it. You can now deploy the bot to AWS and configure it for Facebook Messenger, by using Claudia:
claudia create --region us-east-1 --api-module bot --configure-fb-botNow would be a good time to configure a new Facebook page and a messenger application, as explained in the Facebook Messenger Getting Started Guide. The bot installer prints the web hook URL and the verification token, which you can copy to your Facebook Messenger configuration page. You can then generate the page access token from Facebook. Copy that back to Claudia when asked, and you’re almost done.
In a few moments, your bot will be live, and you can talk to it from the page you created. That was easy, wasn’t it?
If you’d like other Facebook users to talk to it as well, submit it for application review from the Facebook App Developer page.
Deploying to other platforms
The Claudia Bot Builder can also help you set up this bot for all the other platforms. Just run claudia update and provide the additional configuration option:
- For Slack slash commands, use –configure-slack-slash-command
- For Skype, use –configure-skype-bot
- For Telegram, use –configure-telegram-bot
More complex workflows
The example bot just responds with silly excuses so for homework, do something more interesting with it.
The request object passed into the message handling function contains the entire message in the text field, but it also has some other pieces of data for more complex work. The sender field identifies the user sending the message, so you can create threads of continuity and sessions. The type field contains the identifier of the bot endpoint that received the message (for example, skype or facebook) so you can respond differently to different bot systems. The originalRequest field contains the entire unparsed original message, so you can handle platform-specific requests and go beyond simple text.
For examples, check out:
- Fact Bot, which looks up facts about topics on WikiData and creates Facebook Messenger menus.
- Space Explorer Bot, A small FB Messenger chat bot using NASA API
Although it’s enough just to return a string value for simple cases, and the Bot Builder packages it correctly for individual bot engines, you can return a more complex object and get platform-specific features, for example, Facebook buttons. In that case, make sure to use the type field of the request to decide on additional features.
For asynchronous workflows, send back a Promise object, and resolve it with the response later. The convention is the same: if the promise gets resolved with a string, the Claudia Bot Builder automatically packages it into the correct template based on the bot endpoint that received a message. Reply with an object instead of a string, and the Bot Builder will not do any specific parsing, letting you take advantage of more advanced bot features for individual platforms. Remember to configure your Lambda function for longer execution if you plan to use asynchronous replies; by default, AWS limits this to 3 seconds.
Try it out live
You can see this bot in action and play with it live from the GitHub Claudia Examples repository.
More information
For more information on the Claudia Bot Builder, and some nice example projects, check out the Claudia Bot Builder GitHub project repository. For questions and suggestions, visit the Claudia project chat room on Gitter.
Content Replication Using AWS Lambda and Amazon S3
Co-authored by Felix Candelario and Benjamin F., AWS Solutions Architects
Cross-region replication in Amazon S3 lets you copy from one source bucket to one destination bucket, where the destination bucket resides in a separate region from the source bucket. In order to replicate objects to multiple destination buckets or destination buckets in the same region as the source bucket, customers must spin up custom compute resources to manage and execute the replication.
In this post, I describe a solution for replicating objects from a single S3 bucket to multiple destination S3 buckets using an AWS Lambda function. This solution is presented as a complement to cross region replication for specific use cases that require either multiple destination buckets, or a destination bucket that resides in the same region as the source.
The solution leverages S3 event notification, Amazon SNS, and a simple Lambda function to perform continuous replication of objects. Similar to cross-region replication, this solution only replicates new objects added to the source bucket after configuring the function, and does not replicate objects that existed prior to the function’s existence.
Note that while this method offers functionality not currently offered by cross region replication, it also incurs costs that cross region replication would not incur, and has limitations which are noted at the end of the post.
Solution overview
The solution requires one S3 source bucket and at least one destination bucket. The buckets can reside either in the same region or in different regions. On the source bucket, you create an event notification that publishes to an SNS topic. The SNS topic acts as the mechanism to fan out object copying to one or more destinations, each achieved by invoking a separate Lambda function. The function source code is provided as an example that accompanies this post.
You can define a new destination by creating a subscription to the SNS topic that invokes the Lambda function. There can be multiple Lambda functions subscribed to the same topic, each performing the same action, but to a different destination S3 bucket. Define which bucket and which Lambda function by naming the function with the exact name of the S3 destination bucket. There is no need to edit the function code, and the different functions can be identical with the exception of their names. After they are invoked, the functions copy new source bucket objects to the destination buckets simultaneously.
Required IAM permissions
In order for a Lambda function to be able to copy an object, it requires a Lambda function IAM execution role. The function requires S3 GET permissions on the source bucket and S3 PUT permissions on any destination bucket. This needs to be created for each instance of the function (for each destination), calling out the respective destination bucket in the policy. An example IAM policy is provided later in this post.
The user that create the IAM role is passing permissions to Lambda to assume this role. To grant these permissions, the user must already have permissions to perform the iam:PassRole action.
Solution walkthrough
The following walkthrough install the S3 replication functionality using Lambda, SNS topics, and S3 event notifications. This walkthrough assumes that you have created or identified an S3 source bucket and one or more destination buckets. Note the bucket names for later.
Configure the SNS topic and source bucket
The following steps only need to be done one time per source bucket.
Create the SNS topic to fan out
- In the SNS console, create a new SNS topic. Note the topic name for later. A topic is created one time per S3 bucket source, so consider naming the topic as follows: [source-bucket-name]-fanout
- Note the SNS topic’s ARN string and then choose Other topic actions , Edit topic policy , and Advanced View.
- Replace the contents of the default policy with the following:
{
  "Version": "2008-10-17",
  "Id": "<default_policy_ID>",
  "Statement": [
    {
      "Sid": "<default_statement_ID>",
      "Effect": "Allow",
      "Principal": {
        "AWS": "*"
      },
      "Action": [
        "SNS:Publish"
      ],
      "Resource": "arn:aws:sns:us-east-1:123123123123:s3-source-bucket-fanout",
      "Condition": {
        "ArnLike": {
          "AWS:SourceArn": "arn:aws:s3:*:*:s3-source-bucket-name"
        }
      }
    }
  ]
}- Make the following changes in the policy that are marked in red:
- For Resource , change to the ARN value for the SNS topic.
- For AWS:SourceArn , change to the ARN value for the S3 source bucket.
- Choose Update policy.
Configure the source bucket
- In the S3 console, edit the source bucket configuration.
- Expand the Events section and provide a name for the new event. For example: S3 replication to dst buckets: dstbucket1 dstbucket2
- For Events , choose ObjectCreated (ALL).
- For Send to , choose SNS topic.
- For SNS topic , select the topic name chosen in step 2.
- Choose Save.
Configure the Lambda function and SNS subscription
The following steps are repeated for each destination bucket. Additional destinations can be added anytime; however, only subsequently created objects will be replicated to the new destination buckets. Note that the Lambda replication functions are executed in parallel as they are triggered simultaneously via their SNS subscriptions. The following steps only need to be done one time per destination bucket.
Create the Lambda function and IAM policy
- In the Lambda console, choose Create a Lambda function.
- Choose Skip to skip the blueprint selection.
- For Runtime , choose Python 2.7.
- For Name , enter a function name. The function name should match the name of the S3 destination bucket exactly.
- Enter a description that notes the source bucket and destination bucket used.
- For Code entry type , choose Edit code inline.
- Paste the following into the code editor:
import urllib
import boto3
import ast
import json
print('Loading function')

def lambda_handler(event, context):
    s3 = boto3.client('s3')
    sns_message = ast.literal_eval(event['Records'][0]['Sns']['Message'])
    target_bucket = context.function_name
    source_bucket = str(sns_message['Records'][0]['s3']['bucket']['name'])
    key = str(urllib.unquote_plus(sns_message['Records'][0]['s3']['object']['key']).decode('utf8'))
    copy_source = {'Bucket':source_bucket, 'Key':key}
    print "Copying %s from bucket %s to bucket %s ..." % (key, source_bucket, target_bucket)
s3.copy_object(Bucket=target_bucket, Key=key, CopySource=copy_source)- For Handler , leave the default value: lambdafunction.lambdahandler
- For Role , choose Create new role , basic execution role.
- In the IAM dialog box, create a new IAM execution role for Lambda.
- For Role Name , enter a value that includes the destination bucket name. For example: s3replicationexecutionroletobucket[dstbucketname]
- Expand View Policy Document and choose Edit the policy.
- Choose OK to confirm that you’ve read the documentation.
- Replace the contents of the default policy with the following:
{
    "Version": "2012-10-17",
    "Statement": [
        {
            "Effect": "Allow",
            "Action": [
                "logs:CreateLogGroup",
                "logs:CreateLogStream",
                "logs:PutLogEvents"
            ],
            "Resource": "arn:aws:logs:*:*:*"
        },
        {
            "Effect": "Allow",
            "Action": [
                "s3:GetObject"
            ],
            "Resource": [
                "arn:aws:s3:::source-bucket-name/*"
            ]
        },
        {
            "Effect": "Allow",
            "Action": [
                "s3:PutObject"
            ],
            "Resource": [
                "arn:aws:s3:::destination-bucket-name-1/*"
            ]
        }
    ]
}- Make the following changes in the policy that are marked in red:
- Under the s3:GetObject action, change to the ARN value for the source bucket.
- Under the s3:PutObject action, change to the ARN value for the destination bucket.
- Choose Allow to save the policy and close the window.
- For Timeout , keep the default value 5 minutes.
- For VPC , leave the default value No VPC.
- Choose Next.
- Review the configuration and choose Create Function.
Create the SNS topic subscription
- In the SNS console, choose Topics and select the fan out topic [source-bucket-name]-fanout created earlier. Enter the topic’s details page.
- Choose Create Subscription.
- For Protocol, choose AWS Lambda.
- For Endpoint, select the function ARN that represents the destination bucket.
- Choose Create Subscription.
Validate the subscription
- Upload an object to the source bucket.
- Verify that the object was copied successfully to the destination buckets.
- Optional: view the CloudWatch logs entry for the Lambda function execution. For a successful execution, this should look similar to the following screenshot.

Conclusion
This method is simple, and addresses use cases not currently addressed by cross region replication. If you have any suggestions or comments, please feel free to comment below.
Notes
Costs : Getting and putting objects into S3 buckets incurs a cost, as well as cross region data transfer costs. Please see the S3 pricing page for more details.
Lambda : The limitation on file size that the above solution can support is variable and depends on the latency between the source and destination buckets. The Lambda function times out after 5 minutes; if the file copy has yet to complete within that time frame, it does not replicate successfully. Therefore, we recommend running multiple tests after setting up the different destination functions and, based on the results, rely on this method only for file sizes that consistently manage to replicate.
It is possible to expand this solution so that each Lambda execution reports at the end of the copy that replication has completed successfully. The result is a repository that can be queried to verify ongoing replication and that alerts on errors. One approach would be reporting to a DynamoDB table and logging each successful copy. This is beyond the scope of this post.
Also, we recommend carefully monitoring the number of files put into the source bucket as you may need to request an increase to the concurrent execution limits for Lambda.
Error Handling Patterns in Amazon API Gateway and AWS Lambda

Ryan Green @ryangtweets
Software Development Engineer, API Gateway
A common API design practice is to define an explicit contract for the types of error responses that the API can produce. This allows API consumers to implement a robust error-handling mechanism which may include user feedback or automatic retries, improving the usability and reliability of applications consuming your API.
In addition, well-defined input and output contracts, including error outcomes, allows strongly-typed SDK client generation which further improves the application developer experience. Similarly, your API backend should be prepared to handle the various types of errors that may occur and/or surface them to the client via the API response.
This post discusses some recommended patterns and tips for handling error outcomes in your serverless API built on Amazon API Gateway and AWS Lambda.
HTTP status codes
In HTTP, error status codes are generally divided between client (4xx) and server (5xx) errors. It’s up to your API to determine which errors are appropriate for your application. The table shows some common patterns of basic API errors.
| Type | HTTP status code | Description |
|---|---|---|
| Data Validation | 400 (Bad Request) | The client sends some invalid data in the request, for example, missing or incorrect content in the payload or parameters. Could also represent a generic client error. |
| Authentication/Authorization | 401 (Unauthorized)
403 (Forbidden) |
The client is not authenticated (403) or is not authorized to access the requested resource (401). |
| Invalid Resource | 404 (Not Found) | The client is attempting to access a resource that doesn’t exist. |
| Throttling | 429 (Too Many Requests) | The client is sending more than the allowed number of requests per unit time. |
| Dependency Issues | 502 (Bad Gateway)
504 (Gateway Timeout) |
A dependent service is throwing errors (502) or timing out (504). |
| Unhandled Errors | 500 (Internal Server Error)
503 (Service Unavailable) |
The service failed in an unexpected way (500), or is failing but is expected to recover (503). |
For more information about HTTP server status codes, see RFC2616 section 10.5 on the W3C website.
Routing Lambda function errors to API Gateway HTTP responses
In API Gateway, AWS recommends that you model the various types of HTTP responses that your API method may produce, and define a mapping from the various error outcomes in your backend Lambda implementation to these HTTP responses.
In Lambda, function error messages are always surfaced in the “errorMessage” field in the response. Here’s how it’s populated in the various runtimes:
Node.js (4.3):
exports.handler = function(event, context, callback) {
    callback(new Error("the sky is falling!");
};
Java:
public class LambdaFunctionHandler implements RequestHandler<String, String> {
  @Override
    public String handleRequest(String input, Context context) {
        throw new RuntimeException("the sky is falling!");
   }
}
Python:
def lambda_handler(event, context):
    raise Exception('the sky is falling!')
Each results in the following Lambda response body:
{
  "errorMessage" : "the sky is falling!",
    …
}
The routing of Lambda function errors to HTTP responses in API Gateway is achieved by pattern matching against this “errorMessage” field in the Lambda response. This allows various function errors to be routed to API responses with an appropriate HTTP status code and response body.
The Lambda function must exit with an error in order for the response pattern to be evaluated – it is not possible to “fake” an error response by simply returning an “errorMessage” field in a successful Lambda response.
Note: Lambda functions failing due to a service error, i.e. before the Lambda function code is executed, are not subject to the API Gateway routing mechanism. These types of errors include internal server errors, Lambda function or account throttling, or failure of Lambda to parse the request body. Generally, these types of errors are returned by API Gateway as a 500 response. AWS recommends using CloudWatch Logs to troubleshoot these types of errors.
API Gateway method response and integration response
In API Gateway, the various HTTP responses supported by your method are represented by method responses. These define an HTTP status code as well as a model schema for the expected shape of the payload for the response.
Model schemas are not required on method responses but they enable support for strongly-typed SDK generation. For example, the generated SDKs can unmarshall your API error responses into appropriate exception types which are thrown from the SDK client.
The mapping from a Lambda function error to an API Gateway method responseis defined by an integration response. An integration response defines a selection pattern used to match the Lambda function “errorMessage” and routes it to an associated method response.
Note: API Gateway uses Java pattern-style regexes for response mapping. For more information, see Pattern in the Oracle documentation.
Example:
Lambda function (Node.js 4.3):
exports.handler = (event, context, callback) => {
   callback ("the sky is falling!");
};
Lambda response body:
{
  "errorMessage": "the sky is falling!"
}
API Gateway integration response:
Selection pattern : “the sky is falling!”
Method response : 500
API Gateway response:
Status: 500
Response body:
{
  "errorMessage": "the sky is falling!"
}
In this example, API Gateway returns the Lambda response body verbatim, a.k.a. “passthrough”. It is possible to define mapping templates on the integration response to transform the Lambda response body into a different form for the API Gateway method response. This is useful when you want to format or filter the response seen by the API client.
When a Lambda function completes successfully or if none of the integration response patterns match the error message, API Gateway responds with the default integration response (typically, HTTP status 200). For this reason, it is imperative that you design your integration response patterns such that they capture every possible error outcome from your Lambda function. Because the evaluation order is undefined, it is unadvisable to define a “catch-all” (i.e., “.*”) error pattern which may be evaluated before the default response.
Common patterns for error handling in API Gateway and Lambda
There are many ways to structure your serverless API to handle error outcomes. The following section will identify two successful patterns to consider when designing your API.
Simple prefix-based
This common pattern uses a prefix in the Lambda error message string to route error types.
You would define a static set of prefixes, and create integration responses to capture each and route them to the appropriate method response. An example mapping might look like the following:
| Prefix | Method response status |
|---|---|
| [BadRequest] | 400 |
| [Forbidden] | 403 |
| [NotFound] | 404 |
| [InternalServerError] | 500 |
Example:
Lambda function (NodeJS):
exports.handler = (event, context, callback) => {
    callback("[BadRequest] Validation error: Missing field 'name'");
};
Lambda output:
{
  "errorMessage": "[BadRequest] Validation error: Missing field 'name'"
}
API Gateway integration response:
Selection pattern: “^[BadRequest].*”
Method response: 400
API Gateway response:
Status: 400
Response body:
{
  "errorMessage": "[BadRequest] Validation error: Missing field 'name'"
}
If you don’t want to expose the error prefix to API consumers, you can perform string processing within a mapping template and strip the prefix from the errorMessage field.
Custom error object serialization
Lambda functions can return a custom error object serialized as a JSON string, and fields in this object can be used to route to the appropriate API Gateway method response.
This pattern uses a custom error object with an “httpStatus” field and defines an explicit 1-to-1 mapping from the value of this field to the method response.
An API Gateway mapping template is defined to deserialize the custom error object and build a custom response based on the fields in the Lambda error.
Lambda function (Node.js 4.3):
exports.handler = (event, context, callback) => {
    var myErrorObj = {
        errorType : "InternalServerError",
        httpStatus : 500,
        requestId : context.awsRequestId,
        message : "An unknown error has occurred. Please try again."
    }
    callback(JSON.stringify(myErrorObj));
};
Lambda function (Java):
public class LambdaFunctionHandler implements RequestHandler<String, String> {
  @Override
    public String handleRequest(String input, Context context) {

        Map<String, Object> errorPayload = new HashMap();
        errorPayload.put("errorType", "BadRequest");
        errorPayload.put("httpStatus", 400);
        errorPayload.put("requestId", context.getAwsRequestId());
        errorPayload.put("message", "An unknown error has occurred. Please try again.");
        String message = new ObjectMapper().writeValueAsString(errorPayload);

        throw new RuntimeException(message);
    }
}Note: this example uses Jackson ObjectMapper for JSON serialization. For more information, see ObjectMapper on the FasterXML website.
Lambda output:
{
  "errorMessage": "{\"errorType\":\"InternalServerError\",\"httpStatus\":500,\"requestId\":\"40cd9bf6-0819-11e6-98f3-415848322efb\",\"message\":\"An unknown error has occurred. Please try again.\"}"
}
Integration response:
Selection pattern: “.*httpStatus”:500.*”
Method response: 500
Mapping template:
#set ($errorMessageObj = $util.parseJson($input.path('$.errorMessage')))
{
  "type" : "$errorMessageObj.errorType",
  "message" : "$errorMessageObj.message",
  "request-id" : "$errorMessageObj.requestId"
}Note: This template makes use of the $util.parseJson() function to parse elements from the custom Lambda error object. For more information, see Accessing the $util Variable.
API Gateway response:
Status: 500
Response body:
{
  "type": "InternalServerError",
  "message": " An unknown error has occurred. Please try again.",
  "request-id": "e308b7b7-081a-11e6-9ab9-117c7feffb09"
}
This is a full Swagger example of the custom error object serialization pattern. This can be imported directly into API Gateway for testing or as a starting point for your API.
{
  "swagger": "2.0",
  "info": {
    "version": "2016-04-21T23:52:49Z",
    "title": "Best practices for API error responses with API Gateway and Lambda"
  },
  "schemes": [
    "https"
  ],
  "paths": {
    "/lambda": {
      "get": {
        "consumes": [
          "application/json"
        ],
        "produces": [
          "application/json"
        ],
        "parameters": [
          {
            "name": "status",
            "in": "query",
            "required": true,
            "type": "string"
          }
        ],
        "responses": {
          "200": {
            "description": "200 response",
            "schema": {
              "$ref": "#/definitions/Empty"
            }
          },
          "400": {
            "description": "400 response",
            "schema": {
              "$ref": "#/definitions/Error"
            }
          },
          "403": {
            "description": "403 response",
            "schema": {
              "$ref": "#/definitions/Error"
            }
          },
          "404": {
            "description": "404 response",
            "schema": {
              "$ref": "#/definitions/Error"
            }
          },
          "500": {
            "description": "500 response",
            "schema": {
              "$ref": "#/definitions/Error"
            }
          }
        },
        "x-amazon-apigateway-integration": {
          "responses": {
            "default": {
              "statusCode": "200"
            },
            ".*httpStatus\\\":404.*": {
              "statusCode": "404",
              "responseTemplates": {
                "application/json": "#set ($errorMessageObj = $util.parseJson($input.path('$.errorMessage')))\n#set ($bodyObj = $util.parseJson($input.body))\n{\n  \"type\" : \"$errorMessageObj.errorType\",\n  \"message\" : \"$errorMessageObj.message\",\n  \"request-id\" : \"$errorMessageObj.requestId\"\n}"
              }
            },
            ".*httpStatus\\\":403.*": {
              "statusCode": "403",
              "responseTemplates": {
                "application/json": "#set ($errorMessageObj = $util.parseJson($input.path('$.errorMessage')))\n#set ($bodyObj = $util.parseJson($input.body))\n{\n  \"type\" : \"$errorMessageObj.errorType\",\n  \"message\" : \"$errorMessageObj.message\",\n  \"request-id\" : \"$errorMessageObj.requestId\"\n}"
              }
            },
            ".*httpStatus\\\":400.*": {
              "statusCode": "400",
              "responseTemplates": {
                "application/json": "#set ($errorMessageObj = $util.parseJson($input.path('$.errorMessage')))\n#set ($bodyObj = $util.parseJson($input.body))\n{\n  \"type\" : \"$errorMessageObj.errorType\",\n  \"message\" : \"$errorMessageObj.message\",\n  \"request-id\" : \"$errorMessageObj.requestId\"\n}"
              }
            },
            ".*httpStatus\\\":500.*": {
              "statusCode": "500",
              "responseTemplates": {
                "application/json": "#set ($errorMessageObj = $util.parseJson($input.path('$.errorMessage')))\n#set ($bodyObj = $util.parseJson($input.body))\n{\n  \"type\" : \"$errorMessageObj.errorType\",\n  \"message\" : \"$errorMessageObj.message\",\n  \"request-id\" : \"$errorMessageObj.requestId\"\n}"
              }
            }
          },
          "httpMethod": "POST",
          "requestTemplates": {
            "application/json": "{\"failureStatus\" : $input.params('status')\n}"
          },
          "uri": "arn:aws:apigateway:us-east-1:lambda:path/2015-03-31/functions/[MY_FUNCTION_ARN]/invocations",
          "type": "aws"
        }
      }
    }
  },
  "definitions": {
    "Empty": {
      "type": "object"
    },
    "Error": {
      "type": "object",
      "properties": {
        "message": {
          "type": "string"
        },
        "type": {
          "type": "string"
        },
        "request-id": {
          "type": "string"
        }
      }
    }
  }
}
Conclusion
There are many ways to represent errors in your API. While API Gateway and Lambda provide the basic building blocks, it is helpful to follow some best practices when designing your API. This post highlights a few successful patterns that we have identified but we look forward to seeing other patterns emerge from our serverless API users.
Extracting Video Metadata using Lambda and Mediainfo

Michael Raposa
Principal Consultant
For a video asset, technical metadata includes information such as video codec, audio codec, resolution, frame rate, aspect ratio, and a host of other very detailed technical information. With technical metadata, customers can make intelligent decisions about what to do next in their workflow. The asset may be transcoded to a standard “house” format, resized, or have a quality check performed to make sure it is in an acceptable format. The technical metadata may also be stored for indexing and fast retrieval in a database service like Amazon DynamoDB or Amazon RDS.
When customers work with media assets like video and audio files on Amazon S3, there is a typical workflow where assets get uploaded to S3, S3 triggers an event for that upload, and that event triggers an AWS Lambda function, which can extract technical metadata from the asset on S3.
In this post, I walk you through the process of setting up a workflow to extract technical metadata from multimedia files uploaded to S3 using Lambda.
Extraction process
The extraction of technical metadata from the asset on S3 becomes the tricky part in this workflow. You need a way to seamlessly download the minimum number of bytes from the file in order to extract the technical metadata. If you download the entire file, you run into issues with either the limited temp space available to Lambda or run into the 300s timeout limit when dealing with long running functions.
Customers have come up with inventive ways to get around these problems. One typical solution downloads just the first few bytes from the head and tail of the file. To accomplish this limited download, customers use a feature available in S3 called ranged gets that allows you to specify the bytes of a file to download. These downloaded bytes are then concatenated and saved to the Lambda temp storage. A tool like ffprobe is then run against these concatenated bytes to extract the technical metadata.
There are several issues with this process. It’s not immediately apparent which specific bytes to download from the head and the tail of the file. Also, many customers prefer not to store their assets on the local temporary storage available with Lambda. Finally, you may prefer to do all of the processing in memory, which decreases Lambda processing time and hence reduces your costs.
MediaInfo
A more elegant and less brittle solution uses MediaInfo, a popular free and open-source program that extracts technical metadata about media assets for many audio and video files.
Using MediaInfo has several significant benefits:
- Curl functionality.
You can pass a simple URL as an input parameter and MediaInfo downloads only the necessary information from the file on S3 in order to get the technical metadata. For example, MediaInfo processed a 1.6 GB video file in 2.5 seconds and the entire function only used 46 MB of memory. Only parts of the file are downloaded, processed in memory, and never saved to disk.
- An abundance of technical metadata information about the asset.
- XML export format for easier processing programmatically.
- Static compilation to include all dependencies into a single executable that runs in Lambda functions. In this post, I walk through how to compile MediaInfo for Lambda.
Solution overview
The new workflow looks like the following diagram:

In this workflow:
- A multimedia file is uploaded to an S3 bucket.
- Using S3 event notifications, S3 triggers a Lambda function.
- The LambdaMediaInfo Lambda function, which you create below, is executed.
- The Lambda function generates a S3 signed URL, which is passed as an input to MediaInfo. MediaInfo downloads the minimum bytes necessary of the multimedia file stored on S3.
- Using MediaInfo, the Lambda function then extracts the technical metadata from the multimedia file. The technical metadata is then stored in DynamoDB in XML format.
The rest of this post shows the steps necessary to create this workflow on AWS.
Step 1: Compile MediaInfo for Amazon Linux
To start, you need an instance running the same version of Amazon Linux as used by AWS Lambda. You can find the AMI for this version and for your region at Lambda Execution Environment and Available Libraries.
This instance is used only to compile MediaInfo and is terminated as soon as you finish this step. Any instance type is fine, but you may want to launch at least a t2.medium for compiling software that is fairly CPU intensive. On a t2.medium, MediaInfo compiles in about 2 minutes.
Here is a sample command to launch an instance in US East (N. Virginia):
aws ec2 run-instances \
    --image-id ami-60b6c60a \
    --count 1 \
    --instance-type t2.medium \
    --key-name YourKeyPair \
    --security-group-ids sg-xxxxxxxx \
    --subnet-id subnet-xxxxxxxx
After you have launched your instance, SSH into it. For more information, see Getting Started with Amazon EC2 Linux Instances.
After you connect to the instance, execute the following commands. These commands install the necessary libraries to compile MediaInfo, download and extract the MediaInfo source code, and finally compile MediaInfo into a static binary.
# Install Development Tools necessary to compile MediaInfo
sudo yum groupinstall 'Development Tools'
# Install library required to add CURL support to Mediainfo
sudo yum install libcurl-devel

# Download MediaInfo
wget http://mediaarea.net/download/binary/mediainfo/0.7.84/MediaInfo_CLI_0.7.84_GNU_FromSource.tar.xz
# Untar MediaInfo
tar xvf MediaInfo_CLI_0.7.84_GNU_FromSource.tar.xz
cd MediaInfo_CLI_GNU_FromSource

# Compile MediaInfo with Support for URL Inputs
./CLI_Compile.sh --with-libcurl
Notice that version 0.7.84 of MediaInfo is being downloaded. That is the latest version as of this post. You can find the current source code at Download – Sources on the MediaInfo website.
MediaInfo is being compiled with the “–with-libcurl” option. This option adds URL support to MediaInfo and allows you to pass a URL as an input. This is important later when it is time to access files on S3.
After the compile is complete, a static, standalone version of MediaInfo is created. Run the following two commands to confirm successful compilation:
cd MediaInfo/Project/GNU/CLI

./mediainfo --version
You should get an output that looks like the following:
MediaInfo Command line,
MediaInfoLib - v0.7.84
You now need to copy the MediaInfo executable off the instance and down to your local workstation. Later, you bundle this executable with your Lambda function. You can use any convenient method to download: e.g., scp, ftp, copy to S3, etc.
Step 2: Create the DynamoDB table
You create a DynamoDB table to store the technical metadata from the asset. The keyName value, which is the S3 key of the asset, is used as a HASH key. The table name is TechnicalMetadata.
To create the table, execute the following:
aws dynamodb create-table \
    --table-name TechnicalMetadata \
    --attribute-definitions \
        AttributeName=keyName,AttributeType=S \
    --key-schema AttributeName=keyName,KeyType=HASH \
    --provisioned-throughput ReadCapacityUnits=1,WriteCapacityUnits=1
Note the “TableArn” value output by this command, as you need that value in a later step.
Step 3: Write the Lambda function
Here is the Lambda function written in Python that you use:
import logging
import subprocess

import boto3

SIGNED_URL_EXPIRATION = 300     # The number of seconds that the Signed URL is valid
DYNAMODB_TABLE_NAME = "TechnicalMetadata"
DYNAMO = boto3.resource("dynamodb")
TABLE = DYNAMO.Table(DYNAMODB_TABLE_NAME)

logger = logging.getLogger('boto3')
logger.setLevel(logging.INFO)


def lambda_handler(event, context):
    """

    :param event:
    :param context:
    """
    # Loop through records provided by S3 Event trigger
    for s3_record in event['Records']:
        logger.info("Working on new s3_record...")
        # Extract the Key and Bucket names for the asset uploaded to S3
        key = s3_record['s3']['object']['key']
        bucket = s3_record['s3']['bucket']['name']
        logger.info("Bucket: {} \t Key: {}".format(bucket, key))
        # Generate a signed URL for the uploaded asset
        signed_url = get_signed_url(SIGNED_URL_EXPIRATION, bucket, key)
        logger.info("Signed URL: {}".format(signed_url))
        # Launch MediaInfo
        # Pass the signed URL of the uploaded asset to MediaInfo as an input
        # MediaInfo will extract the technical metadata from the asset
        # The extracted metadata will be outputted in XML format and
        # stored in the variable xml_output
        xml_output = subprocess.check_output(["./mediainfo", "--full", "--output=XML", signed_url])
        logger.info("Output: {}".format(xml_output))
        save_record(key, xml_output)

def save_record(key, xml_output):
    """
    Save record to DynamoDB

    :param key:         S3 Key Name
    :param xml_output:  Technical Metadata in XML Format
    :return:
    """
    logger.info("Saving record to DynamoDB...")
    TABLE.put_item(
       Item={
            'keyName': key,
            'technicalMetadata': xml_output
        }
    )
    logger.info("Saved record to DynamoDB")


def get_signed_url(expires_in, bucket, obj):
    """
    Generate a signed URL
    :param expires_in:  URL Expiration time in seconds
    :param bucket:
    :param obj:         S3 Key name
    :return:            Signed URL
    """
    s3_cli = boto3.client("s3")
    presigned_url = s3_cli.generate_presigned_url('get_object', Params={'Bucket': bucket, 'Key': obj},
                                                  ExpiresIn=expires_in)
    return presigned_url
The Lambda function starts by executing the lambda_handler function. The handler loops through records that have been passed to the function by S3. Each record represents a file upload to S3. From each record, the function extracts the bucket and key.
Then the function get_signed_url is called with the bucket and key, and generates a Signed URL for the file on S3. A signed URL allows MediaInfo to access the file securely on S3 via a URL. For more information, see Share an Object with Others.
The signed URL is passed to MediaInfo, which then downloads only the bytes necessary to extract the technical metadata from the file. All of the metadata is outputted as an XML, which can be used for further processing.
Lambda calls save_record to store the technical metadata in DynamoDB. Storing the data in DynamoDB makes future queries and searches on the data much easier.
Step 4: Deploy the Lambda function
Save the code above as lambda_function.py. Then zip that file AND the mediainfo executable into Lambda.zip. The command on Mac OSX is the following:
zip Lambda lambda_function.py mediainfoThe command on your operating system may be different.
Next, create the execution role that Lambda uses when it runs. First, create the actual role:
aws iam create-role \
    --role-name LambdaMediaInfoExecutionRole \
    --assume-role-policy-document file://lambda_trust_policy.json
The trust policy for this role allows Lambda to assume the role. Put the following trust policy document in a file named lambda_trust_policy.json.
{
  "Version": "2012-10-17",
  "Statement": [
    {
      "Sid": "",
      "Effect": "Allow",
      "Principal": {
        "Service": "lambda.amazonaws.com"
      },
      "Action": "sts:AssumeRole"
    }
  ]
}
Create an access policy to be assigned to the role. Change the policy-arn value to the ARN of the LambdaMediaInfoExecutionRolePolicy.
aws iam create-policy \
    --policy-name LambdaMediaInfoExecutionRolePolicy \
    --policy-document file://lambda_access_policy.json

aws iam attach-role-policy \
    --role-name LambdaMediaInfoExecutionRole \
    --policy-arn XXXXXXXXXXXX
When you create this access policy, give the Lambda function the minimum rights required to store Lambda logs to CloudWatch Logs, read files from a specific S3 bucket, and store the technical metadata in the DynamoDB table created in Step 2. Put the following access policy document in a file named lambda_access_policy.json.
{
    "Version": "2012-10-17",
    "Statement": [
        {
            "Action": [
                "logs:CreateLogGroup",
                "logs:CreateLogStream",
                "logs:PutLogEvents"
            ],
            "Effect": "Allow",
            "Resource": "arn:aws:logs:*:*:*"
        },
        {
            "Action": [
              "s3:GetObject"
            ],
            "Effect": "Allow",
            "Resource": "arn:aws:s3:::YOUR_BUCKET/*"
        },
        {
            "Sid": "PutUpdateDeleteOnCrossAccountAuditing",
            "Effect": "Allow",
            "Action": [
                "dynamodb:PutItem",
                "dynamodb:UpdateItem",
                "dynamodb:DeleteItem"
            ],
            "Resource": "DYNAMODB_ARN"
        }
    ]
}
You need to edit “YOUR_BUCKET” and change it to the bucket location where you are storing your files for MediaInfo to process. You also need to edit “DYNAMODB_ARN” to the ARN of the DynamoDB table that was created in Step 2.
Finally, you can create the Lambda function. Change the “role” parameter to the ARN of the LambdaMediaInfoExecutionRole role.
aws lambda create-function \
    --function-name LambdaMediaInfo \
    --runtime python2.7 \
    --role XXXXXXXXXXXX \
    --handler lambda_function.lambda_handler \
    --description "Lambda MediaInfo Function" \
    --timeout 60 \
    --memory-size 128 \
    --zip-file fileb://Lambda.zip
Step 5: Configure S3 to trigger the Lambda function
You need to configure S3 to trigger the Lambda function whenever a new media asset is uploaded to the bucket.
The first step is to add permission to Lambda so that S3 can invoke the function.
aws lambda add-permission \
    --function-name LambdaMediaInfo \
    --statement-id Id-1 \
    --action "lambda:InvokeFunction" \
    --principal s3.amazonaws.com \
    --source-arn arn:aws:s3:::YOUR_BUCKET \
    --source-account YOUR_ACCOUNT_NUMBER
Modify “YOUR_BUCKET” with the location of your media assets and “YOUR_ACCOUNT_NUMBER” with your twelve-digit AWS account number.
Next, add a notification to the S3 bucket that triggers the Lambda function. Modify “YOUR_BUCKET” with the location of your media assets.
aws s3api put-bucket-notification \
    --bucket YOUR_BUCKET \
    --notification-configuration file://notification.json
Put the following notification configuration document in a file named notification.json.
{
  "CloudFunctionConfiguration": {
    "Id": "ObjectCreatedEvents",
    "Events": [ "s3:ObjectCreated:*" ],
    "CloudFunction": "LAMBDA_ARN"
  }
}
You need to replace “LAMBDA_ARN” with the ARN of the LambdaMediaInfo function. This notification configuration triggers the Lambda function whenever a file is created in the S3 bucket.
Step 6: Test
To test, upload a video file to the S3 bucket. S3 then triggers the Lambda function and MediaInfo extracts the technical metadata.
To confirm that the function is working as expected, you can view the CloudWatch logs for the Lambda function.
The following is an excerpt of the logs for a 1.65GB movie file called test-video2.mov, which includes the technical metadata in XML format extracted by MediaInfo. For brevity, much of the metadata is truncated. However, you can see that the video file is in MPEG-4/AVC format, is 57mins 47seconds long, and has a 16:10 aspect ratio.
Also, notice how the Lambda function only took 2.5 seconds and 46 MB of RAM to process the entire 1.65GB file. MediaInfo is able to accomplish fast processing time and low memory utilization by downloading only parts of the video file, as opposed to the entire file. The reduction in time and memory immediately translates into a reduction in Lambda transaction costs.
[INFO] 2016-04-18T20:12:13.74Z Working on new s3_record...
[INFO] 2016-04-18T20:12:13.74Z Bucket: My.Bucket Key: test-video2.mov
[INFO] 2016-04-18T20:12:13.165Z Signed URL: https://s3.amazonaws.com/My.Bucket/test-video2.mov?AWSAccessKeyId=ASIAIS5OGWVK2HTNCS6Q&Expires=1461010633&x-amz-security-token=SAMPLE&Signature=SAMPLE%3D
[INFO] 2016-04-18T20:12:15.524Z Output:
<?xml version="1.0" encoding="UTF-8"?>
<Mediainfo version="0.1"
ref="https://s3.amazonaws.com/My.Bucket/test-video2.mov?AWSAccessKeyId=ASIAIS5OGWVK2HTNCS6Q&Expires=1461010633&x-amz-security-token=SAMPLE&Signature=SAMPLE%3D">
<File>
<track type="General">
…Truncated…
<Format>MPEG-4</Format>
…Truncated…
<Duration>57mn 41s</Duration>
…Truncated…
<Display_aspect_ratio>16:10</Display_aspect_ratio>
<Rotation>0.000</Rotation>
<Frame_rate_mode>VFR</Frame_rate_mode>
<Frame_rate_mode>Variable</Frame_rate_mode>
<Frame_rate>35.139</Frame_rate>
<Frame_rate>35.139 fps</Frame_rate>
<Minimum_frame_rate>5.000</Minimum_frame_rate>
<Minimum_frame_rate>5.000 fps</Minimum_frame_rate>
<Maximum_frame_rate>60.000</Maximum_frame_rate>
<Maximum_frame_rate>60.000 fps</Maximum_frame_rate>
<Original_frame_rate>25.000</Original_frame_rate>
<Original_frame_rate>25.000 fps</Original_frame_rate>
<Frame_count>121645</Frame_count>
<Resolution>8</Resolution>
<Resolution>8 bits</Resolution>
<Colorimetry>4:2:0</Colorimetry>
<Color_space>YUV</Color_space>
<Chroma_subsampling>4:2:0</Chroma_subsampling>
<Chroma_subsampling>4:2:0</Chroma_subsampling>
<Bit_depth>8</Bit_depth>
<Bit_depth>8 bits</Bit_depth>
<Scan_type>Progressive</Scan_type>
<Scan_type>Progressive</Scan_type>
<Interlacement>PPF</Interlacement>
<Interlacement>Progressive</Interlacement>
<Bits__Pixel_Frame_>0.028</Bits__Pixel_Frame_>
<Stream_size>1765037794</Stream_size>
<Stream_size>1.64 GiB (100%)</Stream_size>
<Stream_size>2 GiB</Stream_size>
<Stream_size>1.6 GiB</Stream_size>
<Stream_size>1.64 GiB</Stream_size>
<Stream_size>1.644 GiB</Stream_size>
<Stream_size>1.64 GiB (100%)</Stream_size>
<Proportion_of_this_stream>0.99876</Proportion_of_this_stream>
<Title>Core Media Video</Title>
<Encoded_date>UTC 2015-05-18 19:34:58</Encoded_date>
<Tagged_date>UTC 2015-05-18 19:35:02</Tagged_date>
<Buffer_size>768000</Buffer_size>
<Color_range>Limited</Color_range>
<colour_description_present>Yes</colour_description_present>
<Color_primaries>BT.709</Color_primaries>
<Transfer_characteristics>BT.709</Transfer_characteristics>
<Matrix_coefficients>BT.709</Matrix_coefficients>
</track>
</File>
</Mediainfo>
END RequestId: d696f655-05a1-11e6-8fa7-976f9c7f7486
REPORT RequestId: d696f655-05a1-11e6-8fa7-976f9c7f7486 Duration: 2451.40 ms Billed Duration: 2500 ms Memory Size: 128 MB Max Memory Used: 46 MBFinally, here is a screenshot of the technical metadata being saved to DynamoDB. Note the partial portion of the technical metadata XML stored in the technicalMetadata attribute.

Conclusion
In this post, I simplified a cumbersome and brittle workflow for extracting technical metadata from files into a more elegant solution, using MediaInfo. In addition, the technical metadata is stored in DynamoDB for quick retrieval and searching. You can use this metadata to make intelligent decisions in subsequent downstream workflow steps, such as asset transcoding, image resizing, and general file verification and quality control.
To learn more, see Configuring S3 Event Notifications and Using Lambda with S3. If you have comments or suggestions, please submit them below.
Sumo Logic App for AWS Lambda Released
Today, Sumo Logic made its App for AWS Lambda generally available and introduced a purpose-built Lambda function, which is immediately available for launch in the AWS Blueprint library.
Now, customers using Lambda functions can better visualize things like metering for code execution, predict compute usage, and monitor memory limits through Sumo Logic’s predictive analytics capabilities, thus helping to optimize performance and cost.
Sumo Logic App for AWS Lambda
Lambda handles the scaling of the service behind the scenes, while sending operational logs to CloudWatch. To gain a better handle on costs, customers have requested greater visibility and predictability around Lambda usage. Sumo Logic is purpose-built for this, allowing you to see statistics like compute usage and billed duration, and drill down into items like compute usage by function. The Sumo Logic App also calculates your unused memory. This is important because when you allocate memory and are billed based on memory size, unused memory can be an indicator that you aren’t allocating appropriately.
Other out-of-the-box insights that users get with the Sumo Logic App include:
- Compute usage by function. Sumo Logic converts MB to GB and milliseconds to seconds to get the real billing numbers used, and reports over the last 12 hours.
- Predicted compute usage by function (GB-sec) based on the behavior of the last 12 hours.
- Billed duration of functions by the hour as a line chart juxtaposed with a trendline for the predicted billed duration on a timeline for the last 24 hours.
- Maximum memory used by functions as a line on an outlier chart with the threshold displayed as the area, on a timeline for the last 24 hours.

The Sumo Logic App also allows users to drill down to analyze the number of requests, billed duration and memory utilization of an individual function, as well as function version. This allows users to assign a hard number to assess the impact of a code change across different versions of the same Lambda function, and easily make cost/benefit trade-offs.
In other situations, where different departments own and manage their own set of Lambda functions, the Sumo Logic App for AWS Lambda allows the admin to identify the billing contribution of each function and charge that portion of the bill back to a specific department.
How it Works
AWS Lambda generates operation logs which are exposed via CloudWatch. Every time a function is triggered, it generates useful troubleshooting logs. When a new CloudWatch log becomes available, the Sumo Logic Lambda function for CloudWatch routes that log message to a Sumo Logic webhook. This in turn, acts as the data source for the dashboards and searches enclosed within the Sumo Logic App.

Getting Started
Setting up the Lambda function is easy and can be done under 15 minutes. If you don’t already have a Sumo Logic account, you can try it free. Go to www.sumologic.com/signup-free.
Step 1. Create a Lambda function that routes CloudWatch logs to Sumo Logic.
Step 2. Install the Sumo Logic App for AWS Lambda from the library.

Select a source category and choose Install. Choose Go when asked to confirm.
Step 3. Customize the dashboard and add alerts. Modify the parameters of the search queries. Admins and other users can create custom alerts for themselves so they can be warned of potential spikes.

Sumo Logic Lambda functions
Sumo Logic Lambda functions are open source and available on GitHub. There you’ll find source code for Lambda functions for Amazon Kinesis, Amazon S3 and Amazon CloudWatch Logs. The latter is what powers the Sumo Logic App. As CloudWatch logs become available, the Lambda function processes the data and passes it to Sumo Logic. Assuming you have the Sumo Logic App installed, you can then use our pre-built dashboards and searches to get visualizations or troubleshoot and monitor your applications and systems hosted on AWS. We encourage Lambda developers to contribute to the repository.
Summary
As AWS users increasingly find interesting and unique ways to leverage Lambda, their usage of the service and the number of functions they deploy in their accounts will rapidly grow. The simplicity and the power of Lambda makes it easy to create a function for every application and even maintain different versions of each function.
Learn more
Simply Serverless: Use constant values in Cloudwatch event triggered Lambda functions
Welcome to the second post in our new series: Simply Serverless, today we will show you a quick tip for using Cloudwatch Events with AWS Lambda.
When using an AWS Cloudwatch rule to trigger a Lambda event, one of the multiple options you have to pass data onto your Lamba function is “Constant (JSON Text)”. This handy feature allows you to send static content to your function instead of the matched event.

Keep in mind that you can also create the input targets via the CLI:
aws events put-targets --rule testjson --targets file://targetfile
Hope you’ve enjoyed, and as always I’m listening! @listonb
Bryan Liston
Building, Testing and Deploying Java applications on AWS Lambda using Maven and Jenkins

Jeff Nunn
Solutions Architect
With continuous integration (the practice of continually integrating code into a shared code repository) and continuous deployment (the practice of building, testing, and deploying code often), developers can release software faster and more frequently.
This post shows how the principles of code testing, continuous integration, and continuous deployment can be applied to your AWS Lambda workflows. Using Git, Maven, and Jenkins, you can integrate, test, build and deploy your Lambda functions using these same paradigms.
As a side note, we will be having a webinar on Continuous Delivery to AWS Lambda which covers more methods of Continuous Delivery on Thursday, April 28th. Register for the webinar.
Prerequisites
- Jenkins —
Many of our customers use Jenkins as an automation server to perform continuous integration. While the setup of Jenkins is out of scope for this post, you can still learn about unit testing and pushing your code to Lambda by working through this example. - A Git repository —
This method uses Git commit hooks to perform builds against code to be checked into Git. You can use your existing Git repository, or create a new Git repository with AWS CodeCommit or other popular Git source control managers.
Getting started
In this example, you are building a simple document analysis system, in which metadata is extracted from PDF documents and written to a database, allowing indexing and searching based on that metadata.
You use a Maven-based Java project to accomplish the PDF processing. To explain concepts, we show snippets of code throughout the post.
Overview of event-driven code
To accomplish the document analysis, an Amazon S3 bucket is created to hold PDF documents. When a new PDF document is uploaded to the bucket, a Lambda function analyzes the document for metadata (the title, author, and number of pages), and adds that data to a table in Amazon DynamoDB, allowing other users to search on those fields.
Lambda executes code in response to events. One such event would be the creation of an object in Amazon S3. When an object is created (or even updated or deleted), Lambda can run code using that object as a source.

Create an Amazon DynamoDB table
To hold the document metadata, create a table in DynamoDB, using the Title value of the document as the primary key.

For this example, you can set your provisioned throughput to 1 write capacity unit and 1 read capacity unit.

Write the Java code for Lambda
The Java function takes the S3 event as a parameter, extracting the PDF object and analyzing the document for metadata using Apache PDFBox, and writing the results to DynamoDB.
// Get metadata from the document
PDDocument document = PDDocument.load(objectData);
PDDocumentInformation metadata = document.getDocumentInformation();
...
String title = metadata.getTitle();

if (title == null) {
    title = "Unknown Title";
}
...
Item item = new Item()
    .withPrimaryKey("Title", title)
    .withString("Author", author)
    .withString("Pages", Integer.toString(document.getNumberOfPages()));
The Maven project comes with a sample S3 event (/src/test/resources/s3-event.put.json) from which you can build your tests.
{
  "Records": [
    {
      "eventVersion": "2.0",
      "eventSource": "aws:s3",
      "awsRegion": "us-east-1",
      "eventTime": "1970-01-01T00:00:00.000Z",
      "eventName": "ObjectCreated:Put",
      "userIdentity": {
        "principalId": "EXAMPLE"
      },
      "requestParameters": {
        "sourceIPAddress": "127.0.0.1"
      },
      "responseElements": {
        "x-amz-request-id": "79104EXAMPLEB723",
        "x-amz-id-2": "IOWQ4fDEXAMPLEQM+ey7N9WgVhSnQ6JEXAMPLEZb7hSQDASK+Jd1vEXAMPLEa3Km"
      },
      "s3": {
        "s3SchemaVersion": "1.0",
        "configurationId": "testConfigRule",
        "bucket": {
          "name": "builtonaws",
          "ownerIdentity": {
            "principalId": "EXAMPLE"
          },
          "arn": "arn:aws:s3:::builtonaws"
        },
        "object": {
          "key": "blogs/lambdapdf/aws-overview.pdf",
          "size": 558985,
          "eTag": "ac265da08a702b03699c4739c5a8269e"
        }
      }
    }
  ]
}
Take care to to replace the awsRegion, arn, and key to match your specific region, Amazon Resource Name, and key of the PDF document that you’ve uploaded.
Test your code
The sample code you’ve downloaded contains some basic unit tests. One test gets an item from the DynamoDB table and verifies that the expected metadata exists:
@Test
public void checkMetadataResult() {
    DynamoDB dynamoDB = new DynamoDB(new AmazonDynamoDBClient());
    Table table = dynamoDB.getTable("PDFMetadata");
    Item item = table.getItem("Title", "Overview of Amazon Web Services");

    assertEquals(31, item.getInt("Pages"));
    assertEquals("sajee@amazon.com", item.getString("Author"));
    assertEquals("Overview of Amazon Web Services", item.getString("Title"));
}
Before continuing, test your code to ensure that everything is working:
mvn testAfter ensuring there are no errors, check your DynamoDB table to see the metadata now added to your table.

The code executes because of the sample event in your Maven project, but how does it work when a new PDF is added to your bucket? To test this, complete the connection between Amazon S3 and Lambda.
Create a Lambda function
Use mvn package to package your working code, then upload the resulting JAR file to a Lambda function.
- In the Lambda console, create a new function and set runtime to Java 8.
- Set function package to the project JAR file Maven created in the target folder.
- Set handler to “example.S3EventProcessorExtractMetadata”.
- Create a new value for role based on the Basic With DynamoDB option. A role gives your function access to interact with other services from AWS. In this case, your function to interacts with both Amazon S3 and Amazon DynamoDB. In the window that opens, choose View Policy Document, then choose Edit to edit your policy document.

While this document gives your function access to your DynamoDB resources, you need to add access to your S3 resources as well. Use the policy document below to replace the original.
{
  "Version": "2012-10-17",
  "Statement": [
    {
      "Effect": "Allow",
      "Action": [
        "logs:CreateLogGroup",
        "logs:CreateLogStream",
        "logs:PutLogEvents"
      ],
      "Resource": "arn:aws:logs:*:*:*"
    },
    {
      "Effect": "Allow",
      "Action": [
        "s3:GetObject"
      ],
      "Resource": [
        "arn:aws:s3:::*"
      ]
    },
    {
      "Action": [
        "dynamodb:GetItem",
        "dynamodb:PutItem",
      ],
      "Effect": "Allow",
      "Resource": "*"
    }
  ]
}
It is important to note that this policy document allows your Lambda function access to all S3 and DynamoDB resources. You should lock your roles down to interact only with those specific resources that you wish the function to have access to.
After completing your policy document and reviewing the function settings, choose Create Function.
Create Amazon S3 bucket
- Create a bucket in the Amazon S3 console. Note that buckets created in S3 are in a global namespace: you need to create a unique name.
- After the bucket is created, upload the Overview of Amazon Web Services PDF to your bucket. We’ve included this white paper to use in unit tests for debugging your Lambda function.
- Manage events for your S3 bucket by going to the root bucket properties and choosing Events:

- Give your event a name, such as “PDFUploaded”.
- For Events, choose Object Created (all).
- For Prefix, list the key prefix for the subdirectory that holds your PDFs, if any. If you want to upload PDF documents to the root bucket, you can leave this blank. If you made a “subdirectory” called “pdf”, then the prefix would be “pdf”.
- Leave Suffix blank, and choosing Lambda function as the Send To option, choosing the Lambda function you created.
- Choose Save to save your S3 event.
Test everything
Test the entire process by uploading a new PDF to your bucket. Verify that a new entry was added to your DynamoDB table.

(To troubleshoot any errors, choose Monitoring in your Lambda function to view logs generated by Amazon CloudWatch.)
Enter Jenkins
At this point, you have created a testable Java function for Lambda that uses an S3 event to analyze metadata from a PDF document and stores that information in a DynamoDB table.
In a CI/CD environment, changes to the code might be made and uploaded to a code repository on a frequent basis. You can bring those principles into this project now by configuring Jenkins to perform builds, package a JAR file, and ultimately push the JAR file to Lambda. This process can be based off of a Git repo, by polling the repo for changes, or using Git’s built-in hooks for post-receive or post-commit actions.
Build hooks
Use the post-commit hook to trigger a Jenkins build when a commit is made to the repo. (For the purposes of this post, the repo was cloned to the Jenkins master, allowing you to use the post-commit hook.)
To enable Jenkins to build off Git commits, create a Jenkins project for your repo with the Git plugin, set Build Trigger to “Poll SCM”, and leave Schedule blank.
In your project folder, find .git/hooks/post-commit and add the following:
#!/bin/sh

curl http://<jenkins-master>:8080/job/<your-project-name>/build?delay=0sec
This ensures that when a commit is made in this project, a request is made to your project’s build endpoint on Jenkins. You can try it by adding or modifying a file, committing it to your repo, and examining the build history and console output in your Jenkins dashboard for the status update.

(For more information about implementing a post-receive hook, see the Integrating AWS CodeCommit with Jenkins AWS DevOps Blog post.)
Deploy code to Lambda
You may notice in the console output a command for aws sns publish --topic-arn .... In this project, we’ve added a post-build step to publish a message via Amazon Simple Notification Service (Amazon SNS) as an SMS message. You can add a similar build step to do the same, or take advantage of SNS to HTTP(S) endpoints to post status messages to team chat applications or a distributed list.
However, to be able to push the code to AWS Lambda after a successful commit and build, look at adding a post build step.
- In the configuration settings for your project, choose Add built step and Invoke top-level Maven targets, setting Goal to “package”. This packages up your project as a JAR file and places it into the
targetdirectory. - Add a second build step by choosing Add built step and the Execute shell option.
- For Command, add the following Lambda CLI command (substitute the function-name variable and zip-file variable as necessary):
aws lambda update-function-code --function-name extractPDFMeta --zip-file fileb://target/lambda-java-example-1.0.jar
You have now added the necessary build steps for Jenkins to test and package your code, then upload it to Lambda. Test the entire process start to finish by adding a new PDF document into your S3 bucket and checking the DynamoDB table for changes.
Take it a step further
The code and architecture described here are meant to serve as illustrations for testing your Lambda functions and building out a continuous deployment process using Maven, Jenkins, and AWS Lambda. If you’re running this in a production environment, there may be additional steps you would want to take. Here are a few:
- Add additional unit tests
- Build in additional features and sanity checks, for example, to make sure documents to be analyzed are actually PDF documents
- Adjust the Write Capacity Units (WCU) of your DynamoDB table to accommodate higher levels of traffic
- Add an additional Jenkins post-build step to integrate Amazon SNS to send a notification about a successful Lambda deployment