Category: Amazon API Gateway
Secure API Access with Amazon Cognito Federated Identities, Amazon Cognito User Pools, and Amazon API Gateway

Ed Lima, Solutions Architect
Our identities are what define us as human beings. Philosophical discussions aside, it also applies to our day-to-day lives. For instance, I need my work badge to get access to my office building or my passport to travel overseas. My identity in this case is attached to my work badge or passport. As part of the system that checks my access, these documents or objects help define whether I have access to get into the office building or travel internationally.
This exact same concept can also be applied to cloud applications and APIs. To provide secure access to your application users, you define who can access the application resources and what kind of access can be granted. (more…)
How to remove boilerplate validation logic in your REST APIs with Amazon API Gateway request validation

Ryan Green, Software Development Engineer
Does your API suffer from code bloat or wasted developer time due to implementation of simple input validation rules? One of the necessary but least exciting aspects of building a robust REST API involves implementing basic validation of input data to your API. In addition to increasing the size of the code base, validation logic may require taking on extra dependencies and requires diligence in ensuring the API implementation doesn’t get out of sync with API request/response models and SDKs.
Amazon API Gateway recently announced the release of request validators, a simple but powerful new feature that should help to liberate API developers from the undifferentiated effort of implementing basic request validation in their API backends.
This feature leverages API Gateway models to enable the validation of request payloads against the specified schema, including validation rules as defined in the JSON-Schema Validation specification. Request validators also support basic validation of required HTTP request parameters in the URI, query string, and headers.
When a validation failure occurs, API Gateway fails the API request with an HTTP 400 error, skips the request to the backend integration, and publishes detailed error results in Amazon CloudWatch Logs.
In this post, I show two examples using request validators, validating the request body and the request parameters. (more…)
A Serverless Authentication System by Jumia
Jumia is an ecosystem of nine different companies operating in 22 different countries in Africa. Jumia employs 3000 people and serves 15 million users/month.
Want to secure and centralize millions of user accounts across Africa? Shut down your servers! Jumia Group unified and centralized customer authentication on nine digital services platforms, operating in 22 (and counting) countries in Africa, totaling over 120 customer and merchant facing applications. All were unified into a custom Jumia Central Authentication System (JCAS), built in a timely fashion and designed using a serverless architecture.
In this post, we give you our solution overview. For the full technical implementation, see the Jumia Central Authentication System post on the Jumia Tech blog. (more…)
SAML for Your Serverless JavaScript Application: Part II
Contributors: Richard Threlkeld, Gene Ting, Stefano Buliani
The full code for both scenarios—including SAM templates—can be found at the samljs-serverless-sample GitHub repository. We highly recommend you use the SAM templates in the GitHub repository to create the resources, opitonally you can manually create them.
This is the second part of a two part series for using SAML providers in your application and receiving short-term credentials to access AWS Services. These credentials can be limited with IAM roles so the users of the applications can perform actions like fetching data from databases or uploading files based on their level of authorization. For example, you may want to build a JavaScript application that allows a user to authenticate against Active Directory Federation Services (ADFS). The user can be granted scoped AWS credentials to invoke an API to display information in the application or write to an Amazon DynamoDB table.
Part I of this series walked through a client-side flow of retrieving SAML claims and passing them to Amazon Cognito to retrieve credentials. This blog post will take you through a more advanced scenario where logic can be moved to the backend for a more comprehensive and flexible solution. (more…)
SAML for Your Serverless JavaScript Application: Part I
Contributors: Richard Threlkeld, Gene Ting, Stefano Buliani
The full code for this blog, including SAM templates—can be found at the samljs-serverless-sample GitHub repository. We highly recommend you use the SAM templates in the GitHub repository to create the resources, opitonally you can manually create them.
Want to enable SAML federated authentication? You can use the AWS platform to exchange SAML assertions for short-term, temporary AWS credentials.
When you build enterprise web applications, it is imperative to ensure that authentication and authorization (AuthN and AuthZ) is done consistently and follows industry best practices. At AWS, we have built a service called Amazon Cognito that allows you to create unique Identities for users and grants them short-term credentials for interacting with AWS services. These credentials are tied to roles based on IAM policies so that you can grant or deny access to different resources.
In this post, we walk you through different strategies for federating SAML providers with Amazon Cognito. Additionally, you can federate with different types of identity providers (IdP). These IdPs could be third-party social media services like Facebook, Twitter, and others. You can also federate with the User Pools service of Amazon Cognito and create your own managed user directory (including registration, sign-In, MFA, and other workflows). (more…)
Implementing Serverless Manual Approval Steps in AWS Step Functions and Amazon API Gateway

Ali Baghani, Software Development Engineer
A common use case for AWS Step Functions is a task that requires human intervention (for example, an approval process). Step Functions makes it easy to coordinate the components of distributed applications as a series of steps in a visual workflow called a state machine. You can quickly build and run state machines to execute the steps of your application in a reliable and scalable fashion.
In this post, I describe a serverless design pattern for implementing manual approval steps. You can use a Step Functions activity task to generate a unique token that can be returned later indicating either approval or rejection by the person making the decision.
Key steps to implementation
When the execution of a Step Functions state machine reaches an activity task state, Step Functions schedules the activity and waits for an activity worker. An activity worker is an application that polls for activity tasks by calling GetActivityTask. When the worker successfully calls the API action, the activity is vended to that worker as a JSON blob that includes a token for callback.
At this point, the activity task state and the branch of the execution that contains the state is paused. Unless a timeout is specified in the state machine definition, which can be up to one year, the activity task state waits until the activity worker calls either SendTaskSuccess or SendTaskFailure using the vended token. This pause is the first key to implementing a manual approval step.
The second key is the ability in a serverless environment to separate the code that fetches the work and acquires the token from the code that responds with the completion status and sends the token back, as long as the token can be shared, i.e., the activity worker in this example is a serverless application supervised by a single activity task state.
In this walkthrough, you use a short-lived AWS Lambda function invoked on a schedule to implement the activity worker, which acquires the token associated with the approval step, and prepares and sends an email to the approver using Amazon SES.
It is very convenient if the application that returns the token can directly call the SendTaskSuccess and SendTaskFailure API actions on Step Functions. This can be achieved more easily by exposing these two actions through Amazon API Gateway so that an email client or web browser can return the token to Step Functions. By combining a Lambda function that acquires the token with the application that returns the token through API Gateway, you can implement a serverless manual approval step, as shown below.
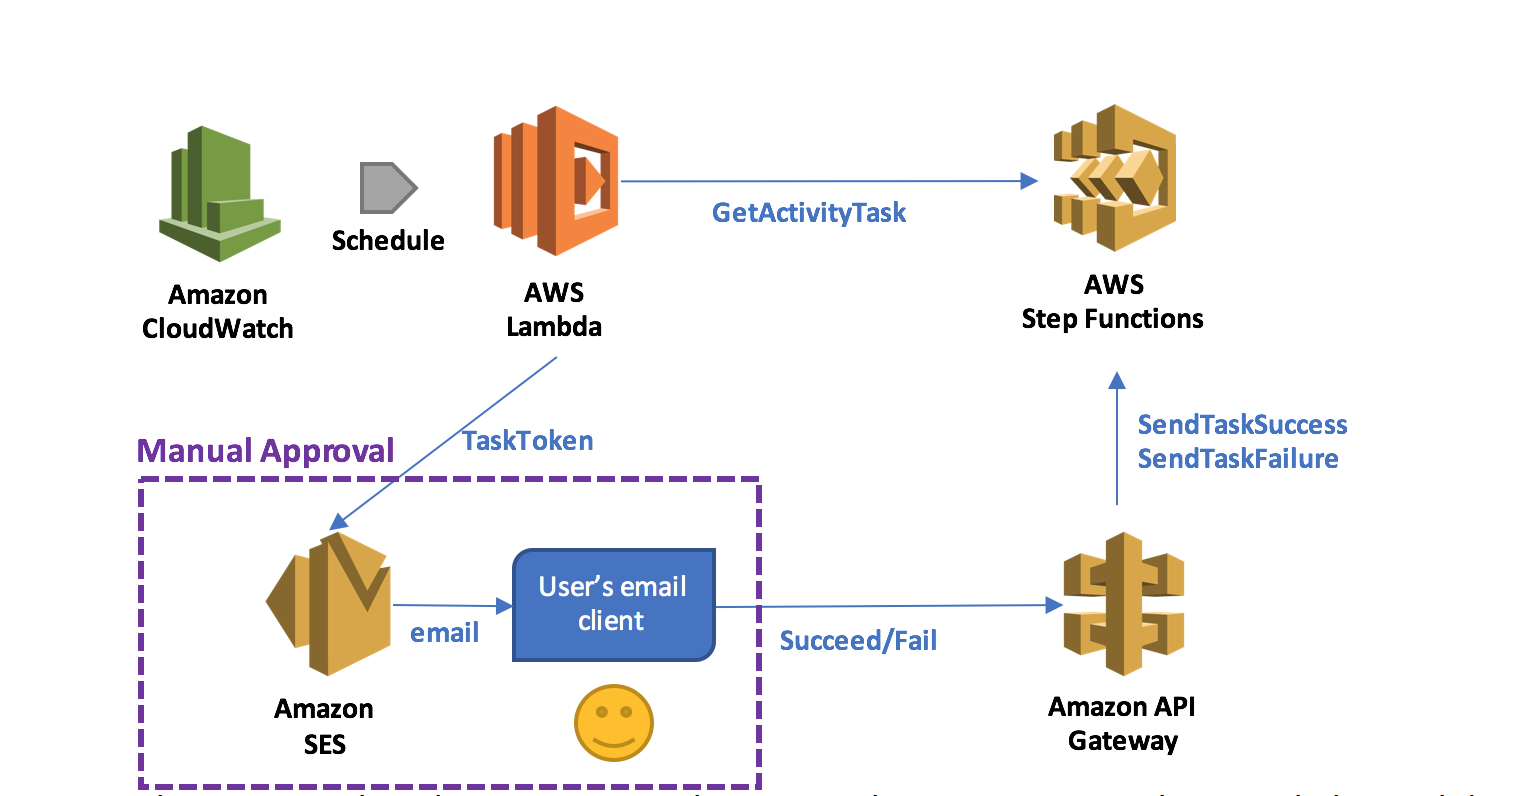
In this pattern, when the execution reaches a state that requires manual approval, the Lambda function prepares and sends an email to the user with two embedded hyperlinks for approval and rejection.
If the authorized user clicks on the approval hyperlink, the state succeeds. If the authorized user clicks on the rejection link, the state fails. You can also choose to set a timeout for approval and, upon timeout, take action, such as resending the email request using retry/catch conditions in the activity task state.
Employee promotion process
As an example pattern use case, you can design a simple employee promotion process which involves a single task: getting a manager’s approval through email. When an employee is nominated for promotion, a new execution starts. The name of the employee and the email address of the employee’s manager are provided to the execution.
You’ll use the design pattern to implement the manual approval step, and SES to send the email to the manager. After acquiring the task token, the Lambda function generates and sends an email to the manager with embedded hyperlinks to URIs hosted by API Gateway.
In this example, I have administrative access to my account, so that I can create IAM roles. Moreover, I have already registered my email address with SES, so that I can send emails with the address as the sender/recipient. For detailed instructions, see Send an Email with Amazon SES.
Here is a list of what you do:
- Create an activity
- Create a state machine
- Create and deploy an API
- Create an activity worker Lambda function
- Test that the process works
Create an activity
In the Step Functions console, choose Tasks and create an activity called ManualStep.

Remember to keep the ARN of this activity at hand.

Create a state machine
Next, create the state machine that models the promotion process on the Step Functions console. Use StatesExecutionRole-us-east-1, the default role created by the console. Name the state machine PromotionApproval, and use the following code. Remember to replace the value for Resource with your activity ARN.
{
  "Comment": "Employee promotion process!",
  "StartAt": "ManualApproval",
  "States": {
    "ManualApproval": {
      "Type": "Task",
      "Resource": "arn:aws:states:us-east-1:ACCOUNT_ID:activity:ManualStep",
      "TimeoutSeconds": 3600,
      "End": true
    }
  }
}
Create and deploy an API
Next, create and deploy public URIs for calling the SendTaskSuccess or SendTaskFailure API action using API Gateway.
First, navigate to the IAM console and create the role that API Gateway can use to call Step Functions. Name the role APIGatewayToStepFunctions, choose Amazon API Gateway as the role type, and create the role.
After the role has been created, attach the managed policy AWSStepFunctionsFullAccess to it.

In the API Gateway console, create a new API called StepFunctionsAPI. Create two new resources under the root (/) called succeed and fail, and for each resource, create a GET method.

You now need to configure each method. Start by the /fail GET method and configure it with the following values:
- For Integration type, choose AWS Service.
- For AWS Service, choose Step Functions.
- For HTTP method, choose POST.
- For Region, choose your region of interest instead of us-east-1. (For a list of regions where Step Functions is available, see AWS Region Table.)
- For Action Type, enter SendTaskFailure.
- For Execution, enter the APIGatewayToStepFunctions role ARN.

To be able to pass the taskToken through the URI, navigate to the Method Request section, and add a URL Query String parameter called taskToken.

Then, navigate to the Integration Request section and add a Body Mapping Template of type application/json to inject the query string parameter into the body of the request. Accept the change suggested by the security warning. This sets the body pass-through behavior to When there are no templates defined (Recommended). The following code does the mapping:
{
   "cause": "Reject link was clicked.",
   "error": "Rejected",
   "taskToken": "$input.params('taskToken')"
}
When you are finished, choose Save.
Next, configure the /succeed GET method. The configuration is very similar to the /fail GET method. The only difference is for Action: choose SendTaskSuccess, and set the mapping as follows:
{
   "output": "\"Approve link was clicked.\"",
   "taskToken": "$input.params('taskToken')"
}
The last step on the API Gateway console after configuring your API actions is to deploy them to a new stage called respond. You can test our API by choosing the Invoke URL links under either of the GET methods. Because no token is provided in the URI, a ValidationException message should be displayed.

Create an activity worker Lambda function
In the Lambda console, create a Lambda function with a CloudWatch Events Schedule trigger using a blank function blueprint for the Node.js 4.3 runtime. The rate entered for Schedule expression is the poll rate for the activity. This should be above the rate at which the activities are scheduled by a safety margin.
The safety margin accounts for the possibility of lost tokens, retried activities, and polls that happen while no activities are scheduled. For example, if you expect 3 promotions to happen, in a certain week, you can schedule the Lambda function to run 4 times a day during that week. Alternatively, a single Lambda function can poll for multiple activities, either in parallel or in series. For this example, use a rate of one time per minute but do not enable the trigger yet.

Next, create the Lambda function ManualStepActivityWorker using the following Node.js 4.3 code. The function receives the taskToken, employee name, and manager’s email from StepFunctions. It embeds the information into an email, and sends out the email to the manager.
'use strict';
console.log('Loading function');
const aws = require('aws-sdk');
const stepfunctions = new aws.StepFunctions();
const ses = new aws.SES();
exports.handler = (event, context, callback) => {

    var taskParams = {
        activityArn: 'arn:aws:states:us-east-1:ACCOUNT_ID:activity:ManualStep'
    };

    stepfunctions.getActivityTask(taskParams, function(err, data) {
        if (err) {
            console.log(err, err.stack);
            context.fail('An error occured while calling getActivityTask.');
        } else {
            if (data === null) {
                // No activities scheduled
                context.succeed('No activities received after 60 seconds.');
            } else {
                var input = JSON.parse(data.input);
                var emailParams = {
                    Destination: {
                        ToAddresses: [
                            input.managerEmailAddress
                            ]
                    },
                    Message: {
                        Subject: {
                            Data: 'Your Approval Needed for Promotion!',
                            Charset: 'UTF-8'
                        },
                        Body: {
                            Html: {
                                Data: 'Hi!<br />' +
                                    input.employeeName + ' has been nominated for promotion!<br />' +
                                    'Can you please approve:<br />' +
                                    'https://API_DEPLOYMENT_ID.execute-api.us-east-1.amazonaws.com/respond/succeed?taskToken=' + encodeURIComponent(data.taskToken) + '<br />' +
                                    'Or reject:<br />' +
                                    'https://API_DEPLOYMENT_ID.execute-api.us-east-1.amazonaws.com/respond/fail?taskToken=' + encodeURIComponent(data.taskToken),
                                Charset: 'UTF-8'
                            }
                        }
                    },
                    Source: input.managerEmailAddress,
                    ReplyToAddresses: [
                            input.managerEmailAddress
                        ]
                };

                ses.sendEmail(emailParams, function (err, data) {
                    if (err) {
                        console.log(err, err.stack);
                        context.fail('Internal Error: The email could not be sent.');
                    } else {
                        console.log(data);
                        context.succeed('The email was successfully sent.');
                    }
                });
            }
        }
    });
};
In the Lambda function handler and role section, for Role, choose Create a new role, LambdaManualStepActivityWorkerRole.

Add two policies to the role: one to allow the Lambda function to call the GetActivityTask API action by calling Step Functions, and one to send an email by calling SES. The result should look as follows:
{
  "Version": "2012-10-17",
  "Statement": [
    {
      "Effect": "Allow",
      "Action": [
        "logs:CreateLogGroup",
        "logs:CreateLogStream",
        "logs:PutLogEvents"
      ],
      "Resource": "arn:aws:logs:*:*:*"
    },
    {
      "Effect": "Allow",
      "Action": "states:GetActivityTask",
      "Resource": "arn:aws:states:*:*:activity:ManualStep"
    },
    {
      "Effect": "Allow",
      "Action": "ses:SendEmail",
      "Resource": "*"
    }
  ]
}
In addition, as the GetActivityTask API action performs long-polling with a timeout of 60 seconds, increase the timeout of the Lambda function to 1 minute 15 seconds. This allows the function to wait for an activity to become available, and gives it extra time to call SES to send the email. For all other settings, use the Lambda console defaults.

After this, you can create your activity worker Lambda function.
Test the process
You are now ready to test the employee promotion process.
In the Lambda console, enable the ManualStepPollSchedule trigger on the ManualStepActivityWorker Lambda function.
In the Step Functions console, start a new execution of the state machine with the following input:
{ "managerEmailAddress": "name@your-email-address.com", "employeeName" : "Jim" } Within a minute, you should receive an email with links to approve or reject Jim’s promotion. Choosing one of those links should succeed or fail the execution.

Summary
In this post, you created a state machine containing an activity task with Step Functions, an API with API Gateway, and a Lambda function to dispatch the approval/failure process. Your Step Functions activity task generated a unique token that was returned later indicating either approval or rejection by the person making the decision. Your Lambda function acquired the task token by polling the activity task, and then generated and sent an email to the manager for approval or rejection with embedded hyperlinks to URIs hosted by API Gateway.
If you have questions or suggestions, please comment below.
Authorizing Access Through a Proxy Resource to Amazon API Gateway and AWS Lambda Using Amazon Cognito User Pools

Ed Lima, Solutions Architect
Want to create your own user directory that can scale to hundreds of millions of users? Amazon Cognito user pools are fully managed so that you don’t have to worry about the heavy lifting associated with building, securing, and scaling authentication to your apps.
The AWS Mobile blog post Integrating Amazon Cognito User Pools with API Gateway back in May explained how to integrate user pools with Amazon API Gateway using an AWS Lambda custom authorizer. Since then, we’ve released a new feature where you can directly configure a Cognito user pool authorizer to authenticate your API calls; more recently, we released a new proxy resource feature. In this post, I show how to use these new great features together to secure access to an API backed by a Lambda proxy resource.
Walkthrough
In this post, I assume that you have some basic knowledge about the services involved. If not, feel free to review our documentation and tutorials on:
Start by creating a user pool called “myApiUsers”, and enable verifications with optional MFA access for extra security:

Be mindful that if you are using a similar solution for production workloads you will need to request a SMS spending threshold limit increase from Amazon SNS in order to send SMS messages to users for phone number verification or for MFA. For the purposes of this article, since we are only testing our API authentication with a single user the default limit will suffice.
Now, create an app in your user pool, making sure to clear Generate client secret:

Using the client ID of your newly created app, add a user, “jdoe”, with the AWS CLI. The user needs a valid email address and phone number to receive MFA codes:
aws cognito-idp sign-up \
--client-id 12ioh8c17q3stmndpXXXXXXXX \
--username jdoe \
--password P@ssw0rd \
--region us-east-1 \
--user-attributes '[{"Name":"given_name","Value":"John"},{"Name":"family_name","Value":"Doe"},{"Name":"email","Value":"jdoe@myemail.com"},{"Name":"gender","Value":"Male"},{"Name":"phone_number","Value":"+61XXXXXXXXXX"}]'
In the Cognito User Pools console, under Users, select the new user and choose Confirm User and Enable MFA:

Your Cognito user is now ready and available to connect.
Next, create a Node.js Lambda function called LambdaForSimpleProxy with a basic execution role. Here’s the code:
'use strict';
console.log('Loading CUP2APIGW2Lambda Function');

exports.handler = function(event, context) {
    var responseCode = 200;
    console.log("request: " + JSON.stringify(event));

    var responseBody = {
        message: "Hello, " + event.requestContext.authorizer.claims.given_name + " " + event.requestContext.authorizer.claims.family_name +"!" + " You are authenticated to your API using Cognito user pools!",
        method: "This is an authorized "+ event.httpMethod + " to Lambda from your API using a proxy resource.",
        body: event.body
    };

    //Response including CORS required header
    var response = {
        statusCode: responseCode,
        headers: {
            "Access-Control-Allow-Origin" : "*"
        },
        body: JSON.stringify(responseBody)
    };

    console.log("response: " + JSON.stringify(response))
    context.succeed(response);
};
For the last piece of the back-end puzzle, create a new API called CUP2Lambda from the Amazon API Gateway console. Under Authorizers, choose Create, Cognito User Pool Authorizer with the following settings:

Create an ANY method under the root of the API as follows:

After that, choose Save, OK to give API Gateway permissions to invoke the Lambda function. It’s time to configure the authorization settings for your ANY method. Under Method Request, enter the Cognito user pool as the authorization for your API:

Finally, choose Actions, Enable CORS. This creates an OPTIONS method in your API:

Now it’s time to deploy the API to a stage (such as prod) and generate a JavaScript SDK from the SDK Generation tab. You can use other methods to connect to your API however in this article I'll show how to use the API Gateway SDK. Since we are using an ANY method the SDK does not have calls for specific methods other than the OPTIONS method created by Enable CORS, you have to add a couple of extra functions to the apigClient.js file so that your SDK can perform GET and POST operations to your API:
    apigClient.rootGet = function (params, body, additionalParams) {
        if(additionalParams === undefined) { additionalParams = {}; }

        apiGateway.core.utils.assertParametersDefined(params, [], ['body']);

        var rootGetRequest = {
            verb: 'get'.toUpperCase(),
            path: pathComponent + uritemplate('/').expand(apiGateway.core.utils.parseParametersToObject(params, [])),
            headers: apiGateway.core.utils.parseParametersToObject(params, []),
            queryParams: apiGateway.core.utils.parseParametersToObject(params, []),
            body: body
        };


        return apiGatewayClient.makeRequest(rootGetRequest, authType, additionalParams, config.apiKey);
    };

    apigClient.rootPost = function (params, body, additionalParams) {
        if(additionalParams === undefined) { additionalParams = {}; }

        apiGateway.core.utils.assertParametersDefined(params, ['body'], ['body']);

        var rootPostRequest = {
            verb: 'post'.toUpperCase(),
            path: pathComponent + uritemplate('/').expand(apiGateway.core.utils.parseParametersToObject(params, [])),
            headers: apiGateway.core.utils.parseParametersToObject(params, []),
            queryParams: apiGateway.core.utils.parseParametersToObject(params, []),
            body: body
        };

        return apiGatewayClient.makeRequest(rootPostRequest, authType, additionalParams, config.apiKey);

    };
You can now use a little front end web page to authenticate users and test authorized calls to your API. In order for it to work, you need to add some external libraries and dependencies including the API Gateway SDK you just generated. You can find more details in our Cognito as well as API Gateway SDK documentation guides.
With the dependencies in place, you can use the following JavaScript code to authenticate your Cognito user pool user and connect to your API in order to perform authorized calls (replace your own user pool Id and client ID details accordingly):
<script type="text/javascript">
 //Configure the AWS client with the Cognito role and a blank identity pool to get initial credentials

  AWS.config.update({
    region: 'us-east-1',
    credentials: new AWS.CognitoIdentityCredentials({
      IdentityPoolId: ''
    })
  });

  AWSCognito.config.region = 'us-east-1';
  AWSCognito.config.update({accessKeyId: 'null', secretAccessKey: 'null'});
  var token = "";

  //Authenticate user with MFA

  document.getElementById("buttonAuth").addEventListener("click", function(){
    var authenticationData = {
      Username : document.getElementById('username').value,
      Password : document.getElementById('password').value,
      };

    var showGetPut = document.getElementById('afterLogin');
    var hideLogin = document.getElementById('login');

    var authenticationDetails = new AWSCognito.CognitoIdentityServiceProvider.AuthenticationDetails(authenticationData);

   // Replace with your user pool details

    var poolData = {
        UserPoolId : 'us-east-1_XXXXXXXXX',
        ClientId : '12ioh8c17q3stmndpXXXXXXXX',
        Paranoia : 7
    };

    var userPool = new AWSCognito.CognitoIdentityServiceProvider.CognitoUserPool(poolData);

    var userData = {
        Username : document.getElementById('user').value,
        Pool : userPool
    };

    var cognitoUser = new AWSCognito.CognitoIdentityServiceProvider.CognitoUser(userData);
    cognitoUser.authenticateUser(authenticationDetails, {
      onSuccess: function (result) {
        token = result.getIdToken().getJwtToken(); // CUP Authorizer = ID Token
        console.log('ID Token: ' + result.getIdToken().getJwtToken()); // Show ID Token in the console
        var cognitoGetUser = userPool.getCurrentUser();
        if (cognitoGetUser != null) {
          cognitoGetUser.getSession(function(err, result) {
            if (result) {
              console.log ("User Successfuly Authenticated!");
            }
          });
        }

        //Hide Login form after successful authentication
        showGetPut.style.display = 'block';
        hideLogin.style.display = 'none';
      },
    onFailure: function(err) {
        alert(err);
    },
    mfaRequired: function(codeDeliveryDetails) {
            var verificationCode = prompt('Please input a verification code.' ,'');
            cognitoUser.sendMFACode(verificationCode, this);
        }
    });
  });

//Send a GET request to the API

document.getElementById("buttonGet").addEventListener("click", function(){
  var apigClient = apigClientFactory.newClient();
  var additionalParams = {
      headers: {
        Authorization: token
      }
    };

  apigClient.rootGet({},{},additionalParams)
      .then(function(response) {
        console.log(JSON.stringify(response));
        document.getElementById("output").innerHTML = ('<pre align="left"><code>Response: '+JSON.stringify(response.data, null, 2)+'</code></pre>');
      }).catch(function (response) {
        document.getElementById('output').innerHTML = ('<pre align="left"><code>Error: '+JSON.stringify(response, null, 2)+'</code></pre>');
        console.log(response);
    });
//}
});

//Send a POST request to the API

document.getElementById("buttonPost").addEventListener("click", function(){
  var apigClient = apigClientFactory.newClient();
  var additionalParams = {
      headers: {
        Authorization: token
      }
    };

 var body = {
        "message": "Sample POST payload"
  };

  apigClient.rootPost({},body,additionalParams)
      .then(function(response) {
        console.log(JSON.stringify(response));
        document.getElementById("output").innerHTML = ('<pre align="left"><code>Response: '+JSON.stringify(response.data, null, 2)+'</code></pre>');
      }).catch(function (response) {
        document.getElementById('output').innerHTML = ('<pre align="left"><code>Error: '+JSON.stringify(response, null, 2)+'</code></pre>');
        console.log(response);
    });
});
</script>
As far as the front end is concerned you can use some simple HTML code to test, such as the following snippet:
<body>
<div id="container" class="container">
    <br/>
    <img src="http://awsmedia.s3.amazonaws.com/AWS_Logo_PoweredBy_127px.png">
    <h1>Cognito User Pools and API Gateway</h1>
    <form name="myform">
        <ul>
          <li class="fields">
            <div id="login">
            <label>User Name: </label>
            <input id="username" size="60" class="req" type="text"/>
            <label>Password: </label>
            <input id="password" size="60" class="req" type="password"/>
            <button class="btn" type="button" id='buttonAuth' title="Log in with your username and password">Log In</button>
            <br />
            </div>
            <div id="afterLogin" style="display:none;">
            <br />
            <button class="btn" type="button" id='buttonPost'>POST</button>
            <button class="btn" type="button" id='buttonGet' >GET</button>
            <br />
          </li>
        </ul>
      </form>
  <br/>
    <div id="output"></div>
  <br/>
  </div>
  <br/>
  </div>
</body>
After adding some extra CSS styling of your choice (for example adding "list-style: none" to remove list bullet points), the front end is ready. You can test it by using a local web server in your computer or a static website on Amazon S3.
Enter the user name and password details for John Doe and choose Log In:

A MFA code is then sent to the user and can be validated accordingly:

After authentication, you can see the ID token generated by Cognito for further access testing:

If you go back to the API Gateway console and test your Cognito user pool authorizer with the same token, you get the authenticated user claims accordingly:

In your front end, you can now perform authenticated GET calls to your API by choosing GET.

Or you can perform authenticated POST calls to your API by choosing POST.

The calls reach your Lambda proxy and return a valid response accordingly. You can also test from the command line using cURL, by sending the user pool ID token that you retrieved from the developer console earlier, in the “Authorization” header:

It’s possible to improve this solution by integrating an Amazon DynamoDB table, for instance. You could detect the method request on event.httpMethod in the Lambda function and issue a GetItem call to a table for a GET request or a PutItem call to a table for a POST request. There are lots of possibilities for this kind of proxy resource integration.
Summary
The Cognito user pools integration with API Gateway provides a new way to secure your API workloads, and the new proxy resource for Lambda allows you to perform any business logic or transformations to your API calls from Lambda itself instead of using body mapping templates. These new features provide very powerful options to secure and handle your API logic.
I hope this post helps with your API workloads. If you have questions or suggestions, please comment below.
Continuous Deployment for Serverless Applications
With a continuous deployment infrastructure, developers can quickly and safely release new features and bug fixes for their applications without manually triggering any deployment scripts. Amazon Web Services offers a number of products that make the creation of deployment pipelines easier:
- AWS CodePipeline
- AWS CodeCommit
- AWS CodeBuild – newly launched
A typical serverless application consists of one or more functions triggered by events such as object uploads to Amazon S3, Amazon SNS notifications, or API actions. Those functions can stand alone or leverage other resources such as Amazon DynamoDB tables or S3 buckets. The most basic serverless application is simply a function.
This post shows you how to leverage AWS services to create a continuous deployment pipeline for your serverless applications. You use the Serverless Application Model (SAM) to define the application and its resources, CodeCommit as your source repository, CodeBuild to package your source code and SAM templates, AWS CloudFormation to deploy your application, and CodePipeline to bring it all together and orchestrate your application deployment.
Creating a pipeline
Pipelines pick up source code changes from a repository, build and package the application, and then push the new update through a series of stages, running integration tests to ensure that all features are intact and backward-compatible on each stage.
Each stage uses its own resources; for example, if you have a "dev" stage that points to a "dev" function, they are completely separate from the "prod" stage that points to a "prod" function. If your application uses other AWS services, such as S3 or DynamoDB, you should also have different resources for each stage. You can use environment variables in your AWS Lambda function to parameterize the resource names in the Lambda code.
To make this easier for you, we have created a CloudFormation template that deploys the required resources. If your application conforms to the same specifications as our sample, this pipeline will work for you:
- The source repository contains an application SAM file and a test SAM file.
- The SAM file called
app-sam.yamldefines all of the resources and functions used by the application. In the sample, this is a single function that uses the Express framework and theaws-serverless-expresslibrary. - The application SAM template exports the API endpoint generated in a CloudFormation output variable called
ApiUrl. - The SAM file called
test-sam.yamldefines a single function in charge of running the integration tests on each stage of the deployment. - The test SAM file exports the name of the Lambda function that it creates to a CloudFormation output variable called
TestFunction.
You can find the link to start the pipeline deployment at the end of this section. The template asks for a name for the service being deployed (the sample is called TimeService) and creates a CodeCommit repository to hold the application's source code, a CodeBuild project to package the SAM templates and prepare them for deployment, an S3 bucket to store build artifacts along the way, and a multi-stage CodePipeline pipeline for deployments.
The pipeline picks up your code when it's committed to the source repository, runs the build process, and then proceeds to start the deployment to each stage. Before moving on to the next stage, the pipeline also executes integration tests: if the tests fail, the pipeline stops.
This pipeline consists of six stages:
- Source – the source step picks up new commits from the CodeCommit repository. CodePipeline also supports S3 and GitHub as sources for this step.
- Build – Using CodeBuild, you pull down your application's dependencies and use the AWS CLI to package your app and test SAM templates for deployment. The
buildspec.ymlfile in the root of the sample application defines the commands that CodeBuild executes at each step. - DeployTests – In the first step, you deploy the updated integration tests using the
test-sam.yamlfile from your application. You deploy the updated tests first so that they are ready to run on all the following stages of the pipeline. - Beta – This is the first step for your app's deployment. Using the SAM template packaged in the Build step, you deploy the Lambda function and API Gateway endpoint to the beta stage. At the end of the deployment, this stage run your test function against the beta API.
- Gamma – Push the updated function and API to the gamma stage, then run the integration tests again.
- Prod – Rinse, repeat. Before proceeding with the prod deployment, your sample pipeline has a manual approval step.
Running the template
- Choose Launch Stack below to create the pipeline in your AWS account. This button takes you to the Create stack page of the CloudFormation console with the S3 link to the pre-populated template.
- Choose Next and customize your StackName and ServiceName.
- Skip the Options screen, choose Next, acknowledge the fact that the template can create IAM roles in your account, and choose Create.

Running integration tests
Integration tests decide whether your pipeline can move on and deploy the app code to the next stage. To keep the pipeline completely serverless, we decided to use a Lambda function to run the integration tests.
To run the test function, the pipeline template also includes a Lambda function called <YourServiceName>_start_tests. The start_tests function reads the output of the test deployment CloudFormation stack as well as the current stage's stack, extracts the output values from the stacks (the API endpoint and the test function name), and triggers an asynchronous execution of the test function. The test function is then in charge of updating the CodePipeline job status with the outcome of the tests. The test function in the sample application generates a random success or failure output.
In the future, for more complex integration tests, you could use AWS Step Functions to execute multiple tests at the same time.
The sample application
The sample application is a very simple API; it exposes time and time/{timeZone} endpoints that return the current time. The code for the application is written in JavaScript and uses the moment-timezone library to generate and format the timestamps. Download the source code for the sample application.
The source code includes the application itself under the app folder, and the integration tests for the application under the test folder. In the root directory for the sample, you will find two SAM templates, one for the application and one for the test function. The buildspec.yml file contains the instructions for the CodeBuild container. At the moment, the buildspecs use npm to download the app's dependencies and then the CloudFormation package command of the AWS CLI to prepare the SAM deployment package. For a sophisticated application, you would run your unit tests in the build step.
After you have downloaded the sample code, you can push it to the CodeCommit repository created by the pipeline template. The app-sam.yaml and test-sam.yaml files should be in the root of the repository. Using the CodePipeline console, you can follow the progress of the application deployment. The first time the source code is imported, the deployment can take a few minutes to start. Keep in mind that for the purpose of this demo, the integration tests function generates random failures.
After the application is deployed to a stage, you can find the API endpoint URL in the CloudFormation console by selecting the correct stack in the list and opening the Outputs tab in the bottom frame.
Conclusion
Continuous deployment and integration are a must for modern application development. It allows teams to iterate on their app at a faster clip and deliver new features and fixes in customers' hands quickly. With this pipeline template, you can bring this automation to your serverless applications without writing any additional code or managing any infrastructure.
You can re-use the same pipeline template for multiple services. The only requirement is that they conform to the same structure as the sample app with the app-sam.yaml and test-sam.yaml in the same repository.
Monetize your APIs in AWS Marketplace using API Gateway

Shiva Krishnamurthy, Sr. Product Manager
Amazon API Gateway helps you quickly build highly scalable, secure, and robust APIs. Today, we are announcing an integration of API Gateway with AWS Marketplace. You can now easily monetize your APIs built with API Gateway, market them directly to AWS customers, and reuse AWS bill calculation and collection mechanisms.
AWS Marketplace lists over 3,500 software listings across 35 product categories with over 100K active customers. With the recent announcement of SaaS Subscriptions, API sellers can, for the first time, take advantage of the full suite of Marketplace features, including customer acquisition, unified billing, and reporting. For AWS customers, this means that they can now subscribe to API products through AWS Marketplace and pay on an existing AWS bill. This gives you direct access to the AWS customer base.
To get started, identify the API on API Gateway that you want to sell on AWS Marketplace. Next, package that API into usage plans. Usage plans allow you to set throttling limits and quotas to your APIs and allow you to control third-party usage of your API. You can create multiple usage plans with different limits (e.g., Silver, Gold, Platinum) and offer them as different API products on AWS Marketplace.
Let’s suppose that you offer a Pet Store API managed by API Gateway and you want to start selling it through AWS Marketplace: you must offer a developer portal, a website that you must maintain that allows new customers to register an account using AWS-provided billing identifiers. Also, the portal needs to provide registered customers with access to your APIs during and after purchase.
To help you get started, we have created a reference implementation of a developer portal application. You can use this implementation to create a developer portal from scratch, or use it as a reference guide to integrate API Gateway into an existing developer portal that you already operate. For a detailed walkthrough on setting up a developer portal using our reference application, see (Generate Your Own API Gateway Developer Portal).
After you have set up your developer portal, register as a seller with the AWS Marketplace. After registration, submit a product load form to list your product for sale. In this step, you describe your API product, define pricing, and submit AWS account IDs to be used to test the subscription. You also submit the URL of your developer portal. Currently, API Gateway only supports “per request” pricing models.
After you have registered as a seller, you are given an AWS Marketplace product code. Log in to the API Gateway console to associate this product code with the corresponding usage plan on API Gateway. This tells API Gateway to send telemetry records to AWS Marketplace when your API is used.

After the product code is associated, test the “end user” flow by subscribing to your API products using the AWS IDs that you submitted via the Marketplace; verify the proper functionality. When you’ve finished verifying, submit your product for final approval using instructions provided in the Seller Guide.
Visit here to learn more about this feature.
Generate Your Own API Gateway Developer Portal
Shiva Krishnamurthy, Sr. Product Manager
Amazon API Gateway helps you quickly build highly scalable, secure, and robust APIs. Developers who want to consume your API to build web, mobile, or other types of apps need a site where they can learn about the API, acquire access, and manage their consumption. You can do this by hosting a developer portal: a web application that lists your APIs in catalog form, displays API documentation to help developers understand your API, and allows them to sign up for access. The application also needs to let developers test your APIs, and provide feedback to grow a successful developer ecosystem. Finally, you may also want to monetize your APIs and grow API product revenue.
Today, we published aws-api-gateway-developer-portal, an open source serverless web application that you can use to get started building your own developer portal. In just a few easy steps, you can generate a serverless web application that lists your APIs on API Gateway in catalog form, and allows for developer signups. The application is built using aws-serverless-express, an open source library that we published recently, that makes it incredibly easy to build serverless web applications using API Gateway and AWS Lambda. The application uses a SAM (Serverless Application Model) template to deploy its serverless resources, and is very easy to deploy and operate.
Walkthrough
In this post, I walk through the steps for creating a sample API and developer portal for third-party developer consumption:
- Create an API or import a Swagger definition
- Deploy the API for developer access
- Document the API for easier developer consumption
- Structure it into a usage plan to set access control policies, and set throttling limits.
- Use aws-api-gateway-developer-portal to generate a developer portal, and then set up and configure the portal
- Log in as a developer and verify the process of consuming an API.
You can also see how to create a AWS Marketplace listing and monetize your API.
Create an API
To get started, log in to the Amazon API Gateway console and import the example API (PetStore). You can also create your own APIs using Swagger, the console, or APIs.

Deploy the API
After creation, deploy the API to a stage to make it accessible to developers, and ready for testing. For this example, use “Marketplace” as the name for the API stage.

Document the API
API Gateway recently announced support for API documentation. You can now document various parts of your API by either importing Swagger or using the API Gateway console to edit API documentation directly.
Navigate to the Documentation tab to add missing documentation and make it easier for developers to understand your API. After you are satisfied with the new documentation, choose Publish Documentation and choose the Marketplace stage created earlier to update the previously deployed PetStore API with the modified documentation.

Package the API into usage plans
Usage plans in API Gateway help you structure your API for developer access. You can associate API keys to usage plans, and set throttling limits and quotas on a per-API key basis. Choose Usage Plans in the console, create a new usage plan, and set throttling limits and quotas as shown below.

When your customers subscribe to this usage plan, their requests are throttled at 200 RPS, and they can each make only 200,000 requests per month. You can change these limits at any time.
Choose Next to create the usage plan. (Skip the API Key screen, and add the Marketplace stage we created earlier)
Generate and configure a developer portal
Now, generate a developer portal in order to list the usage plan that you created earlier. To do this, clone the aws-api-gateway-developer-portal into a local folder. The README includes instructions on how to get set up, but let’s run through it step-by-step. First, ensure that you have the latest version of Node.js installed. For this walkthrough, you use the latest version of the AWS CLI, so make sure that you have your AWS credentials handy. and that you have configured the AWS CLI with the access-key and secret-key using the `aws –configure’ command.
Set up the developer portal
Then, open up a terminal window and run `npm run setup’. This step modifies several project files in-line with the information that you supply—choose a name for the S3 bucket that store webpages for the developer portal, as well as a name for the Lambda function that wraps the Express.js web application. The S3 bucket names that you specify in this step must be region-unique, so use a prefix (eg. ‘my-org-dev-portal-artifacts’).

After entering those details, it then creates the artifacts bucket on S3 (if the S3 bucket name you provided in the previous step doesn’t already exist). It also runs “package and deploy” on the SAM template using the new
command. It takes several minutes for CloudFormation to create the stack.

This step creates all the resources that you need for the developer portal, after setting up the IAM roles that are needed for the operation of this application. Navigate to the AWS CloudFormation console, and choose the Resources tab to see the full list of resources that have been created.
The core components that were created for your portal are listed below:
- API Gateway API: Proxies HTTP requests to the back-end Lambda function (Express.js web server that serves website content)
- Developer portal S3 website URL: Runs the developer portal site (publically accessible bucket)
- Lambda function: Acts as the primary back end or API server
- Cognito user and identity pools: Creates Cognito user pool and identity pool, and links them.
- DynamoDB table – Stores a map of API key IDs to customer IDs, which lets you track the API key and customer association.
- Lambda function Acts as a listener that subscribes to a particular SNS topic, which is useful when customers cancel or subscribe to an API.

Configure the developer portal post-setup
Additional files are then modified with values from your new resources, such as Cognito pool IDs, etc., and your web app is then uploaded to Amazon S3. After this step completes, it opens up your developer portal website in your default browser.

At this point, you have a complete serverless website ready. The application has been integrated with Cognito User Pools, which makes it easy for you to sign up developers and manage their access. For more information, see the Amazon Cognito Your User Pools – Now Generally Available post.
Edit the dev-portal/src/catalog.json file to list your APIs that appear in the developer portal. This can be a subset of all the APIs you have in API Gateway. Replace the contents of this file with your API definitions. For accuracy, export your APIs from API Gateway as Swagger, and copy them into the catalog.json file. Then, run `npm run upload-site’ to make these APIs available in the developer portal.
Verify the process
Test the end-user flow by signing up for access.

After you sign in as a developer, you can subscribe to an API, to receive an API key that you as a developer would use in your API requests.

You can also browse the API documentation that the API owner published (you, as of 5 minutes ago…), and learn more about the API.

You can even test an API with your API Key. Click the “Show API Key” button on the top right corner of the page, and copy your API Key. Next click the red alert icon, enter your API Key, and click Authorize. Finally, click the “Try it out!” button on any of your resources to make a request to your live API.

Your static content for the site is packaged into the folder ‘/dev-portal’. Modify the case studies, and getting started content in this folder; when you’re satisfied, run ‘npm run upload-site’ to push the changes to your portal.
Monetize your APIs
Amazon API Gateway now integrates with the AWS Marketplace to help API owners monetize their API and meter usage for their API products, without writing any code. Now, any API built using API Gateway can easily be published on the AWS Marketplace using the API Gateway console, AWS CLI, or AWS SDK.
API Gateway automatically and accurately meters API consumption for any such API published to the AWS Marketplace and send it to the AWS Marketplace Metering Service, enabling sellers to focus on adding value to their API products rather than building integrations with AWS Marketplace. For more information, see the Monetize your APIs in AWS Marketplace using API Gateway post.
To leverage this feature, you must offer a developer portal that accepts signups from AWS customers. You can use this developer portal implementation to either build your own from scratch, or use it to add functionality to your existing site.
Conclusion
To summarize, you started with an API on API Gateway and structured it for developer consumption. Then in just a few easy steps, you used aws-api-gateway-developer-portal, to spin up a developer portal on serverless architecture, ready to accept developer signups. This application needs no infrastructure management, scales out-of-the-box, and directly integrates with AWS Marketplace to help you monetize your APIs.
If you have any questions or suggestions, please comment below.