Category: AWS OpsWorks
New Resource-Level Permissions for AWS OpsWorks
My colleague Chris Barclay reports on an important new feature for AWS OpsWorks!
— Jeff;
I am pleased to announce that AWS OpsWorks now supports resource-level permissions. AWS OpsWorks is an application management service that lets you provision resources, deploy and update software, automate common operational tasks, and monitor the state of your environment. You can optionally use the popular Chef automation platform to extend OpsWorks using your own custom recipes.
With resource-level permissions you can now:
- Grant users access to specific stacks, making management of multi-user environments easier. For example, you can give a user access to the staging and production stacks but not the secret stack.
- Set user-specific permissions for actions on each stack, allowing you to decide who can deploy new application versions or create new resources on a per-stack basis for example.
- Delegate management of each OpsWorks stack to a specific user or set of users.
- Control user-level SSH access to Amazon EC2 instances, allowing you to instantly grant or remove access to instances for individual users.
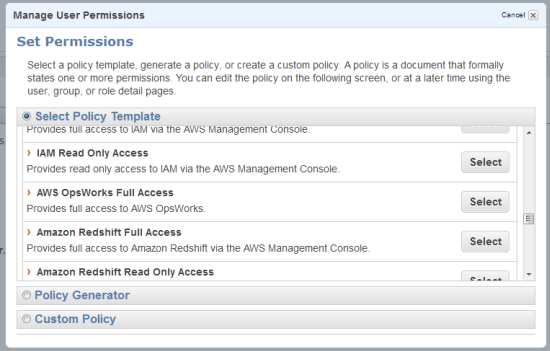
A simple user interface in OpsWorks lets you select a policy for each user on each stack depending on the level of control needed:
- Deny blocks the users access to this stack.
- IAM Policies Only bases a users permissions exclusively on policies attached to the user in IAM.
- Show combines the users IAM policies with permissions that provide read-only access to the stacks resources.
- Deploy combines the users IAM policies with Show permissions and permissions that let the user deploy new application versions.
- Manage combines the users IAM policies with permissions that provide full control of this stack.
These policies make it easy to quickly configure a user with the right permissions for the tasks they need to accomplish. You can also create a custom IAM policy to fine-tune their permissions.
Lets see this in action. In this example we have two users defined in the IAM console: Chris and Mary.
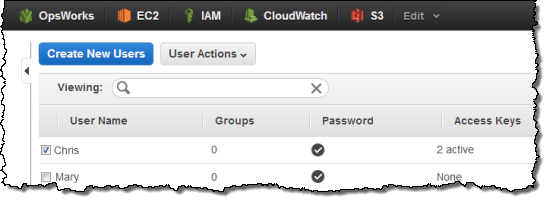
Lets give Chris the AWS OpsWorks Full Access policy; Mary doesnt need any IAM policy to use OpsWorks.
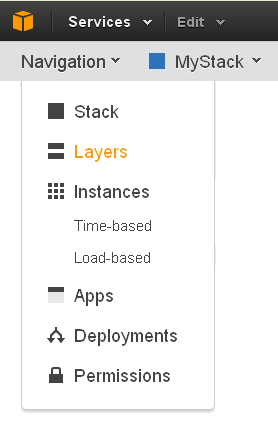
Now go to the OpsWorks console, open the Users view, and import Chris and Mary.
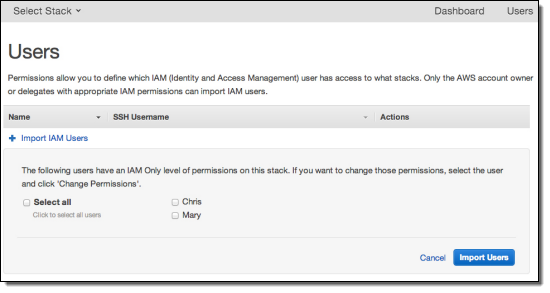
You can then go to a stack and open the Permissions view to designate OpsWorks permissions for each user. Give Mary Manage permissions for the MyWebService stack. Chris should already be able to access this stack because you attached the AWS OpsWorks Full Access policy to his user in IAM.
To remove Chris access to this stack, simply select the Deny radio button next to Chris. Your Permissions view will now look like this:

Chris can no longer view or access the stack because the explicit Deny overrides his users AWS OpsWorks Full Access policy. Mary can still access the stack and she can create, manage and delete resources.
But assume that this is a production stack and you dont want Mary to be able to stop instances. To make sure she cant do that, you can create a custom policy in the IAM console.
Go to the IAM console, select the user Mary and then click Attach User Policy. Add this custom policy:
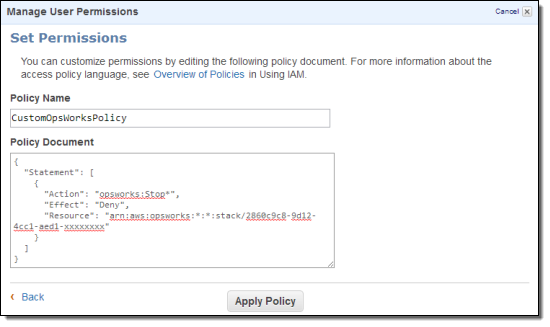
What does this policy mean? Here are the pieces:
- “Action”: “opsworks:Stop*” means this applies to any OpsWorks API action that begins with Stop.
- “Effect”: “Deny” tells OpsWorks to deny that action request.
- “Resource”: “arn:aws:opsworks:*:*:stack/2860c9c8-9d12-4cc1-aed1-xxxxxxxx” specifies that this statement applies only to resources in the specified stack. If Mary was using other stacks, this policy would not apply and she could perform stop actions if she had Manage access.
After applying the policy, you can return to the OpsWorks console and view a running instance as user Mary.
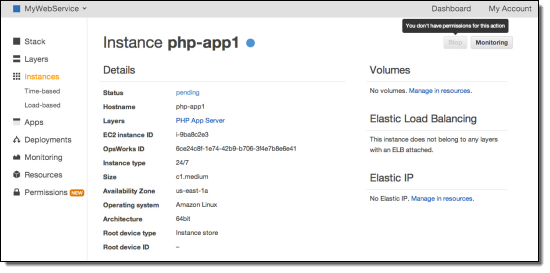
You can see that Mary can no longer stop this instance.
Behind the scenes, a users OpsWorks and IAM permissions are merged and then evaluated to determine whether a request is allowed or denied. In Marys case, the Manage user policy that you applied in OpsWorks allows her to stop instances in that stack. However, the explicit Deny on Stop* actions in her IAM user policy overrides the Allow in her OpsWorks policy. To learn more about policy evaluation, see the IAM documentation.
Once the users action has been evaluated, OpsWorks carries out the request. The user doesnt actually need permissions to use underlying services such as Amazon EC2 you give those permissions to the OpsWorks service role. This gives you control over how resources are administered without requiring you to manage user permissions to each of the underlying services. For example, a policy in IAM might deny Mary the ability to create instances within EC2 (either explicitly, or by simply not giving her explicit permission to do so). But Marys OpsWorks Manage policy allows her to create instances within an OpsWorks stack. Since you can define the region and VPC that each stack uses, this can help you comply with organizational rules on where instances can be launched.
Resource-level permissions give you control and flexibility for how to manage your applications. Try it and let us know what you think! For more information, please see the OpsWorks documentation.
— Chris Barclay, Senior Product Manager
AWS OpsWorks for Java
Chris Barclay sent along an awesome guest post to announce the arrival of AWS OpsWorks for Java!
— Jeff;
I am pleased to announce that AWS OpsWorks now supports Java applications. AWS OpsWorks is an application management service that makes it easy to model and manage your entire application. You can start from templates for common technologies or build your own using Chef recipes with full control of deployments, scaling, monitoring, and automation of each component.
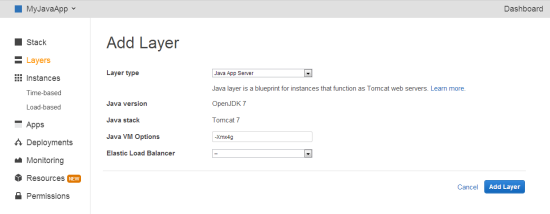
The new OpsWorks Java layer automatically configures Amazon EC2 instances with Apache Tomcat using sensible defaults in order to run your Java application. You can deploy one or more Java apps, such as a front-end web server and back-end business logic, on the same server. You can also customize or extend the Java layer. For example, you can choose a different Tomcat version, change the heap size, or use a different JDK.
To get started, go to the OpsWorks console and create a stack. Next, add a Java layer. Click Instances in the navigation column, add an instance, and start it.
Tomcat supports HTML, Java server pages (JSP), and Java class files. In this example well deploy a simple JSP that prints the date and your Amazon EC2 instances IP address, scale the environment using a load balancer, and discuss how OpsWorks can automate other tasks.
<%@ page import="java.net.InetAddress" %> <html> <body> <% java.util.Date date = new java.util.Date(); InetAddress inetAddress = InetAddress.getLocalHost(); %> The time is <% out.println( date ); out.println("<br>Your server's hostname is "+inetAddress.getHostName()); %> <br> </body> </html>
A typical Java development process includes developing and testing your application locally; checking the source code into a repository; and deploying the built assets to your servers. The example has only one JSP file, but your application might have many files. You can handle that case by creating an archive of those files and directing OpsWorks to deploy the contents of the archive.
Lets create an archive of the JSP and upload that archive to a location that OpsWorks can access. This archive will have only one file, but you can use the same procedure for any number of files.
- Copy the example code to a file named simplejsp.jsp and put the file in a directory named simplejsp.
- Create a .zip archive of the simplejsp directory.
- Create a public Amazon S3 bucket, upload simplejsp.zip to the bucket, and make the file public. For a description of how to perform this task, see Get Started With Amazon Simple Storage Service.
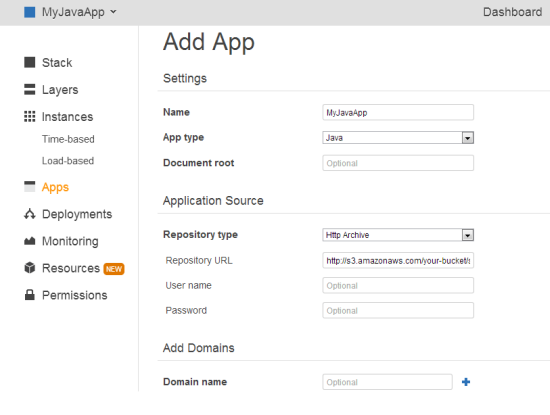
Now click Apps in the navigation column and then click Add an app.
- In Settings, specify a name and select the Java App Type.
- In Application Source, specify the http archive repository type, and enter the URL for the archive that you just uploaded to S3. It should look something like http://s3.amazonaws.com/your-bucket/simplejsp.zip.
Then click Add App.
Next, click Deploy to deploy the app to your instance. The deployment causes OpsWorks to download the file from S3 to the appropriate location on the Java app server. Once the deployment is complete, click the Instances page and copy the public IP address to construct a URL as follows: http://publicIP/appShortName/appname.jsp.
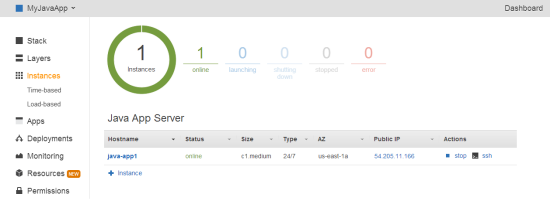
For the example, the URL will look something like http://54.205.11.166/myjavaapp/simplejsp.jsp and when you navigate to the URL you should see something like this:
Wed Oct 30 21:06:07 UTC 2013
Your servers hostname is java-app1
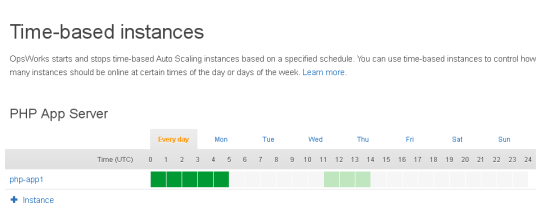
Now that you have one instance running, you can scale the application to handle load spikes using time and load-based instance scaling. Click Time-based under Instances in the left menu and add an instance. You can then select the times that the instance will start and stop. Once you have multiple instances, you will probably want to load balance the traffic among them. In the Amazon EC2 console create an Elastic Load Balancer and add it to your OpsWorks layer. OpsWorks automatically updates the load balancers configuration when instances are started and stopped
Its easy to customize OpsWorks to change the configuration of your EC2 instances. Most settings can be changed directly through the layer settings, such as adding software packages or Amazon EBS volumes. You can change how software is installed using Bash scripts and Chef recipes. You can also change existing recipes by modifying attributes. For example, you can use a different JDK by modifying the stacks custom JSON:
{ "opsworks_java" : { "jvm_pkg" : { "use_custom_pkg_location" : "true", "custom_pkg_location_url_rhel" : "http://s3.amazonaws.com/your-bucket/jre-7u45-linux-x64.gz" } } }
A few clicks in the AWS Management Console are all it takes to get started with OpsWorks. For more information on using the Java layer or customizing OpsWorks, see the documentation.
— Chris Barclay, Senior Product Manager
The AWS Report – Chris Barclay on OpsWorks
In the latest episode of The AWS Report, I spoke with my colleague Chris Barclay to get an update on AWS OpsWorks.. We talked about what it is, what it does, how it simplifies the application deployment process, and its relationship to the DevOps model.
Co-host Lee Zen and I debated the pros and cons of multi-region applications.
If you can take a minute to fill out our video survey after you finish watching, I’d really appreciate it! Thanks in advance.
— Jeff;
Using AWS ElastiCache for Redis With AWS OpsWorks
To build on the recent launch of AWS ElastiCache for Redis, Development Manager Enno Brehm sent me a guest post to show you how to set it up for use in AWS Opsworks.
— Jeff;
With the launch of Amazon ElastiCache for Redis it is now easier than ever to use Redis with your AWS OpsWorks applications. Within minutes you can have this powerful persistent key-value store up and running, fully managed.
In this post we will describe how to make an ElastiCache Redis cluster available to an existing OpsWorks Rails application stack. While these instructions assume a Rails application layer, only a small part is specific to Rails, namely the format and location of the generated configuration file. It should be easy to adapt these instructions to other application architectures (e.g. Node.js or PHP). Furthermore, only the first step is specific to Amazon ElastiCache for Redis, so this tutorial can also serve as a blueprint on how to make any kind of custom configuration information available to your application.
The tutorial consists of 5 steps:
- Set up an ElastiCache Redis cluster, obtain access information (hostname and port) for it and allow network communication from your Rails instances
- Add the access information to your stacks configuration data via custom JSON
- Create a Chef cookbook with a custom recipe to generate a configuration file config/redis.yml in your applications folder.
- Add this custom cookbook to your AWS OpsWorks stack.
- Add the custom recipe to your stacks Ruby layer and deploy the application.
So, lets dive in. We assume you already have an existing Rails application on AWS OpsWorks and know the basic operations, like editing your applications settings, deploying your applications, and logging into your instances via SSH.
Step 1. Create an Amazon ElastiCache Redis Cluster
Go to the Amazon ElastiCache console and check the region in the top right corner it should be the same region that you use for your existing AWS OpsWorks stack; if necessary change it. Click the Launch Cache Cluster button and in the following dialog, enter a name for your cache cluster and make sure to select Redis as the cluster engine. As we dont need SNS notifications, you can turn it off. All other settings can be left at their default.
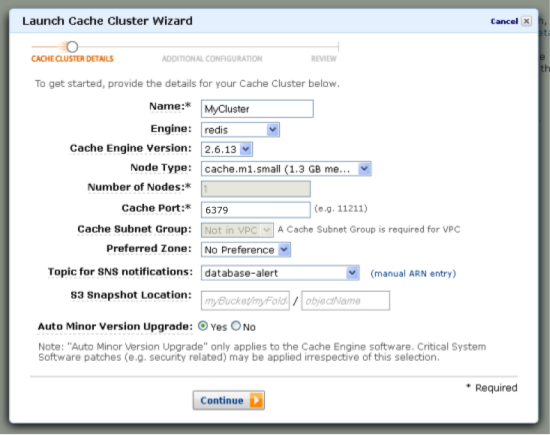
On the next page of the wizard, you will have to select a security group for your cluster. In a production environment you would properly setup security groups, but for the purposes of this tutorial, choosing the default security group will suffice (depending on the EC2 region of your cluster, the option will be called VPC Security Group or just Cache security group). Leave all other options as they are, and click Continue. On the next screen, review your information and launch the cluster.
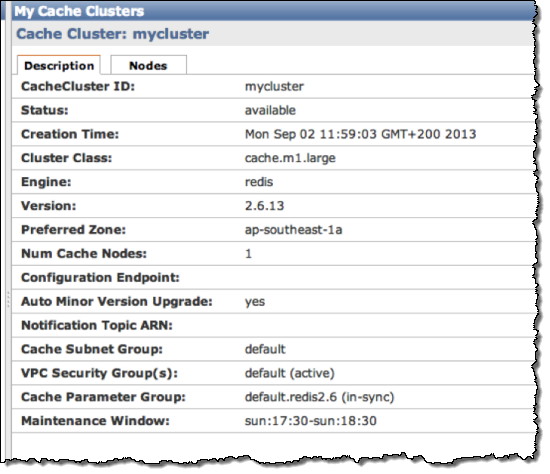
Once the cache cluster is created, you will see it as available in the list of your cache clusters:

Click the cluster name to see details on the cluster:
In the Nodes tab you will find information on how to access your new ElastiCache Redis instance:
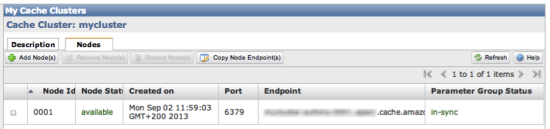
You now have an ElastiCache Redis instance running and you should write down the Endpoint and Port values as we will need to them in the next step, when you enter custom JSON for your stack in the AWS OpsWorks console. For more information on how to setup an Amazon ElastiCache for Redis see the Amazon ElastiCache User Guide.
Before we do this, we have to make sure that your OpsWorks application servers can open network connections to your ElastiCache Redis cluster by placing them in the same default security group. Once again, this is a simplified setup for the purposes of this tutorial; for a production environment you should consult the documentation on ElastiCache, Amazon EC2 Security Groups and Security for Your VPC, to enable communication and secure your actual setup.
Go to the AWS OpsWorks console and choose your stack. In the navigation pane choose Layers and edit your Rails App Server layers settings. Scroll down to the Security Groups section:
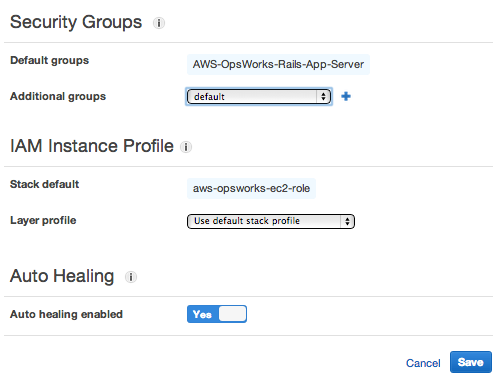
Choose default from the Additional groups select box, and click the small plus sign. Then click Save.
Next, stop your running Rails instances and start them again, as changes to security groups will only be applied on launch.
Your app server instances are now ready to talk to your ElastiCache Redis instance. In the next steps we will let your application know on which hostname and port to connect.
Step 2. Add custom JSON to Your Stack
You could of course hardcode this access information in your application code to access your newly created Redis server, but it is better to keep application and configuration separated. AWS OpsWorks and Chef let you provide your application with a dynamically created configuration file instead. However, first you should let your stack know about the configuration values from step 1:
{
  "deploy":
   {
     "elasticacheredisexample":
     {
      "redis":
        {
          "host": "mycluster.XXXXXXXXX.amazonaws.com",
          "port": "6379"
        }
      }
    }
}
What happens with this custom JSON? Whenever an instance is configured or an application is deployed, AWS OpsWorks pushes a JSON hash to your instance containing information on the stack, its layers and applications. This hash will in turn be used by a Chef run on your instance.
In particular, this configuration hash contains deployment information for each of your applications, stored under the key deploy. (It is quite instructive to see what this hash looks like if you are curious, ssh into one of your Rails app servers, where you can find JSON files from previous Chef runs in /var/lib/aws/opsworks/chef).
Adding custom JSON to your stack like you did above lets you extend this hash – you can add arbitrary information to it or even overwrite existing values. But right now, we are just adding a new section containing the Redis hostname and port. While this doesnt do much by itself, it ensures that these values are available on your instances during deployment. You can verify this by deploying your application now and inspecting the most recent JSON file in /var/lib/aws/opsworks/chef an easy way to do exactly this is to issue the command opsworks-agent-cli get_json as the root user on one of your app server instances, which will print the latest JSON nicely formatted.
For more information on custom JSON, see Use Custom JSON to Modify the Stack Configuration JSON.
In the next steps we will show how to actually make use of this information by creating a custom Chef recipe.
Step 3. Create a Custom Chef Cookbook
Our goal is to generate a YAML configuration file redis.yml in your applications configuration folder and fill it with your Redis access information during deployment.
The redis.yml file we want is very simple, it looks like this:
host: your-cache-cluster-hostname
port: your-cache-cluster-port
To create a cookbook with a recipe for this task, we first will need to create a new directory structure with two files as follows:
  mycookbooks
  |- redis-config
  |- recipes
  |  |- generate.rb
  |- templates
  |- default
  |- redis.yml.erb
This is a folder with one cookbook (it could contain multiple, but for our purposes one will suffice) called redis-config, with a single generate recipe. A Chef cookbook can contain a lot more files and sometimes look a little intimidating, but it doesnt have to in our case, it is very simple and we actually only need two files: a template for the configuration file and a Ruby file telling Chef when and where to generate it.
Here is the ERB template for our configuration file, redis.yml.erb:
host: port:
The variable @redis in this template will be set by the recipe generate.rb, which contains the code that will hook into the deployment process:
node[:deploy].each do |appname, deployconfig|
  # determine root folder of new app deployment
  approot = "#{deployconfig[:deployto]}/current"

  # use template .redis.yml.erb. to generate 'config/redis.yml'
  template "#{approot}/config/redis.yml" do
    source "redis.yml.erb"
    cookbook "redis-config"

    # set mode, group and owner of generated file
    mode "0660"
    group deployconfig[:group]
    owner deployconfig[:user]

    # define variable .@redis. to be used in the ERB template
    variables(:redis => deployconfig[:redis] || {})

    # only generate a file if there is Redis configuration
    notif do
      deploy_config[:redis].blank?
    end
  end
end
The node object is the hash we mentioned in step 2, containing information on your stack , layers, applications etc. We already saw that deployment information for our apps is found under the key deploy, so for example node[:deploy][<app_name>][:deploy_to] contains the folder into which your application got deployed. In the recipe this is used to determine the location for the generated file.
The recipe will loop over configuration information for all your applications in this stack (in your case probably only one), and trigger the generation of redis.yml from the ERB template redis.yml.erb. It initializes the variable redis to pass the information we provided in step 2 (via custom JSON) to the template. However, the not_if block will ensure this is only done if actual values are present – this way you can add information for multiple applications to your custom JSON, but you are also free to leave it out completely.
(Note that the recipe contains the cookbook name redis-config; if you named your cookbook differently, change the recipe accordingly).
This is all thats needed. In the next step we will make this cookbook available to our stack.
Step 4: Install Custom Cookbook
You can choose from different options how to make your custom cookbooks folder available to your AWS OpsWorks stack:
- By creating an internet accessible Git or SVN repository for your cookbooks.
- By creating a zip archive out of the folder and uploading it to Amazon S3.
- By creating a zip archive out of the folder and uploading it to a web server.
See Installing Custom Cookbooks for more information. Since custom cookbooks are active assets, we recommend putting them into version control and making them accessible to AWS OpsWorks via a repository URL.
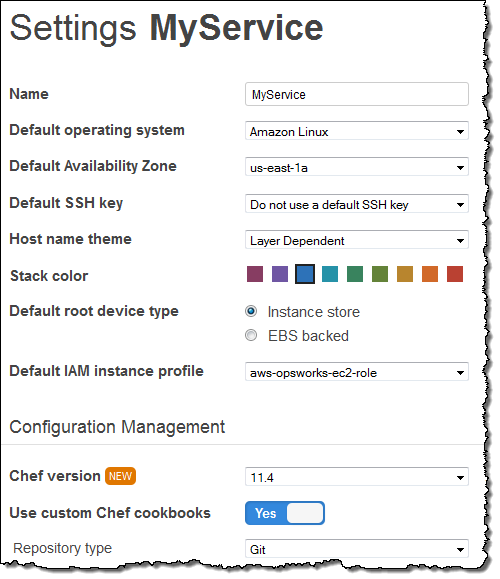
Once you have uploaded your cookbooks folder, open your stacks Settings dialog:
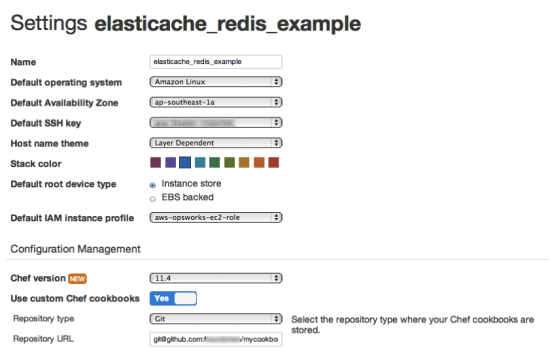
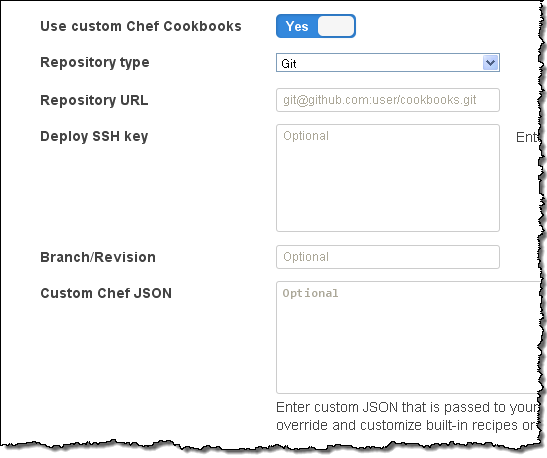
In the lower section, enable Use custom Chef cookbooks. Then select your Repository type and where to find your custom cookbooks. If necessary add authentication information, and click Save.
The last thing to do in this step is to make AWS OpsWorks deploy your cookbooks to each instance you are running. In the navigation pane, click Stack, then click Run Command.
In the following dialog select Update custom cookbooks from the Command select box and confirm by clicking the Update custom cookbooks button. In the following page you can track the progress of this command on each instance and inspect logs if something went wrong, e.g. if there were problems accessing your cookbook repository:
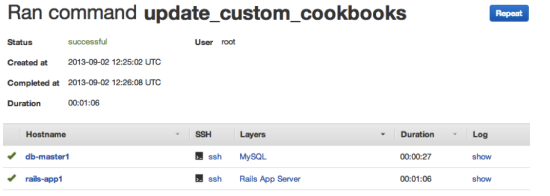
During this command a copy of your cookbooks was downloaded to each instance. When you make changes to your cookbooks, you need to run this command again, so your running instances get the latest cookbooks. You dont have to do this if you start a new instance, as it will get the latest copy automatically.
As your instances now have access to your cookbook, we can integrate them in your applications configuration.
Step 5: Add the Custom Recipe to Your Application and Deploy
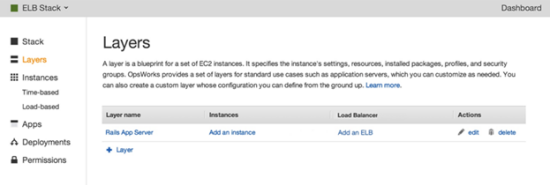
The final step is to hook the recipe into the application deployment. To do this, in the navigation pane, click Layers and then edit the Rails App Server layer settings:
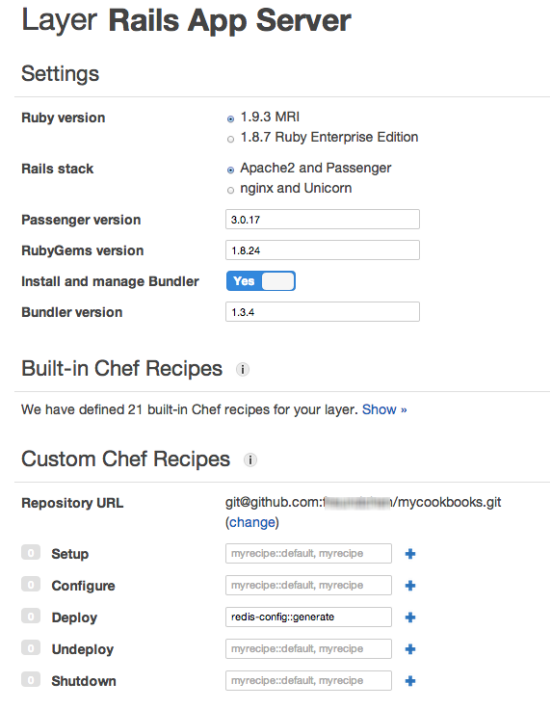
In the section Custom Chef recipes enter redis-config::generate in the Deploy text field and click the Plus symbol. Then click Save. This tells AWS OpsWorks that during deployment you want this recipe to be run. The pattern for recipe names is <cookbook_name>::<recipe_name>, so if you named your cookbook or your recipe differently in Step 3, make sure this matches the names you used.
This completes the setup within your AWS OpsWorks stack and you can now deploy your application by selecting Apps in the navigation pane, and clicking the Deploy link next to your app.
Once the deployment has completed, you can ssh into one of your Rails app servers to inspect the directory /srv/www/<your_app_name>/current/config and you should find the generated redis.yml.
You can now access this file from your application code. One way to do this would is to add the redis gem to your Gemfile and create a Rails initializer in config/initializers/redis.rb as follows:
REDIS_CONFIG = YAML::load_file(Rails.root.join('config', 'redis.yml')) $redis = Redis.new(:host => REDIS_CONFIG['host'], :port => REDIS_CONFIG['port'])
This would make the Redis instance accessible throughout your application code in the variable $redis, but the actual code you would use of course depends on what you want to do with Redis or which gem you plan to use.
Conclusion
In this blog post we demonstrated how you integrate a service like Amazon ElastiCache Redis into an AWS OpsWorks stack by making use of custom JSON and a custom Chef recipe. The basic approach of generating a custom configuration file, dynamically created during deployment, is easily transferable to other services you might want to integrate. If you are not using Rails, it should be easy to adapt the recipe to e.g. generate a different file format by changing the ERB template, or, if your application expects configuration in a different place, you can easily change that in the recipe.
Some Resources
Here are some resources to help you to get the most from AWS OpsWorks and Amazon ElastiCache:
- Amazon ElastiCache documentation
- Amazon ElastiCache – Now With a Dash of Redis
- Customizing AWS OpsWorks
- AWS OpsWorks community forum
- Redis documentation
- Opscode Chef documentation
— Enno Brehm
AWS OpsWorks in the Virtual Private Cloud
Chris Barclay sent me a nice guest post to announce that AWS OpsWorks is now available in the Virtual Private Cloud.
— Jeff;
I am pleased to announce support for using AWS OpsWorks with Amazon Virtual Private Cloud (Amazon VPC). AWS OpsWorks is a DevOps solution that makes it easy to deploy, customize and manage applications. OpsWorks provides helpful operational features such as user-based ssh management, additional CloudWatch metrics for memory and load, automatic RAID volume configuration, and a variety of application deployment options. You can optionally use the popular Chef automation platform to extend OpsWorks using your own custom recipes. With VPC support, you can now take advantage of the application management benefits of OpsWorks in your own isolated network. This allows you to run many new types of applications on OpsWorks.
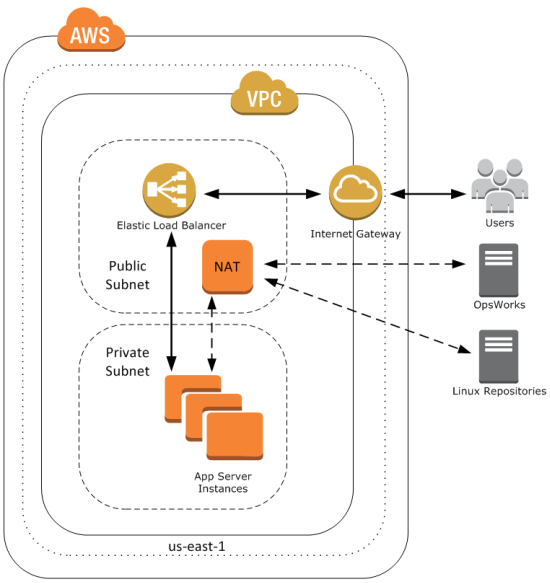
For example, you may want a configuration like the following, with your application servers in a private subnet behind a public Elastic Load Balancer (ELB). This lets you control access to your application servers. Users communicate with the Elastic Load Balancer which then communicates with your application servers through the ports you define. The NAT allows your application servers to communicate with the OpsWorks service and with Linux repositories to download packages and updates.
To get started, well first create this VPC. For a shortcut to create this configuration, you can use a CloudFormation template. First, navigate to the CloudFormation console and select Create Stack. Give your stack a name, provide the template URL http://cloudformation-templates-us-east-1.s3.amazonaws.com/OpsWorksinVPC.template and select Continue. Accept the defaults and select Continue. Create a tag with a key of Name and a meaningful value. Then create your CloudFormation stack.
When your CloudFormation stacks status shows CREATE_COMPLETE, take a look at the outputs tab; it contains several IDs that you will need later, including the VPC and subnet IDs.
You can now create an OpsWorks stack to deploy a sample app in your new private subnet. Navigate to the AWS OpsWorks console and click Add Stack. Select the VPC and private subnet that you just created using the CloudFormation template.

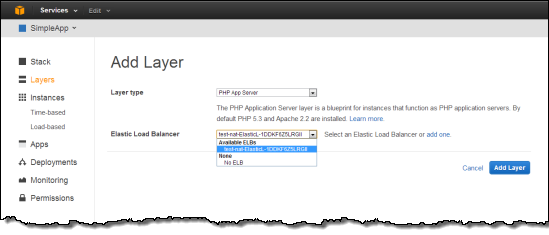
Next, under Add your first layer, click Add a layer. For Layer type box, select PHP App Server. Select the Elastic Load Balancer created in by the CloudFormation template to the Layer and then click Add layer.
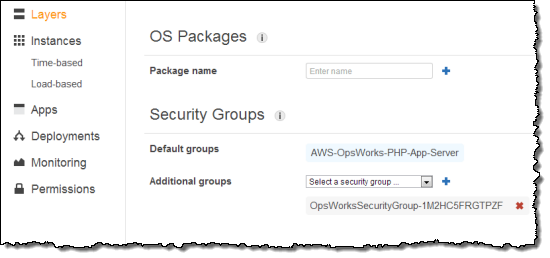
Next, in the layers Actions column click Edit. Scroll down to the Security Groups section and select the Additional Group with OpsWorksSecurityGroup in the name. Click the + symbol, then click Save.
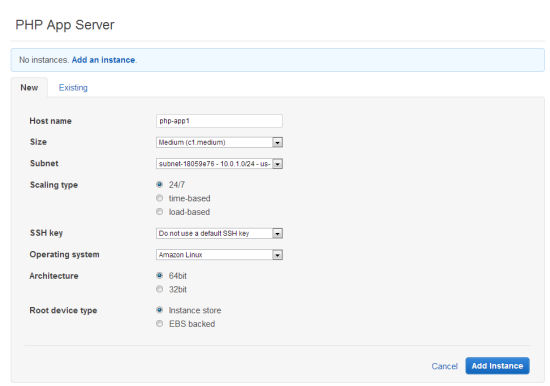
Next, in the navigation pane, click Instances, accept the defaults, and then click Add an Instance. This creates the instance in the default subnet you set when you created the stack.
Under PHP App Server, in the row that corresponds to your instance, click start in the Actions column.
You are now ready to deploy a sample app to the instance you created. An app represents code you want to deploy to your servers. That code is stored in a repository, such as Git or Subversion. For this example, we’ll use the SimplePHPApp application from the Getting Started walkthrough. First, in the navigation pane, click Apps. On the Apps page, click Add an app. Type a name for your app and scroll down to the Repository URL and set Repository URL to git://github.com/amazonwebservices/opsworks-demo-php-simple-app.git, and Branch/Revision to version1. Accept the defaults for the other fields.

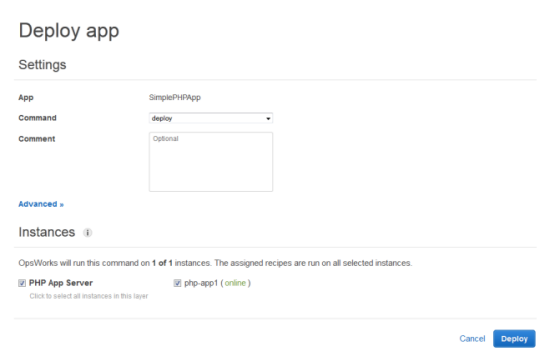
When all the settings are as you want them, click Add app. When you first add a new app, it isn’t deployed yet to the instances for the layer. To deploy your App to the instance in PHP App Server layer, under Actions, click Deploy.
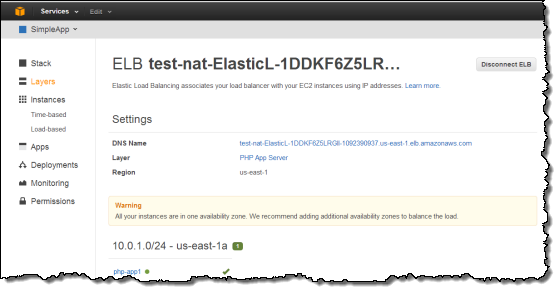
Once your deployment has finished, in the navigation pane, click Layers. Select the Elastic Load Balancer for your PHP App Server layer. The ELB page shows the load balancer’s basic properties, including its DNS name and the health status of the associated instances. A green check indicates the instance has passed the ELB health checks (this may take a minute). You can then click on the DNS name to connect to your app through the load balancer.
You can try these new features with a few clicks of the AWS Management Console. To learn more about how to launch OpsWorks instances inside a VPC, see the AWS OpsWorks Developer Guide.
You may also want to sign up for our upcoming AWS OpsWorks Webinar on September 12, 2013 at 10:00 AM PT. The webinar will highlight common use cases and best practices for how to set up AWS OpsWorks and Amazon VPC.
— Chris Barclay, Senior Product Manager
AWS OpsWorks Update – Custom AMIs and Chef 11 Support
My colleague Chris Barclay sent along a blog post with great news for users of AWS OpsWorks!
— Jeff;
We are happy to introduce two new features for AWS OpsWorks that make it easier for you to manage applications: support for custom Amazon Machine Images (AMIs) and Chef 11. You can use these new features with a few clicks of the AWS Management Console.
We have also added documentation that gives step-by-step instructions on how to use an Amazon RDS database with an OpsWorks stack.
Custom AMIs
Now you have two ways to manage the software that your application uses. Custom AMIs let you save the state of an Amazon EC2 instance including any software packages that you require in your desired configuration. Custom AMIs can give you faster boot times since the software is already installed. They can also provide greater control over installed packages and versions to simplify your development and QA process. OpsWorks continues to support Chef recipes that make it easy to dynamically install, configure, and update any software with a scripted installation. You can use both methods together to reduce boot times for components that change less frequently and make it easy to update dynamic components.
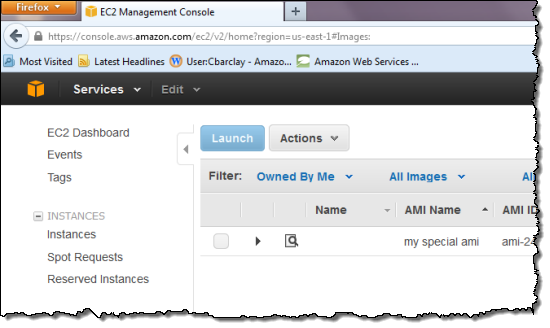
To get started, first create an AMI. The easiest way to create an AMI is from an existing Amazon EBS-Backed Amazon Linux or Ubuntu 12.04 LTS AMI. You can see how to do this in step 10 of the Getting Started documentation. For other AMI creation options, see the EC2 documentation. Your AMI should appear in the EC2 console as “Owned By Me:”
You can then choose one of your AMIs when you create an OpsWorks instance. Select “+ Instance” and open the “Advanced” options. Pull down the Operating System to select “Use Custom AMI:”
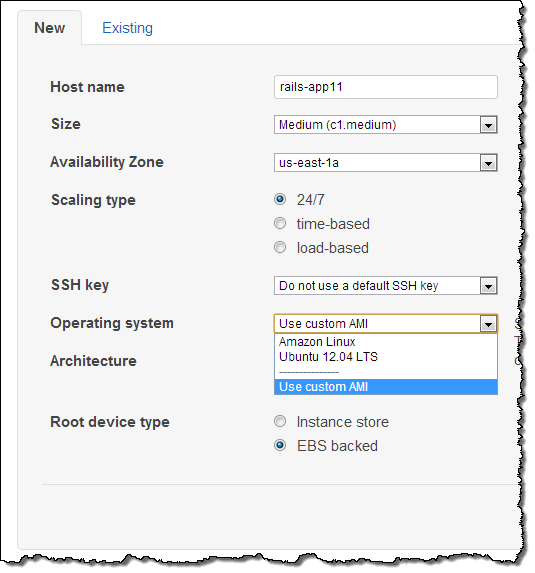
You can then select from a list of your custom AMIs:

Thats all it takes to add an AMI that youve created. You can customize your instance further by using the layer settings, and start the instance and deploy your software at any time.
Chef 11
With this update, you can use Chef 11 features in your recipes and a broader set of community cookbooks. New stacks will support Chef 11.4 by default and existing stacks can upgrade to Chef 11 with the click of a button.
OpsWorks Webinar
You may also want to sign up for our upcoming AWS OpsWorks Webinar on August 8, 2013 at 10:00 AM PDT. The webinar will highlight OpsWorks operational features and best practices including configuration options using custom AMIs and Chef 11 recipes.
— Chris Barclay, Senior Product Manager
AWS OpsWorks Update – Elastic Load Balancing, Monitoring View, More Instance Types
Chris Barclay of the AWS OpsWorks team has put together a really nice guest post to introduce you to three new AWS OpsWorks features.
— Jeff;
We are pleased to announce three new AWS OpsWorks features that make it even easier to manage your applications: Elastic Load Balancing support, a monitoring view of your stacks Amazon CloudWatch metrics, and support for additional Amazon EC2 instance types.
Elastic Load Balancing Support
…
You can now use Elastic Load Balancing to automatically distribute traffic across your applications instances. Some of the advantages of using Elastic Load Balancing with your OpsWorks applications are
- Elastic Load Balancing automatically scales its request handling capacity in response to incoming application traffic.
- Elastic Load Balancing spans multiple AZs for reliability, but provides a single DNS name for simplicity.
- Elastic Load Balancing metrics such as request count and request latency are reported by Amazon CloudWatch.
- SSL certificates are stored using IAM credentials, allowing you to control who can see your private keys.
To get started, once you have created your ELB in the EC2 console, simply add it to the layer you want to load balance, such as your Rails app server. The layer can have a fixed pool of instances or it can use instance-based scaling to grow the capacity based on load or time. OpsWorks automatically takes care of adding and removing the instances in your layer with the load balancer.
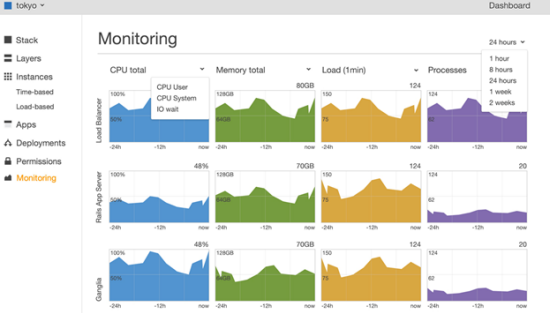
Monitoring View
The new monitoring view is a convenient way to see the status of the instances running your application. OpsWorks sends thirteen 1-minute metrics to CloudWatch for each instance, including CPU, memory and load. The metrics are automatically grouped and filtered by each layer in the stack. You can specify a time period, select a particular metric that you want to view, or drill down to specific instances to get a more detailed view.
Additional Instance Type Support
OpsWorks now supports EBS-backed EC2 instances to give you more instance types to choose for your development needs, including the AWS Free Usage Tier-eligible micro instance.
Go For It
You can use all of these new features with a few clicks of the AWS Management Console.
You may also want to sign up for our upcoming AWS OpsWorks Webinar (May 23 at 10:00 AM PST). In the webinar you will learn about key concepts and design patterns for continuous deployment and integration using technologies like AWS OpsWorks and Chef.
— Chris Barclay, Senior Product Manager
AWS OpsWorks – One Week Report
Its been an exciting first week for AWS OpsWorks.
We appreciate all the product feedback through Twitter, blogs, forums and email. We wanted to share a few common questions that were hearing and explain a little more about our plans for the service. We also invite you to join our Introduction to AWS OpsWorks webinar on March 18, 2013 for a hands-on look at the service.
First, a little more about AWS OpsWorks. As Werner mentioned in his blog, AWS OpsWorks is built on technology originally developed by Peritor, the creators of Scalarium, which was acquired by AWS in 2012. We launched the service with initial support for DevOps application modeling, control, and automation use cases. We plan to rapidly broaden the service by adding more layer types, support for more AWS services, and new features that make it easier for you to control and automate your applications.
Now, on to your questions. You can also see all of our FAQs online.
Q: Do you plan to add support for other layer types, such as Java or Postgres?
Yes, we plan to add built-in support for other layer types. Your feedback on the AWS forums will help us prioritize which ones we add first. Today, though, you can use the AWS OpsWorks custom layer feature to add just about any layer type, including leveraging the hundreds of community-supported Chef cookbooks.
Q: Do you plan to support AWS services such as Amazon VPC, Amazon RDS, and Elastic Load Balancing?
Yes, in addition to already supporting Amazon EC2, Amazon CloudWatch, and AWS IAM, we plan on integrating other AWS services and allowing you to manage them directly from AWS OpsWorks. Your feedback on the AWS forums will help us prioritize which ones we add first. Today, though, you can use Chef recipes within AWS OpsWorks to integrate your Stack with any AWS service. You can see an example of integrating with Amazon S3 in the documentation walk through.
Q: What operating systems does AWS OpsWorks support?
AWS OpsWorks currently supports Amazon Linux and Ubuntu 12.04 LTS. Your feedback on the AWS forums will help us prioritize which additional operating systems to add.
Q: Does AWS OpsWorks support custom AMIs?
No, not at this time. AWS OpsWorks supports the ability to add software to AMIs by defining additional operating system packages and Chef recipes per Layer. Let us know if you need support for your use case in the AWS forums.
Q: Does AWS OpsWorks support other configuration management solutions such as Puppet or CFEngine?
No, not at this time. Let us know if you need support for your use case in the AWS forums.
Q: Can AWS OpsWorks orchestrate changes using Chef recipes after an instance has booted?
Yes. AWS OpsWorks sends lifecycle events to distribute information about the environment, including application deployments, new instance starts, and other information that may be important to maintain your application’s configuration. For details please read the documentation on AWS OpsWorks Lifecycle Events.
— Chris Barclay, Senior Product Manager
PS – Check out the Getting Started With AWS OpsWorks video to see the product in action.
AWS OpsWorks – Flexible Application Management in the Cloud Using Chef
Its been over six years since we launched Amazon EC2. After that launch, weve delivered several solutions that make it easier for you to deploy and manage applications.
Two years ago we launched AWS CloudFormation to provide an easy way to create a collection of related AWS resources and provision them in an orderly and predictable fashion and AWS Elastic Beanstalk that allows users to quickly deploy and manage their applications in the AWS cloud. As our customers run more applications on AWS they are asking for more sophisticated tools to manage their AWS resources and automate how they deploy applications.
AWS OpsWorks features an integrated management experience for the entire application lifecycle including resource provisioning, configuration management, application deployment, monitoring, and access control. It will work with applications of any level of complexity and is independent of any particular architectural pattern.
AWS OpsWorks was designed to simplify the process of managing the application lifecycle without imposing arbitrary limits or forcing you to work within an overly constrained model. You have the freedom to design your application stack as you see fit.
You can use Chef Recipes to make system-level configuration changes and to install tools, utilities, libraries, and application code on the EC2 instance within your application. By making use of the AWS OpsWorks event model, you can activate the recipes of your choice at critical points in the lifecycle of your application. AWS OpsWorks has the power to install code from a wide variety of source code repositories.
There is no additional charge for AWS OpsWorks. You pay only for the AWS resources (EC2 instances, EBS volumes, and so forth) that your application uses.
AWS OpsWorks is available today and you can start using it now!
AWS OpsWorks Concepts
Let’s start out by taking a look at the most important AWS OpsWorks concepts.
An AWS OpsWorks Stack contains a set of Amazon EC2 instances and instance blueprints (which OpsWorks calls Layers) that are used to launch and manage the instances. Each Stack hosts one or more Applications. Stacks also serve as a container for the other user permissions and resources associated with the Apps. A Stack can also contain references to any number of Chef Cookbooks.
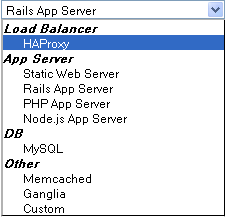
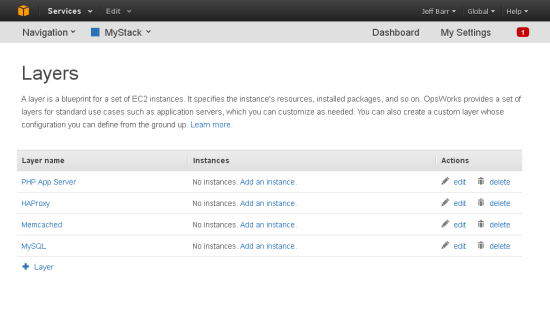
Each Stack contains a number of Layers. Each Layer specifies the setup and configuration of a set of EC2 instances and related AWS resources such as EBS Volumes and Elastic IP Addresses. We’ve included Layers for a number of common technologies including Ruby, PHP, Node.js, HAProxy, Memcached, and MySQL. You can extend these Layers for your own use, or you can create custom Layers from scratch. You can also activate the Chef Recipes of your choice in response to specific events (Setup, Configure, Deploy, Undeploy, and Shutdown).
 AWS OpsWorks installs Applications on the EC2 instances by pulling the code from one or more code repositories. You can indicate that the code is to be pulled from a Git or Subversion repository, fetched via an HTTP request, or downloaded from an Amazon S3 bucket.
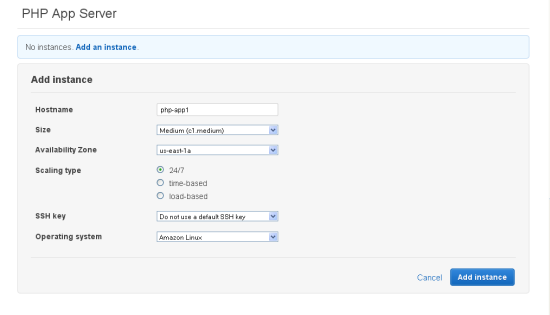
After you have defined a Stack, its Layers, and its Applications, you can create EC2 instances and assign them to specific Layers. You can launch the instances manually, or you can define scaling based on load or by time. Either way, you have full control over the instance type, Availability Zone, Security Group(s), and operating system. As the instances launch, they will be configured to your specifications using the Recipes that you defined for the Layer that contains the instance.
AWS OpsWorks will monitor your instances and report metrics to Amazon CloudWatch (you can also use Ganglia if you’d like). It will automatically replaced failed instances with fully configured fresh ones.
You can create and manage your AWS OpsWorks Stacks using the AWS Management Console]. You can also use it via the OpsWorks API.
AWS OpsWorks in Action
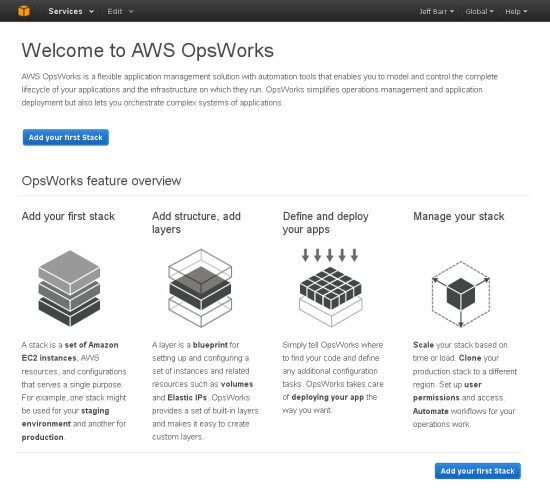
Let’s take a quick look at the AWS OpsWorks Console. The welcome page provides you with a handy overview of the steps you’ll take to get started:
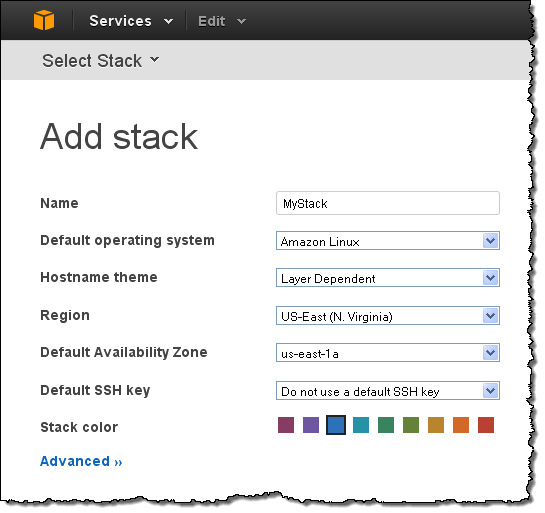
Start out by adding a Stack. You have full control of the Region and the default Availability Zone. You can specify a naming scheme for the EC2 instances in the Stack and you can even select a color to help you distinguish your Stacks:
AWS OpsWorks will assign a name to each EC2 instance that it launches. You can select one of the following themes for the names:

You can add references to one or more Chef Cookbooks:
Now you can add Layers to your Stack:
You can choose one of the predefined Layer types or you can create your own custom Layer using community cookbooks for software like PostgreSQL, Solr, and more:
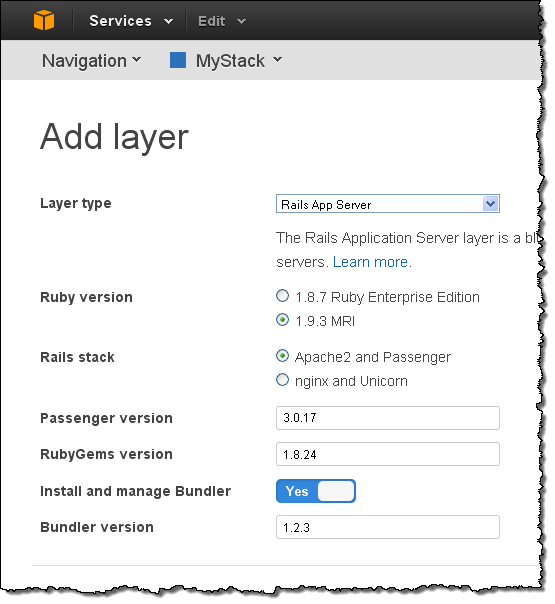
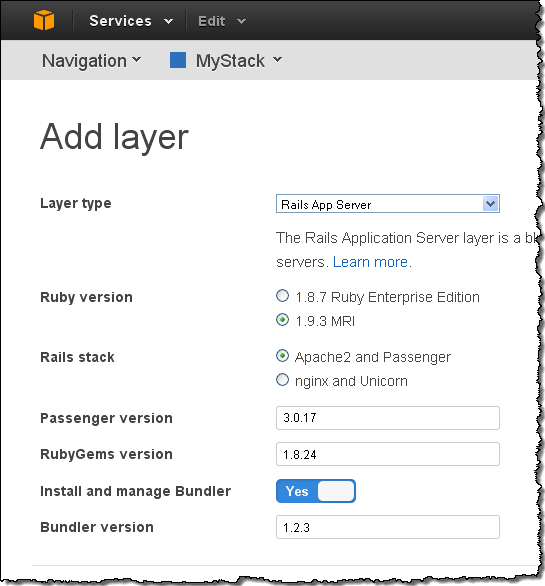
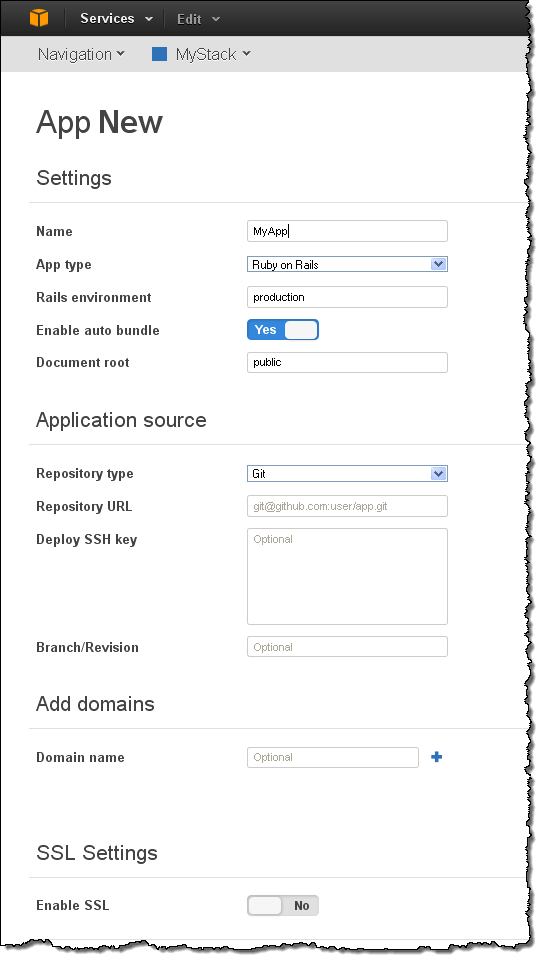
When you add a Layer of a predefined type, you have the opportunity to customize the settings as appropriate. For example, here’s what you can customize if you choose to use the Ruby on Rails Layer:
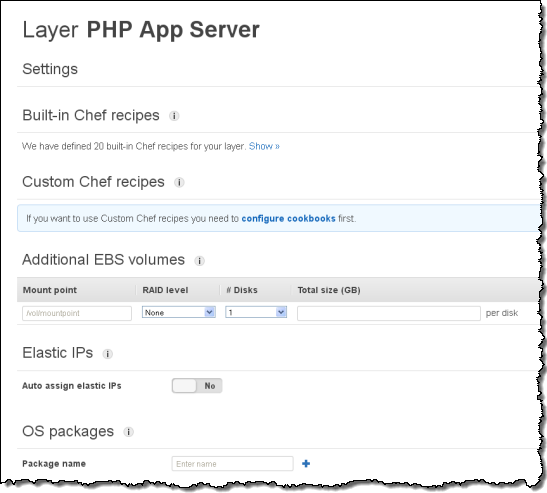
You can add custom Chef Recipes and any additional software packages to your Layer. You can also ask for EBS Volumes or Elastic IP Addresses and you can configure RAID mount points:
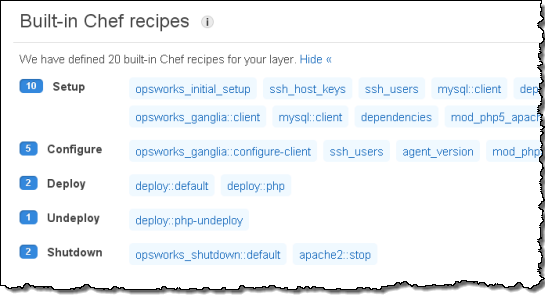
You can see the built-in Chef recipes that AWS OpsWorks includes. You can also add your own Chef Recipes for use at various points in the application lifecycle. Here are the built-in Recipes included with the PHP Layer:
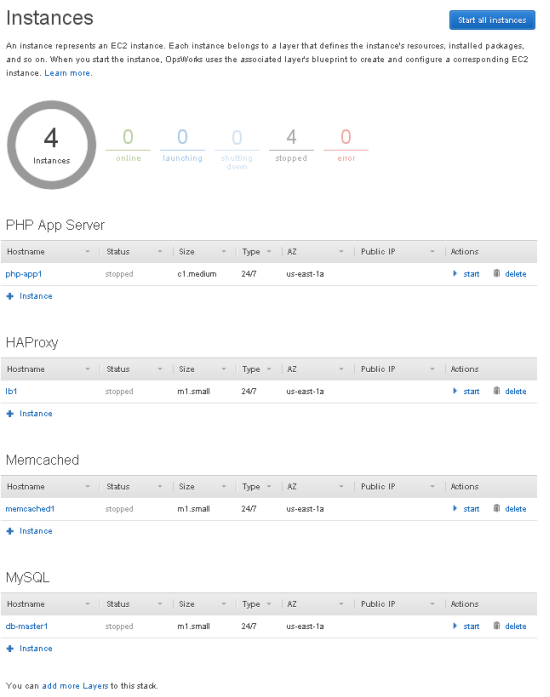
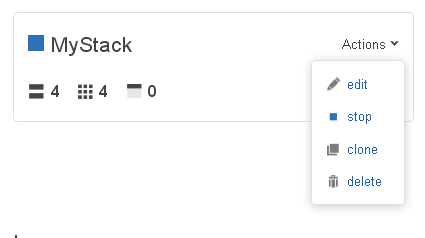
Here’s what my Stack looks like after adding four layers (yours will look different, depending on the number and type of Layers you choose to add):
Applications are your code. You can add one or more Applications to the Stack like this. Your options (and this screen) will vary based on the type of application that you add:
With the Stack, the Layers, and the Applications defined, it is time to add EC2 instances to each Layer. As I noted earlier, you can add a fixed number of instances to a Layer or you can use time or load-based scaling, as appropriate for your application:
You can define time-based scaling in a very flexible manner. You can use the same scaling pattern for each day of the week or you can define patterns for particular days, or you can mix and match:
With everything defined, you can start all of the instances with a single click (you can also control them individually if you’d like):
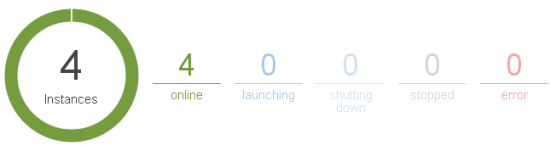
Your instances will be up and running before long:
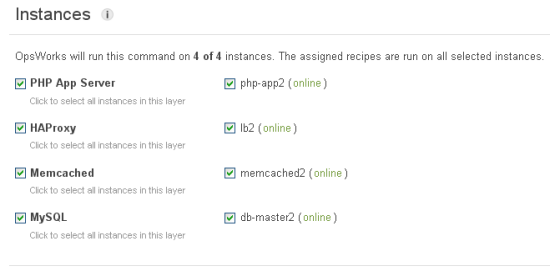
Then you can deploy your Applications to the instances:
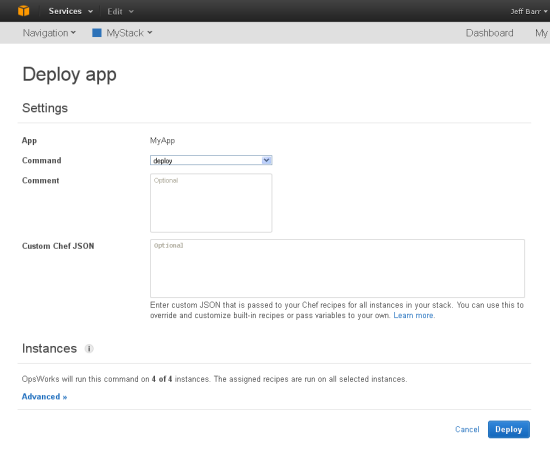
You have the ability to control exactly which instances receive each deployment. AWS OpsWorks pulls the code from your repository and runs the deploy recipes on each of the selected instances to configure all the layers of your app. Heres how it works. When you deploy an app, you might have a recipe on your database Layer that performs a specific configuration task, such as creating a new table. The recipes on your Layers let you to simplify the configuration steps across all the resources in your application with a single action.
Of course, there are times that you may need to get onto the instances. AWS OpsWorks helps here, too. You can configure SSH keys for each IAM user as well as configure which IAM users can use sudo.
At the top level of AWS OpsWorks, you can manage the entire Stack with a couple of clicks:
I hope that you have enjoyed this tour of AWS OpsWorks. I’ve shown you the highlights; there’s even more functionality that you’ll discover over time as you get to know the product.
AWS OpsWorks Demo
Watch this short (5 minute) video to see a demo of AWS OpsWorks:
Getting Started
 As always, we have plenty of resources to get you going:
Looking Ahead
Today, OpsWorks provides full control of software on EC2 instances and lets you use Chef recipes to integrate with AWS resources such as S3 and Amazon RDS. Moving forward, we plan to introduce integrated support for additional AWS resource types to simplify the management of layers that dont require deep control. As always, your feedback will help us to prioritize our development effort.
What Do You Think?
I invite you to give AWS OpsWorks a whirl and let me know what you think. Feel free to leave a comment!
— Jeff;
PS – Don’t forget to read Werner’s take on OpsWorks – Expanding the Cloud – Introducing AWS OpsWorks, a Powerful Application Management Solution.