Category: Amazon VPC
AWS Direct Connect Update – Link Aggregation Groups, Bundles, and re:Invent Recap
AWS Direct Connect helps our large-scale customers to create private, dedicated network connections to their office, data center, or colocation facility. Our customers create 1 Gbps and 10 Gbps connections in order to reduce their network costs, increase data transfer throughput, and to get a more consistent network experience than is possible with an Internet-based connection.
Today I would like to tell you about a new Link Aggregation feature for Direct Connect. I’d also like to tell you about our new Direct Connect Bundles and to tell you more about how we used Direct Connect to provide a first-class customer experience at AWS re:Invent 2016.
Link Aggregation Groups
Some of our customers would like to set up multiple connections (generally known as ports) between their location and one of the 46 Direct Connect locations. Some of them would like to create a highly available link that is resilient in the face of network issues outside of AWS; others simply need more data transfer throughput.
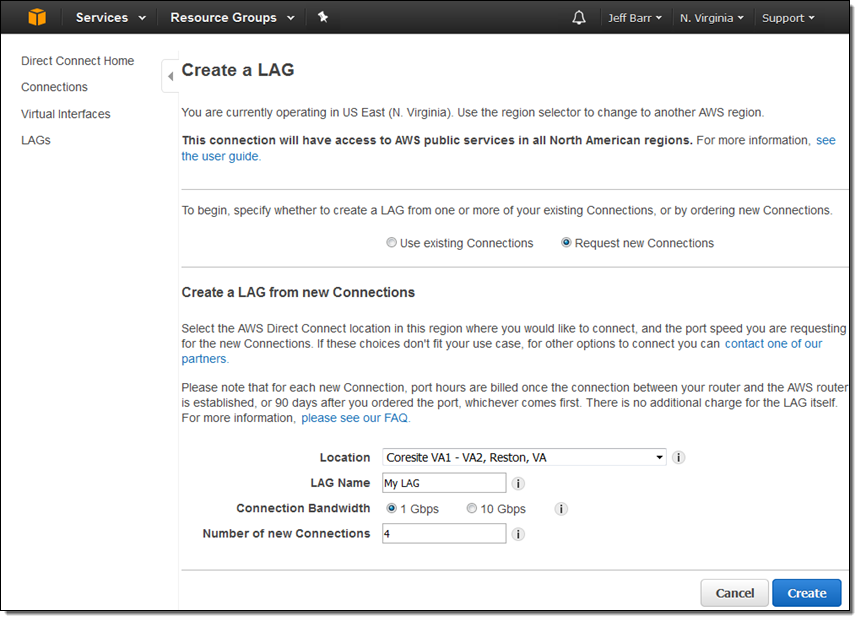
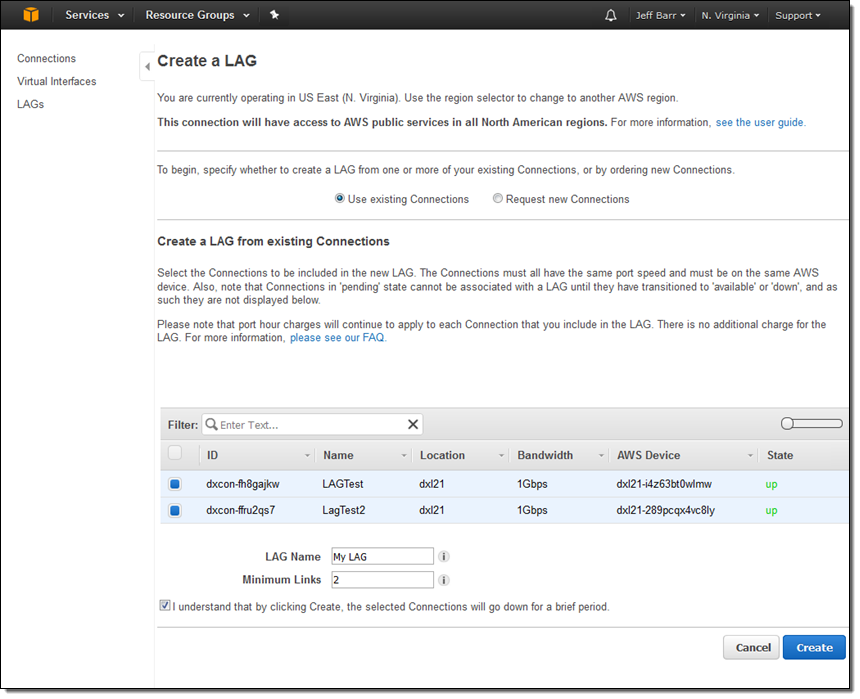
In order to support this important customer use case, you can now purchase up to 4 ports and treat them as a single managed connection, which we call a Link Aggregation Group or LAG. After you have set this up, traffic is load-balanced across the ports at the level of individual packet flows. All of the ports are active simultaneously, and are represented by a single BGP session. Traffic across the group is managed via Dynamic LACP (Link Aggregation Control Protocol – or ISO/IEC/IEEE 8802-1AX:2016). When you create your group, you also specify the minimum number of ports that must be active in order for the connection to be activated.
You can order a new group with multiple ports and you can aggregate existing ports into a new group. Either way, all of the ports must have the same speed (1 Gbps or 10 Gbps).
All of the ports in a group will connect to the same device on the AWS side. You can add additional ports to an existing group as long as there’s room on the device (this information is now available in the Direct Connect Console). If you need to expand an existing group and the device has no open ports, you can simply order a new group and migrate your connections.
Here’s how you can make use of link aggregation from the Console. First, creating a new LAG from scratch:
And second, creating a LAG from existing connections:
Link Aggregation Groups are now available in the US East (Northern Virginia), US West (Northern California), US East (Ohio), US West (Oregon), Canada (Central), South America (São Paulo), Asia Pacific (Mumbai), and Asia Pacific (Seoul) Regions and you can create them today. We expect to make them available in the remaining regions by the end of this month.
Update – we announced availability in the AWS GovCloud (US), EU (London), EU (Ireland), Asia Pacific (Tokyo), Asia Pacific (Singapore), and Asia Pacific (Sydney) Regions at the end of February.
Direct Connect Bundles
We announced some powerful new Direct Connect Bundles at re:Invent 2016. Each bundle is an advanced, hybrid reference architecture designed to reduce complexity and to increase performance. Here are the new bundles:
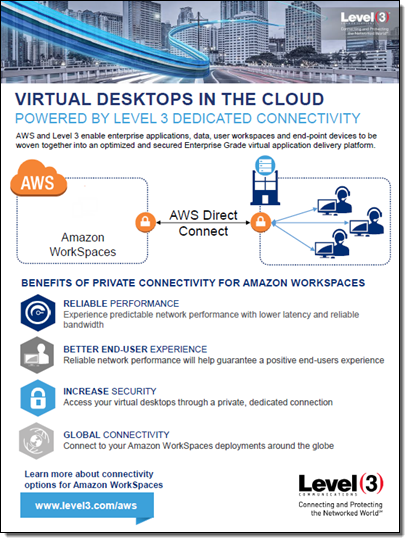
Level 3 Communications Powers Amazon WorkSpaces – Connects enterprise applications, data, user workspaces, and end-point devices to offer reliable performance and a better end-user experience:
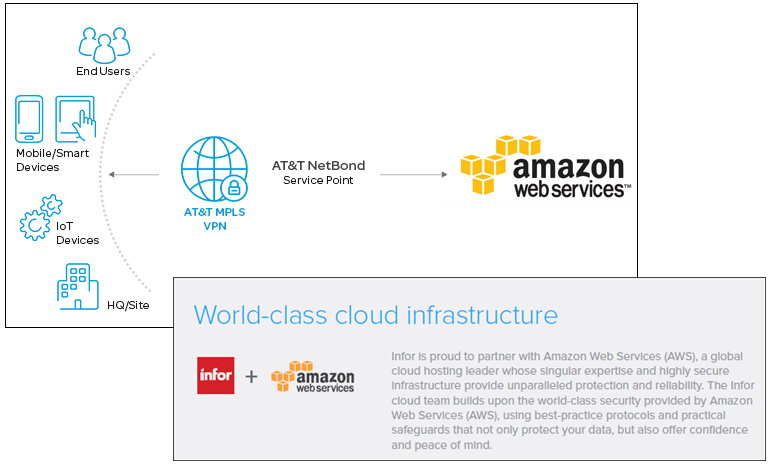
 SaaS Architecture enhanced by AT&T NetBond – Enhances quality and user experience for applications migrated to the AWS Cloud:
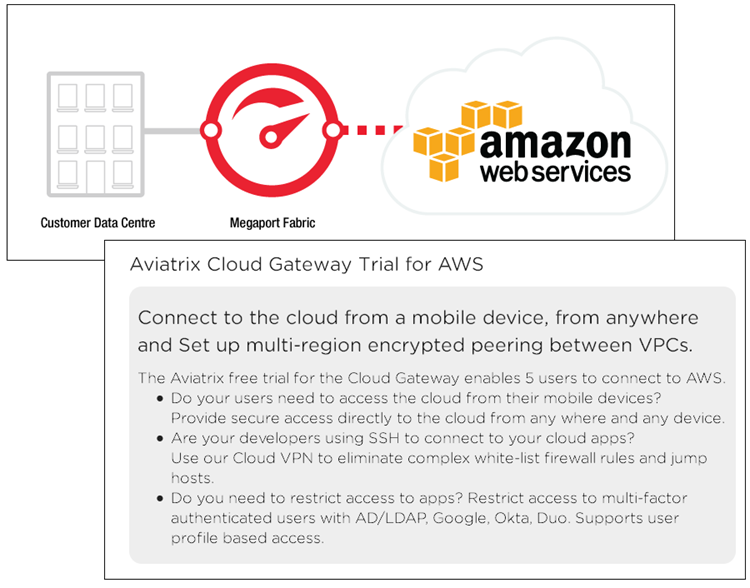
Aviatrix User Access Integrated with Megaport DX – Supports encrypted connectivity between AWS Cloud Regions, between enterprise data centers and AWS, and on VPN access to AWS:
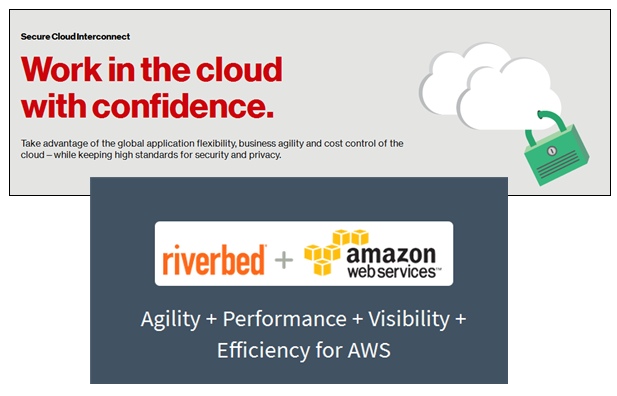
 Riverbed Hybrid SDN/NFV Architecture over Verizon Secure Cloud Interconnect – Allows enterprise customers to provide secure, optimized access to AWS services in a hybrid network environment:
 Direct Connect at re:Invent 2016
In order to provide a top-notch experience for attendees and partners at re:Invent, we worked with Level 3 to set up a highly available and fully redundant set of connections. This network was used to support breakout sessions, certification exams, the hands-on labs, the keynotes (including the live stream to over 25,000 viewers in 122 countries), the hackathon, bootcamps, and workshops. The re:Invent network used four 10 Gbps connections, two each to US West (Oregon) and US East (Northern Virginia):
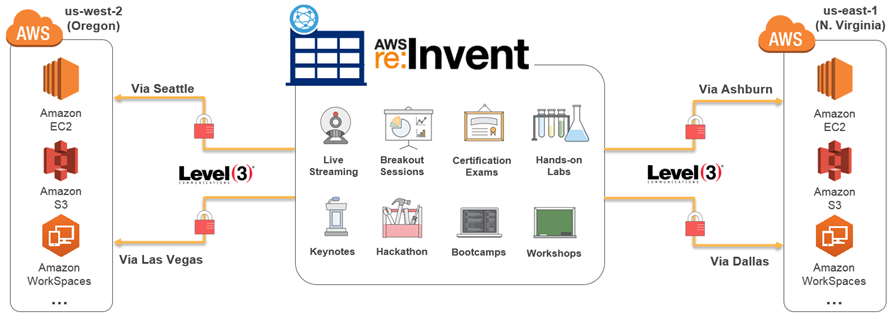
It supported all of the re:Invent venues:

Here are some video resources that will help you to learn more about how we did this, and how you can do it yourself:
- NET205 – Future-Proofing the WAN and Simplifying Security On the way to Cloud (slides).
- NET305 – Extending Data Centers to the Cloud (slides).
- NET402 – Deep Dive: AWS Direct Connect and VPNs (slides).
— Jeff;
User Network-to-Amazon VPC Connectivity for Applications Hosted on AWS
With so much going on at AWS, we often hear from readers asking for ways to help them make more informed decisions, or put together examples for their planning processes. Joining us today is Jim Carroll, a Sr. Category Leader with Amazon Marketplace to talk about AWS Networking services and solutions in the AWS Marketplace.
-Ana
Last month we announced the new AWS Region in London. This new region expands our global infrastructure and provides our partners and customers with even more geographic options to cost-effectively scale and meet compliance and data residency requirements. This announcement is fresh in my mind because of conversations I’ve had recently with our customers about the AWS networking services and solutions in AWS Marketplace that they leverage to connect their corporate network to their virtual private network on the AWS Cloud.
Customers typically deploy this architecture with AWS in order to support one or a combination of business needs:
- Migrate applications to the AWS Cloud over time
- Quickly and cost-effectively scale their network for branch office and remote connectivity, improving end user experience while migrating applications to the AWS Cloud
- Ensure compliance and data residency requirements are met
Today, I will overview the VPN options available to customers with these business needs, to help simplify their decision-making. With Amazon VPC, you can configure an AWS managed VPN, use private circuit connectivity with AWS Direct Connect, and enable third-party networking software on your VPC for VPN connectivity. You may also choose a client-to-site VPN that allows users to directly access AWS from their desktop or mobile devices.
Steve Morad’s 2014 whitepaper, Amazon Virtual Private Cloud Connectivity Options, provides an overview of the remote network-to-Amazon VPC connectivity options. The table below summarizes these insights, followed by considerations for selecting an AWS managed VPN or a user-managed software VPN end-point in your virtual network on AWS. This discussion contains information from Morad’s whitepaper.
| User Network–to–Amazon VPC Connectivity Options | |
| AWS Managed VPN | IPsec VPN connection over the Internet |
| AWS Direct Connect | Dedicated network connection over private lines |
| AWS Direct Connect + VPN | IPsec VPN connection over private lines |
| AWS VPN CloudHub | Connect remote branch offices in a hub-and-spoke model for primary or backup connectivity |
| Software VPN | Software appliance-based VPN connection over the Internet |
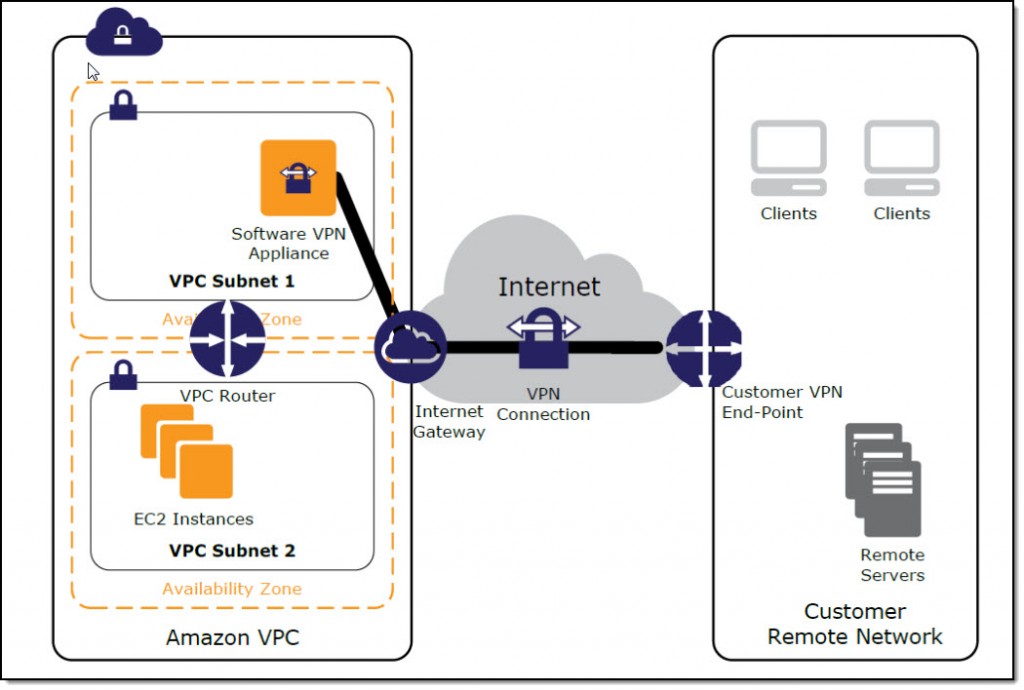
AWS Managed VPN
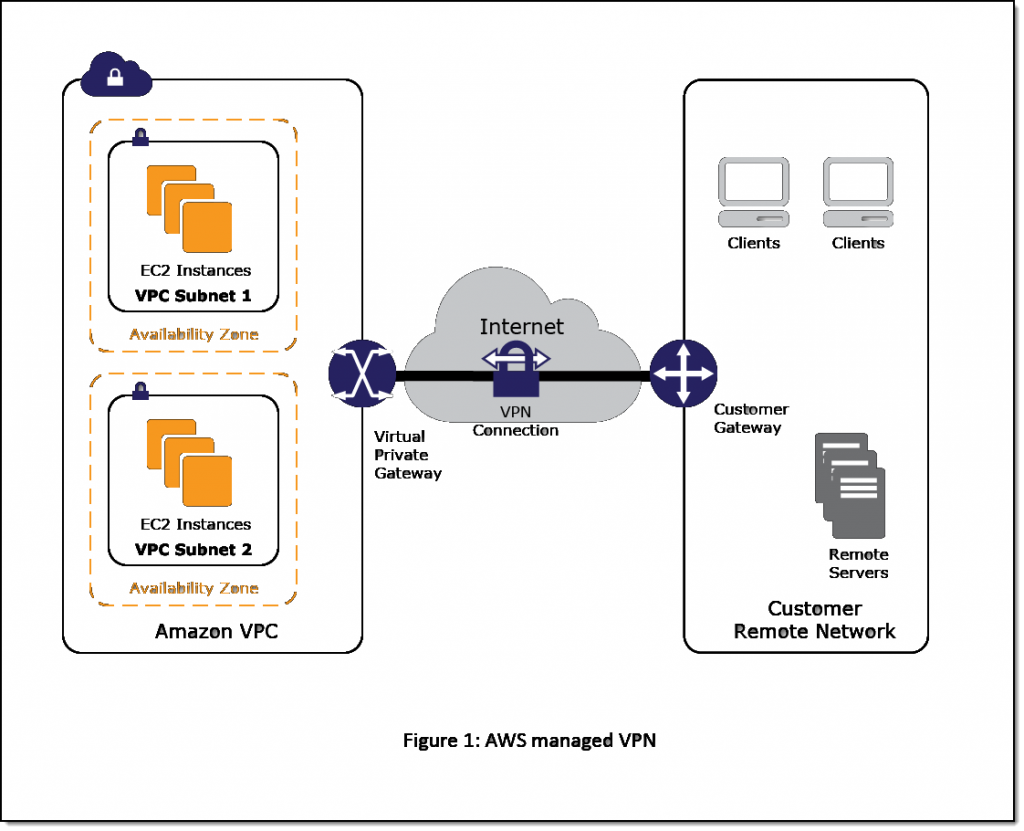
This approach enables you to take advantage of an AWS-managed VPN endpoint that includes automated multi–data center redundancy and failover built into the AWS side of the VPN connection. Both dynamic and static routing options are provided to give you flexibility in your routing configuration. Figure 1 illustrates.
AWS managed VPN considerations:
- Although not shown, the Amazon virtual private gateway represents two distinct VPN endpoints, physically located in separate data centers to increase the availability of your VPN connection.
- Both dynamic and static routing options are provided to give you flexibility in your routing configuration.
- Dynamic routing leverages Border Gateway Protocol (BGP) peering to exchange routing information between AWS and these remote endpoints.
- With dynamic routing, you can also specify routing priorities, policies, and weights (metrics) in your BGP advertisements and influence the path between your network(s) and AWS.
- When using dynamic routing, routes advertised via BGP can be propagated into selected routing tables, making it easier to advertise new routes to AWS.
Software VPN
This option utilizes a software VPN appliance that runs on a single Amazon EC2 instance connecting to your remote network. This option requires that you manage both sides of your Amazon VPC connectivity, including managing the software appliance, configuration, patches, and upgrades.
This option is recommended if you must manage both ends of the VPN connection. Considerations:
- Compliance: You may need to use this approach for compliance and data residency requirements in your hybrid network architecture. IT security and privacy regulations govern specific industries and require your IT infrastructure, including your network, to meet certain government standards.
- Gateway device support: Customers with gateway devices that are not currently supported by the Amazon managed VPN solution, choose to deploy a Software VPN in order to leverage existing on-premises investments. The list of supported gateway devices is located here.
- Networking infrastructure solutions in AWS Marketplace: You can easily extend your on-premises networking infrastructure software with pre-configured and customizable AMIs from popular software vendors on AWS Marketplace.
Example of HA Architecture for Software VPN Instances
Creating a fully resilient VPC connection for software VPN instances requires the setup and configuration of multiple VPN instances and a monitoring instance to track the health of the VPN connections.
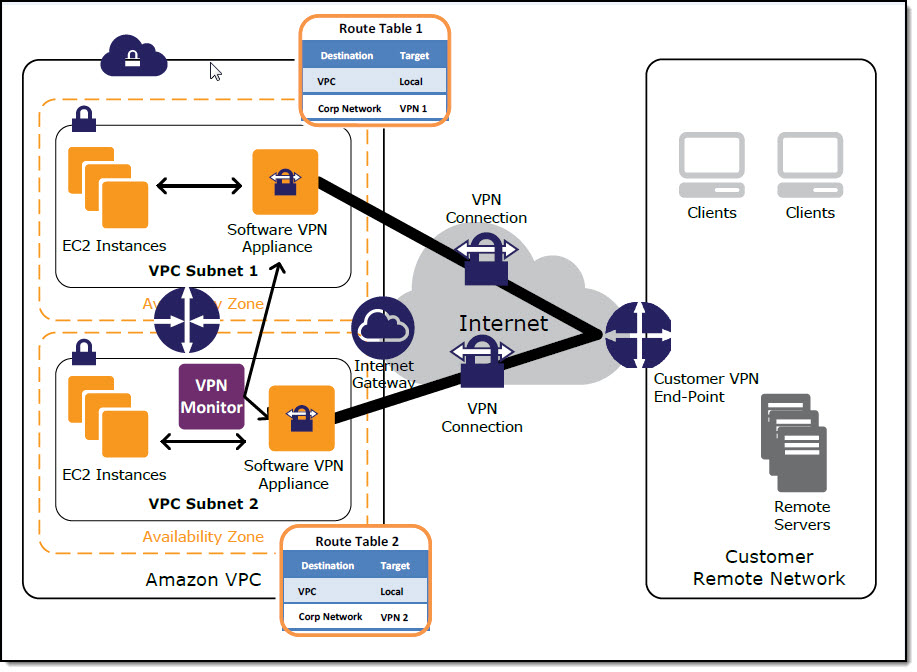
Figure 3: High-Level HA Design
We recommend configuring your VPC route tables to leverage all VPN instances simultaneously by directing traffic from all of the subnets in one Availability Zone through its respective VPN instances in the same Availability Zone. Each VPN instance will then provide VPN connectivity for instances that share the same Availability Zone. The white paper provides more information and considerations.
By leveraging networking infrastructure solutions from popular vendors such as Brocade and Cisco in AWS Marketplace, you can take full advantage of existing investments in on-premises systems and thecloud to meet your unique business challenges.
-Jim Carroll
AWS IPv6 Update – Global Support Spanning 15 Regions & Multiple AWS Services
We’ve been working to add IPv6 support to many different parts of AWS over the last couple of years, starting with Elastic Load Balancing, AWS IoT, AWS Direct Connect, Amazon Route 53, Amazon CloudFront, AWS WAF, and S3 Transfer Acceleration, all building up to last month’s announcement of IPv6 support for EC2 instances in Virtual Private Clouds (initially available for use in the US East (Ohio) Region).
Today I am happy to share the news that IPv6 support for EC2 instances in VPCs is now available in a total of fifteen regions, along with Application Load Balancer support for IPv6 in nine of those regions.
You can now build and deploy applications that can use IPv6 addresses to communicate with servers, object storage, load balancers, and content distribution services. In accord with the latest guidelines for IPv6 support from Apple and other vendors, your mobile applications can now make use of IPv6 addresses when they communicate with AWS.
IPv6 Now in 15 Regions
IPv6 support for EC2 instances in new and existing VPCs is now available in the US East (Northern Virginia), US East (Ohio), US West (Northern California), US West (Oregon), South America (São Paulo), Canada (Central), EU (Ireland), EU (Frankfurt), EU (London), Asia Pacific (Tokyo), Asia Pacific (Singapore), Asia Pacific (Seoul), Asia Pacific (Sydney), Asia Pacific (Mumbai), and AWS GovCloud (US) Regions and you can start using it today!
You can enable IPv6 from the AWS Management Console when you create a new VPC:
Application Load Balancer
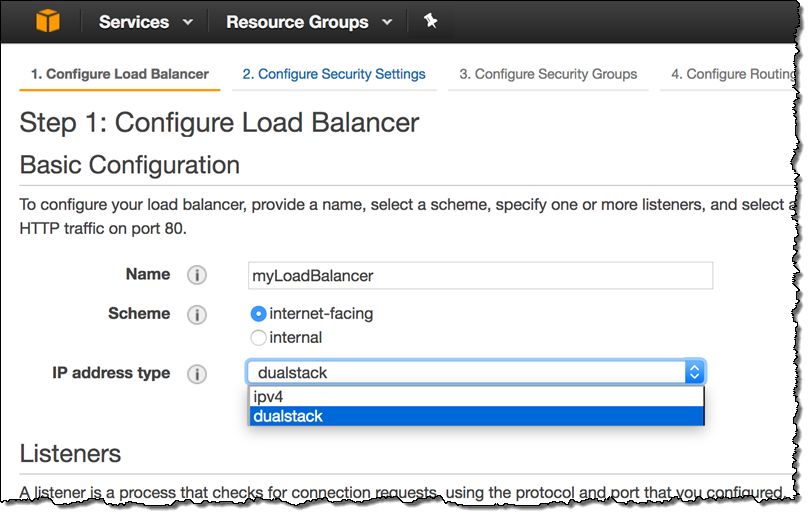
Application Load Balancers in the US East (Northern Virginia), US West (Northern California), US West (Oregon), South America (São Paulo), EU (Ireland), Asia Pacific (Tokyo), Asia Pacific (Singapore), Asia Pacific (Sydney), and AWS GovCloud (US) Regions now support IPv6 in dual-stack mode, making them accessible via IPv4 or IPv6 (we expect to add support for the remaining regions within a few weeks).
Simply enable the dualstack option when you configure the ALB and then make sure that your security groups allow or deny IPv6 traffic in accord with your requirements. Here’s how you select the dualstack option:
You can also enable this option by running the set-ip-address-type command or by making a call to the SetIpAddressType function. To learn more about this new feature, read the Load Balancer Address Type documentation.
IPv6 Recap
Here are the IPv6 launches that we made in the run-up to the launch of IPv6 support for EC2 instances in VPCs:
CloudFront, WAF, and S3 Transfer Acceleration – This launch let you enable IPv6 support for individual CloudFront distributions. Newly created distributions supported IPv6 by default and existing distributions could be upgraded with a couple of clicks (if you using Route 53 alias records, you also need to add an AAAA record to the domain). With IPv6 support enabled, the new addresses will show up in the CloudFront Access Logs. The launch also let you use AWS WAF to inspect requests that arrive via IPv4 or IPv6 addresses and to use a new, dual-stack endpoint for S3 Transfer Acceleration.
Route 53 – This launch added support for DNS queries over IPv6 (support for the requisite AAAA records was already in place). A subsequent launch added support for Health Checks of IPv6 Endpoints, allowing you to monitor the health of the endpoints and to arrange for DNS failover.
IoT – This product launch included IPv6 support for message exchange between devices and AWS IoT.
S3 – This launch added support for access to S3 buckets via dual-stack endpoints.
Elastic Load Balancing – This launch added publicly routable IPv6 addresses for Elastic Load Balancers.
Direct Connect – Supports single and dualstack configurations on public and private VIFs (virtual interfaces).
— Jeff;
New – IPv6 Support for EC2 Instances in Virtual Private Clouds
Update (7/13/2017): Since this post was published, IPv6 supported has been extended and now supports 15 Regions and Multiple AWS Services.
The continued growth of the Internet, particularly in the areas of mobile applications, connected devices, and IoT, has spurred an industry-wide move to IPv6. In accord with a mandate that dates back to 2010, United States government agencies have been working to move their public-facing servers and services to IPv6 as quickly as possible. With 128 bits of address space, IPv6 has plenty of room for growth and also opens the door to new applications and new use cases.
IPv6 for EC2
Earlier this year we launched IPv6 support for S3 (including Transfer Acceleration), CloudFront, WAF, and Route 53. Today we are taking the next big step forward with the launch of IPv6 support for Virtual Private Cloud (VPC) and EC2 instances running in a VPC. This support is launching today in the US East (Ohio) Region and is in the works for the others.
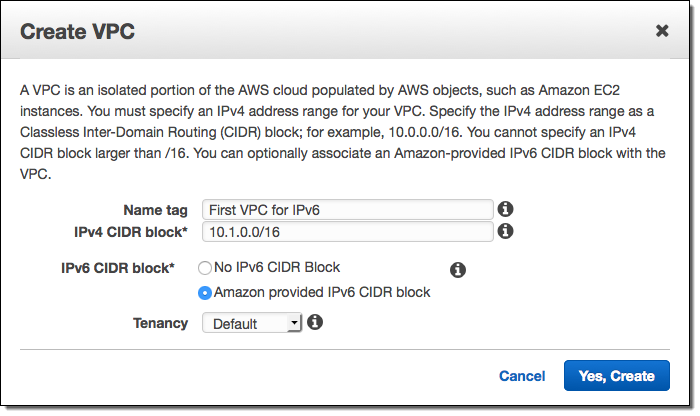
IPv6 support works for new and existing VPCs; you can opt in on a VPC-by-VPC basis by simply checking a box on the Console (API and CLI support is also available):
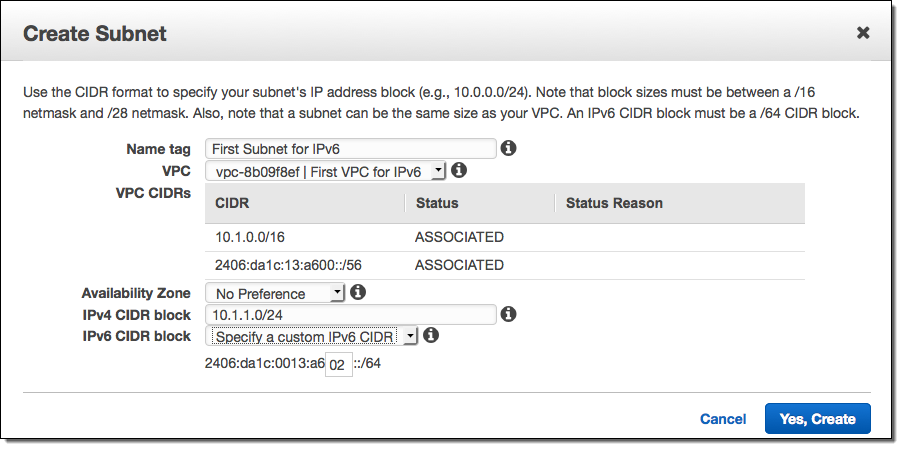
Each VPC is given a unique /56 address prefix from within Amazon’s GUA (Global Unicast Address); you can assign a /64 address prefix to each subnet in your VPC:
As we did with S3, we make use of a dual-stack model that assigns each instance an IPv4 address and an IPv6 address, along with corresponding DNS entries. Support for both versions of the protocol ensures compatibility and flexibility to access resources and applications.
Security Groups, Route Tables, Network ACLs, VPC Peering, Internet Gateway, Direct Connect, VPC Flow Logs, and DNS resolution within a VPC all operate in the same way as today. Application Load Balancer support for the dual-stack model is on the near-term roadmap and I’ll let you know as soon as it is available.
IPv6 Support for Direct Connect
The Direct Connect Console lets you create virtual interfaces (VIFs) with your choice of IPv4 or IPv6 addresses:
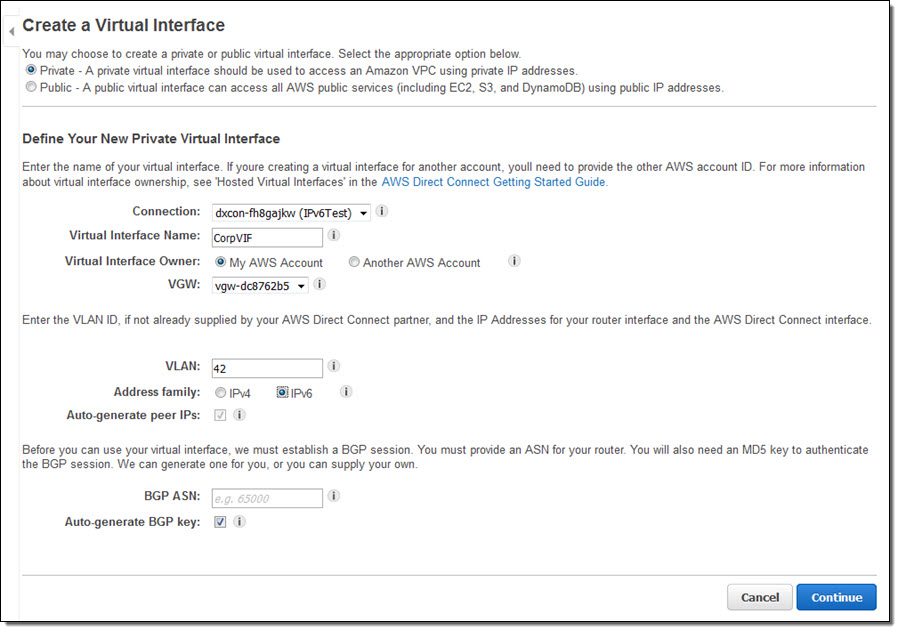
Each VIF supports one BGP peering session over IPv4 and one BGP peering session over IPv6.
New Egress-Only Internet Gateway for IPv6
One of the interesting things about IPv6 is that every address is internet-routable and can talk to the Internet by default. In an IPv4-only VPC, assigning a public IP address to an EC2 instance sets up 1:1 NAT (Network Address Translation) to a private address that is associated with the instance. In a VPC where IPv6 is enabled, the address associated with the instance is public. This direct association removes a host of networking challenges, but it also means that you need another mechanism to create private subnets.
As part of today’s launch, we are introducing a new Egress-Only Internet Gateway (EGW) that you can use to implement private subnets for your VPCs. The EGW is easier to set up and to use than a fleet of NAT instances, and is available to you at no cost. It allows you to block incoming traffic while still allowing outbound traffic (think of it as an Internet Gateway mated to a Security Group). You can create an EGW in all of the usual ways, and use it to impose restrictions on inbound IPv6 traffic. You can continue to use NAT instances or NAT Gateways for IPv4 traffic.
Available Now
IPv6 support for EC2 is now available in the US East (Ohio) Region and you can start using it today at no extra charge. It works with all current-generation EC2 instance types with the exception of M3 and G2, and will be supported on upcoming instance types as well.
IPv6 support for other AWS Regions is in works and I’ll let you know (most likely via a tweet), just as soon as it is ready!
— Jeff;
AWS Solution – Transit VPC
Today I would like to tell you about a new AWS Solution. This one is cool because of what it does and how it works! Like the AWS Quick Starts, this one was built by AWS Solutions Architects and incorporates best practices for security and high availability.
The new Transit VPC Solution shows you how to implement a very useful networking construct that we call a transit VPC. You can use this to connect multiple Virtual Private Clouds (VPCs) that might be geographically disparate and/or running in separate AWS accounts, to a common VPC that serves as a global network transit center. This network topology simplifies network management and minimizes the number of connections that you need to set up and manage. Even better, it is implemented virtually and does not require any physical network gear or a physical presence in a colocation transit hub. Here’s what this looks like:
![]()
In this diagram, the transit VPC is central, surrounded by additional “spoke” VPCs, corporate data centers, and other networks.
The transit VPC supports several important use cases:
- Private Networking – You can build a private network that spans two or more AWS Regions.
- Shared Connectivity – Multiple VPCs can share connections to data centers, partner networks, and other clouds.
- Cross-Account AWS Usage – The VPCs and the AWS resources within them can reside in multiple AWS accounts.
The solution uses a AWS CloudFormation stack to launch and configure all of the AWS resources. It provides you with three throughput options ranging from 500 Mbps to 2 Gbps, each implemented over a pair of connections for high availability. The stack makes use of the Cisco Cloud Services Router (CSR), which is now available in AWS Marketplace. You can use your existing CSR licenses (the BYOL model) or you can pay for your CSR usage on an hourly basis. The cost to run a transit VPC is based on the throughput option and licensing model that you choose, and ranges from $0.21 to $8.40 per hour, with an additional cost (for AWS resources) of $0.10 per hour for each spoke VPC. There’s an additional cost of $1 per month for a AWS Key Management Service (KMS) customer master key that is specific to the solution. All of these prices are exclusive of network transit costs.
The template installs and uses a pair of AWS Lambda functions in a creative way!
The VGW Poller function runs every minute. It scans all of the AWS Regions in the account, looking for appropriately tagged Virtual Private Gateways in spoke VPCs that do not have a VPN connection. When it finds one, it creates (if necessary) the corresponding customer gateway and the VPN connections to the CSR, and then saves the information in an S3 bucket.
The Cisco Configurator function is triggered by the Put event on the bucket. It parses the VPN connection information and generates the necessary config files, then pushes them to the CSR instances using SSH. This allows the VPN tunnels to come up and (via the magic of BGP), neighbor relationships will be established with the spoke VPCs.
By using Lambda in this way, new spoke VPCs can be brought online quickly without the overhead of keeping an underutilized EC2 instance up and running.
The solution’s implementation guide, as always, contains step-by-step directions and security recommendations.
— Jeff;
PS – Check out additional network best practice guidance to find answers to common network questions!
New – Managed NAT (Network Address Translation) Gateway for AWS
You can use Amazon Virtual Private Cloud to create a logically isolated section of the AWS Cloud. Within the VPC, you can define your desired IP address range, create subnets, configure route tables, and so forth. You can also use a virtual private gateway to connect the VPC to your existing on-premises network using a hardware Virtual Private Network (VPN) connection.
An interesting network challenge arises when EC2 instances in a private VPC subnet need to connect to the Internet. Because the subnet is private, the IP addresses assigned to the instances cannot be used in public. Instead, it is necessary to use Network Address Translation (NAT) to map the private IP addresses to a public address on the way out, and then map the public IP address to the private address on the return trip.
New Managed NAT Gateway
Performing this translation at scale can be challenging. In order to simplify the task (and, as usual, to let you spend more time on your application and on your business), we are launching a new Managed NAT Gateway for AWS!
Instead of configuring, running, monitoring, and scaling a cluster of EC2 instances (you’d need at least 2 in order to ensure high availability), you can now create and configure a gateway with a couple of clicks.
The gateway has built-in redundancy for high availability. Each gateway that you create can handle up to 10 Gbps of bursty TCP, UDP, and ICMP traffic, and is managed by Amazon. You control the public IP address by assigning an Elastic IP Address when you create the gateway.
Creating a Managed NAT Gateway
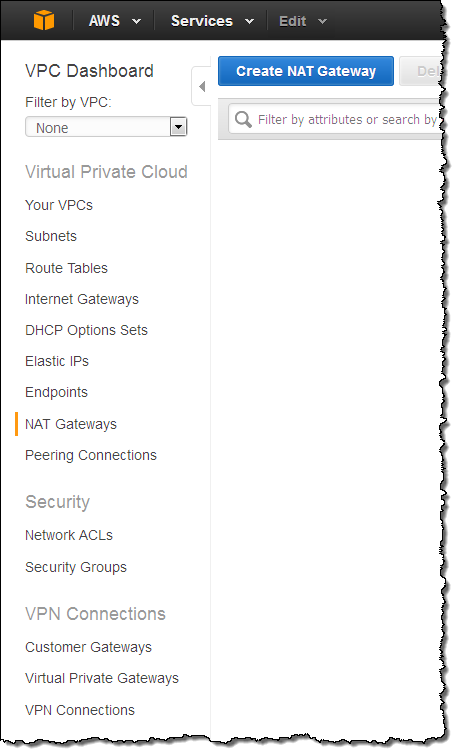
Let’s create a Managed NAT Gateway! Open up the VPC Console, and take a peek at the navigation area on the left. Locate and click on NAT Gateways:
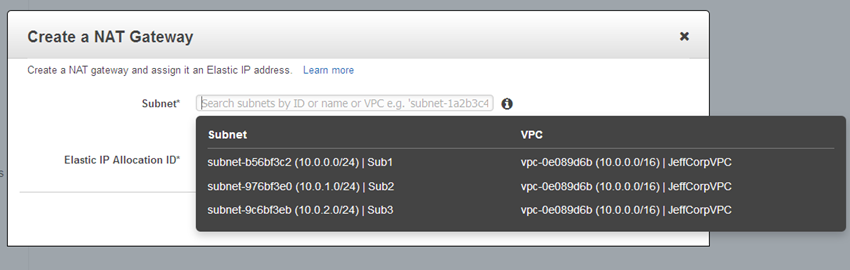
Then click on Create NAT Gateway and choose one of your subnets:
Choose one of your existing Elastic IP addresses, or create a new one:
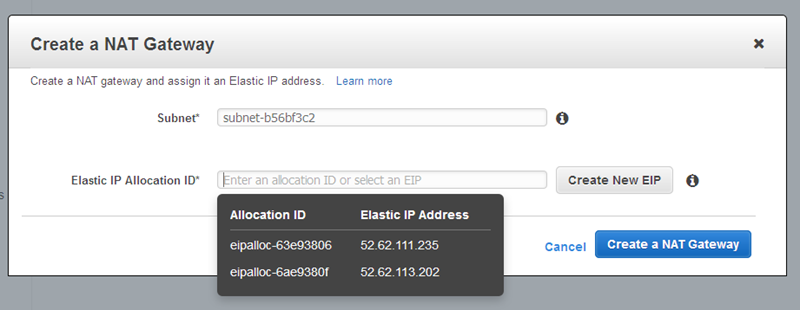
Then click on Create a NAT Gateway, and observe the confirmation:
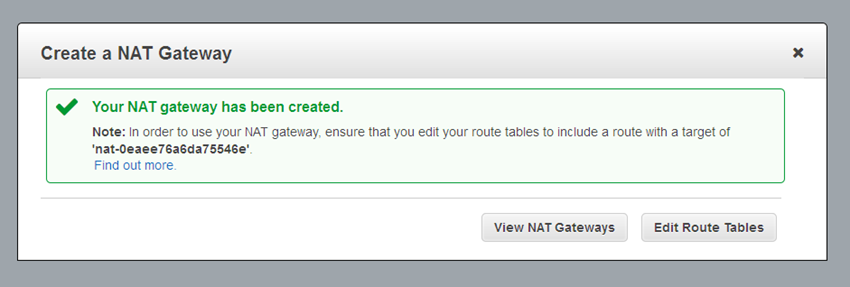
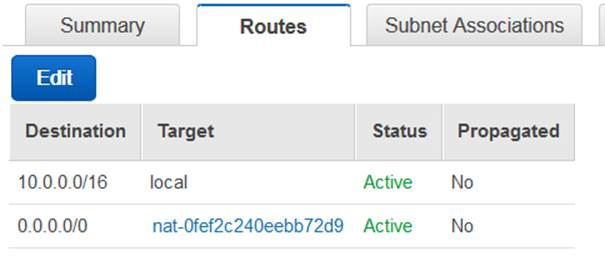
As you can see from the confirmation, you will need to edit your VPC’s route tables to send traffic destined for the Internet toward the gateway. The gateway’s internal (private) IP address will be chosen automatically, and will be on the subnet associated with the gateway. Here’s a sample route table:
And that’s all you need to do. You don’t need to size, scale, or manage the gateway.
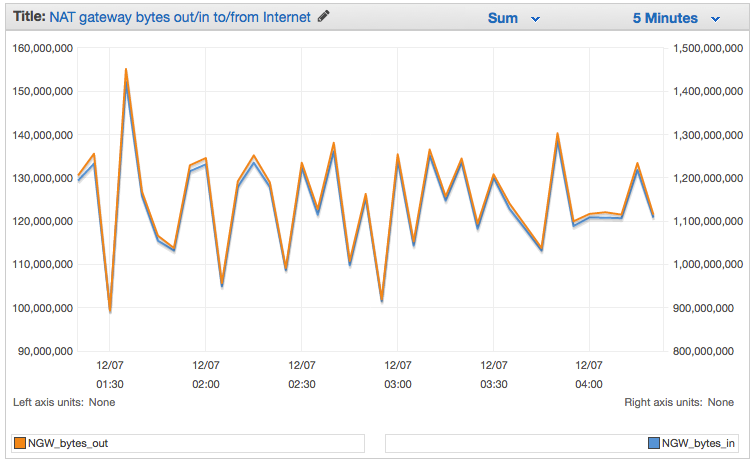
You can use VPC Flow Logs to capture the traffic flowing through your gateway, and then use the information in the logs to create CloudWatch metrics based on packets, bytes, and protocols. You can use the following filter pattern as a starting point (be sure to enter actual values for ENI_ID and NGW_IP):
[version, accountid, interfaceid=ENI_ID, srcaddr, dstaddr=NGW_IP, srcport, dstport, protocol, packets, bytes, start, end, action, log_status]The resulting graph will look like this:
If you create a new VPC using the VPC Wizard, it will offer to create a NAT Gateway and the route table rules for you. This makes the setup process even easier!
To learn more, read about the VPC NAT Gateway in the VPC User Guide.
Pricing and Availability
You can start using this new feature today in the US East (Northern Virginia), US West (Oregon), US West (Northern California), EU (Ireland), Asia Pacific (Singapore), Asia Pacific (Sydney), and Asia Pacific (Tokyo) regions.
Pricing starts at $0.045 per NAT gateway hour plus data processing and data transfer charges. Data processing costs are based on the amount of data processed by the NAT Gateway; data transfer costs are the usual costs to move data between an EC2 instance and the Internet. For more information, read about VPC Pricing.
— Jeff;
ClassicLink – Private Communication Between Classic EC2 Instances & VPC Resources
Amazon Virtual Private Cloud lets you create and run a logically isolated section of the Cloud. Running within a VPC combines the benefits of the cloud with the flexibility of a network topology designed to fit the unique needs of your in-house IT department. For example:
- Isolation – You can create a network and exercise fine-grained control over internal and external connectivity.
- Flexibility – You have full control over the IP address range, routing, subnets, and ACLs.
- Features – Certain AWS features, including Enhanced Networking and the new T2 instances are available only within a VPC. The powerful C3 instances can make use of Enhanced Networking when run within a VPC.
- Private Communication – You can connect to your existing on-premises or colo’ed infrastructure using AWS Direct Connect and a VPN connection.
You define a virtual network by specifying an IP address range using a CIDR block, partition the range in to one or more subnets, and setting up Access Control Lists (ACLs) to allow network traffic to flow between the subnets. After you define your virtual network, you can launch Amazon Elastic Compute Cloud (EC2) instances, Amazon Relational Database Service (RDS) DB instances,
Amazon ElastiCache nodes, and other AWS resources, each on a designated subnet.
Up until now, EC2 instances that were not running within a VPC (commonly known as EC2-Classic) had to use public IP addresses or tunneling to communicate with AWS resources in a VPC. They could not take advantage of the higher throughput and lower latency connectivity available for inter-instance communication. This model also resulted in additional bandwidth charges and has some undesirable security implications.
Hello, ClassicLink
In order to allow EC2-Classic instances to communicate with these resources, we are introducing a new feature known as ClassicLink. You can now enable this feature for any or all of your VPCs and then put your existing Classic instances in to VPC security groups.
ClassicLink will allow you to learn about and adopt VPC features, even if you are currently making good use of EC2-Classic. For example, you can use a new Amazon RDS T2 Instance (available only within a VPC) to launch a cost-effective DB instance that can easily accommodate bursts of traffic and queries. You can also take advantage of the additional control and flexibility available to you when you make use of the VPC security groups. For example, you can make use of outbound traffic filtering rules and you can change the security groups associated with a running instance.
Enabling & Using ClassicLink
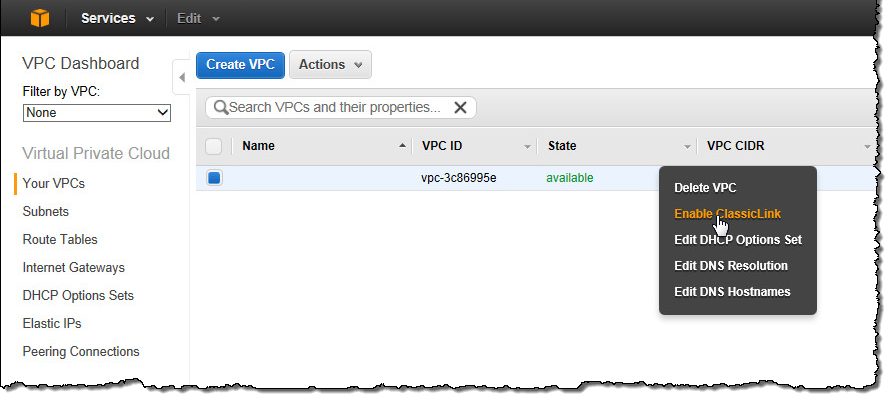
You can enable ClassicLink on a per-VPC basis. Simply open up the VPC tab of the AWS Management Console, select the desired VPC, right-click, and choose Enable ClassicLink:
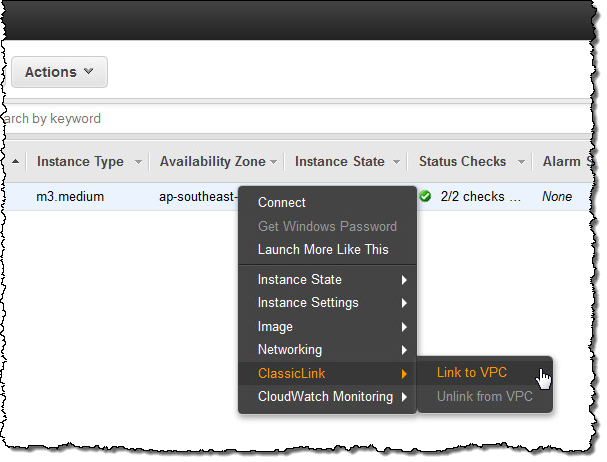
Now you can link any or all of your EC2 instances to the VPC by right-clicking and choosing Link to VPC from the ClassicLink menu:
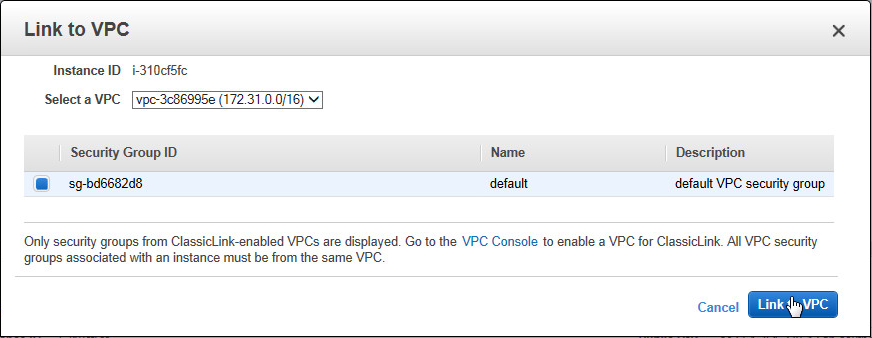
Choose the appropriate security group and you will be good to go:
The new setting takes effect immediately; the instance is now part of the chosen group(s). You can remove the security group(s) from the instance at a later time if you no longer have a need for private communication from the EC2-Classic instance to the AWS resources in the VPC.
Cost and Availability
ClassicLink is accessible from the AWS Management Console, AWS Command Line Interface (CLI), AWS Tools for Windows PowerShell, and the AWS SDKs. To learn more, click here.
ClassicLink is available at no charge. If you are currently running in EC2-Classic and have been looking for an easy way to start taking advantage of VPC resources, please take a closer look.
— Jeff;
New VPC Peering for the Amazon Virtual Private Cloud
The Amazon Virtual Private Cloud (VPC) gives you the power to create a logically isolated section of the AWS Cloud, which you can think of as virtual network. You can launch AWS resources, including Amazon EC2 instances within the network, and you have full control over the virtual networking environment, including the IP address range and the subnet model. You also have full control over network routing, both within the VPC (using route tables) and between networks (using network gateways).
VPC Peering
Today we are making the VPC model even more flexible! You now have the ability to create a VPC peering connection between VPCs in the same AWS Region. Once established, EC2 instances in the peered VPCs can communicate with each other across the peering connection using their private IP addresses, just as if they were within the same network.
You can create a peering connection between two of your own VPCs, or with a VPC in another AWS account.A VPC can have one-to-one peering connections with up to 50 other VPCs in the same Region.
VPC peering enables a number of interesting use cases; let’s take a look at a couple of them.
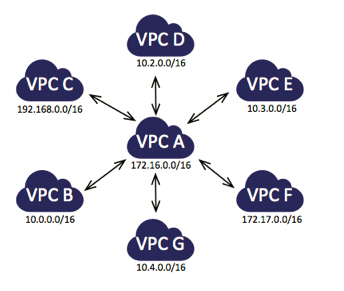
Within a single organization, you can set up peering relationships between VPCs that are run by different departments. One VPC can encompass resources that are shared across an entire organization, with additional, per-department VPCs for resources that are peculiar to the department. Here’s a very simple example:
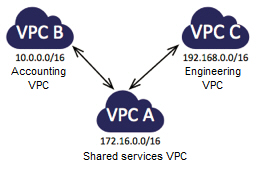
After you set up the peering connections and add entries to the routing tables (to direct packets out of one VPC and into another), the EC2 instances in the Accounting VPC can access the Shared Resources VPC, as can the instances in the Engineering VPC. However, the Accounting instances cannot access the Engineering instances, or vice versa. Peering connections are not transitive; you would need to set up a peering connection between Engineering and Accounting in order to establish connectivity. Think about extending this model with an Operations VPC that is peered with all of the other VPCs in your organization.
As I mentioned earlier, you can also establish VPC peering between a pair of VPCs that are owned by different accounts. Suppose your organization is a member of an industry consortium or a party to a joint venture. You can use VPC peering to share common resources between members of the consortium or other joint venture, all within AWS and with full control of the networking topology:
As was the case in the previous scenario, each participant in the consortium will be able to see and access the shared resources, but not those of the other participants. We’ve documented a number of common peering scenarios in our VPC Peering Guide.
Peering Details
I’m going to show you just how easy it is to create a VPC peering connection in just a minute. Before I do that, I’d like to review the rules that govern the use of this very powerful new feature.
You can connect any two VPCs that are in the same AWS Region, regardless of ownership, as long as both parties agree. We plan to extend this feature to support cross-Region peering in the future. Connections are requested by sending an invitation from one VPC to the other. The invitation must be accepted in order to establish the connection. Needless to say, you should only accept invitations from VPCs that you know. You are free to ignore unwanted or incorrect invitations; they’ll expire before too long.
The VPCs to be peered must have non-overlapping CIDR blocks. This is to ensure that all of the private IP addresses are unique, allowing direct access (as allowed by the peering and routing tables) without the need for any form of network address translation.
As you can see from the scenarios that I described above, VPC peering connections do not generate transitive trust. Just because A is peered with B and B is peered with C, it doesn’t mean that A is peered with C.
The connections are implemented within the VPC fabric; this avoids single points of failure and bandwidth bottlenecks.
There is no charge for setting up or running a VPC peering connection. Data transferred across peering connections is charged at $0.01/GB for send and receive, regardless of the Availability Zones involved.
You can set up VPC peering connections from the AWS Management Console, the VPC APIs, or the AWS Command Line Interface (CLI).
VPC Peering Example
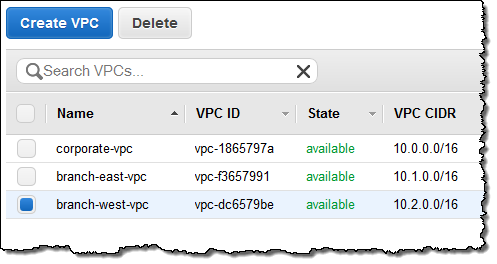
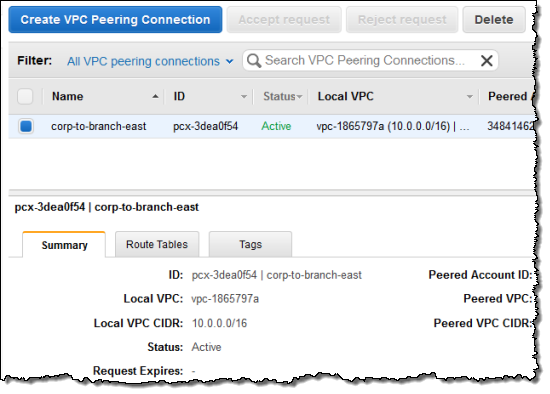
I used the AWS Management Console to set up a VPC peering connection between two of my VPCs, which were named corporate-vpc and branch-east-vpc. Here are the IDs and the CIDRs:
Before I go any further, I should note that these features are available in the “Preview” version of the VPC console. In addition to support for the creation and management of VPC peering connections, the new console includes a multitude of tagging features to simplify and enhance your VPC management operations.
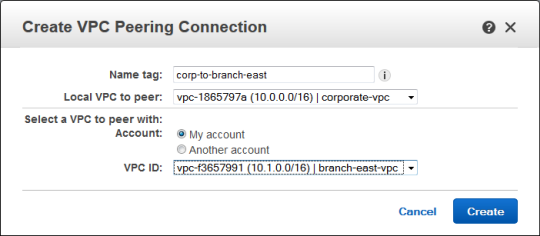
I clicked on Peering Connections in the VPC Dashboard, selected corporate-vpc, and then used the Create VPC Peering Connection button to invite branch-east-vpc to peer:
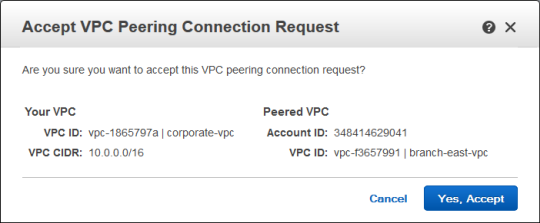
The invite appeared in the list of connections. I selected it and clicked Accept:
The peering connection was created and became visible immediately:
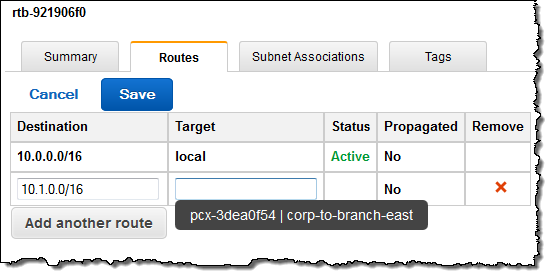
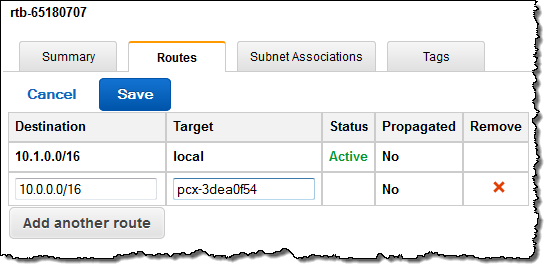
Then I created an entry in the route table of each VPC. As you can see, the console provided me with a helpful popup when it was time for me to choose the Target for the route:
Peer Now
The new VPC peering feature is available now and you can start using it today. I am very interested in seeing how this feature is put to use. Leave me a comment and let me know what you think!
— Jeff;
Federated Users and Temporary Security Credentials for AWS CloudFormation
My colleague Chetan Dandekar brings word of a powerful enhancement to AWS CloudFormation that will make it an even better fit for large-scale corporate deployments.
— Jeff;
AWS CloudFormation gives developers and systems administrators an easy way to create and manage a collection of AWS resources. Today, we added support for the CloudFormation APIs to be called using temporary security credentials provided by the AWS Security Token Service.
This enables a number of scenarios such as federated users using CloudFormation and authorizing Amazon EC2 instances with IAM roles to call CloudFormation. Before this launch, calling CloudFormation required use of an IAM user or AWS account credentials.
AWS supports federated user access to AWS service APIs and resources. Federated users are managed in an external directory and are granted temporary access AWS services. You now have the option of authorizing federated users to call AWS CloudFormation APIs, as an alternative to creating IAM users to use CloudFormation. A federated user can also sign in and manage CloudFormation stacks from the AWS Management Console (if interested, here is a sample proxy server that demonstrates setting this up).
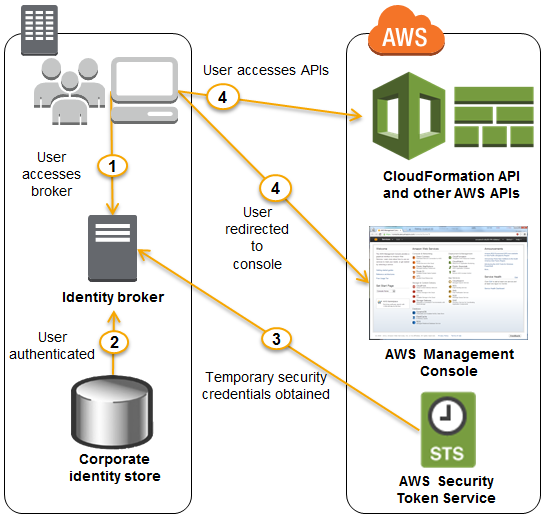
Consider an example where you have a 100 person IT department. The department would likely have specialists such as network architects, database admins, and application developers. Since CloudFormation enables you to model and provision infrastructure as well as applications, many of those specialists would need access to CloudFormation. Now, the IT department does not have to create an IAM user for each of those employees in order to access CloudFormation. You can choose to authorize existing federated users to use CloudFormation. Also, the IT department can fine tune access, for instance, by authorizing the database admins to call CloudFormation and Amazon RDS, while authorizing the application developers to call CloudFormation, and EC2 or AWS Elastic Beanstalk. Furthermore, when members join or leave the IT department, you do not need to add or remove corresponding IAM users. The following diagram shows the flow of a federated user calling CloudFormation:
IAM roles enable easy and secure access to AWS APIs from EC2 instances, without sharing the long-term security credentials (i.e., access keys). The CloudFormations Describe* APIs can already be called using temporary security credentials generated by assuming an IAM role. We now support the complete set of CloudFormation APIs.
Consider an example where you have a regulatory requirement to perform all AWS resource provisioning and management operations from within an Amazon VPC. One approach to comply would be to provision an EC2 instance inside a VPC, which in turn calls the CloudFormation service to provision and manage infrastructure and applications using your CloudFormation templates. You can now use an IAM role to define permissions that allow calling CloudFormation, and delegate those permissions to the EC2 instance. IAM roles use temporary security credentials and take care of rotating credentials on the instance for you. Here is a visualization of this scenario:

To learn more about the AWS CloudFormation, visit the CloudFormation detail page, documentation or watch this introductory video. We also have a large collection of sample templates that makes it easy to get started with CloudFormation within minutes.
— Chetan Dandekar, Senior Product Manager
AWS OpsWorks in the Virtual Private Cloud
Chris Barclay sent me a nice guest post to announce that AWS OpsWorks is now available in the Virtual Private Cloud.
— Jeff;
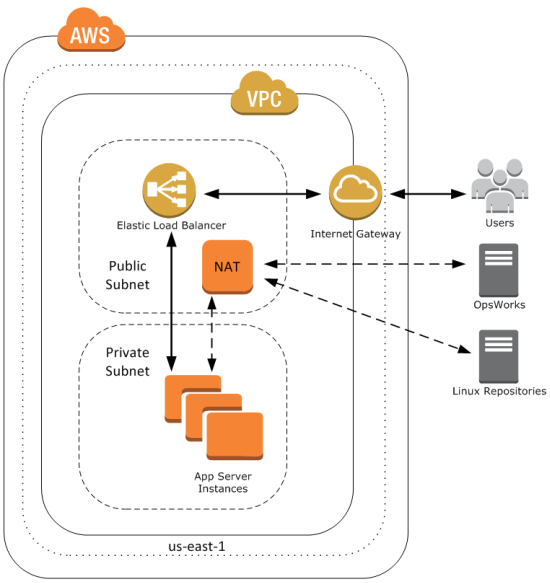
I am pleased to announce support for using AWS OpsWorks with Amazon Virtual Private Cloud (Amazon VPC). AWS OpsWorks is a DevOps solution that makes it easy to deploy, customize and manage applications. OpsWorks provides helpful operational features such as user-based ssh management, additional CloudWatch metrics for memory and load, automatic RAID volume configuration, and a variety of application deployment options. You can optionally use the popular Chef automation platform to extend OpsWorks using your own custom recipes. With VPC support, you can now take advantage of the application management benefits of OpsWorks in your own isolated network. This allows you to run many new types of applications on OpsWorks.
For example, you may want a configuration like the following, with your application servers in a private subnet behind a public Elastic Load Balancer (ELB). This lets you control access to your application servers. Users communicate with the Elastic Load Balancer which then communicates with your application servers through the ports you define. The NAT allows your application servers to communicate with the OpsWorks service and with Linux repositories to download packages and updates.
To get started, well first create this VPC. For a shortcut to create this configuration, you can use a CloudFormation template. First, navigate to the CloudFormation console and select Create Stack. Give your stack a name, provide the template URL http://cloudformation-templates-us-east-1.s3.amazonaws.com/OpsWorksinVPC.template and select Continue. Accept the defaults and select Continue. Create a tag with a key of Name and a meaningful value. Then create your CloudFormation stack.
When your CloudFormation stacks status shows CREATE_COMPLETE, take a look at the outputs tab; it contains several IDs that you will need later, including the VPC and subnet IDs.
You can now create an OpsWorks stack to deploy a sample app in your new private subnet. Navigate to the AWS OpsWorks console and click Add Stack. Select the VPC and private subnet that you just created using the CloudFormation template.

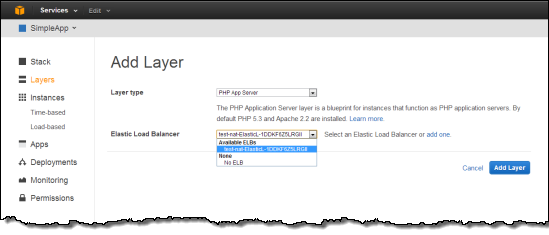
Next, under Add your first layer, click Add a layer. For Layer type box, select PHP App Server. Select the Elastic Load Balancer created in by the CloudFormation template to the Layer and then click Add layer.
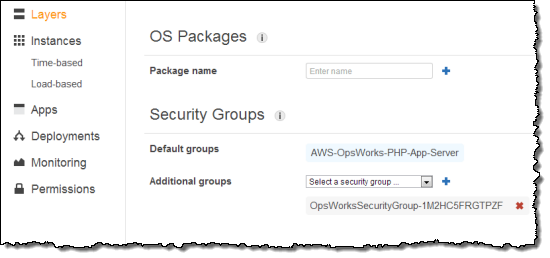
Next, in the layers Actions column click Edit. Scroll down to the Security Groups section and select the Additional Group with OpsWorksSecurityGroup in the name. Click the + symbol, then click Save.
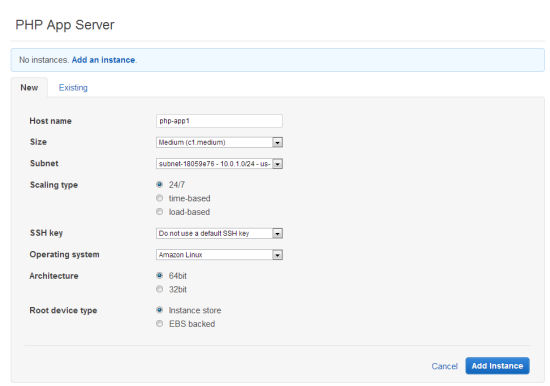
Next, in the navigation pane, click Instances, accept the defaults, and then click Add an Instance. This creates the instance in the default subnet you set when you created the stack.
Under PHP App Server, in the row that corresponds to your instance, click start in the Actions column.
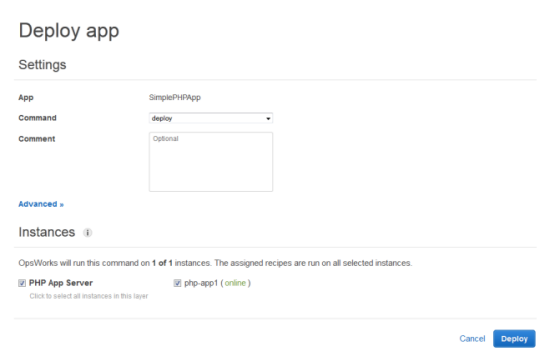
You are now ready to deploy a sample app to the instance you created. An app represents code you want to deploy to your servers. That code is stored in a repository, such as Git or Subversion. For this example, we’ll use the SimplePHPApp application from the Getting Started walkthrough. First, in the navigation pane, click Apps. On the Apps page, click Add an app. Type a name for your app and scroll down to the Repository URL and set Repository URL to git://github.com/amazonwebservices/opsworks-demo-php-simple-app.git, and Branch/Revision to version1. Accept the defaults for the other fields.

When all the settings are as you want them, click Add app. When you first add a new app, it isn’t deployed yet to the instances for the layer. To deploy your App to the instance in PHP App Server layer, under Actions, click Deploy.
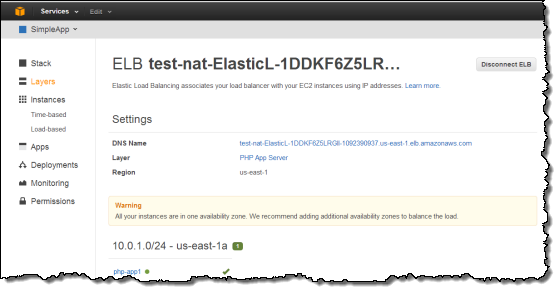
Once your deployment has finished, in the navigation pane, click Layers. Select the Elastic Load Balancer for your PHP App Server layer. The ELB page shows the load balancer’s basic properties, including its DNS name and the health status of the associated instances. A green check indicates the instance has passed the ELB health checks (this may take a minute). You can then click on the DNS name to connect to your app through the load balancer.
You can try these new features with a few clicks of the AWS Management Console. To learn more about how to launch OpsWorks instances inside a VPC, see the AWS OpsWorks Developer Guide.
You may also want to sign up for our upcoming AWS OpsWorks Webinar on September 12, 2013 at 10:00 AM PT. The webinar will highlight common use cases and best practices for how to set up AWS OpsWorks and Amazon VPC.
— Chris Barclay, Senior Product Manager