Category: Amazon EC2
Building Loosely Coupled, Scalable, C# Applications with Amazon SQS and Amazon SNS

Stephen Liedig, Solutions Architect
One of the many challenges professional software architects and developers face is how to make cloud-native applications scalable, fault-tolerant, and highly available.
Fundamental to your project success is understanding the importance of making systems highly cohesive and loosely coupled. That means considering the multi-dimensional facets of system coupling to support the distributed nature of the applications that you are building for the cloud.
By that, I mean addressing not only the application-level coupling (managing incoming and outgoing dependencies), but also considering the impacts of of platform, spatial, and temporal coupling of your systems. Platform coupling relates to the interoperability (or lack thereof) of heterogeneous systems components. Spatial coupling deals with managing components at a network topology level or protocol level. Temporal, or runtime coupling, refers to the ability of a component within your system to do any kind of meaningful work while it is performing a synchronous, blocking operation.
The AWS messaging services, Amazon SQS and Amazon SNS, help you deal with these forms of coupling by providing mechanisms for:
- Reliable, durable, and fault-tolerant delivery of messages between application components
- Logical decomposition of systems and increased autonomy of components
- Creating unidirectional, non-blocking operations, temporarily decoupling system components at runtime
- Decreasing the dependencies that components have on each other through standard communication and network channels
Following on the recent topic, Building Scalable Applications and Microservices: Adding Messaging to Your Toolbox, in this post, I look at some of the ways you can introduce SQS and SNS into your architectures to decouple your components, and show how you can implement them using C#. (more…)
Using Amazon SQS Dead-Letter Queues to Control Message Failure

Michael G. Khmelnitsky, Senior Programmer Writer

Sometimes, messages can’t be processed because of a variety of possible issues, such as erroneous conditions within the producer or consumer application. For example, if a user places an order within a certain number of minutes of creating an account, the producer might pass a message with an empty string instead of a customer identifier. Occasionally, producers and consumers might fail to interpret aspects of the protocol that they use to communicate, causing message corruption or loss. Also, the consumer’s hardware errors might corrupt message payload. For these reasons, messages that can’t be processed in a timely manner are delivered to a dead-letter queue. (more…)
Building High-Throughput Genomics Batch Workflows on AWS: Workflow Layer (Part 4 of 4)

Aaron Friedman is a Healthcare and Life Sciences Partner Solutions Architect at AWS

Angel Pizarro is a Scientific Computing Technical Business Development Manager at AWS
This post is the fourth in a series on how to build a genomics workflow on AWS. In Part 1, we introduced a general architecture, shown below, and highlighted the three common layers in a batch workflow:
- Job
- Batch
- Workflow
In Part 2, you built a Docker container for each job that needed to run as part of your workflow, and stored them in Amazon ECR.
In Part 3, you tackled the batch layer and built a scalable, elastic, and easily maintainable batch engine using AWS Batch. This solution took care of dynamically scaling your compute resources in response to the number of runnable jobs in your job queue length as well as managed job placement. (more…)
Building Scalable Applications and Microservices: Adding Messaging to Your Toolbox

Jakub Wojciak, Senior Software Development Engineer
Throughout our careers, we developers keep adding new tools to our development toolboxes. These range from the programming languages we learn, use, and become experts in, to architectural components such as HTTP servers, load balancers, and databases (both relational and NoSQL).
I’d like to kick off a series of posts to introduce you to the architectural components of messaging solutions. Expand your toolbox with this indispensable tool for building modern, scalable services and applications. In the coming months, I will update this post with links that dive deeper into each topic and illustrate messaging use cases using Amazon Simple Queue Service (SQS) and Amazon Simple Notification Service (SNS). (more…)
Disabling Intel Hyper-Threading Technology on Amazon Linux

Brian Beach, Solutions Architect
Customers running high performance computing (HPC) workloads on Amazon Linux occasionally ask to disable the Intel Hyper-Threading Technology (HT Technology) that is enabled by default. In the pre-cloud world, this was usually performed by modifying the BIOS. That turned off HT Technology for all users, regardless of any possible benefits obtainable, for example, on I/O intensive workloads. With the cloud, HT Technology can be turned on or off, as is best for a particular application.
This post discusses methods for disabling HT Technology. (more…)
Automating the Creation of Consistent Amazon EBS Snapshots with Amazon EC2 Systems Manager (Part 2)

Nicolas Malaval, AWS Professional Consultant
In my previous blog post, I discussed the challenge of creating Amazon EBS snapshots when you cannot turn off the instance during backup because this might exclude any data that has been cached by any applications or the operating system. I showed how you can use EC2 Systems Manager to run a script remotely on EC2 instances to prepare the applications and the operating system for backup and to automate the creating of snapshots on a daily basis. I gave a practical example of creating consistent Amazon EBS snapshots of Amazon Linux running a MySQL database.
In this post, I walk you through another practical example to create consistent snapshots of a Windows Server instance with Microsoft VSS (Volume Shadow Copy Service). (more…)
Automating the Creation of Consistent Amazon EBS Snapshots with Amazon EC2 Systems Manager (Part 1)
Nicolas Malaval, AWS Professional Consultant
If an EC2 instance is up and running, there may be applications working, like databases, with data in memory or pending I/O operations that cannot be retrieved from an Amazon EBS snapshot. If your application is unable to recover from such a state, you might lose vital data for your business.
Amazon EBS provides block level storage volumes for use with EC2 instances. With EBS, you can create point-in-time snapshots of volumes, stored reliably on Amazon S3. If you rely on EBS snapshots as your backup solution and if you cannot turn off the instance during backup, you can create consistent EBS snapshots, which consists of informing the applications that they are about to be backed up so they can get prepared.
In this post, the first of a two-part series, I show you how to use Run Command and Maintenance Window, two features of Amazon EC2 Systems Manager, to automate the execution of scripts on EC2 instances that create consistent EBS snapshots. First, I explain the approach. Then, I walk you through a practical example to create consistent snapshots of an Amazon Linux EC2 instance running MySQL.
Building a Backup System for Scaled Instances using AWS Lambda and Amazon EC2 Run Command
![]() Diego Natali, AWS Cloud Support Engineer
Diego Natali, AWS Cloud Support Engineer
When an Auto Scaling group needs to scale in, replace an unhealthy instance, or re-balance Availability Zones, the instance is terminated, data on the instance is lost and any on-going tasks are interrupted. This is normal behavior but sometimes there are use cases when you might need to run some commands, wait for a task to complete, or execute some operations (for example, backing up logs) before the instance is terminated. So Auto Scaling introduced lifecycle hooks, which give you more control over timing after an instance is marked for termination.
In this post, I explore how you can leverage Auto Scaling lifecycle hooks, AWS Lambda, and Amazon EC2 Run Command to back up your data automatically before the instance is terminated. The solution illustrated allows you to back up your data to an S3 bucket; however, with minimal changes, it is possible to adapt this design to carry out any task that you prefer before the instance gets terminated, for example, waiting for a worker to complete a task before terminating the instance.
Using Auto Scaling lifecycle hooks, Lambda, and EC2 Run Command
You can configure your Auto Scaling group to add a lifecycle hook when an instance is selected for termination. The lifecycle hook enables you to perform custom actions as Auto Scaling launches or terminates instances. In order to perform these actions automatically, you can leverage Lambda and EC2 Run Command to allow you to avoid the use of additional software and to rely completely on AWS resources.
For example, when an instance is marked for termination, Amazon CloudWatch Events can execute an action based on that. This action can be a Lambda function to execute a remote command on the machine and upload your logs to your S3 bucket.
EC2 Run Command enables you to run remote scripts through the agent running within the instance. You use this feature to back up the instance logs and to complete the lifecycle hook so that the instance is terminated.
The example provided in this post works precisely this way. Lambda gathers the instance ID from CloudWatch Events and then triggers a remote command to back up the instance logs.

Set up the environment
Make sure that you have the latest version of the AWS CLI installed locally. For more information, see Getting Set Up with the AWS Command Line Interface.
Step 1 – Create an SNS topic to receive the result of the backup
In this step, you create an Amazon SNS topic in the region in which to run your Auto Scaling group. This topic allows EC2 Run Command to send you the outcome of the backup. The output of the aws iam create-topic command includes the ARN. Save the ARN, as you need it for future steps.
aws sns create-topic --name backupoutcome
Now subscribe your email address as the endpoint for SNS to receive messages.
aws sns subscribe --topic-arn <enter-your-sns-arn-here> --protocol email --notification-endpoint <your_email>
Step 2 – Create an IAM role for your instances and your Lambda function
In this step, you use the AWS console to create the AWS Identity and Access Management (IAM) role for your instances and Lambda to enable them to run the SSM agent, upload your files to your S3 bucket, and complete the lifecycle hook.
First, you need to create a custom policy to allow your instances and Lambda function to complete lifecycle hooks and publish to the SNS topic set up in Step 1.
- Log into the IAM console.
- Choose Policies, Create Policy
- For Create Your Own Policy, choose Select.
- For Policy Name, type “ASGBackupPolicy”.
- For Policy Document, paste the following policy which allows to complete a lifecycle hook:
{
  "Version": "2012-10-17",
  "Statement": [
    {
      "Action": [
        "autoscaling:CompleteLifecycleAction",
        "sns:Publish"
      ],
      "Effect": "Allow",
      "Resource": "*"
    }
  ]
}
Create the role for EC2.
- In the left navigation pane, choose Roles, Create New Role.
- For Role Name, type “instance-role” and choose Next Step.
- Choose Amazon EC2 and choose Next Step.
- Add the policies AmazonEC2RoleforSSM and ASGBackupPolicy.
- Choose Next Step, Create Role.
Create the role for the Lambda function.
- In the left navigation pane, choose Roles, Create New Role.
- For Role Name, type “lambda-role” and choose Next Step.
- Choose AWS Lambda and choose Next Step.
- Add the policies AmazonSSMFullAccess, ASGBackupPolicy, and AWSLambdaBasicExecutionRole.
- Choose Next Step, Create Role.
Step 3 – Create an Auto Scaling group and configure the lifecycle hook
In this step, you create the Auto Scaling group and configure the lifecycle hook.
- Log into the EC2 console.
- Choose Launch Configurations, Create launch configuration.
- Select the latest Amazon Linux AMI and whatever instance type you prefer, and choose Next: Configuration details.
- For Name, type “ASGBackupLaunchConfiguration”.
- For IAM role, choose “instance-role” and expand Advanced Details.
- For User data, add the following lines to install and launch the SSM agent at instance boot:
#!/bin/bash
sudo yum install amazon-ssm-agent -y
sudo /sbin/start amazon-ssm-agent
- Choose Skip to review, Create launch configuration, select your key pair, and then choose Create launch configuration.
- Choose Create an Auto Scaling group using this launch configuration.
- For Group name, type “ASGBackup”.
- Select your VPC and at least one subnet and then choose Next: Configuration scaling policies, Review, and Create Auto Scaling group.
Your Auto Scaling group is now created and you need to add the lifecycle hook named “ASGBackup” by using the AWS CLI:
aws autoscaling put-lifecycle-hook --lifecycle-hook-name ASGBackup --auto-scaling-group-name ASGBackup --lifecycle-transition autoscaling:EC2_INSTANCE_TERMINATING --heartbeat-timeout 3600
Step 4 – Create an S3 bucket for files
Create an S3 bucket where your data will be saved, or use an existing one. To create a new one, you can use this AWS CLI command:
aws s3api create-bucket --bucket <your_bucket_name>
Step 5 – Create the SSM document
The following JSON document archives the files in “BACKUPDIRECTORY” and then copies them to your S3 bucket “S3BUCKET”. Every time this command completes its execution, a SNS message is sent to the SNS topic specified by the “SNSTARGET” variable and completes the lifecycle hook.
In your JSON document, you need to make a few changes according to your environment:
| Auto Scaling group name (line 12) | “ASGNAME=’ASGBackup'”, |
| Lifecycle hook name (line 13) | “LIFECYCLEHOOKNAME=’ASGBackup'”, |
| Directory to back up (line 14) | “BACKUPDIRECTORY=’/var/log'”, |
| S3 bucket (line 15) | “S3BUCKET='<your_bucket_name>'”, |
| SNS target (line 16) | “SNSTARGET=’arn:aws:sns:’${REGION}’:<your_account_id>:<your_sns_ backupoutcome_topic>” |
Here is the document:
{
  "schemaVersion": "1.2",
  "description": "Backup logs to S3",
  "parameters": {},
  "runtimeConfig": {
    "aws:runShellScript": {
      "properties": [
        {
          "id": "0.aws:runShellScript",
          "runCommand": [
            "",
            "ASGNAME='ASGBackup'",
            "LIFECYCLEHOOKNAME='ASGBackup'",
            "BACKUPDIRECTORY='/var/log'",
            "S3BUCKET='<your_bucket_name>'",
            "SNSTARGET='arn:aws:sns:'${REGION}':<your_account_id>:<your_sns_ backupoutcome_topic>'",
            "INSTANCEID=$(curl http://169.254.169.254/latest/meta-data/instance-id)",
            "REGION=$(curl http://169.254.169.254/latest/meta-data/placement/availability-zone)",
            "REGION=${REGION::-1}",
            "HOOKRESULT='CONTINUE'",
            "MESSAGE=''",
            "",
            "tar -cf /tmp/${INSTANCEID}.tar $BACKUPDIRECTORY &> /tmp/backup",
            "if [ $? -ne 0 ]",
            "then",
            "   MESSAGE=$(cat /tmp/backup)",
            "else",
            "   aws s3 cp /tmp/${INSTANCEID}.tar s3://${S3BUCKET}/${INSTANCEID}/ &> /tmp/backup",
            "       MESSAGE=$(cat /tmp/backup)",
            "fi",
            "",
            "aws sns publish --subject 'ASG Backup' --message \"$MESSAGE\"  --target-arn ${SNSTARGET} --region ${REGION}",
            "aws autoscaling complete-lifecycle-action --lifecycle-hook-name ${LIFECYCLEHOOKNAME} --auto-scaling-group-name ${ASGNAME} --lifecycle-action-result ${HOOKRESULT} --instance-id ${INSTANCEID}  --region ${REGION}"
          ]
        }
      ]
    }
  }
}
- Log into the EC2 console.
- Choose Command History, Documents, Create document.
- For Document name, enter “ASGLogBackup”.
- For Content, add the above JSON, modified for your environment.
- Choose Create document.
Step 6 – Create the Lambda function
The Lambda function uses modules included in the Python 2.7 Standard Library and the AWS SDK for Python module (boto3), which is preinstalled as part of Lambda. The function code performs the following:
- Checks to see whether the SSM document exists. This document is the script that your instance runs.
- Sends the command to the instance that is being terminated. It checks for the status of EC2 Run Command and if it fails, the Lambda function completes the lifecycle hook.
- Log in to the Lambda console.
- Choose Create Lambda function.
- For Select blueprint, choose Skip, Next.
- For Name, type “lambda_backup” and for Runtime, choose Python 2.7.
- For Lambda function code, paste the Lambda function from the GitHub repository.
- Choose Choose an existing role.
- For Role, choose lambda-role (previously created).
- In Advanced settings, configure Timeout for 5 minutes.
- Choose Next, Create function.
Your Lambda function is now created.
Step 7 – Configure CloudWatch Events to trigger the Lambda function
Create an event rule to trigger the Lambda function.
- Log in to the CloudWatch console.
- Choose Events, Create rule.
- For Select event source, choose Auto Scaling.
- For Specific instance event(s), choose EC2 Instance-terminate Lifecycle Action and for Specific group name(s), choose ASGBackup.
- For Targets, choose Lambda function and for Function, select the Lambda function that you previously created, “lambda_backup”.
- Choose Configure details.
- In Rule definition, type a name and choose Create rule.
Your event rule is now created; whenever your Auto Scaling group “ASGBackup” starts terminating an instance, your Lambda function will be triggered.
Step 8 – Test the environment
From the Auto Scaling console, you can change the desired capacity and the minimum for your Auto Scaling group to 0 so that the instance running starts being terminated. After the termination starts, you can see from Instances tab that the instance lifecycle status changed to Termination:Wait. While the instance is in this state, the Lambda function and the command are executed.
You can review your CloudWatch logs to see the Lambda output. In the CloudWatch console, choose Logs and /aws/lambda/lambda_backup to see the execution output.
You can go to your S3 bucket and check that the files were uploaded. You can also check Command History in the EC2 console to see if the command was executed correctly.
Conclusion
Now that you’ve seen an example of how you can combine various AWS services to automate the backup of your files by relying only on AWS services, I hope you are inspired to create your own solutions.
Auto Scaling lifecycle hooks, Lambda, and EC2 Run Command are powerful tools because they allow you to respond to Auto Scaling events automatically, such as when an instance is terminated. However, you can also use the same idea for other solutions like exiting processes gracefully before an instance is terminated, deregistering your instance from service managers, and scaling stateful services by moving state to other running instances. The possible use cases are only limited by your imagination.
Learn more about:
I’ve open-sourced the code in this example in the awslabs GitHub repo; I can’t wait to see your feedback and your ideas about how to improve the solution.
Distributed Deep Learning Made Easy
This is a guest post from my colleagues Naveen Swamy and Joseph Spisak.
———————————
Machine learning is a field of computer science that enables computers to learn without being explicitly programmed. It focuses on algorithms that can learn from and make predictions on data.
Most recently, one branch of machine learning, called deep learning, has been deployed successfully in production with higher accuracy than traditional techniques, enabling capabilities such as speech recognition, image recognition, and video analytics. This higher accuracy comes, however, at the cost of significantly higher compute requirements for training these deep models.
One of the major reasons for this rebirth and rapid progress is the availability and democratization of cloud-scale computing. Training state-of-the-art deep neural networks can be time-consuming, with larger networks like ResidualNet taking several days to weeks to train, even on the latest GPU hardware. Because of this, a scale-out approach is required.
Accelerating training time has multiple benefits, including:
- Enabling faster iterative research, allowing scientists to push the state of the art faster in domains such as computer vision or speech recognition.
- Reducing the time-to-market for intelligent applications, allowing AI applications that consume trained, deep learning models to access newer models faster.
- Absorbing new data faster, helping to keep deep learning models current.
AWS CloudFormation, which creates and configures Amazon Web Services resources with a template, simplifies the process of setting up a distributed deep learning cluster. The CloudFormation Deep Learning template uses the Amazon Deep Learning AMI (supporting MXNet, TensorFlow, Caffe, Theano, Torch, and CNTK frameworks) to launch a cluster of Amazon EC2 instances and other AWS resources needed to perform distributed deep learning. CloudFormation creates all resources in the customer account.
EC2 Cluster Architecture
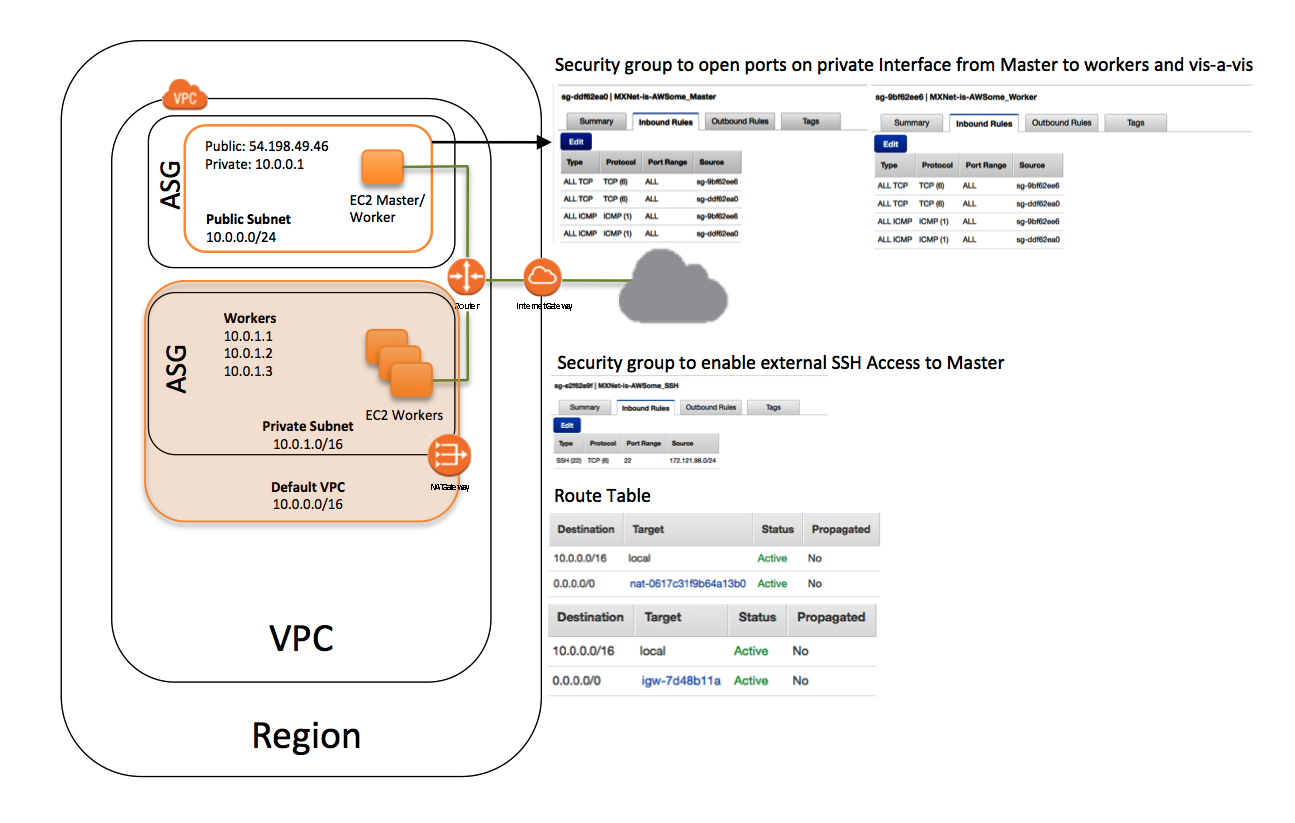
Resources created by the Deep Learning template
The Deep Learning template creates a stack that contains the following resources:
- A VPC in the customer account.
- The requested number of worker instances in an Auto Scaling group within the VPC. These worker instances are launched in a private subnet.
- A master instance in a separate Auto Scaling group that acts as a proxy to enable connectivity to the cluster via SSH. CloudFormation places this instance within the VPC and connects it to both the public and private subnets. This instance has both public IP addresses and DNS.
- A security group that allows external SSH access to the master instance.
- Two security groups that open ports on the private subnet for communication between the master and workers.
- An IAM role that allows users to access and query Auto Scaling groups and the private IP addresses of the EC2 instances.
- A NAT gateway used by the instances within the VPC to talk to the outside world.
The startup script enables SSH forwarding on all hosts. Enabling SSH is essential because frameworks such as MXNet makes use of SSH for communication between master and worker instances during distributed training. The startup script queries the private IP addresses of all the hosts in the stack, appends the IP address and worker alias to /etc/hosts, and writes the list of worker aliases to /opt/deeplearning/workers.
The startup script sets up the following environment variables:
-
$DEEPLEARNING_WORKERS_PATH: The file path that contains the list of workers
-
$DEEPLEARNING_WORKERS_COUNT: The total number of workers
-
$DEEPLEARNING_WORKER_GPU_COUNT: The number of GPUs on the instance
Launch a CloudFormation Stack
Note: To scale to the desired number of instances beyond the default limit, file a support request.
-
Download the Deep Learning template from the MXNet GitHub repo.
-
Open the CloudFormation console, and then choose Create New Stack.
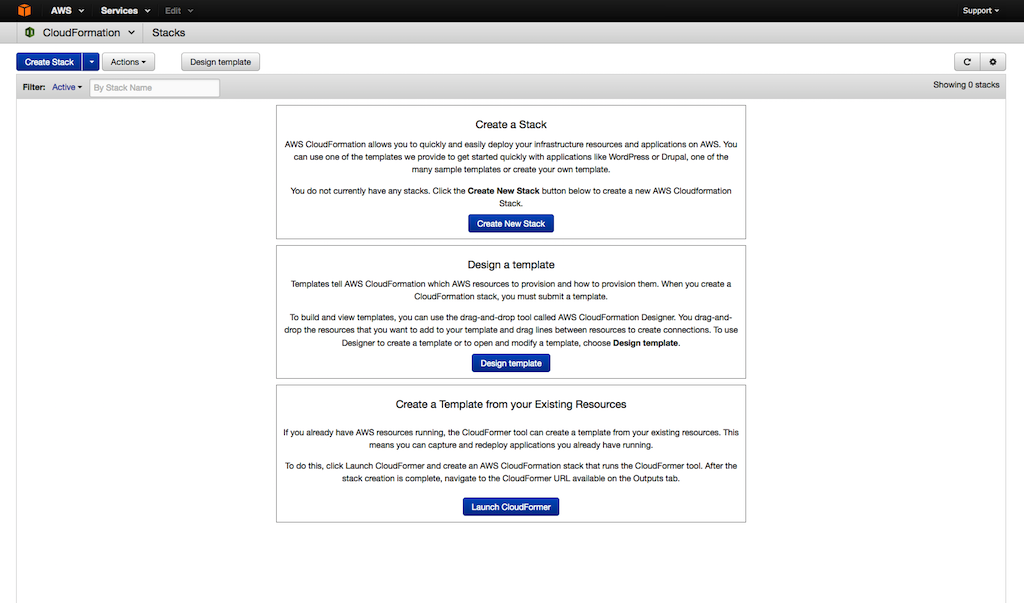
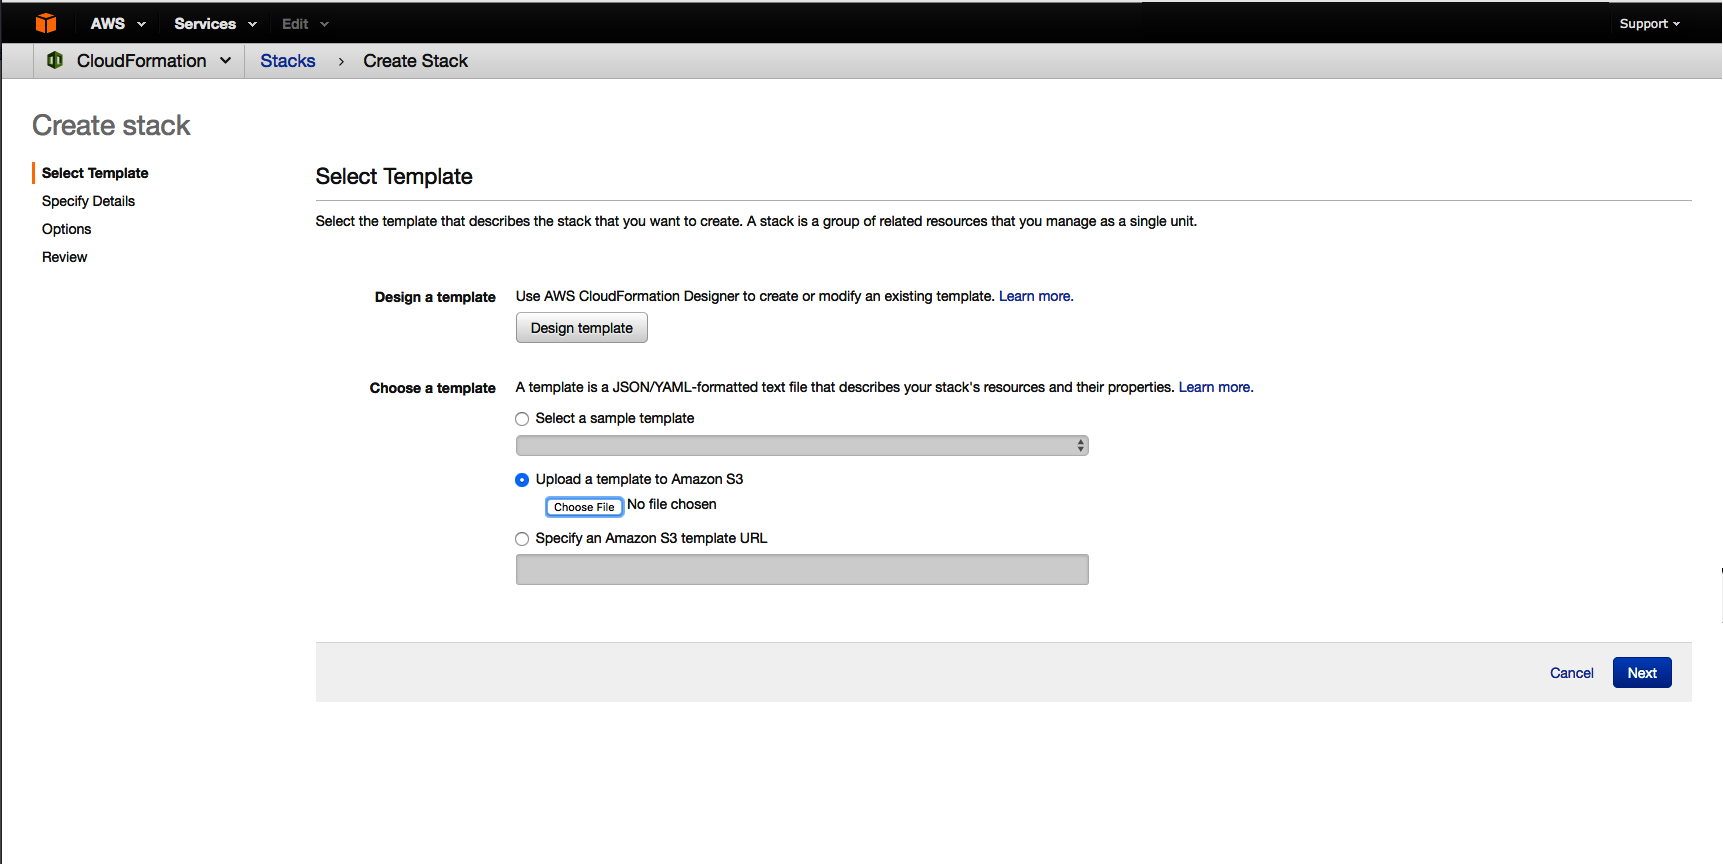
-
Choose Choose File to upload the template, and then choose Next:
-
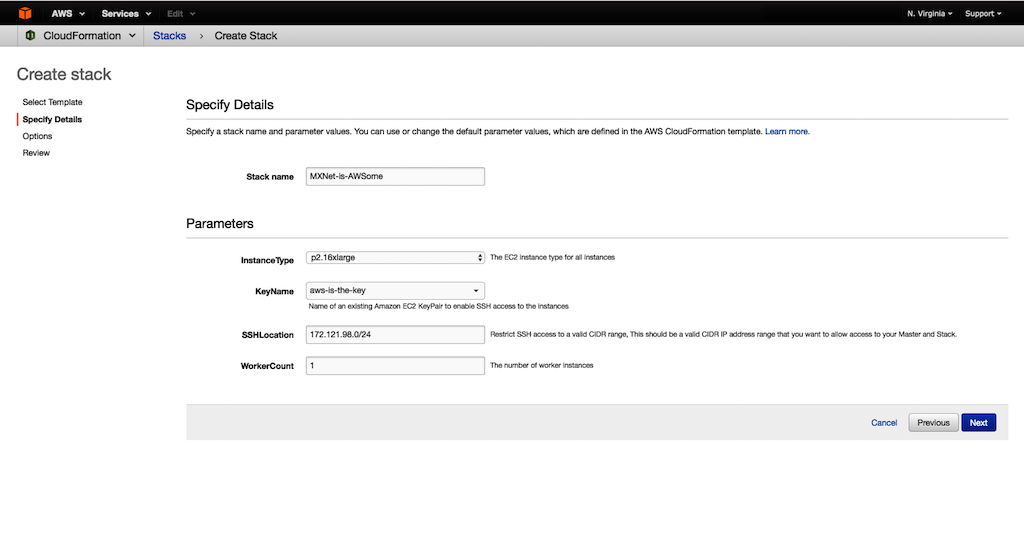
For Stack name, enter a descriptive stack name.
-
Choose a GPU InstanceType, such as a P2.16xlarge.
-
For KeyName, choose an EC2 key pair.
-
For SSHLocation, choose a valid CIDR IP address range to allow SSH access to the master instance and stack.
-
For Worker Count, type a value. The stack provisions the worker count + 1, with the additional instance acting as the master. The master also participates in the training/evaluation. Choose Next.
-
(Optional) Under Tags, type values for Key and Value. This allows you to assign metadata to your resources.
(Optional) Under Permissions, you can choose the IAM role that CloudFormation uses to create the stack. Choose Next.
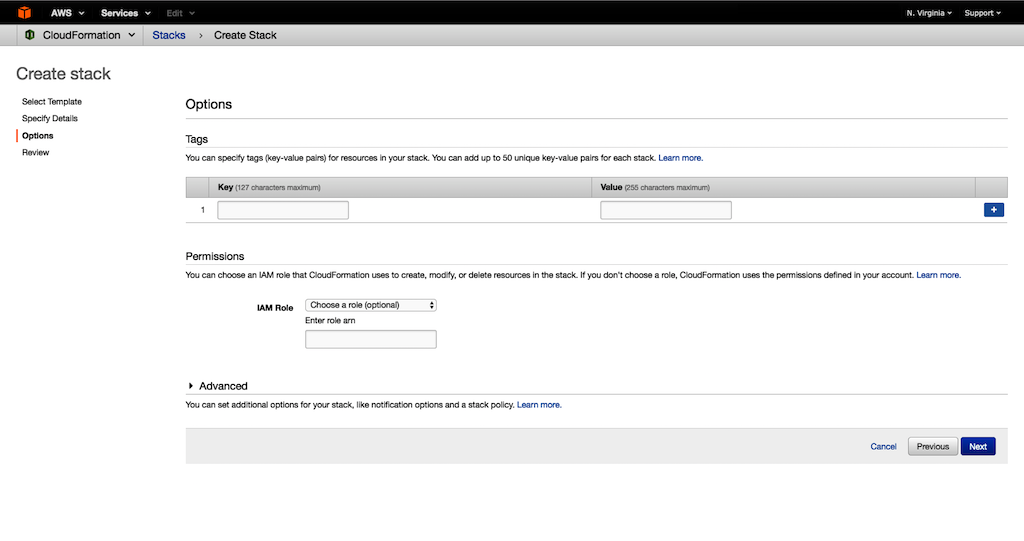
-
Under Capabilities, select the checkbox to agree to allow CloudFormation to create an IAM role. An IAM role is required for correctly setting up a stack.
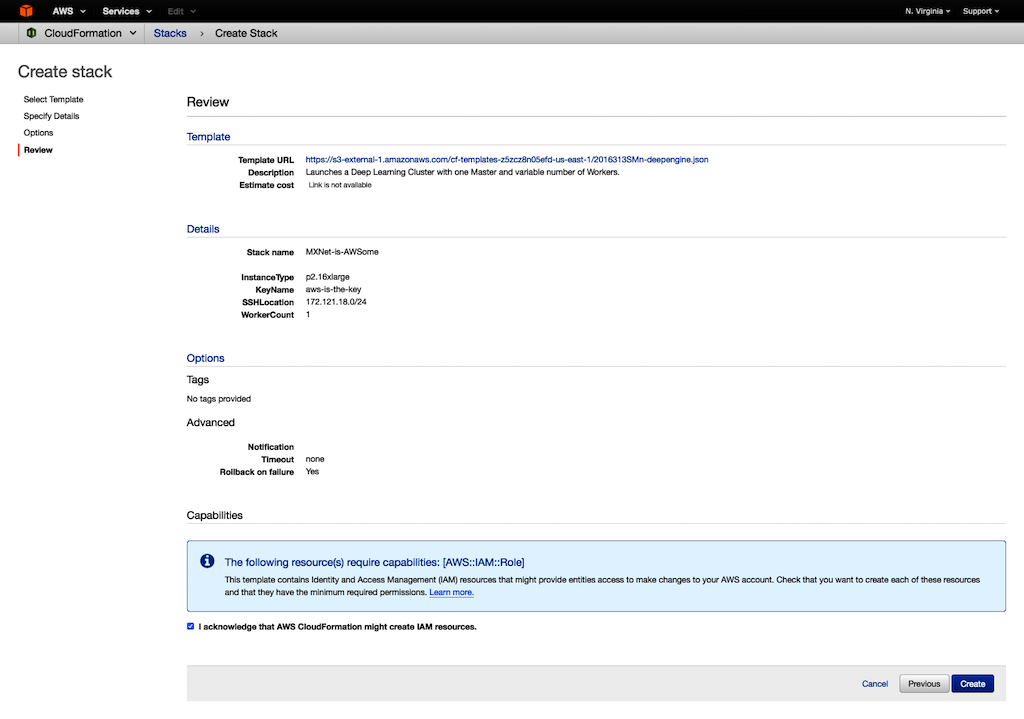
-
To create the CloudFormation stack, choose Create
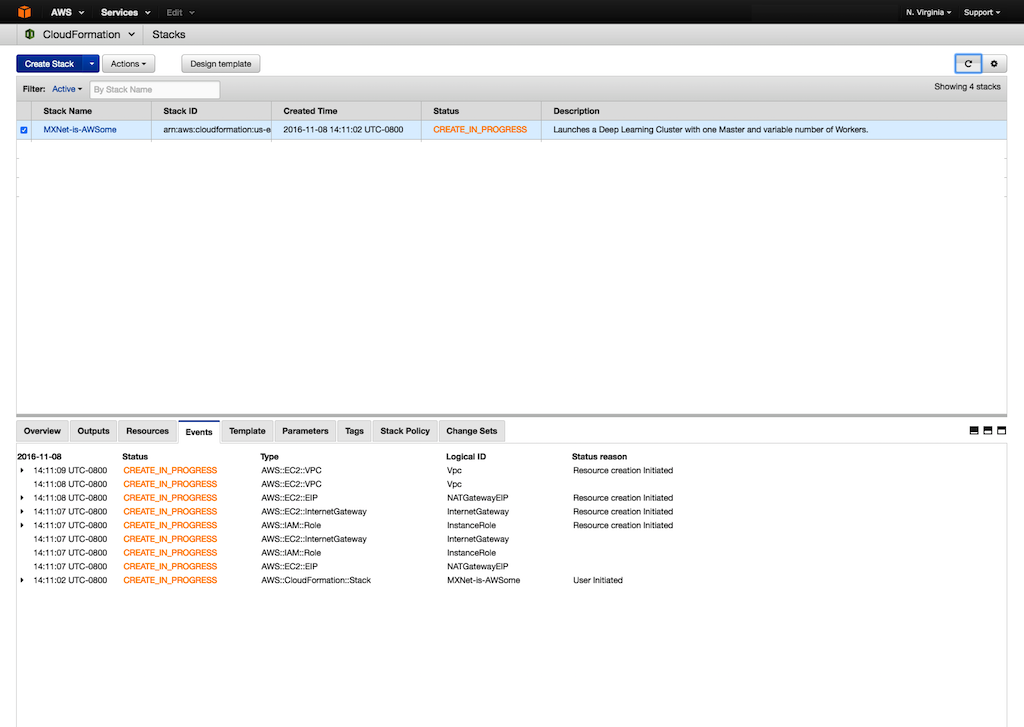
-
To see the status of your stack, choose Events. If stack creation fails, for example, because of an access issue or an unsupported number of workers, troubleshoot the issue. For information about troubleshooting the creation of stacks, see Troubleshooting AWS CloudFormation. The event log records the reason for failure.
Log in to the master instance.
SSH agent forwarding securely connects the instances within the VPC that is connected to the private subnet. The idea is based on Securely Connect to Linux Instances Running in a Private Amazon VPC.
- Find the public DNS/IP of the master.
-
Open the Amazon EC2 console.
-
In the navigation pane, under Auto Scaling, choose Auto Scaling Groups.
-
On the Auto Scaling page, search for the group ID and select it.
-
On the Instances tab, find the instance ID of the master instance.
-
Choose the instance to find the public DNS/IP address used for login.
- Enable SSH agent forwarding.
- Run MXNet distributed training.
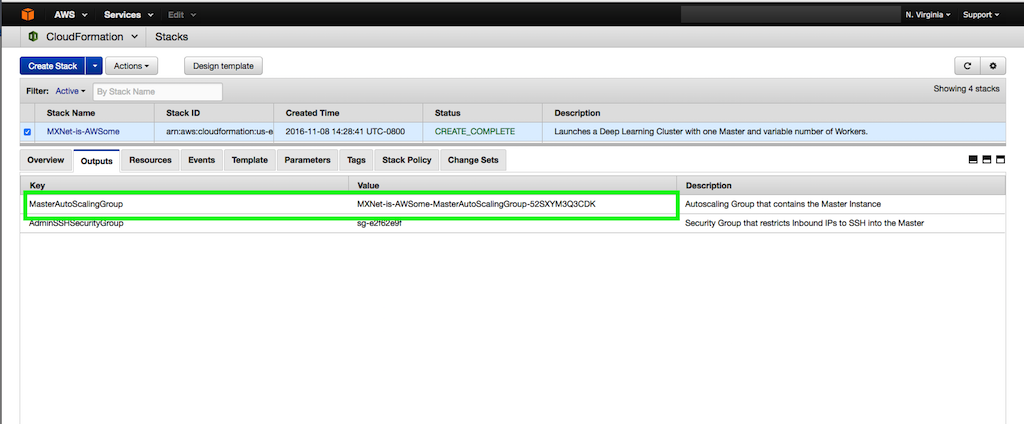
The CloudFormation stack output contains the Auto Scaling group in which the master instance is launched. Note the Auto Scaling group ID for MasterAutoScalingGroup.
This enables communication with all instances in the private subnet. Using the DNS/IP address from Step 1, modify the SSH configuration to include these lines:
Host IP/DNS-from-above
ForwardAgent yes
The following example shows how to run MNIST with data parallelism. Note the use of the DEEPLEARNING_* environment variables:
#terminate all running Python processes across workers
while read -u 10 host; do ssh $host "pkill -f python" ; done 10<$DEEPLEARNING_WORKERS_PATH

#navigate to the mnist image-classification example directory
cd ~/src/mxnet/example/image-classification

#run the MNIST distributed training example
../../tools/launch.py -n $DEEPLEARNING_WORKERS_COUNT -H $DEEPLEARNING_WORKERS_PATH python train_mnist.py --gpus $(seq -s , 0 1 $(($DEEPLEARNING_WORKER_GPU_COUNT - 1))) --network lenet --kv-store dist_sync
These steps are only a subset. For more information about running distributed training, see Run MXNet on Multiple Devices.
FAQ
1. How do I change the IP addresses that are allowed to SSH to the master instance?
The CloudFormation stack output contains the security group that controls the inbound IP addresses for SSH access to the master instance. Use this security group to change your inbound IP addresses.
2. When an instance is replaced, are the IP addresses of the instances updated?
No. You must update IP addresses manually.
3. Does the master instance participate in training/validation?
Yes. Because most deep learning tasks involve GPUs, the master instance acts both as a proxy and as a distributed training/validation instance.
4. Why are the instances in an Auto Scaling group?
Auto Scaling group maintains the number of desired instances by launching a new instance if an existing instance fails. There are two Auto Scaling groups: one for the master and one for the workers in the private subnet. Because only the master instance has a public endpoint to access the hosts in the stack, if the master instance becomes unavailable, you can terminate it and the associated Auto Scaling group automatically launches a new master instance with a new public endpoint.
5. When a new worker instance is added or an existing instance replaced, does CloudFormation update the IP addresses on the master instance?
No, this template does not have the capability to automatically update the IP address of the replacement instance.
Real World AWS Scalability
This is a guest post from Linda Hedges, Principal SA, High Performance Computing.
—–
One question we often hear is, “How well will my application scale on AWS?” For high performance computing (HPC) workloads that cross multiple nodes, the cluster network is at the heart of scalability concerns.
AWS uses advanced Ethernet networking technology, which, like all things AWS, is designed for scale, security, high availability, and low cost. This network is exceptional and continues to benefit from Amazon’s rapid pace of development. Again and again, customers find that the most demanding applications run very well on AWS!
Many have speculated that highly coupled workloads require a name-brand network fabric to achieve good performance. For most applications, this is simply not the case. As with all clusters, the devil is in the details and some applications benefit from cluster tuning.
This post discusses the scalability of a representative, real-world application and provides a few performance tips for achieving excellent application performance using STAR-CCM+ as an example. For more HPC-specific information, see High Performance Computing.
Computational fluid dynamics at TLG Aerospace
TLG Aerospace, a Seattle-based aerospace engineering services company, runs most of their STAR-CCM+ computational fluid dynamics (CFD) cases on AWS. For a detailed case study describing TLG Aerospace’s experience and the results they achieved, see TLG Aerospace.
This post uses one of their CFD cases as an example to understand AWS scalability. By leveraging Amazon EC2 Spot Instances, which allow customers to purchase unused capacity at significantly reduced rates, TLG Aerospace consistently achieves an 80% cost savings compared to their previous cloud and on-premises HPC cluster options. TLG Aerospace experiences solid value, terrific scale-up, and nearly limitless case throughput—all with no queue wait!
Scale-up
HPC applications such as CFD depend heavily on the application’s ability to scale compute tasks efficiently in parallel across multiple compute resources. Parallel performance is often evaluated by determining an application’s scale-up. Scale-up is a function of the number of processors used and is defined as the time it takes to complete a run on one processor, divided by the time it takes to complete the same run on the number of processors used for the parallel run.

As an example, consider an application with a time to completion, or turn-around time of 32 hours when run on one processor. If the same application runs in one hour when run on 32 processors, then the scale-up is 32 hours of time on 1 processor / 1 hour time on 32 processors, or equal to 32 for 32 processes. Scaling is considered to be excellent when the scale-up is close to or equal to the number of processors on which the application is run.
If the same application took 8 hours to complete on 32 processors, it would have a scale-up of only 4: 32 (time on one processor) / 8 (time to complete on 32 processors). A scale-up of 4 on 32 processors is considered to be poor.
Strong scaling vs. weak scaling
In addition to characterizing the scale-up of an application, scalability can be further characterized as “strong” or “weak”. Note that the term “weak”, as used here, does not mean inadequate or bad but is a technical term facilitating the description of the type of scaling that is sought.
Strong scaling offers a traditional view of application scaling, where a problem size is fixed and spread over an increasing number of processors. As more processors are added to the calculation, good strong scaling means that the time to complete the calculation decreases proportionally with increasing processor count.
In comparison, weak scaling does not fix the problem size used in the evaluation, but purposely increases the problem size as the number of processors also increases. The ratio of the problem size to the number of processors on which the case is run is held constant. For a CFD calculation, problem size most often refers to the size of the grid or mesh for a similar configuration.
An application demonstrates good weak scaling when the time to complete the calculation remains constant as the ratio of compute effort to the number of processors is held constant. Weak scaling offers insight into how an application behaves with varying case size.
Scale-up as a function of increasing processor count is shown in Figure 1 for the STAR-CCM+ case data provided by TLG Aerospace. This is a demonstration of “strong” scalability. The blue line shows what ideal or perfect scalability looks like. The purple triangles show the actual scale-up for the case as a function of increasing processor count. Excellent scaling is seen to well over 400 processors for this modest-sized 16M cell case, as evidenced by the closeness of these two curves. This example was run on Amazon EC2 c3.8xlarge instances, each an Intel E5-2680, providing either 16 cores or 32 Hyper-Threading processors using Intel Hyper-Threading Technology (HTT).

Figure 1: Strong Scaling Demonstrated for a 16M Cell STARCCM+ CFD Calculation
Threads vs. cores
AWS customers can choose to run their applications on either threads or cores. For an application like STAR-CCM+, excellent linear scaling can be seen when using either threads or cores, though we always recommend testing specific cases and applications.
For this example, threads were chosen as the processing basis. Running on threads offered a few percentage points in performance improvement when compared to running the same case on cores. Note that the number of available cores is equal to half of the number of available threads.
Processor counts
The scalability of real-world problems is directly related to the ratio of the compute effort per-core to the time required to exchange data across the network. The number of grid cells or mesh size of a CFD case provides a strong indication of how much computational effort is required for a solution. Thus, larger cases scale to even greater processor counts than for the modest sized case discussed here.
STAR-CCM+ has been shown to demonstrate exceptional “weak” scaling on AWS. That’s not shown here, though weak scaling is reflected in Figure 2 by plotting the cells per processor on the horizontal axis. The purple line in Figure 2 shows scale-up as a function of grid cells per processor. The vertical axis for scale-up is on the left-hand side of the graph as indicated by the purple arrow. The green line in Figure 2 shows efficiency as a function of grid cells per processor. The vertical axis for efficiency is shown on the right side of the graph and is indicated with a green arrow. Efficiency is defined as the scale-up divided by the number of processors used in the calculation.

Figure 2: Scale-up and Efficiency as a Function of Cells per Processor
Weak scaling is evidenced by considering the number of grid cells per processor as a measure of compute effort. Holding the grid cells per processor constant while increasing total case size demonstrates weak scaling. Weak scaling is not shown here, because only one CFD case is used.
Efficiency
Fewer grid cells per processor means reduced computational effort per processor. Maintaining efficiency while reducing cells per processor demonstrates the excellent strong scalability of STAR-CCM+ on AWS.
Efficiency remains at about 100% between approximately 250,000 grid cells per thread (or processor) and 100,000 grid cells per thread. Efficiency starts to fall off at about 100,000 grid cells per thread. An efficiency of at least 80% is maintained until 25,000 grid cells per thread. Decreasing grid cells per processor leads to decreased efficiency because the total computational effort per processor is reduced. Note that the perceived ability to achieve more than 100% efficiency (here, at about 150,000 cells per thread) is common in scaling studies, is case-specific, and often related to smaller effects such as timing variation and memory caching.
Turn-around time and cost
Plots of scale-up and efficiency offer an understanding about how a case or application scales. The bottom line, though, is that what really matters to most HPC users is case turn-around time and cost. A plot of turn-around time versus CPU cost for this case is shown in Figure 3. As the number of threads are increased, the total turn-around time decreases. But as the number of threads increases, the inefficiency also increases, which leads to increased costs. The cost shown is based on a typical Spot price for the c3.8xlarge and only includes the computational costs. Small costs are also incurred for data storage. Note that the Spot market price varies from day to day.

Figure 3: Cost for per Run Based on Spot Pricing ($0.35 per hour for c3.8xlarge) as a function of Turn-around Time
Minimum cost and turn-around time were achieved with approximately 100,000 cells per thread. Many users choose a cell count per thread to achieve the lowest possible cost. Others may choose a cell count per thread to achieve the fastest turn-around time.
If a run is desired in 1/3rd the time of the lowest price point, it can be achieved with approximately 25,000 cells per thread. (Note that many users run STAR-CCM+ with significantly fewer cells per thread than this.) While this increases the compute cost, other concerns—such as license costs or schedules—can be overriding factors. For this 16M cell case, the added inefficiency results in an increase in run price from $3 to $4 for computing. Many find the reduced turn-around time well worth the price of the additional instances.
Cluster tuning tips
As with any cluster, good performance requires attention to the details of the cluster setup. While AWS allows for the quick set up and take down of clusters, performance is affected by many of the specifics in that setup. This post provides some examples.
Placement groups
On AWS, a placement group is a grouping of instances within a single Availability Zone that allow for low latency between the instances. Placement groups are recommended for all applications where low latency is a requirement. A placement group was used to achieve the best performance from STAR-CCM+. For more information, see Placement Groups in the Amazon EC2 User Guide for Linux Instances.
Amazon Linux OS
Amazon Linux is a version of Linux maintained by Amazon. The distribution is designed to provide a stable, secure, and highly performant environment. Amazon Linux is optimized to run on AWS and offers excellent performance for running HPC applications. For the case presented here, the operating system used was Amazon Linux. Other Linux distributions are also performant. However, we strongly recommend that for Linux HPC applications, you use a minimum of the version 3.10 Linux kernel, to be sure of using the latest Xen libraries. For more information, see Amazon Linux AMI.
Amazon EBS storage
Amazon Elastic Block Store (Amazon EBS) is a persistent, block-level storage device often used for cluster storage on AWS. EBS provides reliable block-level storage volumes that can be attached (and removed) from an Amazon EC2 instance. A standard EBS General Purpose SSD (gp2) volume is all that is required to meet the needs of STAR-CCM+, and was used for this post. Other HPC applications may require faster I/O to prevent data writes from being a bottleneck to turn-around speed but also, many HPC applications only require the less expensive throughput optimized EBS volumes. For these applications, other storage options exist. For more information, see Storage.
Intel Hyper-Threading Technology (HTT)
As mentioned previously, STAR-CCM+, like many other CFD solvers, runs well on both threads and cores. HTT can improve the performance of some MPI applications depending on the application, case, and size of the workload allocated to each thread; it may also slow performance. The one-size-fits-all nature of the static cluster compute environments means that most HPC clusters disable HTT.
Generally, computationally intensive workloads run best on cores while those that are I/O bound run best on threads. Again, a few percentage points increase in performance was discovered for this case, by running with threads. If there is no time to evaluate the effect of HTT on case performance, then we recommend that HTT be disabled. When disabled, it is important to bind the core to designated CPU, also known as processor or CPU affinity. It almost universally improves performance over unpinned cores for computationally intensive workloads.
Time Stamp Counter
Occasionally, an application includes frequent time measurement in the code; perhaps this is done for performance tuning. Under these circumstances, performance can be improved by setting the clock source to the TSC (Time Stamp Counter). This tuning was not required for this application but is mentioned here for completeness.
Summary
When you evaluate an application, we recommend using a meaningful, real world use case. A case that is too large or small won’t reflect the performance and scalability achievable in everyday operation. The only way you’ll know positively how an application will perform on AWS is to try it!
AWS offers solid strong scaling and exceptional weak scaling. Excellent performance can be achieved on AWS for most applications. In addition to low cost and quick turn-around time, important considerations for HPC also include throughput and availability. AWS offers nearly limitless throughput, security, cost-savings, and high-availability making queues a “thing of the past”. A long queue wait makes for a long case turn-around time, regardless of the scale.
If you have questions or suggestions, please comment below.