AWS Security Blog
Use AWS Fargate and Prowler to send security configuration findings about AWS services to Security Hub
May 3, 2021: Since the author wrote this post, Security Hub has launched native features that simplify integration with Prowler as a findings provider. Therefore, Security Hub native integration with Prowler is now the recommended solution for sending findings from Prowler. For more information, see the Prowler documentation.
In this blog post, I’ll show you how to integrate Prowler, an open-source security tool, with AWS Security Hub. Prowler provides dozens of security configuration checks related to services such as Amazon Redshift, Amazon ElasticCache, Amazon API Gateway and Amazon CloudFront. Integrating Prowler with Security Hub will provide posture information about resources not currently covered by existing Security Hub integrations or compliance standards. You can use Prowler checks to supplement the existing CIS AWS Foundations compliance standard Security Hub already provides, as well as other compliance-related findings you may be ingesting from partner solutions.
In this post, I’ll show you how to containerize Prowler using Docker and host it on the serverless container service AWS Fargate. By running Prowler on Fargate, you no longer have to provision, configure, or scale infrastructure, and it will only run when needed. Containers provide a standard way to package your application’s code, configurations, and dependencies into a single object that can run anywhere. Serverless applications automatically run and scale in response to events you define, rather than requiring you to provision, scale, and manage servers.
Solution overview
The following diagram shows the flow of events in the solution I describe in this blog post.
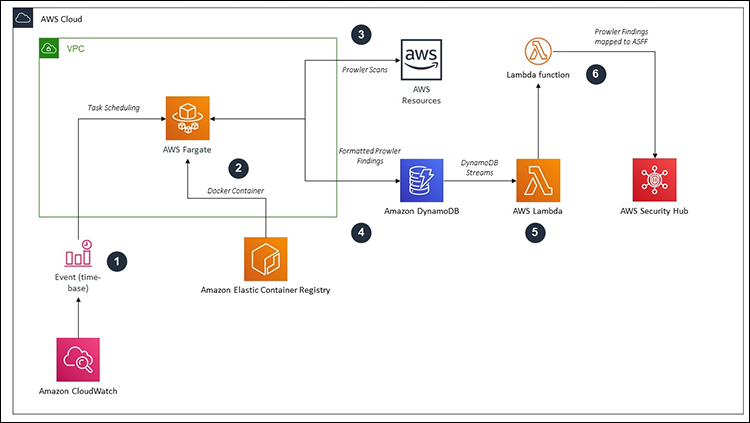
Figure 1: Prowler on Fargate Architecture
The integration works as follows:
- A time-based CloudWatch Event starts the Fargate task on a schedule you define.
- Fargate pulls a Prowler Docker image from Amazon Elastic Container Registry (ECR).
- Prowler scans your AWS infrastructure and writes the scan results to a CSV file.
- Python scripts in the Prowler container convert the CSV to JSON and load an Amazon DynamoDB table with formatted Prowler findings.
- A DynamoDB stream invokes an AWS Lambda function.
- The Lambda function maps Prowler findings into the AWS Security Finding Format (ASFF) before importing them to Security Hub.
Except for an ECR repository, you’ll deploy all of the above via AWS CloudFormation. You’ll also need the following prerequisites to supply as parameters for the CloudFormation template.
Prerequisites
- A VPC with at least 2 subnets that have access to the Internet plus a security group that allows access on Port 443 (HTTPS).
- An ECS task role with the permissions that Prowler needs to complete its scans. You can find more information about these permissions on the official Prowler GitHub page.
- An ECS task execution IAM role to allow Fargate to publish logs to CloudWatch and to download your Prowler image from Amazon ECR.
Step 1: Create an Amazon ECR repository
In this step, you’ll create an ECR repository. This is where you’ll upload your Docker image for Step 2.
- Navigate to the Amazon ECR Console and select Create repository.
- Enter a name for your repository (I’ve named my example securityhub-prowler, as shown in figure 2), then choose Mutable as your image tag mutability setting, and select Create repository.

Figure 2: ECR Repository Creation
Keep the browser tab in which you created the repository open so that you can easily reference the Docker commands you’ll need in the next step.
Step 2: Build and push the Docker image
In this step, you’ll create a Docker image that contains scripts that will map Prowler findings into DynamoDB. Before you begin step 2, ensure your workstation has the necessary permissions to push images to ECR.
- Create a Dockerfile via your favorite text editor, and name it Dockerfile.
- Create a new file called script.sh and paste in the below code. This script will call the remaining scripts, which you’re about to create in a specific order.
Note: Change the AWS Region in the Prowler command on line 3 to the region in which you’ve enabled Security Hub.
- Create a new file called converter.py and paste in the below code. This Python script will convert the Prowler CSV report into JSON, and both versions will be written to the local storage of the Prowler container.
- Create your last file, called loader.py and paste in the below code. This Python script will read values from the JSON file and send them to DynamoDB.
- From the ECR console, within your repository, select View push commands to get operating system-specific instructions and additional resources to build, tag, and push your image to ECR. See Figure 3 for an example.

Figure 3: ECR Push Commands
Note: If you’ve built Docker images previously within your workstation, pass the --no-cache flag with your docker build command.
- After you’ve built and pushed your Image, note the URI within the ECR console (such as 12345678910.dkr.ecr.us-east-1.amazonaws.com/my-repo), as you’ll need this for a CloudFormation parameter in step 3.
Step 3: Deploy CloudFormation template
Download the CloudFormation template from GitHub and create a CloudFormation stack. For more information about how to create a CloudFormation stack, see Getting Started with AWS CloudFormation in the CloudFormation User Guide.
You’ll need the values you noted in Step 2 and during the “Solution overview” prerequisites. The description of each parameter is provided on the Parameters page of the CloudFormation deployment (see Figure 4)

Figure 4: CloudFormation Parameters
After the CloudFormation stack finishes deploying, click the Resources tab to find your Task Definition (called ProwlerECSTaskDefinition). You’ll need this during Step 4.
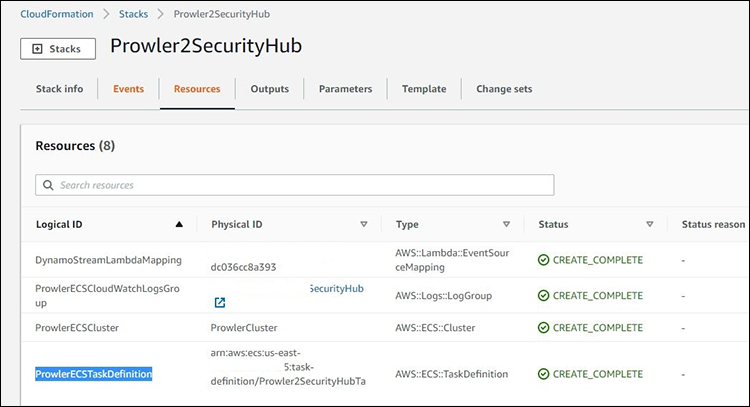
Figure 5: CloudFormation Resources
Step 4: Manually run ECS task
In this step, you’ll run your ECS Task manually to verify the integration works. (Once you’ve tested it, this step will be automatic based on CloudWatch events.)
- Navigate to the Amazon ECS console and from the navigation pane select Task Definitions.
- As shown in Figure 6, select the check box for the task definition you deployed via CloudFormation, then select the Actions dropdown menu and choose Run Task.

Figure 6: ECS Run Task
- Configure the following settings (shown in Figure 7), then select Run Task:
- Launch Type: FARGATE
- Platform Version: Latest
- Cluster: Select the cluster deployed by CloudFormation
- Number of tasks: 1
- Cluster VPC: Enter the VPC of the subnets you provided as CloudFormation parameters
- Subnets: Select 1 or more subnets in the VPC
- Security groups: Enter the same security group you provided as a CloudFormation parameter
- Auto-assign public IP: ENABLED

Figure 7: ECS Task Settings
- Depending on the size of your account and the resources within it, your task can take up to an hour to complete. Follow the progress by looking at the Logs tab within the Task view (Figure 8) by selecting your task. The stdout from Prowler will appear in the logs.
Note: Once the task has completed it will automatically delete itself. You do not need to take additional actions for this to happen during this or subsequent runs.

Figure 8: ECS Task Logs
- Under the Details tab, monitor the status. When the status reads Stopped, navigate to the DynamoDB console.
- Select your table, then select the Items tab. Your findings will be indexed under the primary key NOTES, as shown in Figure 9. From here, the Lambda function will trigger each time new items are written into the table from Fargate and will load them into Security Hub.

Figure 9: DynamoDB Items
- Finally, navigate to the Security Hub console, select the Findings menu, and wait for findings from Prowler to arrive in the dashboard as shown in figure 10.

Figure 10: Prowler Findings in Security Hub
If you run into errors when running your Fargate task, refer to the Amazon ECS Troubleshooting guide. Log errors commonly come from missing permissions or disabled Regions – refer back to the Prowler GitHub for troubleshooting information.
Conclusion
In this post, I showed you how to containerize Prowler, run it manually, create a schedule with CloudWatch Events, and use custom Python scripts along with DynamoDB streams and Lambda functions to load Prowler findings into Security Hub. By using Security Hub, you can centralize and aggregate security configuration information from Prowler alongside findings from AWS and partner services.
From Security Hub, you can use custom actions to send one or a group of findings from Prowler to downstream services such as ticketing systems or to take custom remediation actions. You can also use Security Hub custom insights to create saved searches from your Prowler findings. Lastly, you can use Security Hub in a master-member format to aggregate findings across multiple accounts for centralized reporting.
If you have feedback about this blog post, submit comments in the Comments section below. If you have questions about this blog post, start a new thread on the AWS Security Hub forum.
Want more AWS Security news? Follow us on Twitter.