Category: AWS Elastic Beanstalk
AWS Elastic Beanstalk for Ruby 2
 AWS Elastic Beanstalk makes it easy for you to deploy and manage applications in the AWS cloud. After you upload your application, Elastic Beanstalk will provision, monitor, and scale capacity (Amazon EC2 instances), while also load balancing incoming requests across all of the healthy instances.
Choice of Language and Runtime Environment
Your PHP, Python, Ruby, JavaScript, or .NET code can run in the appropriate Tomcat, Node.js, or IIS environment:

Your Elastic Beanstalk application can use the Amazon Relational Database Service (RDS) to create and manage SQL Server, MySQL, Oracle Database, and PostgreSQL databases.
Elastic Beanstalk chooses and sets sensible defaults for all of the AWS resources that it creates and these values will work fine for a wide variety of applications. Of course, you have the power to customize these settings by editing the appropriate configuration files. See the AWS Elastic Beanstalk Developer Guide for more information.
New Support for Ruby 2
Today we are making Elastic Beanstalk even more useful by adding support for Ruby 2.0 applications. Today’s launch gives you access to a very wide variety of new features.
Elastic Beanstalk for Ruby 2.0 comes with a choice of Passenger Standalone or Puma web server for Ruby with Nginx as a reverse proxy. This highly requested combination allows you to utilize all the virtual cores available on the instance type running your environment.
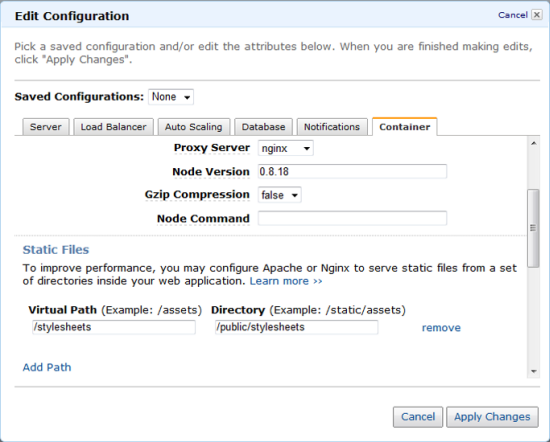
If you use Nginx, you can improve performance by configuring gzip compression and support for static files. Gzip compression reduces the size of the HTTP responses and can increase the apparent speed of your web application. Static file support lets Nginx serve static assets such as images and CSS style sheets in an optimized fashion.
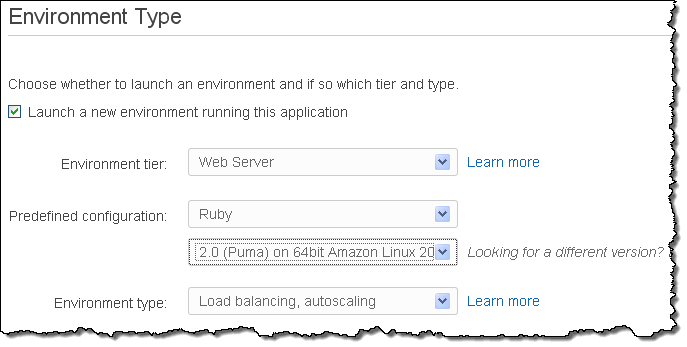
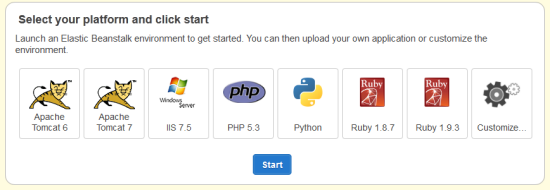
To get started, simply create a new Elastic Beanstalk application and select the Ruby platform. This configuration will use the Puma web server by default:
Sample Ruby Applications
To help you to get started with Ruby 2 and Elastic Beanstalk, we have created some new samples.
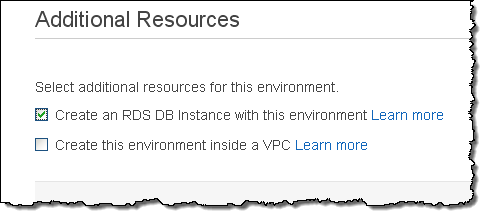
The Sample Rails 4 application creates a simple pre-launch marketing site. Be sure to create an RDS database instance if you use this sample:
The Sample Sinatra application creates a simple welcome page within an environment set up to use the Sinatra domain-specific language (DSL).
And there you go! Ruby 2 support is available now and you can start using it today.
— Jeff;
AWS CloudFormation Adds Support for Redshift and More
My colleague Chetan Dandekar has a lot of good news for AWS CloudFormation users!
— Jeff;
AWS CloudFormation now supports Amazon Redshift. We have recently enhanced our support for other AWS resources as well.
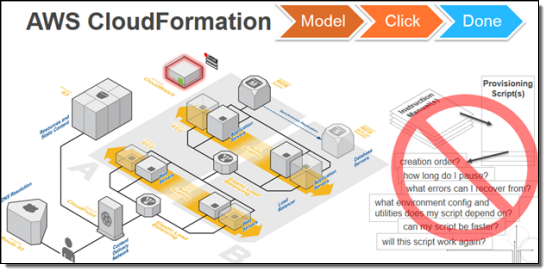
What is CloudFormation?
AWS CloudFormation simplifies provisioning and management of a wide range of AWS resources, from EC2 and VPC to DynamoDB. CloudFormation enables users to model and version control the architecture they want in the CloudFormation template files. An architecture could be as simple as a single EC2 instance or as complex as a distributed database or the entire VPC configuration of an enterprise. (See CloudFormation sample templates). The CloudFormation service can automatically create the desired architecture (CloudFormation stacks) from the template files, without burdening the users with writing complex provisioning code.
CloudFormation speeds up provisioning by parallelizing creation and updating of stacks. The CloudFormation API lets you automate AWS provisioning and also gives you the ability to integrate it with the development and system management tools that you already use.
The CloudFormation templates can also be used to standardize and package products for broader users to use. (For example, an administrator can create a standard VPC configuration template for an entire developer team to use, and an ISV can package a distributed database configuration for its client to provision on AWS).
Amazon Redshift Support
![]() Amazon Redshift is a fast, fully managed, petabyte-scale data warehouse service. You can now launch and manage Redshift clusters using CloudFormation. You can also document, version control, and share your Redshift configuration using CloudFormation templates. Here is a sample CloudFormation template provisioning a Redshift cluster.
Amazon Redshift is a fast, fully managed, petabyte-scale data warehouse service. You can now launch and manage Redshift clusters using CloudFormation. You can also document, version control, and share your Redshift configuration using CloudFormation templates. Here is a sample CloudFormation template provisioning a Redshift cluster.
CloudFormation also supports the other AWS database services: Amazon RDS, Amazon DynamoDB, Amazon SimpleDB and Amazon ElastiCache.
Other Additions
Support for the following AWS features was added in early 2014:
- Auto Scaling scheduled actions and block device properties
- DynamoDB local and global secondary indexes
- SQS dead letter queue (DLQ)
- Updating Elastic Beanstalk applications
- Updating SQS queues and queue policy
- Updating S3 buckets and bucket policies
- Up to 60 parameters and 60 outputs in a CloudFormation template
Read the CloudFormation release notes for additional information on these changes.
To learn more about CloudFormation, please visit the CloudFormation detail page, documentation or watch this introductory video. We have a large collection of sample templates that makes it easy to get started with CloudFormation within minutes.
Background Task Handling for AWS Elastic Beanstalk
My colleague Abhishek Singh sent along a guest post to introduce a really important new feature for AWS Elastic Beanstalk.
— Jeff;
You can now launch Worker Tier environments in Elastic Beanstalk.
These environments are optimized to process application background tasks at any scale. Worker tiers complement the existing web tiers and are ideal for time consuming tasks such as report generation, database cleanup, and email notification.
For example, to send confirmation emails from your application, you can now simply queue a task to later send the email while your application code immediately proceeds to render the rest of your webpage. A worker tier in your environment will later pick up the task and send the email in the background.
A worker is simply another HTTP request handler that Beanstalk invokes with messages buffered using the Amazon Simple Queue Service (SQS). Elastic Beanstalk takes care of creating and managing the queue if one isnt provided. Messages put in the queue are forwarded via HTTP POST to a configurable URL on the local host. You can develop your worker code using any language supported by Elastic Beanstalk in a Linux environment: PHP, Python, Ruby, Java, or Node.js.
You can create a single instance or a load balanced and auto-scaled worker tier that will scale based on the work load. With worker tiers, you can focus on writing the actual code that does the work. You don’t have to learn any new APIs and you don’t have to manage any servers. For more information, read our new documentation on the Environment Tiers.
Use Case – Sending Confirmation Emails
Imagine, youre a startup with a game changing idea or product and youd like to gauge customer interest.
You create a simple web application that will allow potential customers to register their email address to be notified of updates. As with most businesses, you decide that once the customer has provided their email address you will send them a confirmation email informing them that their registration was successful. By using an Elastic Beanstalk worker tier to validate the email address and to generate and send the confirmation email, you can make your front-end application non-blocking and provide customers with a more responsive user experience.
The remainder of the post will walk you through creating a worker tier and deploying a sample Python worker application that can be used to send emails asynchronously. If you do not have a frontend application, you can download a Python based front-end application from the AWS Application Management Blog.
We’ll use the Amazon Simple Email Service (SES). Begin by adding a verified sender email address as follows:
- Log in to the SES Management Console and select Email Addresses from the left navigation bar.
- Click on Verify a New Email Address.
- Type in the email address you want to use to send emails and click Verify This Email Address. You will receive an email at the email address provided with a link to verify the email address. Once you have verified the email address, you can use the email address as the SOURCE_EMAIL_ADDRESS.
Next, download and customize the sample worker tier application:
- Download the worker tier sample application source bundle and extract the files into a folder on your desktop.
- Browse to the folder and edit the line that reads SOURCE_EMAIL_ADDRESS = ‘nobody@amazon.com in the default_config.py file so that it refers to the verified sender email address, then save the file.
- Select all of the files in the folder and add them to a zip archive. For more details on creating a source bundle to upload to Elastic Beanstalk, please read Creating an Application Source Bundle.
Now you need to create an IAM Role for the worker role. Here’s what you need to do:
- Log in to the IAM Management Console and select Roles on the left navigation bar.
- Click the Create New Role button to create a new role.
- Type in WorkerTierRole for the Role Name.
- Select AWS Service Roles and select Amazon EC2.
- Select Custom Policy and click Select.
- Type in WorkerTierRole for the Policy Name, paste the following snippet as the Policy Document, and click Continue:
{ "Version": "2012-10-17", "Statement": [ { "Effect": "Allow", "Action": [ "ses:SendEmail" ], "Resource": [ "*" ] }, { "Effect": "Allow", "Action": [ "sqs:*" ], "Resource": [ "*" ] }, { "Effect": "Allow", "Action": [ "cloudwatch:PutMetricData" ], "Resource": [ "*" ] } ] } - Click Create Role to create the role.
You are now ready to create the Elastic Beanstalk application which will host the worker tier. Follow these steps:
- Log in to the AWS Elastic Beanstalk Web Console and click on Create New Application
- Enter the application name and description and click Create
- Select Worker for the Environment tier drop down, Python for the Predefined configuration and Single instance for Environment type. Click Continue.
- Select Upload your own and Browse to the source bundle you created previously.
- Enter the environment name and description and click Continue.
- On the Additional Resources page, leave all options unselected and click Continue.
- On the Configuration Details page, select the WorkerTierRole that you created earlier from the Instance profile drop down and click Continue.
- On the Worker Details page, modify the HTTP path to /customer-registered and click Continue.
- Review the configuration and click Create.
Once the environment is created and its health is reported as Green, click on View Queue to bring up the SQS Management Console:

Then Click Queue Actions and select Send a Message.
Type in messages in the following format; click Send Message to send a confirmation email:
{ "name" : "John Smith", "email" : "john@example.com" }
This new feature is available now and you can start using it today.
— Abhishek Singh, Senior Product Manager
A New Elastic Beanstalk Management Console…
With AWS Elastic Beanstalk, you can deploy, monitor, and grow your application quickly and easily. Its management console is an essential piece of the overall experience and helps make complex tasks simple. Today, Im happy to introduce a redesign of the Elastic Beanstalk management console that streamlines common tasks further and adds new functionality that youve requested through our feedback mechanism.
Starting today, you can also create a new type of Elastic Beanstalk environment that runs your application on a single EC2 instance. This new environment type is ideal for development workloads or for non-critical, low traffic applications and reduces the overall cost of an Elastic Beanstalk environment. This new environment type uses the same software stacks so you can easily migrate to a load-balanced, autoscaled environment when your application is ready for takeoff.
Heres a quick list of my favorite console features:
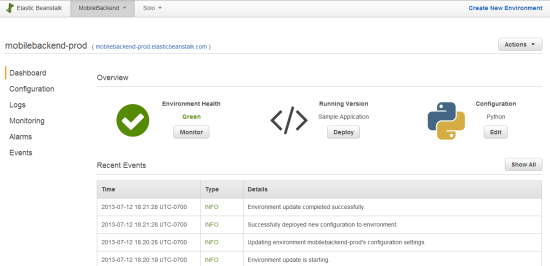
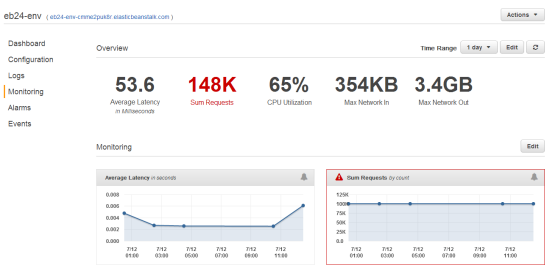
- A redesigned environment dashboard that provides you with a snapshot of your environment and puts the most common actions at your fingertips:
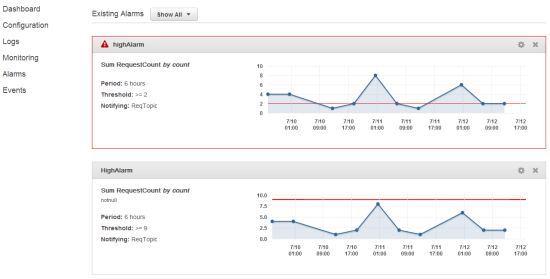
- A customizable monitoring and alarming experience that shows how your application is doing. You can customize this dashboard with relevant CloudWatch metrics and even add alarms in case you want to be notified of significant changes. For example, you may want to monitor the number of requests to your application and set an alarm when they exceed an unexpected value.
- A VPC configuration page to help secure your environment inside an existing VPC. Be sure to check out the Elastic Beanstalk Developer Guide for the requirements to run your Elastic Beanstalk environment in a VPC.

You can try out the new Elastic Beanstalk Console today!
–Jeff, with lots of help from Saad;
AWS Elastic Beanstalk for .NET now Supports VPC, RDS, and Configuration Files
AWS Elastic Beanstalk for .NET now supports the Amazon Virtual Private Cloud (VPC), seamlessly integrates with the Amazon Relational Database Service (RDS), and can be customized using configuration files.
Elastic Beanstalk allows you to easily deploy and manage .NET applications on AWS. Because Elastic Beanstalk leverages Windows Server 2008 R2 and Windows Server 2012, you can run .NET applications with minimal changes.
VPC Integration
With Amazon VPC, you can set up your own virtual network and you can configure Elastic Beanstalk to run your .NET applications inside of this logically isolated section of the AWS cloud. For example, you can create a private subnet where you host your Elastic Beanstalk backend services and then expose the public-facing web application in a public subnet. Visit the AWS Elastic Beanstalk Developer Guide to learn more about Using AWS Elastic Beanstalk with Amazon VPC.
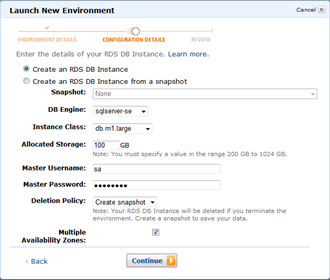
RDS Integration
If your application relies on a relational database, you can easily configure an Amazon RDS DB Instance for your Elastic Beanstalk .NET application. Using the AWS Toolkit for Visual Studio or the AWS Management Console, you can add an RDS DB Instance with just a few clicks. The connection information is automatically exposed to your application through a connection string. Visit Using Amazon RDS in the AWS Elastic Beanstalk Developer Guide.
Configuration Files
Elastic Beanstalk configuration files are YAML text files that allow you to customize your environment in two ways:
- You can customize the software running inside your environment by downloading files, running commands, installing agents and packages, and setting environment variables.
- You can provision and configure additional resources such as DynamoDB tables, SQS queues, and CloudWatch alarms.
For example, if your application requires write permissions to app_data, you can grant it these permissions using the following configuration file:
01 –changeperm :
command : icacls “C:/inetpub/wwwroot/myapp/App_Data” /grant DefaultAppPool : (OI ) (CI )F > log. txt 2 >& 1
cwd : “C:/inetpub/wwwroot/myapp”
Visit Customizing and Configuring AWS Elastic Beanstalk Environments in the AWS Elastic Beanstalk Developer Guide to learn more about configuration files and for additional examples.
— Jeff + Saad;
AWS Elastic Beanstalk for Node.js
Im happy to be able to tell you that AWS Elastic Beanstalk now supports Node.js applications. You can now build event-driven Node.js applications and then use Elastic Beanstalk to deploy and manage them on AWS.
Elastic Beanstalk automatically configures the environment and resources using sensible defaults in order to run your Node.js application. You can focus on writing your application and let Elastic Beanstalk run it and scale it automatically.
Elastic Beanstalk for Node.js includes a bunch of features that are specific to the Node.js environment. Here are some of my favorites:
- Choose Nginx or Apache as the reverse proxy to your Node.js application. You can even choose to not use any proxy if your application requires that the client establishes a direct connection.
- Configure HTTP and TCP load balancing depending on what your application needs. If your application uses WebSockets, then TCP load balancing might be more appropriate for your workload.
- Configure the Node.js stack by using the specific version of Node.js that your application needs or by providing the command that is used to launch your Node.js application. You can also manage dependencies using npm.
- Help improve performance by configuring gzip compression and static files when using Nginx or Apache. With gzip compression, you can reduce the size of your response to the client to help create faster transfer speeds. With static files, you can let Nginx or Apache quickly serve your static assets (such as images or CSS) without having these requests take time away from the data-intensive processing that your Node.js application might be performing.
- Seamlessly integrate your app with Amazon RDS to store and retrieve data from a relational data store.
- Customize your EC2 instances or connect your app to AWS resources using Elastic Beanstalk configuration files (visit the AWS Elastic Beanstalk Developer Guide to learn more about configuration files).
- Run your Node.js application inside an Amazon Virtual Private Cloud for additional networking control.
To get started, simply create a new Elastic Beanstalk application and select the Node platform:
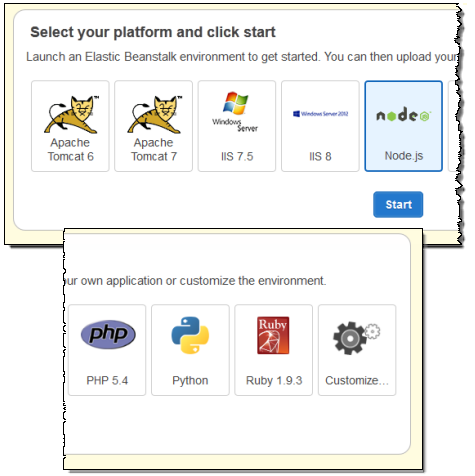
You can configure all of the options for your Node.js environment from within Elastic Beanstalk:
To learn more about Elastic Beanstalk for Node.js, visit the AWS Elastic Beanstalk Developer Guide. The documentation also includes step-by-step guides for using the Express and Geddy frameworks with Elastic Beanstalk.
— Jeff;
AWS Elastic Beanstalk – Environment Resource Support + Updated PHP Runtime
AWS Elastic Beanstalk can now provision and configure AWS resources to power your application. In conjunction with a new version of our PHP runtime, you get more control and more flexibility with less code.
In October, we announced the Elastic Beanstalk configuration files and talked about how they can help you configure EC2 instances without creating and maintaining custom AMIs. We have extended these configuration files to allow you to provision and configure resources such as SQS queues and DynamoDB tables for your Elastic Beanstalk application. The configuration file format is YAML-based, and you can find the details in the AWS Elastic Beanstalk Developer Guide.
We are also announcing an updated PHP runtime that supports configuration files as well as the seamless integration with Amazon RDS and Amazon VPC – see my previous blog post for details. The PHP runtime supports 5.3 and 5.4. You can also install dependencies using Composer. Visit the Elastic Beanstalk Developer Guide to learn more about the updated PHP runtime and for walkthroughs of how to deploy CakePHP and Symfony2.
I’d lke to show you how simple and powerful it is to use Elastic Beanstalk to create and configure the new environment resources. Ill use the updated PHP runtime and show you how to configure DynamoDB backed session management. You can find the full example in the AWS Elastic Beanstalk Developer Guide.
Here’s what you need to do:
- Launch an Elastic Beanstalk PHP environment (see the AWS Elastic Beanstalk Developer Guide).
- Create an IAM role with enough permission to read and write to the DynamoDB table (lets call it SessionRole).
- Add an .ebextensions directory to your application.
- In that directory, create a configuration file called dynamodb.config with the following content:
Resources:
SessionTable:
Type: AWS::DynamoDB::Table
Properties:
KeySchema:
HashKeyElement:
AttributeName: Index
AttributeType: S
ProvisionedThroughput:
ReadCapacityUnits: 1
WriteCapacityUnits: 1 - Add the role to the Elastic Beanstalk environment (this and all of the subsequent snippets also belong in the dynamodb.config file):
AWSEBAutoScalingLaunchConfiguration:
Properties:
IamInstanceProfile:
Fn::GetOptionSetting:
OptionName: IAMInstanceProfileARN
DefaultValue: “arn:aws:iam:: 123456789123:instance-profile/SessionRole” - Pass the details of the DynamoDB table to the EC2 instances in your environment:
files:
“/var/app/sessiontable”:
mode: “000444”
content: |
` {“Ref” : “SessionTable” }`
` {“Ref” : “AWS::Region” }` - Add a CloudWatch Alarm so that you are alerted when requests to DynamoDB get throttled:
SessionThrottledRequestsAlarm:
Type: AWS::CloudWatch::Alarm
Properties:
AlarmDescription: { “Fn::Join” : [“”, [ { “Ref” : “AWSEBEnvironmentName” }, “: requests are being throttled.” ] ] }
Namespace: AWS/DynamoDB
MetricName: ThrottledRequests
Dimensions:
– Name: TableName
Value: { “Ref” : “SessionTable” }
Statistic: Sum
Period: 300
EvaluationPeriods: 1
Threshold:
Fn::GetOptionSetting:
OptionName: SessionThrottledRequestsThreshold
DefaultValue: 1
ComparisonOperator: GreaterThanThreshold
AlarmActions:
– Ref: SessionAlarmTopic
InsufficientDataActions:
– Ref: SessionAlarmTopic - Make sure to include a require for the AWS SDK for PHP 2 in your composer.json file:
“require” : {
“aws/aws-sdk-php” : “*”
}
- Finally, add the following code to your PHP application to connect it to the configuration file:
<?php
// Include the SDK using the Composer autoloader
require ‘vendor/autoload.php’;use Aws\DynamoDb\DynamoDbClient;
// Grab the session table name and region from the configuration file
list($tableName, $region) = file(__DIR__ . ‘/../sessiontable’);// Create a DynamoDB client and register the table as the session handler
$dynamodb = DynamoDbClient::factory(array(‘region’ => $region));
$handler = $dynamodb->registerSessionHandler(array(‘table_name’ => $tablename, ‘hash_key’ => ‘Index’));?>
As you can see, you can use this new Elastic Beanstalk feature to set up and configure the AWS resources needed by your application.
— Jeff, with lots of help from Saad
AWS Expansion in Brazil – Elastic Beanstalk, Provisioned IOPS for EBS and RDS
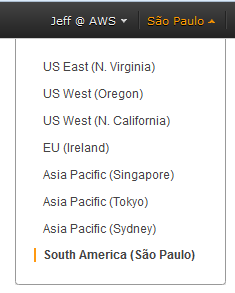 We launched an AWS Region in Brazil almost a year ago, along with Portuguese and Spanish versions of the AWS Blog.
Today we are adding the following new AWS functionality in the Region:
AWS Elastic Beanstalk – You can now deploy and manage .NET, PHP, Python, Ruby, and Java applications in the AWS Cloud using AWS Elastic Beanstalk. With this new addition to our lineup in Brazil, you can get your application online more quickly and allow Elastic Beanstalk to handle system updates, scaling, monitoring, and lots more.
EBS Provisioned IOPS – You can now create EBS Provisioned IOPS volumes in Brazil, with up to 2000 IOPS per EBS volume. This will give you more control and the ability to create fast, responsive applications on AWS.
RDS Provisioned IOPS – You can now create RDS Database Instances with up to 10,000 Provisioned IOPS (for MySQL and Oracle) or 7,000 (SQL Server). This gives you the power to create fast, responsive database-driven applications on AWS. As part of today’s launch, this is also available in the Asia Pacific (Singapore) Region.
— Jeff;
PS[0] – Check out the AWS Products and Services by Region to find out which services are available in each AWS Region.
PS[1] – This post is also available in Portuguese and Spanish.
AWS Elastic Beanstalk – Ruby Support and VPC Integration
AWS Elastic Beanstalk now supports Ruby applications and Amazon Virtual Private Cloud (VPC). Let’s take a look at each of these important and powerful new features.
Ruby Support
Elastic Beanstalk continues to expand the list of supported platforms (Java, PHP, Python, and .NET) and now adds Ruby applications. If youre a Ruby developer, you can now focus on your application and let Elastic Beanstalk handle the details of provisioning, deployment, monitoring, and scaling.
Elastic Beanstalk runs Ruby applications on the Passenger application server. This means you can develop and test locally and seamlessly deploy to Elastic Beanstalk without changes to your application code. The Elastic Beanstalk Developer Guide is a good place to learn more about the Ruby support. It also includes a walkthrough for Rails and Sinatra applications.
If you havent used Elastic Beanstalk before, heres a quick tour of its application management capabilities:
Choose your runtime and deploy using Git and the eb command line or the AWS Management Console:
Customize your environment using YAML configuration files and a Gemfile.
Use snapshot logs to debug your application.
Let Elastic Beanstalk automatically monitor the health of your application and auto-scale it.
Seamlessly integrate your Elastic Beanstalk application with Amazon RDS.
VPC Integration
You can now run Elastic Beanstalk applications within a Virtual Private Cloud (VPC). You can now define and provision a private, virtual network in the cloud and connect it to your corporate network using a VPN connection. This allows you to run many new types of applications on Elastic Beanstalk. For example, you can run your intranet applications such as a trouble ticketing application or a reporting site on Elastic Beanstalk. Here’s the network topology:
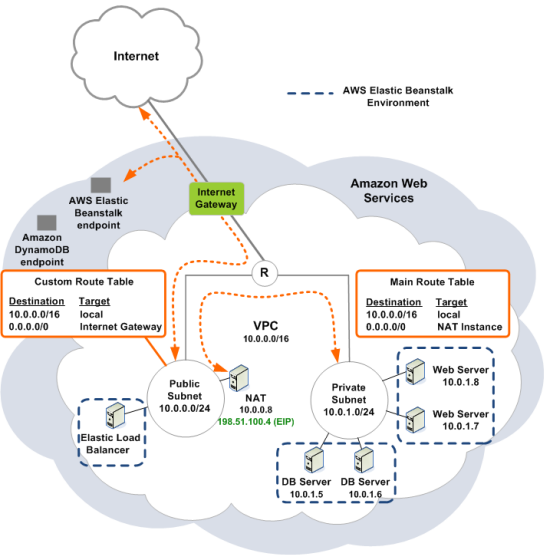
Once you have your VPC set up, you simply provide the VPC ID and the subnet IDs to Elastic Beanstalk and your application gets automatically provisioned inside the VPC.
To learn more about how to launch Elastic Beanstalk environments inside a VPC, visit the Elastic Beanstalk Developer Guide. We also have an example CloudFormation template that creates a VPC that you can use to launch Elastic Beanstalk environments.
— Jeff;
PS – We are hiring software development engineers, product managers, and BI engineers. If you are passionate about building the best developer experience, get in touch with us at aws-elasticbeanstalk-jobs@amazon.com.
Customize Elastic Beanstalk Using Configuration Files
Saad Ladki of the Elastic Beanstalk team is back with another guest post. Today, Saad talks about a customization feature that will allow you to customize the run-time configuration of your applications by installing packages and libraries, running commands, and editing files.
— Jeff;
A few weeks ago, we announced Python support for AWS Elastic Beanstalk, including the ability to customize the Python environment using a declarative configuration file and integrating with Amazon RDS DB Instances.
Today, Im excited that were adding more customizations through the configuration files. The configuration files now allow you to declaratively install packages and libraries, configure software components (such as Apache Tomcat or the Apache Web Server), and run commands on the Amazon EC2 instances in your Elastic Beanstalk environment. You can also set environment variables across your fleet of EC2 instances, create users and groups, and start or stop daemons.
So why is this big news? In the past, to make changes to an Elastic Beanstalk environment, you had to create and maintain custom Amazon Machine Images (AMIs). Now, a change as small as adding a font library or as involved as installing and configuring an agent entails only a few lines of YAML.
Example: Customize a Tomcat 7 configuration
Lets look at an example of customizing the Tomcat server.xml to increase the number of concurrent threads:
- Using the AWS Toolkit for Eclipse, create a new AWS Web Project:
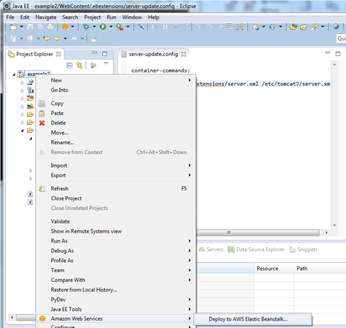
- Create a new directory .ebextensions in the WebContent directory of your application. This ensures that the .ebextensions directory is at the root of your .war file.
Tip: By default, the Eclipse Project Explorer view will hide files that start with a .. You can modify this setting by clicking on the menu at the top of the Project Explorer, then click on Customize View and uncheck the .* resources box on the Filters tab. - Add a file called server-update.config to the .ebextensions directory. The contents of the file should look like this:
container_commands:
replace-config:
command: cp .ebextensions/server.xml /etc/tomcat7/server.xml
- Right-click the project, click Amazon Web Services, and then click Deploy to Elastic Beanstalk.
For more details on how to deploy applications from Eclipse, visit the AWS Elastic Beanstalk Developer Guide. For more details on the configuration system, read our new Customizing and Configuring Elastic Beanstalk Containers documentation.
Once the environment is up and running, your Tomcat installation on the EC2 instances will now be using the updated server.xml. Any new instances that are launched within the environment will have the same customizations applied.
Note: Configuration files can be used only with newly created Python and Java environments. If you have existing environments, heres how you can migrate them.
You can include multiple .config files inside the .ebextensions directory. This allows you to separate customizations into different files and allow you to share your favorite customizations with your co-workers.
You can also leverage the Amazon CloudWatch custom metrics example to easily setup monitoring through CloudWatch.
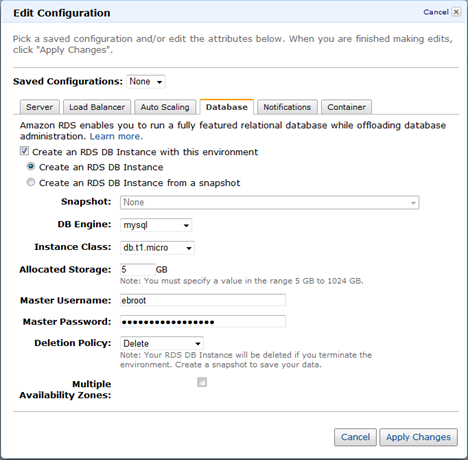
Add an Amazon RDS Database Instance
Additionally, you can now easily create a new Amazon Relational Database Service (RDS) database Instance with your Elastic Beanstalk Tomcat environment. Simply log into to the Elastic Beanstalk console, select your application, and on the Actions menu for the environment, click Edit/Load Configuration. The Database tab allows you to add a new Amazon RDS DB Instance.
Once the database is created, you can retrieve the connection information and build the connection string using Java system properties:
String dbName = System. getProperty ( “RDS_DB_NAME” ) ;
String userName = System. getProperty ( “RDS_USER” ) ;
String password = System. getProperty ( “RDS_PASSWORD” ) ;
String hostname = System. getProperty ( “RDS_HOSTNAME” ) ;
String port = System. getProperty ( “RDS_PORT” ) ;
For more information on how to set up an RDS database Instance in the Elastic Beanstalk environment, visit the AWS Elastic Beanstalk Developer Guide.
— Saad