Category: AWS Elastic Beanstalk
Launch: AWS Elastic Beanstalk launches support for Custom Platforms
There is excitement in the air! I am thrilled to announce that customers can now create custom platforms in AWS Elastic Beanstalk. With this latest release of the AWS Elastic Beanstalk service, developers and systems admins can now create and manage their own custom Elastic Beanstalk platform images allowing complete control over the instance configuration. As you know, AWS Elastic Beanstalk is a service for deploying and scaling web applications and services on common web platforms. With the service, you upload your code and it automatically handles the deployment, capacity provisioning, load balancing, and auto-scaling.

Previously, AWS Elastic Beanstalk provided a set of pre-configured platforms of multiple configurations using various programming languages, Docker containers, and/or web containers of each aforementioned type. Elastic Beanstalk would take the selected configuration and provision the software stack and resources needed to run the targeted application on one or more Amazon EC2 instances. With this latest release, there is now a choice to create a platform from your own customized Amazon Machine Image (AMI). The custom image can be built from one of the supported operating systems of Ubuntu, RHEL, or Amazon Linux. In order to simplify the creation of these specialized Elastic Beanstalk platforms, machine images are now created using the Packer tool. Packer is an open source tool that runs on all major operating systems, used for creating machine and container images for multiple platforms from a single configuration.
Custom platforms allow you to manage and enforce standardization and best practices across your Elastic Beanstalk environments. For example, you can now create your own platforms on Ubuntu or Red Hat Enterprise and customize your instances with languages/frameworks currently not supported by Elastic Beanstalk e.g. Rust, Sinatra etc.
Creating a Custom Platform
In order to create your custom platform, you start with a Packer template. After the Packer template is created, you would create platform definition file, a platform.yaml file, platform hooks, which will define the builder type for the platform, and script files,. With these files in hand, you would create a zip archive file, called a platform definition archive, to package the files, associated scripts and/or additional items needed to build your Amazon Machine Image (AMI). A sample of a basic folder structure for building a platform definition archive looks as follows:
| |– builder | Contains files used by Packer to create the custom platform |
| |– custom_platform.json | Packer template |
| |– platform.yaml | Platform definition file |
| |– ReadMe.txt | Describes the sample |
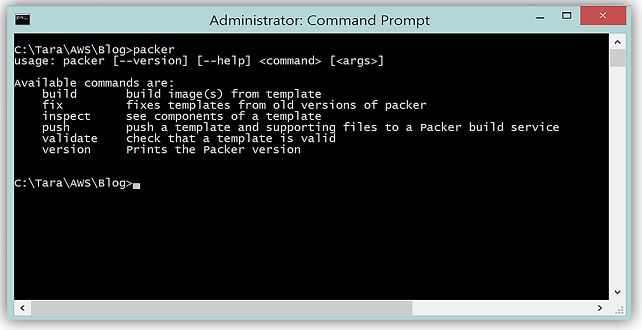
The best way to take a deeper look into the new custom platform feature of Elastic Beanstalk is to put the feature to the test and try to build a custom AMI and platform using Packer. To start the journey, I am going to build a custom Packer template. I go to the Packer site, and download the Packer tool and ensured that the binary is in my environment path.
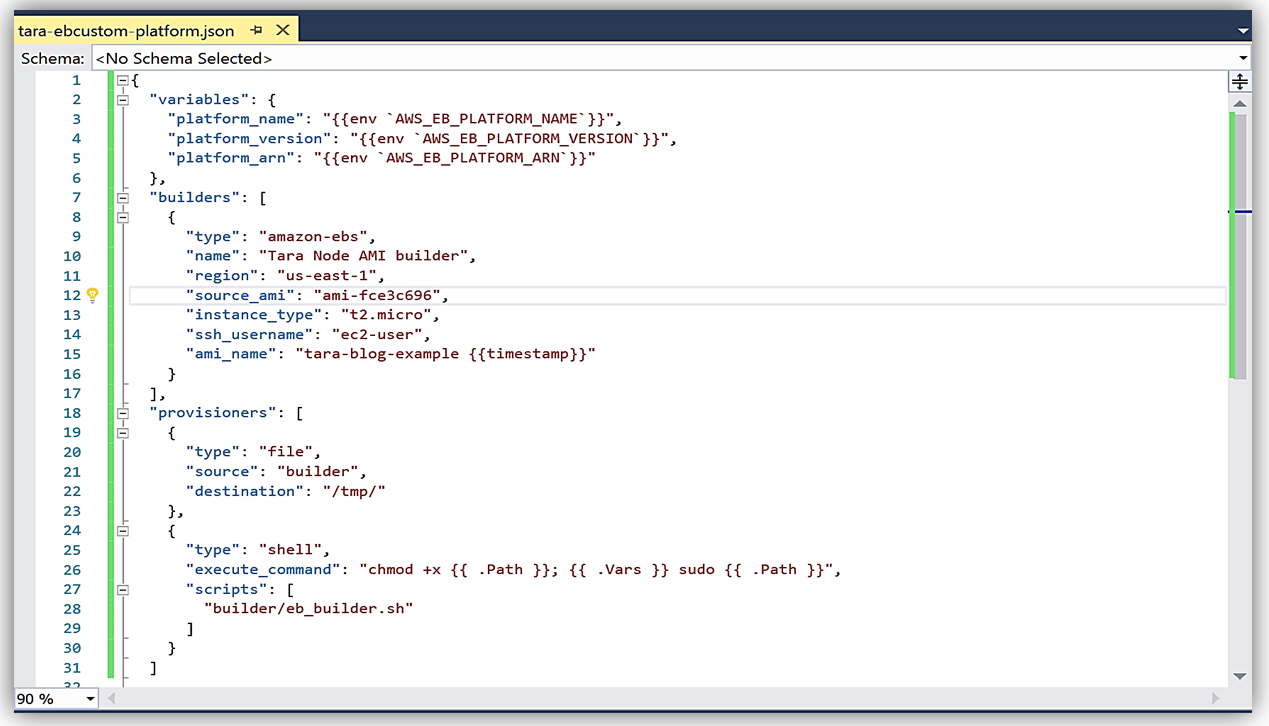
Now let’s build the template. The Packer template is the configuration file in JSON format, used to define the image we want to build. I will open up Visual Studio and use this as the IDE to create a new JSON file to build my Packer template.

The Packer template format has a set of keys designed for the configuration of various components of the image. The keys are:
- variables (optional): one or more key/value strings defining user variables
- builders (required): array that defines the builders used to create machine images and configuration of each
- provisioners (optional): array defining provisioners to be used to install and configure software for the machine image
- description (optional): string providing a description of template
- min_packer_version (optional): string of minimum Packer version that is required to parse the template.
- post-processors (optional): array defining post-processing steps to take once image build is completed
If you want a great example of the Packer template that can be used to create a custom image used for a custom Elastic Beanstalk platform, the Elastic Beanstalk documentation has samples of valid Packer templates for your review.
In the template, I will add a provisioner to run a build script to install Node with information about the script location and the command(s) needed to execute the script. My completed JSON file, tara-ebcustom-platform.json, looks as follows:
Now that I have my template built, I will validate the template with Packer on the command line.
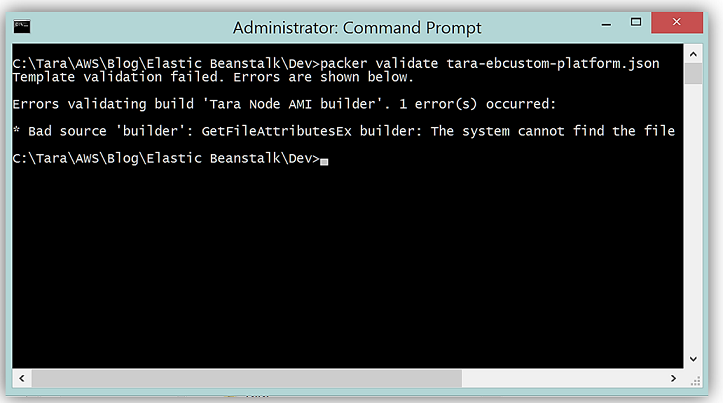
What is cool is that my Packer template fails because, in the template, I specify a script, eb_builder.sh, that is located in a builder folder. However, I have not created the builder folder nor shell script noted in my Packer template. A little confused that I am happy that my file failed? I believe that this is great news because I can catch errors in my template and/or missing files needed to build my machine image before uploading it to the Elastic Beanstalk service. Now I will fix these errors by building the folder and file for the builder script.
Using the sample of the scripts provided in the Elastic Beanstalk documentation, I build my Dev folder with the structure noted above. Within the context of Elastic Beanstalk custom platform creation, the aforementioned scripts used from the sample are called platform hooks. Platform Hooks are run during lifecycle events and in response to management operations.
An example of the builder script used in my custom platform implementation is shown below:
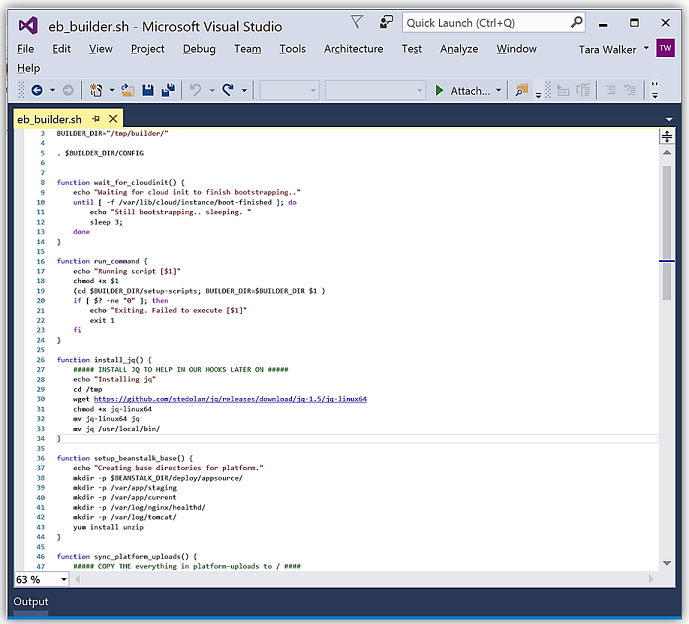
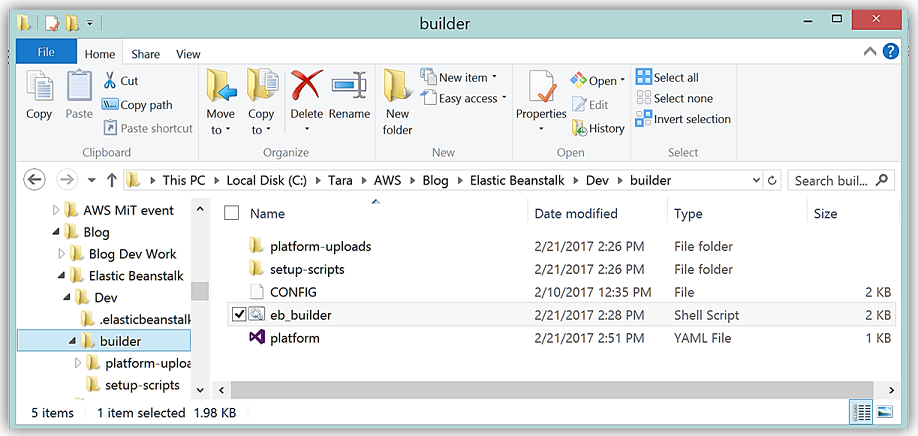
My builder folder structure holds the builder script, platform hooks, and other scripts, referred to as platform scripts, used to build the custom platform. Platform scripts are the shell scripts that you can use to get environment variables and other information in platform hooks. The platform hooks are located in a subfolder of my builder folder and follows the structure shown below:
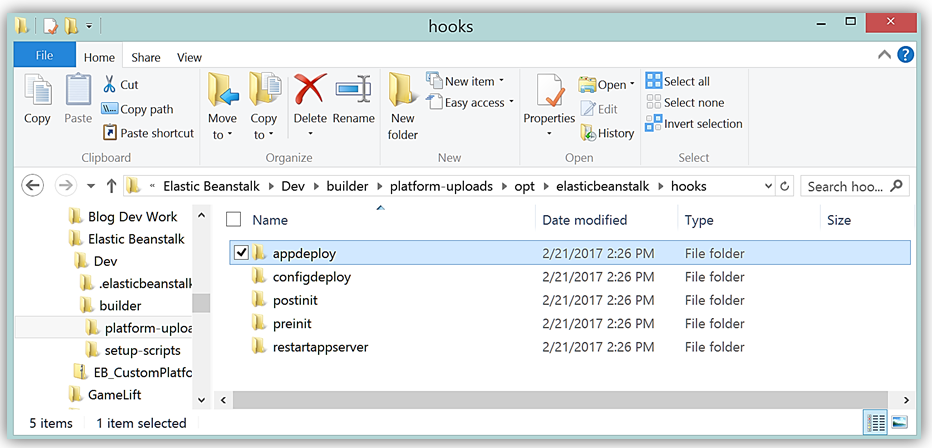
All of these items; Packer template, platform.yaml, builder script, platform hooks, setup, config files and platform scripts make up the platform definition contained in my builder folder you see below.
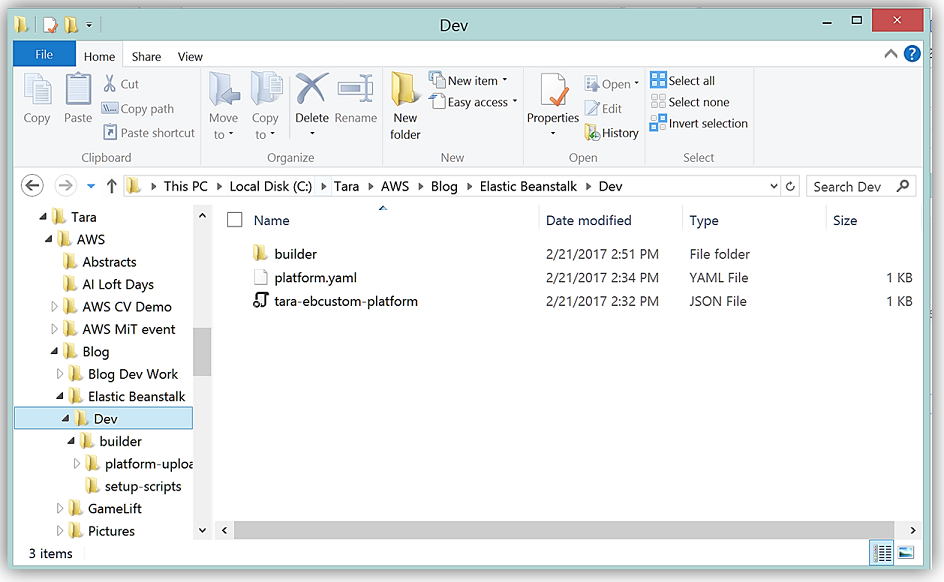
I will leverage the platform.yaml provided in the sample .yaml file and change it as appropriate for my Elastic Beanstalk custom platform implementation. The result is following completed platform.yaml file:
version: "1.0"

provisioner:
  type: packer
  template: tara-ebcustom-platform.json
  flavor: amazon

metadata:
  maintainer: TaraW
  description: Tara Sample NodeJs Container.
  operating_system_name: Amazon linux
  operating_system_version: 2016.09.1
  programming_language_name: ECMAScript
  programming_language_version: ECMA-262
  framework_name: NodeJs
  framework_version: 4.4.4
  app_server_name: "none"
  app_server_version: "none"

option_definitions:
  - namespace: "aws:elasticbeanstalk:container:custom:application"
    option_name: "NPM_START"
    description: "Default application startup command"
    default_value: "node application.js"
Now, I will validate my Packer template again on the command line.
All that is left for me is to create the platform using the EB CLI. This functionality is available with EB CLI version 3.10.0 or later. You can install the EB CLI from here and follow the instructions for installation in the Elastic Beanstalk developer guide.
To use the EB CLI to create a custom platform, I would select the folder containing the files extracted from the platform definition archive. Within the context of that folder, I need perform the following steps:
- Use the EB CLI to initialize the platform repository and follow the prompts
- eb platform init or ebp init
- Launch the Packer environment with the template and scripts
- eb platform create or ebp create
- Validate an IAM role was successfully created for the instance. This instance profile role will be automatically created via the EB create process.
- aws-elasticbeanstalk-custom-platform-ec2-role
- Verify status of platform creation
- eb platform status or ebp status
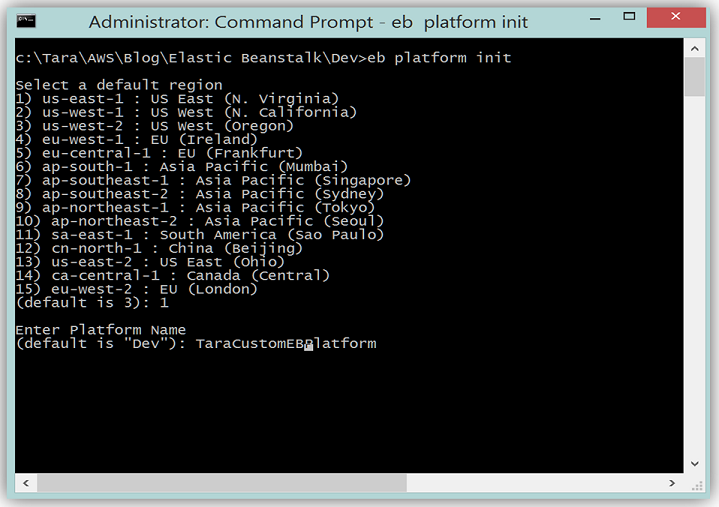
I will now go to the Command Line and use EB CLI command to initialize the platform by running the eb platform init command.
Next step is to create the custom platform using the EB CLI, so I’ll run the shortened command, ebp create, in my platform folder.
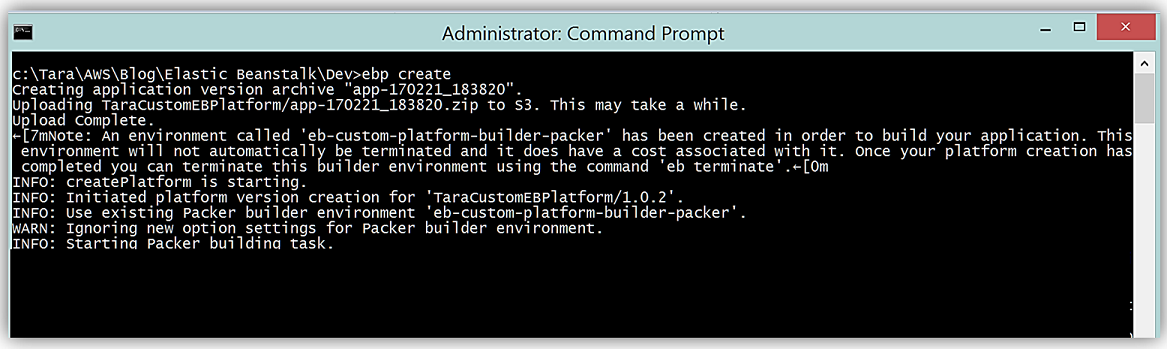
Success! A custom Elastic Beanstalk platform has been created and we can deploy this platform for our web solution. It is important to remember that when you create a custom platform, you launch a single instance environment without an EIP that runs Packer, and additionally you can reuse this environment for multiple platforms, as well as, multiple versions of each platform. Additionally, custom platforms are region-specific, therefore, you must create your platforms separately in each region if you use Elastic Beanstalk in multiple regions.
Deploying Custom Platforms
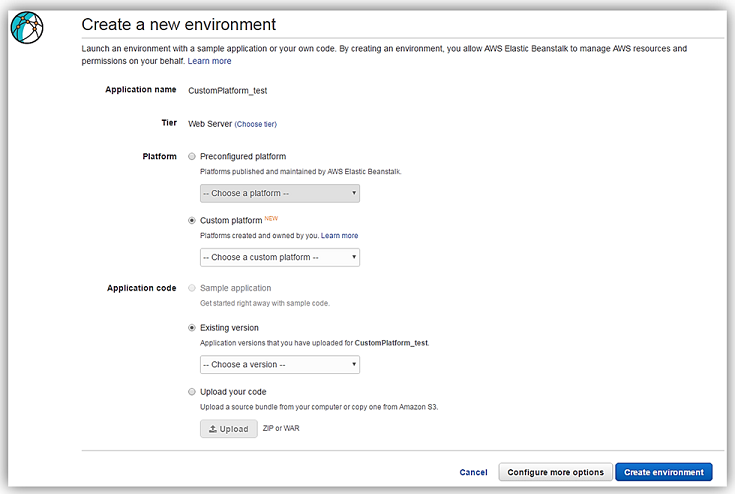
With the custom platform now created, you can deploy an application either via the AWS CLI or via the AWS Elastic Beanstalk Console. The ability to create an environment with an already created custom platform is only available for the new environment wizard.
You can select an already created custom platform on the Create a new environment web page by selecting the Custom Platform radio option under Platform. You would then select the custom platform you previously created from the list of available custom platforms.
Additionally, the EB CLI can be used to deploy the latest version of your custom platform. Using the command line to deploy the previously created custom platform would look as follows:
- eb deploy -p tara-ebcustom-platform
Summary
You can get started building your own custom platforms for Elastic Beanstalk today. To learn more about Elastic Beanstalk or custom platforms by going the AWS Elastic Beanstalk product page or the Elastic Beanstalk developer guide.
– Tara
New – AWS Application Load Balancer
We launched Elastic Load Balancing (ELB) for AWS in the spring of 2009 (see New Features for Amazon EC2: Elastic Load Balancing, Auto Scaling, and Amazon CloudWatch to see just how far AWS has come since then). Elastic Load Balancing has become a key architectural component for many AWS-powered applications. In conjunction with Auto Scaling, Elastic Load Balancing greatly simplifies the task of building applications that scale up and down while maintaining high availability.
On the Level
Per the well-known OSI model, load balancers generally run at Layer 4 (transport) or Layer 7 (application).
A Layer 4 load balancer works at the network protocol level and does not look inside of the actual network packets, remaining unaware of the specifics of HTTP and HTTPS. In other words, it balances the load without necessarily knowing a whole lot about it.
A Layer 7 load balancer is more sophisticated and more powerful. It inspects packets, has access to HTTP and HTTPS headers, and (armed with more information) can do a more intelligent job of spreading the load out to the target.
Application Load Balancing for AWS
 Today we are launching a new Application Load Balancer option for ELB. This option runs at Layer 7 and supports a number of advanced features. The original option (now called a Classic Load Balancer) is still available to you and continues to offer Layer 4 and Layer 7 functionality.
Application Load Balancers support content-based routing, and supports applications that run in containers. They support a pair of industry-standard protocols (WebSocket and HTTP/2) and also provide additional visibility into the health of the target instances and containers. Web sites and mobile apps, running in containers or on EC2 instances, will benefit from the use of Application Load Balancers.
Let’s take a closer look at each of these features and then create a new Application Load Balancer of our very own!
Content-Based Routing
An Application Load Balancer has access to HTTP headers and allows you to route requests to different backend services accordingly. For example, you might want to send requests that include /api in the URL path to one group of servers (we call these target groups) and requests that include /mobile to another. Routing requests in this fashion allows you to build applications that are composed of multiple microservices that can run and be scaled independently.
As you will see in a moment, each Application Load Balancer allows you to define up to 10 URL-based rules to route requests to target groups. Over time, we plan to give you access to other routing methods.
Support for Container-Based Applications
Many AWS customers are packaging up their microservices into containers and hosting them on Amazon EC2 Container Service. This allows a single EC2 instance to run one or more services, but can present some interesting challenges for traditional load balancing with respect to port mapping and health checks.
The Application Load Balancer understands and supports container-based applications. It allows one instance to host several containers that listen on multiple ports behind the same target group and also performs fine-grained, port-level health checks
Better Metrics
Application Load Balancers can perform and report on health checks on a per-port basis. The health checks can specify a range of acceptable HTTP responses, and are accompanied by detailed error codes.
As a byproduct of the content-based routing, you also have the opportunity to collect metrics on each of your microservices. This is a really nice side-effect that each of the microservices can be running in its own target group, on a specific set of EC2 instances. This increased visibility will allow you to do a better job of scaling up and down in response to the load on individual services.
The Application Load Balancer provides several new CloudWatch metrics including overall traffic (in GB), number of active connections, and the connection rate per hour.
Support for Additional Protocols & Workloads
The Application Load Balancer supports two additional protocols: WebSocket and HTTP/2.
WebSocket allows you to set up long-standing TCP connections between your client and your server. This is a more efficient alternative to the old-school method which involved HTTP connections that were held open with a “heartbeat” for very long periods of time. WebSocket is great for mobile devices and can be used to deliver stock quotes, sports scores, and other dynamic data while minimizing power consumption. ALB provides native support for WebSocket via the ws:// and wss:// protocols.
HTTP/2 is a significant enhancement of the original HTTP 1.1 protocol. The newer protocol feature supports multiplexed requests across a single connection. This reduces network traffic, as does the binary nature of the protocol.
The Application Load Balancer is designed to handle streaming, real-time, and WebSocket workloads in an optimized fashion. Instead of buffering requests and responses, it handles them in streaming fashion. This reduces latency and increases the perceived performance of your application.
Creating an ALB
Let’s create an Application Load Balancer and get it all set up to process some traffic!
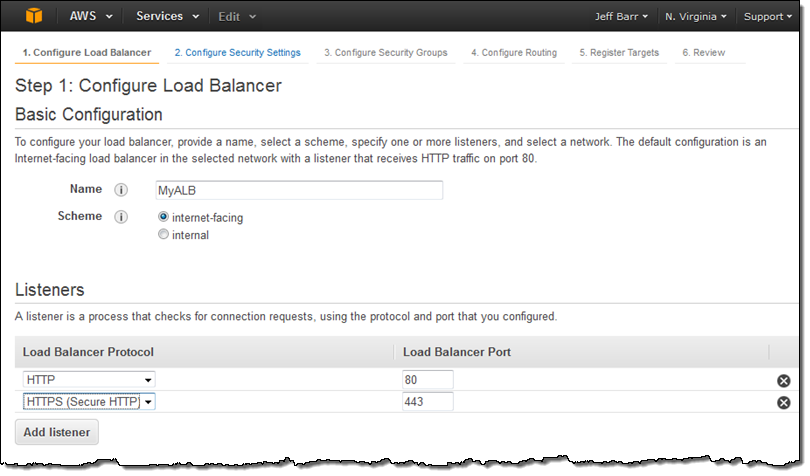
The Elastic Load Balancing Console lets me create either type of load balancer:
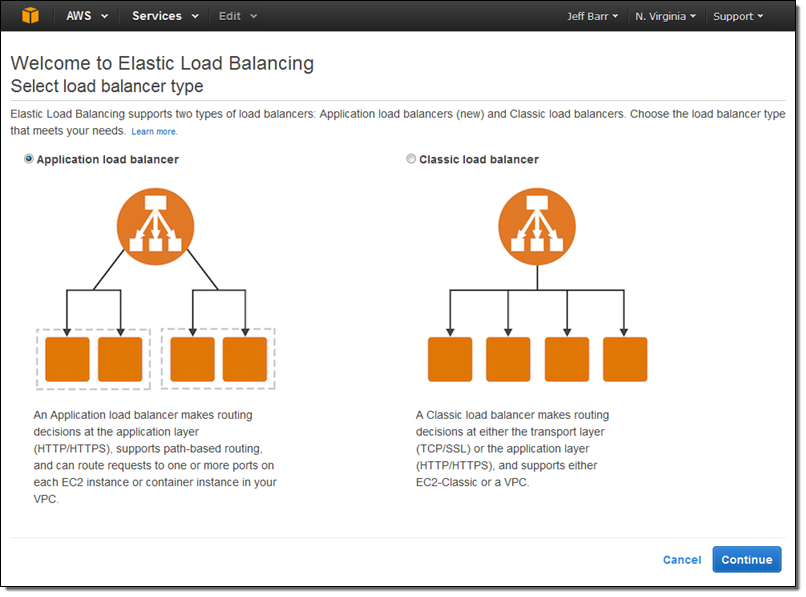 I click on Application load balancer, enter a name (MyALB), and choose internet-facing. Then I add an HTTPS listener:
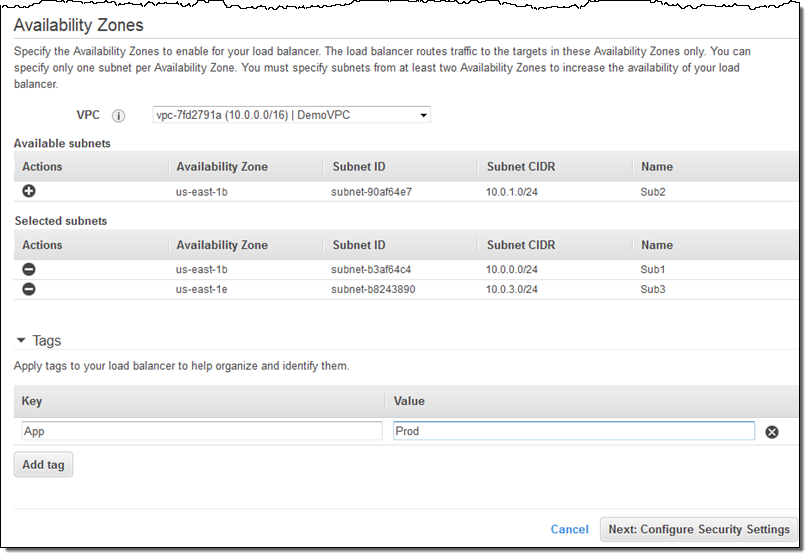
On the same screen, I choose my VPC (this is a VPC-only feature) and one subnet in each desired Availability Zone, tag my Application Load Balancer, and proceed to Configure Security Settings:
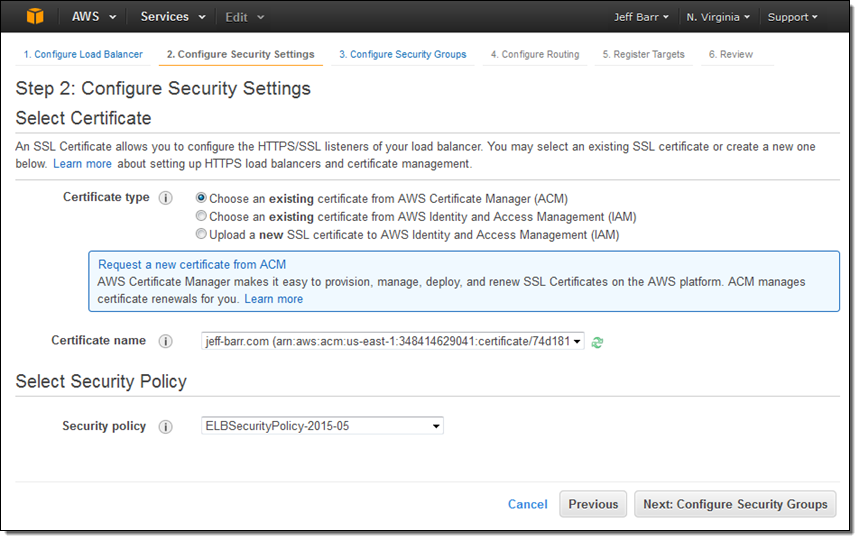
Because I created an HTTPS listener, my Application Load Balancer needs a certificate. I can choose an existing certificate that’s already in IAM or AWS Certificate Manager (ACM), upload a local certificate, or request a new one:
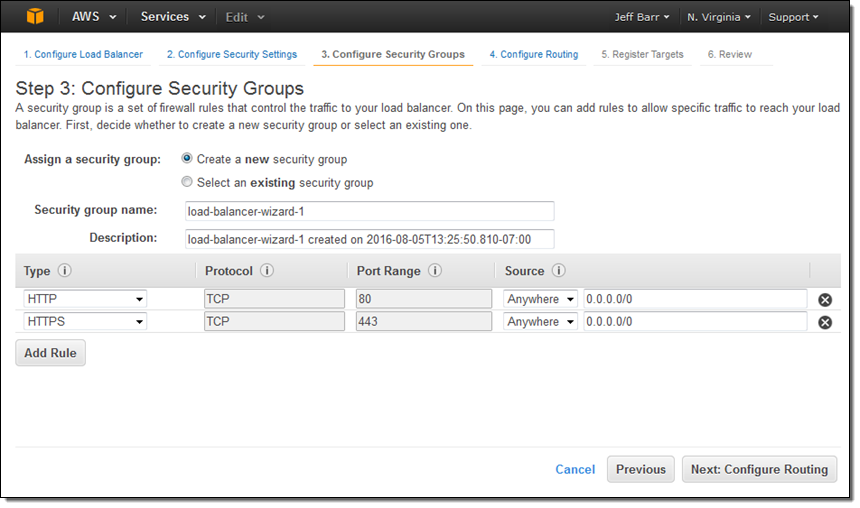
Moving right along, I set up my security group. In this case I decided to create a new one. I could have used one of my existing VPC or EC2 security groups just as easily:
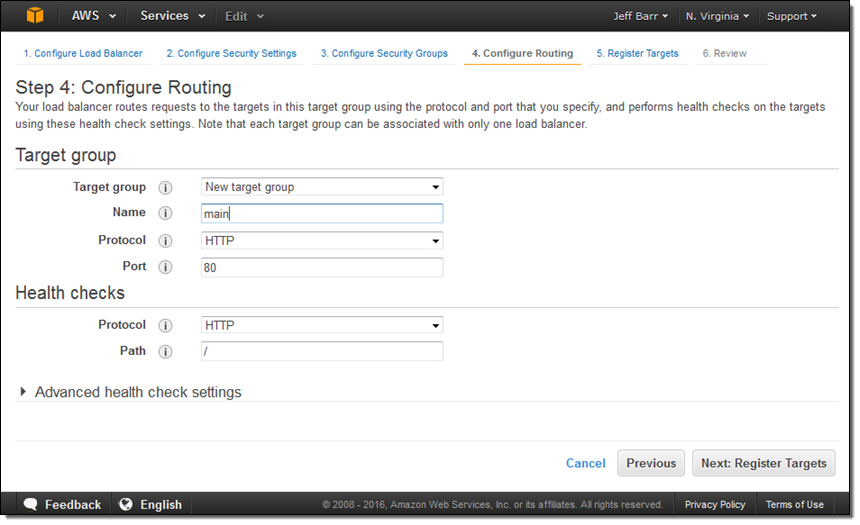
The next step is to create my first target group (main) and to set up its health checks (I’ll take the defaults):
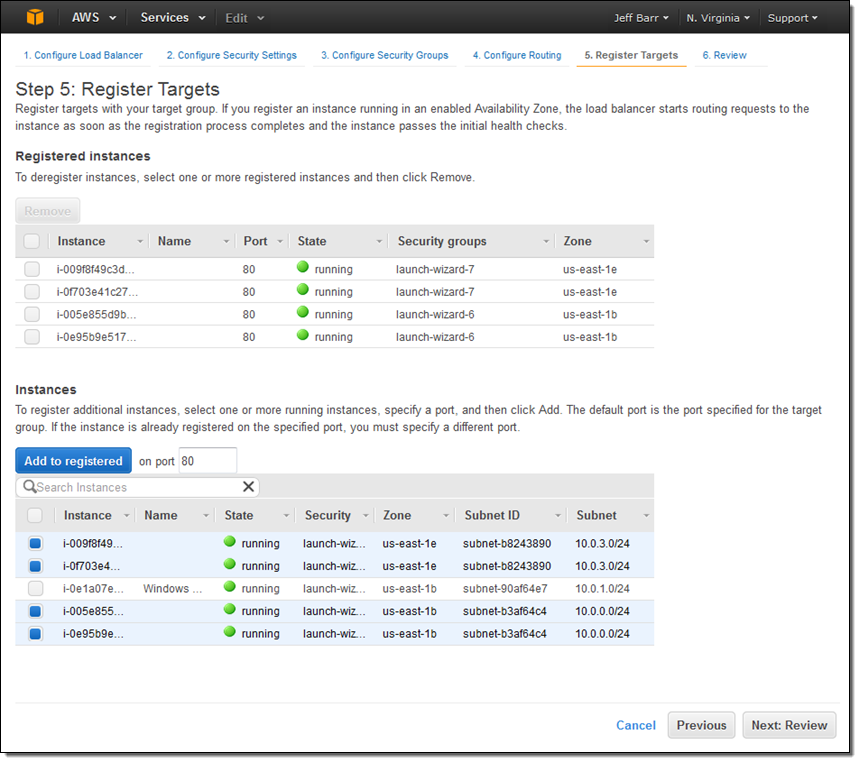
Now I am ready to choose the targets—the set of EC2 instances that will receive traffic through my Application Load Balancer. Here, I chose the targets that are listening on port 80:
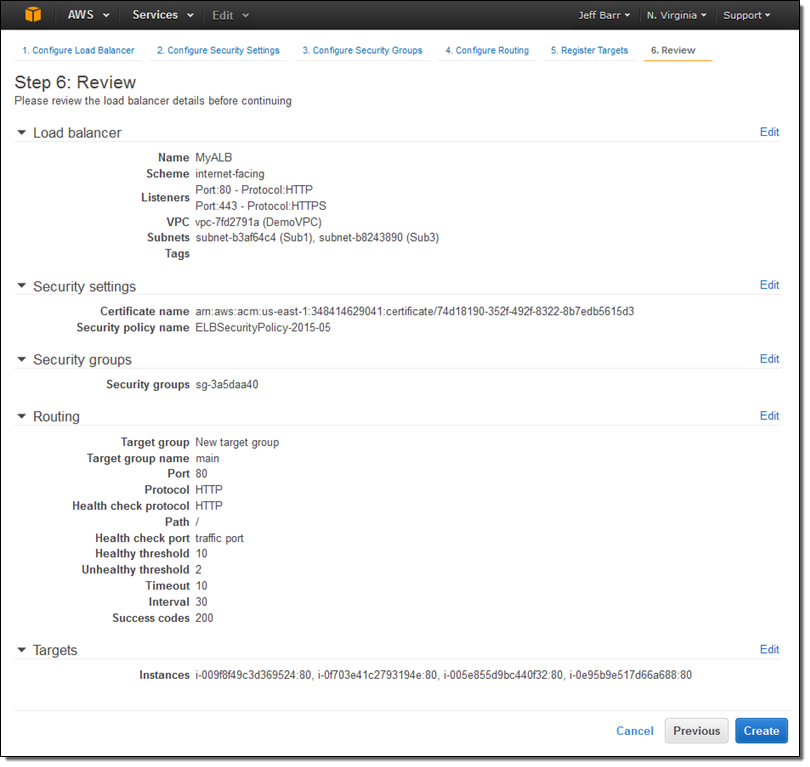
The final step is to review my choices and to Create my ALB:
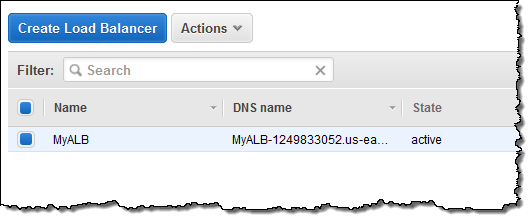
After I click on Create the Application Load Balancer is provisioned and becomes active within a minute or so:
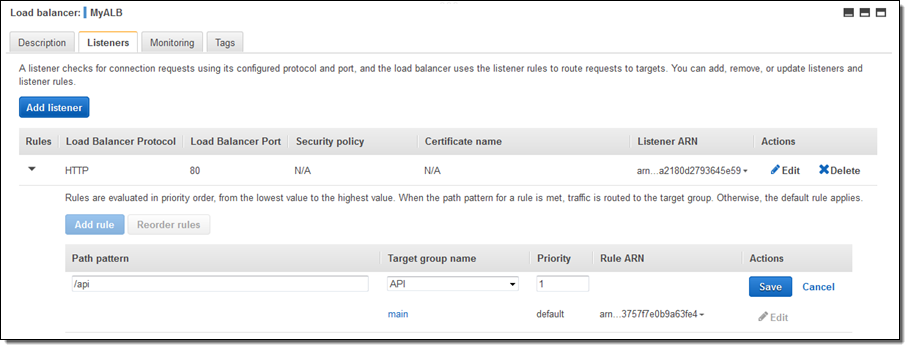
I can create additional target groups:
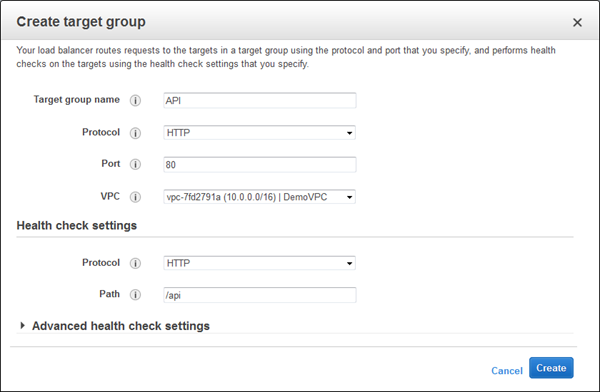
And then I can add a new rule that routes /api requests to that target:
Application Load Balancers work with multiple AWS services including Auto Scaling, Amazon ECS, AWS CloudFormation, AWS CodeDeploy, and AWS Certificate Manager (ACM). Support for and within other services is in the works.
Moving on Up
If you are currently using a Classic Load Balancer and would like to migrate to an Application Load Balancer, take a look at our new Load Balancer Copy Utility. This Python tool will help you to create an Application Load Balancer with the same configuration as an existing Classic Load Balancer. It can also register your existing EC2 instances with the new load balancer.
Availability & Pricing
The Application Load Balancer is available now in all commercial AWS regions and you can start using it today!
The hourly rate for the use of an Application Load Balancer is 10% lower than the cost of a Classic Load Balancer.
When you use an Application Load Balancer, you will be billed by the hour and for the use of Load Balancer Capacity Units, also known as LCU’s. An LCU measures the number of new connections per second, the number of active connections, and data transfer. We measure on all three dimensions, but bill based on the highest one. One LCU is enough to support either:
- 25 connections/second with a 2 KB certificate, 3,000 active connections, and 2.22 Mbps of data transfer or
- 5 connections/second with a 4 KB certificate, 3,000 active connections, and 2.22 Mbps of data transfer.
Billing for LCU usage is fractional, and is charged at $0.008 per LCU per hour. Based on our calculations, we believe that virtually all of our customers can obtain a net reduction in their load balancer costs by switching from a Classic Load Balancer to an Application Load Balancer.
— Jeff;
New – Managed Platform Updates for AWS Elastic Beanstalk
AWS Elastic Beanstalk simplifies the process of deploying and running web applications and web services. You simply upload your code and Elastic Beanstalk will take care of the details. This includes provisioning capacity, setting up load balancing and auto scaling, and arranging for application health monitoring. You can build Elastic Beanstalk applications using a variety of platforms and languages including Java, PHP, Ruby, Node.js, Python, .NET, Go, and Docker.
Elastic Beanstalk regularly releases new versions of supported platforms with operating system, web & app server, and language & framework updates. Until now, you needed to initiate a manual update (via the Elastic Beanstalk Console, command line interface, or API) to update your Elastic Beanstalk environments to the new version of the platform or language. This gave you full control over the timing of updates, but left you with one more thing to remember and to manage.
Managed Platform Updates
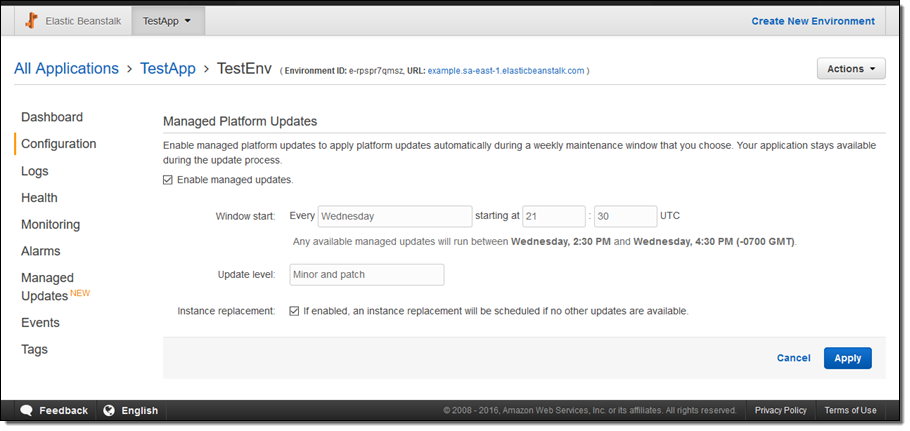
Today we are making Elastic Beanstalk even more powerful by adding support for managed platform updates. You simply select a weekly maintenance window and Elastic Beanstalk will update your environment to the latest platform version automatically.
The updates are installed using an immutable deployment model to ensure that no changes are made to the existing environment until the updated replacement instances are available and deemed healthy (according to the health check that you have configured for the application). If issues are detected during the update, traffic will continue to be routed to the existing instances. The immutable deployment model also ensures that your application will remain available during updates in order to minimize disruption to your users.
You can choose to install minor updates and patches automatically, and you can also trigger updates outside of the maintenance window. Because major updates typically require careful testing before being deployed, they will not take place automatically and must be triggered manually.
You can configure managed updates from the Elastic Beanstalk Console. First, enable them in the Configuration tab:
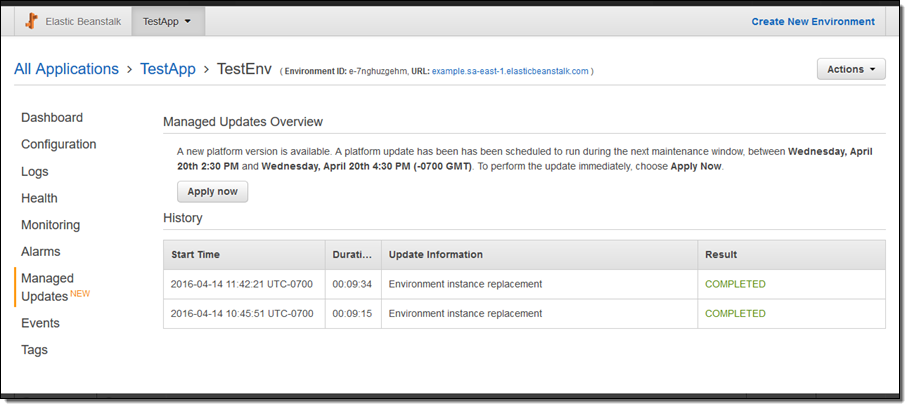
And then manage them in the Managed Updates tab:
Available Now
This new feature is available now and you can start using it today. There’s no charge for the feature, but you will pay for any additional EC2 instances that are used to ensure a seamless update.
— Jeff;
Elastic Beanstalk Update – Support for Java and Go
My colleague Abhishek Singh is the product manager for AWS Elastic Beanstalk. He wrote the following guest post in order to let you know that the service now supports Java JAR files and the Go programming language!
— Jeff;
AWS Elastic Beanstalk already simplifies the process of deploying and scaling Java, .NET, PHP, Python, Ruby, Node.js, and Docker web applications and services on AWS. You simply upload your code and Elastic Beanstalk automatically handles the deployment, including capacity provisioning, load balancing, auto-scaling to application health monitoring. At the same time, you retain full control over the AWS resources powering your application and can access them at any time.
Today we are making Elastic Beanstalk even more useful by adding support for Java and Go applications. In addition, the new platforms simplify the process of configuring the Nginx reverse proxy that runs on the web tier. You can now place an nginx.conf file in the .ebextensions/nginx folder to override the Nginx configuration. You can also place configuration files in the .ebextensions/nginx/conf.d folder in order to have them included in the Nginx configuration provided by the platform. For more information, see Configuring the Reverse Proxy.
- .ebextensions/nginx/nginx.conf – Overrides the Nginx configuration for the platform.
- .ebextensions/nginx/conf.d – Files are included in the Nginx configuration provided by the platform.
New Support for Java
You can now run any Java application, including those that use servers or frameworks such as Jetty or Play and are no longer restricted to using Tomcat as the application server for your Java applications.
You can deploy your Java application to Elastic Beanstalk in the following ways:
- Upload your application’s JAR file.
- Upload an archive containing your application’s JAR file with a Procfile defining additional command line parameters required to run your application. See Application Process Configuration (Procfile) for details.
- Upload an archive containing multiple JAR files with a Procfile defining how each JAR should be run. See Application Process Configuration (Procfile) for details.
- Upload an archive containing your application’s source, a Buildfile, and a Procfile. For details, see Building Applications On-Server (Buildfile).
To get started, simply create a new Elastic Beanstalk environment and select the Java platform under the Preconfigured category. Both Java 7 and Java 8 are supported:

New Support for Go
Also, you can now run Go language applications on AWS Elastic Beanstalk. You can deploy your Go application to Elastic Beanstalk in the following ways:
- Upload an archive containing your application’s source. AWS Elastic Beanstalk will automatically build and run your application (AWS Elastic Beanstalk assumes that the main function is in a file named application.go).
- Upload an archive containing your application’s binary with a Procfile defining additional command line parameters required to run your application. See Application Process Configuration (Procfile) for details.
- Upload an archive containing your application’s source, a Buildfile, and a Procfile. For details, see Building Applications On-Server (Buildfile).
Like the Java platform, the Go platform also supports running multiple processes by defining them in a Procfile.

To begin using the new platforms, log in to the AWS Elastic Beanstalk Management Console or use the EB CLI to create an environment running the appropriate platform.
— Abhishek Singh, Senior Product Manager, AWS Elastic Beanstalk
Elastic Beanstalk Update – Enhanced Application Health Monitoring
My colleague Abhishek Singh shared a guest post that brings word of a helpful new Elastic Beanstalk feature!
— Jeff;
AWS Elastic Beanstalk simplifies the process of deploying and scaling Java, .NET, PHP, Node.js, Python, Ruby, Go, and Docker web applications and services on AWS. Today we are making Elastic Beanstalk even more useful by adding support for enhanced application health monitoring.
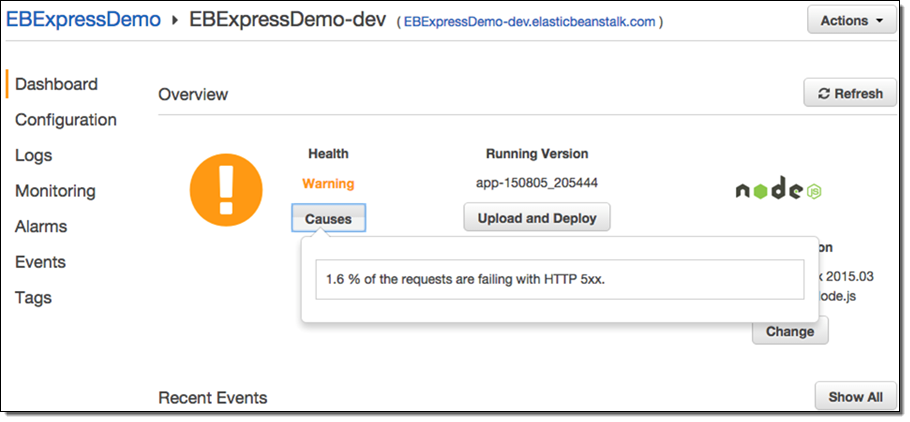
To understand the benefit of this new feature, imagine you have a web application with a bug that causes it to return an error when someone visits the /blog page but the rest of your application works as expected. Previously, you could detect such issues by either monitoring the Elastic Load Balancers HTTPCode_Backend_5XX metric or going to the URL yourself to test it out. With enhanced application health monitoring, Elastic Beanstalk does the monitoring for you and highlights such issues by changing the health status as necessary. With this new feature, Elastic Beanstalk not only monitors the EC2 and ELB health check statuses but also monitors processes (application, proxy, etc.) and essential metrics (CPU, memory, disk space, etc.) to determine the overall health of your application.
At the core of the enhanced health monitoring feature are a set of rules that allow Elastic Beanstalk to detect anomalies in your running application and flag them by changing the health status. With every change in health status, Elastic Beanstalk provides a list of causes for the change. In the example above, the system would detect an increase in 500 errors as visitors visit the /blog page and flag it by changing the health status from “Ok” to “Warning” with a cause of “More than 1% of requests are failing with 5XX errors”.
Here’s what the status looks like in the AWS Management Console:
And from the command line (via eb health --refresh):

As you can see, this makes it much easier to know when your application is not performing as expected, and why this is the case (we are working on a similar view for the Console). For further details on how enhanced application health monitoring works, see Factors in Determining Instance and Environment Health.
As part of this feature we have also made some other changes:
- Health monitoring is now near real-time. Elastic Beanstalk now evaluates application health and reports metrics every 10 seconds or so instead of every minute.
- Rolling deployments require health checks to pass before a version deployment to a batch of instances is deemed successful. This ensures that any impact due to regressions in application versions is minimized to a batch of instances. For more information, see Deploying Application Versions in Batches.
- The set of values for the health status has been expanded from three (Green, Yellow, and Red) to seven (Ok, Warning, Degraded, Severe, Info, Pending, and Unknown). This allows Elastic Beanstalk to provide you with a more meaningful health status. For more information, see Health Colors and Statuses.
- We have added over 40 additional environment and instance metrics including percentiles of application response times, hard disk space consumption, CPU utilization, all of which can be published to Amazon CloudWatch as desired for monitoring and alarming. For a complete list of available metrics and more information on how to use Amazon CloudWatch with this feature, see Enhanced Health Metrics.
To begin using this feature, log in to the AWS Elastic Beanstalk Management Console or use the EB CLI to create an environment running platform version 2.0.0 or newer.
— Abhishek Singh, Senior Product Manager, AWS Elastic Beanstalk
Run Docker Apps Locally Using the Elastic Beanstalk (EB) CLI
The guest blog post below was written by Jaehyun Wie while he was a developer intern on the AWS Elastic Beanstalk Team. It shows you how to run your Docker apps locally using the Elastic Beanstalk Command Line Interface (CLI).
— Jeff;
The Elastic Beanstalk command line interface (EB CLI) makes it easier for developers, working with command line tools, to get started with Elastic Beanstalk. Last November, we released a revamped version of the EB CLI that added a number of new commands and made it even simpler to get started. Today, we’ve added new commands to run your app locally.
In this post, we will walk through a simple example of using the new local commands. The remainder of this post will assume that you have the EB CLI v3.3 and Docker 1.6.0 installed. If you do not have the EB CLI installed, see Install the EB CLI using pip (Windows, Linux, OS X or Unix). To install Docker see Docker installation instructions. Before going any further, make sure that the docker command is on your PATH. If you are using boot2docker, make sure that the boot2docker VM is up and running.
Creating the App
To begin, we will create an app that can be run on an Elastic Beanstalk platform that is preconfigured for Docker:
$ git clone https://github.com/awslabs/eb-python-flask.git
$ cd eb-python-flask
$ eb init -p "python-3.4-(preconfigured-docker)"
Running the App Locally
In order to run our app locally, all we need to do is use the local run command:
$ eb local run
This command will do everything required to run the Flask app in a Docker container. The terminal will hang while your app is running, and you can kill it at any time by using CTRL+C. By default, the container will listen on port 8080. To run your app on a different port, you can use the –port option:
$ eb local run --port 5000
You can also pass in environment variables at runtime if your app depends on them:
$ eb local run --envvars FLASK_DEBUG=true,APP_VERSION=v1.2.0
Opening Your App in a Browser
Now that your app is running, you can open it in a browser. Open a new terminal and run the following command:
$ eb local open
Viewing Status and Getting Application Logs
You can view the status of your local application like this:
$ eb local status
This will display output that looks like this:
Platform: 64bit Debian jessie v1.2.1 running Python 3.4 (Preconfigured - Docker)
Container name: fdc00101ed4ebf79a5119bb67bf59f56618ce1da
Container ip: 127.0.0.1
Container running: True
Exposed host port(s): 8080
Full local URL(s): 127.0.0.1:8080
The local command also maps logs to your current directory so that you can access your application logs. To see where the logs are stored:
$ eb local logs
Each invocation of local run creates a new sub-directory for logs, so your logs will never be overwritten.
To learn more, read Running a Docker Environment Locally with the EB CLI and eb local command documentation.
— Jaehyun Wie, SDE Intern
Elastic Beanstalk Update – Clone Environments, 1-Click IAM Role Creation, Periodic Worker Tasks
AWS Elastic Beanstalk simplifies the process of deploying and scaling Java, .NET, PHP, Node.js, Python, Ruby, Go, and Docker web applications and services.
Today we are making Elastic Beanstalk even more useful by adding three new features:
- Easy cloning of environments.
- 1-Click IAM role creation.
- Support for periodic worker tasks.
Let’s take a look at each of these new features!
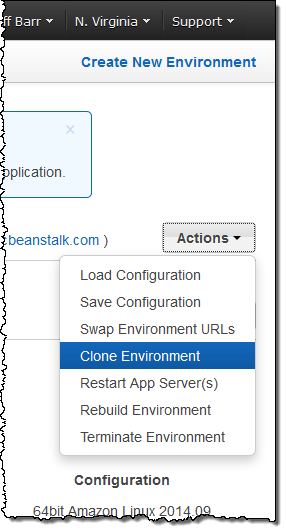
Easy Cloning of Environments
You can now use an existing Elastic Beanstalk environment as the basis for a new one by simply cloning and then editing it. Cloning an environment also creates copies of any AWS resources associated with it (it does not, however copy data stored in Amazon RDS to the clone). As part of the cloning process you have the opportunity to update the Environment Name, Environment URL, Description and Platform values to reflect the new environment. You will use the same language and framework when you update the Platform and can choose a newer version of the same solution stack.
You can initiate the cloning process from the Elastic Beanstalk Console or from the Elastic Beanstalk command line, better known as eb (documentation). Here’s how you do it from the Console:
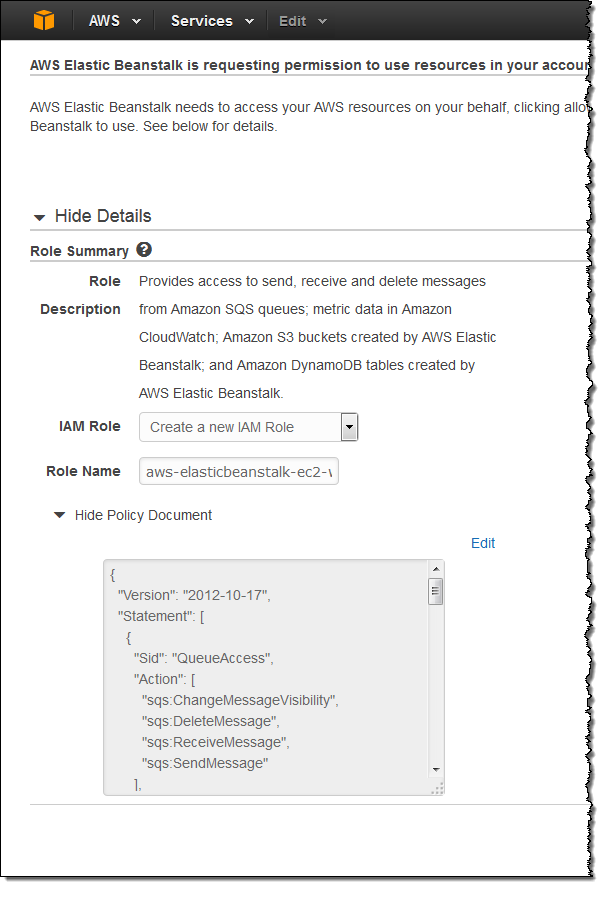
1-Click IAM Role Creation
IAM one-click role creation is a feature that various AWS services have adopted in order to streamline the process of creating IAM roles and granting those roles permissions. One-click role creation appears in Elastic Beanstalk as part of the workflow for creating new applications or launching new environments.
Creating roles with a single click is simple and straightforward, and does not require you to use the IAM Console. You simple create the role and configure the policy without leaving the Beanstalk workflow. You can even edit the policy directly.
Here’s what this feature looks like:
Periodic Worker Tasks
The Elastic Beanstalk Worker Tier is designed to host long-running processes such as reporting, analytics, and database cleanup. Workers are simply HTTP request handlers that are triggered by an Amazon Simple Queue Service (SQS) message.
You can now configure Elastic Beanstalk to send messages to a queue periodically. The message is delivered as an HTTP POST to a configurable URL on the local host; the HTTP header will contain the name of the periodic task.
Your Worker Tier can consist of a single EC2 instance or an auto-scaled, load-balanced set of EC2 instances.
In order to invoke periodic tasks, your application source bundle must include a cron.yaml file at the root level. The file must contain information about the periodic tasks you want to schedule. Specify this information using standard crontab syntax.
Available Now
These features are available now and you can start using them today!
— Jeff;
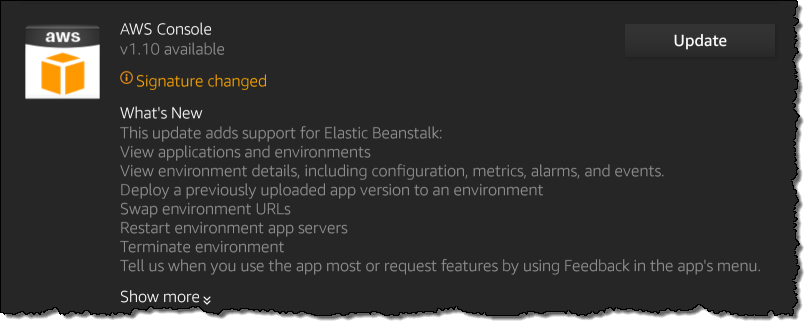
AWS Console Mobile App Update – Support for Elastic Beanstalk
We have updated the AWS Console mobile app with support for AWS Elastic Beanstalk. I’ll let the app’s update notice tell you what’s new:
Let’s take a quick look at the new features! The main screen of the app includes a new Beanstalk Applications section:
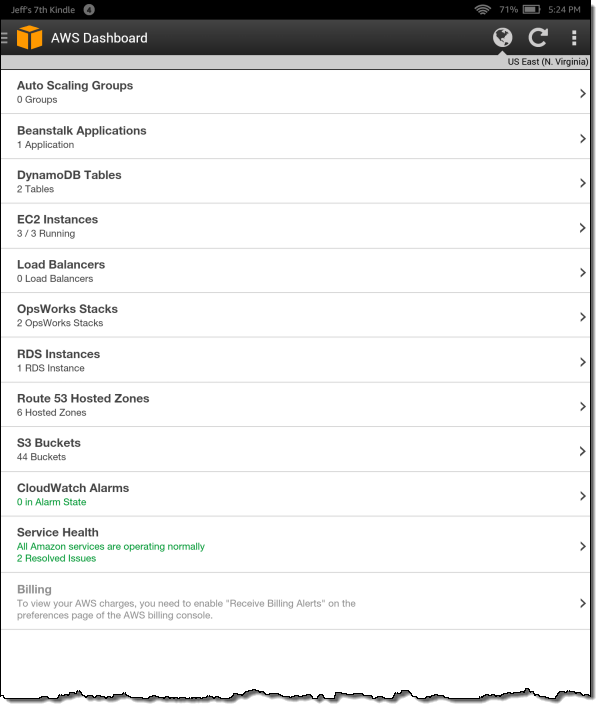
I can see all of my Elastic Beanstalk applications:

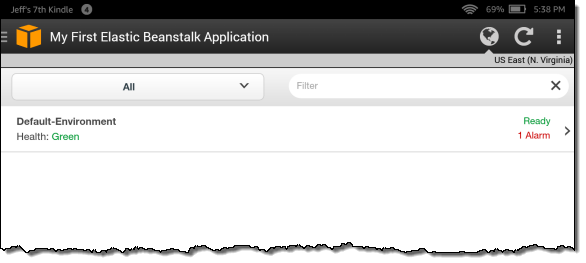
From there I can zoom and see the Elastic Beanstalk environments for any desired application:
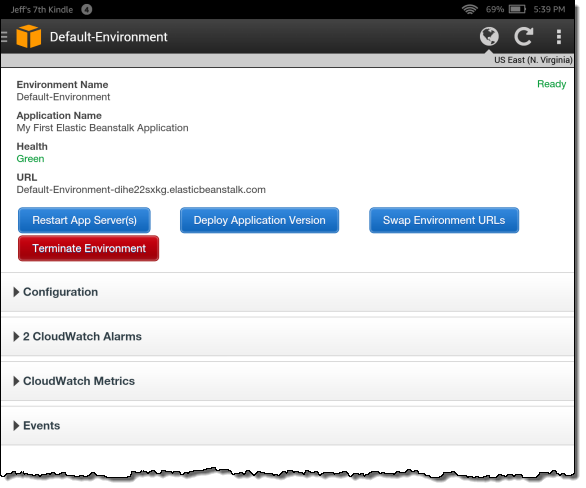
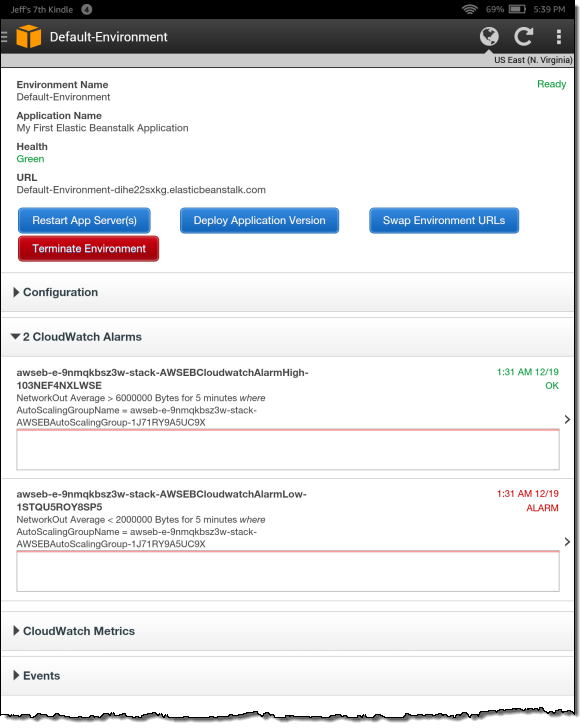
Diving even deeper, I can focus on a particular environment:
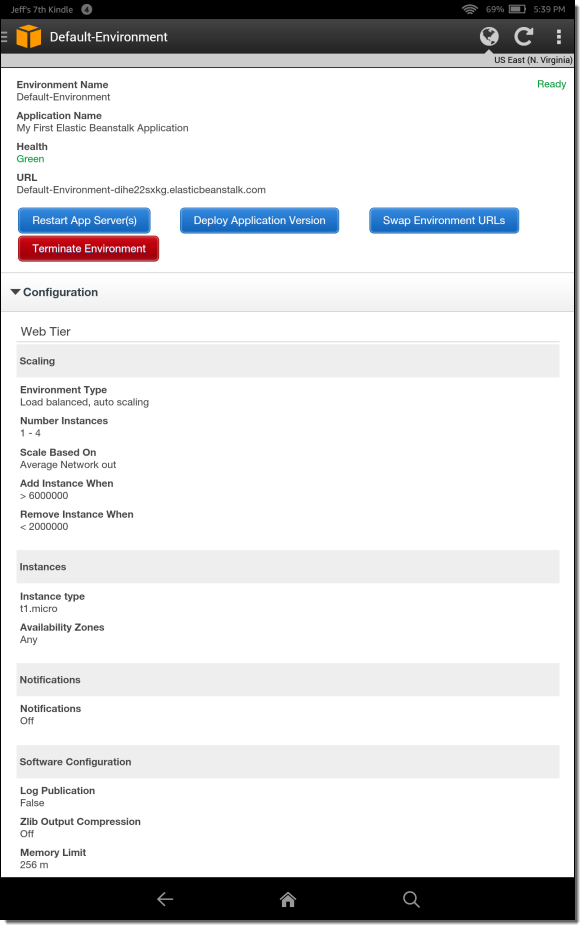
I can open up individual sections to see what’s going on. Here’s the Configuration section:
If a CloudWatch alarm fires, I can open up the CloudWatch Alarms section to see what’s going on:
I can also take a detailed look at a particular CloudWatch metric:

I can also perform certain operations on the environment:

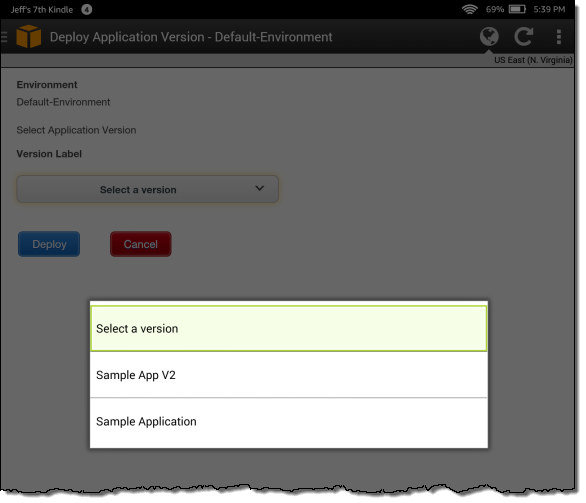
For example, I can deploy any desired version of the application to the environment:
Download & Install Now
The new version of the AWS Console mobile app is available now and you can start using it today. Here are the download links:


— Jeff;
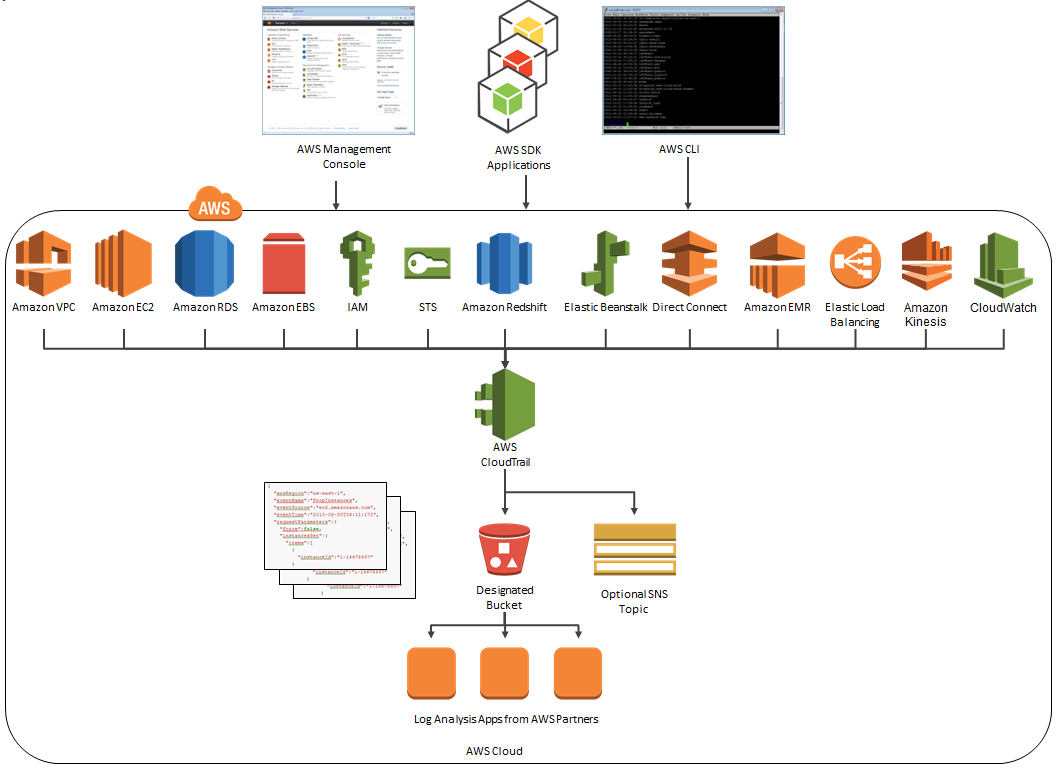
AWS CloudTrail Update – Seven New Services & Support From CloudCheckr
AWS CloudTrail records the API calls made in your AWS account and publishes the resulting log files to an Amazon S3 bucket in JSON format, with optional notification to an Amazon SNS topic each time a file is published.
Our customers use the log files generated CloudTrail in many different ways. Popular use cases include operational troubleshooting, analysis of security incidents, and archival for compliance purposes. If you need to meet the requirements posed by ISO 27001, PCI DSS, or FedRAMP, be sure to read our new white paper, Security at Scale: Logging in AWS, to learn more.
Over the course of the last month or so, we have expanded CloudTrail with support for additional AWS services. I would also like to tell you about the work that AWS partner CloudCheckr has done to support CloudTrail.
New Services
At launch time, CloudTrail supported eight AWS services. We have added support for seven additional services over the past month or so. Here’s the full list:
- Amazon EC2
- Elastic Block Store (EBS)
- Virtual Private Cloud (VPC)
- Relational Database Service (RDS)
- Identity and Access Management (IAM)
- Security Token Service (STS)
- Redshift
- CloudTrail
- Elastic Beanstalk – New!
- Direct Connect – New!
- CloudFormation – New!
- Elastic MapReduce – New!
- Elastic Load Balancing – New!
- Kinesis – New!
- CloudWatch – New!
Here’s an updated version of the diagram that I published when we launched CloudTrail:
News From CloudCheckr
CloudCheckr (an AWS Partner) integrates with CloudTrail to provide visibility and actionable information for your AWS resources. You can use CloudCheckr to analyze, search, and understand changes to AWS resources and the API activity recorded by CloudTrail.
Let’s say that an AWS administrator needs to verify that a particular AWS account is not being accessed from outside a set of dedicated IP addresses. They can open the CloudTrail Events report, select the month of April, and group the results by IP address. This will display the following report:
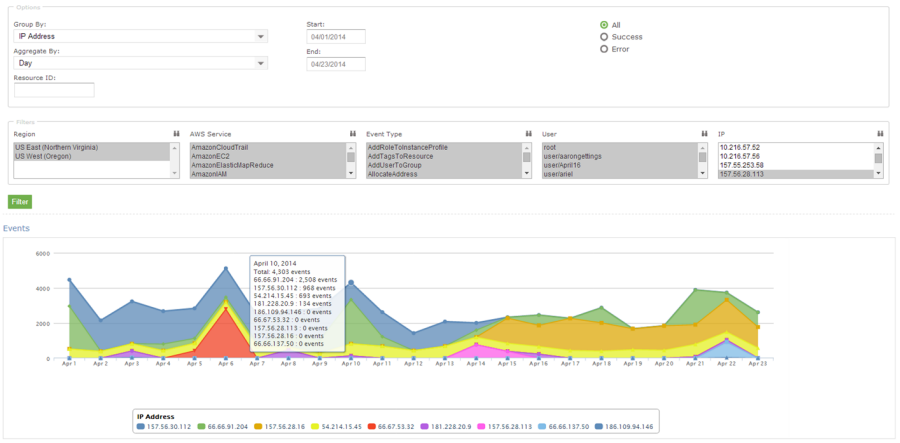
As you can see, the administrator can use the report to identify all the IP addresses that are being used to access the AWS account. If any of the IP addresses were not on the list, the administrator could dig in further to determine the IAM user name being used, the calls being made, and so forth.
CloudCheckr is available in Freemium and Pro versions. You can try CloudCheckr Pro for 14 days at no charge. At the end of the evaluation period you can upgrade to the Pro version or stay with CloudCheckr Freemium.
— Jeff;
AWS Elastic Beanstalk for Docker
 AWS Elastic Beanstalk makes it easy for you to deploy and manage applications in the AWS cloud. After you upload your application, Elastic Beanstalk will provision, monitor, and scale capacity (Amazon EC2 instances), while also load balancing incoming requests across all of the healthy instances.
![]() Docker automates the deployment of applications in the form of lightweight, portable, self-sufficient containers that can run in a variety of environments. Containers can be populated from pre-built Docker images or from a simple recipe known as a Dockerfile.
Docker automates the deployment of applications in the form of lightweight, portable, self-sufficient containers that can run in a variety of environments. Containers can be populated from pre-built Docker images or from a simple recipe known as a Dockerfile.
Docker’s container-based model is very flexible. You can, for example, build and test a container locally and then upload it to the AWS Cloud for deployment and scalability. Docker’s automated deployment model ensures that the runtime environment for your application is always properly installed and configured, regardless of where you decide to host the application.
Today we are enhancing Elastic Beanstalk with the ability to launch applications contained in Docker images or described in Dockerfiles. You can think of Docker as an exciting and powerful new runtime environment for Elastic Beanstalk, joining the existing Node.JS, PHP, Python, .NET, Java, and Ruby environments.
Beanstalk, Meet Docker
With today’s launch, you now have the ability to build and test your applications on your local desktop and then deploy them to the AWS Cloud via Elastic Beanstalk.
You can use any desired version of the programming language, web server, and application server. You can configure them as you see fit, and you can install extra packages and libraries as needed.
You can launch existing public and private Docker images. Each image contains a snapshot of your application and its dependencies, and can be created locally using a few simple Docker commands.To use an image with Elastic Beanstalk, you will create a file called Dockerrun.aws.json. This file specifies the image to be used and can also set up a port to be exposed and volumes to be mapped in to the container from the host environment. If you are using a private Docker image, you will also need to create a .dockercfg file, store it in Amazon S3, and reference it from the Authentication section of Dockerrun.aws.json.
You can also use a Dockerfile. The Docker commands contained in such a file will be processed and executed as part of the Auto Scaling configuration established by Elastic Beanstalk. In other words, each freshly created EC2 instance used to host an Elastic Beanstalk application will be configured as directed by your Dockerfile.
Regardless of which option you choose, you always upload a single file to Elastic Beanstalk. This upload can be:
- A plain Dockerfile.
- A plain Docker.aws.json file.
- A Zip file that contains either Dockerfile or Docker.aws.json, along with other application assets.
The third option can be useful for applications that require a number of “moving parts” to be present on the instance. If you are using a Dockerfile, you could also choose to fetch these parts using shell commands embedded in the file.
Docker in Action
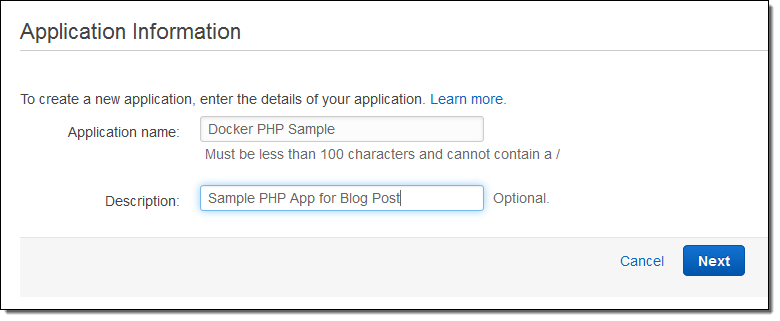
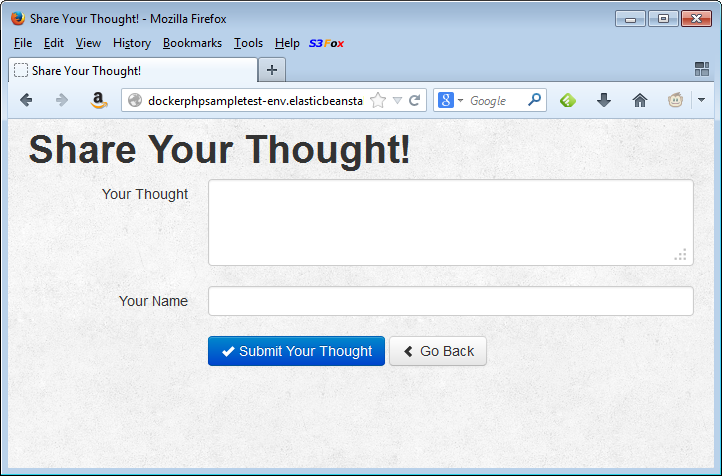
Let’s create a simple PHP application using Elastic Beanstalk for Docker! The first step is the same for every Elastic Beanstalk application — I simply fill in the name and the description:
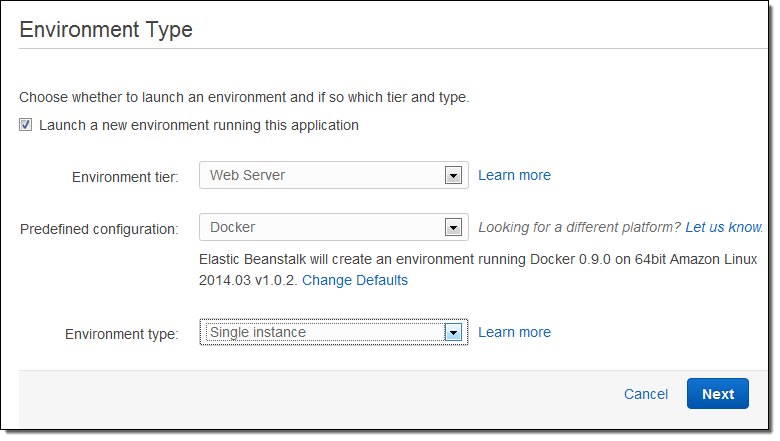
Then I choose Docker as the Predefined Configuration. This application will not need to scale very high, so a single instance environment is fine:
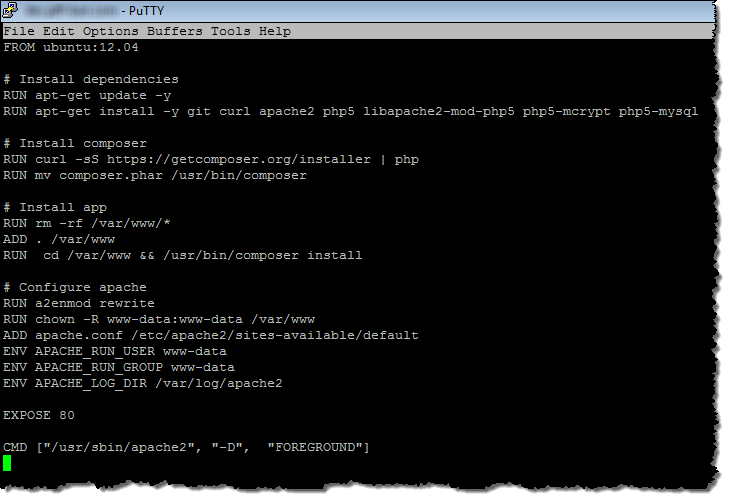
The moving parts are in a single directory, with src and web subdirectories and a Dockerfile at the root:
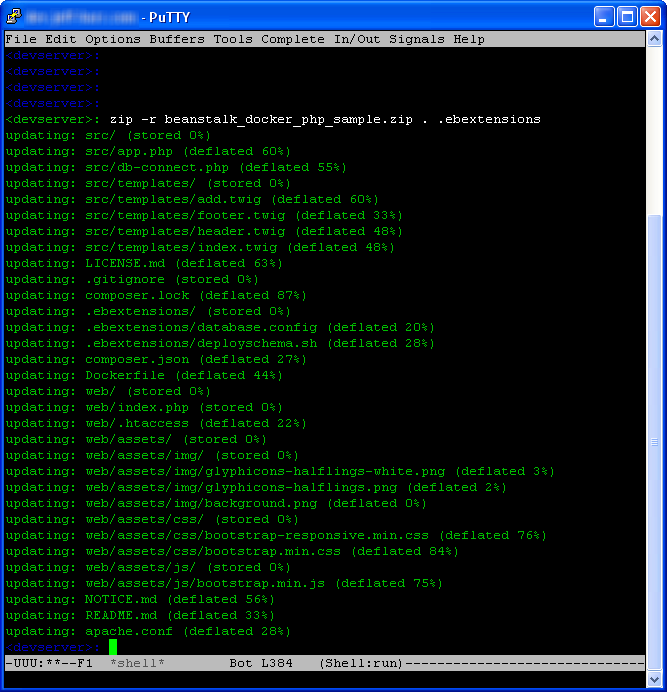
I zipped them up into a single file like this (note that I had to to explicity mention the .ebextensions directory)
Then I upload the file to Elastic Beanstalk:
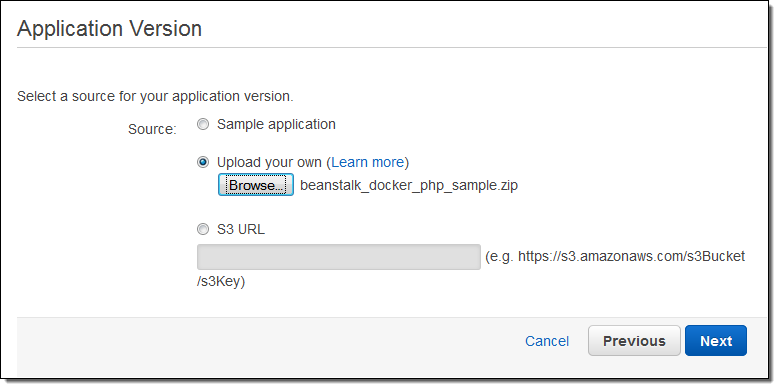
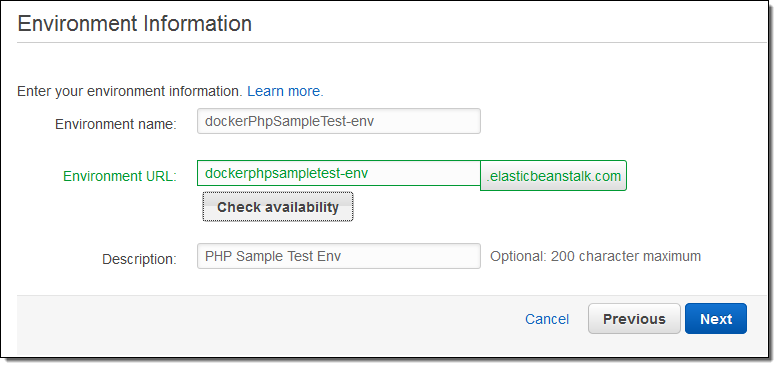
With the file uploaded, I can now create an Elastic Beanstalk environment. This will be my testing environment; later I could create a separate environment for production. Elastic Beanstalk lets me configure each environment independently. I can also choose to run distinct versions of my application code in each environment:
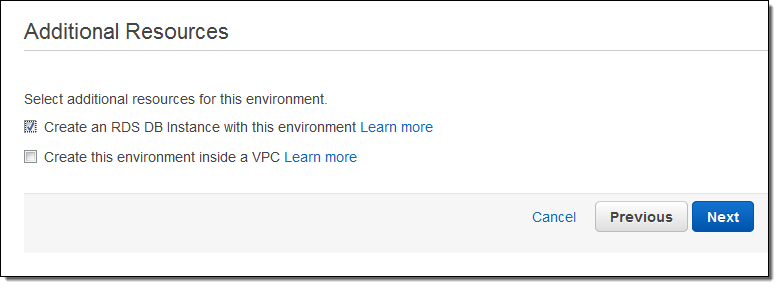
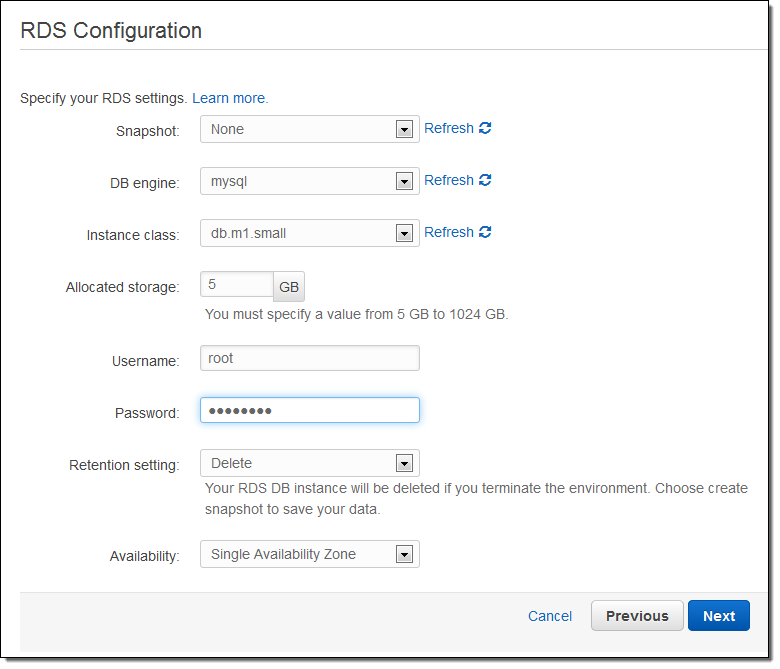
The PHP application makes use of a MySQL database so I will ask Elastic Beanstalk to create it for me (I’ll configure it in a step or two):
Now I choose my instance type. I can also specify an EC2 keypair; this will allow me to connect to the application’s EC2 instances via SSH and can be useful for debugging:
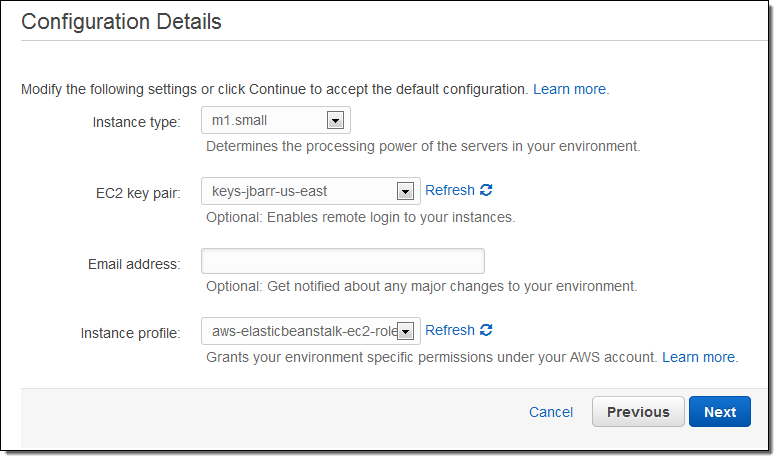
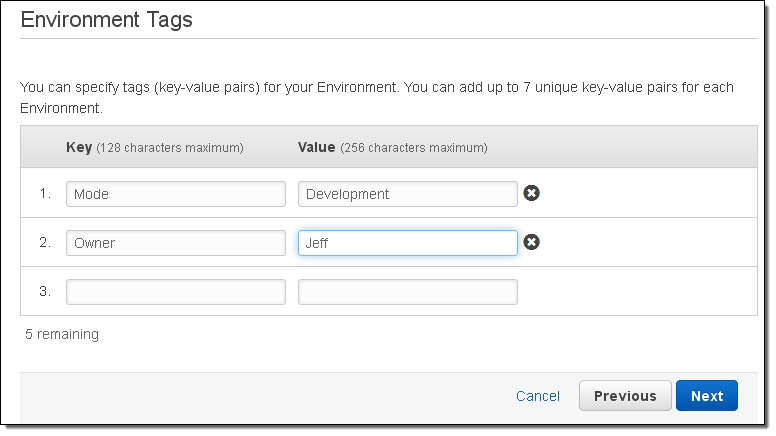
I can also tag my Elastic Beanstalk application and the AWS resources that it creates (this is a new feature that was launched earlier this week):
Now I can configure my RDS instance. The user name and the password will be made available to the EC2 instance in the form of environment variables.
The following PHP code retrieves the user name and the password:
<?php
  define('DB_NAME', getenv('RDS_DB_NAME'));
  define('DB_USER', getenv('RDS_USERNAME'));
  define('DB_PASSWORD', getenv('RDS_PASSWORD'));
  define('DB_HOST', getenv('RDS_HOSTNAME'));
  define('DB_TABLE', 'urler');
?>
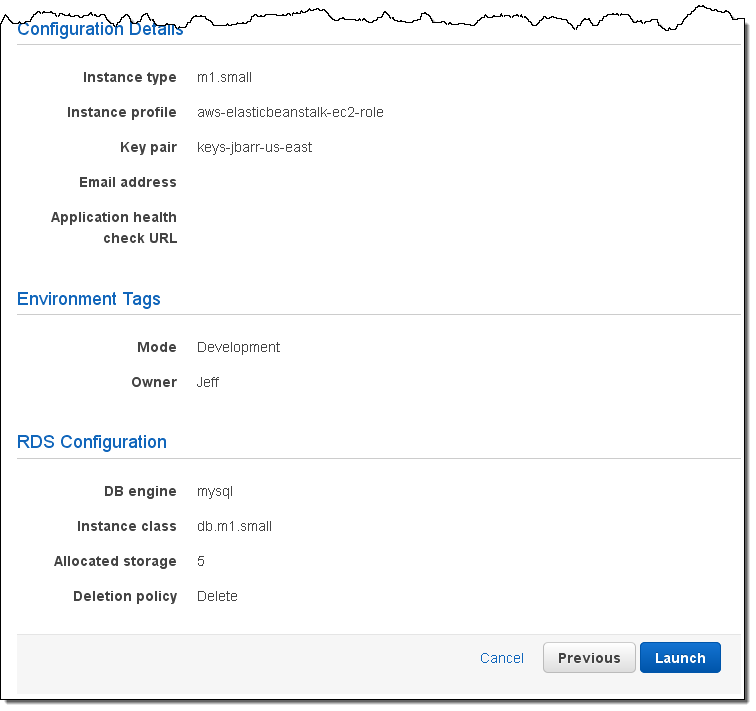
The last step before launching is to confirm all of the settings:
Elastic Beanstalk shows me the status of the application and the environment, with dynamic updates along the way:
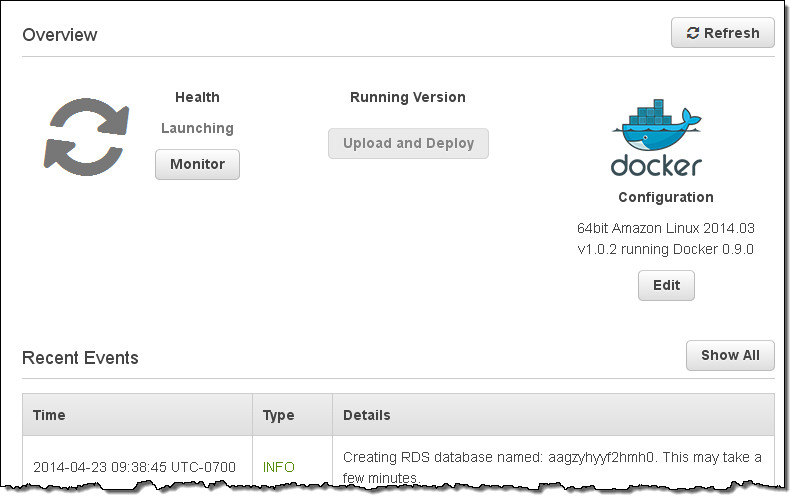
After a few minutes the environment will be up and running:
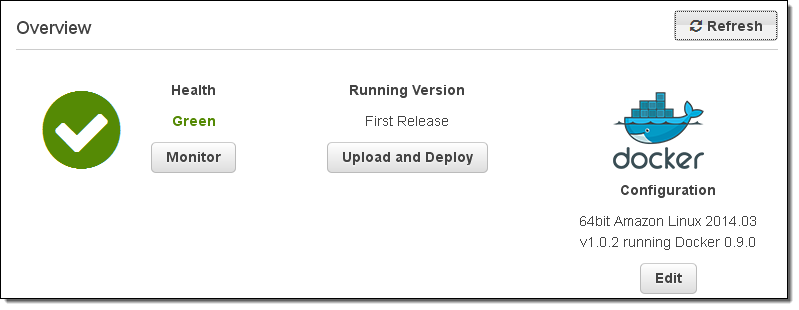
The application is just a click away:
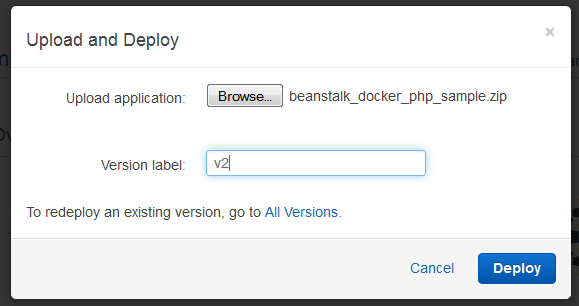
After I have created an environment, I can update the source code, create a new ZIP file, and deploy it to the environment in a matter of seconds.
AWS Elastic Beanstalk for Docker is available in all AWS Regions and you can start using it today!
— Jeff;
PS – The Elastic Beanstalk team holds office hours every Thursday morning. Join them this coming week for Part 3 of a continuing series and learn how to Develop, Deploy, and Manage for Scale with Elastic Beanstalk and CloudFormation.