Category: Amazon Athena
New – S3 Sync capability for EC2 Systems Manager: Query & Visualize Instance Software Inventory
It is now essential, with the fast paced lives we all seem to lead, to find tools to make it easier to manage our time, our home, and our work. With the pace of technology, the need for technologists to find management tools to easily manage their systems is just as important. With the introduction of Amazon EC2 Systems Manager service during re:Invent 2016, we hoped to provide assistance with the management of your systems and software.
If are not yet familiar with the Amazon EC2 Systems Manager, let me introduce this capability to you. EC2 Systems Manager it is a management service that helps to create system images, collect software inventory, configure both Windows and Linux operating systems, as well as, apply Operating Systems patches. This collection of capabilities allows remote and secure administration for managed EC2 instances or hybrid environments with on-premise machines configured for Systems Manager. With this EC2 service capability, you can additionally record and regulate the software configuration of these instances using AWS Config.
Recently we have added another feature to the inventory capability of EC2 Systems Manager to aid you in the capture of metadata about your application deployments, OS and system configurations, Resource Data Sync aka S3 Sync. S3 Sync for EC2 Systems Manager allows you to aggregate captured inventory data automatically from instances in different regions and multiple accounts and store this information in Amazon S3. With the data in S3, you can run queries against the instance inventory using Amazon Athena, and if you choose, use Amazon QuickSight to visualize the software inventory of your instances.

Let’s look at how we can utilize this Resource Data Sync aka S3 Sync feature with Amazon Athena and Amazon QuickSight to query and visualize the software inventory of instances. First things first, I will make sure that I have the Amazon EC2 Systems Manager prerequisites completed; configuration of the roles and permissions in AWS Identity and Access Management (IAM), as well as, the installation of the SSM Agent on my managed instances. I’ll quickly launch a new EC2 instance for this Systems Manager example.
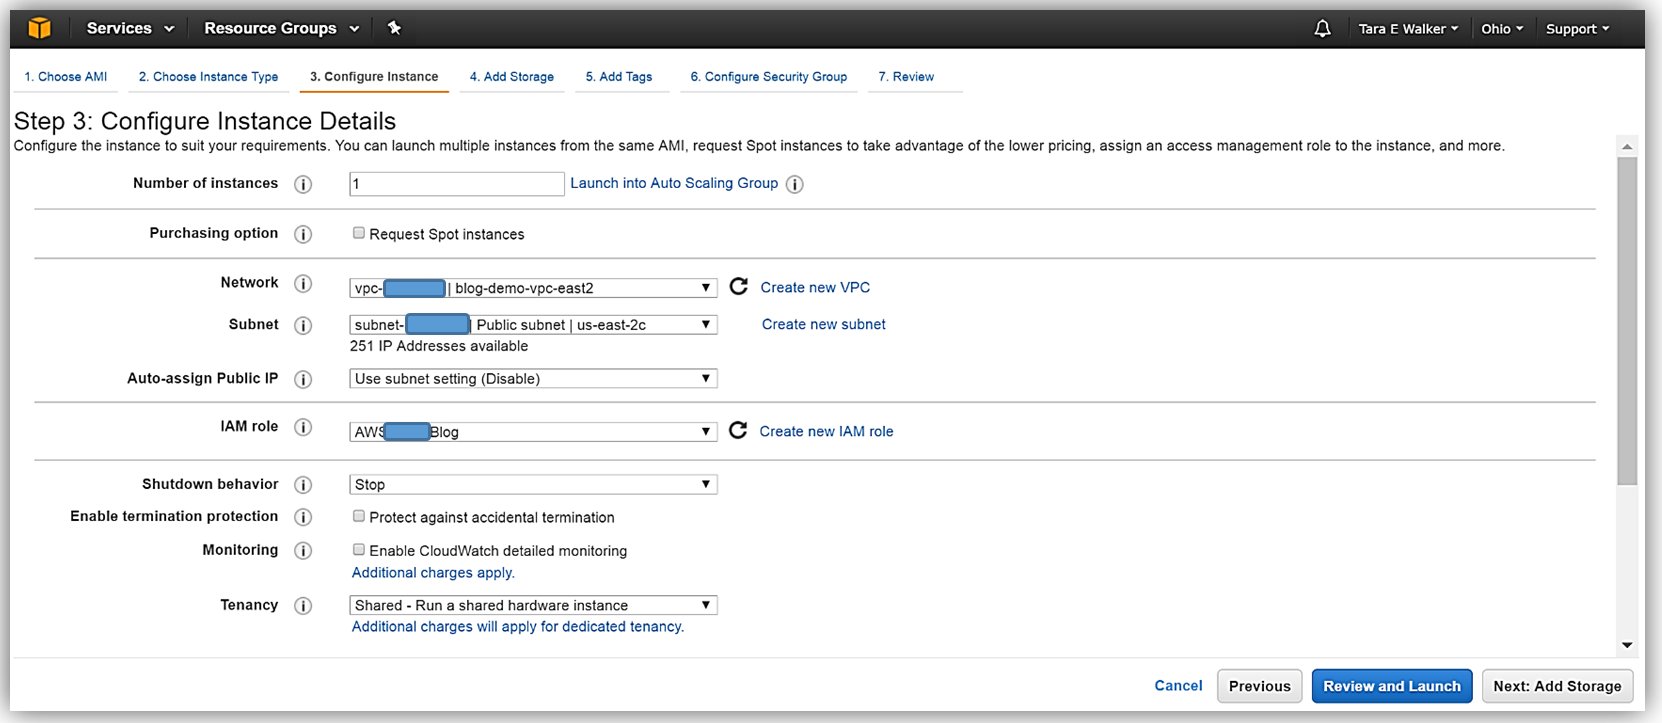
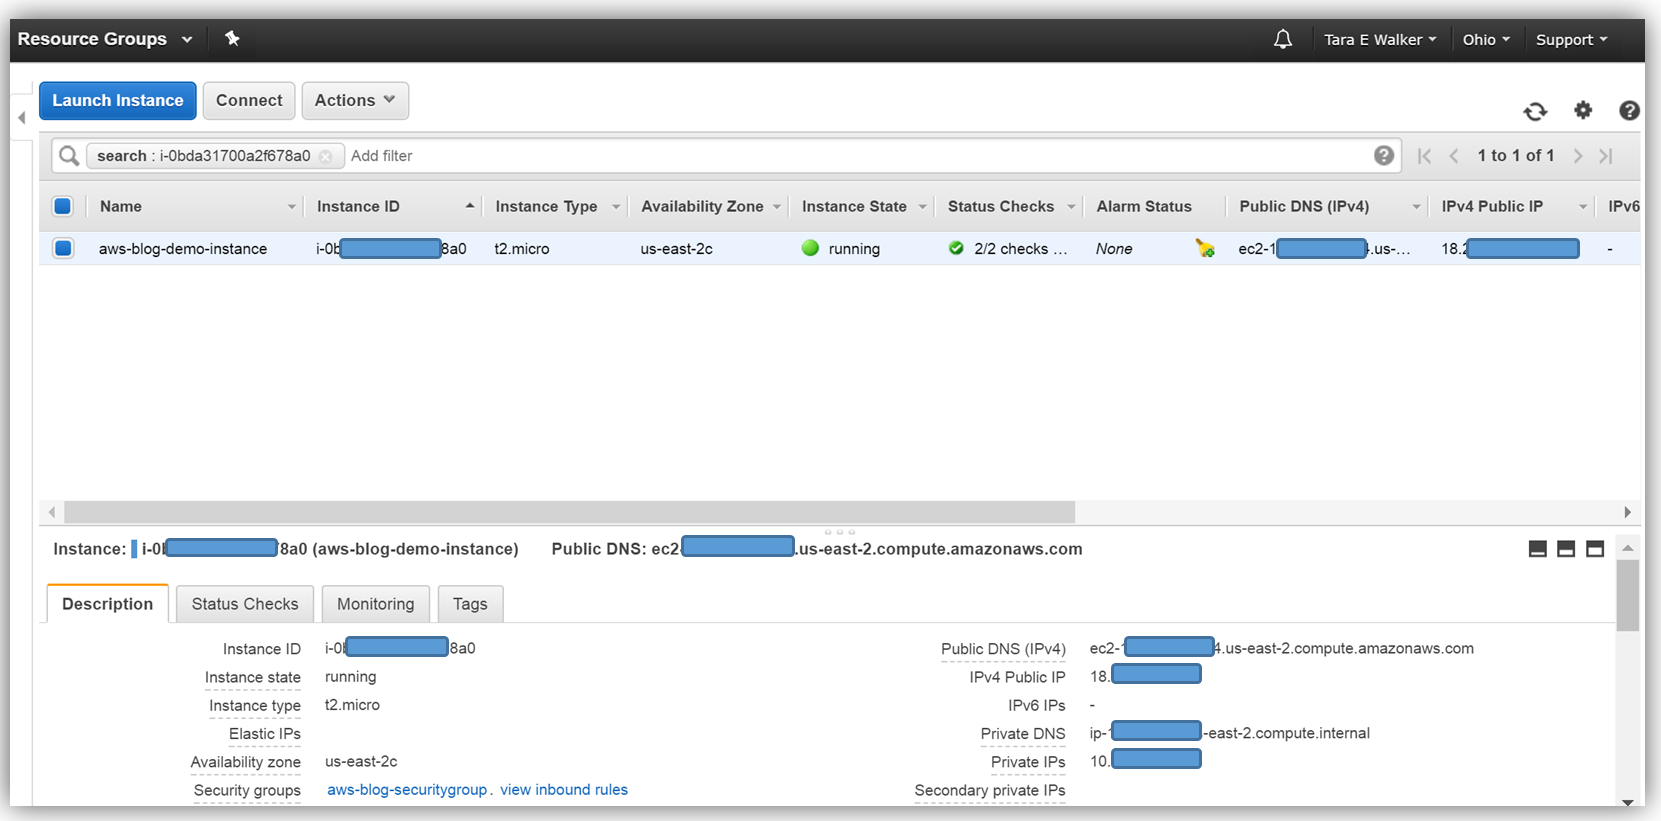
Now that my instance has launched, I will need to install the SSM Agent onto my aws-blog-demo-instance. One thing I should mention is that it is essential that your IAM user account has administrator access in the VPC in which your instance was launched. You can create a separate IAM user account for instances with EC2 Systems Manager, by following the instructions noted here: http://docs.aws.amazon.com/systems-manager/latest/userguide/sysman-configuring-access-policies.html#sysman-access-user. Since I am using an account with administrative access, I won’t need to create an IAM user to continue installing the SSM Agent on my instance.
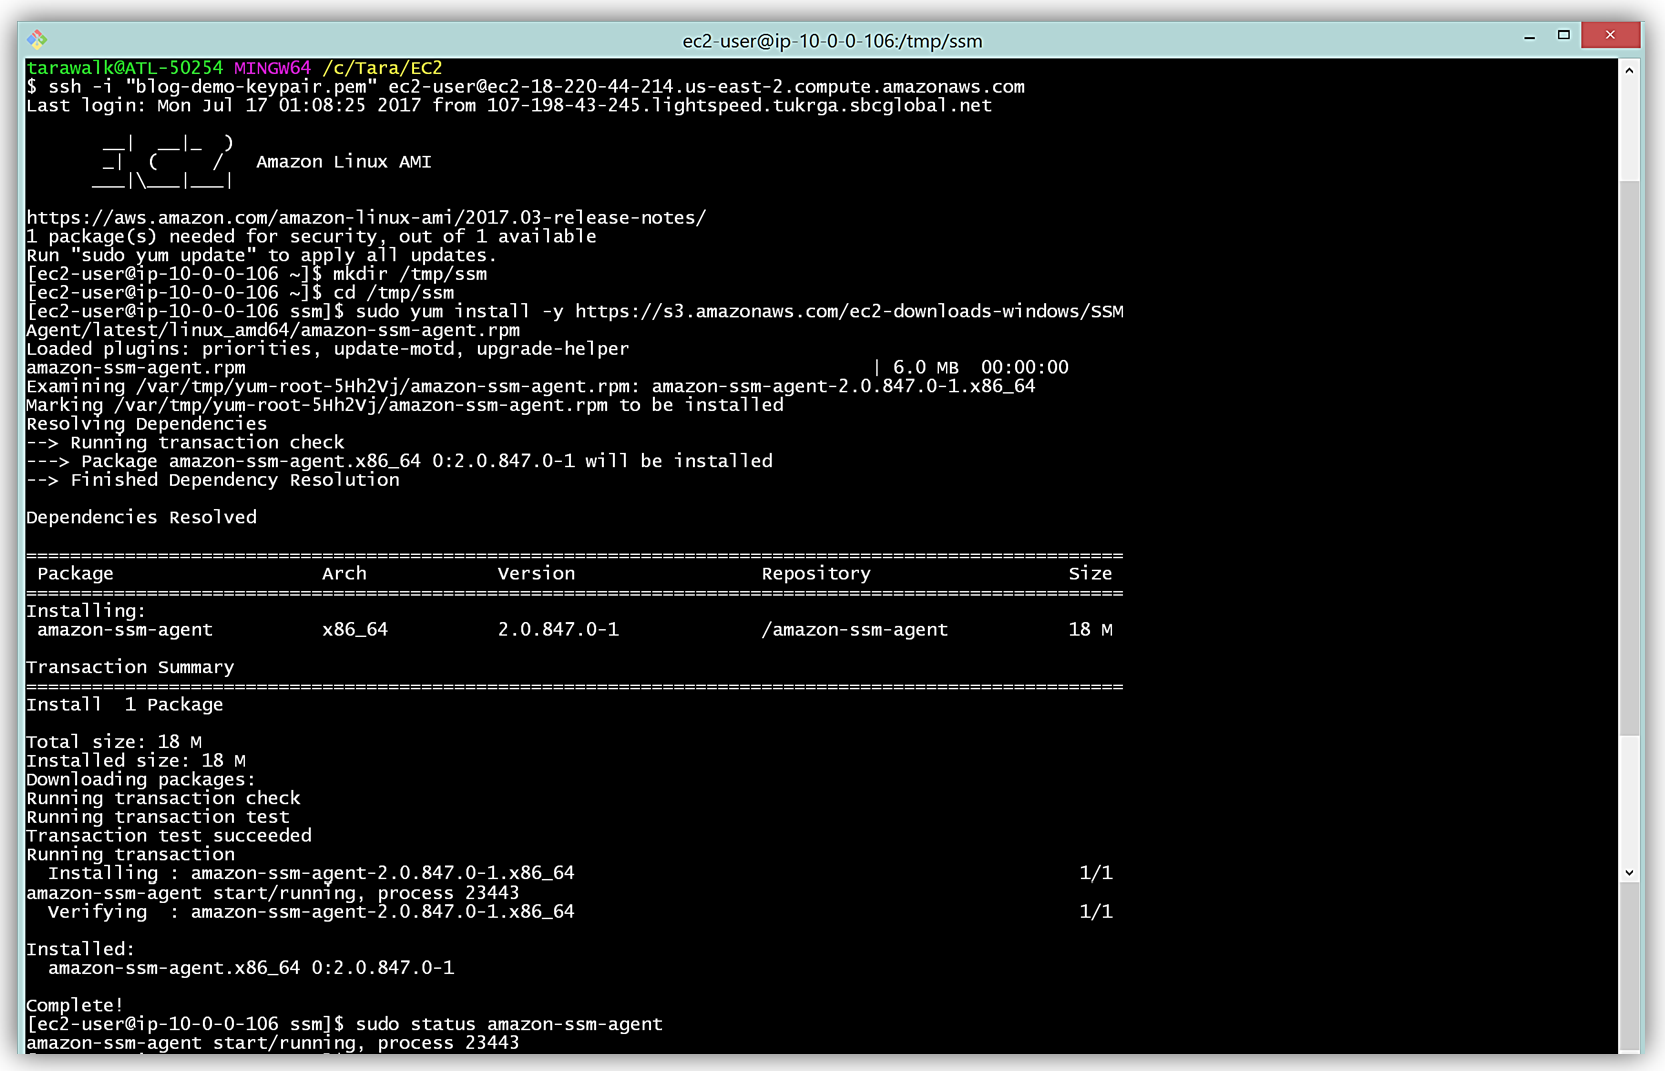
To install the SSM Agent, I will SSH into my instance, create a temporary directory, and pull down and install the necessary SSM Agent software for my Amazon Linux EC2 instance. An EC2 instance based upon a Windows AMI already includes the SSM Agent so I would not need to install the agent for Windows instances.
To complete the aforementioned tasks, I will issue the following commands:
mkdir /tmp/ssm

cd /tmp/ssm

sudo yum install -y https://s3.amazonaws.com/ec2-downloads-windows/SSMAgent/latest/linux_amd64/amazon-ssm-agent.rpm
You can find the instructions to install the SSM Agent based upon the type of operating system of your EC2 instance in the Installing SSM Agent section of the EC2 Systems Manager user guide.
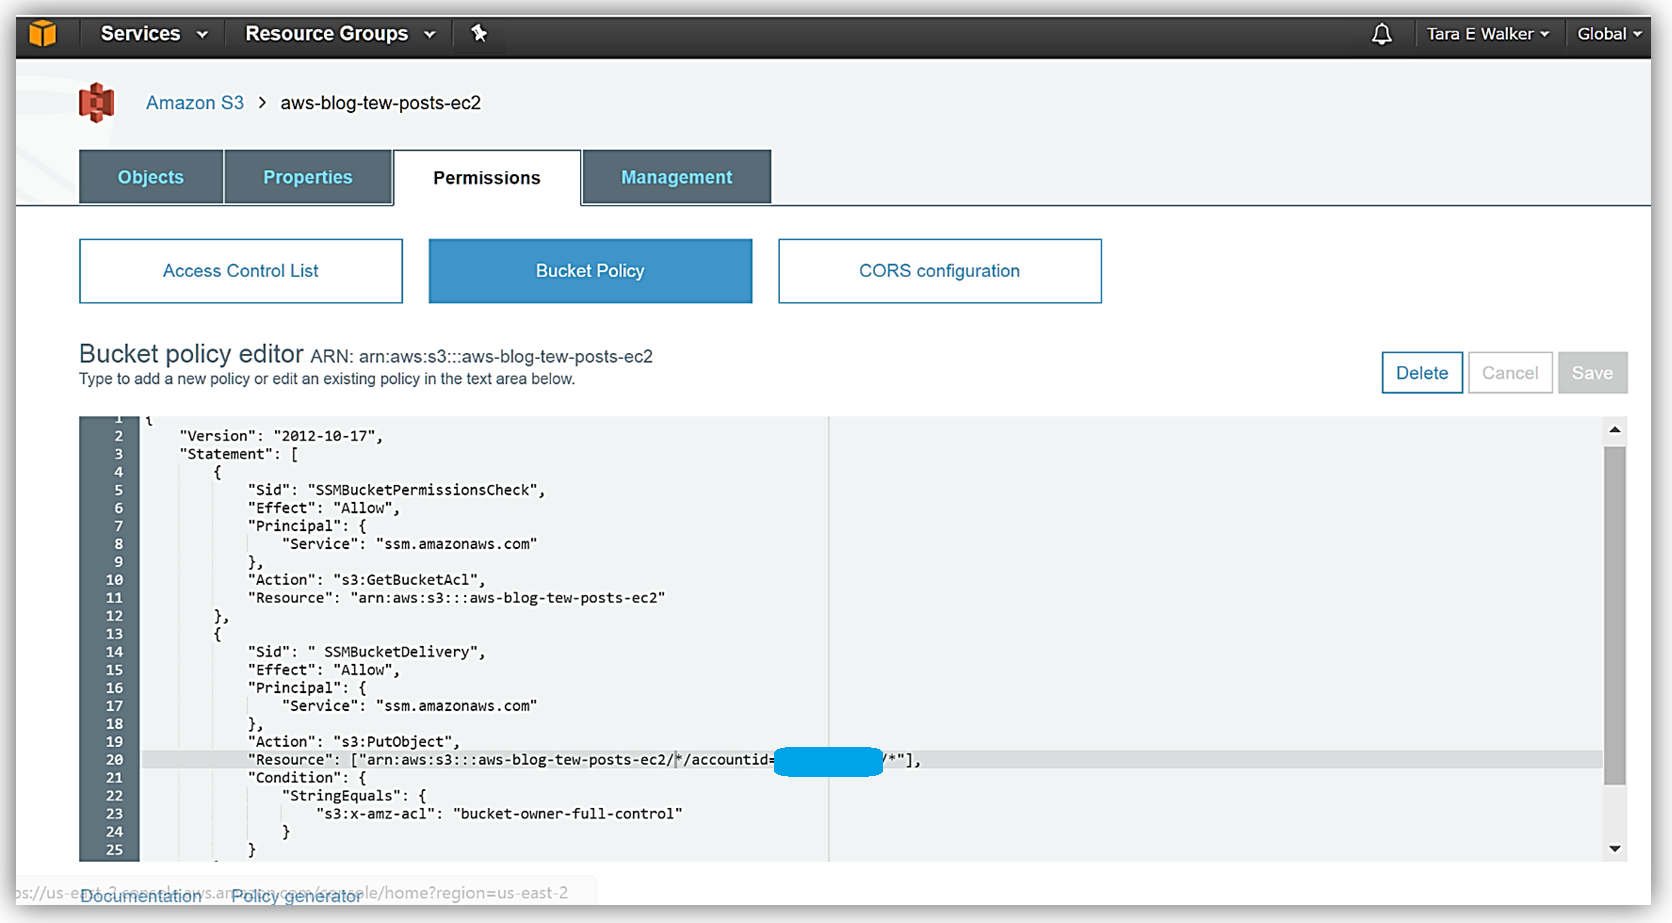
Now that I have the Systems Manager agent running on my instance, I’ll need to use a S3 bucket to capture the inventory data. I’ll create a S3 bucket, aws-blog-tew-posts-ec2, to capture the inventory data from my instance. I will also need to add a bucket policy to ensure that EC2 Systems Manager has permissions to write to my bucket. Adding the bucket policy is simple, I select the Permissions tab in the S3 Console and then click the Bucket Policy button. Then I specify a bucket policy which gives the Systems Manager the ability to check bucket permissions and add objects to the bucket. With the policy in place, my S3 bucket is now ready to receive the instance inventory data.
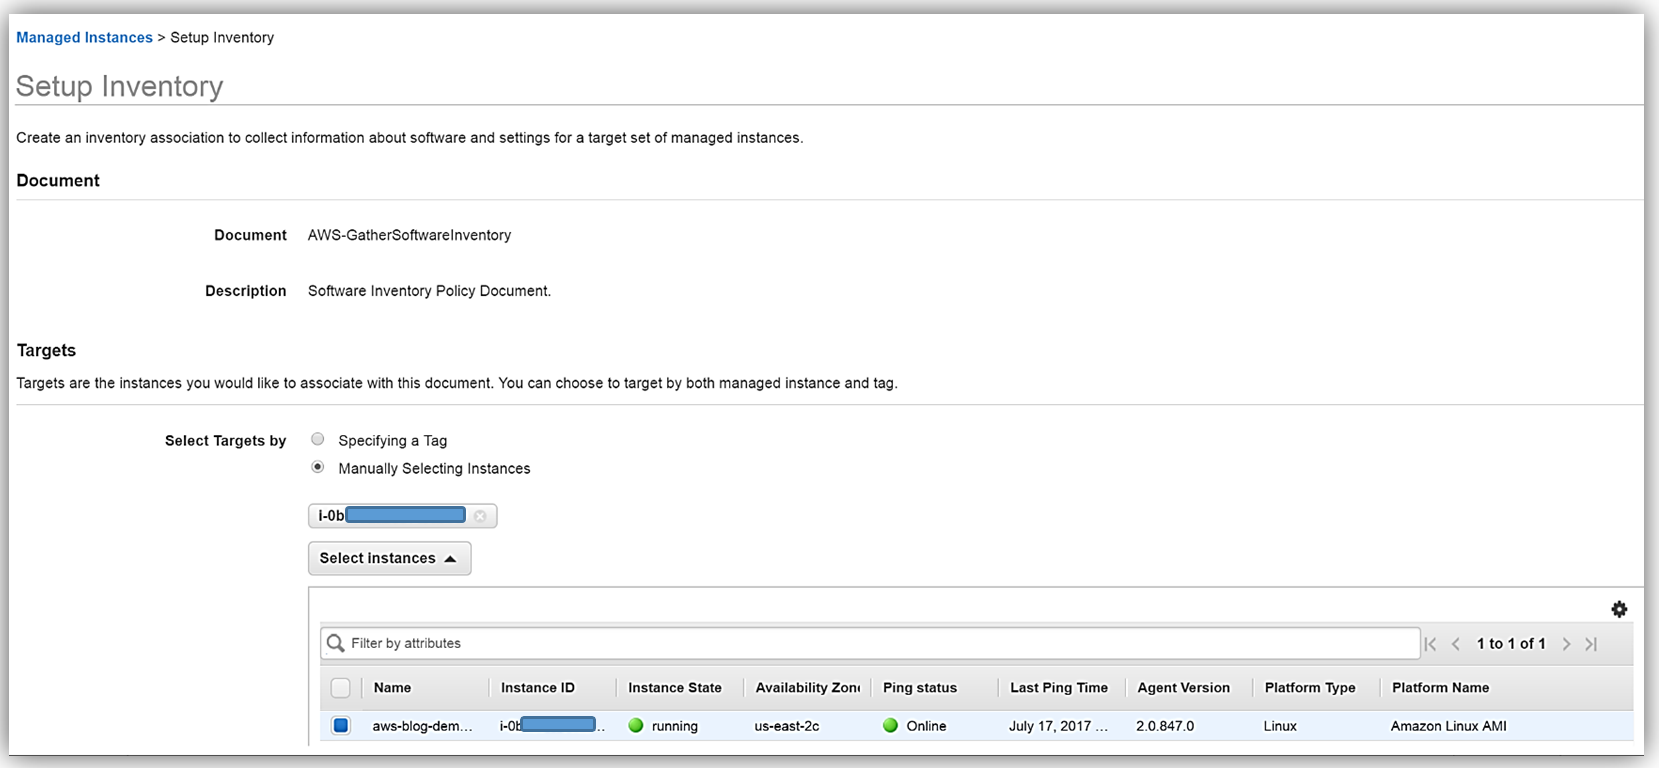
To configure the inventory collection using this bucket, I will head back over to the EC2 console and select Managed Resources under Systems Manager Shared Resources section, then click the Setup Inventory button.
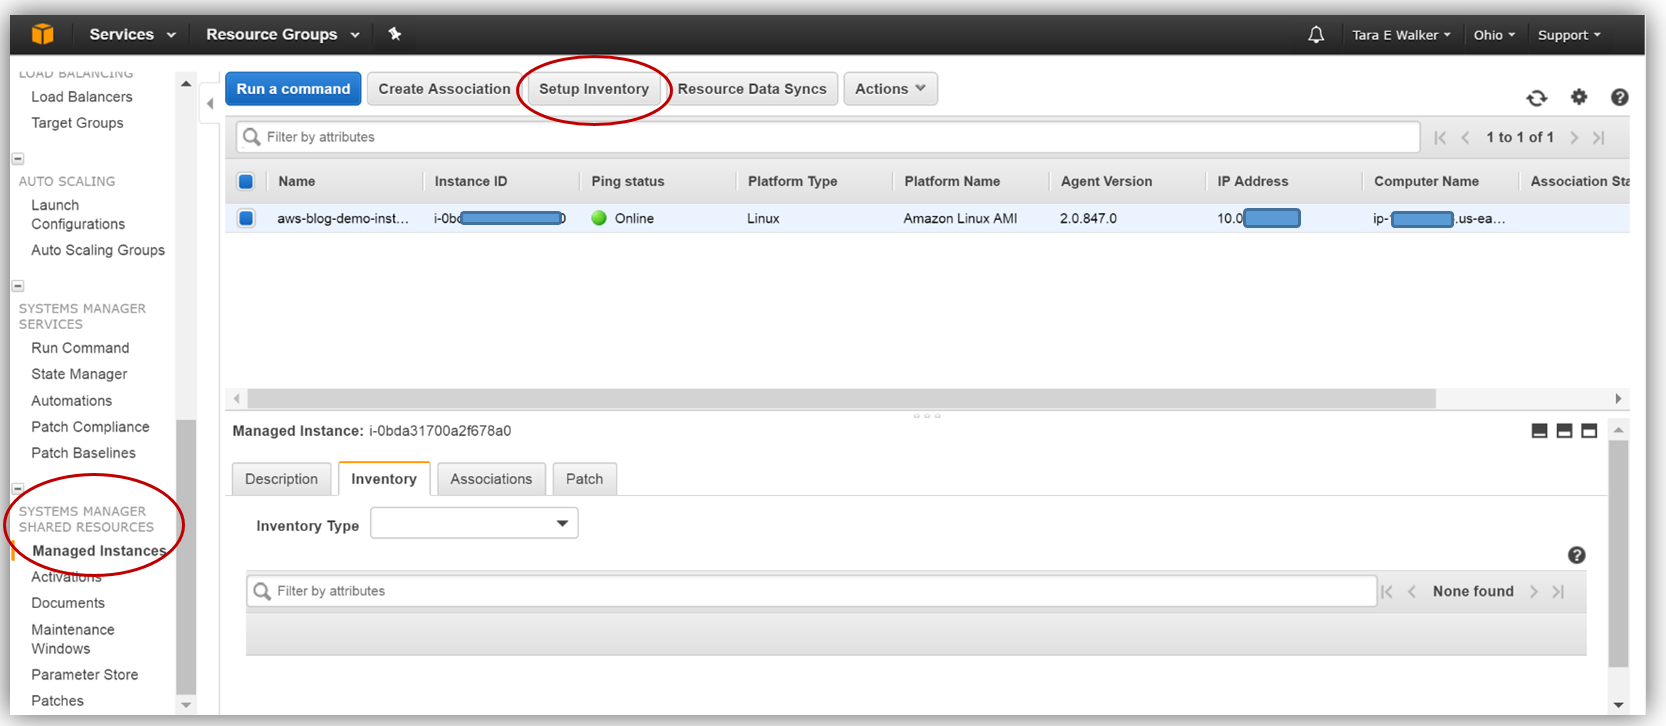
In the Targets section, I’ll manually select the EC2 instance I created earlier from which I want to capture the inventory data. You should note that you can select multiple instances for which to capture inventory data if desired.
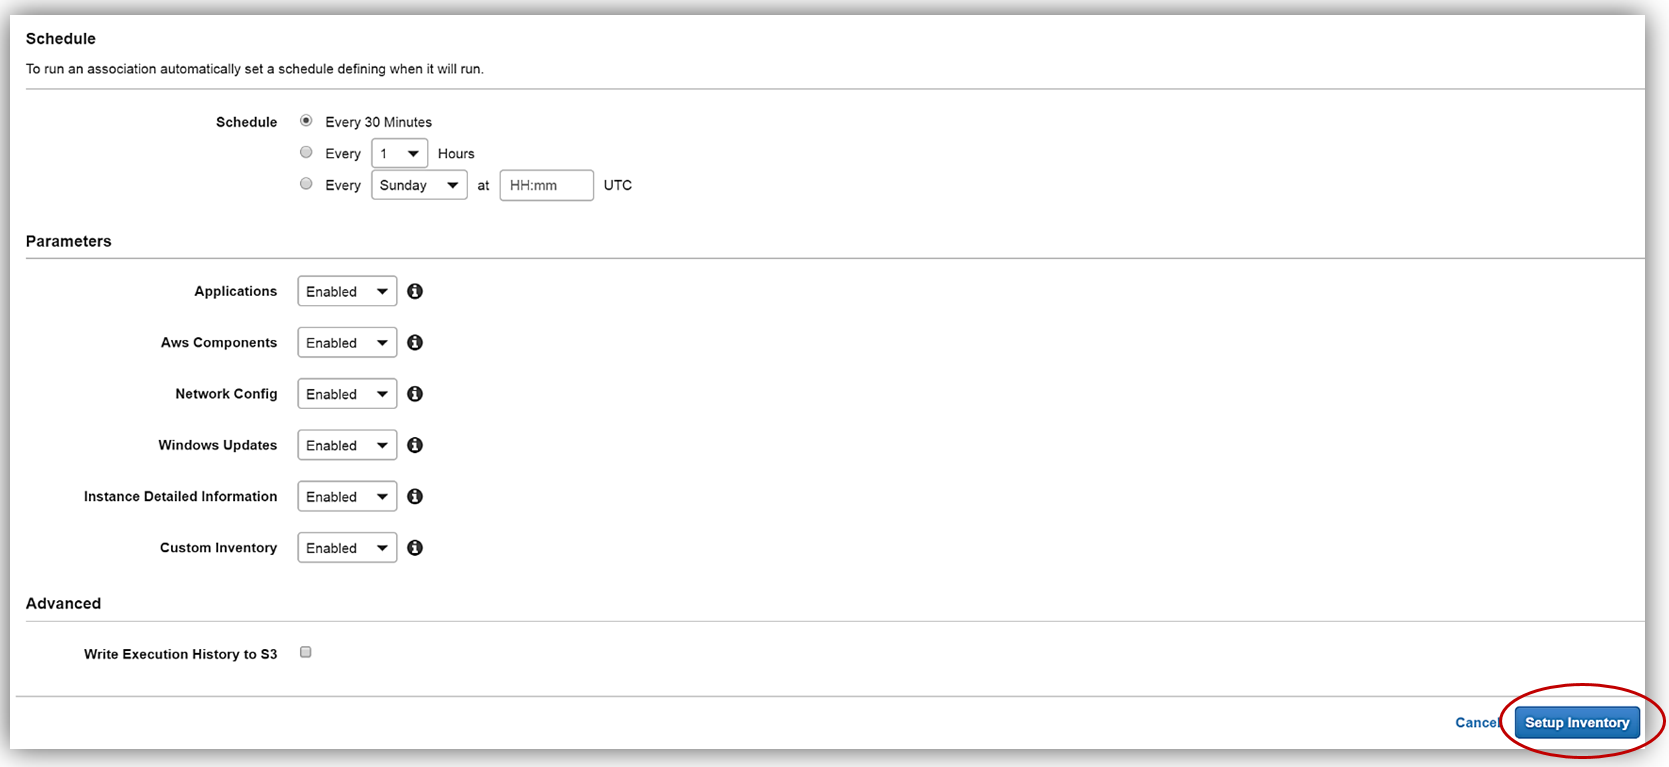
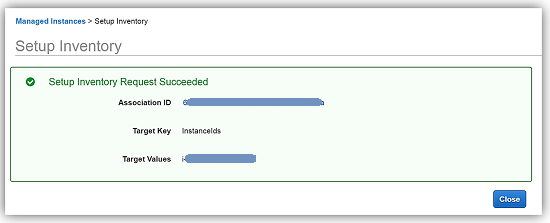
Scrolling down to the Schedule section, I will choose 30 minutes for the time interval of how often I wish for inventory metadata to be gathered from my instance. Since I’m keeping the default Enabled value for all of the options in the Parameters section, and I am not going to write the association logs to S3 at this time, I only need to click the Setup Inventory button. When the confirmation dialog comes up noting that the Inventory has been set up successfully, I will click the Close button to go back to the main EC2 console.
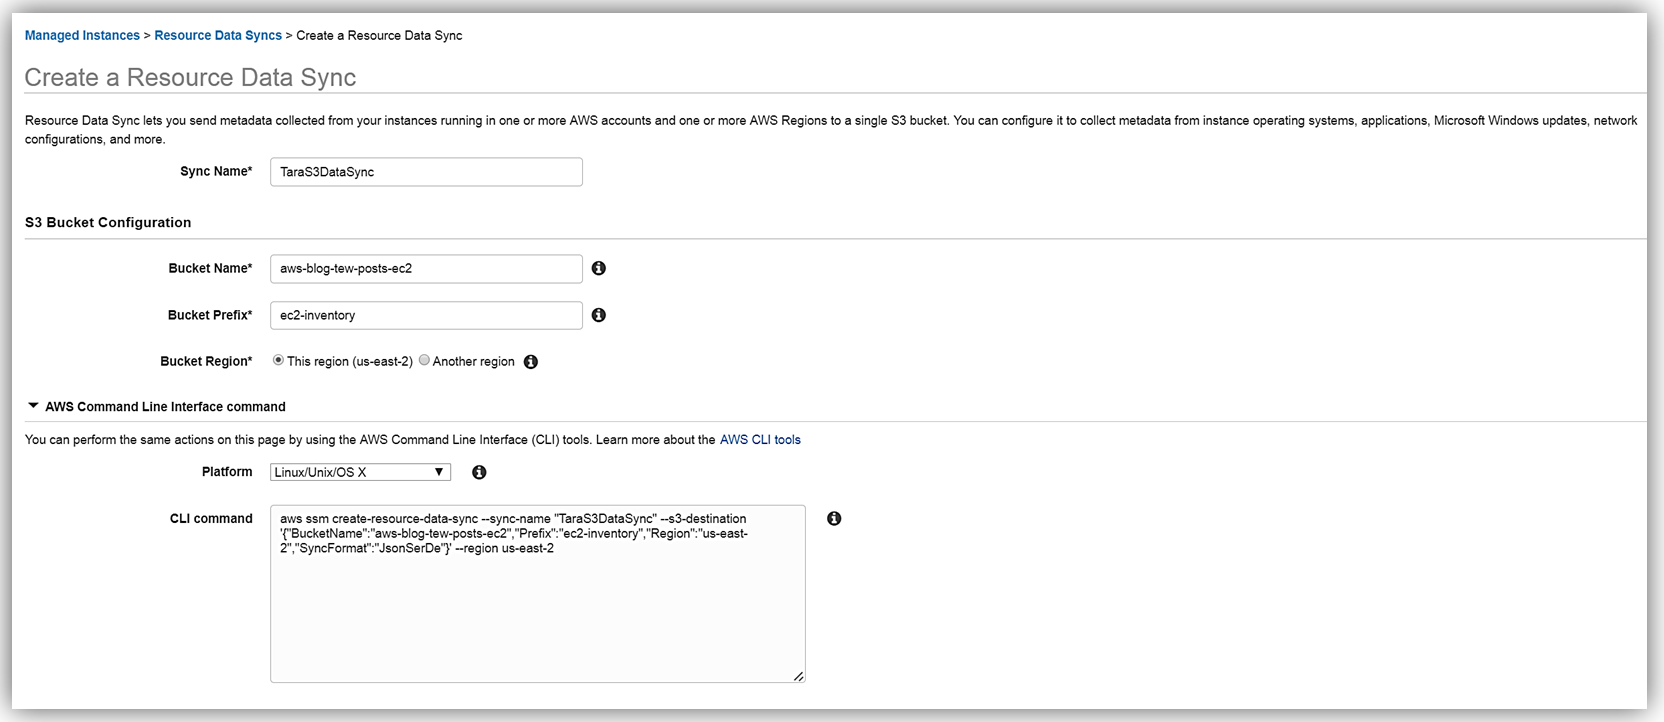
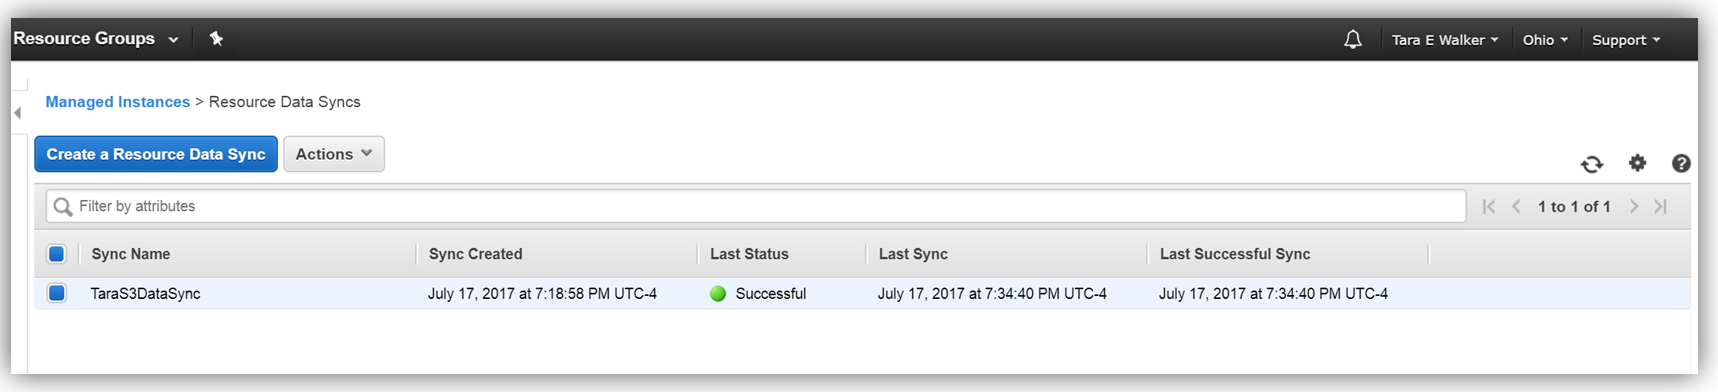
Back in the EC2 console, I will set up my Resource Data Sync using my aws-blog-tew-posts-ec3 S3 bucket for my Managed Instance by selecting the Resource Data Syncs button.

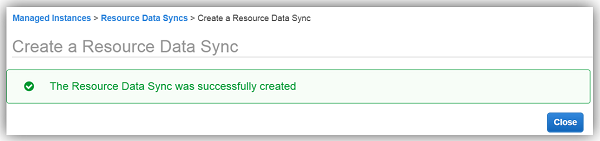
To set up my Resource data, I will enter my information for the Sync Name, Bucket Name, Bucket Prefix, and the Bucket Region that my bucket is located. You should also be aware that the Resource Data Sync and the sync S3 target bucket can be located in different regions. Another thing to note is that the CLI command for completing this step is displayed, in case I opt to utilize the AWS CLI for creating the Resource Data Sync. I click the Create button and my Resource Data Sync setup is complete.
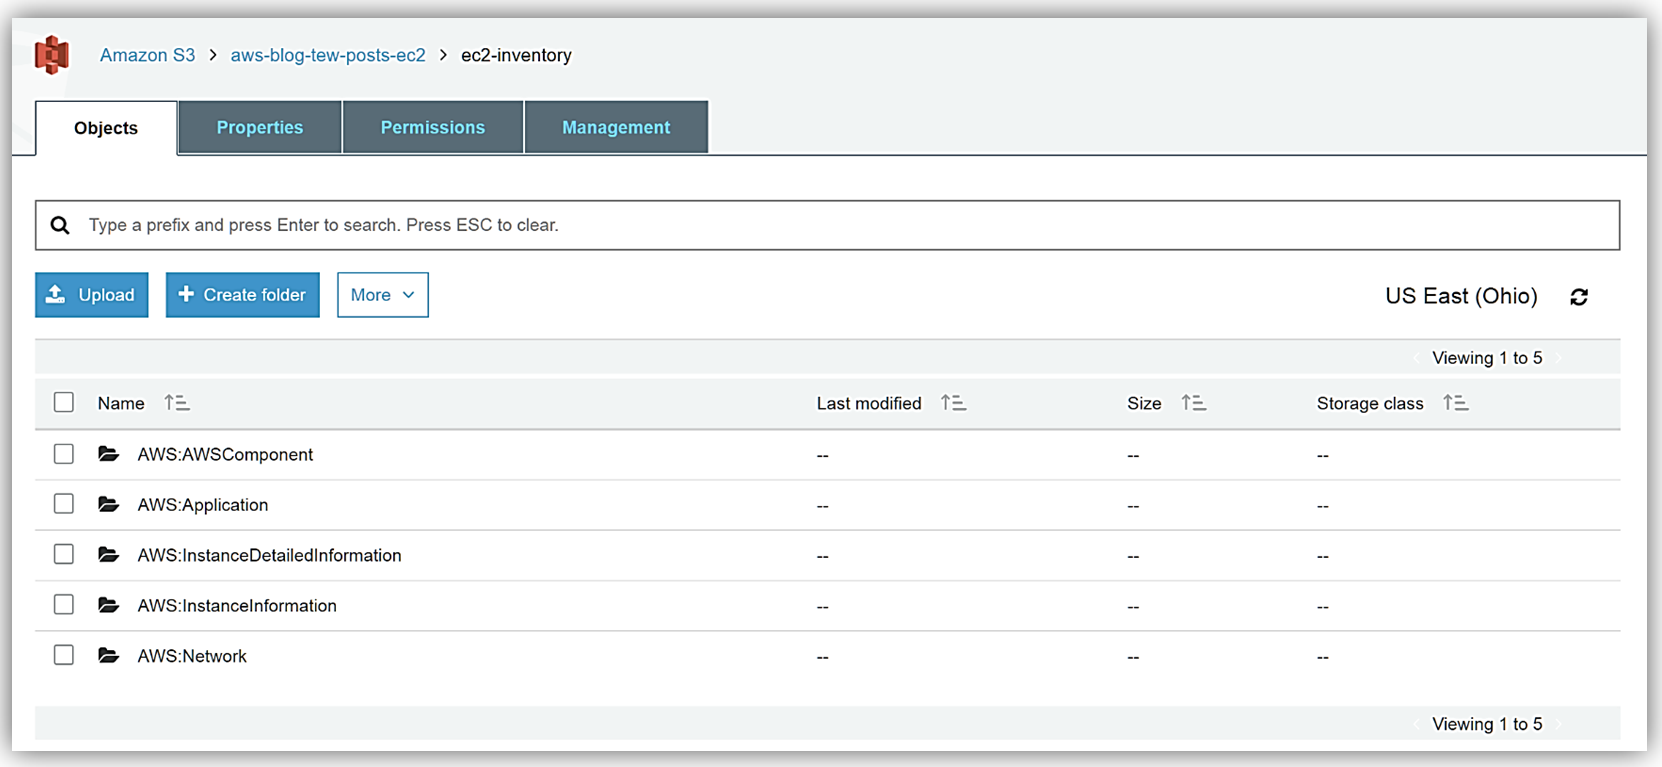
After a few minutes, I can go to my S3 bucket and see that my instance inventory data is syncing to my S3 bucket successfully.
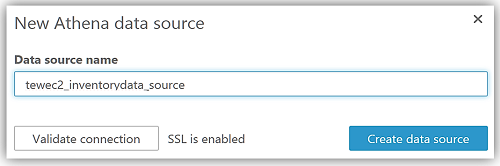
With this data syncing directly into S3, I can take advantage of the querying capabilities of the Amazon Athena service to view and query my instance inventory data. I create a folder, athenaresults, within my aws-blog-tew-posts-ec2 S3 bucket, and now off to the Athena console I go!
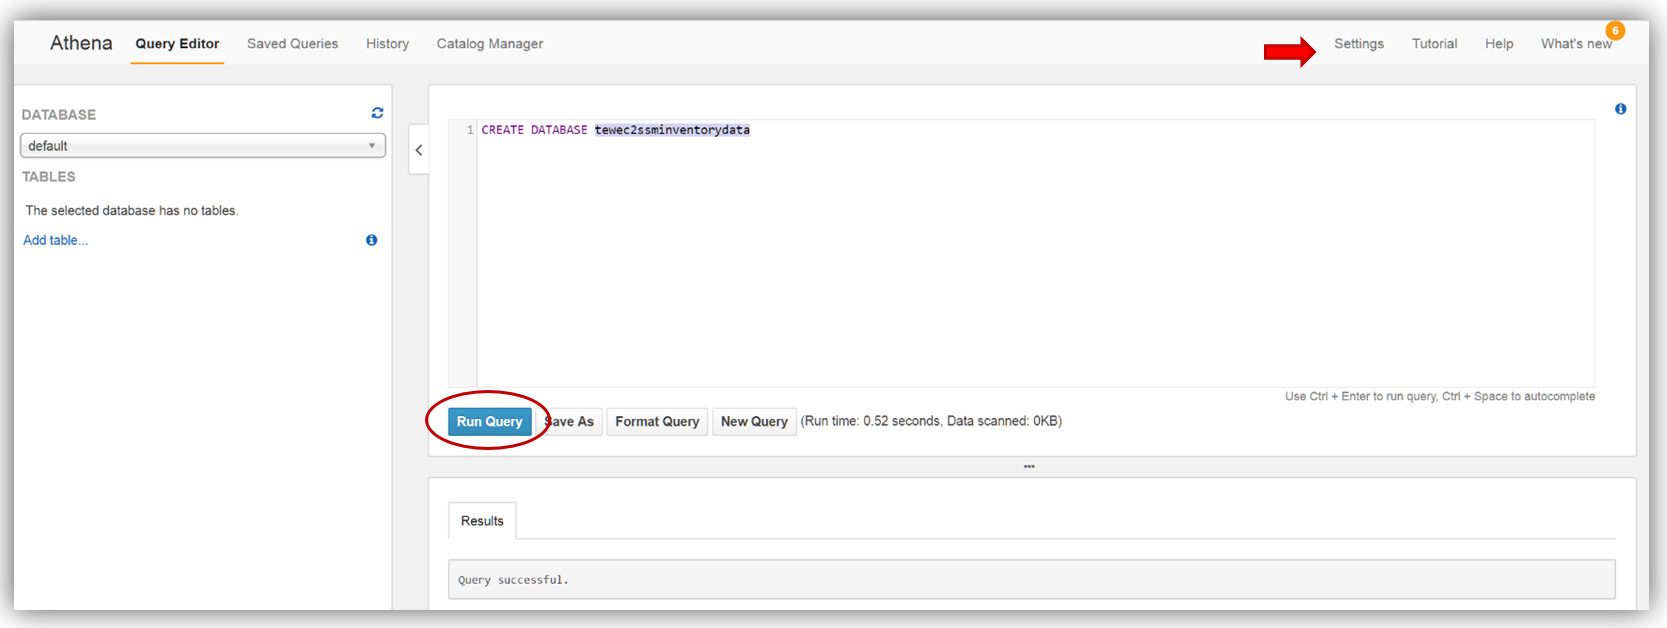
In the Athena console, I will change the Settings option to point to my athenaresults folder in my bucket by entering: s3://aws-blog-tew-posts-ec2/athenaresults. Now I can create a database named tewec2ssminventorydata for capturing and querying the data sent from SSM to my bucket, by entering in a CREATE DATABASE SQL statement in the Athena editor and clicking the Run Query button.
With my database created, I’ll switch to my tewec2ssminventorydata database and create a table to grab the inventory application data from the S3 bucket synced from the Systems Manager Resource Data Sync.
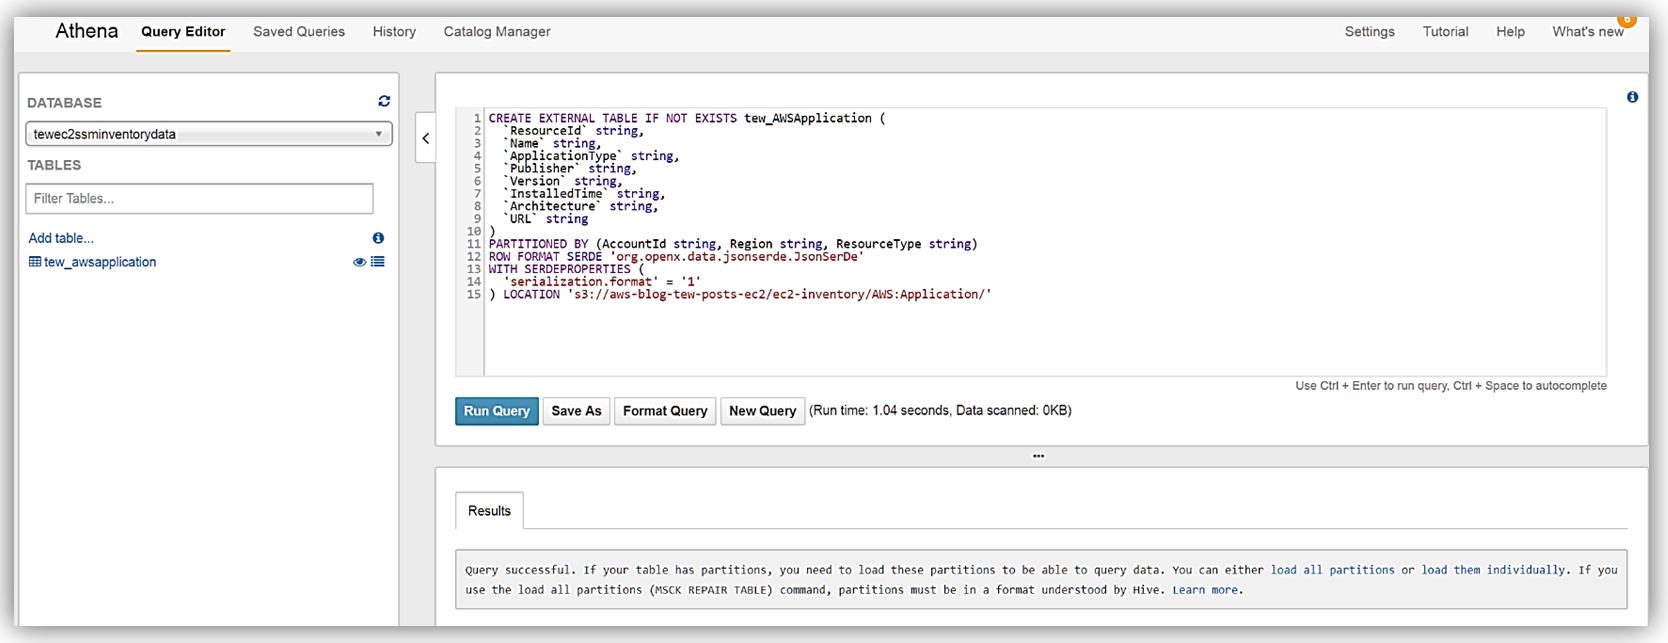
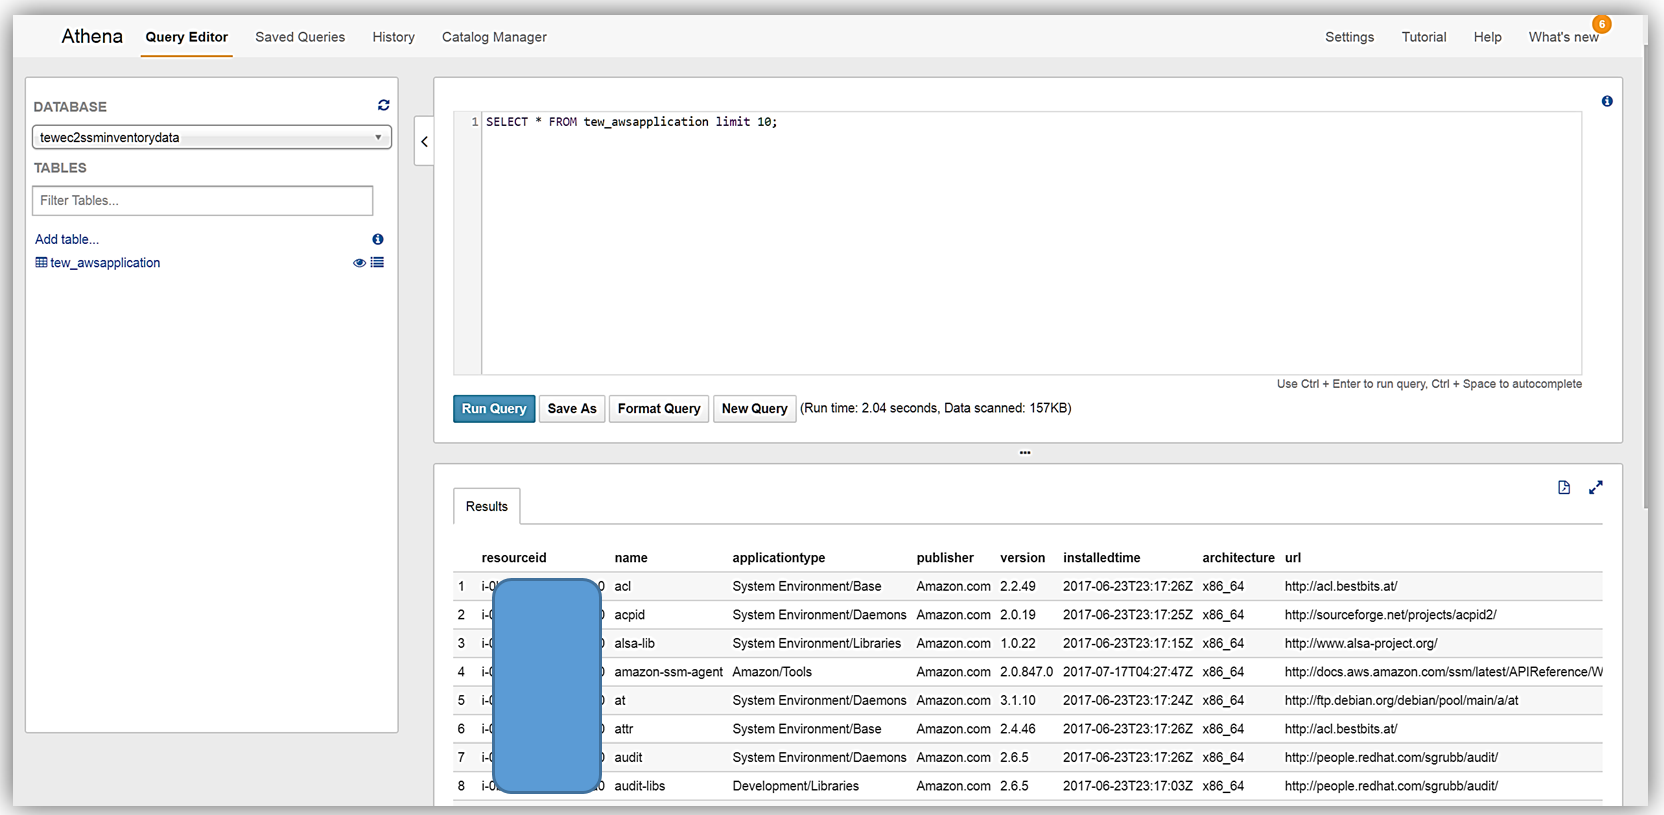
As the query success message notes, I’ll run the MSCK REPAIR TABLE tew_awsapplication command to partition the newly created table. Now I can run queries against the inventory data being synced from the EC2 Systems Manager to my Amazon S3 buckets. You can learn more about querying data with Amazon Athena on the product page and you can review my blog post on querying and encrypting data with Amazon Athena.
Now that I have query capability of this data it also means I can use Amazon QuickSight to visualize my data.
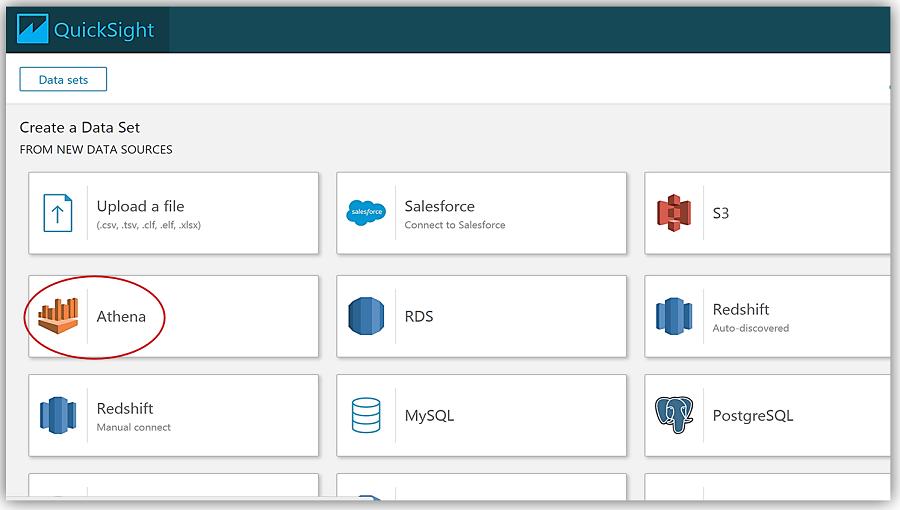
If you haven’t created an Amazon QuickSight account, you can quickly follow the getting started instructions to setup your QuickSight account. Since I already have a QuickSight account, I’ll go to the QuickSight dashboard and select the Manage Data button. On my Your Data Sets screen, I’ll select the New data set button.
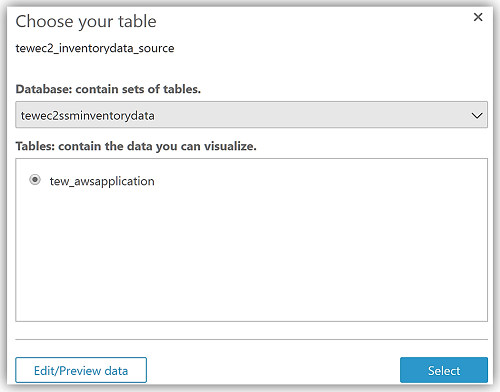
Now I can create a dataset from my Athena table holding the Systems Manager Inventory Data by selecting Athena as my data source.
This takes me through a series of steps to create my data source from the Athena tewec2ssminventorydata database and the tew_awsapplication table.
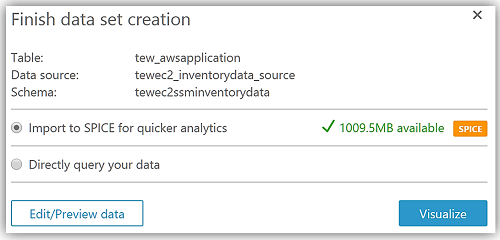
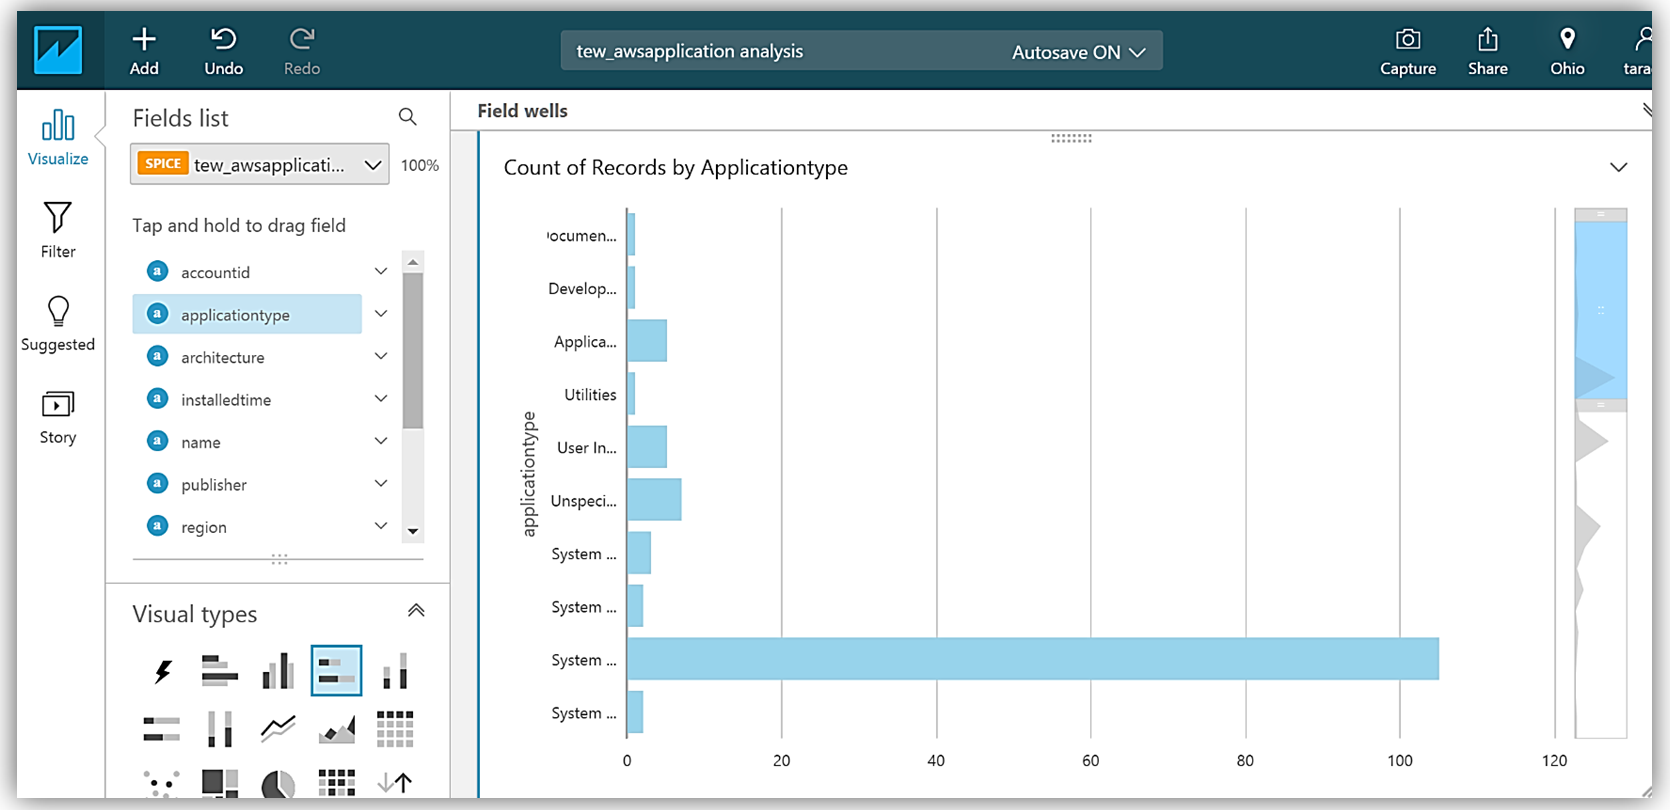
After choosing Visualize to create my data set and analyze the data in the Athena table, I am now taken to the QuickSight dashboard where I can build graphs and visualizations for my EC2 System Manager inventory data.
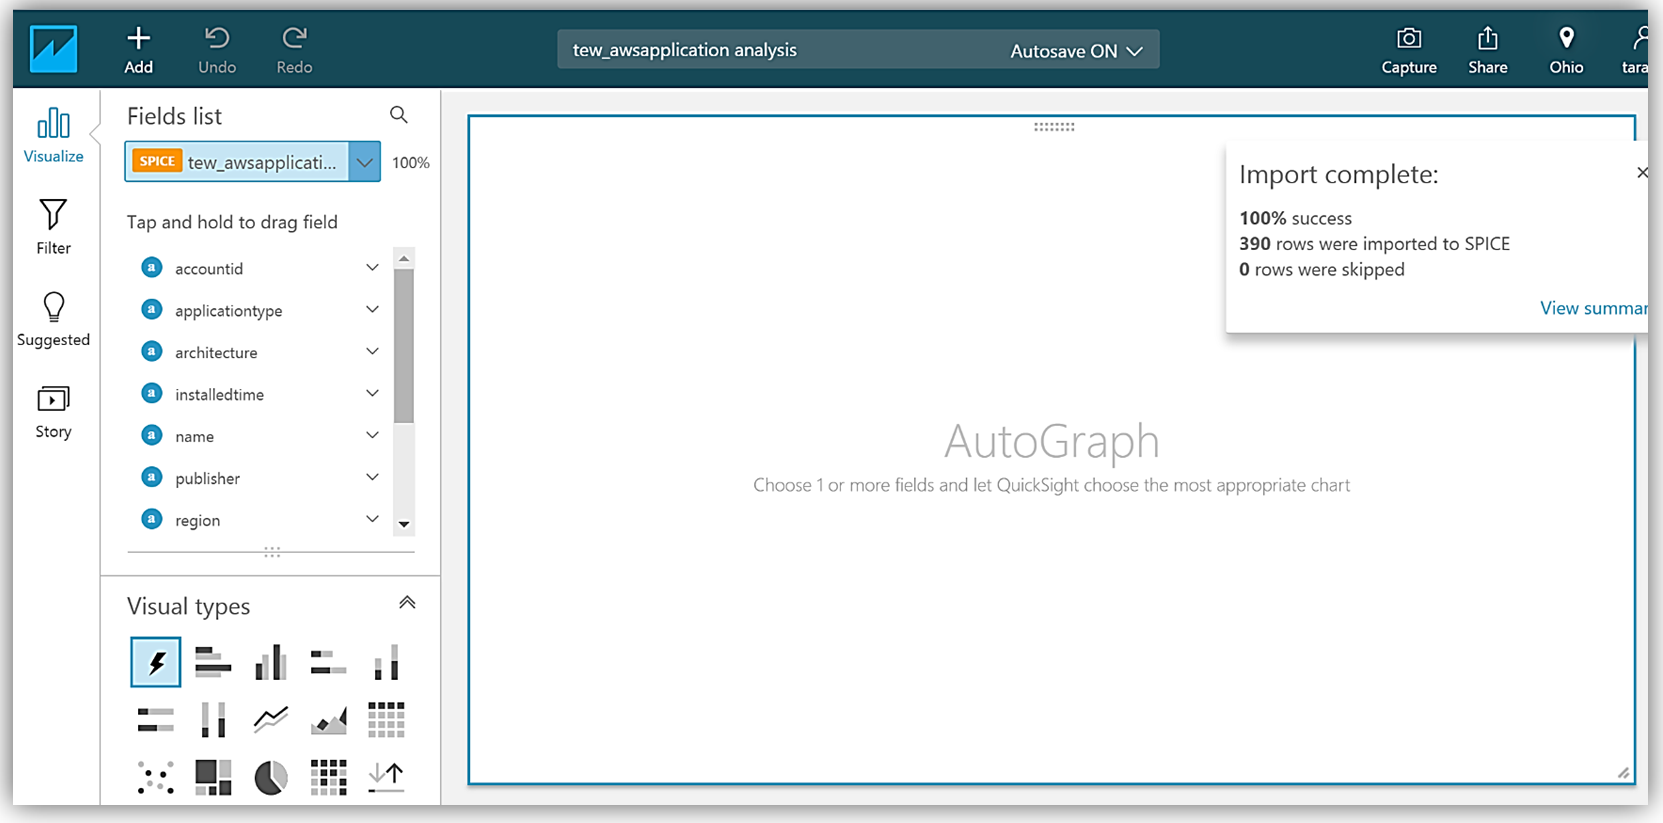
Adding the applicationtype field to my graph, allows me to build a visualization using this data.
Summary
With the new Amazon EC2 Systems Manager Resource Data Sync capability to send inventory data to Amazon S3 buckets, you can now create robust data queries using Amazon Athena and build visualizations of this data with Amazon QuickSight. No longer do you have to create custom scripts to aggregate your instance inventory data to an Amazon S3 bucket, now this data can be automatically synced and stored in Amazon S3 allowing you to keep your data even after your instance has been terminated. This new EC2 Systems Manager capability also allows you to send inventory data to S3 from multiple accounts and different regions.
To learn more about Amazon EC2 Systems Manager and EC2 Systems Manager Inventory, take a look at the product pages for the service. You can also build your own query and visualization solution for the EC2 instance inventory data captured in S3 by checking out the EC2 Systems Manager user guide on Using Resource Data Sync to Aggregate Inventory Data.
In the words of my favorite Vulcan, “Live long, query and visualize and prosper” with EC2 Systems Manager.
– Tara
Launch: Amazon Athena adds support for Querying Encrypted Data
In November of last year, we brought a service to the market that we hoped would be a major step toward helping those who have the need to securely access and examine massive amounts of data on a daily basis. This service is none other than Amazon Athena which I think of as a managed service that is attempting “to leap tall queries in a single bound” with querying of object storage. A service that provides AWS customers the power to easily analyze and query large amounts of data stored in Amazon S3.

Amazon Athena is a serverless interactive query service that enables users to easily analyze data in Amazon S3 using standard SQL. At Athena’s core is Presto, a distributed SQL engine to run queries with ANSI SQL support and Apache Hive which allows Athena to work with popular data formats like CSV, JSON, ORC, Avro, and Parquet and adds common Data Definition Language (DDL) operations like create, drop, and alter tables. Athena enables the performant query access to datasets stored in Amazon Simple Storage Service (S3) with structured and unstructured data formats.
You can write Hive-compliant DDL statements and ANSI SQL statements in the Athena Query Editor from the AWS Management Console, from SQL clients such as SQL Workbench by downloading and taking advantage of the Athena JDBC driver. Additionally, by using the JDBC driver you can run queries programmatically from your desired BI tools. You can read more about the Amazon Athena service from Jeff’s blog post during the service release in November.
After releasing the initial features of the Amazon Athena service, the Athena team kept with the Amazon tradition of focusing on the customer by working diligently to make your customer experience with the service better. Therefore, the team has added a feature that I am excited to announce; Amazon Athena now provides support for Querying Encrypted data in Amazon S3. This new feature not only makes it possible for Athena to provide support for querying encrypted data in Amazon S3, but also enables the encryption of data from Athena’s query results. Businesses and customers who have requirements and/or regulations to encrypt sensitive data stored in Amazon S3 are able to take advantage of the serverless dynamic queries Athena offers with their encrypted data.
Supporting Encryption
Before we dive into the using the new Athena feature, let’s take some time to review the supported encryption options that S3 and Athena supports for customers needing to secure and encrypt data. Currently, S3 supports encrypting data with AWS Key Management Service (KMS). AWS KMS is a managed service for the creation and management of encryption keys used to encrypt data. In addition, S3 supports customers using their own encryption keys to encrypt data. Since it is important to understand the encrypted options that Athena supports for datasets stored on S3, in the chart below I have provided a breakdown of the encryption options supported with S3 and Athena, as well as, noted when the new Athena table property, has_encrypted_data, is required for encrypted data access.

For more information on Amazon S3 encryption with AWS KMS or Amazon S3 Encryption options, review the information in the AWS KMS Developer Guide on How Amazon Simple Storage Service (Amazon S3) Uses AWS KMS and Amazon S3 Developer Guide on Protecting Data Using Encryption respectively.
Creating & Accessing Encrypted Databases and Tables
As I noted before, there are a couple of ways to access Athena. Of course, you can access Athena through the AWS Management Console, but you also have the option to use the JDBC driver with SQL clients like SQL Workbench and other Business Intelligence tools. In addition, the JDBC driver allows for programmatic query access.
Enough discussion, it is time to dig into this new Athena service feature by creating a database and some tables, running queries from the table and encryption of the query results. We’ll accomplish all this by using encrypted data stored in Amazon S3.
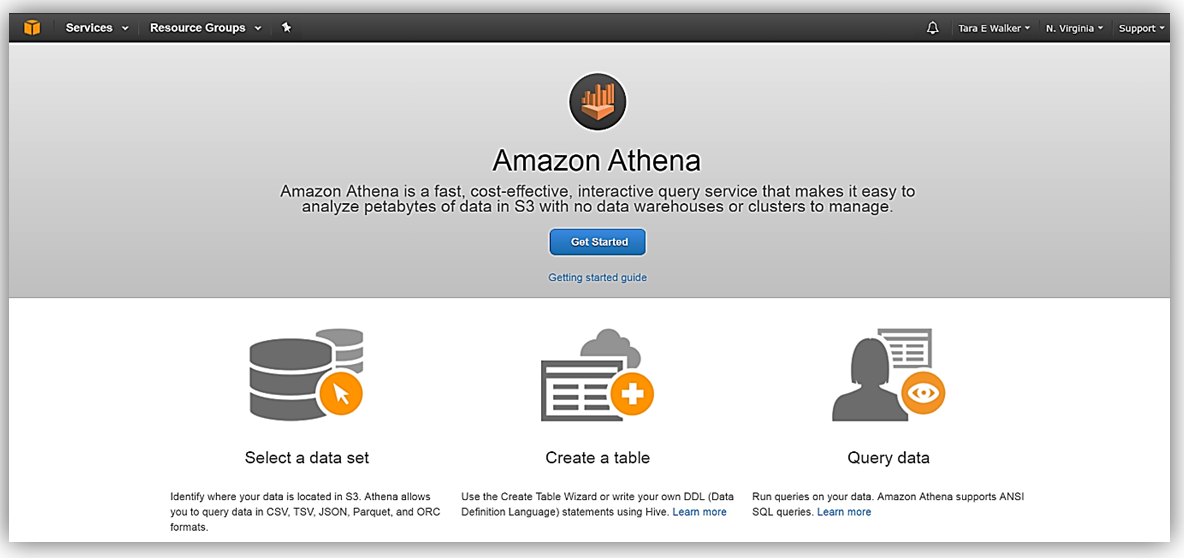
If this is your first time logging into the service, you will see the Amazon Athena Getting Started screen as shown below. You would need to click the Get Started button to be taken the Athena Query Editor.
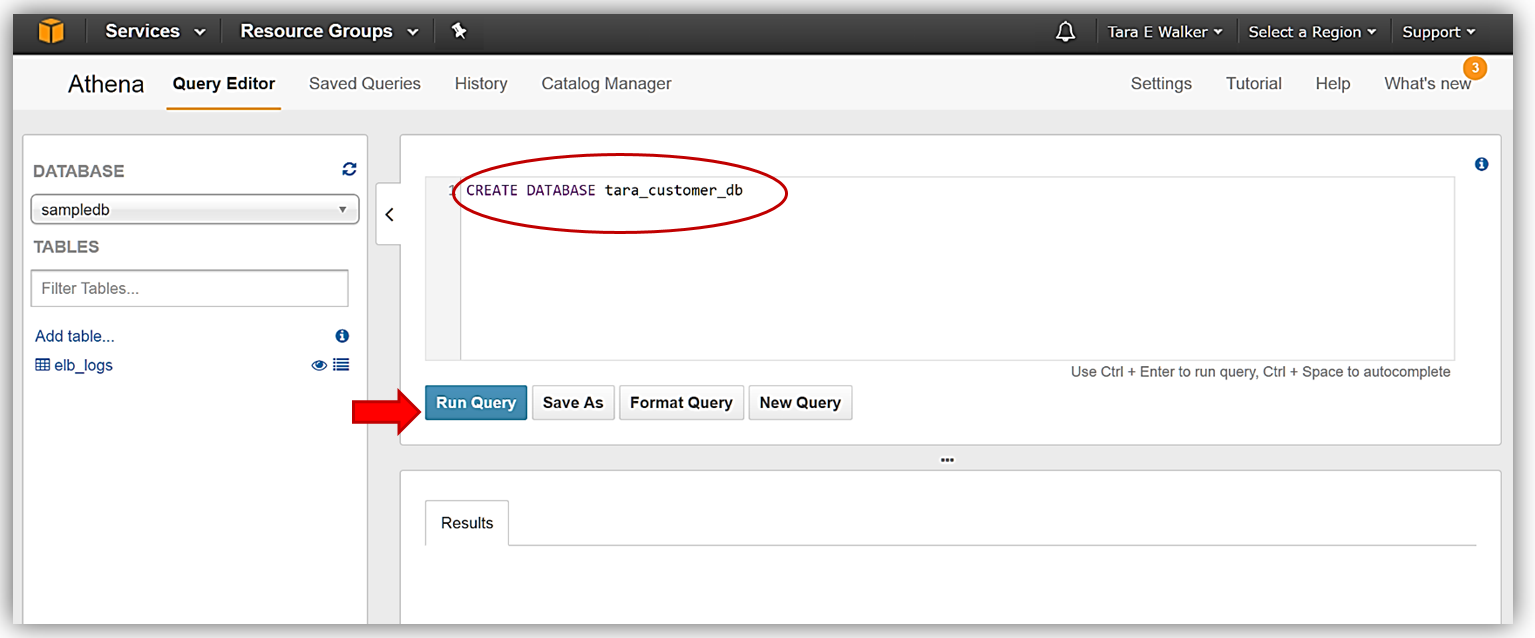
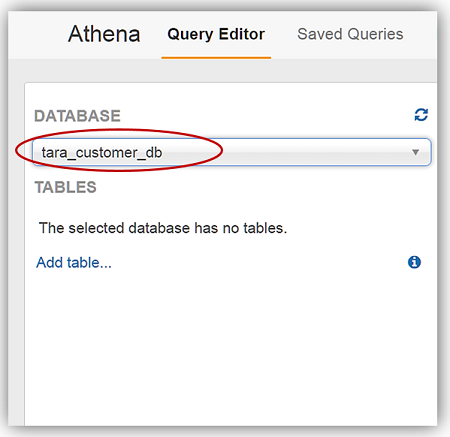
Now that we are in the Athena Query Editor, let’s create a database. If the sample database is shown when you open your Query Editor you would simply start typing your query statement in the Query Editor window to clear the sample query and create the new database.
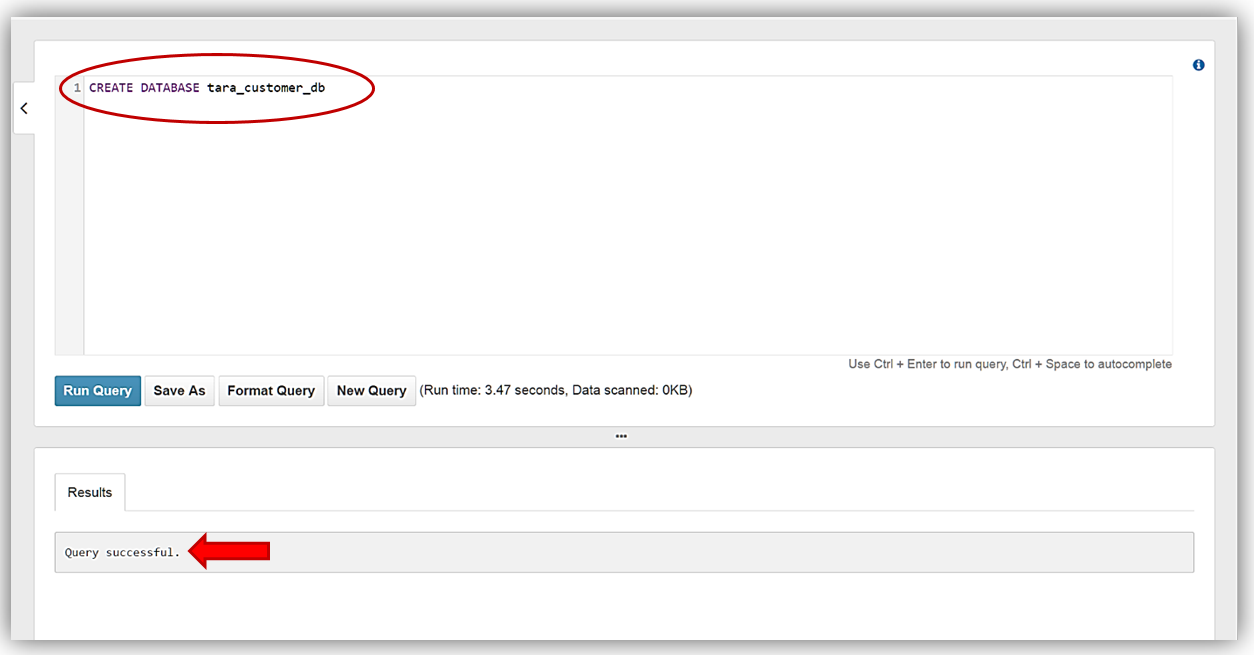
I will now issue the Hive DDL Command, CREATE DATABASE <dbname> within the Query Editor window to create my database, tara_customer_db.
Once I receive the confirmation that my query execution was successful in the Results tab of Query Editor, my database should be created and available for selection in the dropdown.
I now will change my selected database in the dropdown to my newly created database, tara_customer_db.
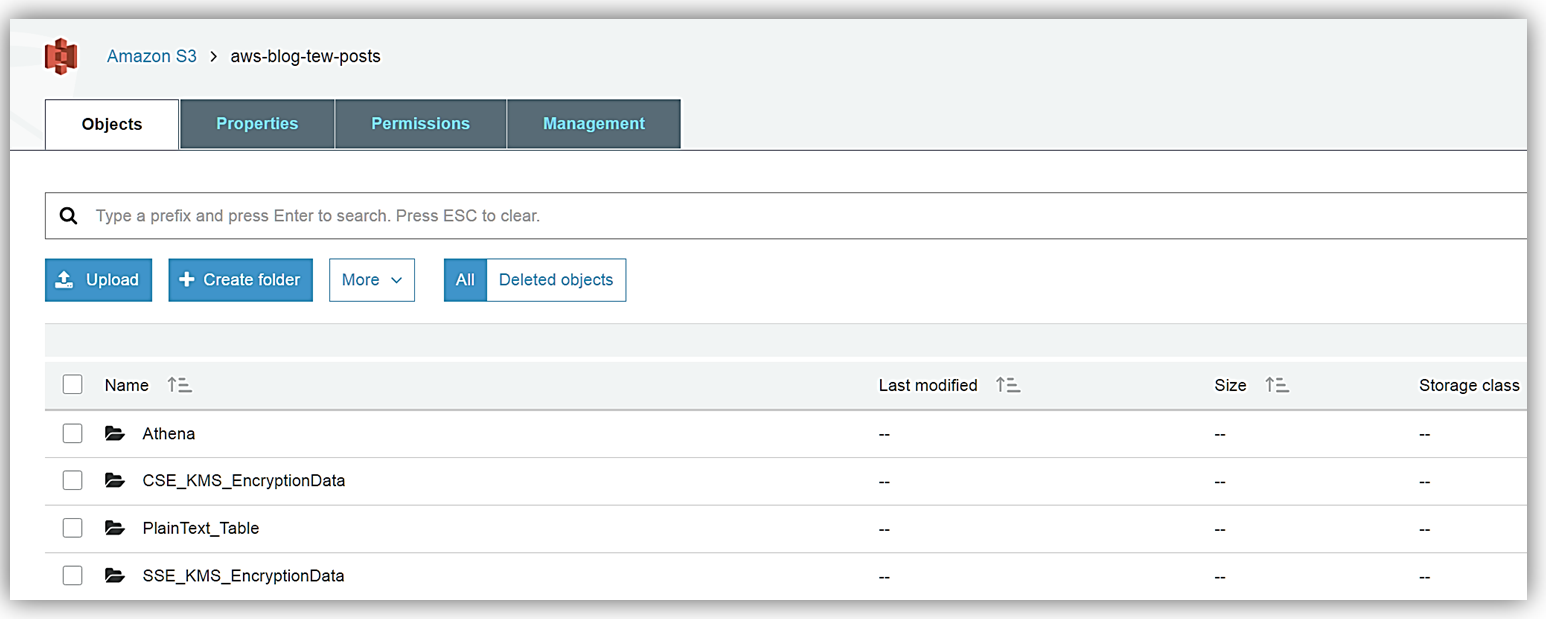
With my database created, I am able to create tables from my data stored in S3. Since I did not have data encrypted with the various encryption types, the product group was kind enough to give me some sample data files to place in my S3 buckets. The first batch of sample data that I received was encrypted with SSE-KMS which if you recall from the encryption table matrix we discussed above is encryption type, Server-Side Encryption with AWS KMS–Managed Keys. I stored this set of encrypted data in my S3 bucket aptly named: aws-blog-tew-posts/SSE_KMS_EncryptionData. The second batch of sample data was encrypted with CSE-KMS, which is the encryption type, Client-Side Encryption with AWS, and is stored in my aws-blog-tew-posts/ CSE_KMS_EncryptionData S3 bucket. The last batch of data I received is just good old-fashioned plain text, and I have stored this data in the S3 bucket, aws-blog-tew-posts/PlainText_Table.
Remember to access my data in the S3 buckets from the Athena service, I must ensure that my data buckets have the correct permissions to allow Athena access each bucket and data contained therein. In addition, working with AWS KMS encrypted data requires users to have roles that include the appropriate KMS key policies. It is important to note that to successfully read KMS encrypted data, users must have the correct permissions for access to S3, Athena, and KMS collectively.
There are several ways that I can provide the appropriate access permissions between S3 and the Athena service:
- Allow access via user policy
- Allow access via bucket policy
- Allow access with both a bucket policy and user policy.
To learn more about the Amazon Athena access permissions and/or the Amazon S3 permissions by reviewing the Athena documentation on Setting User and Amazon S3 Bucket Permissions.
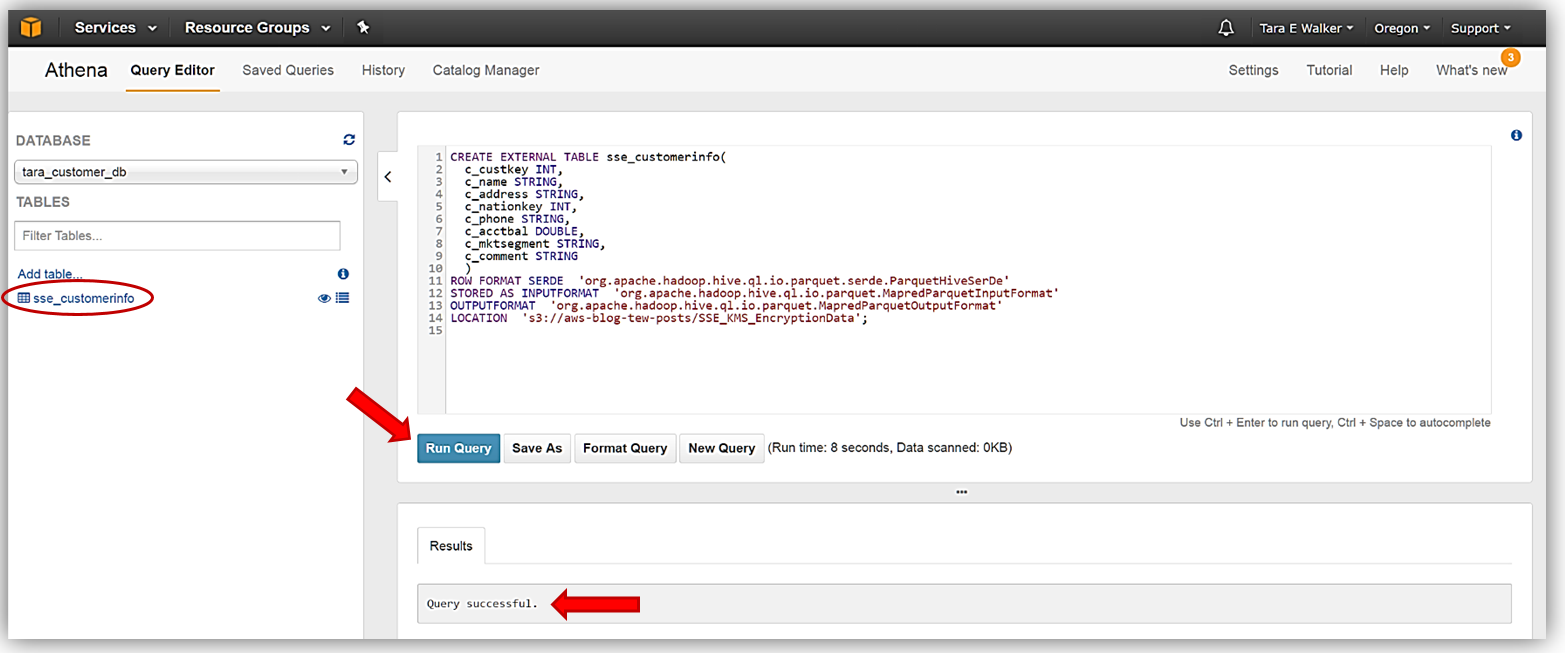
Since my data is ready and setup in my S3 buckets, I just need to head over to Athena Query Editor and create my first new table from the SSE-KMS encrypted data. My DDL commands that I will use to create my new table, sse_customerinfo, is as follows:
CREATE EXTERNAL TABLE sse_customerinfo(
  c_custkey INT,
  c_name STRING,
  c_address STRING,
  c_nationkey INT,
  c_phone STRING,
  c_acctbal DOUBLE,
  c_mktsegment STRING,
  c_comment STRING
  )
ROW FORMAT SERDE  'org.apache.hadoop.hive.ql.io.parquet.serde.ParquetHiveSerDe'
STORED AS INPUTFORMAT  'org.apache.hadoop.hive.ql.io.parquet.MapredParquetInputFormat'
OUTPUTFORMAT  'org.apache.hadoop.hive.ql.io.parquet.MapredParquetOutputFormat'
LOCATION  's3://aws-blog-tew-posts/SSE_KMS_EncryptionData';
I will enter my DDL command statement for the sse_customerinfo table creation into my Athena Query Editor and click the Run Query button. The Results tab will note that query was run successfully and you will see my new table show up under the tables available for the tara_customer_db database.
I will repeat this process to create my cse_customerinfo table from the CSE-KMS encrypted batch of data and then the plain_customerinfo table from the unencrypted data source stored in my S3 bucket. The DDL statements used to create my cse_customerinfo table are as follows:
CREATE EXTERNAL TABLE cse_customerinfo (
  c_custkey INT,
  c_name STRING,
  c_address STRING,
  c_nationkey INT,
  c_phone STRING,
  c_acctbal DOUBLE,
  c_mktsegment STRING,
  c_comment STRING
)
ROW FORMAT SERDE   'org.apache.hadoop.hive.ql.io.parquet.serde.ParquetHiveSerDe'
STORED AS INPUTFORMAT  'org.apache.hadoop.hive.ql.io.parquet.MapredParquetInputFormat'
OUTPUTFORMAT  'org.apache.hadoop.hive.ql.io.parquet.MapredParquetOutputFormat'
LOCATION   's3://aws-blog-tew-posts/CSE_KMS_EncryptionData'
TBLPROPERTIES ('has_encrypted_data'='true');
Again, I will enter my DDL statements above into the Athena Query Editor and click the Run Query button. If you review the DDL statements used to create the cse_customerinfo table carefully, you will notice a new table property (TBLPROPERTIES) flag, has_encrypted_data, was introduced with the new Athena encryption capability. This flag is used to tell Athena that the data in S3 to be used with queries for the specified table is encrypted data. If take a moment and refer back to the encryption matrix table we I reviewed earlier for the Athena and S3 encryption options, you will see that this flag is only required when you are using the Client-Side Encryption with AWS KMS–Managed Keys option. Once the cse_customerinfo table has been successfully created, a key symbol will appear next to the table identifying the table as an encrypted data table.

Finally, I will create the last table, plain_customerinfo, from our sample data. Same steps as we performed for the previous tables. The DDL commands for this table are:
CREATE EXTERNAL TABLE plain_customerinfo(
  c_custkey INT,
  c_name STRING,
  c_address STRING,
  c_nationkey INT,
  c_phone STRING,
  c_acctbal DOUBLE,
  c_mktsegment STRING,
  c_comment STRING
)
ROW FORMAT SERDE 'org.apache.hadoop.hive.ql.io.parquet.serde.ParquetHiveSerDe'
STORED AS INPUTFORMAT 'org.apache.hadoop.hive.ql.io.parquet.MapredParquetInputFormat'
OUTPUTFORMAT 'org.apache.hadoop.hive.ql.io.parquet.MapredParquetOutputFormat'
LOCATION 's3://aws-blog-tew-posts/PlainText_Table';
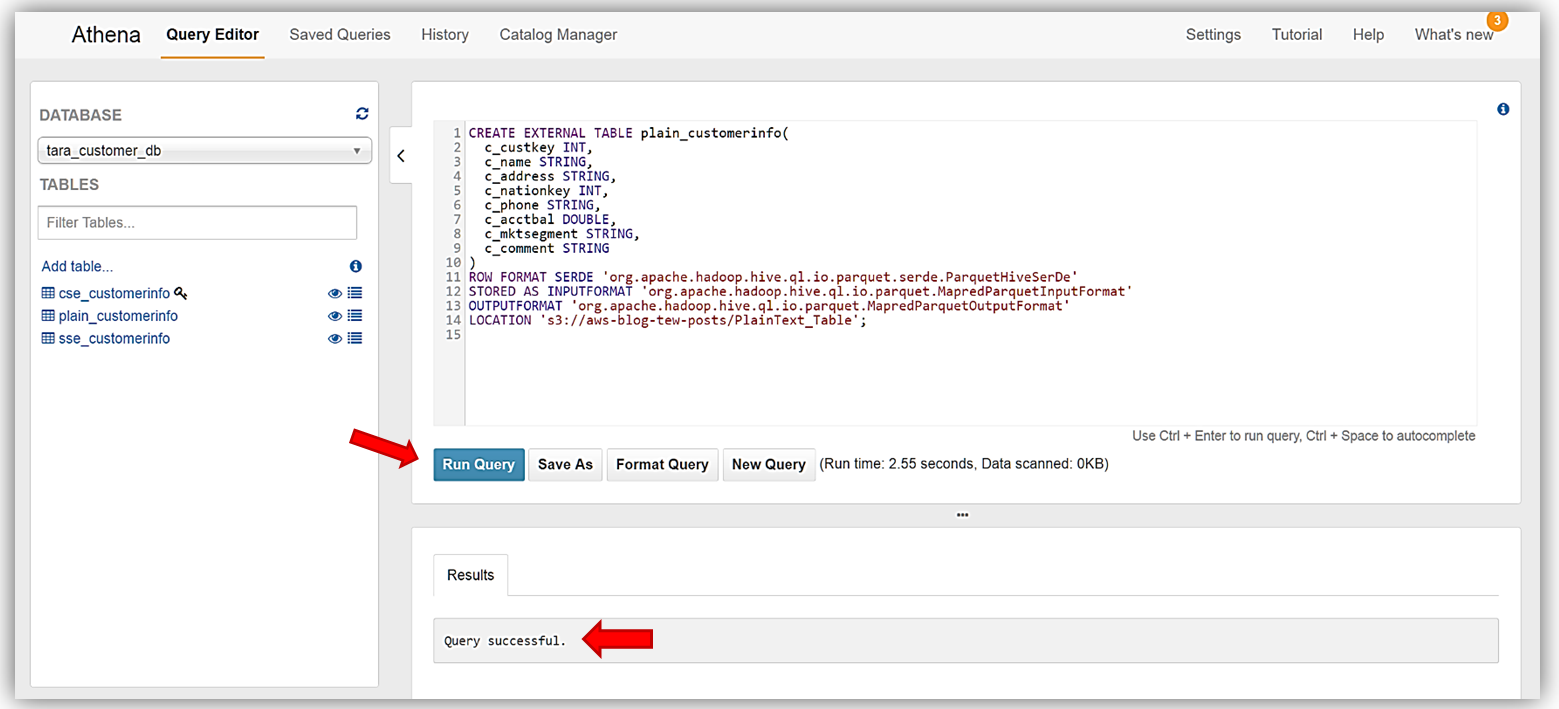
Great! We have successfully read encrypted data from S3 with Athena, and created tables based on the encrypted data. I can now run queries against my newly created encrypted data tables.
Running Queries
Running Queries against our new database tables is very simple. Again, common DDL statements and commands can be used to create queries against your data stored in Amazon S3. For our query review, I am going to use Athena’s preview data feature. In the list of tables, you will see two icons beside the tables. One icon is a table property icon, selecting this will bring up the selected table properties, however, the other icon, displayed as an eye symbol, and is the preview data feature that will generate a simple SELECT query statement for the table.
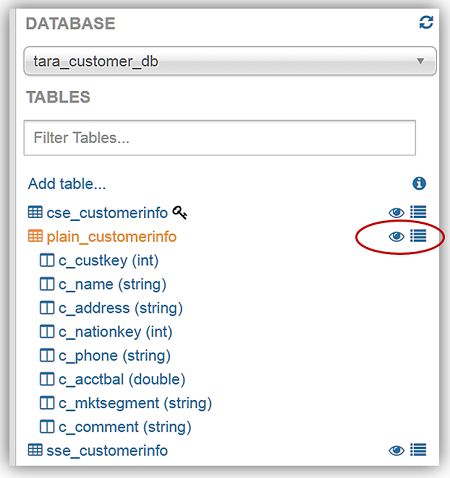
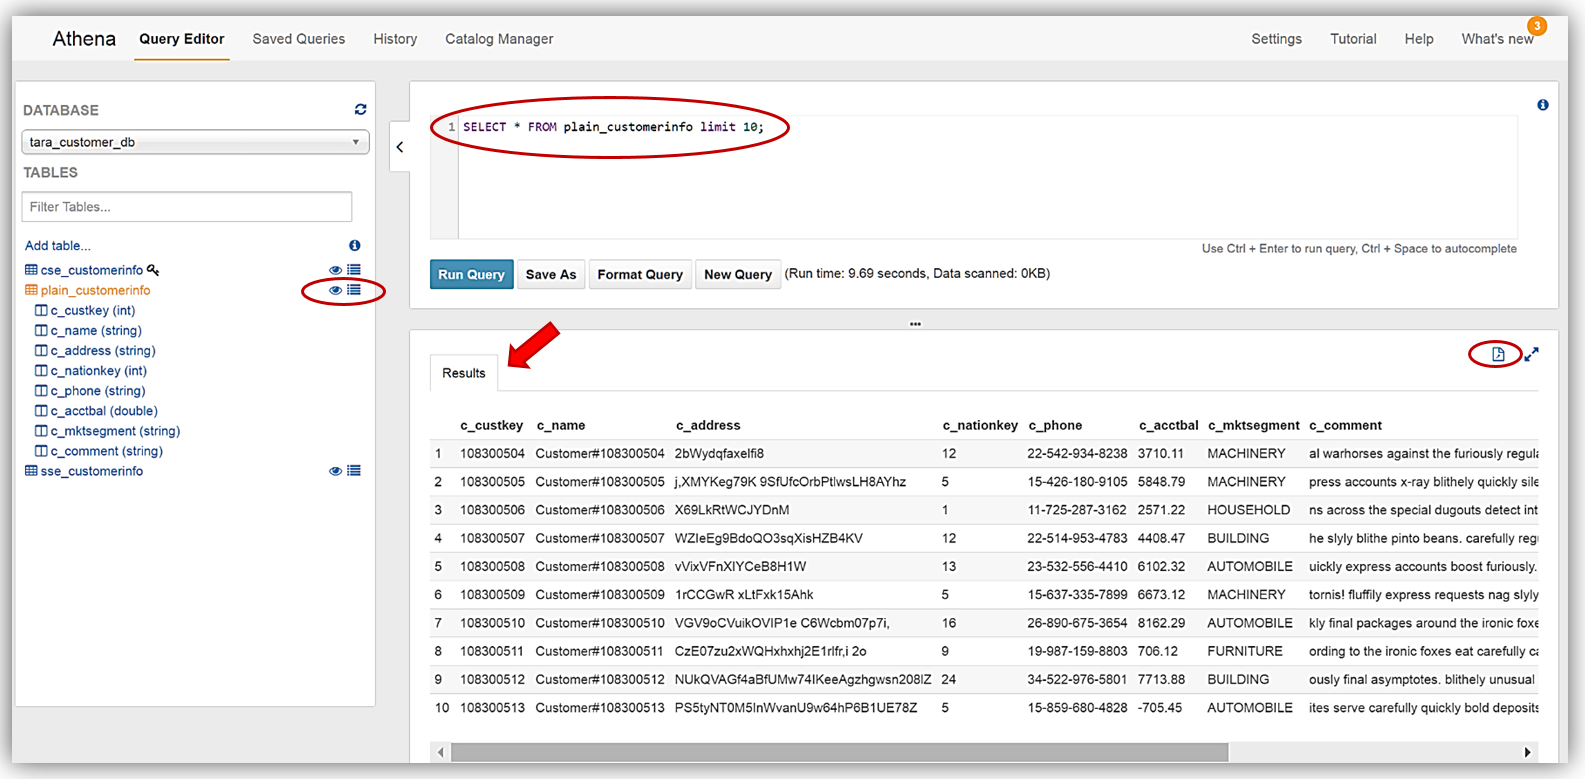
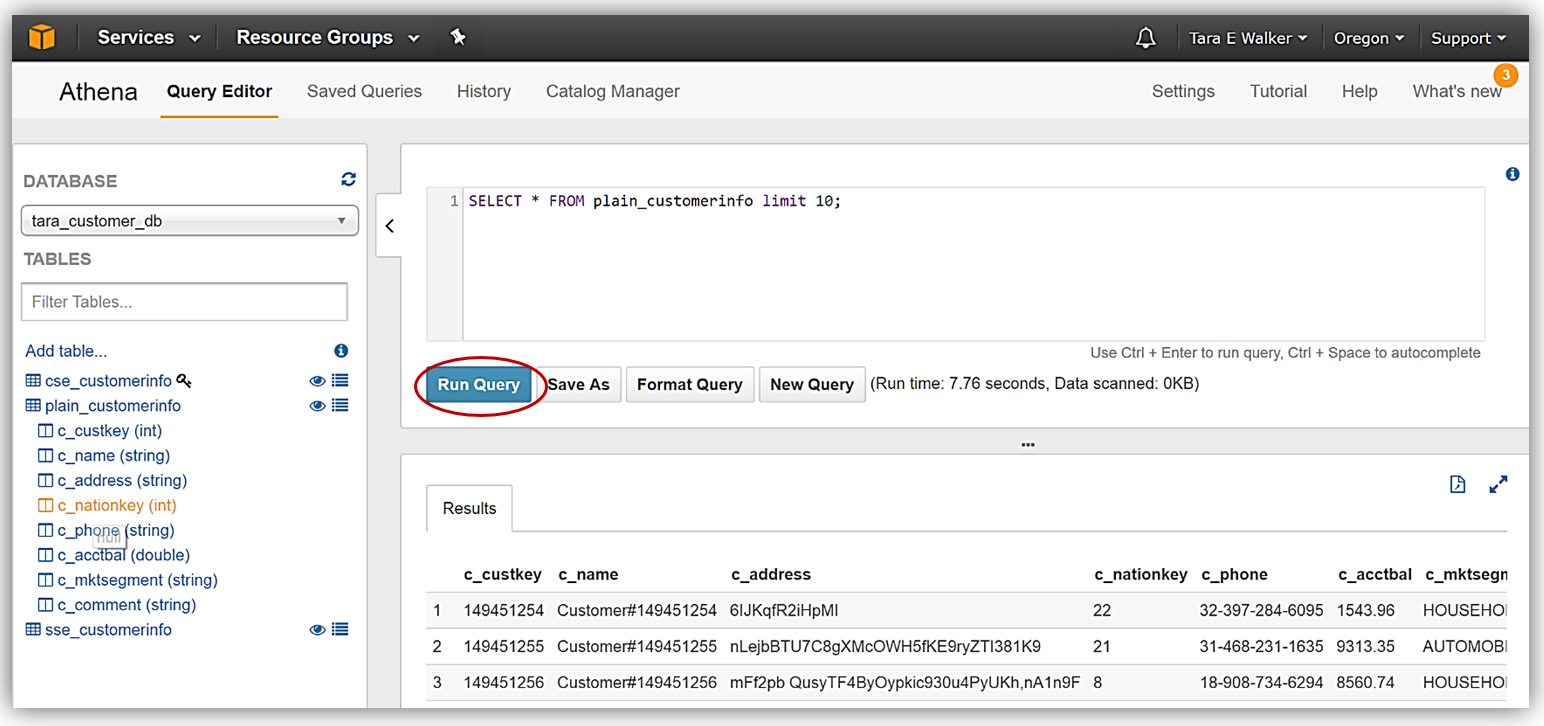
To demonstrate running queries with Athena, I have selected to preview data for my plain_customerinfo by selecting the eye symbol/icon next to the table. The preview data feature creates the following DDL statement:
SELECT * FROM plain_customerinfo limit 10;The query results from using the preview data feature with my plain_customerinfo table are displayed in the Results tab of the Athena Query Editor and provides the option to download the query results by clicking the file icon.
The new Athena encrypted data feature also supports encrypting query results and storing these results in Amazon S3. To take advantage of this feature with my query results, I will now encrypt and save my query data in a bucket of my choice. You should note that the data table that I have selected is currently unencrypted.
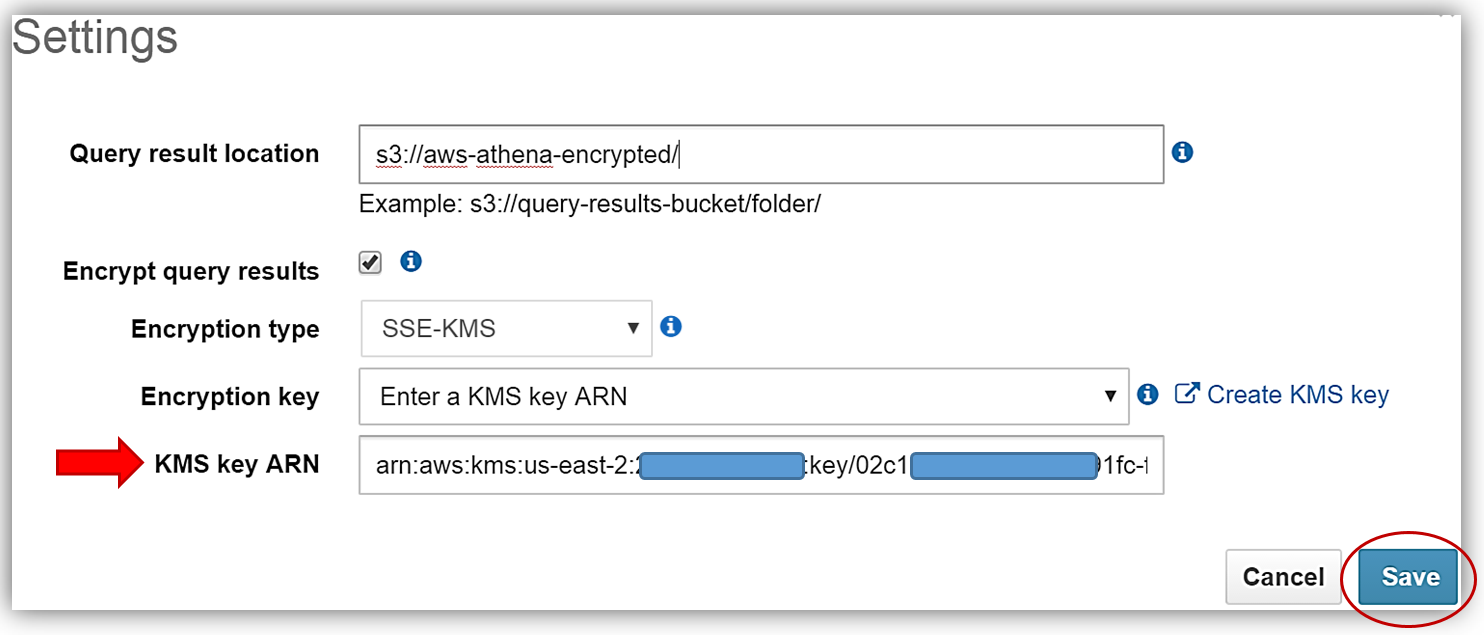
First, I’ll select the Athena Settings menu and the review the current storage settings for my query results. Since I do not have a KMS key to use for encryption, I will select the Create KMS key hyperlink and create a KMS key for use in encrypting my query results with Athena and S3. For details on how to create a KMS key and configure the appropriate user permissions, please see http://docs.aws.amazon.com/kms/latest/developerguide/create-keys.html.

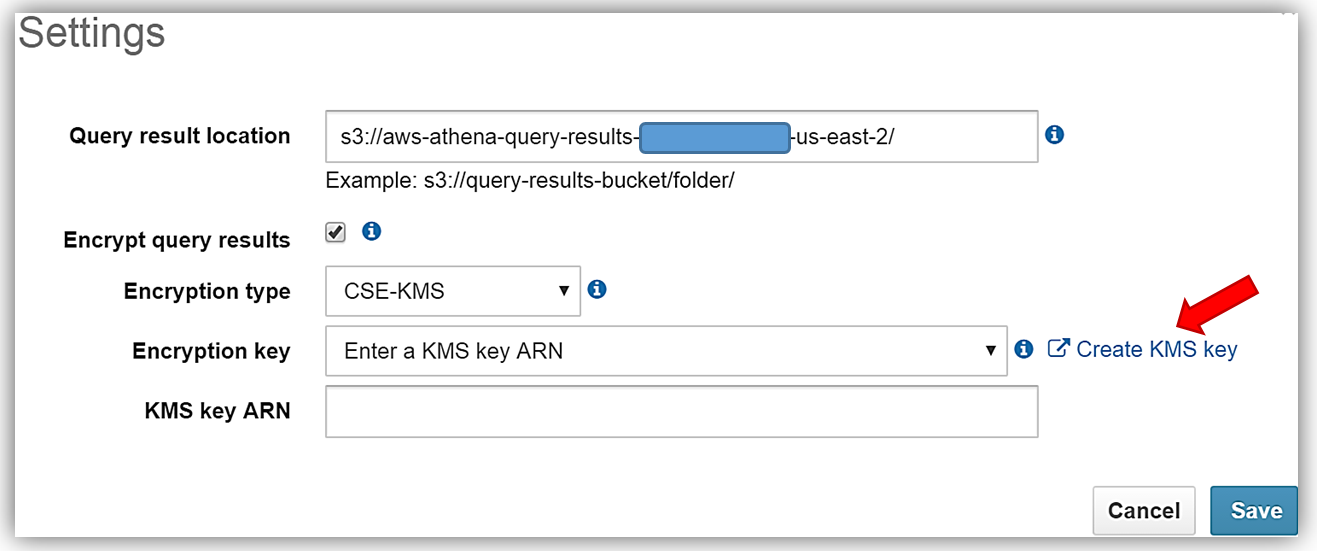
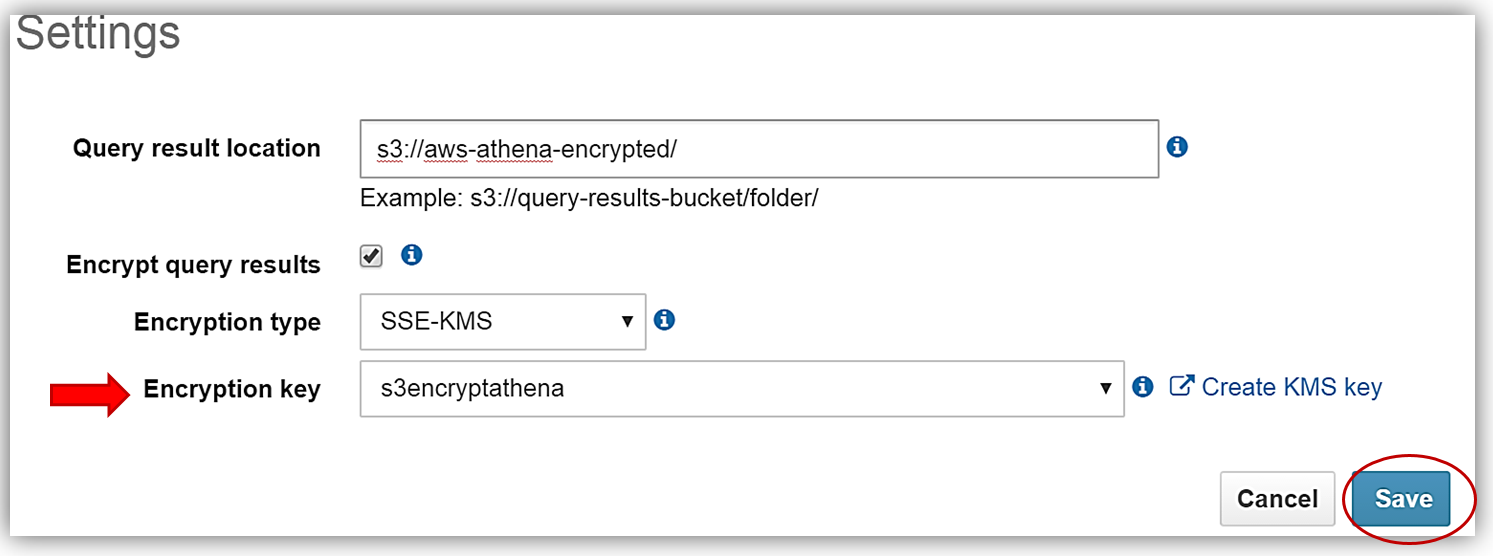
After successfully creating my s3encryptathena KMS key and copying the key ARN for use in my Athena settings, I return to the Athena console Settings dialog and select the Encrypt query results textbox. I, then update the Query result location textbox point to my s3 bucket, aws-athena-encrypted, which will be the location for storing my encrypted query results.
The only thing that is left is to select the Encryption type and enter my KMS key. I can do this by either selecting the s3encryptathena key from the Encryption key dropdown or enter its ARN in the KMS key ARN textbox. In this example, I have chosen to use SSE-KMS for the encryption type. You can see both examples of selecting the KMS key below. Clicking the Save button completes the process.
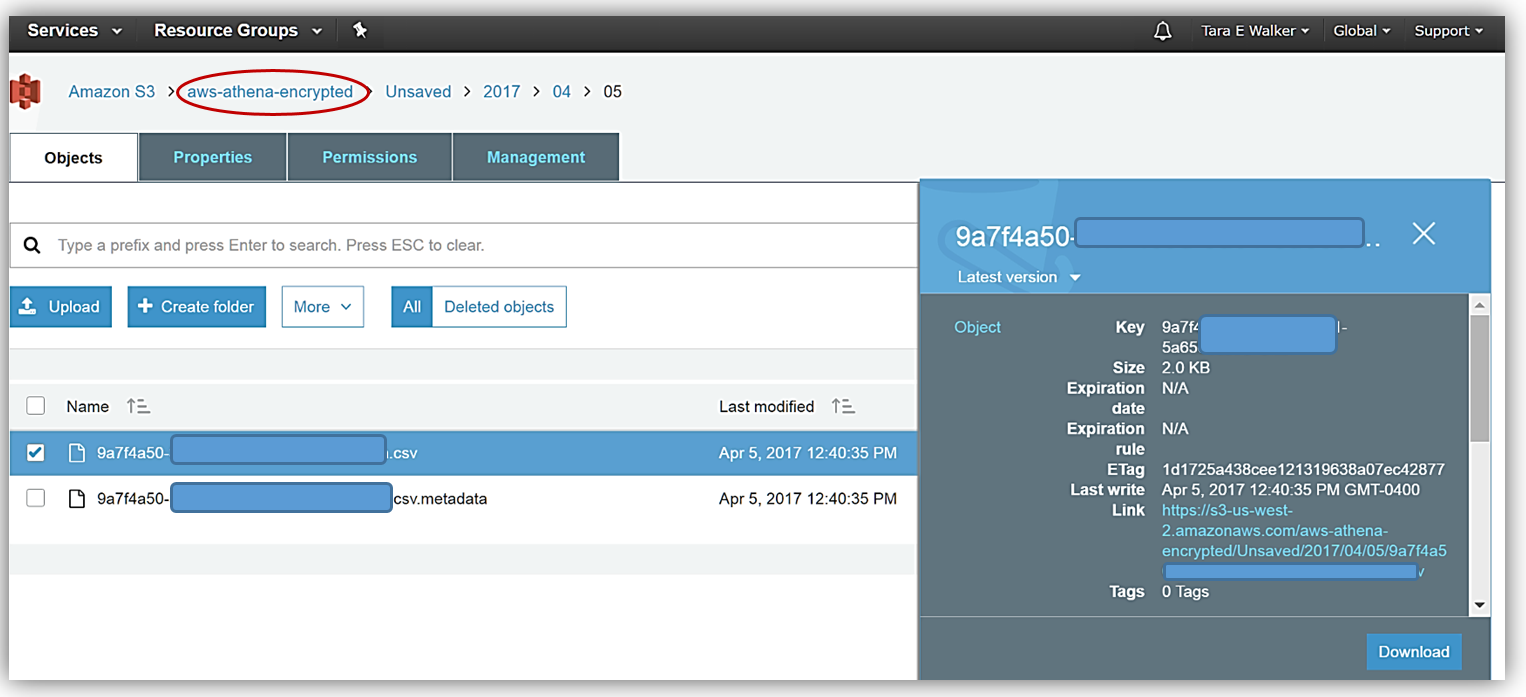
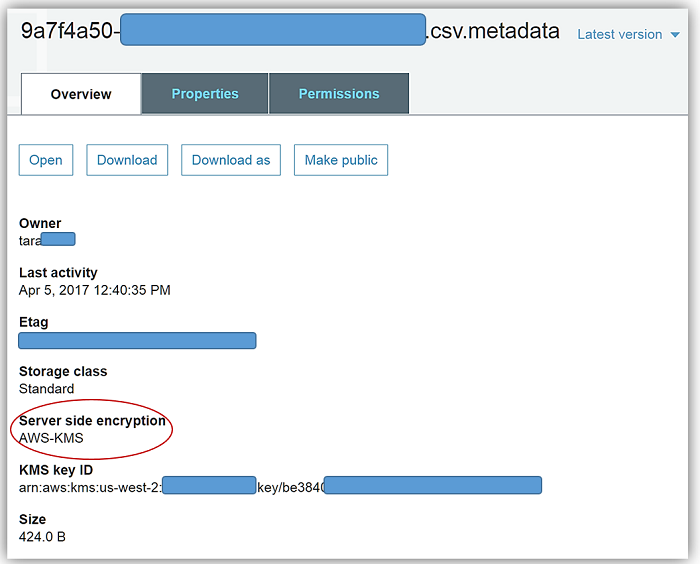
Now I will rerun my current query for my plain_customerinfo table. Remember this table is not encrypted, but with the Athena settings changes made for adding encryption for the query results, I have enabled the query results run against this table to be stored with SSE-KMS encryption using my KMS key.
After my query rerun, I can see the fruits of my labor by going to the Amazon S3 console and viewing the CSV data files saved in my designated bucket, aws-athena-encrypted, and the SSE-KMS encryption of the bucket and files.
Summary
Needless to say, this Athena launch has several benefits for those needing to secure data via encryption while still retaining the ability to perform queries and analytics for data stored in varying data formats. Additionally, this release includes improvements I did not dive into with this blog post.
- A new version of the JDBC driver that supports new encryption feature and key updates.
- Added the ability to add, replace, and change columns using ALTER TABLE.
- Added support for querying LZO-compressed data.
See the release documentation in the Athena user guide to more details and start leveraging Athena to query your encrypted data stored in Amazon S3 now, by reviewing the Configuring Encryption Options section in the Athena documentation.
Learn more about Athena and serverless queries on Amazon S3 by visiting the Athena product page or reviewing the Athena User Guide. In addition, you can dig deeper on the functionality of Athena and data encryption with S3 by reviewing the AWS Big Data Blog post: Analyzing Data in S3 using Amazon Athena and the AWS KMS Developer Guide.
Happy Encrypting!
– Tara
Amazon Athena – Interactive SQL Queries for Data in Amazon S3
The amount of data that we all have to deal with grows every day (I still keep a floppy disk or two around in order to remind myself that 1.44 MB once seemed like a lot of storage). These days, many people routinely process and query data in structured or semi-structured files at petabyte scale. They want to do this at high speed and they don’t want to spend a whole lot of time preprocessing, scanning, loading, or indexing data. Instead, they simply want to point-and-shoot: identify the data, run queries that are often ad hoc and exploratory in nature, get the results, and act on the results, all in a matter of minutes.
Introducing Amazon Athena
 Today I would like to tell you about Amazon Athena.
Athena is a new serverless query service that makes it easy to analyze large amounts of data stored in Amazon S3 using Standard SQL. You simply point Athena at some data stored in Amazon Simple Storage Service (S3), identify your fields, run your queries, and get results in seconds. You don’t have to build, manage, or tune a cluster or any other infrastructure, and you pay only for the queries that you run. Behind the scenes, Athena parallelizes your query, spreads it out across hundreds or thousands of cores, and delivers results in seconds.
Athena includes an interactive query editor to help get you going as quickly as possible. Your queries are expressed in standard ANSI SQL and can use JOINs, window functions, and other advanced features. Athena is based on the Presto distributed SQL engine and can query data in many different formats including JSON, CSV, log files, text with custom delimiters, Apache Parquet, and Apache ORC. You can run your queries from the AWS Management Console or from a SQL clients such as SQL Workbench, and you can use Amazon QuickSight to visualize your data. You can also download and use the Athena JDBC driver and run queries from your favorite Business Intelligence tool.
Each Athena table can be comprised of one or more S3 objects; each Athena database can contain one or more tables. Because Athena makes direct references to data stored in S3, you can take advantage of the scale, flexibility, data durability, and data protection options that it offers, including the use of AWS Identity and Access Management (IAM) policies to control access to data.
Athena in Action
I took Athena for a spin by opening it up in the AWS Management Console. The main screen shows the Athena Query Editor:

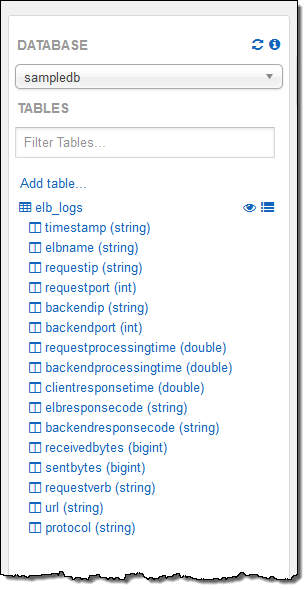
My account was already configured with a sample database and, within the database, a sample table named elb_logs. To get started, I entered a simple query and clicked on Run Query. It ran in less than a second and the results were displayed in the console, with the option to download them in CSV form:
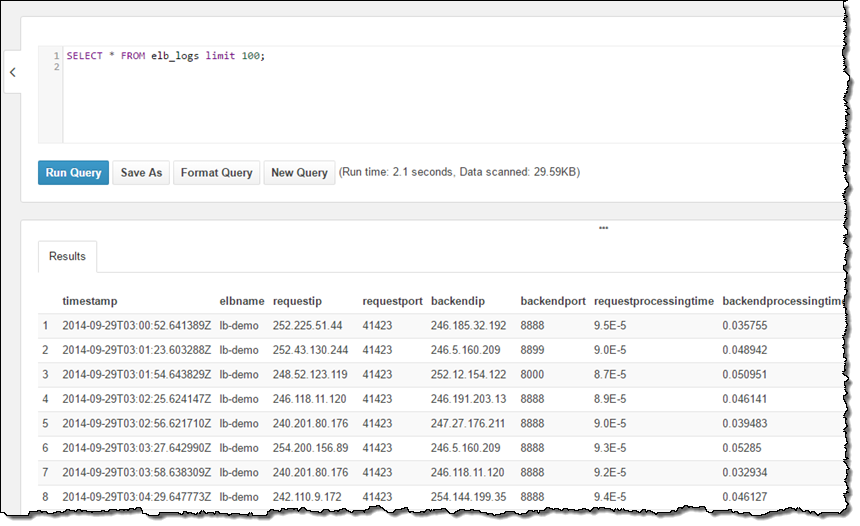
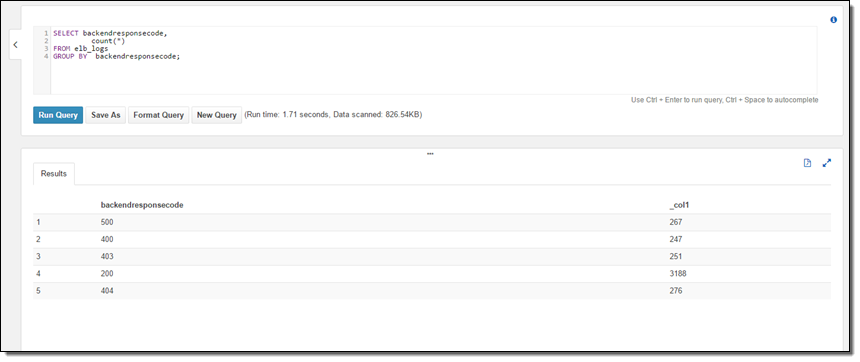
The sample table contained Elastic Load Balancing log files so I analyzed the HTTP status codes:
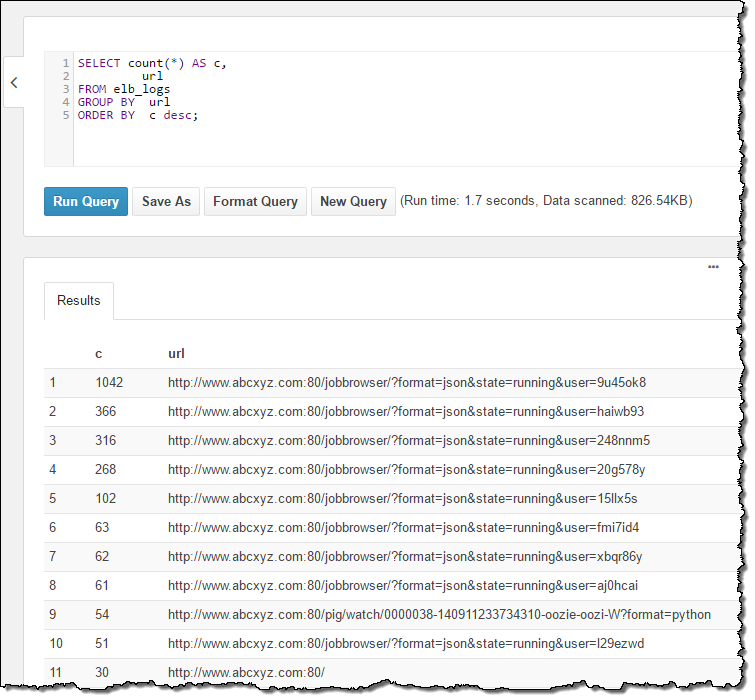
And the URLs:
The table definition points to an S3 bucket, and encompasses all of the objects in the bucket. If new log files arrived during my interactive session, they would automatically be included in subsequent queries (I’ll talk more about table definitions in a minute).
As I was writing the queries I made use of the table description in the console. I simply double-clicked on the table and field names to insert them into the query:
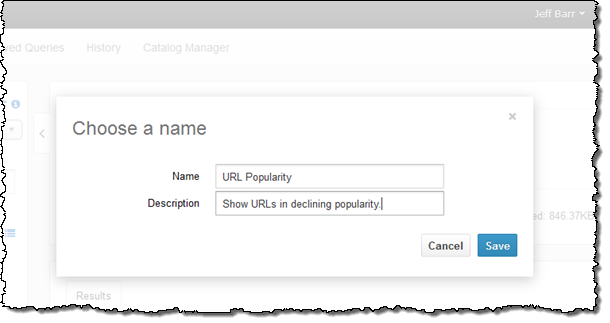
I ended this part of my exploration by saving my query:
Next, I wanted to learn how to create my own database and to reference my own data. There are two ways to do this — using a DDL statement or through a wizard. My colleagues supplied me with some DDL, so I went ahead and used it:
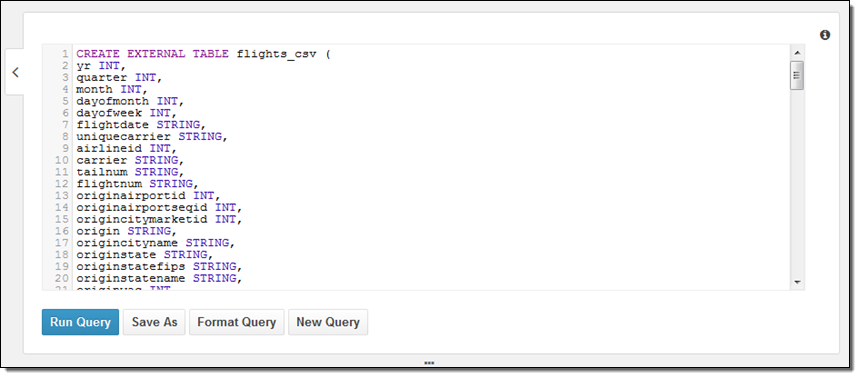
The most interesting part of the query is at the end; here’s what it looks like:
PARTITIONED BY (year STRING)
ROW FORMAT DELIMITED
  FIELDS TERMINATED BY ','
    ESCAPED BY '\\'
      LINES TERMINATED BY '\n'
      LOCATION 's3://us-east-1.elasticmapreduce.samples/flights/cleaned/gzip/';
Because the data is partitioned by year, I had to run one final query to set up the metadata for subsequent queries:
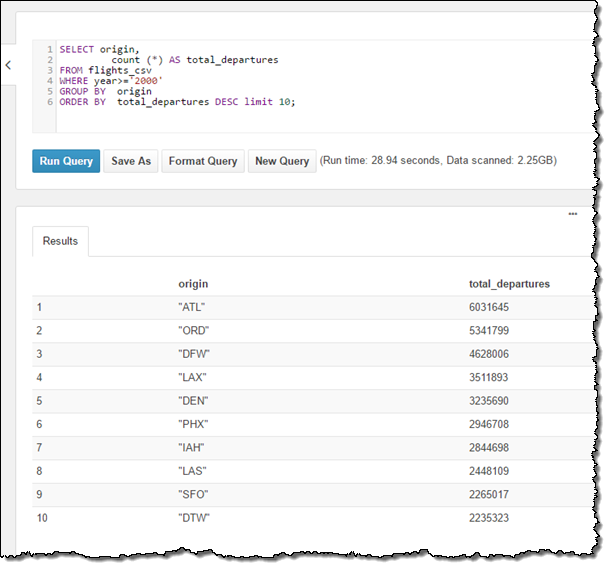
MSCK REPAIR TABLE flights_csv;Then I ran a simple query to tally up the 10 most popular departure cities, using data from 2000 onward:
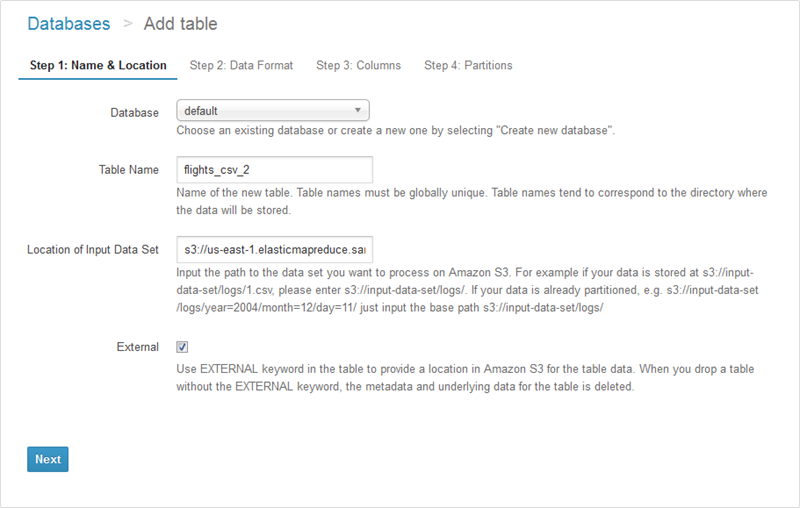
I also had the option to create the table using Athena’s table wizard (accessible from the Catalog Manager). In this case I would start by naming the table and specifying its location:
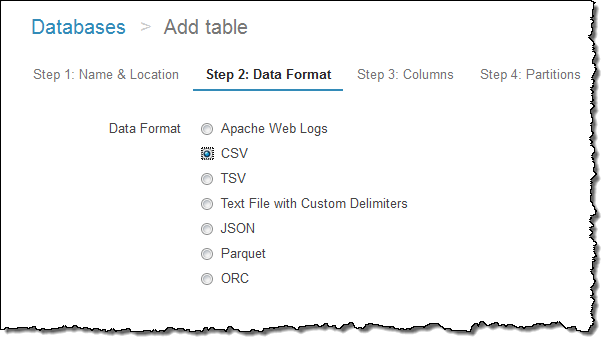
Then I would specify the format:
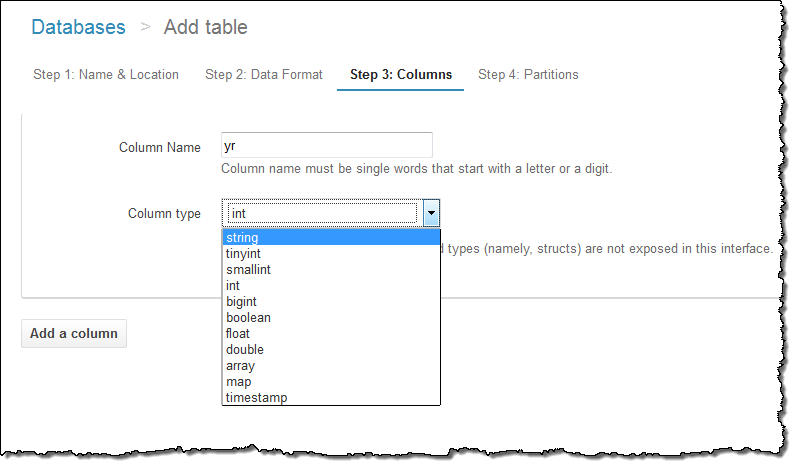
And the name and data type of each column:
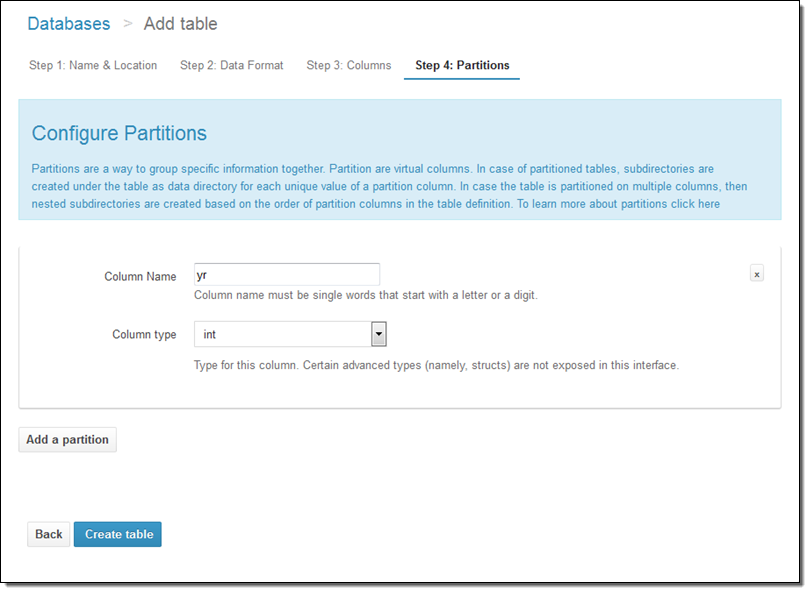
I can also set up the partition model:
Athena has lots of other cool features but space keeps me from showing off every last one of them. Let’s take quick looks at three: the Saved Queries, the History, and the catalog manager.
Earlier in this post I saved one of my queries. I can click on Saved Queries to see all of the queries that I have saved, along several that came with my account:
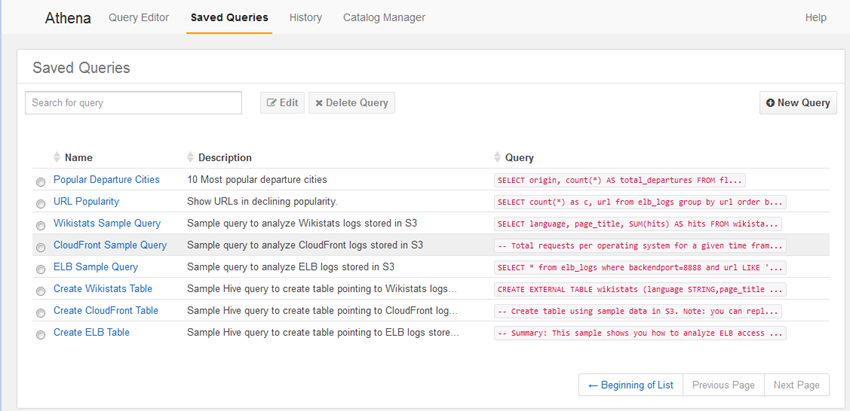
I can use them as-is, or edit them as desired.
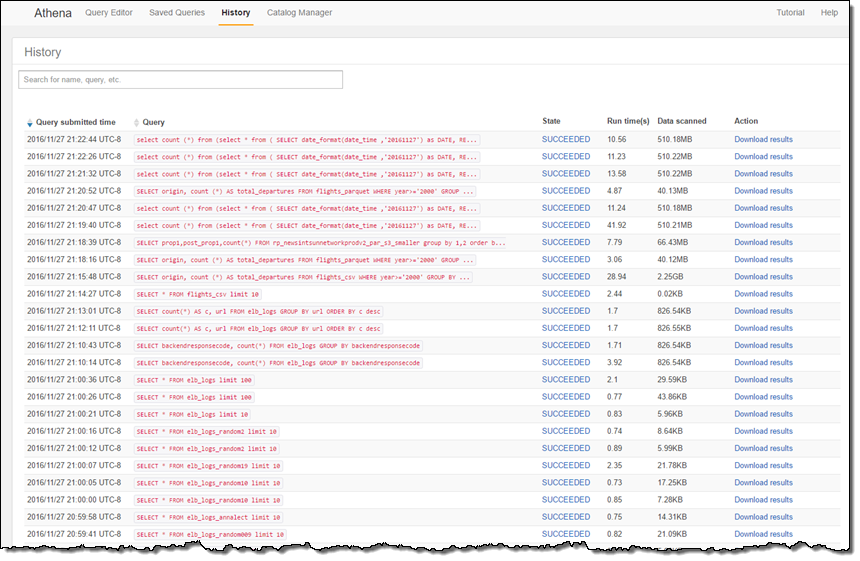
I can click on History to see my previous queries and download the results that they generated:
And I can use the catalog manager to see my existing databases, create new ones, and create new tables:

Although I have focused on the interactive aspects of Athena, keep in mind that you can also use our JDBC connectors in conjunction with your existing Business Intelligence tools.
Available Now
Amazon Athena is available now in the US East (Northern Virginia) and US West (Oregon) Regions today and will become available in other regions in the coming months.
You pay only for the queries that you run; you are charged based on the amount of data scanned by each query (the console will display this information after each query). This means that you can realize significant cost savings by compressing, partitioning, or converting your data to a columnar format.
Ready to learn more? We have a webinar on December 14th. Register here.
— Jeff;