Category: Amazon Elastic Transcoder
Amazon Elastic Transcoder Update – Support for MPEG-DASH
Amazon Elastic Transcoder converts media files (audio and video) from one format to another. The service is robust, scalable, cost-effective, and easy to use. You simply create a processing pipeline (pointing to a pair of S3 buckets for input and output in the process), and then create transcoding jobs. Each job reads a specific file from the input bucket, transcodes it to the desired format(s) as specified in the job, and then writes the output to the output bucket. You pay for only what you transcode, with price points for Standard Definition (SD) video, High Definition (HD) video, and audio. We launched the service with support for an initial set of transcoding presets (combinations of output formats and relevant settings). Over time, in response to customer demand and changes in encoding technologies, we have added additional presets and formats. For example, we added support for the VP9 Codec earlier this year.
Support for MPEG-DASH
Today we are adding support for transcoding to the MPEG-DASH format. This International Standard format supports high-quality audio and video streaming from HTTP servers, and has the ability to adapt to changes in available network throughput using a technique known as adaptive streaming. It was designed to work well across multiple platforms and at multiple bitrates, simplifying the transcoding process and sidestepping the need to create output in multiple formats.
During the MPEG-DASH transcoding process, the content is transcoded into segmented outputs at the different bitrates and a playlist is created that references these outputs. The client (most often a video player) downloads the playlist to initiate playback. Then it monitors the effective network bandwidth and latency, requests video segments as needed. If network conditions change during the playback process, the player will take action, upshifting or downshifting as needed.
You can serve up the transcoded content directly from S3 or you can use Amazon CloudFront to get the content even closer to your users. Either way, you need to create a CORS policy that looks like this:
<?xml version="1.0" encoding="UTF-8"?>
<CORSConfiguration xmlns="http://s3.amazonaws.com/doc/2006-03-01/">
<CORSRule>
<AllowedOrigin>*</AllowedOrigin>
<AllowedMethod>GET</AllowedMethod>
<MaxAgeSeconds>3000</MaxAgeSeconds>
<AllowedHeader>*</AllowedHeader>
</CORSRule>
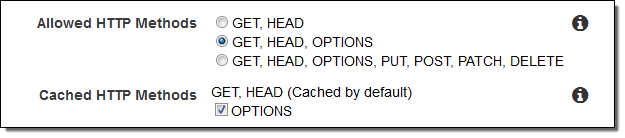
</CORSConfiguration>If you are using CloudFront, you need to enable the OPTIONS method, and allow it to be cached:
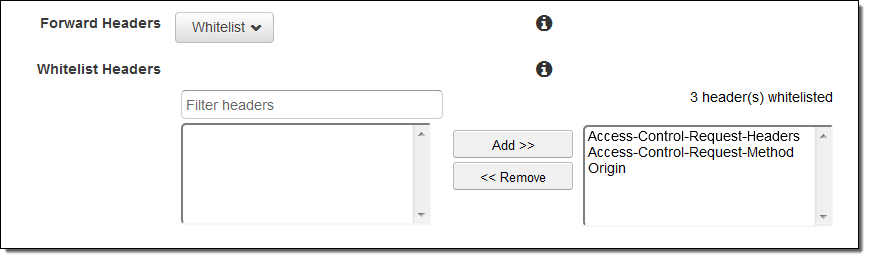
You also need to add three headers to the whitelist for the distribution:
Transcoding With MPEG-DASH
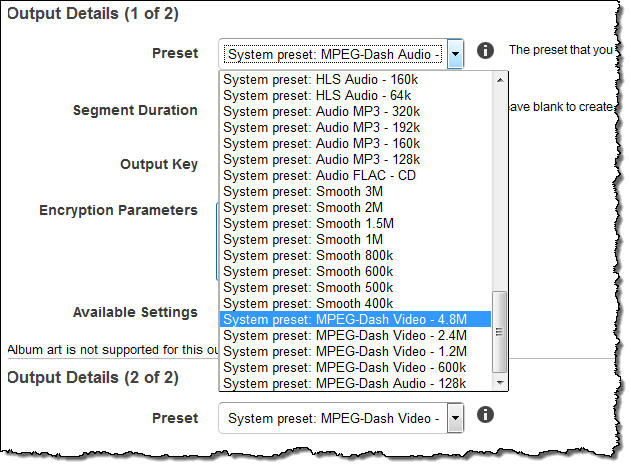
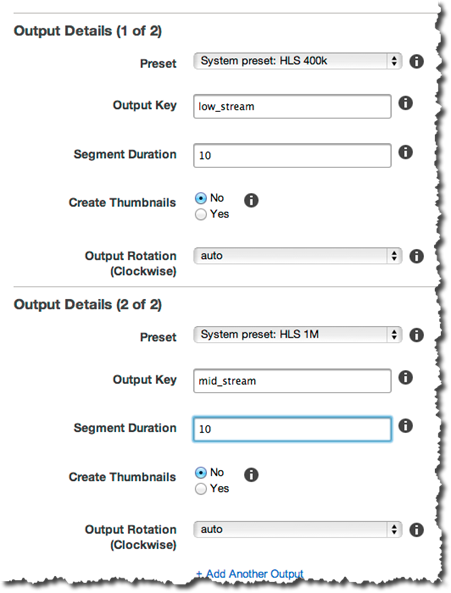
To make use of the adaptive bitrate feature of MPEG-DASH, you create a single transcoding job and specify multiple outputs, each with a different preset. Here are your choices (4 for video and 1 for audio):
When you use this format, you also need to choose a suitable segment duration (in seconds). A shorter duration produces a larger number of smaller segments and allows the client to adapt to changes more quickly.
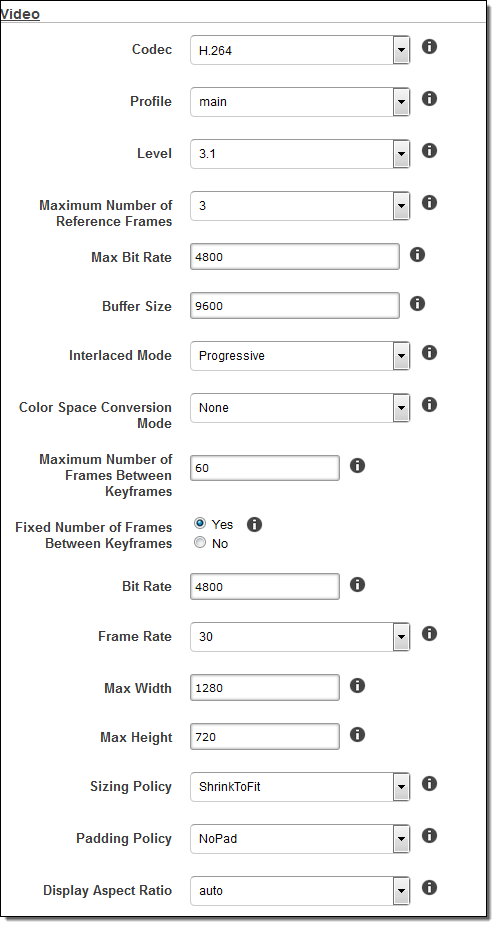
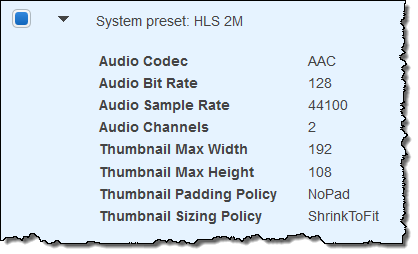
You can create a single playlist that contains all of the bitrates, or you can choose the bitrates that are most appropriate for your customers and your content. You can also create your own presets, using an existing one as a starting point:
Available Now
MPEG-DASH support is available now in all Regions where Amazon Elastic Transcoder is available. There is no extra charge for this use of this format (see Elastic Transcoder Pricing to learn more).
— Jeff;
Amazon Elastic Transcoder Update – PlayReady DRM Support for Smooth Streaming and HLS
My colleague Omid Behzadian sent a guest post to introduce an important new feature for Amazon Elastic Transcoder.
— Jeff;
You can now use Amazon Elastic Transcoder to apply Microsoft PlayReady DRM protection to your Smooth Streaming and HLS outputs. When creating your transcoding job, simply include the encryption key and license server URL provided by your PlayReady License Provider. Your files will be transcoded and packaged in one simple step.
The following diagram illustrates how to apply PlayReady DRM protection to your content and deliver it:
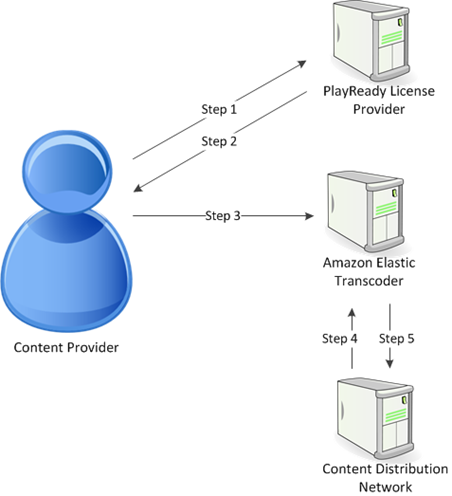
Elastic Transcoder handles the DRM packaging (the last three steps of this process) for you. Here’s the overall flow:
- The content provider calls their DRM license provider with a key id to generate a content key.
- The license provider uses the key id to generate a content key and returns it and a license acquisition URL to the content provider.
- The content provider calls Amazon Elastic Transcoder with the content key, key id, and license acquisition URL.
- Amazon Elastic Transcoder fetches the file to be protected, transcodes it, and bundles it with the DRM information.
- Amazon Elastic Transcoder sends the DRM protected file to the Content Distribution Network (e.g., Amazon CloudFront), which distributes the file.
There are no additional charges Elastic Transcoder charges for using this new DRM packaging feature. To learn more, please consult the Securing Your Content chapter in the Elastic Transcoder Developer Guide.
— Omid Behzadian, Senior Product Manager
Amazon Elastic Transcoder Update – New Formats & Conversion Controls
Amazon Elastic Transcoder converts (transcodes) media (video and audio) files into renditions optimized for playback on desktops, mobile devices, tablets, and televisions.
Today, we are making Elastic Transcoder even more useful! We’ve added support for generating NTSC outputs (the television standard used in the United States and Canada), and PAL outputs (the standard used in most other countries), and we are also adding new formats for the web.
New Formats
Here are the new formats:
- FLV container with H.264 video and AAC or MP3 audio
- MPG container with MPEG-2 video and MP2 audio
- Animated GIF
To support NTSC and PAL , we have added support for the MPEG – 2 MPEG-2 video, audio, and program stream container, extended our color space support, and added options for interlacing. You can generate output that is compliant with PAL or NTSC by selecting the appropriate system preset.
For the web, we’ve added animated GIF and FLV outputs. Animated GIF files work natively in most browsers, whereas FLV allows you to reach devices via their Flash plugin. The FLV packaging is optimized to work with the Flash media player. By packing into this format, you can more easily reach older devices not capable of being reached by more recent formats. Together these features allow you to reach a wider range of devices, including legacy browsers and televisions. Here’s a sample animated GIF:

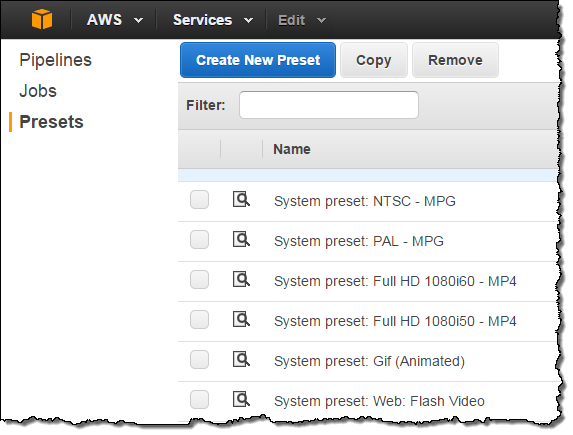
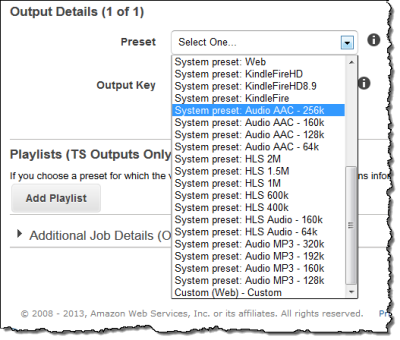
New Console Options
The ETS Console has been updated to support the new presets, codecs, and options. Here is how you select one of the new presets:
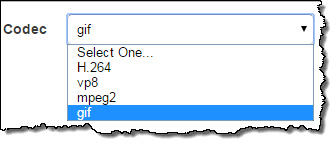
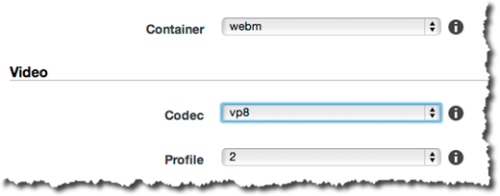
Here is how you choose a codec:
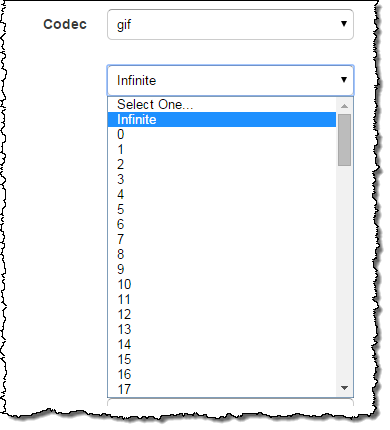
If you are generating an animated GIF you can set the number of times that the animation will play:
— Jeff;
Elastic Transcoder Update – AES-128 Encryption for HLS Content
Amazon Elastic Transcoder lets you convert media files in to versions that will play on smart phones, tablets, PCs, and smart TVs. As I have mentioned in the past, it takes care of all of the more tedious aspects of the media transcoding process on your behalf. You create a transcoding job and Elastic Transcoder will take care of everything else.
We have made a number of important improvements to Elastic Transcoder in the last couple of months. Here’s a recap:
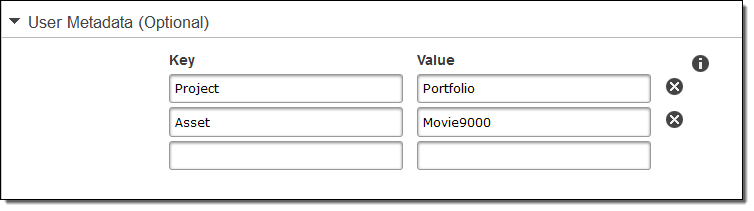
- Custom Metadata Pass-Through – Last December we gave you the ability to attach up to ten key-value pairs to each of your Elastic Transcoder jobs. The metadata is included in job notifications and can be used to map your jobs back to the content in your internal Content Management System (CMS):
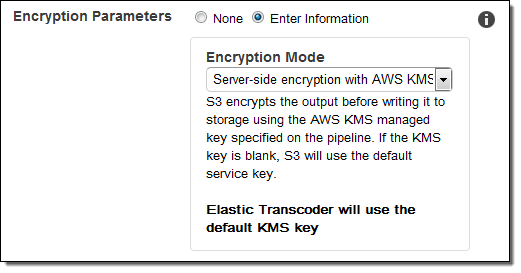
- Media File Encryption – Last November we announced AWS Key Management Service (KMS) support for Elastic Transcoder. This release gave you the power to ensure the confidentiality of media assets (mezzanine files, thumbnails, captions, and watermarks) as they move between your application and the Elastic Transcoder service. This launch let you control who could decrypt your content and also allowed you to use AWS CloudTrail to create an audit report of all encryption and decryption operations:
- CloudTrail Integration – Announced last October, API calls made to Elastic Transcoder are recorded, logged, and then delivered to the Amazon Simple Storage Service (S3) bucket of your choice.
- Support for HLS v4 – Also announced last October, this feature supports the popular HTTPS Live Streaming (HLS) protocol, commonly used on newer iOS and Android devices.
AES-128 Encryption to Protect HLS Content
Today we are making another improvement to Elastic Transcoder. You can now use AES-128 encryption to protect the transcoded files (which are broken down by HLS into smaller pieces commonly known as media segments), while still making use of generic content delivery mechanisms!
When you enable this feature, each media segment is encrypted using AES-128 and a single encryption key. A URL to the decryption key is written to each playlist (HLS supports multiple encodings known as variants; each one supports an alternate rendering of the same content). When the content is viewed, the player will download the key and decrypt the media segments during the playback process.
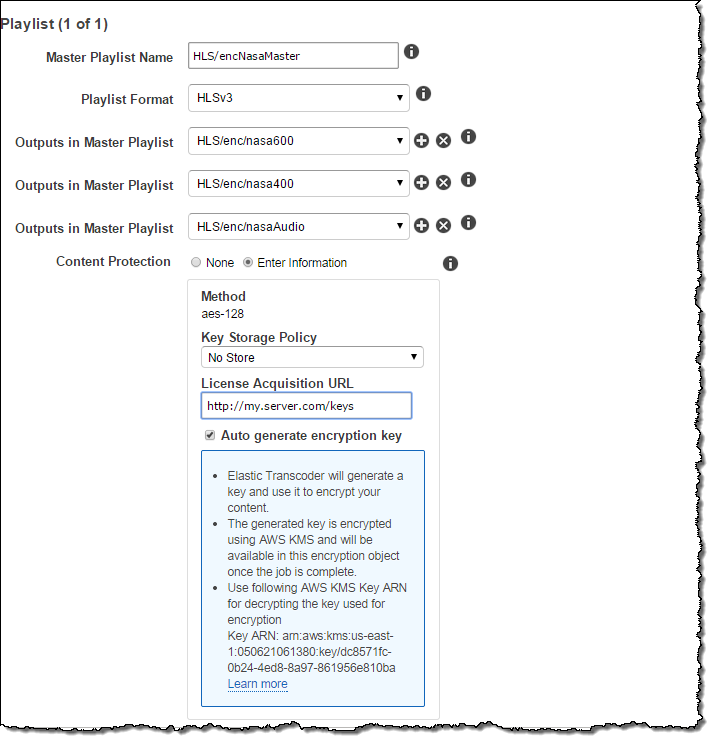
In order to make use of this new feature, you need to associate an Elastic Transcoder pipeline with a KMS master key. You have two choices when it comes to keys: you can create your own keys or you can have Elastic Transcoder generate them for you. Regardless of the option that you choose, you need to wait for the job to complete and then store the key in a database that you manage (this information is available to you via the ReadJob API).
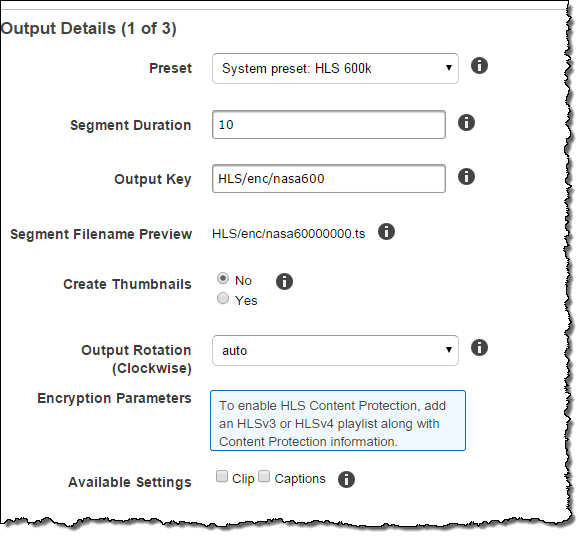
To enable HLS content protection, you simply add an HLS v3 or HLS v4 playlist to your transcoding job, along with the content protection information:
Here’s how you enter the content protection information:
Playing Back Protected Content
Each variant playlist will contain a URL that the media player will use to fetch the content protection key using a standard HTTP request. In order to protect access to the key, the content provider must authenticate and authorize the media player. The authentication should result in a session cookie that identifies the media player. The content provider should mandate that the cookie is present and acceptable before returning the key. This mechanism will prevent unauthorized playback and decryption of the content.
If you choose to use a Content Distribution Network (CDN) such as Amazon CloudFront to distribute your content, you will need to ensure that the encrypted media files are accessible from your CloudFront distribution. However, you must be careful not to store your keys in a publicly accessible location. For safety and simplicity, we recommend that you use the “No Store” key storage policy so that your key is never written to file storage.
Full information on use of AES-128 to protect content is available in the Elastic Transcoder Developer Guide.
Pricing and Availability
This feature is available now and you can start using it today. There’s no extra charge for the use of AES-128 encryption; you pay only for the content that you transcode (see the Elastic Transcoder Pricing page for more information).
— Jeff;
Audio Support for the Amazon Elastic Transcoder
The Amazon Elastic Transcoder gives you the power to convert or transcode media files from one format to another, making it possible for you to create files that are compatible with smart phones, tablets, PCs, and other devices without having to worry about servers, storage, scalability, or a host of other issues.
We are adding audio transcoding support to the Elastic Transcoder today. You can transcode existing audio files (e.g. music and podcasts) to new formats, and you can strip out the audio tracks from video files to create audio-only streams. You can use this option to create audio podcasts from video originals and to support iOS applications that require an audio-only HTTP Live Streaming (HLS) file set.
You transcode audio files in much the same way that you transcode video files. You create a transcoding pipeline (or use an existing one), and then create a transcoding job. The transcoding job can use one of the new audio transcoding system presets or your own custom presets. You can create audio output using the AAC, Vorbis, or MP3 codecs.
Audio transcoding is billed at the rate of $0.0045 (less than 1/2 of a cent) per minute of audio output in the US East (Northern Virginia) Region; see the Elastic Transcoder Pricing page for information on pricing in the other AWS Regions. You also get 20 minutes per month of audio transcoding as part of the AWS Free Usage Tier.
As always, this new feature is available now and you can start using it today!
— Jeff;
Amazon Cloud Drive Using Amazon Elastic Transcoder
 You can now upload videos to your Amazon Cloud Drive and view them on your Kindle or your Android device.
With support for a multitude of file formats and video codecs, implementing this feature from scratch would have been a lengthy and technically challenging undertaking. Cloud Drive already uses multiple AWS service, so using Amazon Elastic Transcoder was a natural move, and one that helped them to launch as quickly as possible.
I sat down with the Cloud Drive team to learn a bit more about their work. Here’s what they told me.
The top-level goal was to allow users of the Cloud Drive to upload most any video and be able to view it on a Kindle or Android device within minutes. After investigating the feasibility of creating their own transcoding system using a combination of open source and commercial software, they decided that the Elastic Transcoder would give them the features, efficiency, and scalability that were needed to launch on time.
Features
The team wanted to allow users to upload and view almost any video. The Elastic Transcoder allows them to support more than 20 file formats and 40 video codecs, including videos captured on archaic devices and stored in obsolete formats.
Because Cloud Drive already stored uploaded files in Amazon S3 (they also make heavy use of EC2, SQS, SNS, CloudFront and DynamoDB), it was easy for the team to get started. They created an initial set of transcoding pipelines, decided on the set of output formats that they wanted to support, and created Elastic Transcoding presets as needed.
Efficiency
In order to provide a great user experience, the team set a goal of having finished videos available 15 minutes or less after they were uploaded. They were able to over-achieve on this goal and report that videos are often ready within a minute or two.
The Cloud Drive team gained additional efficiency by making use of a new feature just recently released for the Elastic Transcoder. Instead of creating one transcoding job for each desired output resolution (they currently support three), they simply request multiple outputs from a single job. This allows them to support more sizes and type of devices and simplifies their internal workflow management.
Scalability
Cloud Drive users have already uploaded lots and lots of videos to their drives. In order to make these videos viewable, the Cloud Drive team worked to process the entire library ahead of the launch.They used transcoding pipelines to manage/optimize their workflow by stuffing each pipeline with a multitude of jobs. By making use of Elastic Transcoder’s ability to scale on demand, they were able to process their entire backlog in just a few weeks.
Without scalable processing infrastructure, they would have been faced with a thorny dilemma: acquire far more hardware than needed for transcoding on a long term basis, or force users to wait months for their older videos to become viewable.
Customer videos are stored in several different AWS Regions. The team made use of Elastic Transcoder in the US East (Northern Virginia), US West (Oregon), and Europe (Ireland).
Do It Yourself
You can transcode up to 20 minutes of SD video each month at no charge as part of the AWS Free Usage Tier. Read more about the Elastic Transcoder, peruse the documentation, and get started today.
— Jeff;
PS – The Cloud Drive team is hiring for all sorts of interesting development, program management, and product management positions. I’m sure they’d be happy to take a look at your resume!
Amazon Elastic Transcoder – Watermarking, Bit / Frame Rate Control
We added a big batch of features to the Amazon Elastic Transcoder just a couple of months ago. Let’ s do it again!
Today we are adding three new features that will give you additional control of the appearance, bit rate, and frame rate of the videos that you transcode. As you can see from the screen shots below, you can access all three of these features from the AWS Management Console. Here’s the scoop:
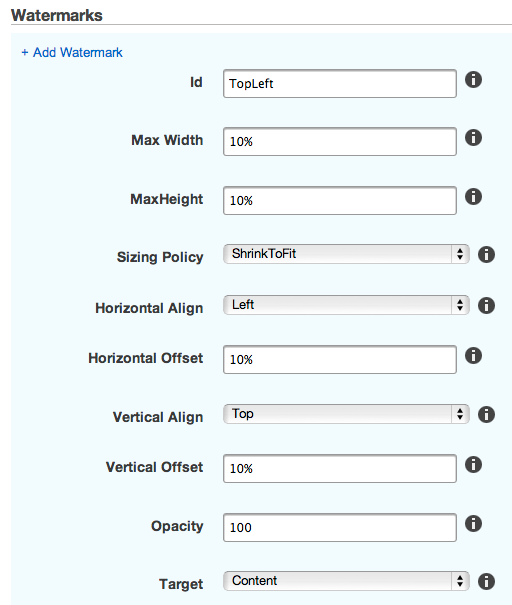
Visual Watermarking allows you to overlay up to four still images (PNG or JPG format) on your output video, with full control over the position, size, and scale, and opacity. You can use this to add a logo, legend, or other identifying information to your video.
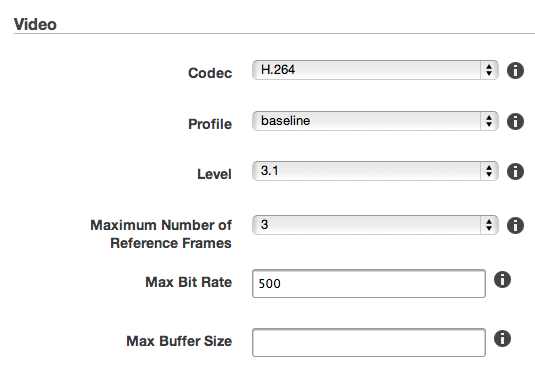
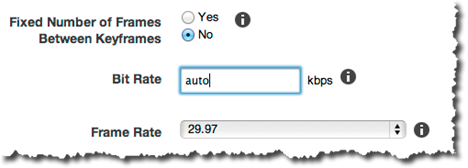
Maximum Bit Rate Control lets you limit the instantaneous bit rate of your output video. You can use this setting to ensure that your video meets the playback specifications and bandwidth requirements of your desired output devices.
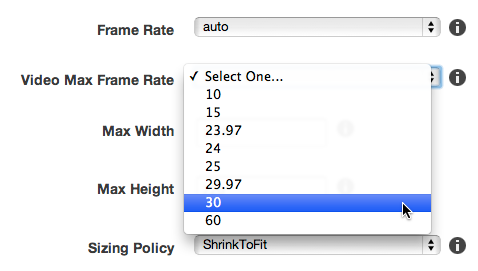
Maximum Frame Rate control lets you specify a maximum frame rate for your output video. This is useful when you wish to maintain the frame rate of the source media except in cases where it would otherwise exceed a certain frame rate threshold.
As always, these features are available now and you can start using them today! Read the Elastic Transcoder Documentation to learn more.
— Jeff;
New Features for the Amazon Elastic Transcoder
We released the Amazon Elastic Transcoder with an initial set of features and a promise to iterate quickly based on customer feedback. You’ve supplied us with plenty of feedback (primarily via the Elastic Transcoder Forum) and have a set of powerful enhancements ready as a result.
Here’s what’s new:
- Apple HTTP Live Streaming (HLS) Support. Amazon Elastic Transcoder can create HLS-compliant pre-segmented files and playlists for delivery to compatible players on iOS and Android devices, set-top boxes and web browsers. You can use our new system-defined HLS presets to transcode an input file into adaptive-bitrate filesets for targeting multiple devices, resolutions and bitrates. You can also create your own presets.
- WebM Output Support. Amazon Elastic Transcoder can now transcode content into VP8 video and Vorbis audio, for playback in browsers, like Firefox, that do not natively support H.264 and AAC.
- MPEG2-TS Output Container Support. Amazon Elastic Transcoder can now transcode content into transport stream containing H.264 video and AAC audio, which are commonly used in broadcast systems.
- Multiple Outputs Per Job. Amazon Elastic Transcoder can now produce multiple renditions of the same input from a single transcoding job. For example, with a single job you can create H.264, HLS and WebM versions of the same video for delivery to multiple platforms, which is easier than creating multiple jobs and saves you time.
- Automatic Video Bit rate Optimization. With this feature, Amazon Elastic Transcoder will automatically adjust the bit rate in order to optimize the visual quality of your transcoded output. This takes the guesswork out of choosing the right bit rate for your video content.
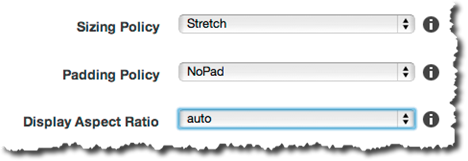
- Enhanced Aspect Ratio and Sizing Policies. You can use these new settings in transcoding presets to precisely control scaling, cropping, matting and stretching options to get the output that you expect regardless of how the input is formatted.
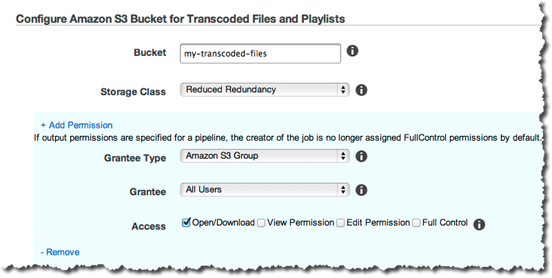
- Enhanced S3 Options for Output Videos. Amazon Elastic Transcoder now enables you to set S3 Access Control Lists (ACLs) and storage type options without needing to use the Amazon S3 API or console. By using this feature, your files are then created with the right permissions in-place, ready for delivery to end-users.
To learn more about these features, visit the Elastic Transcoder Documentation and sign up for our free What’s New with Amazon Elastic Transcoder webinar. The webinar will be held on May 29th at 10 AM PT.
As usual, these features are availble now and you can start using them today.
— Jeff;
The New Amazon Elastic Transcoder
Transcoding is the process of converting a media file (audio or video) from one format, size, or quality to another. Implementing a transcoding system on your own can be fairly complex. You might need to use a combination of open source and commercial code, and you’ll need to deal with scaling and storage. You’ll probably need to implement a workload management system using message queues or the like. You’ll probably need to license audio and video codecs. In short, it isn’t as easy as it could be.
The new Amazon Elastic Transcoder makes it easy for you to transcode video files in a scalable and cost-effective fashion. With no start-up costs, your costs are determined by the duration (in minutes) of your transcoded videos. Transcoding of Standard Definition (SD) video (less than 720p) costs $0.015 (one and a half cents) per minute in US East (Northern Virginia). High Definition (HD) video (720p or greater) costs $0.03 (three cents) per minute, also in US East. As part of the AWS Free Usage Tier, the first 20 minutes of SD transcoding or 10 minutes of HD transcoding are provided at no charge.
You can initiate transcoding jobs from the AWS Management Console or through the APIs. You can also arrange to receive notification at various points in the transcoding process.
Transcoding Model
The Amazon Elastic Transcoder takes input from an Amazon S3 bucket, transcodes it, and writes the resulting file to another S3 bucket. You can use the same bucket for input and output, and the buckets can be in any Region. If your transcoding jobs run in a particular Region and retrieve or place content in a different Region, you’ll pay the usual AWS data transfer charges.
You will create or reference objects of five distinct types each time you transcode a file. You’ll start with one or more Input Files, and create Transcoding Jobs in a Transcoding Pipeline for each file. Each job must reference a particular Transcoding Preset, and will result in the generation of a single Output File.
The Elastic Transcoder accepts Input Files in a wide variety of web, consumer, and professional formats. If the file contains multi-track audio, the first two will be passed through to the output, since they’re commonly used as the left and right channels.
The Elastic Transcoder generates Output Files. For the first release we are supporting the MP4 container type, the H.264 video codec, and the AAC (Advanced Audio Coding) audio codec.
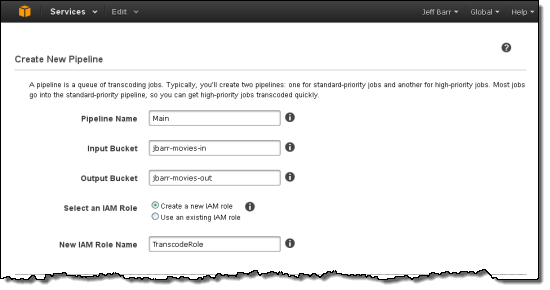
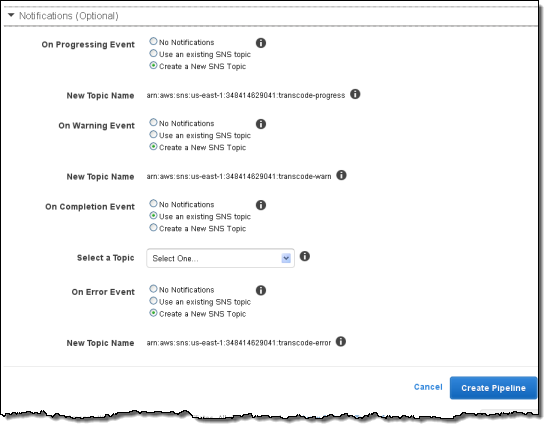
You’ll need to create and named one or more Transcoding Pipelines. When you create the Pipeline you’ll specify Input and Output Buckets, an IAM role, and four SNS topics. Notifications will be sent when the Elastic Transcoder starts and finishes each Job, and when it needs to tell you that it has detected an error or warning condition. You can use the same topic for all of the notifications or you can use distinct topics for each one. You can create up to four Transcoding Pipelines per account by default; if you need more just contact us.
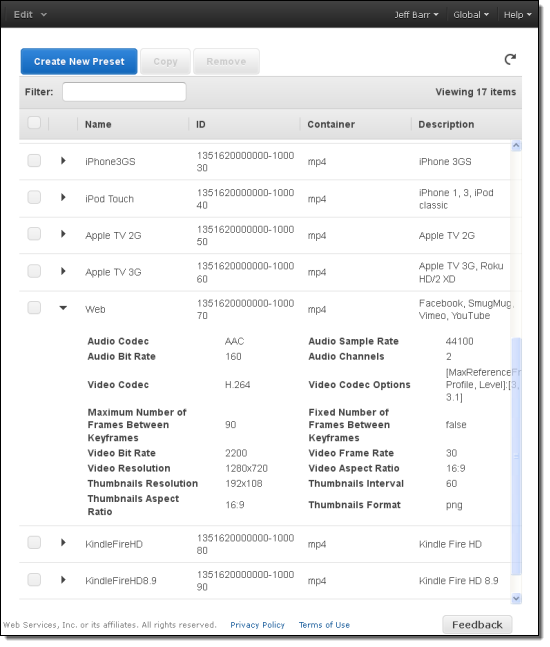
After you have created a Pipeline, you need to choose a Transcoding Preset (we’ve created them for a number of common output formats) or create a custom one. A Preset tells the Elastic Transcoder what settings to use when processing a particular Input File. Presets are named, and can reference another Preset as a base. You can specify many settings when you create a Preset including the sample rate, bit rate, resolution (output height and width), the number of reference and keyframes, a video bit rate, some thumbnail creation options, and more.
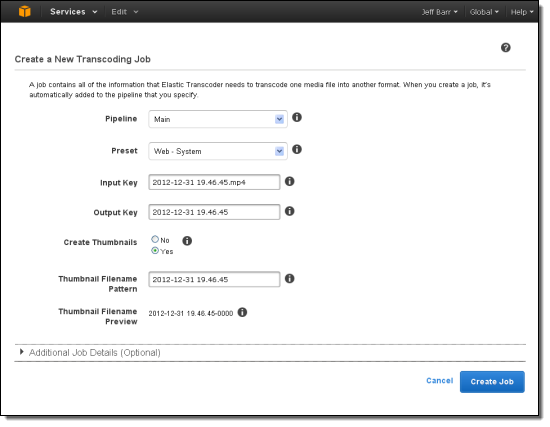
The next step is to create a Job (or lots of them, this is a highly scalable service). Each Job must specify a Pipeline, a Preset, and a pair of S3 keys (file names for Input and Output). The Elastic Transcoder can automatically detect the input frame rate, resolution, interlacing, and container type. You have the option to override the automatically detected values by specifying them in the Job, and you can also tell the Elastic Transcoder to rotate the video as needed, in increments of 90 degrees.
Jobs submitted to a Pipeline will be processed in submission order, but one Pipeline may process several of your Jobs simultaneously if resources are available. The amount of clock time needed to process a Job will vary depending on the particulars of the input file and of the settings in the Preset, but will typically be about one third (1/3) of the playing time of the file for a Standard Definition video. For example, a three minute video is generally transcoded in about one minute. You can pause and resume any of your Pipelines if necessary.
Your application can monitor the status of each Job by subscribing to the SNS topics associated with the Pipeline. It can also use the ListJobsByStatus function to find all of the Jobs with a given status (e.g. “Completed”) or the GetJob function to retrieve detailed information about a particular job.
Elastic Transcoder in Action
I transcoded a video using the AWS Management Console. Here are some screen shots. I start by creating a Pipeline and setting up SNS notifications:
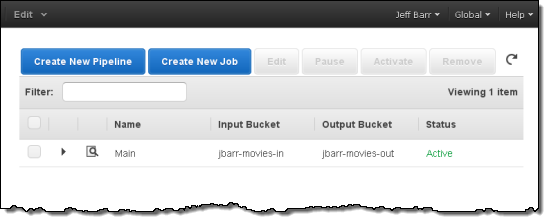
I can see my Pipelines and their status::
Then I select a good Preset:
And create the Job:
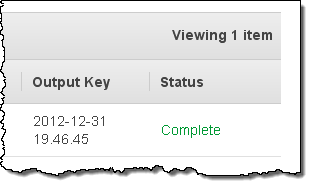
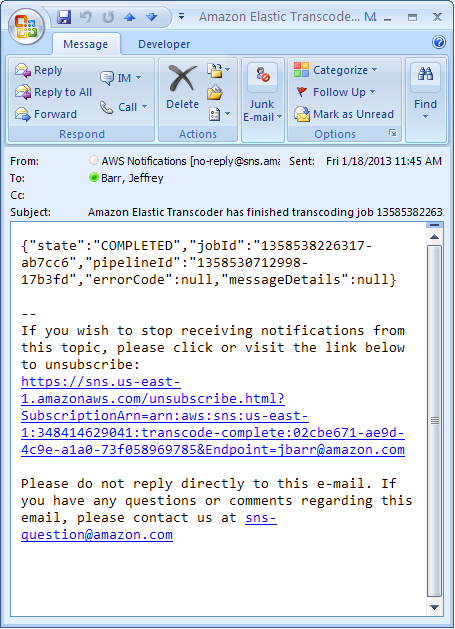
I can monitor the Job’s status and await completion:
I created an email subscription to an SNS topic to ensure that I would receive a message after each of my videos had been transcoded successfully. Here’s what the notification looked like:
Get Started Now
Amazon Elastic Transcoder is available now in the following AWS Regions:
- US East (Northern Virginia).
- US West (Oregon)
- US West (Northern California)
- Europe (Ireland)
- Asia Pacific (Japan)
- Asia Pacific (Singapore
The following AWS tools and SDKs now include support for the Amazon Elastic Transcoder:
- AWS SDK for Ruby.
- AWS SDK for .NET.
- AWS SDK for Java.
- AWS SDK for PHP 2.
- AWS Tools for Windows PowerShell.
- AWS SDK for Node.js.
Learn more about Elastic Transcoder Pricing, read the Developer Guide and you’ll be good to go!
— Jeff;