Category: Amazon API Gateway
Box Platform on AWS Marketplace – Lambda Blueprints & Sample Code
Box is a cloud-based file sharing and content management system, with an API that recently became available in AWS Marketplace (Box Platform – Cloud Content Management APIs). With an array of features for collaboration and an emphasis on security, Box has found a home in many enterprises (see their success stories page for a list).
The Box API allows developers to build content experiences into web and mobile apps. Today I would like to tell you about some AWS Lambda blueprints and templates that will help you to build AWS applications that use this API to simplify user authentication and to add metadata to newly uploaded content. The templates are based on the Box Node Lambda Sample and should be a robust starting point for your own development.
Let’s take a look at the blueprints and then review some handy blog posts written by our friends at Box.
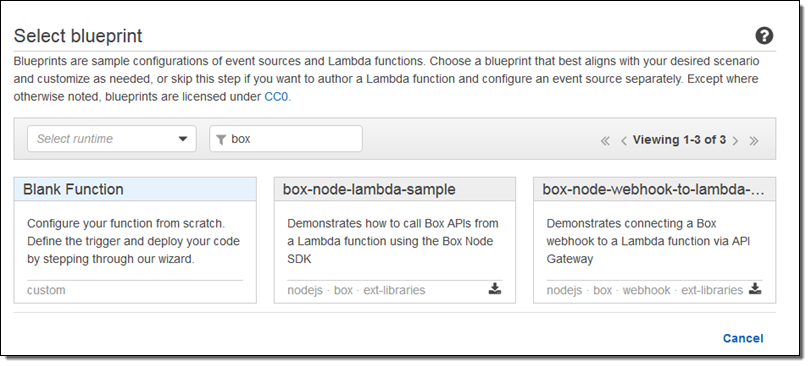
Box Blueprints for Lambda
The blueprints show you how to call the Box APIS and to connect a Box webhook to a Lambda function via Amazon API Gateway. To find them, simply open up the Lambda Console and search for box:
The first blueprint uses security credentials stored in the BOX_CONFIG environment variable. You can set the variable from within the Lambda Console:

The code in this blueprint retrieves and logs the Box User object for the user identified by the credentials.
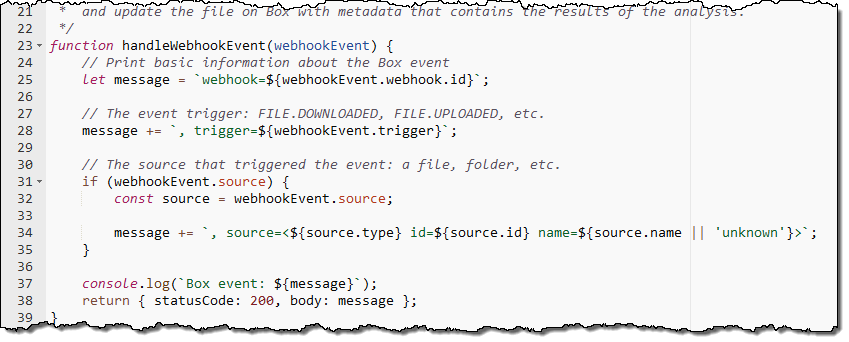
The second blueprint implements a Box webhook that sits behind an API Gateway endpoint. It accepts requests, validates them, and logs them to Amazon CloudWatch:
Handy Blog Posts
The developer relations team at Box has written some blog posts that show you how to use Box in conjunction with several AWS services:
Manage User Authentication with Box Platform using Amazon Cognito – This post shows you how to use Amazon Cognito to power a login page for your app users. Cognito will handle authentication and user pool management and the code outlined in the blog post will create an App User in Box the first time the user logs in. The code is available as box-node-cognito-lambdas-sample on GitHub.
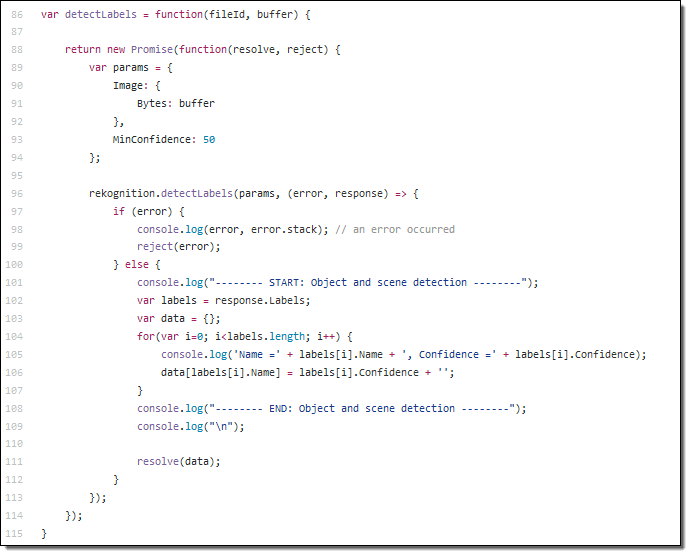
Add Deep Learning-based Image Recognition to your Box App with Amazon Rekognition – This post shows you how to build an image tagging application that is powered by Amazon Rekognition. Users take and upload photos, which are automatically labeled with metadata that that is stored in Amazon DynamoDB. The code is activated by a webhook when a file is uploaded. You can find the code in the box-node-rekognition-webhook on GitHub.
 Thanks to our friends at Box for taking the time to create these helpful developer resources!
— Jeff;
Roundup of AWS HIPAA Eligible Service Announcements
At AWS we have had a number of HIPAA eligible service announcements. Patrick Combes, the Healthcare and Life Sciences Global Technical Leader at AWS, and Aaron Friedman, a Healthcare and Life Sciences Partner Solutions Architect at AWS, have written this post to tell you all about it.
-Ana
We are pleased to announce that the following AWS services have been added to the BAA in recent weeks: Amazon API Gateway, AWS Direct Connect, AWS Database Migration Service, and Amazon SQS. All four of these services facilitate moving data into and through AWS, and we are excited to see how customers will be using these services to advance their solutions in healthcare. While we know the use cases for each of these services are vast, we wanted to highlight some ways that customers might use these services with Protected Health Information (PHI).
![]() As with all HIPAA-eligible services covered under the AWS Business Associate Addendum (BAA), PHI must be encrypted while at-rest or in-transit. We encourage you to reference our HIPAA whitepaper, which details how you might configure each of AWS’ HIPAA-eligible services to store, process, and transmit PHI. And of course, for any portion of your application that does not touch PHI, you can use any of our 90+ services to deliver the best possible experience to your users. You can find some ideas on architecting for HIPAA on our website.
As with all HIPAA-eligible services covered under the AWS Business Associate Addendum (BAA), PHI must be encrypted while at-rest or in-transit. We encourage you to reference our HIPAA whitepaper, which details how you might configure each of AWS’ HIPAA-eligible services to store, process, and transmit PHI. And of course, for any portion of your application that does not touch PHI, you can use any of our 90+ services to deliver the best possible experience to your users. You can find some ideas on architecting for HIPAA on our website.
Amazon API Gateway
Amazon API Gateway is a web service that makes it easy for developers to create, publish, monitor, and secure APIs at any scale. With PHI now able to securely transit API Gateway, applications such as patient/provider directories, patient dashboards, medical device reports/telemetry, HL7 message processing and more can securely accept and deliver information to any number and type of applications running within AWS or client presentation layers.
One particular area we are excited to see how our customers leverage Amazon API Gateway is with the exchange of healthcare information. The Fast Healthcare Interoperability Resources (FHIR) specification will likely become the next-generation standard for how health information is shared between entities. With strong support for RESTful architectures, FHIR can be easily codified within an API on Amazon API Gateway. For more information on FHIR, our AWS Healthcare Competency partner, Datica, has an excellent primer.
AWS Direct Connect
Some of our healthcare and life sciences customers, such as Johnson & Johnson, leverage hybrid architectures and need to connect their on-premises infrastructure to the AWS Cloud. Using AWS Direct Connect, you can establish private connectivity between AWS and your datacenter, office, or colocation environment, which in many cases can reduce your network costs, increase bandwidth throughput, and provide a more consistent network experience than Internet-based connections.
In addition to a hybrid-architecture strategy, AWS Direct Connect can assist with the secure migration of data to AWS, which is the first step to using the wide array of our HIPAA-eligible services to store and process PHI, such as Amazon S3 and Amazon EMR. Additionally, you can connect to third-party/externally-hosted applications or partner-provided solutions as well as securely and reliably connect end users to those same healthcare applications, such as a cloud-based Electronic Medical Record system.
AWS Database Migration Service (DMS)
To date, customers have migrated over 20,000 databases to AWS through the AWS Database Migration Service. Customers often use DMS as part of their cloud migration strategy, and now it can be used to securely and easily migrate your core databases containing PHI to the AWS Cloud. As your source database remains fully operational during the migration with DMS, you minimize downtime for these business-critical applications as you migrate your databases to AWS. This service can now be utilized to securely transfer such items as patient directories, payment/transaction record databases, revenue management databases and more into AWS.
Amazon Simple Queue Service (SQS)
Amazon Simple Queue Service (SQS) is a message queueing service for reliably communicating among distributed software components and microservices at any scale. One way that we envision customers using SQS with PHI is to buffer requests between application components that pass HL7 or FHIR messages to other parts of their application. You can leverage features like SQS FIFO to ensure your messages containing PHI are passed in the order they are received and delivered in the order they are received, and available until a consumer processes and deletes it. This is important for applications with patient record updates or processing payment information in a hospital.
Let’s get building!
We are beyond excited to see how our customers will use our newly HIPAA-eligible services as part of their healthcare applications. What are you most excited for? Leave a comment below.
Is it on AWS? Domain Identification Using AWS Lambda
In the guest post below, my colleague Tim Bray explains how he built IsItOnAWS.com . Powered by the list of AWS IP address ranges and using a pair of AWS Lambda functions that Tim wrote, the site aims to tell you if your favorite website is running on AWS.
— Jeff;
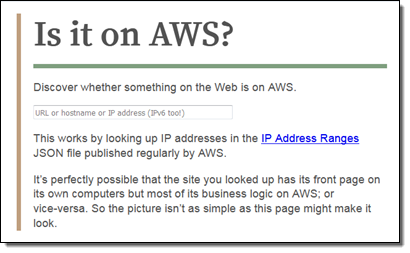
Is it on AWS?
I did some recreational programming over Christmas and ended up with a little Lambda function that amused me and maybe it’ll amuse you too. It tells you whether or not a given domain name (or IP address) (even IPv6!) is in the published list of AWS IP address ranges. You can try it out over at IsItOnAWS.com. Part of the construction involves one Lambda function creating another.
That list of of ranges, given as IPv4 and IPv6 CIDRs wrapped in JSON, is here; the how-to documentation is here and there’s a Jeff Barr blog. Here are a few lines of the “IP-Ranges” JSON:
As soon as I saw it, I thought “I wonder if IsItOnAWS.com is available?” It was, and so I had to build this thing. I wanted it to be:
- Serverless (because that’s what the cool kids are doing),
- simple (because it’s a simple problem, look up a number in a range of numbers), and
- fast. Because well of course.
Database or Not?
 The construction seemed pretty obvious: Simplify the IP-Ranges into a table, then look up addresses in it. So, where to put the table? I thought about Amazon DynamoDB, but it’s not obvious how best to search on what in effect is a numeric range. I thought about SQL databases, where it is obvious, but note #2 above. I thought about Redis or some such, but then you have to provision instances, see #1 above. I actually ended up stuck for a few days scratching my head over this one.
Then a question occurred to me: How big is that list of ranges? It turns out to have less than a thousand entries. So who needs a database anyhow? Let’s just sort that JSON into an array and binary-search it. OK then, where does the array go? Amazon S3 would be easy, but hey, look at #3 above; S3’s fast, but why would I want it in the loop for every request? So I decided to just generate a little file containing the ranges as an array literal, and include it right into the IsItOnAWS Lambda function. Which meant I’d have to rebuild and upload the function every time the IP addresses change.
It turns out that if you care about those addresses, you can subscribe to an Amazon Simple Notification Service (SNS) topic that will notify you whenever it changes (in my recent experience, once or twice a week). And you can hook your subscription up to a Lambda function. With that, I felt I’d found all the pieces anyone could need. There are two Lambda functions: the first, newranges.js, gets the change notifications, generates the JavaScript form of the IP-Ranges data, and uploads a second Lambda function, isitonaws.js, which includes that JavaScript. Vigilant readers will have deduced this is all with the Node runtime.
The new-ranges function, your typical async/waterfall thing, is a little more complex than I’d expected going in.
Postmodern IP Addresses
Its first task is to fetch the IP-Ranges, a straightforward HTTP GET. Then you take that JSON and smooth it out to make it more searchable. Unsurprisingly, there are both IPv4 and IPv6 ranges, and to make things easy I wanted to mash ’em all together into a single array that I could search with simple string or numeric matching. And since IPv6 addresses are way too big for JavaScript numbers to hold, they needed to be strings.
It turns out the way the IPv4 space embeds into IPv6’s ("::ffff:0:0/96") is a little surprising. I’d always assumed it’d be like the BMP mapping into the low bits of Unicode. I idly wonder why it’s this way, but not enough to research it.
The code for crushing all those CIDRs together into a nice searchable array ended up being kind of brutish, but it gets the job done.
Building Lambda in Lambda
Next, we need to construct the lambda that’s going to actually handle the IsItOnAWS request. This has to be a Zipfile, and NPM has tools to make those. Then it was a matter of jamming the zipped bytes into S3 and uploading them to make the new Lambda function.
The sharp-eyed will note that once I’d created the zip, I could have just uploaded it to Lambda directly. I used the S3 interim step because I wanted to to be able to download the generated “ranges” data structure and actually look at it; at some point I may purify the flow.
The actual IsItOnAWS runtime is laughably simple, aside from a bit of work around hitting DNS to look up addresses for names, then mashing them into the same format we used for the ranges array. I didn’t do any HTML templating, just read it out of a file in the zip and replaced an invisible <div> with the results if there were any. Except for, I got to code up a binary search method, which only happens once a decade or so but makes me happy.
Putting the Pieces Together
Once I had all this code working, I wanted to connect it to the world, which meant using Amazon API Gateway. I’ve found this complex in the past, but this time around I plowed through Create an API with Lambda Proxy Integration through a Proxy Resource, and found it reasonably linear and surprise-free.
However, it’s mostly focused on constructing APIs (i.e. JSON in/out) as opposed to human experiences. It doesn’t actually say how to send HTML for a human to consume in a browser, but it’s not hard to figure out. Here’s how (from Node):
Once I had everything hooked up to API Gateway, the last step was pointing isitonaws.com at it. And that’s why I wrote this code in December-January, but am blogging at you now. Back then, Amazon Certificate Manager (ACM) certs couldn’t be used with API Gateway, and in 2017, life is just too short to go through the old-school ceremony for getting a cert approved and hooked up. ACM makes the cert process a real no-brainer. What with ACM and Let’s Encrypt loose in the wild, there’s really no excuse any more for having a non-HTTPS site. Both are excellent, but if you’re using AWS services like API Gateway and CloudFront like I am here, ACM is a smoother fit. Also it auto-renews, which you have to like.
So as of now, hooking up a domain name via HTTPS and CloudFront to your API Gateway API is dead easy; see Use Custom Domain Name as API Gateway API Host Name. Worked for me, first time, but something to watch out for (in March 2017, anyhow): When you get to the last step of connecting your ACM cert to your API, you get a little spinner that wiggles at you for several minutes while it hooks things up; this is apparently normal. Fortunately I got distracted and didn’t give up and refresh or cancel or anything, which might have screwed things up.
By the way, as a side-effect of using API Gateway, this is all running through CloudFront. So what with that, and not having a database, you’d expect it to be fast. And yep, it sure is, from here in Vancouver anyhow. Fast enough to not bother measuring.
I also subscribed my email to the “IP-Ranges changed” SNS topic, so every now and then I get an email telling me it’s changed, and I smile because I know that my Lambda wrote a new Lambda, all automatic, hands-off, clean, and fast.
— Tim Bray, Senior Principal Engineer
AWS Lambda – A Look Back at 2016
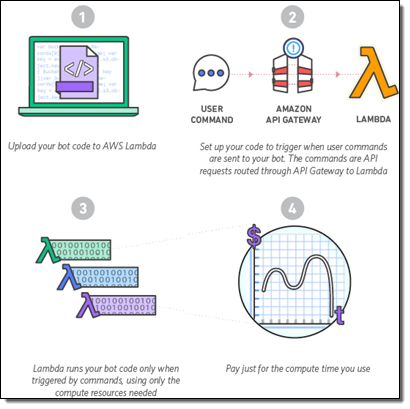
2016 was an exciting year for AWS Lambda, Amazon API Gateway and serverless compute technology, to say the least. But just in case you have been hiding away and haven’t heard of serverless computing with AWS Lambda and Amazon API Gateway, let me introduce these great services to you. AWS Lambda lets you run code without provisioning or managing servers, making it a serverless compute service that is event-driven and allows developers to bring their functions to the cloud easily for virtually any type of application or backend. Amazon API Gateway helps you quickly build highly scalable, secure, and robust APIs at scale and provides the ability to maintain and monitor created APIs.
With the momentum of serverless in 2016, of course, the year had to end with a bang as the AWS team launched some powerful service features at re:Invent to make it even easier to build serverless solutions. These features include:
- AWS Greengrass: Run local compute, messaging & data caching for connected IoT devices using Lambda and AWS IoT; https://aws.amazon.com/blogs/aws/aws-greengrass-ubiquitous-real-world-computing/
- Lambda@Edge Preview: New Lambda feature that allows code to be run at global AWS edge locations and triggered in response to Amazon CloudFront requests to reduce network latency to end users; https://aws.amazon.com/blogs/aws/coming-soon-lambda-at-the-edge/
- AWS Batch Preview: Batch computing workload planning, scheduling, and execution across AWS compute services including upcoming Lambda integration as a batch Job; https://aws.amazon.com/blogs/aws/aws-batch-run-batch-computing-jobs-on-aws/
- AWS X-Ray: Analyze and debug distributed applications, such as those built using a microservices architecture, written in Java, Node.js, and .NET deployed on EC2, ECS, AWS Elastic Beanstalk, and upcoming AWS Lambda support; https://aws.amazon.com/blogs/aws/aws-x-ray-see-inside-of-your-distributed-application/
- Continuous Deployment for Serverless: AWS services to create a continuous deployment pipeline for your serverless applications; https://aws.amazon.com/blogs/compute/continuous-deployment-for-serverless-applications/
- Step Functions: Using visual workflows as a reliable way to organize the components of microservices and distributed applications; https://aws.amazon.com/blogs/aws/new-aws-step-functions-build-distributed-applications-using-visual-workflows/
- Snowball Edge: Petabyte-scale data transport appliance with on-board storage and Lambda-powered local processing: https://aws.amazon.com/blogs/aws/aws-snowball-edge-more-storage-local-endpoints-lambda-functions/
- Dead Letter Queues: Support for Lambda function failure notifications to queue or another notification system
- C# Support: C# code as a supported language for AWS Lambda
- API Gateway Monetization: Integration of API Gateway with AWS Marketplace
- API Gateway Developer Portal: Open source serverless web application to get started building your own developer portal
Since Jeff has already introduced most of the aforementioned new service features for building distributed applications and microservices like Step Functions, let’s walk-through the last four new features not yet discussed using a common serverless use case example: Real-time Stream Processing. In our walk-through of the stream processing use case, we will implement a Dead Letter Queue for notifications of errors that may come from the Lambda function processing a stream of data, we will take an existing Lambda function written in Node.js to process the stream and rewrite it using the C# language. We then will build an example of the monetization of a Lambda backed API using API Gateway’s integration with AWS Marketplace. This will be exciting, so let’s get started.
During the AWS Developer Days in San Francisco and Austin, I presented an example of leveraging AWS Lambda for real-time stream processing by building a demo showcasing a streaming solution with Twitter Streaming APIs. I will build upon this example to demonstrate the power of Dead Letter Queues (DLQ), C# Support, API Gateway Monetization features, and the open source template for API Gateway Developer Portal. In the demo, a console or web application streams tweets gathered from the Twitter Streaming API that has the keywords ‘awscloud’ and/or ‘serverless’. Those tweets are sent real-time to Amazon Kinesis Streams where Lambda detects the new records and processes the stream batch by writing the tweets to the NoSQL database, Amazon DynamoDB.
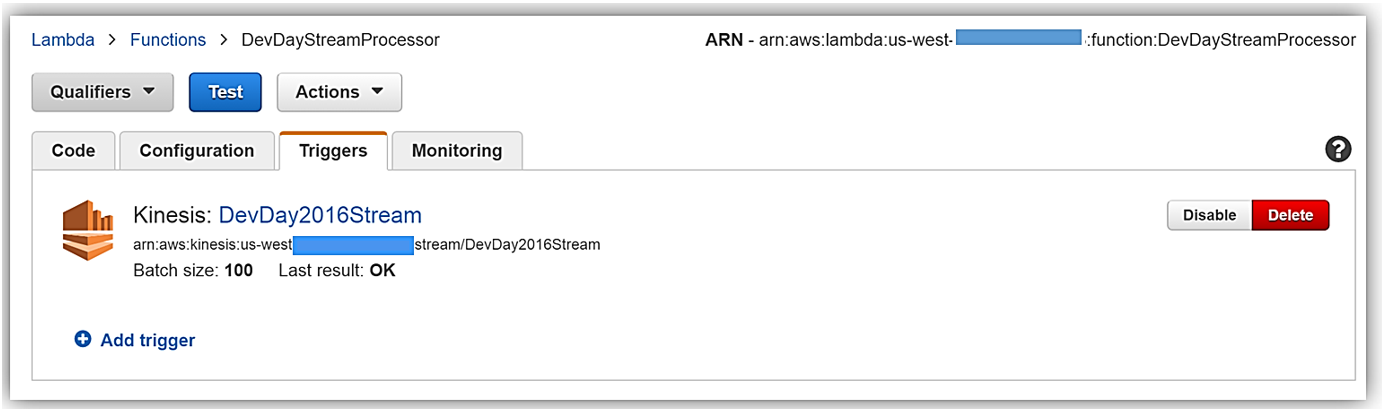
Now that we understand the real-time streaming process demo’s workflow, let’s take a deeper look at the Lambda function that processes the batch records from Kinesis. First, you will notice below that the Lambda function, DevDayStreamProcessor, has an event source or trigger that is a Kinesis stream named DevDay2016Stream with a Batch size of 100. Our Lambda function will poll the stream periodically for new records and automatically read and process batches of records, in this case, the tweets detected on the stream.
Now we will examine our Lambda function code which is written in Node.js 4.3. The section of the Lambda function shown below loops through the batch of tweet records from our Kinesis stream, parses each record, and writes desired tweet information into an array of JSON data. The array of the JSON tweet items is passed to the function, ddbItemsWrite which is outside of our Lambda handler.
'use strict';
console.log('Loading function');

var timestamp;
var twitterID;
var tweetData;
var ddbParams;
var itemNum = 0;
var dataItemsBatch = [];
var dbBatch = [];
var AWS = require('aws-sdk');
var ddbTable = 'TwitterStream';
var dynamoDBClient = new AWS.DynamoDB.DocumentClient();

exports.handler = (event, context, callback) => {
    var counter = 0;

    event.Records.forEach((record) => {
        // Kinesis data is base64 encoded so decode here
        console.log("Base 64 record: " + JSON.stringify(record, null, 2));
        const payload = new Buffer(record.kinesis.data, 'base64').toString('ascii');
        console.log('Decoded payload:', payload);

        var data = payload.replace(/[\u0000-\u0019]+/g," ");
        try
        {  tweetData = JSON.parse(data);   }
        catch(err)
        {  callback(err, err.stack);   }

        timestamp = "" + new Date().getTime();
        twitterID = tweetData.id.toString();
        itemNum = itemNum+1;

         var ddbItem = {
                PutRequest: {
                    Item: {
                        TwitterID: twitterID,
                        TwitterUser: tweetData.username.toString(),
                        TwitterUserPic: tweetData.pic,
                        TwitterTime: new Date(tweetData.time.replace(/( \+)/, ' UTC$1')).toLocaleString(),
                        Tweet: tweetData.text,
                        TweetTopic: tweetData.topic,
                        Tags: (tweetData.hashtags) ? tweetData.hashtags : " ",
                        Location: (tweetData.loc) ? tweetData.loc : " ",
                        Country: (tweetData.country) ? tweetData.country : " ",
                        TimeStamp: timestamp,
                        RecordNum: itemNum
                    }
                }
            };

            dataItemsBatch.push(ddbItem);
            counter++;
});

    var twitterItems = {};
    twitterItems[ddbTable] = dataItemsBatch;
    ddbItemsWrite(twitterItems, 0, context, callback);

};
The ddbItemsWrite function shown below will take the array of JSON tweet records processed from the Kinesis stream, and write the records multiple items at a time to our DynamoDB table using batch operations. This function leverages the DynamoDB best practice of retrying unprocessed items by implementing an exponential backoff algorithm to prevent write request failures due to throttling on the individual tables.
 function ddbItemsWrite(items, retries, ddbContext, ddbCallback)
    {
        dynamoDBClient.batchWrite({ RequestItems: items }, function(err, data)
            {
                if (err)
                {
                    console.log('DDB call failed: ' + err, err.stack);
                    ddbCallback(err, err.stack);
                }
                else
                {
                    if(Object.keys(data.UnprocessedItems).length)
                    {
                        console.log('Unprocessed items remain, retrying.');
                        var delay = Math.min(Math.pow(2, retries) * 100, ddbContext.getRemainingTimeInMillis() - 200);
                        setTimeout(function() {ddbItemsWrite(data.UnprocessedItems, retries + 1, ddbContext, ddbCallback)}, delay);
                    }
                    else
                    {
                         ddbCallback(null, "Success");
                         console.log("Completed Successfully");
                    }
                }
            }
        );
    }
Currently, this Lambda function works as expected and will successfully process tweets captured in Kinesis from the Twitter Streaming API, however, this function has a flaw that will cause an error to occur when processing batch write requests to our DynamoDB table. In the Lambda function, the current code does not take into account that the DynamoDB batchWrite function should be comprised of no more than 25 write (put) requests per single call to this function up to 16 MB of data. Therefore, without changing the code appropriately to have the ddbItemsWrite function to handle batches of 25 or have the handler function put items in the array in groups of 25 requests before sending to the ddbItemsWrite function; there will be a validation exception thrown when the batch of tweets items sent is greater than 25. This is a great example of a bug that is not easily detected in small-scale testing scenarios yet will cause failures under production load.
Dead Letter Queues
Now that we are aware of an event that will cause the ddbItemsWrite Lambda function to throw an exception and/or an event that will fail while processing records, we have a first-rate scenario for leveraging Dead Letter Queues (DLQ).
Since AWS Lambda DLQ functionality is only available for asynchronous event sources like Amazon S3, Amazon SNS, AWS IoT or direct asynchronous invocations, and not for streaming event sources such as Amazon Kinesis or Amazon DynamoDB streams; our first step is to break this Lambda function into two functions. The first Lambda function will handle the processing of the Kinesis stream, and the second Lambda function will take the data processed by the first function and write the tweet information to DynamoDB. We will then setup our DLQ on the second Lambda function for the error that will occur on writing the batch of tweets to DynamoDB as noted above.
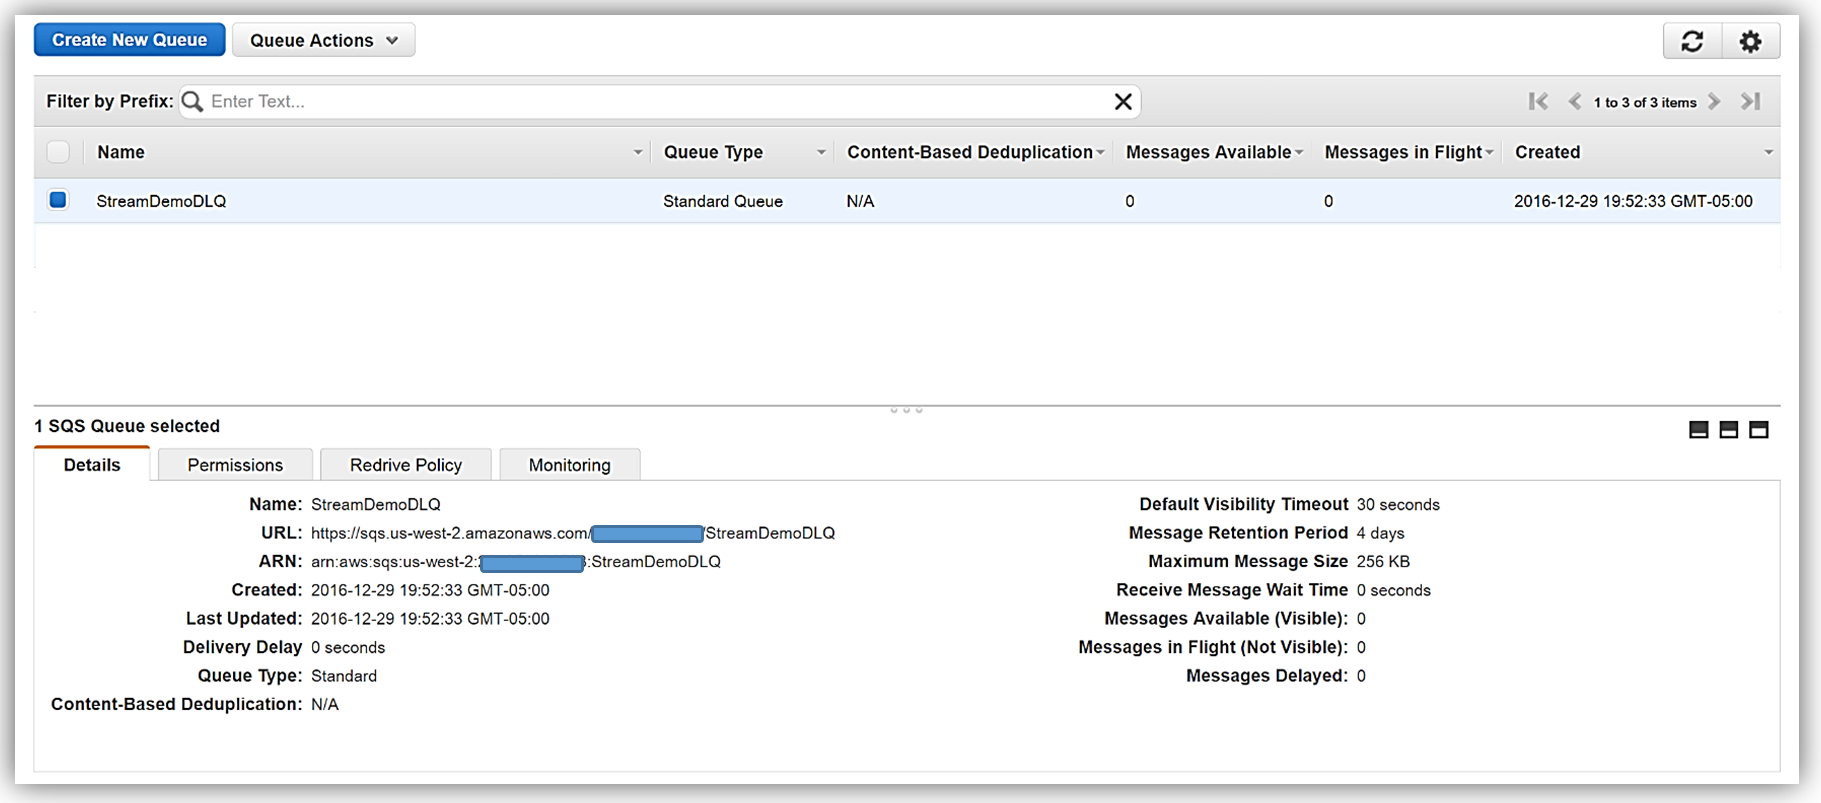
We have two options when setting up a target for our DLQ; Amazon SNS topic or an Amazon SQS queue. In this walk-through, we will opt for using an Amazon SQS queue. Therefore, my first step in using DLQ is to create a SQS Standard queue. A Standard queue type is a queue which has high transactions throughput, a message will be delivered at least once, but another copy of the message may also be delivered, and it is possible that messages might be delivered in an order different from which they were sent. You can learn more about creating SQS queues and queue type in the Amazon SQS documentation.
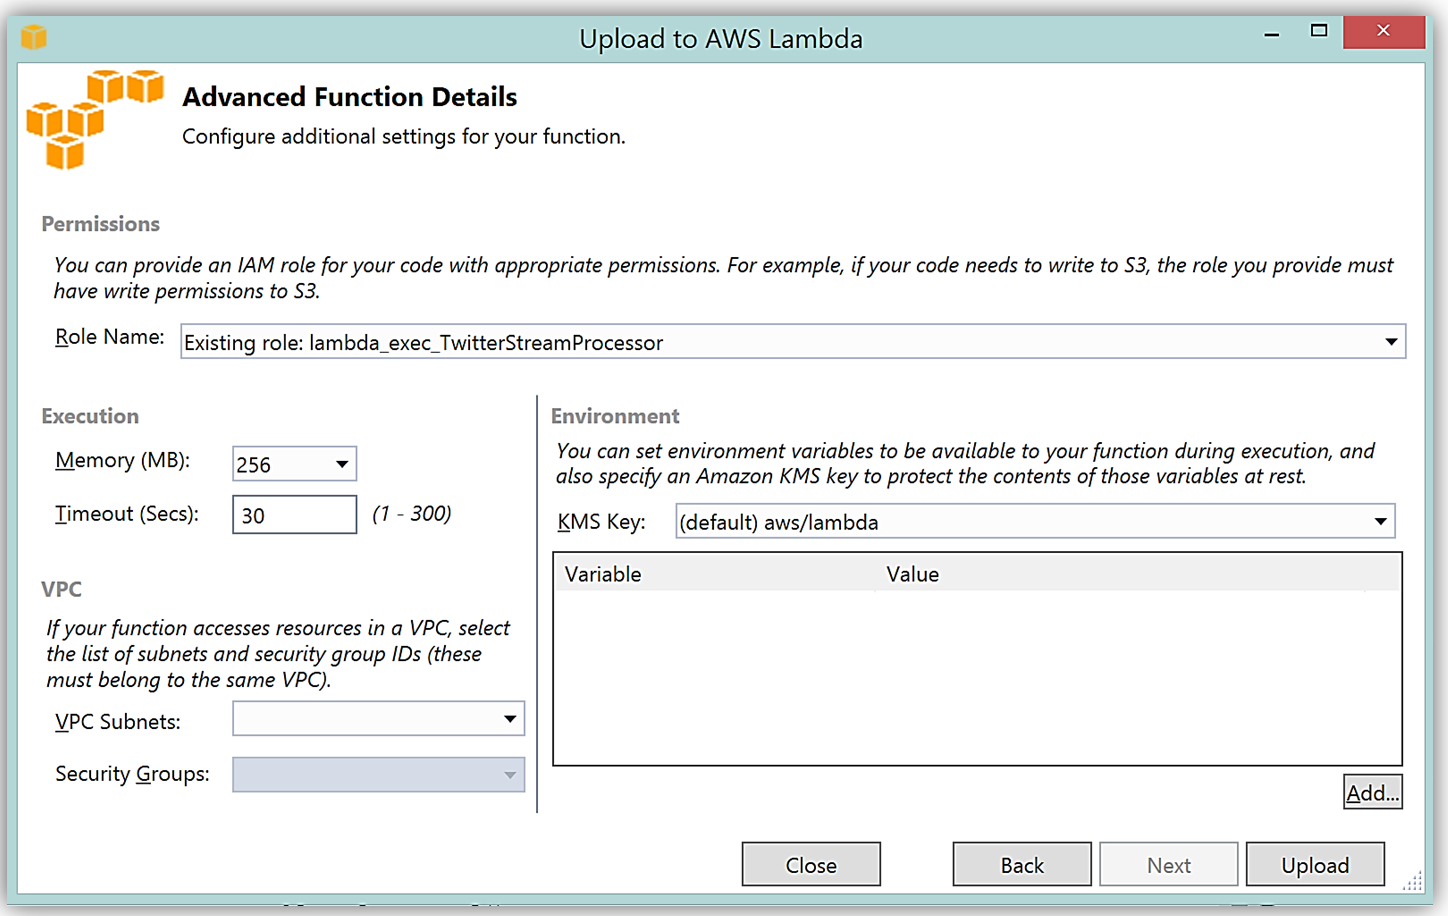
Once my queue, StreamDemoDLQ, is created, I will grab the ARN from the Details tab of this selected queue. If I am not using the console to designate the DLQ resource for this function, I will need the ARN for the queue for my Lambda function to identify this SQS queue as the DLQ target for error and event failure notifications. Additionally, I will use the ARN to add permissions to my Lambda execution role policy in order to access this SQS queue.
I will now return to my Lambda function and select the Configuration tab and expand the Advanced settings section. I will select SQS in the DLQ Resource field and select my StreamDemoDLQ queue in the SQS Queue field dropdown.
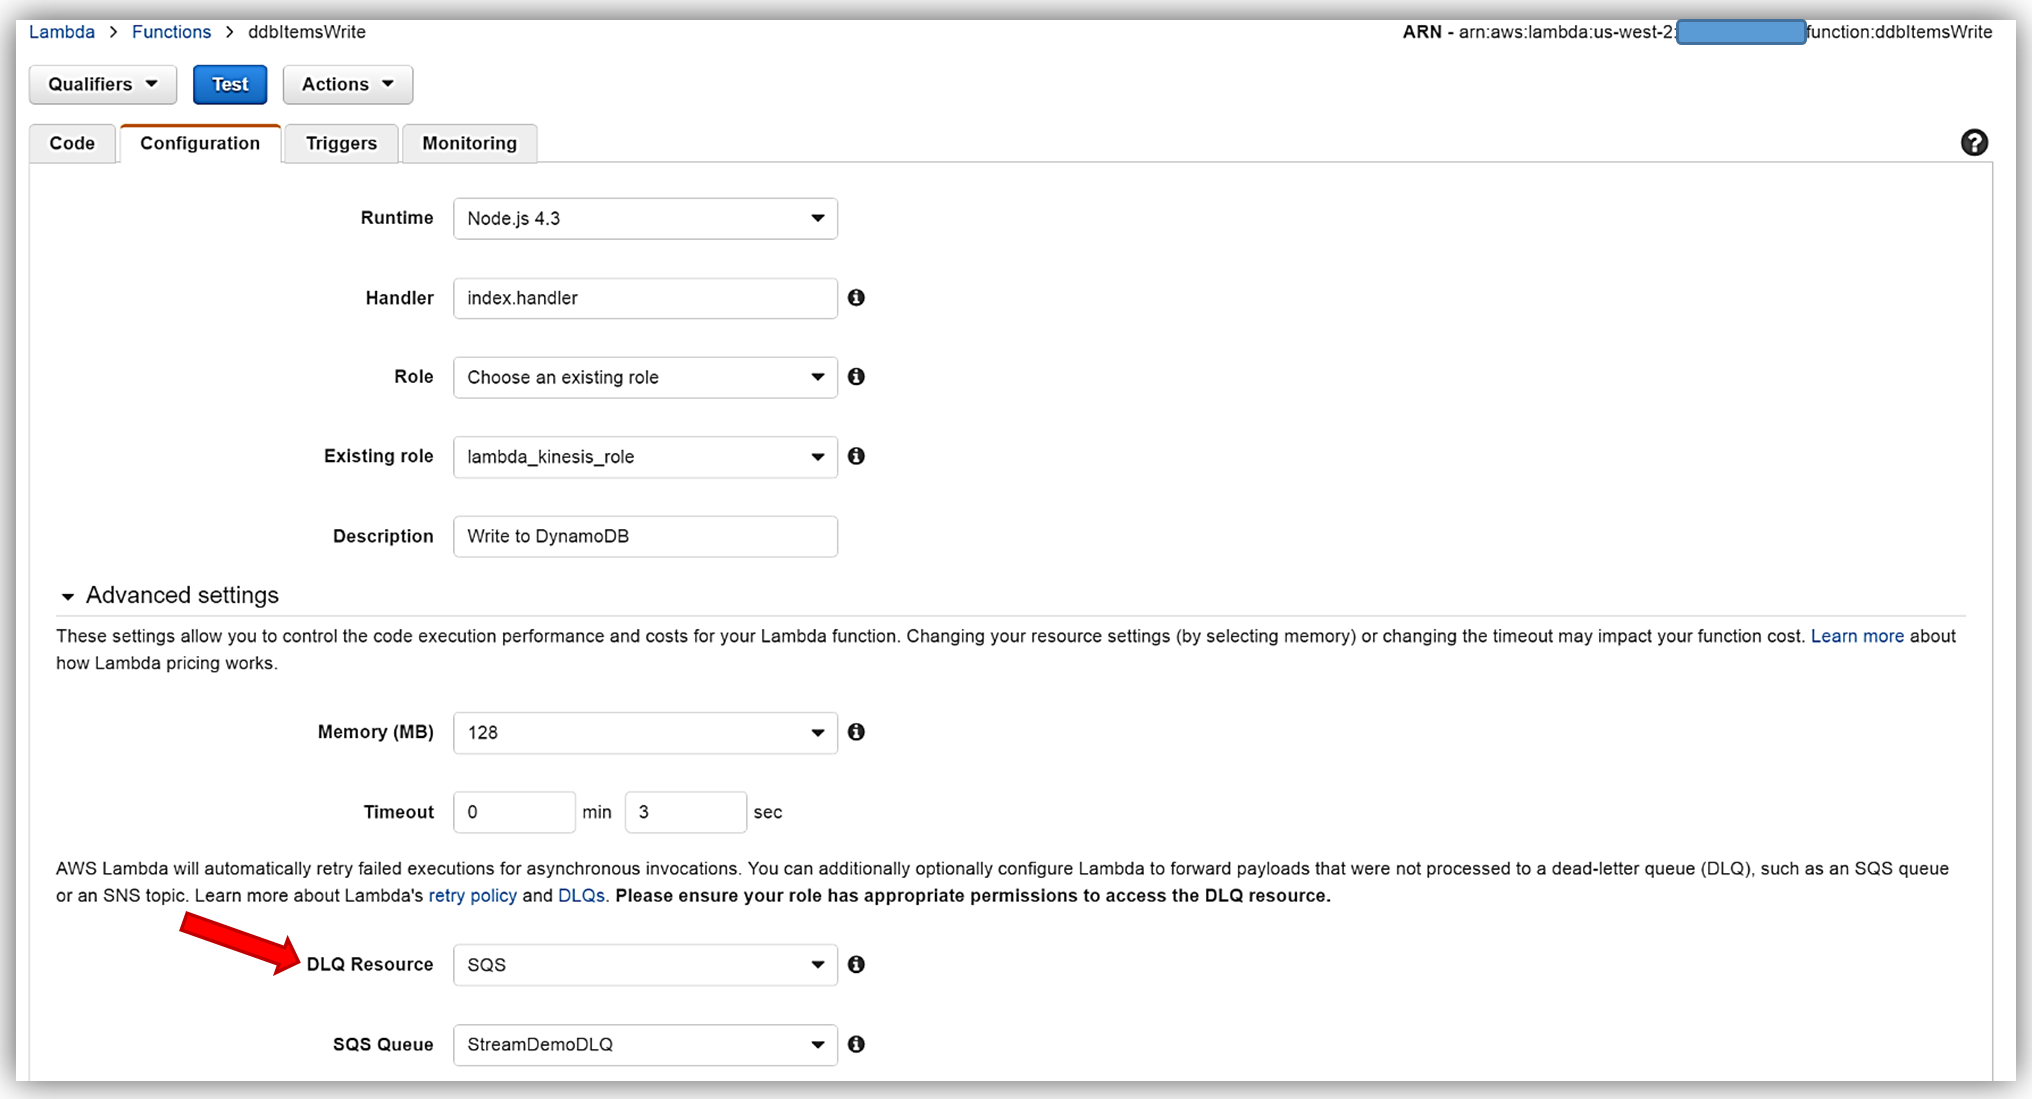
Remember, the execution role for the Lambda function must explicitly provide sqs:SendMessage access permissions to in order to successfully send messages to your SQS DLQ. Therefore, I ensured that my Lambda role, lambda_kinesis_role, has the following IAM policy for SQS permissions.

We have now successfully configured a Dead Letter Queue for our Lambda function using Amazon SQS. To learn more about Dead Letter Queues in Lambda, read the Troubleshooting and Monitoring section of the AWS Lambda Developer Guide and check out the AWS Compute Blog post on Dead Letter Queues.
C# Support
As I mentioned earlier, another very exciting feature added to Lambda during AWS re:Invent was the support for the C# language via the open source .NET Core 1.0 platform. Since the Lambda console does not offer editing for compiled languages yet, in order to author a C# Lambda function you can use tooling in Visual Studio with the AWS Toolkit, Yeoman, and/or the .NET CLI. To deploy Lambda functions written in C#, you can use the Lambda plugin in the AWS ToolKit for Visual Studio or create a deployment package with the .NET Core command line.
A C# Lambda function handler should be defined as an instance or static method in a class. There are two handler function parameters; the first is the input type which is the event data and second is the Lambda context object of type ILambdaContext. The event data input object types for AWS Services include the following:
- Amazon.Lambda.APIGatewayEvents
- Amazon.Lambda.CognitoEvents
- Amazon.Lambda.ConfigEvents
- Amazon.Lambda.DynamoDBEvents
- Amazon.Lambda.KinesisEvents
- Amazon.Lambda.S3Events
- Amazon.Lambda.SNSEvents
Now that we have discussed more detail around C# Support in Lambda, let’s rewrite our DevDayStreamProcessor lambda function with the C# language. For this example, I will use Visual Studio IDE to write the Lambda function, and additionally take advantage of the AWS Lambda Visual Studio plugin to deploy the function. Remember in order to use the AWS Toolkit for Visual Studio with Lambda, you will need to have Visual Studio 2015 Update 3 version and NET Core tools. You can read more about installing Visual Studio 2015 Update 3 and .NET Core here.
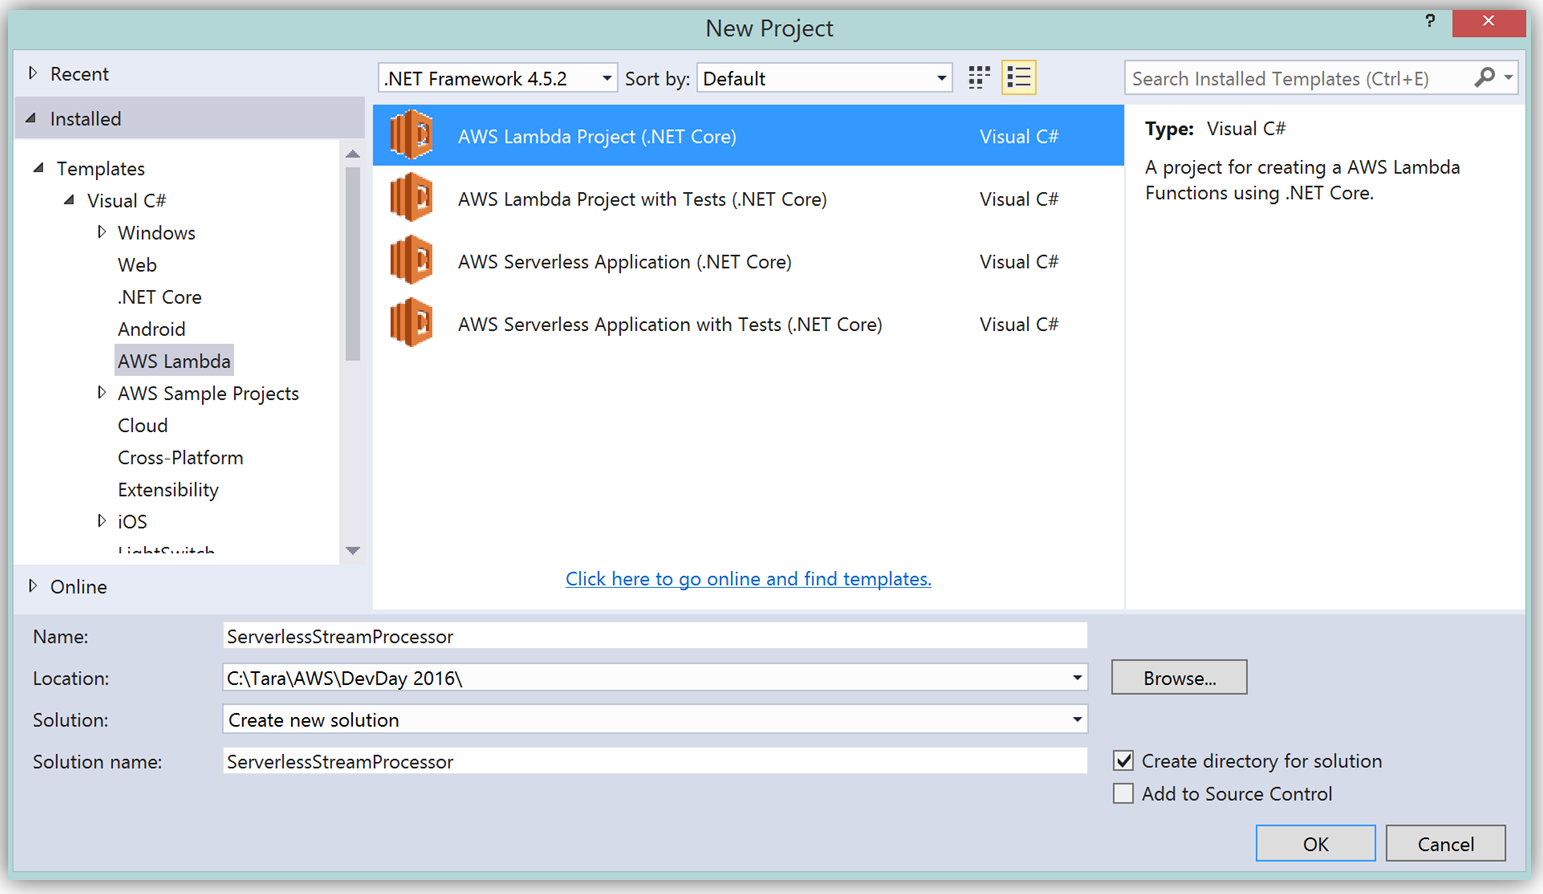
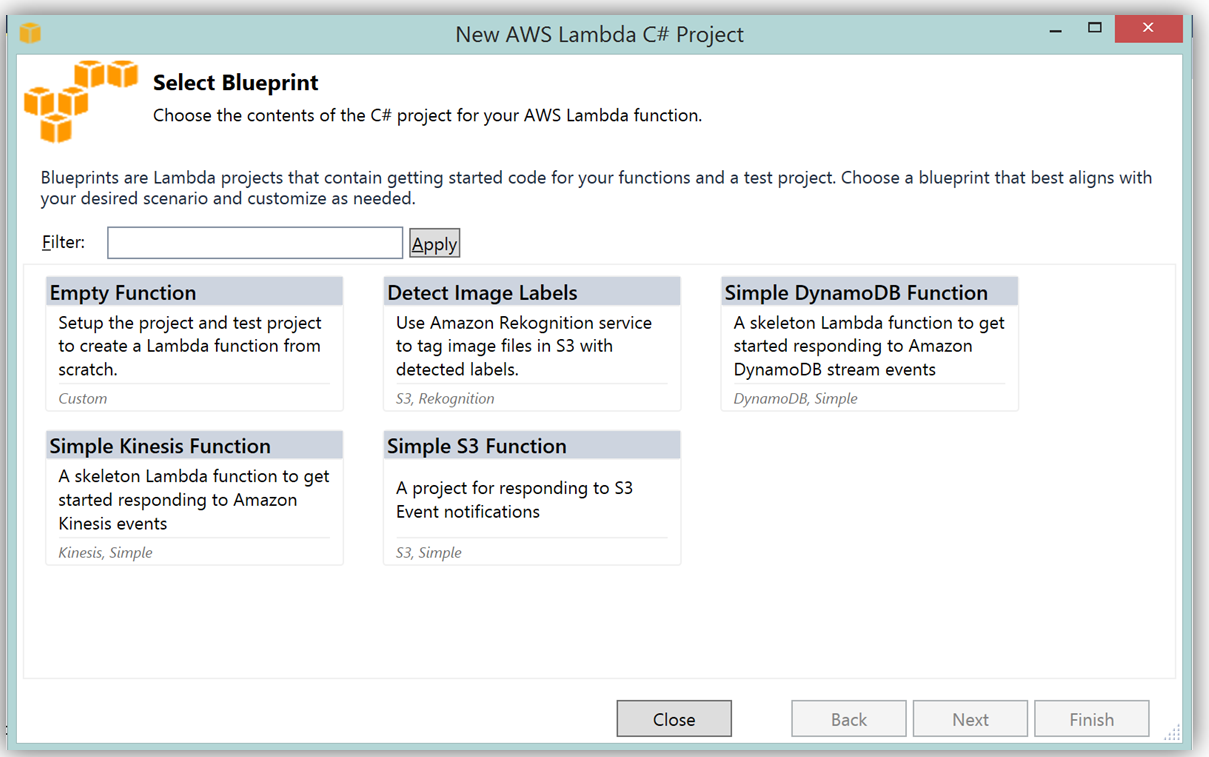
To create the C# function using Visual Studio, I start a New Project, select AWS Lambda Project (.NET Core) and name it ServerlessStreamProcessor.
What’s really cool about taking advantage of the AWS Toolkit for Visual Studio to author this function, is that inside of Visual Studio I can use Lambda blueprints to get started in a similar way that I would in using the Lambda console. Therefore in order to replicate the DevDayStreamProcessor in C#, I will select the Simple Kinesis Function blueprint.
It should be noted that when writing Lambda functions in C#, there is no need to mark the class declaration nor the target handler function as a Lambda function. Additionally, when writing CloudWatch logs you can use the standard C# Console class WriteLine function or use the ILambdaContext LogLine function found as a part of the ILambdaContext interface. With the template for accessing the Kinesis stream in place, I finish writing the C# Lambda function, ServerlessStreamProcessor, utilizing the same variable names as in the Node.js code in DevDayStreamProcessor. Please note the C# Lambda handler function below.
using System.Collections.Generic;
using Amazon.Lambda.Core;
using Amazon.Lambda.KinesisEvents;
using Amazon.DynamoDBv2;
using Amazon.DynamoDBv2.DataModel;
using Newtonsoft.Json.Linq;

// Assembly attribute to enable the Lambda function's JSON input to be converted into a .NET class.
[assembly: LambdaSerializerAttribute(typeof(Amazon.Lambda.Serialization.Json.JsonSerializer))]

namespace ServerlessStreamProcessor
{
    public class LambdaTwitterStream
    {
        string twitterID, timeStamp;
        int itemNum = 0;

        private static AmazonDynamoDBClient dynamoDBClient = new AmazonDynamoDBClient();
        List<TwitterItem> dataItemsBatch = new List<TwitterItem>();

        public void FunctionHandler(KinesisEvent kinesisEvent, ILambdaContext context)
        {
            DynamoDBContext dbContext = new DynamoDBContext(dynamoDBClient);
            context.Logger.LogLine($"Beginning to process {kinesisEvent.Records.Count} records...");

            foreach (var record in kinesisEvent.Records)
            {
                context.Logger.LogLine($"Event ID: {record.EventId}");
                context.Logger.LogLine($"Event Name: {record.EventName}");

                // Kinesis data is base64 encoded so decode here
                string tweetData = GetRecordContents(record.Kinesis);
                context.Logger.LogLine($"Decoded Payload: {tweetData}");
                tweetData = @"" + tweetData;
                JObject twitterObj = JObject.Parse(tweetData);

                twitterID = twitterObj["id"].ToString();
                timeStamp = DateTime.Now.Millisecond.ToString();
                itemNum++;
                context.Logger.LogLine(timeStamp);
                context.Logger.LogLine($"Twitter ID is: {twitterID}");
                context.Logger.LogLine(itemNum.ToString());

                TwitterItem ddbItem = new TwitterItem()
                {
                    TwitterID = twitterID,
                    TwitterUser = twitterObj["username"].ToString(),
                    TwitterUserPic = twitterObj["pic"].ToString(),
                    TwitterTime = DateTime.Parse(twitterObj["time"].ToString()).ToUniversalTime().ToString(),
                    Tweet = twitterObj["text"].ToString(),
                    TweetTopic = twitterObj["topic"].ToString(),
                    Tags = twitterObj["hashtags"] != null ? twitterObj["hashtags"].ToString() : String.Empty,
                    Location = twitterObj["loc"] != null ? twitterObj["loc"].ToString() : String.Empty,
                    Country = twitterObj["country"] != null ? twitterObj["country"].ToString() : String.Empty,
                    TimeStamp =  timeStamp,
                    RecordNum = itemNum
                };

                dataItemsBatch.Add(ddbItem);
            }

            context.Logger.LogLine(JObject.FromObject(dataItemsBatch).ToString());
            ddbItemsWrite(dataItemsBatch, 0, dbContext, context);
            context.Logger.LogLine("Success - Completed Successfully");
            context.Logger.LogLine("Stream processing complete.");
        }
There are only a few differences that should be noted between our Kinesis stream processor written in C# and our original Node.js code. Since the input parameter type supported by default in C# Lambda functions is the System.IO.Stream type, the Kinesis base64 string is decoded by using a StreamReader with ASCII encoding in a blueprint provided function, GetRecordContents.
private string GetRecordContents(KinesisEvent.Record streamRecord)
{
    using (var reader = new StreamReader(streamRecord.Data, Encoding.ASCII))
    {
        return reader.ReadToEnd();
    }
}
The other thing to note is that in order to write the tweet data to the DynamoDB Table, I added the AWS .NET SDK NuGet package for DynamoDB; AWSSDK.DynamoDBv2 to the Lambda function project via the NuGet package manager within Visual Studio. I also created a .NET data object, TwitterItem, to map to the data being stored in the DynamoDB table. Using the AWS .NET SDK higher level programming interface, object persistence model for DynamoDB, I created a collection of TwitterItem objects to be written via the BatchWrite object class in our ddbItemsWrite C# function.
private async void ddbItemsWrite(List<TwitterItem> items, int retries, DynamoDBContext ddbContext, ILambdaContext context)
{
BatchWrite<TwitterItem> twitterStreamBatchWrite = ddbContext.CreateBatchWrite<TwitterItem>();

        try
        {
            twitterStreamBatchWrite.AddPutItems(items);
            await twitterStreamBatchWrite.ExecuteAsync();
        }
        catch (Exception ex)
        {
            context.Logger.LogLine($"DDB call failed: {ex.Source} ");
            context.Logger.LogLine($"Exception: {ex.Message}");
            context.Logger.LogLine($"Exception Stacktrace: {ex.StackTrace}");
        }
}
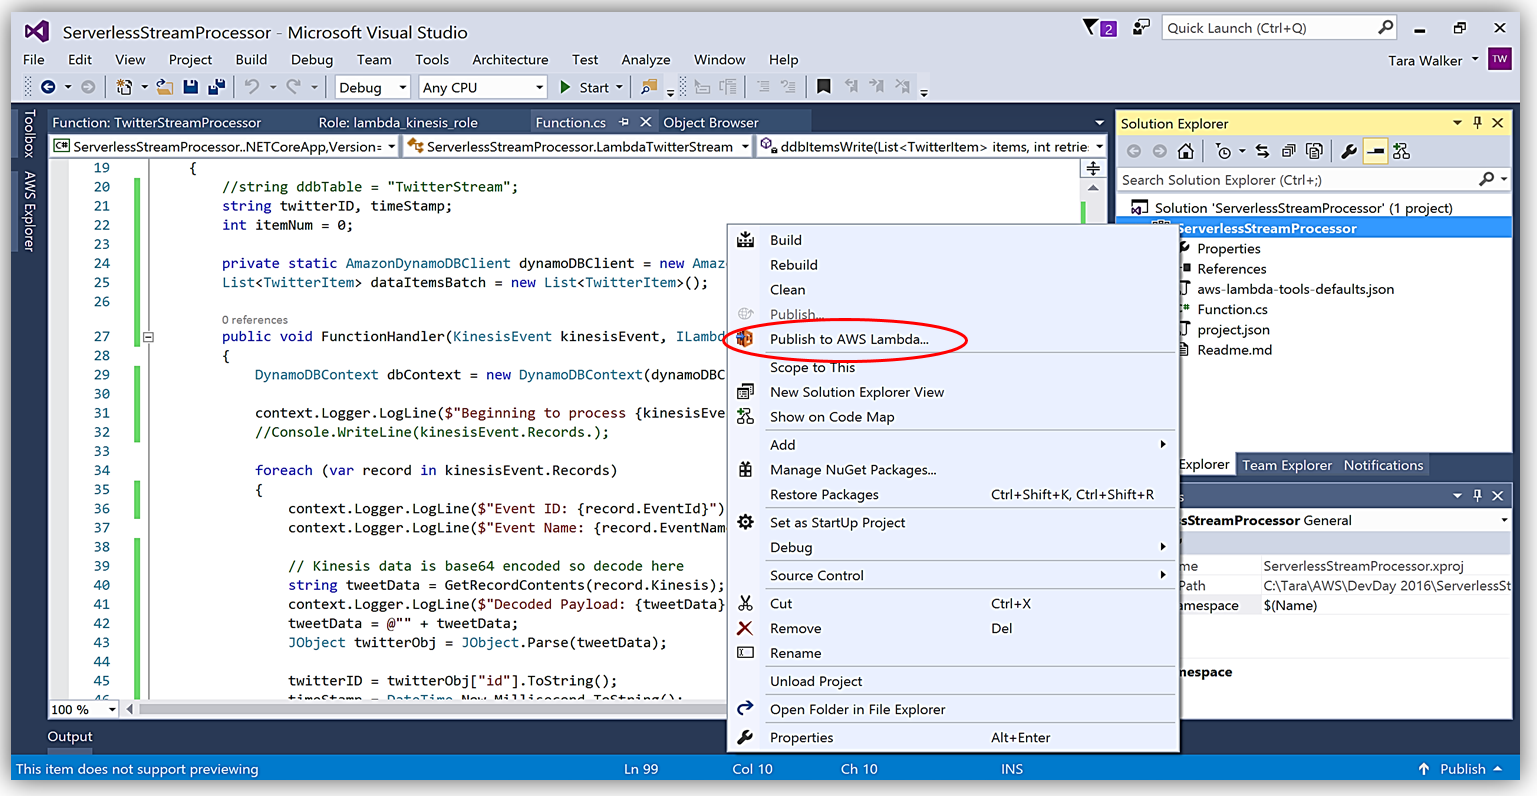
Another benefit of using AWS Toolkit for Visual Studio to author my C# Lambda function is that I can deploy my Lambda function directly to AWS with a single click. Selecting my project name in the Solution Explorer and performing a right-click, I get a menu option, Publish to AWS Lambda, which brings up a menu for information to include about my Lambda function for deployment to AWS.
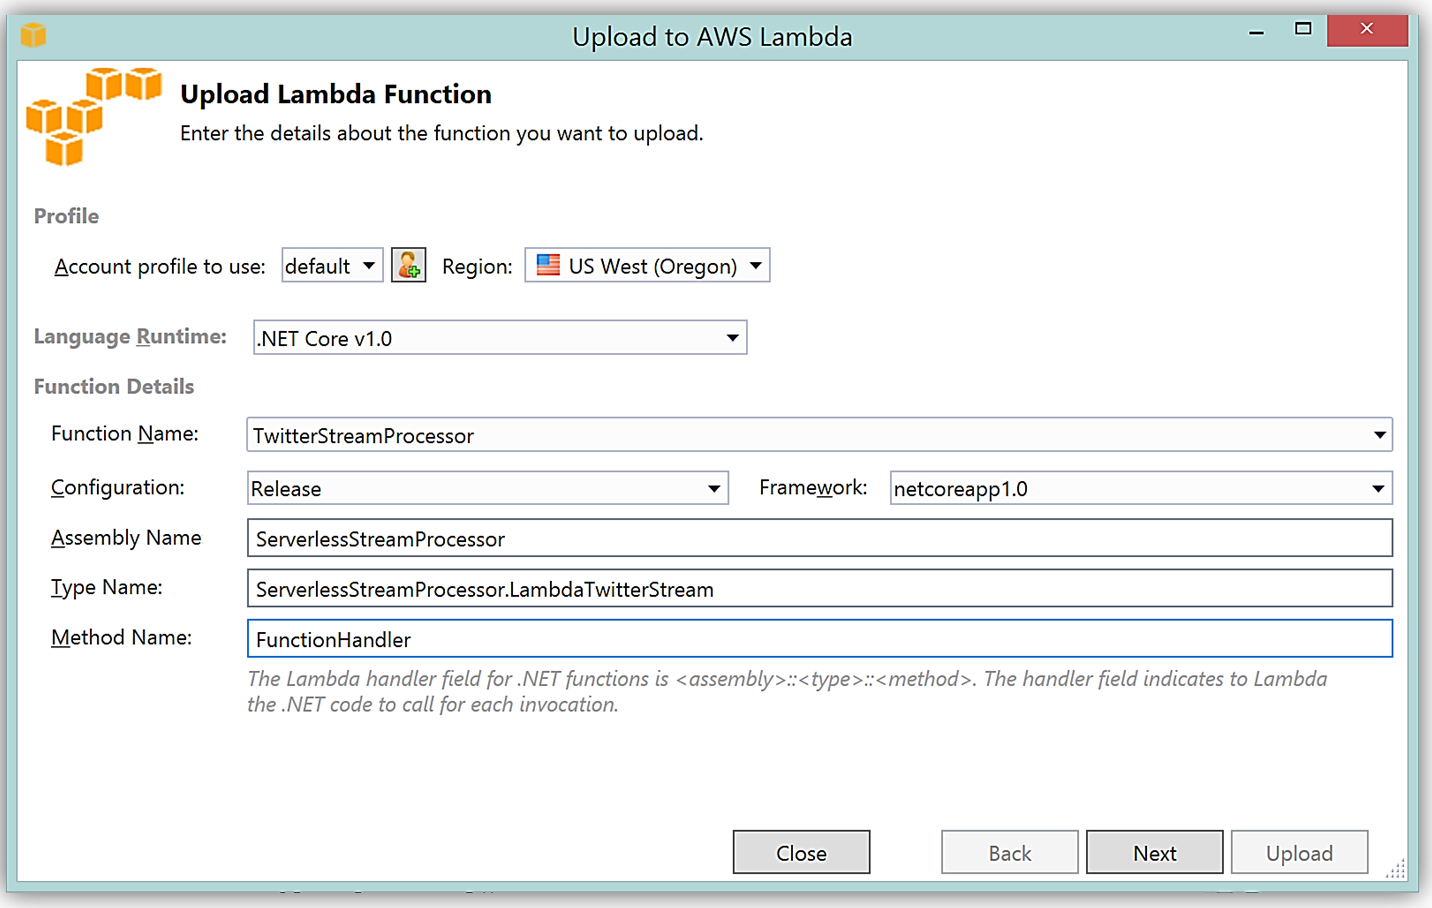
It is important to note that the handler function signature follows the nomenclature of Assembly :: Namespace :: ClassName :: Method, therefore, the signature of our C# Lambda function shown here is: ServerlessStreamProcessor :: ServerlessStreamProcessor.LambdaTwitterStream :: FunctionHandler. We provide this information to the Upload to AWS Lambda dialog box and select Next to assign a role for the function.
Upon completion, you can test in the Lambda console or in Visual Studio with AWS toolkit provided plugin (shown below) using the sample data of the triggering event source for an iterative approach to developing the Lambda function.
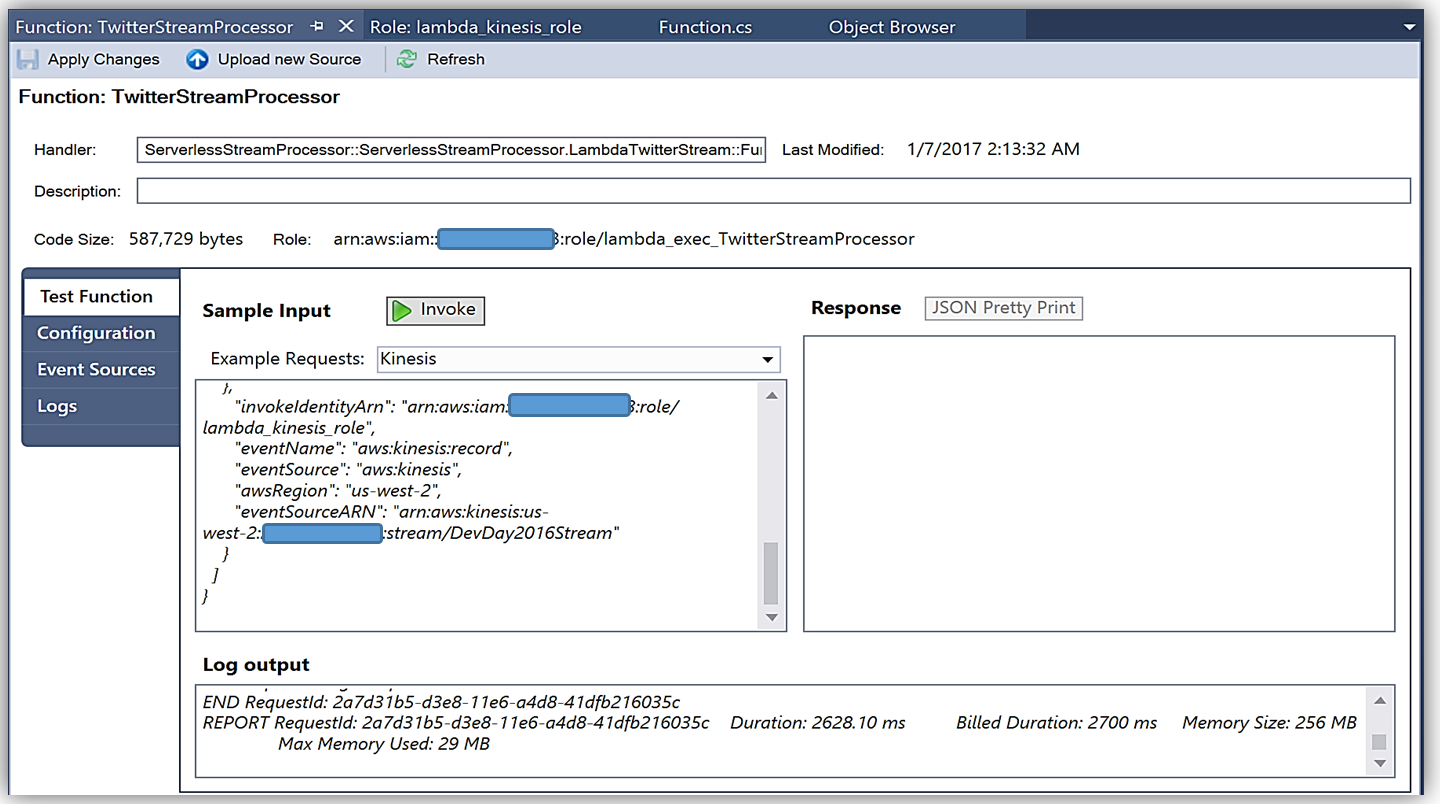
You can learn more about authoring AWS Lambda functions using the C# Language in the AWS Lambda developer guide or by reading the post announcing C# Support on the Compute Blog.
API Gateway Monetization and Developer Portal
If you have been following the microservices momentum, you may be aware of an architectural pattern that calls for using smart endpoints and/or using an API gateway via REST APIs to manage access and exposure of individual services that make up a microservices solution. Amazon API Gateway enables creation and management of RESTful APIs to expose AWS Lambda functions, external HTTP endpoints, as well as, other AWS services. In addition, Amazon API Gateway allows clients and external developers to have access to a deployed APIs by via HTTP protocol or a platform/language targeted SDK.
With the introduction of SaaS Subscriptions on AWS Marketplace and the API Gateway integration with the AWS Marketplace, you can now monetize your APIs by allowing customers to directly consume the APIs you create with API Gateway in the AWS Marketplace. AWS customers can subscribe and be billed for the APIs published on the marketplace with their existing AWS account. With the integration of API Gateway with the AWS Marketplace, the process to get started is easy on the AWS Marketplace.
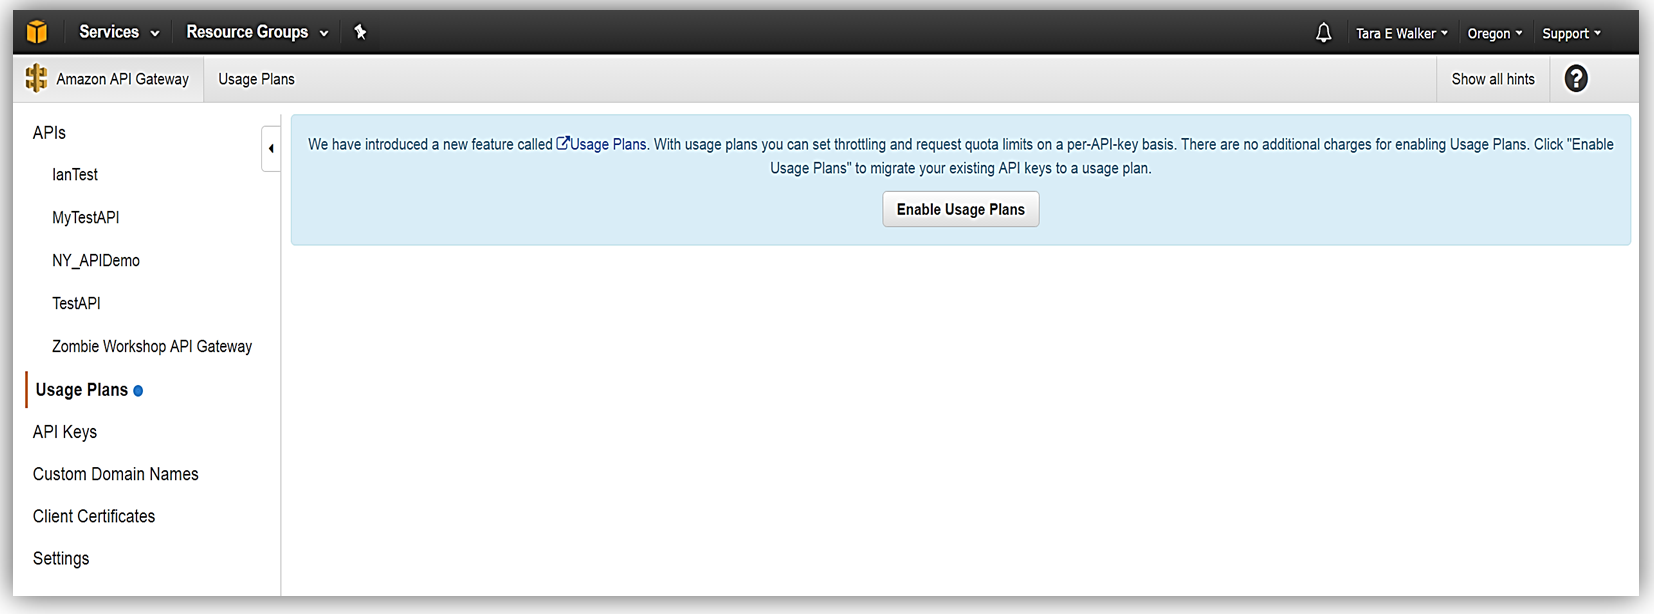
To get started, you must ensure that you have enabled the Usage Plan feature in Amazon API Gateway.
Once enabled the next step is to create a Usage Plan, enable throttling (if desired) with targeted rate and burst request thresholds, and finally enable quotas (if you choose) by providing targeted request quota per a set timeframe.

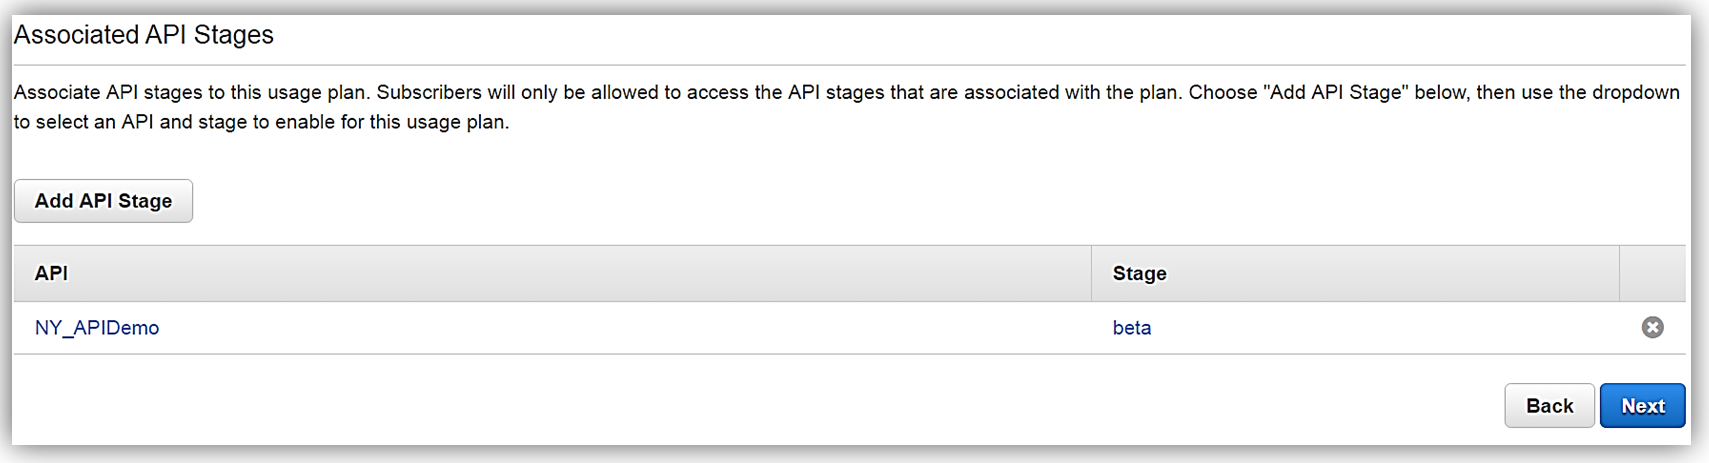
Next, we would choose our APIs and related stage(s) that we wish to be associated with the usage plan. Please note that this is an optional step as you can opt not associate a specific API with your usage plan.
All that is left to do is add or create an API key for the usage plan. Again, it should be noted that this is also an optional step in creating your usage plan.

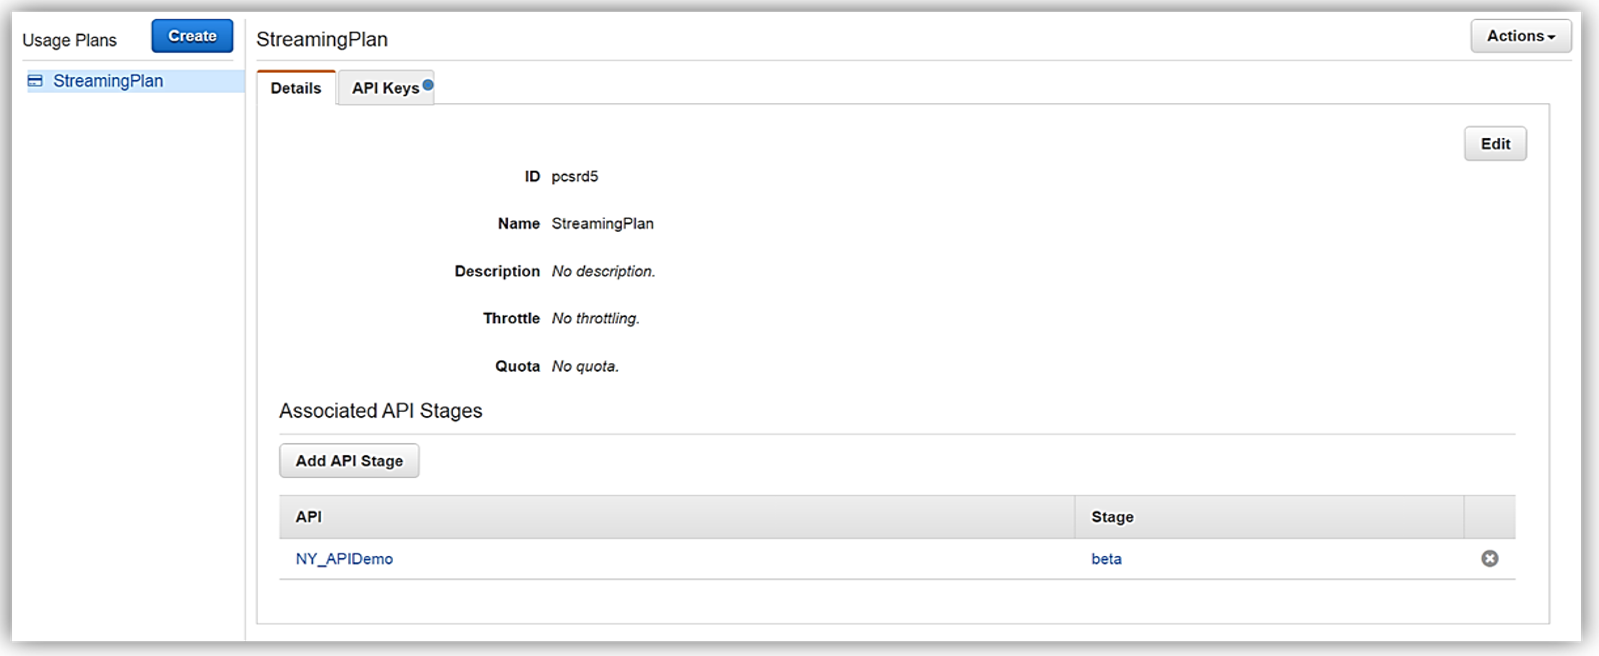
Now that we have our usage plan, StreamingPlan, we are ready for the next step in preparation for selling our API on the marketplace. You have the option to create multiple usage plans with varying APIs and limits, and sell these plans as differentiated API products on AWS Marketplace.
In order to enable customers to buy our new API product, however, the AWS Marketplace requires that each API product has an external developer portal to handle subscription requests, provide API information details and ability for the management of usage.
This customer need for an external developer portal for the marketplace birthed the new open source API Gateway developer portal serverless web application implementation. The goal of the API Gateway developer portal project was to allow customers to follow a few easy steps to create a serverless web application that lists a catalog of your APIs built with API Gateway while allowing for developer signups.
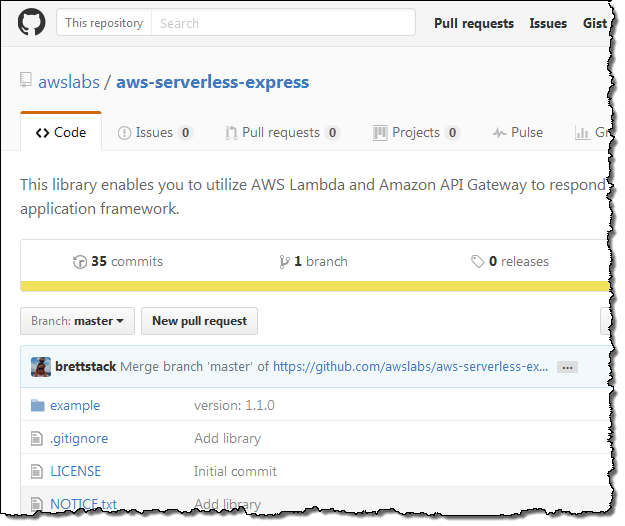
The API Gateway developer portal was built upon AWS Serverless Express; an open source library published by AWS which aids you in utilizing AWS Lambda and Amazon API Gateway in building web applications/services with the Node.js Express framework. Additionally, the API Gateway developer portal application uses an AWS SAM (Serverless Application Model) template to deploy its serverless resources. AWS SAM is a simplified CloudFormation template and specification that allows easier management and deployment of serverless applications on AWS.
To build your developer portal using the API Gateway portal, you would start by cloning the aws-api-gateway-developer-portal project from GitHub.
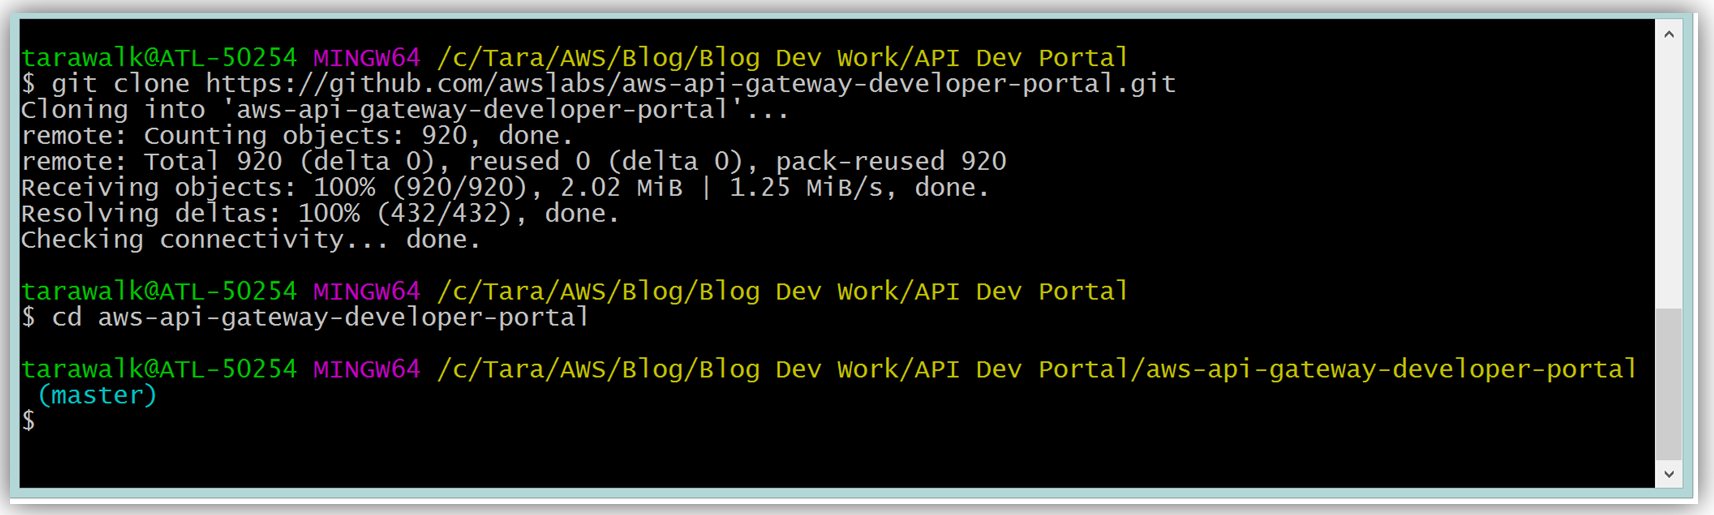
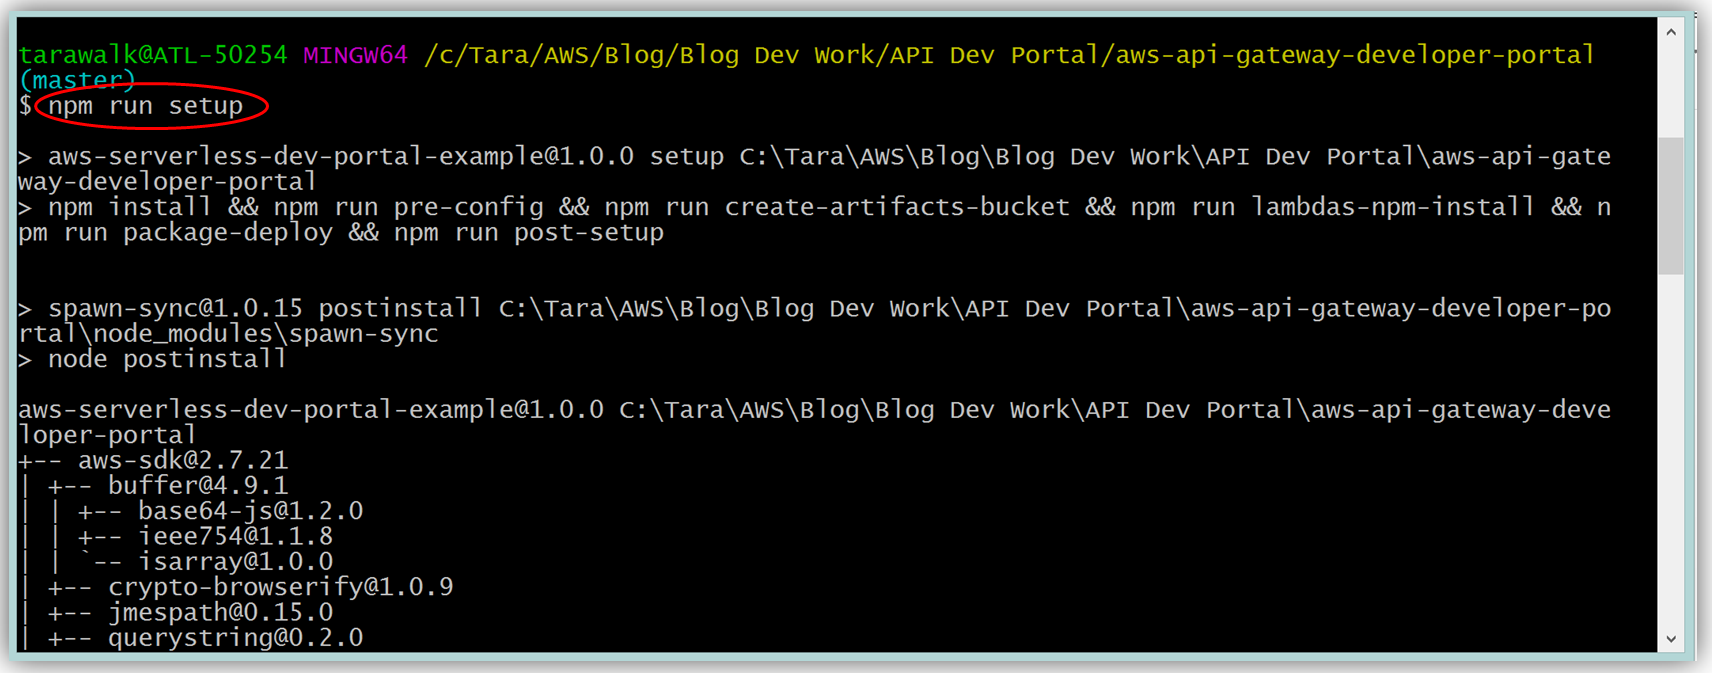
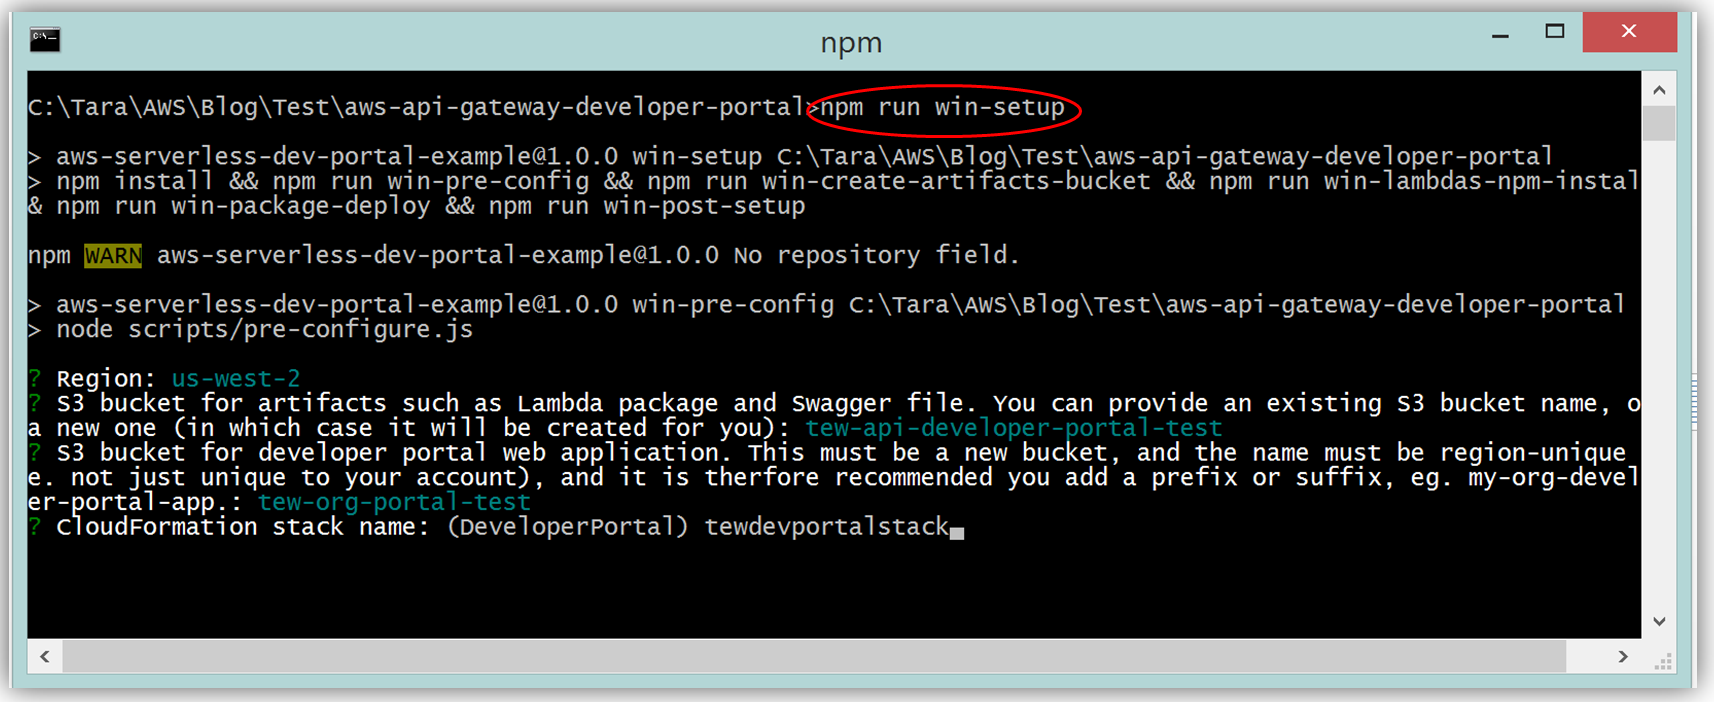
Assuming you have the latest version of the AWS CLI and Node.js installed, you would setup the developer portal by running “npm run setup” on the command line for Mac and Linux OS users. For Windows users, you would run “npm run win-setup” on the command line setup the developer portal.
The result is a functional sample developer portal website running on S3 that you can customize in order to create your own developer portal for your APIs.
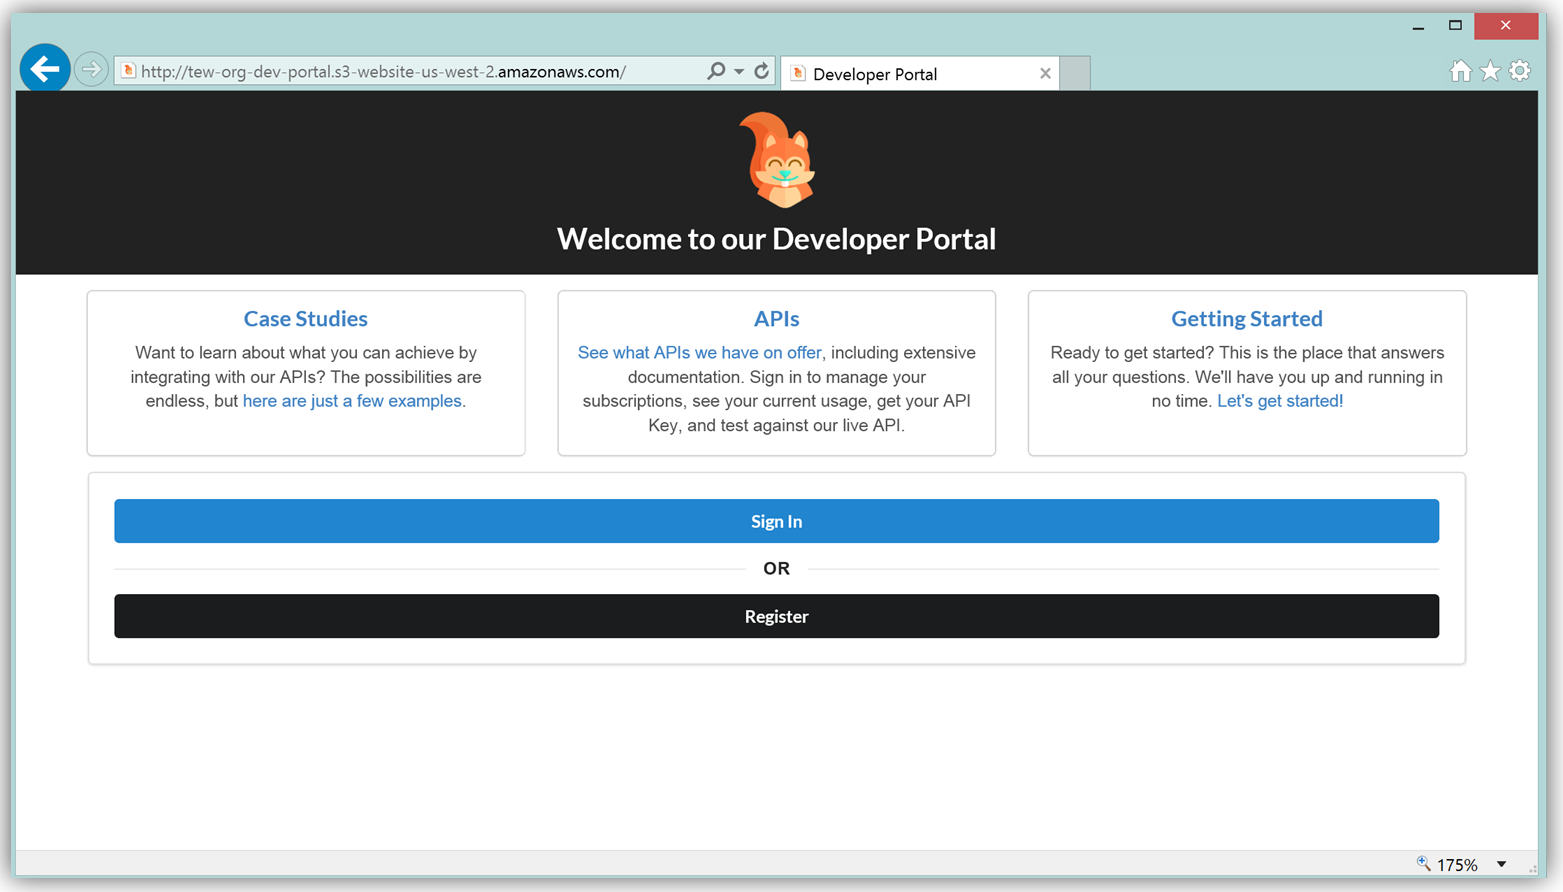
The frontend of the sample developer portal website is built with the React JavaScript library, and the backend is an AWS Lambda function running using the aws-serverless-express library. Additionally, a Lambda function with a SNS event source was created as a listener for notification when customers subscribe or unsubscribe to your API via the AWS Marketplace console. You can learn more about the steps to build, customize, and deploy your API Gateway developer portal web application with this reference project by visiting the AWS Compute blog post which discusses the architecture and implementation in more detail.
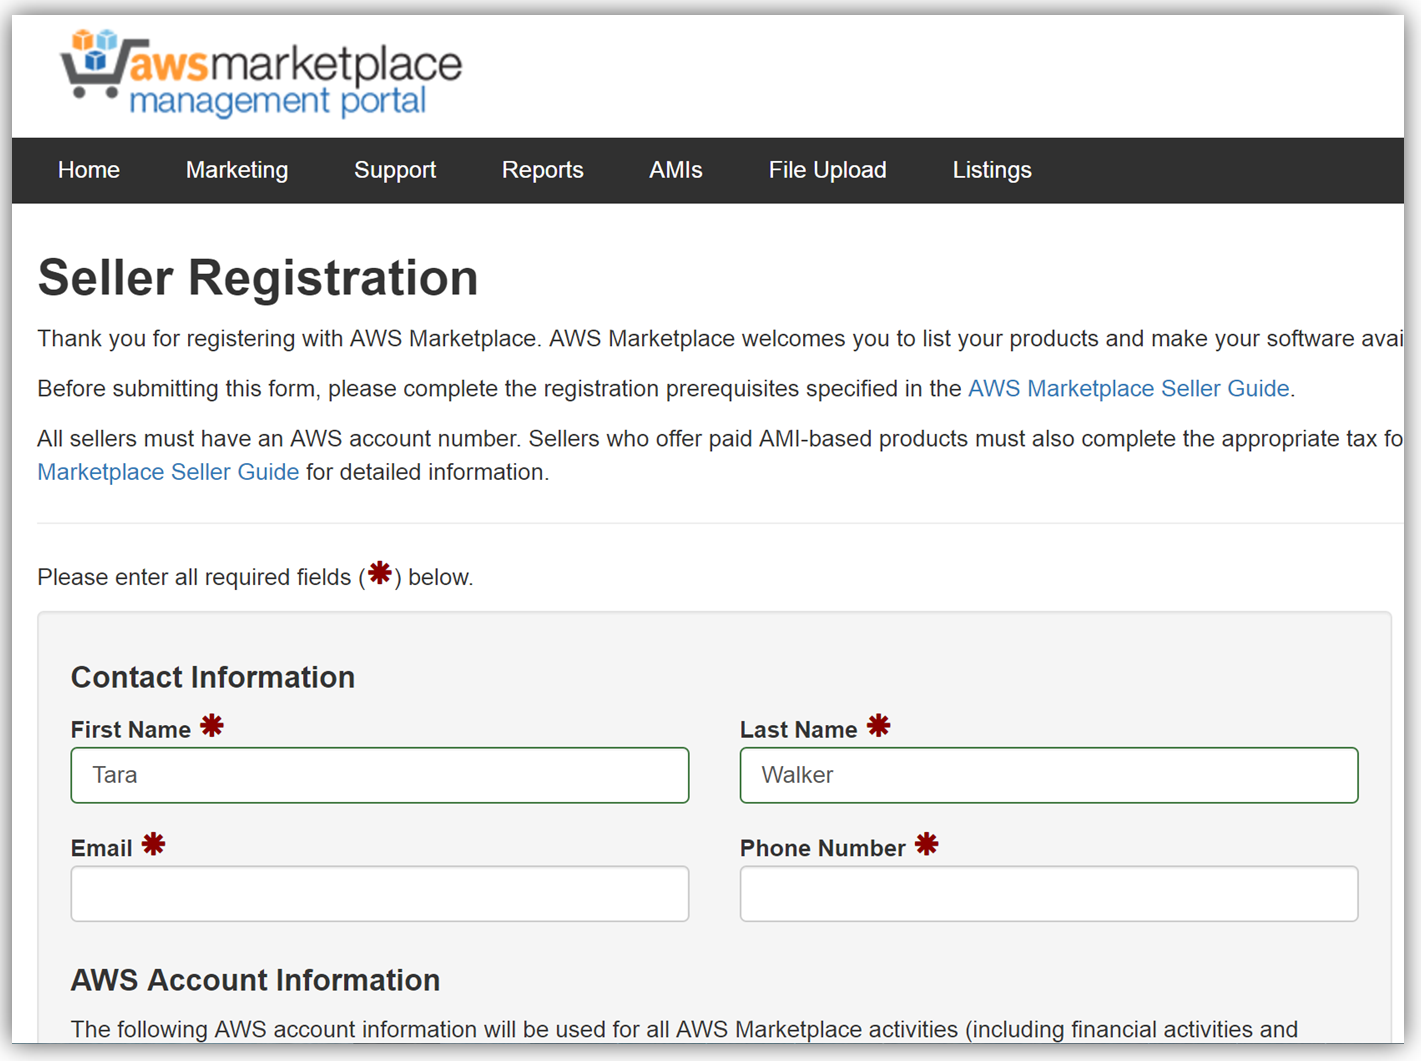
The next key step in monetizing our API is establishing an account on the AWS Marketplace. If an account is not already established, registering is simply verifying that you meet the requirement prerequisites provided in the AWS Marketplace Seller Guide and completing a seller registration form on the AWS Marketplace Management Portal. You can see a snapshot of the start of the seller registration form below.
To list the API, you would fill a product load form describing the API, establish the pricing for the API, and provide t\he IDs of AWS Accounts that will test the API subscription process. Completing this form would also require you to submit the URL for your API developer portal.
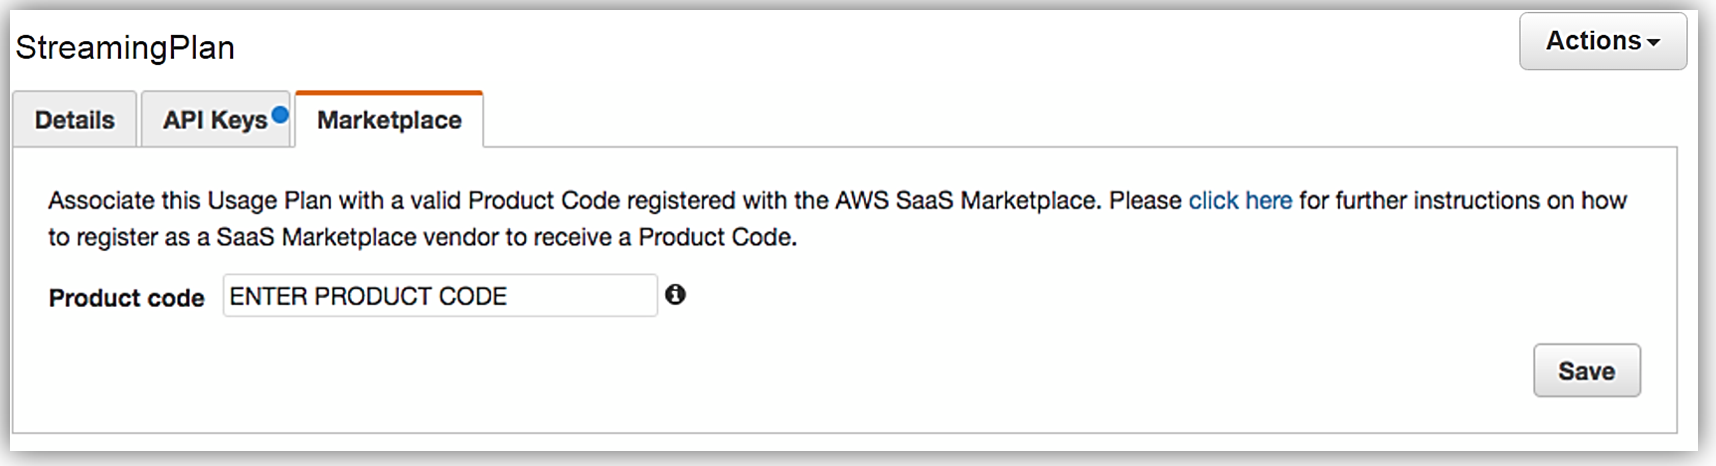
When your seller registration is complete, you will be supplied an AWS Marketplace product code. You will need to associate your marketplace product code with your API usage plan. In order to complete this step, you would simply log into the API Gateway console and go to your API usage plan. Go to the Marketplace tab and enter your product code. This tells API Gateway to send measurement data to AWS Marketplace when your API is used.
With your Amazon API Gateway managed API packaged into a usage plan, the accompanying API developer portal created, seller account registration completed, and product code associated with API usage plan; we are now ready to monetize our API on the AWS Marketplace.
Learn more about monetizing your APIs created with API Gateway by checking out the related blog post and reviewing the API Gateway developer guide documentation.
Summary
As you can see, the AWS teams were busy in 2016 working to make the customer experience easier for creating and deploying serverless architectures, as well as, providing mechanisms for customers to generate and monetize their API Gateway managed APIs.
Visit the product documentation for AWS Lambda and Amazon API Gateway to learn more about these services and all the newly released features.
– Tara
Congratulations to the Winners of the Serverless Chatbot Competition!
 I announced the AWS Serverless Chatbot Competion in August and invited you to build a chatbot for Slack using AWS Lambda and Amazon API Gateway.
Last week I sat down with fellow judges Tim Wagner (General Manager of AWS Lambda) and Cecilia Deng (a Software Development Engineer on Tim’s team) to watch the videos and to evaluate all 62 submissions. We were impressed by the functionality and diversity of the entrees, as well as the efforts that the entrants put in to producing attractive videos to show their submissions in action.
After hours of intense deliberation we chose a total of 9 winners: 8 from individuals, teams & small organizations and one from a larger organization. Without further ado, here you go:
Individuals, Teams, and Small Organizations
Here are the winners of the Serverless Slackbot Hero Award. Each winner receives one ticket to AWS re:Invent, access to discounted hotel room rates, public announcement and promotion during the Serverless Computing keynote, some cool swag, and $100 in AWS Credits. You can find the code for many of these bots on GitHub. In alphabetical order, the winners are:
AWS Network Helper – “The goal of this project is to provide an AWS network troubleshooting script that runs on a serverless architecture, and can be interacted with via Slack as a chat bot.” GitHub repo.
B0pb0t – “Making Mealtime Awesome.” GitHub repo.
Borges – “Borges is a real-time translator for multilingual Slack teams.” GitHub repo.
CLIve – “CLIve makes managing your AWS EC2 instances a doddle. He understands natural language, so no need to learn a new CLI!”
Litlbot – “Litlbot is a Slack bot that enables realtime interaction with students in class, creating a more engaged classroom and learning experience.” GitHub repo.
Marbot – “Forward alerts from Amazon Web Services to your DevOps team.”
Opsidian – “Collaborate on your AWS infra from Slack using natural language.”
ServiceBot – “Communication platform between humans, machines, and enterprises.” GitHub repo.
Larger Organization
And here’s the winner of the Serverless Slackbot Large Organization Award:
Eva – “The virtual travel assistant for your team.” GitHub repo.
Thanks & Congratulations
I would like to personally thank each of the entrants for taking the time to submit their entries to the competition!
Congratulations to all of the winners; I hope to see you all at AWS re:Invent.
— Jeff;
PS – If this list has given you an idea for a chatbot of your very own, please watch our Building Serverless Chatbots video and take advantage of our Serverless Chatbot Sample.
Running Express Applications on AWS Lambda and Amazon API Gateway
Express is a web framework for Node.js . It simplifies the development of “serverless” web sites, web applications, and APIs. In a serverless environment, most or all of the backend logic is run on-demand in a stateless fashion (see Mike Roberts’ article on Serverless Architectures for a more detailed introduction). AWS Lambda, when used in conjunction with the new Amazon API Gateway features that I blogged about earlier this month (API Gateway Update – New Features Simplify API Development), allows existing Express applications to be run in serverless fashion. When you use API Gateway you have the opportunity to take advantage of additional features such as Usage Plans which allow you to build a developer ecosystem around your APIs, and caching which allows you to build applications that are responsive and cost-effective.
In order to help you to migrate your Express applications to Lambda and API Gateway, we have created the aws-serverless-express package. This package contains a working example that you can use as a starting point for your own work.
I have two resources that you can use to migrate your Express code and applications to API Gateway and Lambda:
- Running Express Apps in AWS Lambda shows you how to use Claudia.js and the aws-serverless-express module to deploy your application. You simply remove the existing TCP listener, create a Lambda proxy wrapper, and deploy!
- Going Serverless: Migrating an Express Application to Amazon API Gateway and AWS Lambda goes in to a bit more depth than the previous post. For example, it shows you how to set up environment variables, manage database connections, and provides some guidance on efficient hosting of static assets. The post also details the entire release process and introduces some other Lambda and API Gateway features that might be of interest to you.
— Jeff;
API Gateway Update – New Features Simplify API Development
Amazon API Gateway allows you to quickly and easily build and run application backends that are robust and scalable. With the recent addition of usage plans, you can create an ecosystem of partner developers around your APIs. Let’s review some terminology to start things off:
 Endpoint – A URL (provided by API Gateway) that responds to HTTP requests. These requests use HTTP methods such as GET, PUT, and POST.
Resource – A named entity that exists (symbolically) within an endpoint, referred to by a hierarchical path.
Behavior – The action that your code will take in response to an HTTP request on a particular resource, using an HTTP method.
Integration – The API Gateway mapping from the endpoint, resource, and HTTP method to the actual behavior, and back again.
Today we are extending the integration model provided by API Gateway with support for some new features that will make it even easier for you to build new API endpoints and to port existing applications:
Catch-all Path Variables – Instead of specifying individual paths and behaviors for groups of requests that fall within a common path (such as /store/), you can now specify a catch-all route that intercepts all requests to the path and routes them to the same function. For example a single greedy path (/store/{proxy+}) will intercept requests made to /store/list-products, /store/add-product, and /store/delete-product.
ANY Method – Instead of specifying individual behaviors for each HTTP method (GET, POST, PUT, and so forth) you can now use the catch-all ANY method to define the same integration behavior for all requests.
Lambda Function Integration – A new default mapping template will send the entire request to your Lambda function and then turn the return value into an HTTP response.
HTTP Endpoint Integration – Another new default mapping template will pass the entire request through to your HTTP endpoint and then return the response without modification. This allows you to use API Gateway as an HTTP proxy with very little in the way of setup work.
Let’s dive in!
Catch-all Path Variables
Suppose I am creating a new e-commerce API. I start like this:
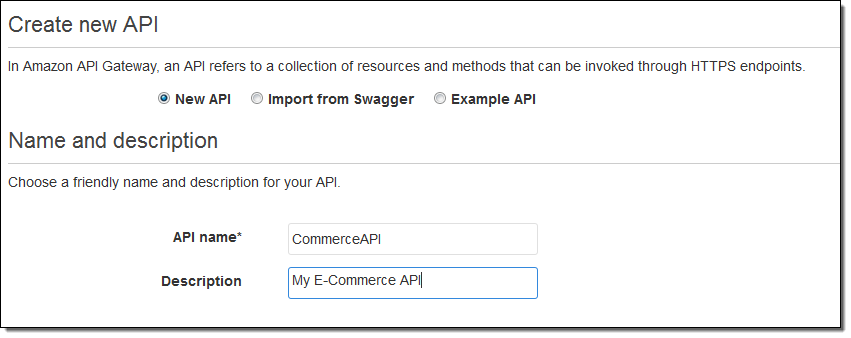
And then create the /store resource:
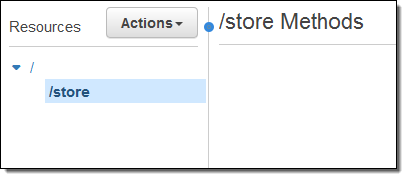
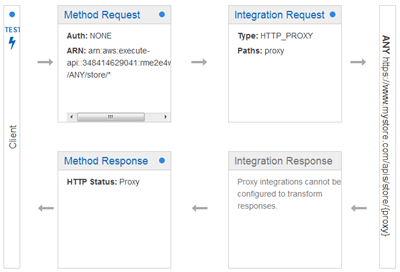
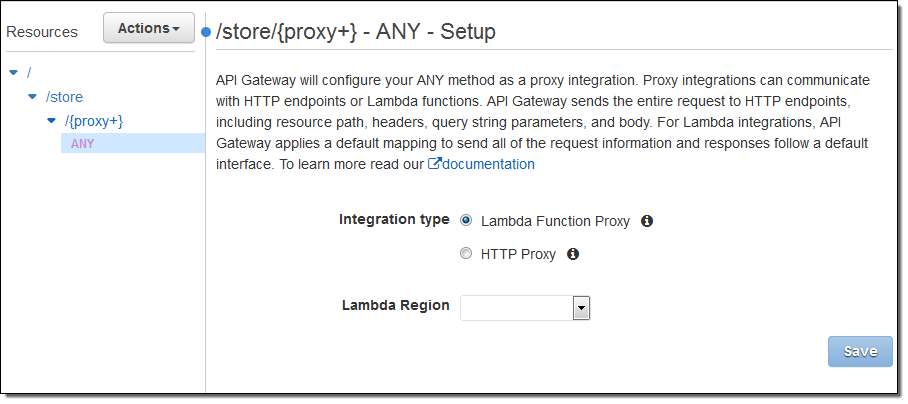
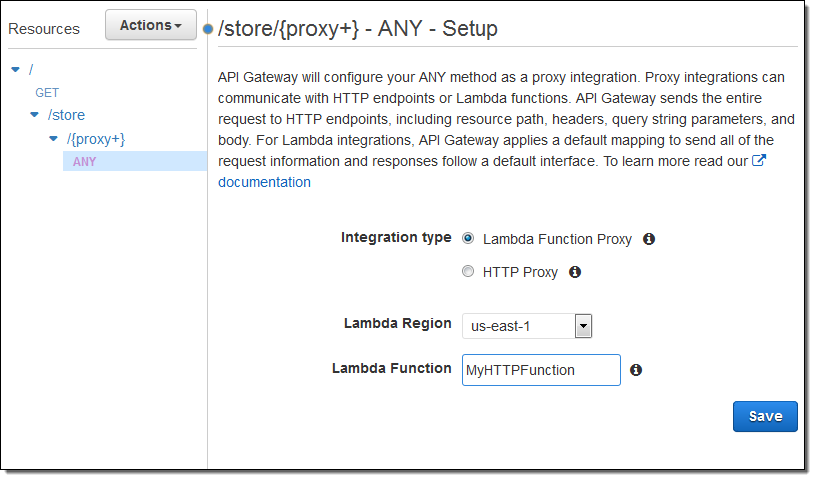
Then I use a catch-all path variable to intercept all requests to any resource within /store (I also had to check Configure as proxy resource):

Because {proxy+} routes requests for sub-resources to the actual resource, it must be used as the final element of the resource path; it does not make sense to use it elsewhere. The {proxy+} can match a path of any depth; the example above would also match /store/us/clothing, /store/us/clothing/children, and so forth.
The proxy can connect to a Lambda function or an HTTP endpoint:
ANY Method
I no longer need to specify individual behaviors for each HTTP method when I define my resources and the methods on them:
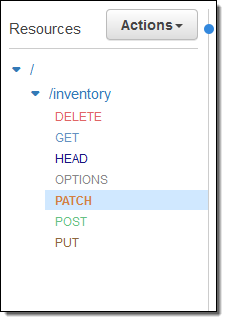
Instead, I can select ANY and use the same integration behavior for all of the methods on the resource:
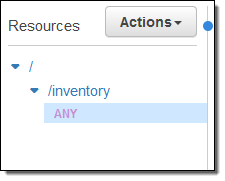
This is cleaner, simpler, and easier to set up. Your code (the integration point for all of the methods on the resource) can inspect the method name and take an appropriate action.
The ANY method is created automatically when I use a greedy path variable, as shown above. It can also be used for individual resources. You can override the configuration for an individual method (perhaps you want to handle DELETE differently), by simply creating it and changing the settings.
Lambda Function Integration
It is now easier than ever to implement a behavior using a Lambda function. A new, built-in Lambda integration template automatically maps the HTTP request elements (headers, query parameters, and payload) into a form directly consumable by the function. The template also maps the function’s return value (an object with status code, header, and body elements) to a properly structured HTTP response.
Here’s a simple function that I copied from the documentation (you can find it in Lambda Function for Proxy Integration):
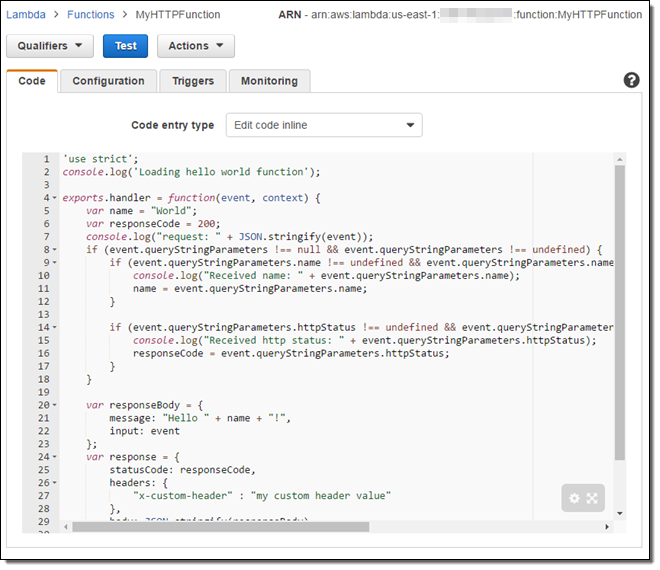
I connected it to /store like this:
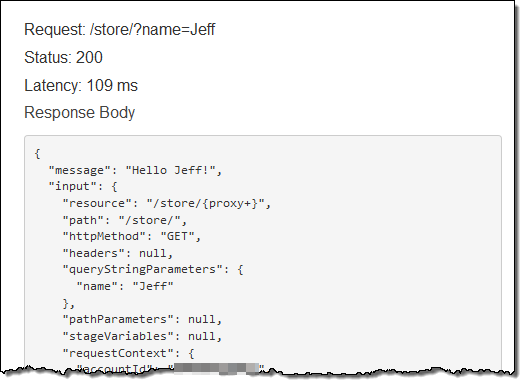
Then I deployed it (not shown), and tested it out like this:
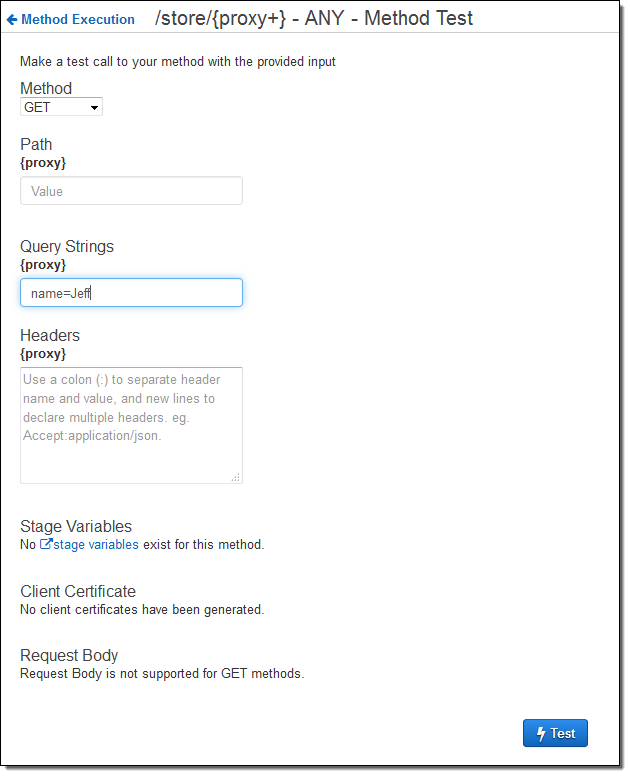
The function ran as expected; the console displayed the response body, the headers, and the log files for me. Here’s the first part:
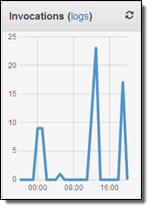
Then I hopped over to the Lambda Console and inspected the CloudWatch Logs for my function:
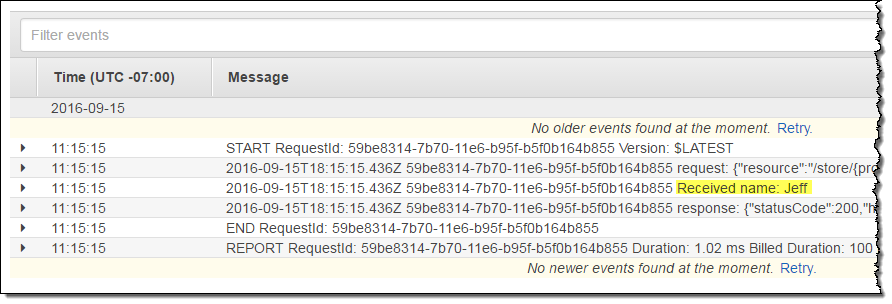
As you can see, line 10 of my function produced the message that I highlighted in yellow.
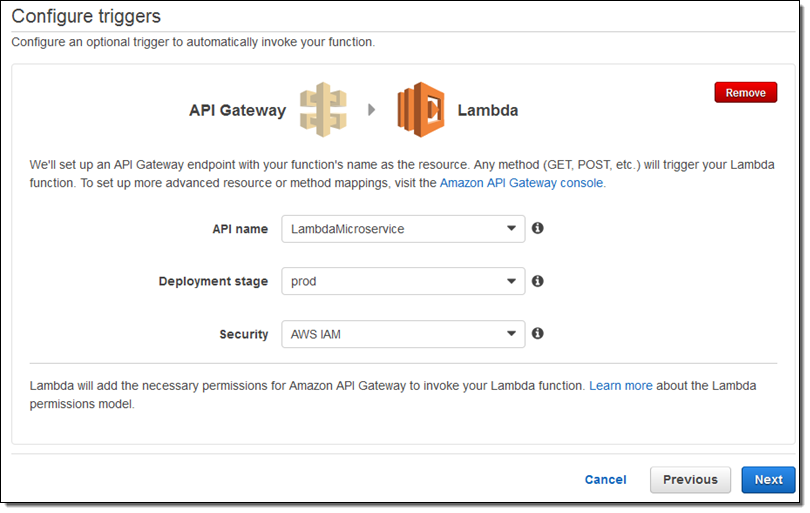
So, to sum it all up: you can now write Lambda functions that respond to HTTP requests on your API’s resources without having to spend any time setting up mappings or transformations. In fact, a new addition to the Lambda Console makes this process even easier! You can now configure the API Gateway endpoint as one of the first steps in creating a new Lambda function:
HTTP Function Integration
You can also pass API requests through to an HTTP endpoint running on an EC2 instance or on-premises. Again, you don’t have to spend any time setting up mappings or transformations. Instead, you simply select HTTP for the integration type, click on Use HTTP Proxy integration, and enter the name of your endpoint:
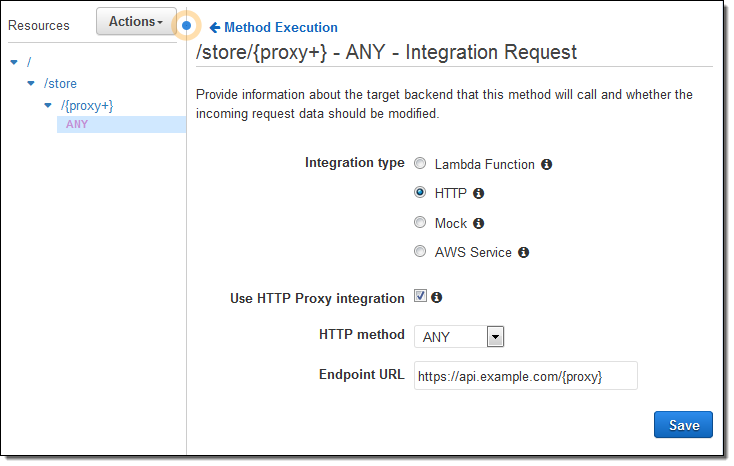
If you specify an HTTP method of ANY, the method of the incoming request will be passed to the endpoint as-is. Otherwise, the method will be set to the indicated value as part of the call.
Available Now
The features described above are available now and you can start using them today at no extra charge.
— Jeff;
New – Usage Plans for Amazon API Gateway
We introduced the Amazon API Gateway last year in order to allow developers to build backend web services for mobile, web, enterprise, and IoT applications (read Amazon API Gateway – Build and Run Scalable Application Backend to learn more). Since that time, AWS customers have built API implementations that run on AWS Lambda, Amazon Elastic Compute Cloud (EC2), and on servers running outside of AWS.
In many cases, our customers plan to create an ecosystem of partner developers building applications on top of their APIs. The API Gateway allows our customers to create API keys for each of their customers:
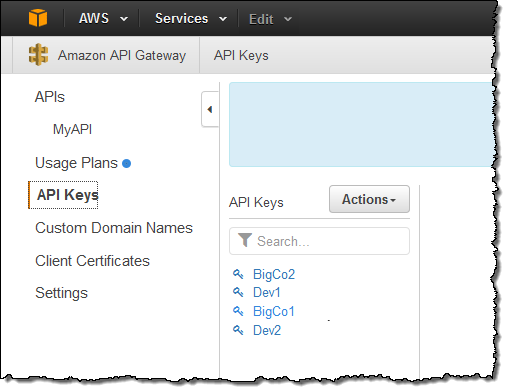
These keys identify each user of the API, and allow the API developer to control the set of services and service stages (environments such as test, beta, and production) that the key holder can access. Because the APIs often provide substantial business value, our customers have told us that they would like to build APIs, regulate access to them, and monetize them by charging based on usage.
New Usage Plans
In order to support this use case, we are introducing Usage Plans for API Gateway. This new feature allows developers to build and monetize APIs and to create ecosystems around them. You can create usage plans for different levels of access (Bronze, Silver, and Gold), different categories of users (Student, Individual, Professional, or Enterprise), and so forth. Plans are named and control the following aspects of access to an API:
- Throttling – Overall request rate (average requests per second) and a burst capacity.
- Quota – Number of requests that can be made per day, week, or month.
- API / Stages – The API and API stages that can be accessed.
If you choose to make use of Usage Plans, each of your APIs must be associated with a plan. Fortunately, the API Gateway will be more than happy to create default plans and associate them with your APIs. You need only confirm that you want this to happen:
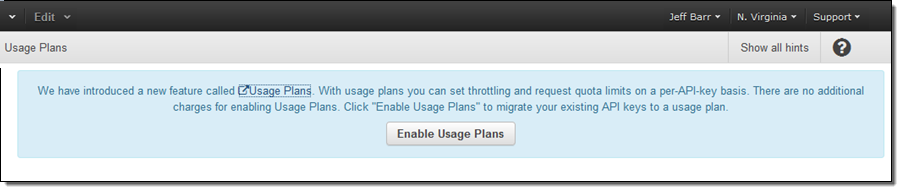
The default plans have no throttling and no quota, and will not change the behavior of the API.
Creating a Usage Plan
Let’s step through the process of creating a Usage Plan. Open up the API Gateway Console, navigate to Usage Plans, and click on Create. Assign a name and a description, then set the Throttling and Quota options as desired:
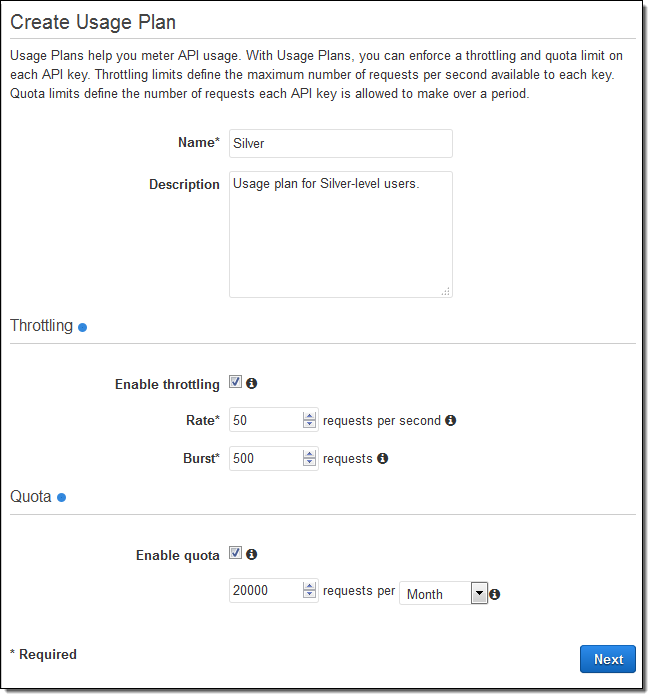
Throttling is implemented using a Token Bucket model. The bucket is large enough to hold the number of tokens denoted by the Burst value, and gains new tokens at the specified Rate. Each API request removes one token from the bucket. Using a Token Bucket allows you to have APIs that support a steady stream of requests with the capability to accommodate the occasional burst. You can use/think of throttling in two different ways. From the business side, it allows you to use a Usage Plan to control how many requests each of your customers can make. From the technical side, it allows you to insulate the services that are used to implement the APIs from excessive requests. This is especially important if those services are implemented outside of AWS and cannot scale to meet demand.
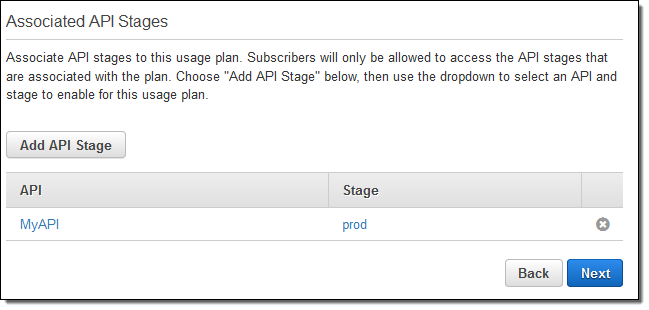
Click on Next, and then select the API and API Stages that can be accessed via the Usage Plan:
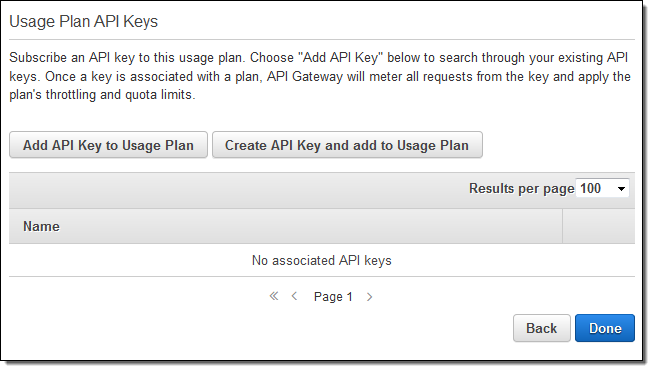
Click on Next to create the plan, and then add some API Keys to it You can add existing keys or create new ones:
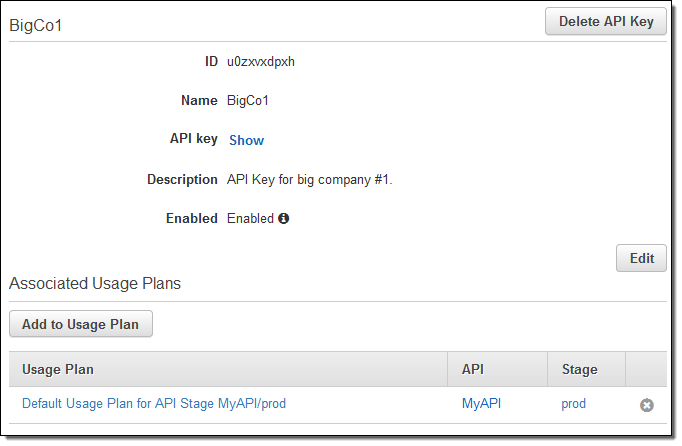
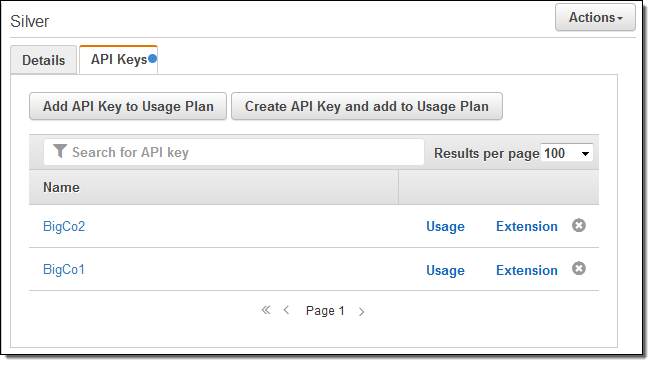
If you are planning to attach the usage plan to an existing API Key, you must first remove the default plan from the key because the key cannot reference multiple plans that refer to the same stage. You can do this by opening up the API Keys in a second browser tab and clicking on the “x” to the right of the default plan:
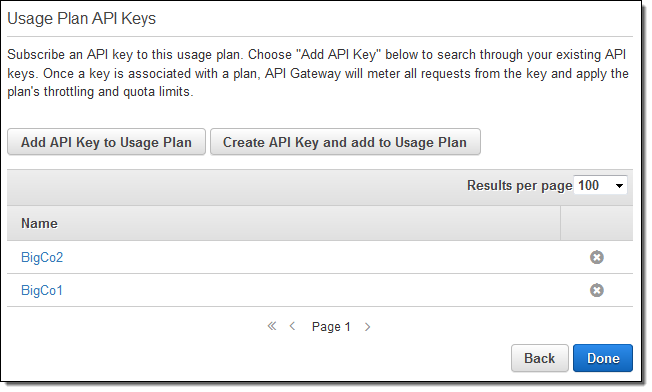
Now (on the tab where you are adding the API Keys to the plan), select one or more API Keys (representing subscribers to the API), and click on Done:
As soon as your users (subscribers) start to make calls to the APIs using their API Keys, their usage will be throttled and limited as specified in the plan. You can view their usage at any time by clicking on Usage:
Quotas are applied and respected in real time. Usage data can be up to 30 minutes behind.
You can download usage data for the plan by clicking on Export Usage Data:

You can then process and analyze the data as desired. For example, you could bill your subscribers on a per-call basis.
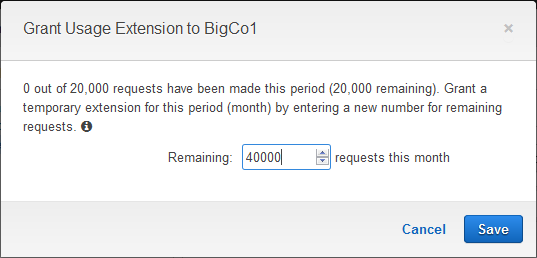
If one of your subscribers is making exceptionally good use of your API and is getting close to their quota for the period, you can grant a usage extension to them without changing the Usage Plan. Simply click on Extension and enter the number of requests that they are permitted to make for the remainder of the period:
Using Usage Plans
As I mentioned earlier, you can use Usage Plans to bill for usage and to create an ecosystem around your APIs.
You can control and police access, and you can selective grant special access to individual subscribers as needed. For example, you can create API Keys and Usage Plans that allow access to specific API stages. Most of your subscribers will need access to your production stage; a few will need access to your development or beta testing stages.
Before I wrap up, I should point out that the API Keys are for identification, not for authentication. The keys are not used to sign requests, and should not be used as a security mechanism (this is a perfect use case for Cognito Your User Pools).
Available Now
This feature is available now and you can start using it today.
— Jeff;
Enter the AWS Serverless Chatbot Competition!
Earlier this month I was asked to be a judge for the AWS Serverless Chatbot Competition and I was happy to accept!
Build a Chatbot
 We want you to build a chatbot for Slack using AWS Lambda and Amazon API Gateway. You can also use other APIs (the Slack Events API will be helpful), additional services (AWS or otherwise), and other data sources. Your entry should be creative and original, and should provide genuine value to Slack users.
The AWS Free Tier provides you with access to Lambda, API Gateway, and other AWS services at no charge. New and existing AWS users get 1 million Lambda requests and 400,000 GB-seconds of compute time for free. New AWS users get 1 million API calls per month to the API Gateway for up to 12 months after signing up.
Your Entry
After you build your chatbot, I would encourage you to spend some time on the packaging and the marketing. Be sure to supply the following items as part of your entry:
- Demonstration video of your chatbot in action.
- Brief explanation of what it does and what makes it unique.
- Link to your public or private GitHub repo (include all files needed to run your chatbot).
- Instructions for testing and using your chatbot.
Your chatbot can be a new or existing application, but it must use Lambda and API Gateway. The code must function as shown in the video, and the submission must be in English. It also has to be substantially different from any other app submitted by the same submitter, team, or organization.
Prizes
Individuals, teams, and organizations with 50 or less employees are eligible for the Serverless Chatbot Hero Award. This award includes one ticket to AWS re:Invent and access to discounted hotel room rates, along with recognition at the Serverless State of the Union address, some cool swag, $100 in AWS credits, and publicity opportunities for their bot. We will make up to eight of these awards.
Larger organizations are eligible for a non-cash, recognition-only award.
See the FAQ for more information on rules and eligibility.
Timeline
Here’s the timeline for the competition:
- August 10 – September 29, 2016 – Submission period.
- October 3-7 – AWS Judging.
- October 15 – Winners announced.
Get Started Now
Here’s what you need to do to get started:
- Read the Rules and Eligibility Guidelines.
- Register for the AWS Serverless Chatbot Competition.
- Create AWS and Slack developer accounts.
- Visit the Resources Page to learn more about the APIs and services.
- Build your chatbot. Our sample code (aws-serverless-chatbot-sample) is a good place to start.
- Create your demo video and your other materials for the submission.
- Submit your materials before 5 PM ET on September 29, 2016.
I’m looking forward to seeing, using, and judging the entries!
Relevant Webinars
Here are some upcoming webinars that will help you to get started:
- August 24 – Getting Started with Serverless Architectures.
- August 30 – Building Serverless Chatbots.
You may also find these recordings of past webinars to be helpful:
- AWS Lambda – Event-driven Code for Devices and the Cloud.
- Build and Manage Your APIs with Amazon API Gateway.
— Jeff;
Amazon API Gateway – Build and Run Scalable Application Backends
I like to think of infrastructure as the part of a system that everyone needs and no one likes to work on! It is often undifferentiated & messy, tedious to work on, difficult to manage, critical to the success of whatever relies on it, and generally taken for granted (as long as it works as expected).
Many of our customers host backend web services for their mobile, web, enterprise, or IoT (Internet of Things) applications on AWS. These services have no user interface. Instead, they are accessed programmatically, typically using a REST-style interface. In order to successfully host an application backend you need to think about the infrastructure: authorization, access control, traffic management, monitoring, analytics, and version management. None of these tasks are easy, and all count as infrastructure. In many cases you also need to build, maintain, and distribute SDKs (Software Development Kits) for one or more programming languages. Put it all together, and the amount of code and resources (not to mention head-scratching) devoted to the infrastructure for web services can dwarf the actual implementation of the service. Many of our customers have told us that they would like to make investments in web services, but have little interest in building or maintaining the infrastructure for them due to the cost and complexity involved.
New API Gateway
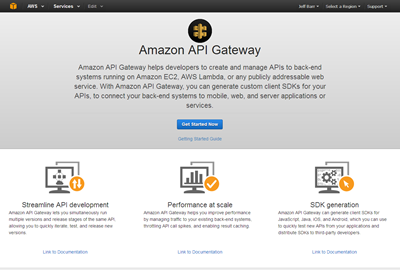 Today we are introducing the new Amazon API Gateway. This new pay-as-you-go service allows you to quickly and easily build and run application backends that are robust, and scalable. Instead of worrying about the infrastructure, you can focus on your services.
The API Gateway makes it easy for you to connect all types of applications to API implementations that run on AWS Lambda, Amazon Elastic Compute Cloud (EC2), or a publicly addressable service hosted outside of AWS. If you use Lambda (I’ll show you how in just a moment), you can implement highly scalable APIs that are totally server-less.
You can also implement APIs that wrap around, enhance, and effectively modernize legacy systems. You can aggregate the results from multiple old-school RPC-style web services calls into a single response, filter and process the data, and even protect the backend service from overload by taking advantage of the built-in throttling feature.
The API Gateway was designed to deliver on the following promises:
- Scalable & Efficient – Handle any number of requests per second (RPS) while making good use of system resources.
- Self-Service & Highly Usable – Allow you to define, revise, deploy, and monitor APIs with a couple of clicks, without requiring specialized knowledge or skills, including easy SDK generation.
- Reliable – Allow you to build services that are exceptionally dependable, with full control over error handling, including customized error responses.
- Secure – Allow you to take advantage of the latest AWS authorization mechanisms and IAM policies to manage your APIs and your AWS resources.
- Performant – Allow you to build services that are globally accessible (via CloudFront) for low latency access, with data transfer to the backend over the AWS network.
- Cost-Effective – Allow you to build services that are economical to run, with no fixed costs and pay-as-you-go pricing.
 We spent a lot of time focusing on the needs of developers as we designed this service. For example, many of our customers told us that they use Swagger to describe their APIs. They can import their existing definitions into the API Gateway in minutes using a tool that we supply, and connect them to new or existing implementations just as quickly.
We also support an API-first development model so that definitions can be created while the implementation is still underway. Once the APIs have been defined, the API Gateway can create JavaScript, iOS, and Android SDKs with a couple of clicks (we’ll add even more languages in the future).
 There are also plenty of features designed to simplify testing and deployment. You can test your APIs from within the AWS Management Console, with full access to the HTTP status code, the response (body and headers), and the request log.
You can create multiple environments (which the gateway calls stages) of a given API and then selectively deploy them within the scope of a tag that you define (think dev, beta, prod, and so forth), again with a couple of clicks. Each operation in each version can (but need not) have a distinct implementation. When the time comes to create a new version of an API, you can clone an existing one, deploy the clone to a distinct stage, and continue to work on both, with the eventual goal of deprecating the older one. You can also use custom domain names to exercise more control over the URL of each service.
 Finally, the API Gateway provides plenty of operational support!
After you deploy your API, the Gateway will expeditiously accept, handle, monitor, and respond to requests. You can configure a cache on a per-stage basis, with full control over the lifetime of cached responses and the mapping of request parameters to cache keys. Requests to your APIs are logged to Amazon CloudWatch and detailed metrics are reported to Amazon CloudWatch on a per-stage, per-method basis. Administrative actions such as creating and configuring APIs are logged to CloudTrail for auditing. You can throttle requests if they exceed a desired rate, and you can use AWS Identity and Access Management (IAM), Amazon Cognito, or OAuth credentials to authorize access to individual methods.
API Gateway in Action
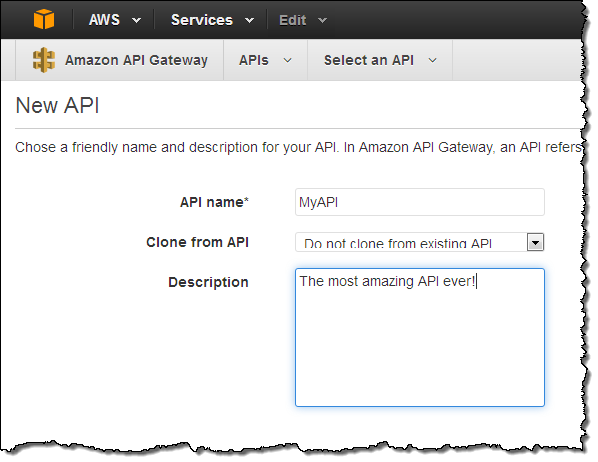
Let’s walk through the process of creating an API in front of a couple of Lambda functions. Due to space constraints, I’m going to show off just a few of the Gateway’s features and I’m going to skip a couple of steps related to IAM policies. I would encourage you to read the Amazon API Gateway Developer Guide to learn more about what the service can do and to learn how to create the necessary policies.
I’ll start by opening up the API Gateway Console and creating an API:
The console shows my API in tree fashion:
![]()
Then I create a child resource within the root resource by clicking on the Create Resource button:
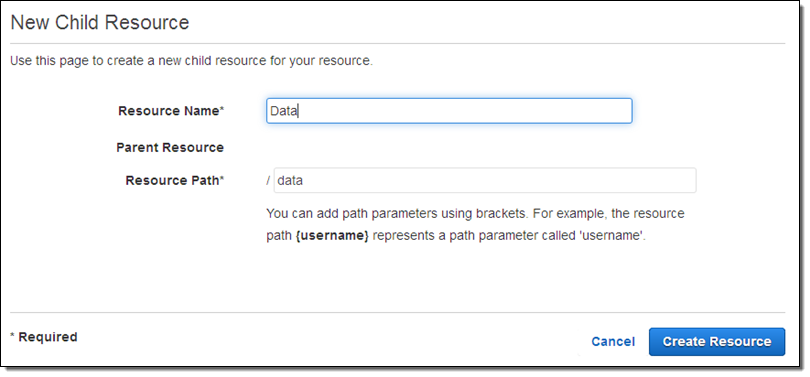
The new resource is created and shown in the tree:

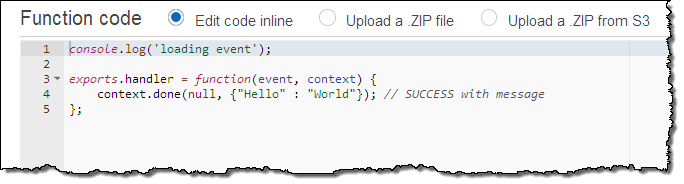
Now I need some actual code. I switch over to the Lambda Console and create a pair of functions that will serve as implementations of methods on the /data resource. The first function is called GetHelloWorld. It takes no inputs and returns a very simple constant JSON object. Here’s the code:
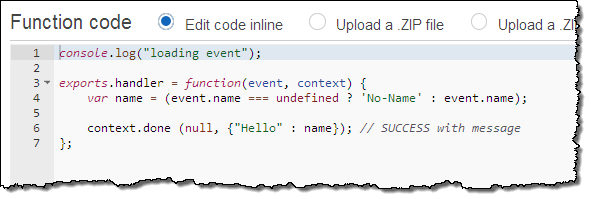
The second function is called GetHelloWithName. This one is slightly more sophisticated. If it is supplied with a parameter called name, it will return that name in the JSON object. If the parameter is not present it will use the string “No-Name” instead. Here’s the code:
With the two functions ready, I can now create the methods on the resource and attach them to the code. I return to the API Gateway Console, click on Create Method, and choose an HTTP method:
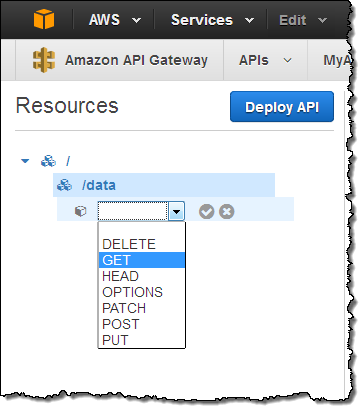
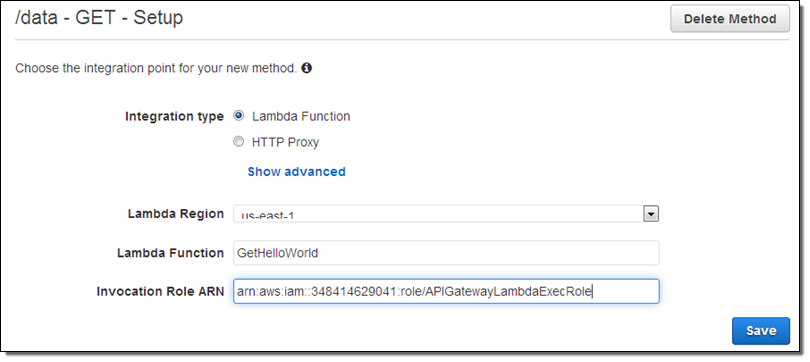
I can create multiple methods (one per HTTP verb) on any of my resources. I’ll choose GET, and then designate a Lambda function as my Integration Type (we’ll talk about the other ones later on):
Now I have the option to customize each phase of the call to the API (method request & response, integration request & response):
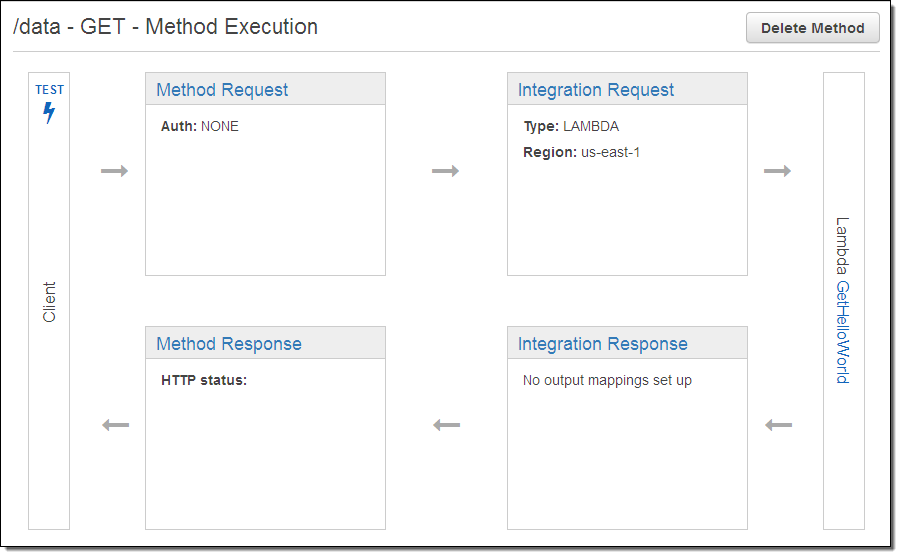
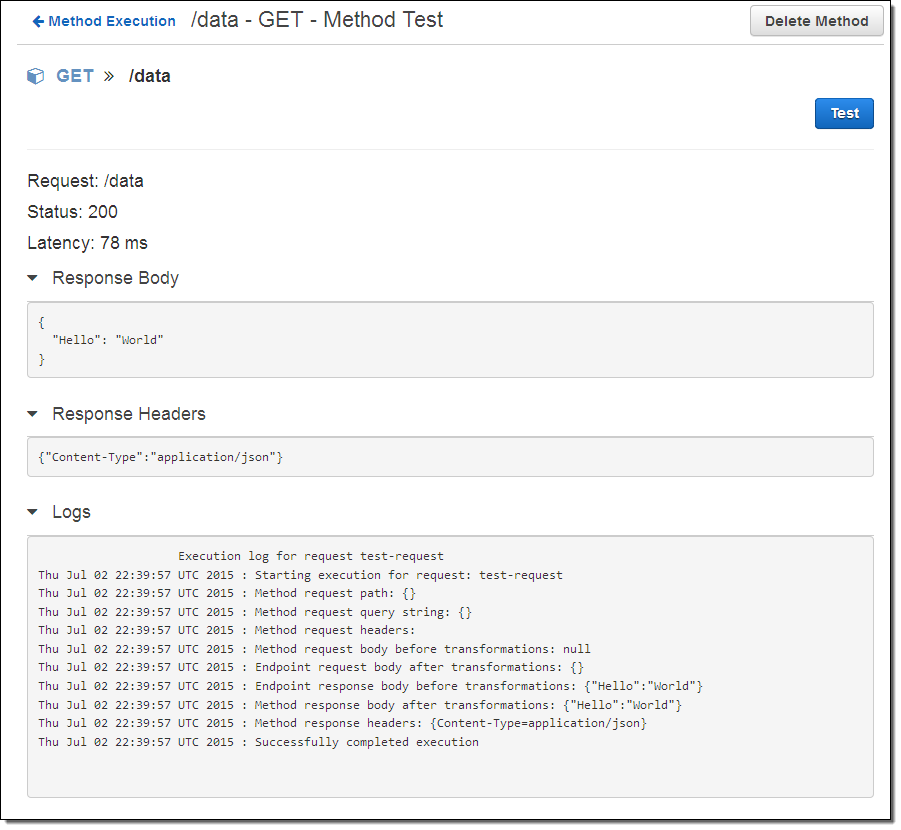
The default settings will work just fine for me! It is time to see my method in action, so I click on the TEST icon (the lightning bolt) and then click the Test button. The API Gateway calls my method and provides me with access to the response body, response headers, and an execution log (the work that was done to prepare for, issue, and process the call to my Lambda function):
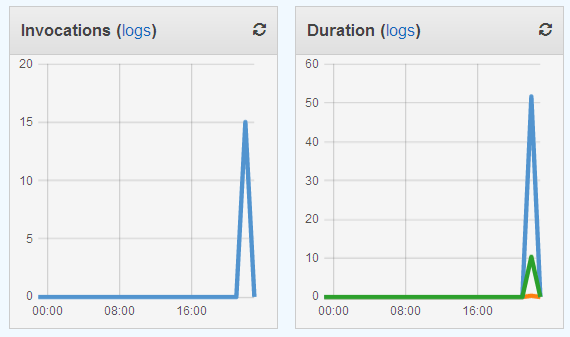
I can also hop on over to the Lambda Console and see the metrics for my function from there:
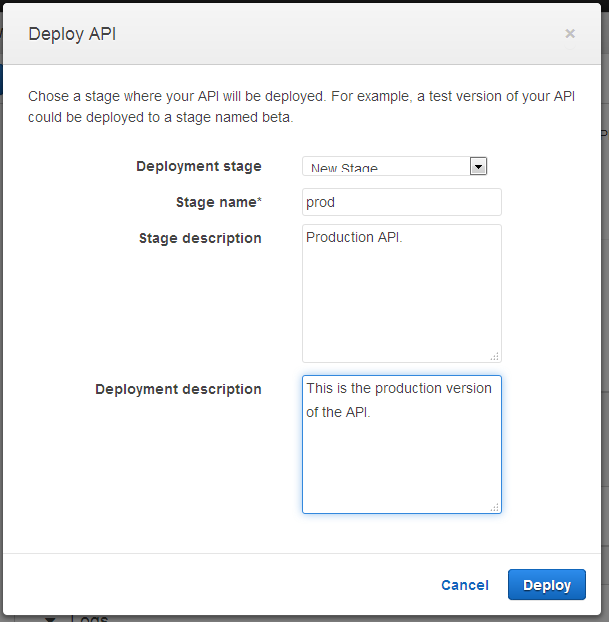
Once I am happy with my API I can deploy it so that others can make use of it. To do this I simply click on the Deploy API button, and then choose a stage. The stage becomes part of the API’s URL; it allows me to have multiple, parallel deployments (staging, beta, production, and so forth) that are isolated and independent of each other. Here’s how I create a stage called prod (for production):
Then I have the opportunity to set some options for the stage. I can opt to log API calls to CloudWatch Logs and to send per-metric metrics to CloudWatch. I can also indicate that every call to the API must include an API key in order for it to be accepted:
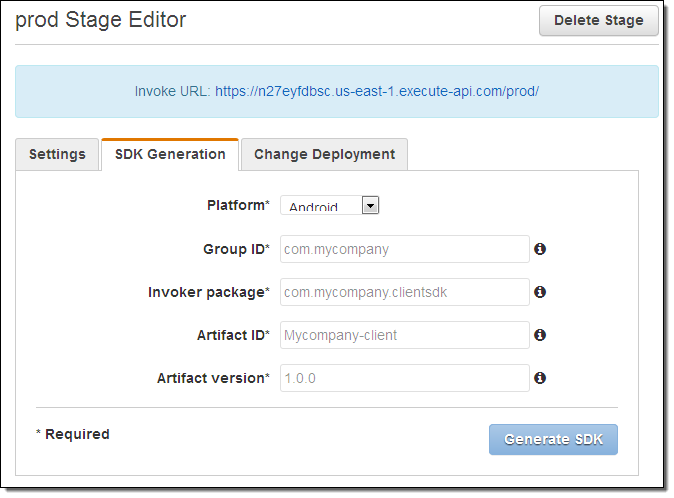
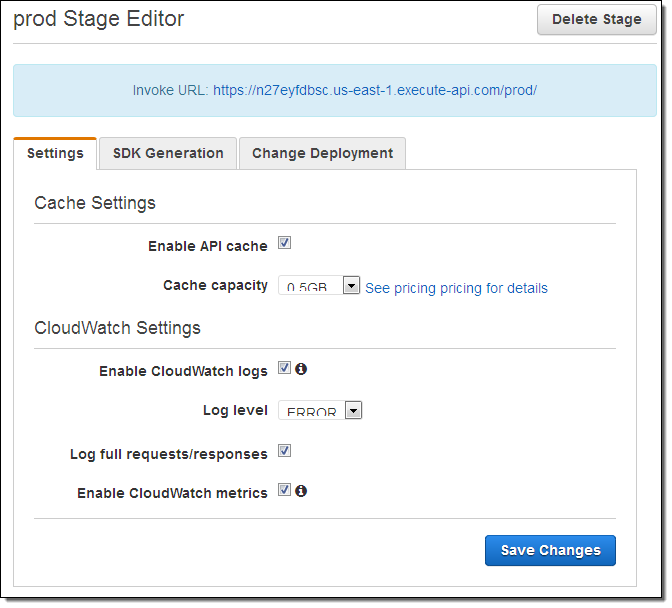 As you can see, the Console displays the invocation URL for the API. It also gives me the option to generate an SDK for it:
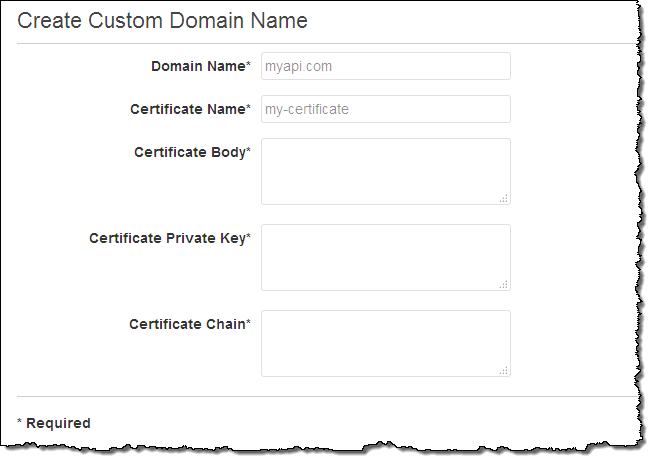
I can also create a custom domain name and expose the resulting URL as the preferred invocation URL for my service (all of this can be done via the Console, and is implemented via CloudFront):
At this point I have created and deployed a fully scalable API without having to think about the infrastructure. If my Hello World function became incredibly popular, I would need to do nothing more than to make sure that my AWS account was configured to handle the appropriate number of concurrent Lambda requests.
Enhancing Legacy Services
You (or your organization) probably has some existing web services that respond to older protocols such as XML-RPC or SOAP. You can use the API Gateway to modernize these services by taking advantage of the following features, picking and choosing as needed to suit your needs:
- Traffic Management – You can configure the API Gateway to throttle requests if they exceed a predefined limit. This will allow you to avoid overloading existing (and possibly non-scalable) backend systems.
- Authorization – You can enable the latest AWS-style (AWS Signature v4) authentication for the APIs that you create (check out Signing API Requests) for more information on AWS authentication. The SDKs that you generate through the API Gateway will take care of all of the necessary signing, encryption, and decryption.
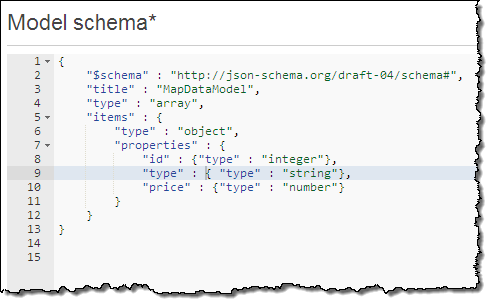
- Data Transformation – If your existing services return XML-style data, you can use the API Gateway to transform the output to JSON as part of your modernization effort. One of our early customer is in the process of moving their service implementation to a Lambda-based model, with functions that return JSON data. During the transition period they are using the API Gateway to transform the output of legacy services to JSON, allowing them to make a move that is seamless and non-disruptive. The transformation is specified using JSON-Schema, like this:
- REST-to-RPC and Back – You can create new API endpoints that respond to GET requests, and map them to existing endpoints that are accessed using a POST. Along the way you can use the API Gateway to transform the GET parameters into the request body for the POST.
Wait, There’s More!
Let’s take a look at a couple more API Gateway features before we wrap up.
The connection between my resource definition (the resource name and the HTTP method) and some code is called an Integration Request. As you have already seen, the request can be routed to a Lambda function with a couple of clicks. It can also be routed to an arbitrary HTTP endpoint (running on EC2 or at any public accessible location). Along the way, the request can be mapped to a different HTTP method (changing a GET to a POST, for example) and an API Gateway Model can be used to transform the input into the form required by the service running at the endpoint. Models are specified using JSON-Schema and can be set up using the Console.
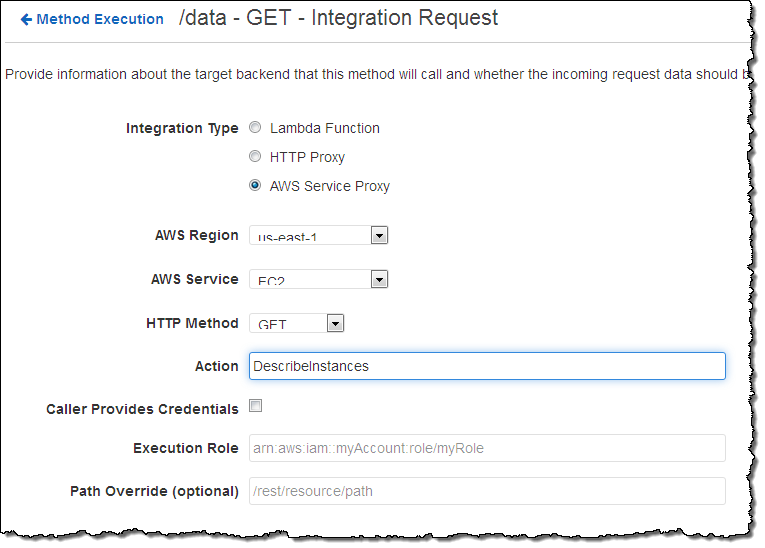
I can use an API function provided by an AWS service as an endpoint. This option makes use of the AWS Service Proxy included within the API Gateway. Here’s how I would set that up:
I mentioned API keys earlier. If you want to allow third parties (customers, developers, or integration partners) to access your API on a controlled basis, you can create API keys and mandate that they be used to call your API. This function is designed for metering usage; you should use one of the AWS authentication options (or OAuth) to control access to your APIs.
Available Now
The Amazon API Gateway is available today in the US East (Northern Virginia), US West (Oregon), and EU (Ireland) regions and you can start using it today.
The pricing model is simple. You pay for calls to the API and for outbound data transfer (the information returned by your APIs). Caching is priced separately, and the price is depending on the size of the cache that you configure.
— Jeff;