Category: AWS Lambda
Why Use AWS Lambda in a Custom VPC?
By Akash Jain. Akash is a Partner Solutions Architect (SA) at AWS.
As a Partner Solutions Architect (SA), I work closely with APN Partners as they look to use AWS services in innovative ways to address their customers’ use cases. Recently, I came across an interesting use case with an APN Partner who configured an AWS Lambda function to access resources running in a custom virtual private cloud (VPC) to call an internal API over the virtual private network (VPN). In this post, I’ll walk through how this APN Partner is evolving an existing architecture to take advantage of AWS Lambda’s capabilities and to optimize the managed services they provide to their customers.
Existing architecture
For those who are new to AWS Lambda, it is a compute service that lets you run code (written up as “Lambda functions”) without provisioning or managing servers. These functions execute in response to a wide variety of AWS service events and custom events, and can be used in a variety of scenarios. AWS Lambda executes your code only when needed and scales automatically from a few requests per day to thousands per second. With AWS Lambda, you pay only for the requests served and the compute time required to run your code.
The particular use case I’ll discuss today involves an APN Partner who needed to integrate a customer’s AWS environment with their own on-premises environment to provide managed services. Several VPN connections were set up between their on-premises environment and different AWS Regions. As a part of the integration, all system alerts in a region needed to be consolidated in one place. In this case, that was the APN Partner’s on-premises environment.
To make this happen, they set up Amazon CloudWatch alerts to trigger a Lambda function. The job of the Lambda function was to call an externally hosted web service and pass the alert as payload. The web service could then convert the CloudWatch alerts to a format that the Netcool API, which was hosted on premises, could understand.
The following diagram outlines the setup of this architecture. For simplicity’s sake, I’ve chosen not to represent components like subnets, customer gateway, and VPN gateway.

After we reviewed this architecture with the APN Partner, they chose to re-evaluate and optimize it, for a few reasons:
- Extra cost – A dedicated system (VM) was in place to host the web service, and its job was to convert the message from the CloudWatch alert format to the Netcool API format. Getting the VM, OS, and other software in place required an upfront cost.
- Maintenance – Managing and maintaining this server added an extra layer of maintenance. The team had to patch the server regularly to keep it up-to-date.
- Security complexity – The API for converting the format was exposed externally, so it resulted in an additional security layer for authentication, authorization, and DoS/DDoS protection.
- Low scalability – The web service could not auto-scale because it was installed on a single VM.
- Fault tolerance – If the server went down, all the alerts would be lost.
Accessing resources in a VPC from a Lambda function
Working with the APN Partner, we decided to take advantage of AWS Lambda in a way that would alleviate these concerns with the existing architecture. We asked ourselves two questions: “What if we move the format conversion logic of the web service into AWS Lambda itself?” and then, “How can the modified Lambda function call the Netcool API, which is not exposed externally?”
The answer is to access resources in a VPC from an AWS Lambda function, a helpful feature that was introduced by AWS in early 2016. With this feature, the AWS Lambda function can call the Netcool API over the existing VPN connection, which was established for secure administrative access. When the Lambda function accesses resources in a VPC, it gets a private IP address from the VPC. It can then communicate with any service within the VPC or with any other system accessible from that VPC.

The benefits of this approach are:
- Manageability – The Lambda function automatically runs your code without requiring you to provision or manage servers. This means that your support team can focus on important system alerts instead of managing and maintaining the infrastructure around it.
- Minimized cost – You pay for what you use. For Lambda, you’re charged based on how many requests the Lambda function receives and how long your code executes. Since we’re working with system alerts in this scenario, I don’t expect the Lambda function to be more expensive than monthly charges for running a server.
- Security – Because the Lambda function is VPC-enabled, all communications between AWS and the on-premises environment will be over a secure tunnel.
- High scalability – Lambda can launch as many copies of the function as needed to scale to the rate of incoming events.
- Fault tolerance – Lambda can be a part of multiple subnets spanning multiple Availability Zones.
Lambda functions automatically scale based on the number of events they process. For VPC-enabled Lambda functions, you should make sure that your subnet has enough elastic network interfaces (ENIs) and IP addresses to meet the demand. For details on calculating ENI capacity, see the AWS Lambda documentation.
A Lambda function enabled to access resources within a VPC may take some time to instantiate, because an ENI needs to be initialized and attached to it. In the case of inactivity over a long period of time, the alerts may take some time to process. A workaround I suggest is to keep the Lambda function warm by triggering dummy CloudWatch alerts, as explained in a post on the A Cloud Guru blog.
Driving managed service optimization
As the APN Partner in this example is a Managed Service Provider (MSP), I’d like to tie this example back to how next-gen MSPs can drive workload optimizations and cost efficiencies for their customers.
Service delivery quality is a key value next-gen MSPs bring to customers. An essential goal for MSPs is to try to develop the tools, processes, and governance required to deliver reliable services cost-effectively. By accessing resources in a custom VPC from a Lambda function and leveraging an existing VPN connection, an MSP can send alerts more securely, reliably, and cost-effectively.
Conclusion
In this post, we briefly discussed the benefits of running Lambda functions that can access resources inside your private VPC. Your Lambda functions can access Amazon Redshift data warehouses, Amazon ElastiCache clusters, Amazon Relational Database Service (Amazon RDS) instances, and service endpoints that are accessible only from within a particular VPC, such as resources over VPN. I recommend that you keep sufficient ENI and IP addresses under a subnet for auto-scaling purposes, and keep your Lambda function warm if you need a quicker response in case of longer inactivity.
For more information, I recommend that you take a look at the AWS documentation. Do you have comments? Talk to me in the comments section. I’d love to hear from you.
Generating Custom AWS CloudFormation Templates with Lambda to Create Cross-Account Roles
Ian Scofield is a Partner Solutions Architect (SA) at AWS.
In a previous post in our series, we showed how to use an AWS CloudFormation launch stack URL to help customers create a cross-account role in their AWS account. As mentioned in an earlier APN Blog post, a cross-account role is the recommended method to enable access to a customer account for partner integrations, and creating the role using a CloudFormation template instead of following a long series of manual steps can reduce failure rates and improve the customer onboarding experience.
In this post, we will explore the use of custom CloudFormation templates to further streamline the onboarding process.
Recall that the CloudFormation template in our previous example was static and required the customer to enter a 12-digit AWS account ID and an arcane value called an external ID. Of course, omitting or entering incorrect values results in a failed CloudFormation launch, or, worse, a useless cross-account role sitting in the customer account.
Since we already know the values of these two parameters (the partner’s AWS account ID is the parameter we want the customer to trust, and the external ID is a unique value we generate for each customer), it makes sense for us to automate template creation and set these values ahead of time on behalf of the customer.
About external IDs
The external ID is a piece of data defined in the trust policy that the partner must include when assuming a role. This allows the role to be assumed only when the correct value is passed, which specifically addresses the confused deputy problem. External IDs are a good way for APN Partners to improve the security of cross-account role handling in a SaaS solution, and should be used by APN Partners who are implementing products that use cross-account roles. For a deeper look into why external IDs are important and why APN Partners should use them, take a look at How to Use External ID When Granting Access to Your AWS Resources on the AWS Security Blog.
There are many methods for setting default values in CloudFormation templates. We’ll discuss two of these. Keep in mind that although this blog post focuses on cross-account role creation, the method of populating parameters on the fly can be used for any other components within the template. Depending on the parameter in question, one of the methods we discuss might be a better fit than the other.
The first method is to supply the partner’s account ID and external ID as the default values to CloudFormation parameters. The customer can inspect and potentially overwrite parameter values in the CloudFormation console before launching the template (Figure 1). In some cases, this level of transparency might be required so the customer is aware of the AWS Account ID they are granting access to.
However, as noted previously, incorrect values will result in the CloudFormation stack failing to launch or associate correctly, so any customer modifications to these parameters are likely to result in a failure.
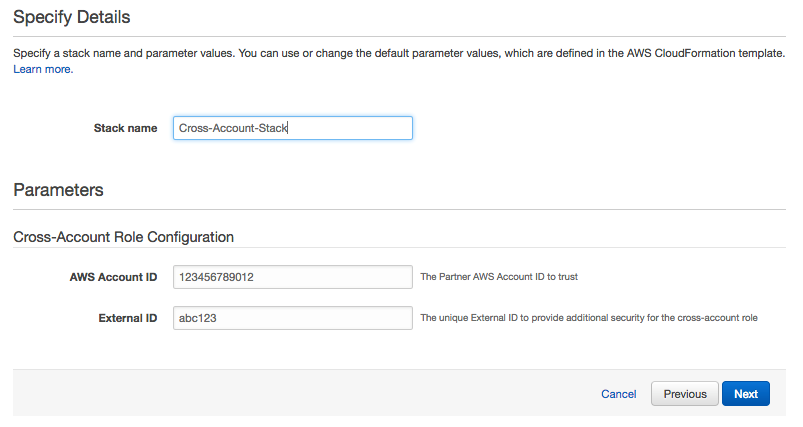
Figure 1: Using default parameter values
The second method (Figure 2) doesn’t expose any parameters to the customer; instead, it hard-codes the partner’s account ID and external ID directly into the resources in the template. This helps ensure the successful creation of the role and association with the partner account, while removing any additional work for the customer.

Figure 2: Hardcoding parameter values
In both of these scenarios, how do you insert values that are unique for each customer into the template? In order for either method to work, you have to create a custom template for each customer with their unique values. This requires some additional steps in your onboarding workflow; however, the simplicity it provides to the customer and reduced chances of failure can outweigh the initial setup on your side.
To demonstrate this scenario, I created a mock portal to handle the customer onboarding experience:

Figure 3: Mock portal for onboarding
The portal requires the customer to provide their AWS account ID to associate with the uniquely generated external ID. When the user clicks Generate Custom Template, the account ID is sent to your application and invokes an AWS Lambda function. In my example, I’m using Amazon API Gateway to invoke the function, which does the following:
1. Puts an entry with the account ID into an Amazon DynamoDB table. This allows you to track customers and associate the cross-account role we’ll create later with the AWS account ID. You can also store the external ID and any other information pertaining to the customer in the DynamoDB table.
2. Generates a customized template for the user from a master template. The master template has all the necessary information and some placeholder values that you substitute with customized values:
The Lambda function downloads the template and uses a simple replace() function to replace the placeholder strings with the unique values you’ve generated for this customer.
3. Uploads the customized template to an S3 bucket with the customer’s account ID prepended to the file name to correlate templates with specific customers.
4. Sends back the S3 URL for the custom-generated template, and then displays a Launch Stack button on the portal for the customer to begin the onboarding process.

Figure 4: Launch UI
At this point, the customer clicks the Launch Stack button and begins the onboarding process for their AWS account. The stack creates the cross-account role with the provided policy embedded in the template, without the customer having to copy and paste policy documents and manually go through the role creation process.
There are a few outstanding items that would make this solution simpler still. How does the partner get the Amazon Resource Name (ARN) for the cross-account role we created? What happens to the custom template in the S3 bucket? What if the customer tears down the template without notifying the partner? We’ll continue to expand on this topic through future posts. See post 3 in our series here.
Let us know if you have any questions or comments!
Facilitating a Migration to AWS with CloudEndure by Leveraging Automation
By Carmen Puccio and Mandus Momberg. Carmen and Mandus are AWS Partner Solutions Architects focused on Migration.
It’s no secret that migrating software and services from an on-premises environment to the cloud entails unique considerations and requirements. To provide confidence in the outcome of your migration, your migration strategy needs to scale easily. This means that a large part of your workflow must be automated. There is no shortage of documentation on why automation in the cloud is important. In this post, we will show you how to perform an automated migration utilizing AWS Advanced Technology Partner CloudEndure, with a focus on incorporating automated tests so you can be confident that your application is working as expected post-migration.
The migration of a workload from on-premises to AWS requires careful planning and precise execution. There are many different strategies for moving to the cloud, and there are also numerous tools that help facilitate migration. All migration tools share common goals: to facilitate a migration to AWS by minimizing downtime and application workload impact, and to ensure that data loss is minimized.
Customers who want to quickly move their workloads to the cloud typically follow the rehost method, i.e. lift and shift. One of the challenges when executing a rehost is the amount of time it takes to manually confirm that a migrated application is performing as expected. Migrations that incorporate automation and rapid testing pipelines to validate proper migration are not only more likely to succeed but also improve efficiency as you take advantage of repeatable processes and decrease manual verification times. (more…)
Automating Lifecycle Rules for Multipart Uploads in Amazon S3
Erin McGill co-authored this blog with Mike Ruiz. Both Erin and Mike are AWS Partner Solutions Architects.
Amazon Simple Storage Service (Amazon S3) provides a secure, durable, highly scalable, and simple way to store your object data. It’s easy to create new buckets to contain data, and to store and retrieve any amount of data from those buckets at any time, from anywhere on the web, so the number of buckets and objects stored in an S3 account can quickly become substantial. To help you manage objects during their lifetime, AWS has developed lifecycle configurations for S3 buckets. If you are not familiar with S3 lifecycle rule creation, we recommend that you read Jeff Barr’s blog post on creating the lifecycle rules in the console. Jeff’s post walks through applying the multipart upload and deleting markers for expired objects. In this post, we’ll go beyond manual operations and explore automation for enforcement of S3 default policies.
Automating S3 bucket policy management
Why automate policy management? An APN Partner recently asked us, “How can we apply S3 lifecycle rules across all our S3 buckets in connection with IT-directed requirements?” In the example from this APN Partner, their IT department wanted to have the AbortIncompleteMultipartUpload rule applied to all their S3 buckets, regardless of when the bucket was created. This APN Partner works with large objects (objects larger than 5 GB), and uploads hundreds of these objects every day across hundreds of S3 buckets by using the multipart upload API. They explained that manually operating their scaled environment was very time consuming and prone to error and waste, so to we set to work identifying all the steps required to automate the process.
The maximum size for a single upload of an object in Amazon S3 is 5 GB. To store larger objects (up to 5 TB), you use the multipart upload API to split objects into smaller components and upload them independently or in parallel. When using the multipart upload API, the application interacting with S3 starts by breaking the large object into smaller parts. Next, it initiates a multipart upload to a specific bucket and provides a name for the final object, uploads all parts, and then signals completion of the multipart upload by sending a successful request to S3. Upon receiving the successful request, S3 assembles all the parts and creates the final object in the bucket. S3 stores the parts until it receives the successful request or until the job is aborted, and then frees up the parts storage. If S3 doesn’t receive a successful request, the object parts are stored in the bucket and are not visible in the console, but still incur a cost. To see any stored object parts, you can use the list-parts S3 API call. To delete the object parts that are left over from an incomplete multipart upload after a specific number of days, you can set a lifecycle rule with the AbortIncompleteMultipartUpload action.
Working with existing policies
It’s important to understand if a policy, or multiple policies, are already applied to the whole bucket or to a subset of objects within the bucket. The subset is defined by a policy prefix, designating an S3 bucket directory location or the beginning of an object name or key. For example, if the prefix is xyz, the rule applies only to the objects whose key name begins with the xyz string. If a prefix is not stated, the policy is applied to the whole bucket.
When designating a policy that applies to a whole S3 bucket, you do not provide a Prefix. If you attempt to apply the same action to a whole bucket policy that is already applied to xyz, you will get an error. For example, if there is an existing policy applied to the prefix xyz, with the action AbortIncompleteMultipartUploads and you want to use the same action in a whole bucket policy, it will fail:

This limitation is the same regardless of whether you’re applying a lifecycle rule through the command line or programmatically. If you want to be able to programmatically apply your default bucket lifecycle policy, you should keep this in mind, as this error will stop the rule from being applied to the bucket.
Using AWS Lambda to automate lifecycle policies
Automating enforcement of a default bucket policy is beneficial to many APN Partners and customers as manually applying a policy to every S3 bucket can be a daunting task and possibly prone to error. While there are many ways to automate enforcement of a default bucket policy, we are going to walk through doing so by creating a scheduled AWS Lambda function. For those who aren’t familiar with it, AWS Lambda is a compute service that lets you run code (written up as “Lambda functions”) without provisioning or managing servers. These functions execute in response to a wide variety of AWS service events and custom events, and can be used in a variety of scenarios including big data processing and automation scenarios like these. In this scenario, for the Lambda function, you can use Boto3, the Python SDK, and your AWS account. Using the SDK, you can easily interact with the AWS S3 API. Boto provides an easy to use, object-oriented API, as well as low-level direct service access.
The Lambda function will read a default configuration file in a designated policy bucket , and using the S3 API, check the lifecycle policies applied to all buckets, and verify that the action is applied in the policy. If the configuration is missing, then it will apply it. If there is a variance, it will log an error. The Lambda function can be scheduled to execute at a certain time interval to periodically run to ensure that all new buckets created in your account will have the default lifecycle policy applied even if the creator neglects to apply the policy when creating the bucket.
Applying a lifecycle policy using the S3 API will replace all bucket policies already applied to the S3 bucket. The documentation for the put_bucket_lifecycle_configuration states, “If a lifecycle configuration exists, it replaces it.” Whatever you put in the bucket via the SDK will overwrite any existing lifecycle configuration. Because of this limitation, we need to check all buckets and see if they already have a policy applied. If they do, then the policy applied needs to be taken into consideration when applying the default bucket policy.
You also need to consider the location of the S3 bucket when evaluating applied lifecycle policies. You might receive the following error message if you don’t provide the location of the S3 bucket:
Automation considerations
In the course of our testing, we found that there are six possible states that we need to consider for an S3 bucket when comparing a desired policy to policies already applied to the bucket:
- There are no policies applied to the S3 bucket.
- There are some policies that are applied, but they apply only to prefixes within the bucket, and do not match the action from the desired bucket policy within those policies.
- There are some policies that are applied, but they apply only to prefixes within the bucket, and one of the actions matches the desired action.
- There is a whole bucket policy (where Prefix = ”), and the desired action is not applied.
- There is a whole bucket policy and the desired action is applied, and its value is equal to the desired action value.
- There is a whole bucket policy and the desired action is applied and its value is not equal the desired action value.
If you want to automatically apply the desired action by default to all S3 buckets, then you need to consider all six of these possibilities.
Here is a table that describes these states:
| Policies? | Same Prefix? | Same Action? | Same Action Value? | Example |
| No | No | No | No | N/A |
| Yes | No | No | No | |
| Yes | No | Yes | Yes | |
| Yes | Yes | No | No |
    { …[snip]…
        u'Rules': [ u'Expiration': { u'Days': 395},
                    u'ID': 'xxx234',
                    u'Prefix': '',
                    u'Status': 'Enabled',
                    u'Transitions': [ { u'Days': 30,
                                        u'StorageClass': 'STANDARD_IA'}]}]
}
|
| Yes | Yes | Yes | Yes | |
| Yes | Yes | Yes | No |
Listing account S3 buckets
Request a listing of the S3 buckets in the account. From the returned list, you request the lifecycle policy for each bucket. The following is an example of a response from a get_bucket_lifecycle_configuration request (this has been reformatted for readability):
The request returns a dictionary. The key in the dictionary of interest to us is the Rules key—more importantly, the list within the Rules key:
In this case, the list contains one dictionary entry with 4 keys:
Since each bucket lifecycle policy can have multiple rules, you must check each rule and compare it to the desired rule. In this case, you can ignore the ID of the rule, as it is optional and has no effect on the rule itself. You can assume that the Status for all applied lifecycle rules is Enabled.
Verifying existing lifecycle policies
If policies exist in the bucket, you can verify that the desired policy is applied, check for potential conflicts, and identify the bucket as a candidate for policy update.
Checking lifecycle policies on an S3 bucket that does not have any policies raises a ClientError:
To get around this error, create an exception to catch ClientError and keep track of buckets that have no lifecycle policies applied.
For buckets that have lifecycle policies, we do the following:
- Check if the bucket has the desired action. In this example, the action is
AbortIncompleteMultipartUpload. - If the bucket has the desired action, then check the value. If the value doesn’t match, log a message of the mismatch.
- If the value does match, check the policy
Prefixvalue.- If
Prefix = ''for the policy, then the default policy has been applied to the whole bucket. This is the desired state. - If
Prefixhas a value, then log a message because there is a conflicting lifecycle policy applied to a subset of objects within the bucket.
- If
- If the bucket has policies that do not match the desired default action, then check the
Prefixvalue for each policy. This value will determine how the new lifecycle policy rule list to apply to the bucket is generated so it is in the desired state.- If there is a prefix value, then append the desired action to the Rules dictionary.
- If
Prefix = '', then add the action to the existing whole bucket policy.
Programmatically applying the default bucket policy using Python
Now, you want to apply the default whole bucket policy to those buckets that do not have overlapping or conflicting policies.
Because putting a lifecycle configuration via the SDK overwrites existing lifecycle configurations, simply using the put_bucket_lifecycle_configuration method without any logic will remove any previously applied bucket lifecycle configuration.
If there is a bucket policy that already exists for a prefix that also contains the desired action or has the wrong value for the desired action, log a message to request a manual review of these bucket lifecycle configurations. There can be a valid reason why the bucket policies are different from the desired default, so this will give you a chance to highlight the differences and easily review them.
If the bucket already has a lifecycle policy applied to a subset of objects and the action doesn’t overlap, you can use the Python append method on the Rules list. For example, if the bucket_policy json contains the following list as the value of the Rules key:
you run bucket_policy['Rules'].append(desired_whole_bucket_policy) and apply a newly constructed policy to the bucket:
To be able to apply the default action to existing lifecycle policy applied to the whole bucket, you can compare the keys of the applied whole bucket lifecycle rule to the keys that are in the desired default policy. Once you find the key that is in the default rule but missing from the applied rule, we can add it to the applied bucket rule dictionary.
For example, if the following policy is applied to the bucket:
You can check to see if each key in the desired default policy exists in the currently applied policy. If missing, then we can add the key and value to the dictionary whole_bucket_lifecycle_rule[action] = desired_policy[action].
The newly constructed whole bucket policy is:
Output/Logging
Your scheduled Lambda function updates buckets with the desired default policy where it was straightforward to do so, as well as logs a list of buckets that weren’t able to be updated due to an incorrect value or where an action was already applied to a subset of objects.
Conclusion
In this post, we’ve walked through various S3 lifecycle policies, how to deal with pre-existing policies on buckets across various regions in AWS, and how to automate the application of lifecycle policies across hundreds of buckets, specifically focusing on the AbortIncompleteMultipartUpload action. We hope you’re able to use this information to optimize the management of multipart uploads as you scale.
For more information, we encourage you to visit the S3 documentation page.
Have You Read Our 2016 AWS Partner Solutions Architect Guest Posts?
In 2016, we hosted 38 guest posts from AWS Partner Solutions Architects (SAs), who work very closely with both Consulting and Technology Partners as they build solutions on AWS. As we kick off 2017, I want to take a look back at all of the fantastic content created by our SAs. A few key themes emerged throughout SA content in 2016, including a focus on building SaaS on AWS, DevOps and how to take advantage of particular AWS DevOps Competency Partner tools on AWS, Healthcare and Life Sciences, Networking, and AWS Quick Starts.
Partner SA Guest Posts
- How to Prepare Your Business and Technical Teams on AWS, by Erik Farr
- Data Democratization with APN Technology Partner Calgary Scientific, by Chris Crosbie
- Multi-Tenant Storage with Amazon DynamoDB, by Tod Golding
- Terraform: Beyond the Basics with AWS, by Josh Campbell and Brandon Chavis
- Securely Accessing Customer AWS Accounts with Cross-Account IAM Roles, by David Rocamora
- Modeling SaaS Tenant Profiles on AWS, by Tod Golding
- Architecting Microservices Using Weave Net and Amazon EC2 Container Service, by Brandon Chavis
- Optimizing SaaS Tenant Workflows and Costs, by Tod Golding
- Amazon VPC for On-Premises Network Engineers, Part One, by Nick Matthews
- Automatically Delete Terminated Instances in Chef Server with AWS Lambda and CloudWatch Events, by Josh Campbell
- Amazon VPC for On-Premises Network Engineers, Part Two, by Nick Matthews
- Taking NAT to the Next Level in AWS CloudFormation Templates, by Santiago Cardenas
- AWS Sample Integrations for Atlassian Bitbucket Pipelines, by Josh Campbell
- Managing SaaS Users with Amazon Cognito, by Tod Golding
- AWS Quick Start for Docker Datacenter (DDC), by Brandon Chavis
- Oracle Database Encryption Options on Amazon RDS, by Sanjeet Sahay
- Migrating Applications to SaaS: A Minimally Invasive Approach, by Tod Golding
- Deploy Red Hat OpenShift on Amazon Web Services, by Tony Vattathil
- How to Deploy a High Availability Web Service on AWS Using Spotinst, by Joseph Fontes
- How AWS Partners Can Optimize Healthcare by Orchestrating HIPAA Workloads on AWS, by Niranjan Hira
- Migrating Applications to SaaS: Rethinking Your Design, by Tod Golding
- Introducing the SaaS Enablement Framework for AWS Partners, by Tod Golding
- July Partner SA Highlights – Learn About Opsee, Splunk, and Twistlock, by David Rocamora and Brandon Chavis
- AWS Summit Santa Clara 2016 Recap, by Paul Sears
- How to List Your Product in AWS Marketplace, by Suney Sharma
- How AWS Partner Medidata Solutions Approaches GxP Compliance in the Cloud, by Chris Crosbie
- AWS Networking for Developers, by Nick Matthews and Mark Stephens
- How to Build Sparse EBS Volumes for Fun and Easy Snapshotting, by Ian Scofield and Mike Ruiz
- New AWS Security Competency Partner Solution: Sophos Outbound Gateway, by Nick Matthews and Sophos
- August Partner SA Highlights: Learn about Freshservice, Fugue, and Zerto!, by Ian Scofield and Juan Villa
- How Signiant Uses AWS Lambda and Amazon DynamoDB to run its SaaS Solution on AWS, by Mike Deck
- Automating ECR Authentication on Marathon with the Amazon ECR Credential Helper, by Erin McGill and Brandon Chavis
- AWS Quick Starts for Atlassian Tools, by Shiva Narayanaswamy
- Get Started with HashiCorp Consul and Vault on AWS with Our New AWS Quick Starts, by Brandon Chavis
- How to Navigate Multitenant Storage Strategies on AWS – A New SaaS Whitepaper, by Tod Golding
- How to Integrate Your SaaS Service with SaaS Subscriptions for AWS Marketplace, by David Aiken
- 2016 Technical Recap: Healthcare and Life Sciences, by Aaron Friedman
- Financial Services Segment re:Invent Recap, by Peter Williams
There’ll be plenty more to come from our SAs in 2017, and we want to hear from you. What topics would you like to see our SAs discuss on the APN Blog? What would be most helpful for you as you continue to take advantage of AWS and build your business? Tell us in the comments. We look forward to hearing from you!
How Signiant Uses AWS Lambda and Amazon DynamoDB to run its SaaS Solution on AWS
By Mike Deck, Partner Solutions Architect, AWS
When AWS Lambda was launched in 2014, it unlocked an ability for AWS customers and partners to implement full-featured, scalable solutions without the need to deploy or manage any servers. I work with many SaaS partners who are now leveraging the serverless model for various components of their architecture. The first step in this journey is often to re-engineer ancillary workloads that can be easily re-implemented without servers. This can afford immediate reductions in infrastructure costs and operational surface area as well as provide valuable experience in building and running systems using this new paradigm.
Signiant, an Advanced APN Technology Partner, Digital Media Competency Partner, and Storage Competency Partner, is a textbook example of a firm who has put this pattern into practice. Over time, Signiant has re-architected its solution on AWS that leverages the bounce and delivery notifications provided by Amazon Simple Email Service (Amazon SES), via an Amazon Simple Notification Service (Amazon SNS) topic. Each iteration of the company’s system has made improvements to the scalability and operational efficiency of the solution, culminating in a simple, Lambda-based serverless architecture. In this post, I will walk through how Signiant has re-architected its SaaS solution on AWS to take advantage of the capabilities of AWS Lambda and a serverless architecture.
Solution Overview
Signiant’s SaaS solution on AWS is called Media Shuttle. This product is used pervasively within the media and entertainment industry to quickly transfer very large files. Using a simple browser plugin or mobile app, users can send or share files of any size through a simple portal. Media Shuttle takes care of the transfer acceleration, security, scalability, elasticity, and resource management on the user’s behalf.
Architecture Evolution
One key feature of Media Shuttle is its delivery notification system, built on Amazon SES. When a file becomes available, the system will send an email to the user with a secure link for downloading the content. These notification emails will occasionally bounce or be caught in spam filtering systems which prevents users from retrieving their files, and generally results in a support call from the sender to figure out why the email was never received.
To improve the support team’s ability to resolve these issues while maintaining the privacy of the sender and email content, Signiant developed a simple system for tracking email bounces that has evolved over time. The initial solution, depicted below, was to subscribe an internal email distribution list to the Amazon SNS topic that received the bounce notifications. This provided simple alerts to the support team when emails bounced and was very easy to implement, but it presented scalability problems as adoption of the product grew. Pretty soon, there were thousands of notifications flooding the support team’s inboxes, and searching for a given customer’s email quickly became cumbersome.

In the next iteration of the solution, the email list was replaced by a database-backed web application running on Amazon Elastic Compute Cloud (Amazon EC2). The bounce notifications were delivered via the Amazon SNS topic to an Amazon Simple Queue Service (Amazon SQS) queue. The application would poll the queue and update a local database that the support team could then search through a simple web UI. Shortly after this version of the system was released, SES added the ability to capture notifications for deliveries in addition to bounces. Signiant added these notifications to the system as well, so that support engineers could see successful delivery statuses in addition to bounces.

The v2 architecture shown above worked well. It was more scalable than using an email distribution list, and the search capabilities were vastly improved. Despite these functional improvements, the new system required more maintenance than the team would have liked. They now had an additional server they were running just for this process, and the database they had chosen was having difficulties managing the increasing load. To optimize the system further, the team decided to re-engineer its solution to take advantage of the benefits of AWS Lambda and a serverless architecture.
The team designed a completely serverless architecture using Lambda to host the message processing logic and Amazon DynamoDB for its database. In the current architecture, instead of a PHP process polling a queue, they have a simple Lambda function written in Python subscribed to the SNS topics fed by SES. The Lambda function was easy to develop based on their existing PHP application that processed SQS messages. The relational database has been replaced by a DynamoDB table which is trivial to scale as the number of emails tracked continues to grow.

Signiant’s current architecture for capturing email status is depicted above. While this system captures delivery status of SES emails, the pattern being employed is extremely versatile and can be applied to any event-driven data processing workflow. By moving to a serverless architecture, Signiant not only decreased the direct cost of running this system, but also removed the operational overhead of managing a one-off server for this isolated task. “Porting our previous message processor to run on Lambda was really straightforward and the new design is much simpler and more robust than our previous server-based system,” said Dave North, the Director of DevOps at Signiant. The new architecture also eliminated the scaling concerns present in the other versions of the system. Using AWS Lambda, the message processors now scale seamlessly without any additional configuration or management, and the database’s throughput can be increased with a simple parameter update.
Conclusion
In this post, I’ve walked through how Signiant has evolved its architecture over time to take advantage of a serverless architecture design. Whether event data is delivered via an SNS topic as is the case here, sent directly to Lambda through a direct service integration as is the case with Amazon Simple Storage Service (Amazon S3), or generated from your own applications using the AWS SDK, you can build systems to capture, process and report on those events using this same basic architecture.
If you would like to see working code samples for the system discussed in this post, Signiant has open sourced both the code for the Lambda functions (https://github.com/Signiant/aws-ses-recorder) and the reporting console application (https://github.com/Signiant/aws-ses-recorder-query-tool). Note that these are not managed by AWS. You can also get started building you own serverless SES notification handler using the SES notifications blueprint in the Lambda console.
How AWS Partners Can Optimize Healthcare by Orchestrating HIPAA Workloads on AWS
Christopher Crosbie was also a contributor on this post.
In his new book, The Death of Cancer, world renowned oncologist Dr. Vincent T. DeVita Jr. laments: “… it illustrates what has been, for me, a source of perennial frustration: at this date, we are not limited by the science; we are limited by our ability to make good use of the information and treatments we already have.”[1] This frustration with the sluggish pace of technology adoption in healthcare is uncomfortably familiar. To make matters worse, illegal access of medical records continues at an alarming rate; as the Financial Times reported in December 2015, over 100m health records were hacked in 2015.[2] Not only have we been slow to employ new technologies, we have also come to tolerate a surprising dearth of privacy.
In this post, we will explore some ways AWS partners can use AWS orchestration services in conjunction with a DevSecOps methodology to deliver technology solutions that help to optimize healthcare while maintaining HIPAA compliance to safeguard patient privacy.[3]
HIPAA-eligible Services and Orchestration Services
Let’s start with HIPAA-eligible services and how they can be used together with orchestration services for healthcare applications. Customers who are subject to HIPAA and store Protected Health Information (PHI) on AWS must designate their account as a HIPAA account. Customers may use any AWS service in these accounts, but only services defined as HIPAA-eligible services in the Business Associates Agreement (BAA) should be used to process, store, or transmit PHI.
AWS follows a standards-based risk management program to ensure that the HIPAA-eligible services specifically support the security, control, and administrative processes required under HIPAA. Using these services to store and process PHI allows AWS and AWS customers to address the HIPAA requirements applicable to our utility-based operating model.
AWS is constantly seeking customer feedback for new services to add to the AWS HIPAA compliance program. Currently there are nine HIPAA-eligible services, including Amazon DynamoDB, Amazon Elastic Block Store (Amazon EBS), Amazon Elastic Compute Cloud (Amazon EC2), Amazon Elastic MapReduce (EMR), Elastic Load Balancing (ELB), Amazon Glacier, Amazon Relational Database Service (RDS) (MySQL and Oracle engines), Amazon Redshift, and Amazon Simple Storage Service (Amazon S3) (excluding Amazon S3 Transfer Acceleration).
Just because a service is not HIPAA-eligible doesn’t mean that you can’t use it for healthcare applications. In fact, many services you would use as part of a typical DevSecOps architecture pattern are only used to automate and schedule automation activities, and therefore do not store, process, or transmit PHI. As long as only HIPAA-eligible services are used to store, process, or transmit PHI, you may be able to use orchestration services such as AWS CloudFormation, AWS Elastic Beanstalk, Amazon EC2 Container Service (Amazon ECS), and AWS OpsWorks to assist with HIPAA compliance and security by automating activities that safeguard PHI.
Let’s walk through a few example scenarios using AWS Elastic Beanstalk, Amazon ECS, and AWS Lambda to demonstrate how AWS partners have used orchestration services to optimize their healthcare application to meet their own HIPAA eligibility requirements.
AWS Elastic Beanstalk Example
Consider an internal-facing IIS web application that is deployed using AWS Elastic Beanstalk.

Figure 1: Elastic Beanstalk Application
Set up the network
Let’s start with a simple AWS CloudFormation template that does a few things for us (the template uses one Availability Zone for illustration). First, it sets up an Amazon VPC so that EC2 instances launched in this VPC are launched with their tenancy attribute set to dedicated. It then creates a public subnet and a private subnet with the necessary routing and networking components so that instances in the private subnet can connect to the Internet as needed.
Here’s the AWS CloudFormation template that sets up networking: https://github.com/awslabs/apn-blog/blob/master/orchestrating/vpc-with-public-and-private-subnets.json
Set up the application
Now we have a logical network where we can launch Dedicated Instances so that they are only accessible internally. Assuming we also have an Amazon EBS snapshot that we can use as the base image for our encrypted EBS volume and the Elastic Beanstalk application bundle that we wish to deploy, we can use an AWS CloudFormation template to easily set up this application. First, we set up a new Elastic Beanstalk application (we could also use the .NET Sample Application from the AWS Elastic Beanstalk tutorial); then, we make our bundle available as an application version; finally, we launch an Elastic Beanstalk environment so we can interact with our new web service that needs to process PHI.
Here’s the AWS CloudFormation template: https://github.com/awslabs/apn-blog/blob/master/orchestrating/eb-iis-app-in-vpc.json
We would also configure the Elastic Load Balancer for end-to-end encryption so secure connections are terminated at the load balancer and traffic from the load balancer to the back-end instances is re-encrypted. Another option here would be to have the load balancer relay HTTPS traffic without decryption, but then the load balancer would not be able to optimize routing or report response metrics because it would not be able to “see” requests.
Note how we used the power of AWS CloudFormation and Elastic Beanstalk but left our application (which is running on EC2 Dedicated Instances with encrypted EBS volumes) with the responsibility to store, process, and transmit PHI.
Did it work?
The new application is visible on the Elastic Beanstalk console with a URI for the load balancer. We then log into the Bastion host and use the browser there to confirm the application is running.
Amazon ECS Example
In this second scenario, we look at Amazon EC2 Container Service (Amazon ECS) and Amazon EC2 Container Registry (Amazon ECR). Consider a PHP application that runs on Docker.
Since ECS is only orchestrating and scheduling application containers that are deployed and run on a cluster of EC2 instances, ECS can be used under the AWS BAA because the actual PHI is managed on EC2 (a HIPAA-eligible service). We must still ensure that EC2 instances processing, storing or transmitting PHI are launched with dedicated tenancy and that PHI is encrypted at rest and in transit. In addition, we must ensure that no PHI leaks into any configuration or metadata such as a task definition. As an example, this means the definition of what applications to start must not contain any PHI, and the exit string of a failed container must not contain PHI as this data is persisted in the ECS service itself, outside of EC2.
Similarly, we can use ECR to house our Docker images as long as we can ensure that the images themselves do not contain any PHI. As an example, images that require cached PHI or PHI as “seed” data must not be added to ECR. A custom registry on dedicated tenancy EC2 instances with encrypted volumes might serve as an alternative.
Set up ECR & ECS
We followed the Getting Started Guide to create the IAM roles that are required and then created a repository for Docker images.
# from local console using aws-shell (https://github.com/awslabs/aws-shell)
aws> ecr create-repository --region us-west-2 --repository-name aws-phi-demo
Set up the network
This AWS CloudFormation template creates a VPC with dedicated tenancy for use with ECS, a private subnet, and a public subnet. It creates the corresponding route tables, Internet gateway, and managed NAT gateway. It also adds the appropriate network routes. Then, it creates an ECS security group for container instances in the VPC. Finally, it creates a Linux bastion host. For illustration, we also use this instance as our Docker-admin instance to manage Docker images (you can, of course, build and manage Docker images in other ways).
Here’s the template: https://github.com/awslabs/apn-blog/blob/master/orchestrating/ecs-vpc-with-public-and-private-subnets.json
Set up Docker
Next, we created a Docker image for the application.
# log in to the Docker-admin instance (get IP address from the Outputs tab)
$ ssh -i  ec2-user@

# install packages needed by new image (for illustration, we'll use a simple php web app)
$ sudo yum install git aws-cli
$ git clone https://github.com/awslabs/ecs-demo-php-simple-app
$ cd ecs-demo-php-simple-app/

# optional - update Dockerfile to use ubuntu:14.04
# change FROM to ubuntu:14.04
# change source location to /var/www/html (from /var/www)
# change to use apache2ctl (instead of apache)

# build the Docker image from the Dockerfile and tag it as aws-phi-demo for the default registry (AWS ECR)
# substitute ${awsAccountId} with your AWS Account ID (e.g., 123456789012)
$ export awsAccountId=...
$ docker build -t aws-phi-demo .

# verify that image was created correctly and pushed to the appropriate repository
$ docker images

# run the newly created Docker image mapping ports as needed
$ docker run -p 80:80 -p 443:443 aws-phi-demo

# confirm that the site is available (e.g., use another terminal session on the docker-admin instance)
$ curl --verbose "http://localhost/"

# stop the Docker container (docker ps, docker stop from the other terminal)
We pushed the image so it became available in ECR.
# get login command for docker (need to set up credentials first or run this somewhere else)
$ aws ecr get-login --region us-west-2

# login using docker login command (provided above)

# tag the image
$ docker tag aws-phi-demo:latest \
    ${awsAccountId}.dkr.ecr.us-west-2.amazonaws.com/aws-phi-demo:latest

# push the image to the new repo
$ docker push ${awsAccountId}.dkr.ecr.us-west-2.amazonaws.com/aws-phi-demo:latest

# confirm the image is now available (e.g., from aws-shell on the local console)
aws> ecr list-images --repository-name aws-phi-demo
Start up a cluster
This AWS CloudFormation template creates an ECS cluster with an internal-facing load balancer. It then uses the ECR reference to set up a task definition and a service for the Docker image that has been provided. Finally, it sets up a launch configuration and an Auto Scaling Group to launch some container instances to host the application.
Note: Container instances are created with encrypted volumes, so data is protected at rest (Docker creates LVM volumes from the EBS volumes provided).
Here’s the template: https://github.com/awslabs/apn-blog/blob/master/orchestrating/ecs-php-app-in-vpc.json
Did it work?
We created an internal-facing application, so we used the Docker-admin instance to confirm it’s available.
# from the Docker-admin instance, confirm that the app is available using the load balancer, for example...
$ curl --verbose "http://internal-ecs-demo-EcsElasti-11YT610RK4VGN-499766265.us-west-2.elb.amazonaws.com"
As with the previous example, we see how another set of orchestration services helps to automate application activities while relying on HIPAA-eligible services to store, process, and transmit PHI.
AWS Lambda Example
Consider the scenario where PHI is posted to an S3 bucket and we need an application similar to the ones above to process the data and store results back to S3. Can we use S3 event notifications with a Lambda function? Yes, we can, as long as the Lambda function does not store, process, or transmit PHI.
Set up an S3 bucket
Let’s start with a bucket.
# from aws-shell
# create the bucket
aws> s3 mb --region us-west-2 s3://phi-demo

# attach a policy that requires encrypted uploads (using SSE-S3)
aws> s3api put-bucket-policy --bucket phi-demo --policy
'{
   "Version":"2012-10-17",
   "Id":"PutObjPolicy",
   "Statement":[{
         "Sid":"DenyUnEncryptedObjectUploads",
         "Effect":"Deny",
         "Principal":"*",
         "Action":"s3:PutObject",
         "Resource":"arn:aws:s3:::phi-demo/*",
         "Condition":{
            "StringNotEquals":{
               "s3:x-amz-server-side-encryption":"AES256"
            }
         }
      }
   ]
}'

# confirm the policy is in effect
aws> s3 cp ip-ranges.json "s3://phi-demo/"
upload failed: ./ip-ranges.json to s3://phi-demo/ip-ranges.json A client error
(AccessDenied) occurred when calling the PutObject operation: Access Denied

# use SSE-S3 encryption this time
aws> s3 cp --sse AES256  ip-ranges.json "s3://phi-demo/"
upload: ./ip-ranges.json to s3://phi-demo/ip-ranges.json

# confirm SSE is turned on
aws> s3api head-object --bucket phi-demo --key "ip-ranges.json"

# add a "folder" for data
aws> s3api put-object --bucket phi-demo --key "data/"
Set up AWS Lambda
Then, we need to set up a new Lambda function that is invoked when an object is added to the bucket.
# create the IAM Role we need and attach the access policy to it
aws> iam create-role --role-name lambda_s3_exec_role --assume-role-policy-document
'{
  "Version": "2012-10-17",
  "Statement": [
    {
      "Sid": "",
      "Effect": "Allow",
      "Principal": {
        "Service": "lambda.amazonaws.com"
      },
      "Action": "sts:AssumeRole"
    }
  ]
}'

aws> iam put-role-policy --role-name lambda_s3_exec_role
--policy-name s3_access --policy-document
'{
  "Version": "2012-10-17",
  "Statement": [
    {
      "Effect": "Allow",
      "Action": [
        "logs:CreateLogGroup",
        "logs:CreateLogStream",
        "logs:PutLogEvents"
      ],
      "Resource": "arn:aws:logs:*:*:*"
    },
    {
      "Effect": "Allow",
      "Action": [
        "s3:GetObject",
        "s3:PutObject"
      ],
      "Resource": [
        "arn:aws:s3:::phi-demo"
      ]
    }
  ]
}'

# make function source available (as an example, invoke PHI service with S3 URI)
# use the s3-get-object blueprint as a guide, but remember that the function
# must not retrieve the PHI bytes
aws> s3 cp orchestrate-phi-demo.zip s3://phi-demo/src/lambda/orchestrate-phi-demo.zip

# create a function (replace ${account} with the correct account number)
aws> lambda create-function --cli-input-json
'{
    "FunctionName": "orchestrate-phi-demo",
    "Runtime": "nodejs",
    "Role": "arn:aws:iam::${account}:role/lambda_s3_exec_role",
    "Handler": "index.handler",
    "Code": {
        "S3Bucket": "phi-demo",
        "S3Key": "src/lambda/orchestrate-phi-demo.zip"
    },
    "Description": "Function that will orchestrate phi-demo",
    "Timeout": 300,
    "MemorySize": 128,
    "Publish": true
}'

# allow S3 to invoke the function (this should include a source-account so only
# the intended bucket is connected
aws> lambda add-permission --region us-west-2 --function-name orchestrate-phi-demo \
  --action "lambda:InvokeFunction" --principal s3.amazonaws.com \
  --statement-id 20160502-phi-demo-lambda --source-arn arn:aws:s3:::phi-demo

# configure Notifications so the function is invoked when s3 Objects are created
# (replace ${account} with the correct account number)
aws> s3api put-bucket-notification-configuration --bucket phi-demo --region us-west-2 --notification-configuration
'{
    "LambdaFunctionConfigurations": [
        {
            "Id": "orchestrate-phi-demo-nc",
            "LambdaFunctionArn": "arn:aws:lambda:us-west-2:
${account}:function:orchestrate-phi-demo",
            "Events": [
                "s3:ObjectCreated:*"
            ],
            "Filter": {
                "Key": {
                    "FilterRules": [
                        {
                            "Name": "prefix",
                            "Value": "data/"
                        },
                        {
                            "Name": "suffix",
                            "Value": ".phi"
                        }
                    ]
                }
            }
        }
    ]
}'
Did it work?
When a new object is added, the function is invoked and the corresponding PHI service is invoked.
# add some object
aws> s3 cp ./test.phi s3://phi-demo/data/test-001.phi
Use CloudWatch Logs to confirm that the function executed successfully.
Conclusion
We have just reviewed three simple examples of how HIPAA-eligible services can be used with orchestration services to safeguard patient privacy while delivering solutions that can help optimize healthcare applications. AWS partners have tools at their disposal to address the need to manage HIPAA-compliant workloads. Healthcare customers should not fear non-eligible services just because they are non-eligible. Some services don’t typically interact with PHI so they may not need to be “eligible”.
[1] DeVita, Vincent T., and Elizabeth DeVita-Raeburn. The Death of Cancer: After Fifty Years on the Front Lines of Medicine, a Pioneering Oncologist Reveals Why the War on Cancer Is Winnable–and How We Can Get There. Page 32. New York: Sarah Crichton Books; Farrar, Straus, and Giroux, 2015.
[2] Scannell, Kara, and Gina Chon. “Cyber Security: Attack of the Health Hackers – FT.com.” Financial Times. N.p., 21 Dec. 2015. Web. 05 July 2016.
[3] Note that this post is not intended to guarantee HIPAA compliance – customers should ensure that any AWS services are used consistent with their HIPAA compliance programs, that risks are addressed in their risk analysis and risk management programs, and that they consult with qualified HIPAA counsel or consultants when appropriate.
Learn about the New Sumo Logic App for AWS Lambda
Today, Advanced all-in APN Technology Partner Sumo Logic, also an AWS Big Data and Security Competency Partner, made its App for AWS Lambda generally available and introduced a purpose-built Lambda function, which is immediately available for launch in the AWS Blueprint library.
My colleague Bryan Liston wrote a great blog post about the launch over on the AWS Compute Blog. Click here to check it out, and learn more about how the Sumo Logic App for AWS Lambda works.
Our friends over at Sumo Logic also issued a press release on the launch, which you can read here.
Want to learn more about Sumo Logic’s journey as an APN Partner? Watch the company’s AWS Partner Success video below: