Category: AWS CloudFormation
Partner SA Roundup – July 2017
This month, Juan Villa, Pratap Ramamurthy, and Roy Rodan from the Emerging Partner SA team highlight a few of the partners they work with. They’ll be exploring Microchip, Domino, and Cohesive Networks.
Microchip Zero Touch Secure Provisioning Kit, by Juan Villa
![]() AWS IoT is a managed cloud platform that enables connected devices to easily and securely interact with cloud applications and other devices. In order for devices to interact with AWS IoT via the Message Queue Telemetry Transport (MQTT) protocol, they must first authenticate using Transport Layer Security (TLS) mutual authentication. This process involves the use of X.509 certificates on both the devices and in AWS IoT. A single certificate contains a private and a public key component. An IoT device needs to store the private key that corresponds to its certificate in order to establish a TLS connection with mutual authentication.
AWS IoT is a managed cloud platform that enables connected devices to easily and securely interact with cloud applications and other devices. In order for devices to interact with AWS IoT via the Message Queue Telemetry Transport (MQTT) protocol, they must first authenticate using Transport Layer Security (TLS) mutual authentication. This process involves the use of X.509 certificates on both the devices and in AWS IoT. A single certificate contains a private and a public key component. An IoT device needs to store the private key that corresponds to its certificate in order to establish a TLS connection with mutual authentication.
Private keys can be somewhat difficult to store securely on IoT devices. It’s easy to simply store data on a device’s local memory, but this is not enough to protect the key from tampering. It’s quite easy, and affordable, to purchase the necessary hardware to read the content of the memory from most microcontrollers and memory components used on IoT devices. This means that private keys used for authentication and establishing trust need to be stored in a secure manner.
This is where a secure element chip comes in! Microchip, an APN Advanced Technology Partner, is a silicon manufacturer that makes a secure element chip called the ATECC508A. This chip has a hardware-based secure key storage mechanism that is tamper-proof. In fact, once a key is stored in the ATECC508A, its contents cannot be read. The chip accomplishes this with hardware-based cryptographic acceleration features that allow it to perform cryptographic operations very quickly and with power efficiency. When considering ATECC508A for your product, keep in mind that Microchip can preload certificates on the secure element during manufacturing, before delivery. Combining this feature with AWS IoT’s support for custom certificate authorities and just-in-time registration can streamline device provisioning and security.
To make this secure element chip easy for you to try out, Microchip makes an evaluation kit called the Zero Touch Secure Provisioning Kit. This kit includes a SAM G55 Cortex-M4 microcontroller, the ATECC508A secure element, and an ATWINC1500 power-efficient 802.11 b/g/n module, and comes with instructions on how to get started with AWS IoT. With this combination of silicon products you can begin testing and developing your next IoT product in a secure fashion.
Before you work on your next IoT project, I recommend that you consider a secure element in your design. For more information on ATECC508A, please read the datasheet on the Microchip website.
Domino Data Science Platform, by Pratap Ramamurthy
 Machine learning, artificial intelligence, and predictive analytics are all data science techniques. Data scientists analyze data, search for insights that can be extracted, and build predictive models to solve business problems. To help data scientists with these tasks, a new set of tools, like Jupyter notebooks, as well as a wide variety of software packages ranging from deep learning neural network frameworks, like MXNet, to CUDA drivers, are becoming popular. Data science as a field is growing rapidly as companies increase their reliance on these new technologies.
However, supporting a team of data scientists can be challenging. They need access to different tools and software packages, as well as a variety of servers connected to the cloud. They want to collaborate by sharing projects, not just code or results. They want to be able to publish models with minimal friction. While data scientists want flexibility, companies need to ensure security and compliance. Companies also need to understand resource how resources like data and compute power are being used.
Domino, an APN Advanced Technology Partner, solves these challenges by providing a convenient platform for data scientists to spin up interactive workspaces using the tools that they already know and love e.g., Jupyter, RStudio, Zeppelin, as well as commercial languages like SAS and Matlab, as seen in the diagram below.
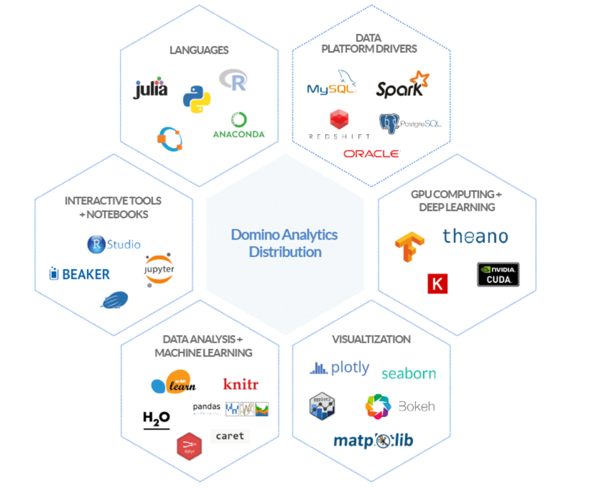
Image used with permission
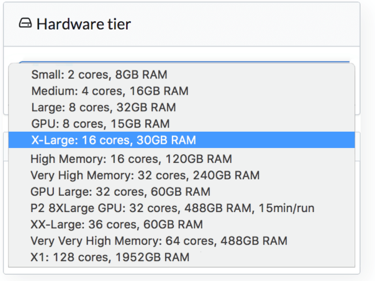
In the Domino platform, users can run experiments on a wide variety of instances that mirror the latest Amazon EC2 options provided by AWS, as seen in the screenshot. Customers can run a notebook on instances with up to 2 TB of RAM with the AWS X1 instance family. If more computational power is needed, you can switch the same notebook to GPU instances as necessary or connect to a Spark cluster.
 Because the software used for data science and machine learning has several layers, and new software technologies are introduced and adopted rapidly, the data science environment is often difficult to deploy and manage. Domino solves this problem by storing the notebooks, along with the software dependencies, inside a Docker image. This allows the same code to be rerun consistently in the future. There is no need to manually reconstruct the software, and this saves valuable time for data scientists.
Domino helps data scientists share and collaborate. They have introduced the software development concepts of code sharing, peer review, and discussions seamlessly into the data science platform.
For companies that have not yet started their cloud migration, Domino on AWS makes data science an excellent first project. Domino runs entirely on AWS and integrates well into many AWS services. Customers who have stored large amounts of data in Amazon S3 can easily access it from within Domino. After training their models by using this data, they can easily deploy their machine learning model into AWS with a click of a button, and within minutes access it using an API. All of these features help data scientists focus on data science and not the underlying platform.
Today, Domino Data Science Platform is available as a SaaS offering at the Domino website. Additionally, if you prefer to run the Domino software in your own virtual private cloud (VPC), you can install the supporting software by using an AWS CloudFormation template that will be provided to you. If you prefer a dedicated VPC setting, Domino also offers a managed service offering, which runs Data Science Platform in a separate VPC. Before considering those options, get a quick feel for the platform by signing up for a free trial.
Cohesive Networks, by Roy Rodan
![]() Many AWS customers have a hybrid network topology where part of their infrastructure is on premises and part is within the AWS Cloud. Most IT experts and developers aren’t concerned with where the infrastructure resides—all they want is easy access to all their resources, remote or local, from their local networks.
Many AWS customers have a hybrid network topology where part of their infrastructure is on premises and part is within the AWS Cloud. Most IT experts and developers aren’t concerned with where the infrastructure resides—all they want is easy access to all their resources, remote or local, from their local networks.
So how do you manage all these networks as a single distributed network in a secure fashion? The configuration and maintenance of such a complex environment can be challenging.
Cohesive Networks, an APN Advanced Technology Partner, has a product called VNS3:vpn, which helps alleviate some of these challenges. The VNS3 product family helps you build and manage a secure, highly available, and self-healing network between multiple regions, cloud providers, and/or physical data centers. VNS3:vpn is available as an Amazon Machine Image (AMI) on the AWS Marketplace, and can be deployed on an Amazon EC2 instance inside your VPCs.
One of the interesting features of VNS3 is its ability to create meshed connectivity between multiple locations and run an overlay network on top. This effectively creates a single distributed network across locations by peering several remote VNS3 controllers.
Here is an example of a network architecture that uses VNS3 for peering:
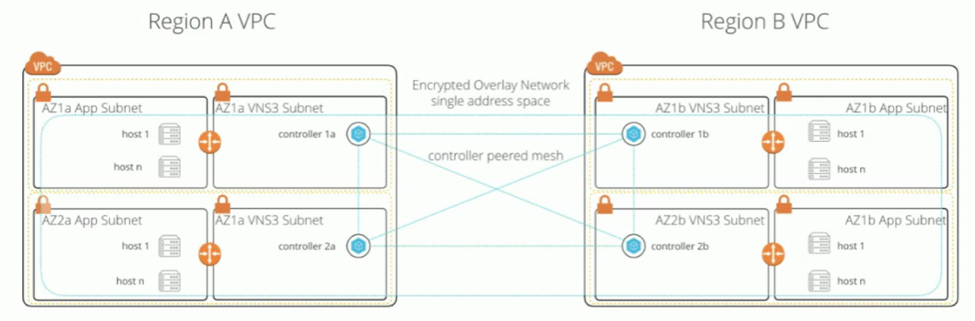
The VNS3 controllers act as six machines in one, to address all your network needs:
- Router
- Switch
- SSL/IPsec VPN concentrator
- Firewall
- Protocol redistributor
- Extensible network functions virtualization (NFV)
The setup process is straightforward and well-documented with both how-to videos and detailed configuration guides.
Cohesive Networks also provides a web-based monitoring and management system called VNS3:ms in a separate server, where you can update your network topology, fail over between VNS3 controllers, and monitor your network and instances’ performance.
See the VNS3 family offerings from Cohesive Networks in AWS Marketplace, and start building your secured, cross-connected network. Also, be sure to head over to the Cohesive Networks website to learn more about the VNS3 product family.
New AWS CloudFormation Stack Quick-Create Links further simplify customer onboarding
Post by Ian Scofield and Erin McGill
We recently wrapped up a series (Parts 1, 2, 3, and 4) on using AWS CloudFormation to ease the creation of cross-account roles during customer onboarding. It takes the reader through creating custom launch stack URLs for AWS CloudFormation, using an AWS Lambda function to generate a custom template with individualized parameters, and automatically sending the Amazon Resource Name (ARN) of the created cross-account role back to the SaaS owner. The process removes many of the manual steps involved in the creation of a cross-account role and the associated policy documents, reducing the chances of failure.
Although this solution simplified the workflow and helped reduce failure rates during onboarding, there were still two areas open to improvement:
- We required the SaaS owner to customize each customer’s template and hardcode values. These templates needed to be stored, shared publicly, and then promptly deleted.
- The AWS CloudFormation wizard contained multiple pages, and partners told us they wanted to streamline this process.
At AWS, we listen to our customers and partners to learn where we can improve, and our roadmap is almost exclusively driven by customer feedback. Based on the feedback we received on the customer onboarding process, I am pleased to announce that the AWS CloudFormation team has added the Stack Quick-Create Links feature which solves the issues we outlined above.
- Embedding parameters in the launch stack URL – The AWS CloudFormation team has removed the need to store customized templates by adding the ability to embed parameter values directly in the launch stack URL.
- Streamlined launch stack wizard – Users will now be directed to an AWS CloudFormation wizard that has been reduced to a single page.
Embedding Parameters in the launch stack URL
A launch stack URL makes it easy for customers to launch AWS CloudFormation templates by sending them straight to the AWS CloudFormation wizard with the template location and stack name pre-populated.
As a refresher, the URL looks like this:
https://console.aws.amazon.com/cloudformation/home?region=region#/stacks/new?
stackName=stack_name&templateURL=template_location

Wrap Up: Cross-Account Role Onboarding Workflow
By Ian Scofield. Ian is a Partner Solutions Architect (SA) at AWS.
Over the course of three blog posts (Parts 1, 2, and 3), we’ve been discussing a new way for APN Partners to onboard customers, focusing on the creation of cross-account roles. Throughout this series, we’ve proposed the usage of AWS CloudFormation for the creation of this role, to provide an automated process that can seamlessly integrate into an existing onboarding workflow.
In this post, we’ll recap the components discussed so far, put it all together, and show you the completed workflow. As we move along, each step we discuss (designated as Step 1, 2, 3, etc. in the text) will correlate with a numbered arrow in the following diagram.

As you’ll recall from the earlier posts, to kick off the onboarding process, we first ask the customer to provide their AWS account ID. (Step 1) We use this information as follows:
- We whitelist the provided account ID in our non-public Amazon SNS topic to adhere to security best practices. (Step 2)
- We create a customer tracking entry in our Amazon DynamoDB table. (Step 3)
- We associate a uniquely generated external ID with the provided account ID and store in our DynamoDB Table (Step 3).
After storing the relevant information and updating the relevant policies, we generate a customized CloudFormation template. (Step 4) In Part 2 of this series, we demonstrated a method for generating customized templates using an AWS Lambda function to replace values. This customized template will contain the AWS account ID the customer will trust, and the uniquely generated external ID the partner uses to assume the role.
There are two options available: include the two IDs as the default values for the CloudFormation parameters, or hardcode the IDs into the resources section of the template. If we prepopulate the parameters with the IDs, the user can easily inspect the IDs, but might override them with incorrect data. If we hardcode the IDs into the resources section, the user will not be presented with any parameters to fill in. This removes the risk of entering erroneous values at the cost of visibility. We prefer the second option, as it increases the robustness of the process.
Once this customized template has been generated and uploaded to an Amazon S3 bucket, we provide the user with a launch stack URL. When the user clicks this link (Step 5), they will be directed to the AWS CloudFormation console with the stack name and template location prepopulated, so they can launch the customized template easily. Embedded in this template is a custom resource, which automatically sends the Amazon Resource Name (ARN) for the created cross-account role back to the APN Partner. (Step 6) Once the APN Partner receives the role ARN, they can be sure that the CloudFormation template has been launched. Additionally, this process eliminates all manual steps, including the customer copying and pasting the created ARN back into the APN Partner’s onboarding workflow.
Custom resources provide an additional benefit. They are triggered whenever the CloudFormation stack is updated or deleted. If the customer modifies the template or deletes the stack, a notification will be sent to the APN Partner, which allows them to react to the change appropriately. For example, if a user deletes the stack, the partner can reach out and ask if there were any technical problems that led to them discontinuing the service, provide an exit survey, or trigger an off-boarding workflow.
On the APN Partner side, this custom resource takes the cross-account role ARN and puts it in the DynamoDB table that contains the customer data. (Step 7) We now have a customer record that contains their AWS account ID, a unique external ID, and a cross-account role ARN, which can be used together to assume the role in the customer’s account. As a final cleanup step, the custom resource deletes the customized template from the S3 bucket, since it’s no longer needed.
In summary, we’ve provided a workflow where the customer simply provides their AWS account ID, clicks a launch stack button, and then follows the CloudFormation wizard. At no point does the user have to interact with the IAM console, copy and paste policy documents and role ARNs, or engage with any other potentially error-prone or manual steps.
With this workflow, we’ve reduced the chances of failure due to misconfiguration or incorrectly typed values, and we’ve minimized onboarding friction to reduce the chance of customers getting stuck or frustrated and abandoning the onboarding process. As an added benefit, we’ve also provided a way to capture the removal of the trust policy and cross-account role. This allows APN Partners to proactively reach out to determine if the removal was due to accidental deletion, and engage with customers if there were any technical issues that led to them tearing down the role.
Be sure to read the preceding posts for more detail on each of these steps. Let us know if you have any questions or comments regarding this process!
Collecting Information from AWS CloudFormation Resources Created in External Accounts with Custom Resources
By Erin McGill. Erin is a Partner Solutions Architect (SA) at AWS.
Throughout this series, we’ve talked about easing cross-account role creation with AWS CloudFormation and a custom stack URL. We’ve also discussed how to dynamically generate CloudFormation templates to populate a unique external ID. But once your cross-account role is created, how does the Amazon Resource Name (ARN) for the generated cross-account role in the customer account get back to your company’s onboarding portal? Asking the customer to cut and paste the output ARN is possible, but it’s a manual step that’s prone to human error.
In this post, we’ll describe how to use a custom resource to send the cross-account role ARN to the onboarding portal. A custom resource enables you to add custom provisioning logic to a CloudFormation template. AWS CloudFormation runs this code anytime a stack is created, updated, or deleted. By adding a custom resource to the template that is launched in your customer’s account, you can post a custom resource request that includes the cross-account role ARN back to an Amazon SNS topic.
Every time the CloudFormation stack is updated or deleted, it will trigger the custom resource.
Even if no action is taking place within the custom resource during these stages, you need a mechanism to signal back to the ResponseURL, a success or failure. The ResponseURL is provided in the custom resource request. If the ResponseURL does not receive a success or failure, the CloudFormation stack will remain in an UPDATE_IN_PROGRESS or DELETE_IN_PROGRESS state, and will ultimately fail upon reaching the timeout waiting for a response.
The SNS topic runs in your company’s AWS account, which is associated with your onboarding portal, as shown in the following illustration.

The onboarding portal then takes the message that arrives in the SNS topic and uses it to associate the new cross-account role ARN with the customer’s account ID and unique external ID. You can use an Amazon DynamoDB table as a tracking mechanism. This table stores the cross-account role ARN in an item that also contains the customer’s account ID and unique external ID from earlier in the onboarding process.
The SNS topic in your company’s AWS account that receives the cross-account role ARN from a customer’s AWS account should not be publicly accessible—it should be restricted to only those authorized to send messages to the topic. In a previous post in this series, we explained how the user-provided AWS account ID is associated with our generated unique external ID for the customer in a DynamoDB table. With the AWS account ID, you can also whitelist this account in the SNS topic policy to keep your AWS resource secure.
When your customer launches the CloudFormation stack, the template creates the custom resource. As demonstrated in our previous blog post, the Service Token for the custom resource is prepopulated with the SNS topic associated with the onboarding portal in your company’s AWS account. Once the cross-account role is created, the custom resource is triggered, and it sends the cross-account role ARN, your customer’s AWS account ID, and any other additional information you want to include to the SNS topic in your company’s AWS account.
Since the stack remains in the customer’s account, it will continue to provide a mechanism for capturing changes to the CloudFormation stack, including deletion, back to your company. For example, if a customer deletes the CloudFormation stack, thereby deleting the cross-account role, a notification will be sent to the same SNS topic. This will allow you or your support staff to proactively reach out for troubleshooting or assistance. We recommend removing the customer’s AWS account ID from the SNS topic policy during the stack deletion phase, as they will need to restart the workflow to re-onboard, which will, in turn, re-whitelist their account ID.
Here’s the Resources section from an example CloudFormation template that demonstrates how to create the cross-account role and send it back to your company’s SNS topic:
This CloudFormation YAML script has one section, Resources, with two resources defined within it:
The CrossAccountRole resource creates the IAM role that your company can assume in the customer’s account. It consists of three properties:
AssumeRolePolicyDocument– Identifies your company by your account ARN, provided in the Principal, and sets the condition that your company account is allowed to assume the role only as long as the external ID is provided when assuming the role.Path– A friendly name or path for the role. We’ve chosen to set this to a forward slash for simplicity.PolicyDocument– Defines the permissions that this role will be granted. In this example, we are granting the ability to describe EC2 instances in the account and naming the policy
The PhoneHomeCustomResource creates a custom resource with three properties:
ServiceToken– Identifies the endpoint that gives the template the ability to access the custom resource in your company’s account. In this case, the service token is the SNS topic ARN in your company’s account. This service token must be from the same region as the stack being created. This SNS topic will, in turn, trigger a Lambda function. This function can perform any onboarding required by your workflow, but, most importantly, sends back theSUCCESSstatus to CloudFormation so it can proceed with launching the stack.RoleArn– The ARN of the CrossAccountRoleAccountID– The account ID of the customer’s account that is launching your CloudFormation stack.
CloudFormation is able to identify dependencies and will wait till the RoleArn resource has been created. Once created, the custom resource will be invoked and the RoleArn and theAccountID values will be sent to the ServiceToken, which is the SNS topic in your company’s account.
In this blog series, we showed you how to create a URL to launch a stack in your customer’s account, dynamically generate a CloudFormation template to include unique data for each customer, and automatically acquire and send information back about created resources, such as IAM cross-account role ARNs. In the next, and final, post in this series, we’ll provide a walkthrough of the entire process.
Do you have any questions or comments? Let us know in the comments section, and check back soon for the final post in this series.
Generating Custom AWS CloudFormation Templates with Lambda to Create Cross-Account Roles
Ian Scofield is a Partner Solutions Architect (SA) at AWS.
In a previous post in our series, we showed how to use an AWS CloudFormation launch stack URL to help customers create a cross-account role in their AWS account. As mentioned in an earlier APN Blog post, a cross-account role is the recommended method to enable access to a customer account for partner integrations, and creating the role using a CloudFormation template instead of following a long series of manual steps can reduce failure rates and improve the customer onboarding experience.
In this post, we will explore the use of custom CloudFormation templates to further streamline the onboarding process.
Recall that the CloudFormation template in our previous example was static and required the customer to enter a 12-digit AWS account ID and an arcane value called an external ID. Of course, omitting or entering incorrect values results in a failed CloudFormation launch, or, worse, a useless cross-account role sitting in the customer account.
Since we already know the values of these two parameters (the partner’s AWS account ID is the parameter we want the customer to trust, and the external ID is a unique value we generate for each customer), it makes sense for us to automate template creation and set these values ahead of time on behalf of the customer.
About external IDs
The external ID is a piece of data defined in the trust policy that the partner must include when assuming a role. This allows the role to be assumed only when the correct value is passed, which specifically addresses the confused deputy problem. External IDs are a good way for APN Partners to improve the security of cross-account role handling in a SaaS solution, and should be used by APN Partners who are implementing products that use cross-account roles. For a deeper look into why external IDs are important and why APN Partners should use them, take a look at How to Use External ID When Granting Access to Your AWS Resources on the AWS Security Blog.
There are many methods for setting default values in CloudFormation templates. We’ll discuss two of these. Keep in mind that although this blog post focuses on cross-account role creation, the method of populating parameters on the fly can be used for any other components within the template. Depending on the parameter in question, one of the methods we discuss might be a better fit than the other.
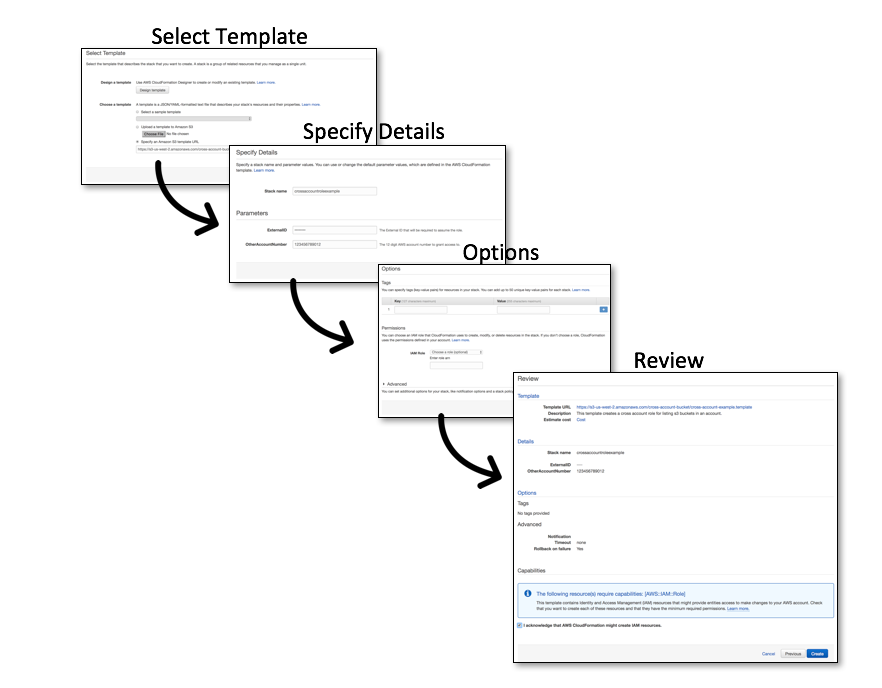
The first method is to supply the partner’s account ID and external ID as the default values to CloudFormation parameters. The customer can inspect and potentially overwrite parameter values in the CloudFormation console before launching the template (Figure 1). In some cases, this level of transparency might be required so the customer is aware of the AWS Account ID they are granting access to.
However, as noted previously, incorrect values will result in the CloudFormation stack failing to launch or associate correctly, so any customer modifications to these parameters are likely to result in a failure.
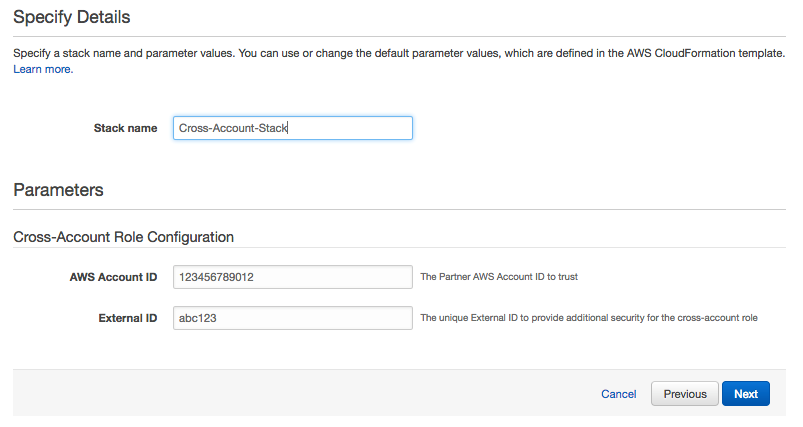
Figure 1: Using default parameter values
The second method (Figure 2) doesn’t expose any parameters to the customer; instead, it hard-codes the partner’s account ID and external ID directly into the resources in the template. This helps ensure the successful creation of the role and association with the partner account, while removing any additional work for the customer.

Figure 2: Hardcoding parameter values
In both of these scenarios, how do you insert values that are unique for each customer into the template? In order for either method to work, you have to create a custom template for each customer with their unique values. This requires some additional steps in your onboarding workflow; however, the simplicity it provides to the customer and reduced chances of failure can outweigh the initial setup on your side.
To demonstrate this scenario, I created a mock portal to handle the customer onboarding experience:

Figure 3: Mock portal for onboarding
The portal requires the customer to provide their AWS account ID to associate with the uniquely generated external ID. When the user clicks Generate Custom Template, the account ID is sent to your application and invokes an AWS Lambda function. In my example, I’m using Amazon API Gateway to invoke the function, which does the following:
1. Puts an entry with the account ID into an Amazon DynamoDB table. This allows you to track customers and associate the cross-account role we’ll create later with the AWS account ID. You can also store the external ID and any other information pertaining to the customer in the DynamoDB table.
2. Generates a customized template for the user from a master template. The master template has all the necessary information and some placeholder values that you substitute with customized values:
The Lambda function downloads the template and uses a simple replace() function to replace the placeholder strings with the unique values you’ve generated for this customer.
3. Uploads the customized template to an S3 bucket with the customer’s account ID prepended to the file name to correlate templates with specific customers.
4. Sends back the S3 URL for the custom-generated template, and then displays a Launch Stack button on the portal for the customer to begin the onboarding process.

Figure 4: Launch UI
At this point, the customer clicks the Launch Stack button and begins the onboarding process for their AWS account. The stack creates the cross-account role with the provided policy embedded in the template, without the customer having to copy and paste policy documents and manually go through the role creation process.
There are a few outstanding items that would make this solution simpler still. How does the partner get the Amazon Resource Name (ARN) for the cross-account role we created? What happens to the custom template in the S3 bucket? What if the customer tears down the template without notifying the partner? We’ll continue to expand on this topic through future posts. See post 3 in our series here.
Let us know if you have any questions or comments!
Facilitating a Migration to AWS with CloudEndure by Leveraging Automation
By Carmen Puccio and Mandus Momberg. Carmen and Mandus are AWS Partner Solutions Architects focused on Migration.
It’s no secret that migrating software and services from an on-premises environment to the cloud entails unique considerations and requirements. To provide confidence in the outcome of your migration, your migration strategy needs to scale easily. This means that a large part of your workflow must be automated. There is no shortage of documentation on why automation in the cloud is important. In this post, we will show you how to perform an automated migration utilizing AWS Advanced Technology Partner CloudEndure, with a focus on incorporating automated tests so you can be confident that your application is working as expected post-migration.
The migration of a workload from on-premises to AWS requires careful planning and precise execution. There are many different strategies for moving to the cloud, and there are also numerous tools that help facilitate migration. All migration tools share common goals: to facilitate a migration to AWS by minimizing downtime and application workload impact, and to ensure that data loss is minimized.
Customers who want to quickly move their workloads to the cloud typically follow the rehost method, i.e. lift and shift. One of the challenges when executing a rehost is the amount of time it takes to manually confirm that a migrated application is performing as expected. Migrations that incorporate automation and rapid testing pipelines to validate proper migration are not only more likely to succeed but also improve efficiency as you take advantage of repeatable processes and decrease manual verification times. (more…)
Have You Read Our 2016 AWS Partner Solutions Architect Guest Posts?
In 2016, we hosted 38 guest posts from AWS Partner Solutions Architects (SAs), who work very closely with both Consulting and Technology Partners as they build solutions on AWS. As we kick off 2017, I want to take a look back at all of the fantastic content created by our SAs. A few key themes emerged throughout SA content in 2016, including a focus on building SaaS on AWS, DevOps and how to take advantage of particular AWS DevOps Competency Partner tools on AWS, Healthcare and Life Sciences, Networking, and AWS Quick Starts.
Partner SA Guest Posts
- How to Prepare Your Business and Technical Teams on AWS, by Erik Farr
- Data Democratization with APN Technology Partner Calgary Scientific, by Chris Crosbie
- Multi-Tenant Storage with Amazon DynamoDB, by Tod Golding
- Terraform: Beyond the Basics with AWS, by Josh Campbell and Brandon Chavis
- Securely Accessing Customer AWS Accounts with Cross-Account IAM Roles, by David Rocamora
- Modeling SaaS Tenant Profiles on AWS, by Tod Golding
- Architecting Microservices Using Weave Net and Amazon EC2 Container Service, by Brandon Chavis
- Optimizing SaaS Tenant Workflows and Costs, by Tod Golding
- Amazon VPC for On-Premises Network Engineers, Part One, by Nick Matthews
- Automatically Delete Terminated Instances in Chef Server with AWS Lambda and CloudWatch Events, by Josh Campbell
- Amazon VPC for On-Premises Network Engineers, Part Two, by Nick Matthews
- Taking NAT to the Next Level in AWS CloudFormation Templates, by Santiago Cardenas
- AWS Sample Integrations for Atlassian Bitbucket Pipelines, by Josh Campbell
- Managing SaaS Users with Amazon Cognito, by Tod Golding
- AWS Quick Start for Docker Datacenter (DDC), by Brandon Chavis
- Oracle Database Encryption Options on Amazon RDS, by Sanjeet Sahay
- Migrating Applications to SaaS: A Minimally Invasive Approach, by Tod Golding
- Deploy Red Hat OpenShift on Amazon Web Services, by Tony Vattathil
- How to Deploy a High Availability Web Service on AWS Using Spotinst, by Joseph Fontes
- How AWS Partners Can Optimize Healthcare by Orchestrating HIPAA Workloads on AWS, by Niranjan Hira
- Migrating Applications to SaaS: Rethinking Your Design, by Tod Golding
- Introducing the SaaS Enablement Framework for AWS Partners, by Tod Golding
- July Partner SA Highlights – Learn About Opsee, Splunk, and Twistlock, by David Rocamora and Brandon Chavis
- AWS Summit Santa Clara 2016 Recap, by Paul Sears
- How to List Your Product in AWS Marketplace, by Suney Sharma
- How AWS Partner Medidata Solutions Approaches GxP Compliance in the Cloud, by Chris Crosbie
- AWS Networking for Developers, by Nick Matthews and Mark Stephens
- How to Build Sparse EBS Volumes for Fun and Easy Snapshotting, by Ian Scofield and Mike Ruiz
- New AWS Security Competency Partner Solution: Sophos Outbound Gateway, by Nick Matthews and Sophos
- August Partner SA Highlights: Learn about Freshservice, Fugue, and Zerto!, by Ian Scofield and Juan Villa
- How Signiant Uses AWS Lambda and Amazon DynamoDB to run its SaaS Solution on AWS, by Mike Deck
- Automating ECR Authentication on Marathon with the Amazon ECR Credential Helper, by Erin McGill and Brandon Chavis
- AWS Quick Starts for Atlassian Tools, by Shiva Narayanaswamy
- Get Started with HashiCorp Consul and Vault on AWS with Our New AWS Quick Starts, by Brandon Chavis
- How to Navigate Multitenant Storage Strategies on AWS – A New SaaS Whitepaper, by Tod Golding
- How to Integrate Your SaaS Service with SaaS Subscriptions for AWS Marketplace, by David Aiken
- 2016 Technical Recap: Healthcare and Life Sciences, by Aaron Friedman
- Financial Services Segment re:Invent Recap, by Peter Williams
There’ll be plenty more to come from our SAs in 2017, and we want to hear from you. What topics would you like to see our SAs discuss on the APN Blog? What would be most helpful for you as you continue to take advantage of AWS and build your business? Tell us in the comments. We look forward to hearing from you!
Deploy to Production using AWS CodeBuild and the AWS Developer Tools Suite
This is a guest post from Paul Duvall, Stelligent, with contributions from Brian Jakovich and Jonny Sywulak, Stelligent. Paul Duvall is CTO at Stelligent, and an AWS Community Hero.
Stelligent is an AWS DevOps Competency Partner.
At re:Invent 2016, AWS announced a new fully managed service called AWS CodeBuild that allows you to build your software. Using CodeBuild, you can build code using pre-built images for Java, Ruby, Python, Golang, Docker, Node, and Android or use your own customize images for other environments without provisioning additional compute resources and configuration. This way you can focus more time on developing your application or service features for your customers.
In our previous post, An Introduction to CodeBuild, we described the purpose of AWS CodeBuild, its target users, and how to setup an initial CodeBuild project. In this post, you will learn how to integrate and automate the orchestration of CodeBuild with the rest of the AWS Developer Tools suite – including AWS CodeDeploy, AWS CodeCommit, and AWS CodePipeline using AWS’ provisioning tool, AWS CloudFormation. By automating all of the actions and stages into a deployment pipeline, you can release changes to users in production whenever you choose to do so. You’ll see an example that walks you through the process along with a detailed screencast that shows you every step in launching the solution and testing the deployment.
Figure 1 shows this deployment pipeline in action.

Figure 1 – CodePipeline building with CodeBuild and deploying with CodeDeploy using source assets in CodeCommit
Keep in mind that CodeBuild is a building block service you can use for executing build, static analysis, and test actions that you can integrate into your deployment pipelines. You use an orchestration tool like CodePipeline to model the workflow of these actions along with others such as polling a version-control repository, provisioning environments, and deploying software.
Prerequisites
Here are the prerequisites for this solution:
- AWS Account – Follow these instructions to create an AWS Account: Creating an AWS Account
- EC2 Key Pair – Follow these instructions to create an EC2 Key Pair: Creating Your Key Pair Using Amazon EC2
These prerequisites will be explained in greater detail in the Deployment Steps section.
Architecture and Implementation
In Figure 2, you see the architecture for launching a deployment pipeline that gets source assets from CodeCommit, builds with CodeBuild, and deploys software to an EC2 instance using CodeDeploy. You can click on the image to launch the template in CloudFormation Designer.

Figure 2 – Architecture of CodeBuild, CodePipeline, CodeDeploy, and CodeCommit solution
The components of this solution are described in more detail below:
- AWS CloudFormation – All of the resource generation of this solution is described in CloudFormation which is a declarative code language that can be written in JSON or YAML
- AWS CodeBuild – Creates a CodeBuild project using the AWS::CodeBuild::Project
- AWS CodeCommit – Creates a CodeCommit Git repository using the AWS::CodeCommit::Repository
- AWS CodeDeploy – CodeDeploy automates the deployment to the EC2 instance that was provisioned by the nested stack using the AWS::CodeDeploy::Application and AWS::CodeDeploy::DeploymentGroup
- AWS CodePipeline – I’m defining CodePipeline’s stages and actions in CloudFormation code which includes using CodeCommit as a source action, CodeBuild as a build action, and CodeDeploy for a deploy action (For more information, see Action Structure Requirements in AWS CodePipeline)
- Amazon EC2 – A nested CloudFormation stack is launched to provision multiple EC2 instances on which the CodeDeploy agent is installed. The CloudFormation template called through the nested stack is provided by AWS.
- AWS IAM – An Identity and Access Management (IAM) Role is provisioned using the AWS::IAM::Role resource which defines the resources that the pipeline can access.
- AWS SNS – Provisions a Simple Notification Service (SNS) Topic using the AWS::SNS::Topic The SNS topic is used by the CodeCommit repository for notifications.
CloudFormation Template
In this section, I’ll highlight a few code snippets from the CloudFormation template that automates the provisioning of the AWS Developer Tools stack along with other resources including EC2, IAM, and SNS. You can find a link to the CloudFormation template at the bottom of this post.
CodeBuild
AWS CloudFormation has provided CodeBuild support from day one. Using the AWS::CodeBuild::Project resource, you can provision your CodeBuild project in code as shown in the sample below.
    "CodeBuildJavaProject":{
      "Type":"AWS::CodeBuild::Project",
      "DependsOn":"CodeBuildRole",
      "Properties":{
        "Name":{
          "Ref":"AWS::StackName"
        },
        "Description":"Build Java application",
        "ServiceRole":{
          "Fn::GetAtt":[
            "CodeBuildRole",
            "Arn"
          ]
        },
        "Artifacts":{
          "Type":"no_artifacts"
        },
        "Environment":{
          "Type":"LINUX_CONTAINER",
          "ComputeType":"BUILD_GENERAL1_SMALL",
          "Image":"aws/codebuild/java:openjdk-8"
        },
        "Source":{
          "Location":{
            "Fn::Join":[
              "",
              [
                "https://git-codecommit.",
                {
                  "Ref":"AWS::Region"
                },
                ".amazonaws.com/v1/repos/",
                {
                  "Ref":"AWS::StackName"
                }
              ]
            ]
          },
          "Type":"CODECOMMIT"
        },
        "TimeoutInMinutes":10,
        "Tags":[
          {
            "Key":"Owner",
            "Value":"JavaTomcatProject"
          }
        ]
      }
    },
The key attributes, blocks, and values of the CodeBuild CloudFormation resource are defined here:
- Name – Define the unique name for the project. In my CloudFormation template, I’m using the stack name as a way of uniquely defining the CodeBuild project without requiring user input.
- ServiceRole – Refer to the previously-created IAM role resource that provides the proper permissions to CodeBuild.
- Environment Type – The type attribute defines the type of container that CodeBuild uses to build the code.
- Environment ComputeType – The compute type defines the CPU cores and memory the build environment uses
- Environment Image – The image is the programming platform on which the environment runs.
- Source Location and Type – In Source, I’m defining the CodeCommit URL as the location along with the type. Along with the CODECOMMIT type, CodeBuild also supports S3 and GITHUB. In defining CodeCommit as the type, CodeBuild automatically searches for a yml file in the root directory of the source repository. See the Build Specification Reference for AWS CodeBuild for more detail.
- TimeoutInMinutes – This is the amount of time before the CodeBuild project will cease running. This modifies from the default of 60 minutes to 10 minutes.
- Tags – I can define multiple tag types for the CodeBuild project. In this example, I’m defining the team owner.
For more information, see the AWS::CodeBuild::Project resource documentation.
CodeCommit
With CodeCommit, you can provision a fully managed private Git repository that integrates with other AWS services such as CodePipeline and IAM. To automate the provisioning of a new CodeCommit repository, you can use the AWS::CodeCommit::Repository CloudFormation resource. You can create a trigger to receive notifications when the master branch gets updated using an SNS Topic as a dependent resource that is created in the same CloudFormation template. For a more detailed example and description, see Provision a hosted Git repo with AWS CodeCommit using CloudFormation.
CodeDeploy
AWS CodeDeploy provides a managed service to help you automate and orchestrate software deployments to Amazon EC2 instances or those that run on-premises.
To configure CodeDeploy in CloudFormation, you use the AWS::CodeDeploy::Application and AWS::CodeDeploy::DeploymentGroup resources.
CodePipeline
While you can create a deployment pipeline for CodePipeline in CloudFormation by directly writing the configuration code, we often recommend that customers manually create the initial pipeline using the CodePipeline console and then once it’s established run the get-pipeline command (as shown below) to get the proper CodePipeline configuration to use in defining the CloudFormation template. To create a pipeline using the console, follow the steps in the Simple Pipeline Walkthrough. Choose CodeCommit as a source provider, CodeBuild as a build provider and CodeDeploy as a deploy provider.
In the following snippet, you see how you can use the AWS::CodePipeline::Pipeline resource to define the deployment pipeline in CodePipeline. A snippet of this configuration is shown below.
 "CodePipelineStack":{
      "Type":"AWS::CodePipeline::Pipeline",
      "Properties":{
      ...
        "Stages":[
...
Once the CodePipeline has been manually created using the AWS console, you can run the following command to get the necessary resource configuration that can be copied and modified in CloudFormation. Replace PIPELINE-NAME with the name of the pipeline that you manually created.
aws codepipeline get-pipeline --name PIPELINE-NAME
You will get the configuration output using this command. You can add this configuration to the CodePipeline resource configuration in CloudFormation. You’ll need to modify the attribute names from lowercase to title case.
In configuring the CodeBuild action for the CodePipeline resource, the most relevant section is in defining the ProjectName as shown in the snippet below.
  "ProjectName":{
    "Ref":"CodeBuildJavaProject"
  }
},
…
CodeBuildJavaProject references the CodeBuild project resource defined previously in the template.
Costs
Since costs can vary as you use certain AWS services and other tools, you can see a cost breakdown and some sample scenarios to give you an idea of what your monthly spend might look like. Note this will be dependent on your unique environment and deployment, and the AWS Cost Calculator can assist in establishing cost projections.
- CloudFormation – No additional cost.
- CodeBuild – CodeBuild charges per minute used. It comes with 100 minutes per month at no charge. For a simple execution of this demo, you can stay within the limits of the AWS Free Tier – please read about the Free Tier here. For more information, see AWS CodeBuild pricing.
- CodeCommit – If used on a small project of less than six users, there’s no additional cost. See AWS CodeCommit Pricing for more information.
- CodeDeploy – No additional cost.
- CodePipeline – $1 a month per pipeline unless you’re using it as part of the free tier. For more information, see AWS CodePipeline pricing.
- EC2 – There are a number of Instance types and pricing options. See Amazon EC2 Pricing for more information.
- IAM – No additional cost.
- SNS – Considering you likely won’t have over 1 million Amazon SNS requests for this particular solution, there’s no cost. For more information, see AWS SNS Pricing.
So, for this particular sample solution, if you just run it once and terminate it within the day, you’ll spend a little over $1 or even less if your CodePipeline usage is eligible for the AWS Free Tier.
Deployment Steps
There are three main steps in launching this solution: preparing an AWS account, launching the stack, and testing the deployment. Each is described in more detail in this section. Please note that you are responsible for any charges incurred while creating and launching your solution.
Step 1. Prepare an AWS Account
- If you don’t already have an AWS account, create one at http://aws.amazon.com by following the on-screen instructions. Part of the sign-up process involves receiving a phone call and entering a PIN using the phone keypad. Be sure you’ve signed up for the CloudFormation service.
- Use the region selector in the navigation bar of the console to choose the Northern Virginia (us-east-1) region
- Create a key pair. To do this, in the navigation pane of the Amazon EC2 console, choose Key Pairs, Create Key Pair, type a name, and then choose Create.
Step 2. Launch the Stack
Click on the Launch Stack button below to launch the CloudFormation stack. Before you launch the stack, review the architecture, configuration, and other considerations discussed in this post. To download the template, click here.
![]()
Time to deploy: Approximately 7 minutes
The template includes default settings that you can customize by following the instructions in this post.
Step 3. Test the Deployment
Click on the CodePipelineURL Output in your CloudFormation stack. You’ll see that the pipeline has failed on the Source action. This is because the Source action expects a populated repository and it’s empty. The way to resolve this is to commit the application files to the newly-created CodeCommit repository. First, you’ll need to clone the repository locally. To do this, get the CloneUrlSsh Output from the CloudFormation stack you launched in Step 2. A sample command is shown below. You’ll replace {CloneUrlSsh} with the value from the CloudFormation stack output. For more information on using SSH to interact with CodeCommit, see the Connect to the CodeCommit Repository section at: Create and Connect to an AWS CodeCommit Repository.
{CloneUrlSsh}
cd {localdirectory}
Once you’ve cloned the repository locally, download the sample application files from the aws-codedeploy-sample-tomcat Git repository and place the files directly into your local repository. Do not include the aws-codedeploy-sample-tomcat folder. Go to the local directory and type the following to commit and push the new files to the CodeCommit repository:
git add .
git commit -am "add all files from the AWS Java Tomcat CodeDeploy application"
git push
Once these files have been committed, the pipeline will discover the changes in CodeCommit and run a new pipeline instance and all stages and actions should succeed as a result of this change. It takes approximately 3-4 minutes to complete all stages and actions in the pipeline.
Access the Application and Pipeline Resources
Once the CloudFormation stack has successfully completed, select the stack and go to the Outputs tab and click on the CodePipelineURL output value. This will launch the deployment pipeline in CodePipeline console. Go to the Deploy action and click on the Details link. Next, click on the link for the Deployment Id of the CodeDeploy deployment. Then, click on the link for the Instance Id. From the EC2 instance, copy the Public IP value and paste into your browser and hit enter to launch the Java sample application – as displayed in Figure 3.
![]()
Figure 3 – Deployed Java Application
You can access the Source and Build using the CodePipeline Action Details. For example, go to the pipeline and click on commit id for the Source action and click on the Details to the Build action. See Figure 4 for a detailed illustration of this pipeline.

Figure 4 – CodePipeline with Action Details
There are also direct links for the CodeCommit, CodeBuild, and CodeDeploy resources in the CloudFormation Outputs as well.
Commit Changes to CodeCommit
Make some visual modifications to the src/main/webapp/WEB-INF/pages/index.jsp page and commit these changes to your CodeCommit repository to see these changes get deployed through your pipeline. You perform these actions from the directory where you cloned the local version of your CodeCommit repo (in the directory created by your git clone command). To push these changes to the remote repository, see the commands below.
git add .
git commit -am "modify front page for AWS sample Java Tomcat CodeDeploy application"
git push
Once these changes have been committed, CodePipeline will discover the changes made to your CodeCommit repo and initiate a new pipeline. After the pipeline is successfully completed, follow the same instructions for launching the application from your browser. Once deployed, you should see the modifications you made in the application upon entering the URL – as shown in Figure 5.

Figure 5 – Deployed Java Application with Changes Committed to CodeCommit, Built with CodeBuild, and Deployed with CodeDeploy
How-to Video
In this video, I walk through the deployment steps described above.
Additional Resources
- Here are some additional resources you might find useful:
- AWS CodeBuild – Product Page
- AWS CodeBuild – Fully Managed Build Service – Blog post from Jeff Barr
- An Introduction to AWS CodeBuild – First part of the two-part series on CodeBuild from Stelligent
Summary
In this post, you learned how to define and launch a CloudFormation stack capable of provisioning a fully-codified continuous delivery solution using CodeBuild. Additionally, the example included the automation of a CodePipeline deployment pipeline – which included the CodeCommit, CodeBuild, and CodeDeploy integration.
Furthermore, I described the prerequisites, architecture, implementation, costs, and deployment steps of the solution.
Sample Code
The code for the examples demonstrated in this post are located at https://github.com/stelligent/aws-codedeploy-sample-tomcat. Let us know if you have any comments or questions @stelligent.
The content and opinions in this blog are those of the third party author and AWS is not responsible for the content or accuracy of this post.
Get Started with HashiCorp Consul and Vault on AWS with Our New AWS Quick Starts
We’re pleased to announce our latest AWS Quick Start reference deployments, Consul and Vault by HashiCorp, an AWS DevOps Competency Partner. We developed these Quick Starts in collaboration with HashiCorp, and we feel that these guides represent current best practices in Consul and Vault deployments. Consul and Vault are two very popular tools in the AWS Partner ecosystem, and we hope that these Quick Starts help alleviate some heavy lifting for AWS Customers and Partners who are getting started with these tools.
HashiCorp Consul on AWS
The first Quick Start I’d like to discuss is Consul, which is a solution for configuration and service discovery. Consul is a commonly used primitive for distributed systems, and it’s natively highly available and resilient to failure. Consul is a tool for discovering and configuring services in your infrastructure. To read more about Consul use cases, see our previous blog post about Consul and how it integrates with Amazon EC2 Container Service (ECS), or how AWS CodeDeploy and Consul can be used to confidently deploy applications within an application environment.
The AWS Quick Start for HashiCorp Consul deploys an Amazon Virtual Private Cloud (VPC) with private and public subnets (although you can use your pre-existing VPC), a cluster of 3 Consul servers in a multi-AZ configuration, and support for Auto Scaling to allow a dynamically sizeable number of clients.
The Quick Start creates public subnets with managed network address translation (NAT) gateways to allow outbound Internet access for resources in the private subnets. The Quick Start deploys NAT instances in regions where NAT gateways aren’t available.

Figure 1: Consul on AWS Architecture Diagram
In the private subnets, we create a consul seed instance for bootstrapping purposes, 3, 5, or 7 consul servers, as well as an autoscaling group for consul clients.
For details, download the Consul Quick Start deployment guide.
HashiCorp Vault on AWS
The AWS Quick Start for HashiCorp Vault is a natural addition to Consul, and the two tools are built to work together. Vault is a tool that manages passwords, tokens, and other secrets used in modern computing. We’ve configured Vault to use Consul as the persistence layer on the backend, which allows Vault to be deployed in a highly available fashion. Launching the Vault template for a new VPC automatically deploys Consul as well.

Figure 2: Vault on AWS Architecture Diagram
We’ve built a few integrations into the AWS platform for Vault, including Amazon CloudWatch alarms for memory utilization and CloudWatch logs for the Vault audit logs, and we’ve made sure to configure Amazon EC2 Auto Recovery on both Vault instances.
Once the Vault template is up and running, you should take a look at the deployment guide for next steps for configuring Vault. You’ll find the IP addresses for your Vault nodes in the “Outputs” section of the AWS CloudFormation console. You should log into one one of these IP addresses to begin configuration of the Vault server. Much of the configuration is very specific to your individual use case, so you’ll need to follow the guide and start by “unsealing” Vault. For details, download the Vault Quick Start deployment guide.
To learn more about Vault, visit the HashiCorp Vault website.
To learn more about Consul, visit the HashiCorp Consul website.
Taking NAT to the Next Level in AWS CloudFormation Templates
Santiago Cardenas is a Partner Solutions Architect (SA) at AWS.
So you’re already creating your cloud infrastructure using AWS CloudFormation to automate your deployments through infrastructure-as-code. As you design the virtual network, you’re probably already using public and private subnets within your Amazon Virtual Private Cloud (Amazon VPC), given the best practices of subnet isolation for front-end and back-end resources. A public subnet includes a direct route to the Internet through the Internet gateway that is attached to the VPC. A private subnet, on the other hand, has no such route and must hop through another device, such as a Network Address Translation (NAT) instance, to get to the Internet. Typically, you’ll use a Linux instance that is configured to act as a NAT device by configuring IPv4 forwarding and using iptables for IP masquerading. The challenge, however, is ensuring that these instances are highly available, scale with traffic, and don’t become the bottleneck or single point of failure.
Cue in NAT gateways!
A managed NAT gateway has built-in redundancy at the Availability Zone level and a simple management console and API. In addition to this and other benefits, it can be easily configured through AWS CloudFormation, making it a great choice for new and existing templates.
A typical CloudFormation template that uses NAT instances will have the following resources of interest:
{
    ...
    "Resources" : {
        ...
        "NAT1EIP" : {
            "Type" : "AWS::EC2::EIP",
            "Properties" : {
                "Domain" : "vpc",
                "InstanceId" : {
                    "Ref" : "NAT1"
                }
            }
        },
        "NAT1" : {
            "Type" : "AWS::EC2::Instance",
            "DependsOn" : "VPCGatewayAttachment",
            "Properties" : {
                "ImageId" : {
                    "Fn::FindInMap" : [
                        "AWSRegionArchNatAMI",
                        {
                            "Ref" : "AWS::Region"
                        },
                        {
                            "Fn::FindInMap" : [
                                 "AWSInstanceType2Arch",
                                 {
                                     "Ref" : "NATInstanceType"
                                 },
                                 "Arch"
                            ]
                        }
                    ]
                },
                "InstanceType" : {
                    "Ref" : "NATInstanceType"
                },
                "Tags" : [
                    {
                        "Key" : "Name",
                        "Value" : "NAT1"
                    }
                ],
                "NetworkInterfaces" : [
                    {
                        "GroupSet" : [
                            {
                                "Ref" : "NATSecurityGroup"
                            }
                        ],
                        "AssociatePublicIpAddress" : "true",
                        "DeviceIndex" : "0",
                        "DeleteOnTermination" : "true",
                        "SubnetId" : {
                            "Ref" : "PublicSubnetAZ1"
                        }
                    }
                ],
                "KeyName"           : {
                    "Ref" : "KeyPairName"
                },
                "SourceDestCheck"   : "false"
           }
       },
       "PrivateRoute1" : {
           "Type" : "AWS::EC2::Route",
           "Properties" : {
               "RouteTableId" : {
                   "Ref" : "PrivateRouteTable"
               },
               "DestinationCidrBlock" : "0.0.0.0/0",
               "InstanceId" : {
                   "Ref" : "NAT1"
               }
           }
       },
       ...
   }
   ...
}
This example snippet includes the following resources that are directly involved with a NAT instance deployment. These are things like:
- The Elastic IP address that is to be attached to the NAT instance.
- The NAT instance itself, coming from an Amazon Linux NAT AMI (Amazon Machine Image).
- The route to the Internet via the NAT instance. This route is later added to the route table associated with the private subnets in the same Availability Zone.
We also recommend that your architecture include at least two Availability Zones, which means that you would include the code above at least twice in your CloudFormation template (once per Availability Zone).
Modifying your CloudFormation template to discontinue the use of NAT instances and consume NAT gateways is straightforward. You would:
- Allocate an Elastic IP address. However, it would not be directly assigned to an instance.
- Create a NAT gateway resource.
- Create a route to the Internet, but via the NAT gateway instead of going through a NAT instance. As in the code for NAT instances, this route would then be associated with the route table for the private subnets in the same Availability Zone.
The updated example would look something like this:
{
    ...
    "Resources" : {
        ...
        "NATGateway1EIP" : {
            "Type" : "AWS::EC2::EIP",
            "Properties" : {
                "Domain" : "vpc"
            }
        },
        "NATGateway1" : {
            "Type" : "AWS::EC2::NatGateway",
            "DependsOn" : "VPCGatewayAttachment",
            "Properties" : {
                "AllocationId" : {
                    "Fn::GetAtt" : [
                        "NATGateway1EIP",
                        "AllocationId"
                    ]
                },
                "SubnetId" : {
                    "Ref" : "PublicSubnetAZ1"
                }
            }
        },
        "PrivateRoute1" : {
            "Type" : "AWS::EC2::Route",
            "Properties" : {
                "RouteTableId" : {
                    "Ref" : "PrivateRouteTable1"
                },
                "DestinationCidrBlock" : "0.0.0.0/0",
                "NatGatewayId" : {
                    "Ref" : "NATGateway1"
                }
            }
        },
        ...
    }
    ...
}
As you can observe from the updated example, updating your CloudFormation templates to utilize a NAT gateway is a modest change that improves the architecture of the VPC while removing the burden of configuring, monitoring, and scaling the NAT instances. For more information about the NAT gateway resource type, see the AWS CloudFormation User Guide.
There are a few additional things to keep in mind about NAT gateways at this time:
- They are available in most (but not all) regions. For supported regions, see the NAT gateway section of the Amazon VPC Pricing
- They only handle outbound traffic.
- They don’t support complex iptables rules.
- If you used the NAT instance as a bastion, you would need to stand up a separate bastion now. This is a better practice anyway, because it properly separates the instance roles and duties, therefore allowing finer grained security control.
For further reading, please see:
- New – Managed NAT Gateway for AWS (AWS blog post)
- NAT Gateways (Amazon VPC User Guide)
- Comparison of NAT Instances and NAT Gateways (Amazon VPC User Guide)
- Reference page for NAT gateway resource (AWS CloudFormation User Guide)
- NAT gateway pricing and availability
Have you read our recent posts on Amazon VPC for on-premises network engineers? Check out part one and part two.