Category: Amazon Redshift
Look Before You Leap – The Coming Leap Second and AWS (Updated)
My colleague Mingxue Zhao sent me a guest post designed to make sure that you are aware of an important time / clock issue.
Note: This post was first published on May 18, 2015. We made some important additions and corrections on May 25, 2015.
— Jeff;
The International Earth Rotation and Reference Systems (IERS) recently announced that an extra second will be injected into civil time at the end of June 30th, 2015. This means that the last minute of June 30th, 2015 will have 61 seconds. If a clock is synchronized to the standard civil time, it should show an extra second 23:59:60 on that day between 23:59:59 and 00:00:00. This extra second is called a leap second. There have been 25 such leap seconds since 1972. The last one took place on June 30th, 2012.
Clocks in IT systems do not always follow the standard above and can behave in many different ways. For example:
- Some Linux kernels implement a one-seconds backwards jump instead of the extra “:60” second, repeating the 59th second (see the article, Resolve Leap Second Issues in Red Hat Enterprise Linux for more information).
- Windows time servers ignore the leap second signal and will sync to the correct time after the leap second (see How the Windows Time Service Treats a Leap Second for more information).
- Some organizations, including Amazon Web Services, plan to spread the extra second over many hours surrounding the leap second by making every second slightly longer.
- If a clock doesn’t connect to a time synchronization system, it drifts on its own and will not implement any leap second or an adjustment for it.
If you want to know whether your applications and systems can properly handle the leap second, contact your providers. If you run time-sensitive workloads and need to know how AWS clocks will behave, read this document carefully. In general, there are three affected parts:
- The AWS Management Console and backend systems
- Amazon EC2 instances
- Other AWS managed resources
For more information about comparing AWS clocks to UTC, see the AWS Adjusted Time section of this post.
AWS Management Console and Backend Systems
The AWS Management Console and backend systems will NOT implement the leap second. Instead, we will spread the one extra second over a 24-hour period surrounding the leap second by making each second slightly longer. During these 24 hours, AWS clocks may be up to 0.5 second behind or ahead of the standard civil time (see the AWS Adjusted Time section for more information).
You can see adjusted times in consoles (including resource creation timestamps), metering records, billing records, Amazon CloudFront logs, and AWS CloudTrail logs. You will not see a “:60” second in these places and your usage will be billed according to the adjusted time.
Amazon EC2 Instances
Each EC2 instance has its own clock and is fully under your control; AWS does not manage instance clocks. An instance clock can have any of the behaviors listed at the beginning of this post. Contact your OS provider to understand the expected behavior of your operating system.
If you use the Amazon Linux AMI, your instance will implement the one-second backwards jump and will see “23:59:59” twice. You may find the following information useful:
- Forum post: Amazon Linux AMI and the 2015-06-30 leap second.
- Configuring NTP for instances using Amazon Linux AMIs: Setting the Time for Your Linux Instance.
- Configuring NTP for instances using Amazon-provided Microsoft Windows AMIs: Setting the Time for a Windows Instance.
If you use SUSE Linux Enterprise Server, take a look at Fixes and Workaround to Avoid Issues Caused by Leap Second 2015.
Other AWS Managed Resources
Other AWS resources may also have their own clocks. Unlike EC2 instances, these resources are fully or partially managed by AWS.
The following resources will implement the one-second backwards jump and will see :23:59:59″ twice:
- Amazon CloudSearch clusters
- Amazon EC2 Container Service instances
- Amazon EMR Clusters
- Amazon RDS instances
- Amazon Redshift instances
To enable time synchronization on EMR clusters, your VPC has to allow access to NTP. Make sure that your EMR clusters have access to the Internet, and that your security groups and network ACLs allow outbound UDP traffic on port 123.
AWS Adjusted Time
This section provides specific details on how clocks will behave in the AWS Management Console and backend systems.
Starting at 12:00:00 PM on June 30th, 2015, we will slow down AWS clocks by 1/86400. Every second on AWS clocks will take 1+1/86400 seconds of “real” time, until 12:00:00 PM on July 1st, 2015, when AWS clocks will be behind by a full second. Meanwhile, the standard civil time (UTC) will implement the leap second at the end of June 30th, 2015 and fall behind by a full second, too. Therefore, at 12:00:00 PM July 1st, 2015, AWS clocks will be synchronized to UTC again. The table below illustrates these changes.
| UTC | AWS Adjusted Clock | AWS vs. UTC | Notes |
| 11:59:59 AM June 30th, 2015 | 11:59:59 AM June 30th, 2015 | +0 | AWS clocks are synchronized to UTC. |
| 12:00:00 PM | 12:00:00 PM | +0 | |
| 12:00:01 | Each second is 1/86400 longer and AWS clocks fall behind UTC. The gap gradually increases to up to 1/2 second. | ||
| 12:00:01 | +1/86400 | ||
| 12:00:02 | |||
| 12:00:02 | +2/86400 | ||
| … | … | … | |
| 23:59:59 | |||
| 23:59:59 | +43199/86400 | ||
| 23:59:60 | Leap second injected to UTC. | ||
| 00:00:00 AM July 1st, 2015 | -1/2 | AWS clocks gain 1/2 second ahead of UTC. | |
| 00:00:00 AM July 1st, 2015 | AWS clocks keep falling behind and the gap with UTC shrinks gradually. | ||
| 00:00:01 | -43199/86400 | ||
| 00:00:01 | |||
| 00:00:02 | -43198/86400 | ||
| … | … | … | |
| 11:59:59 AM | -1/86400 | ||
| 11:59:59 AM | |||
| 12:00:00 PM July 1st ,2015 | 12:00:00 PM July 1st ,2015 | +0 | The gap shrinks to zero. AWS clocks synchronize to UTC again. |
| 12:00:01 | 12:00:01 | +0 | |
| … | … | … |
If you have any questions about this upcoming event, please contact AWS Support or post in the EC2 Forum.
— Mingxue Zhao, Senior Product Manager
Quickly Filter Data in Amazon Redshift Using Interleaved Sorting
My colleague Tina Adams sent a guest post to introduce another cool and powerful feature for Amazon Redshift.
— Jeff;
Amazon Redshift, our fully managed data warehouse service, makes it fast and easy to analyze all your data. You can get started with a 160GB cluster for free for 2 months, and scale to a couple of petabytes for less than $1,000/TB/Year. Amazon Redshift uses a massively parallel processing, scale-out architecture to ensure compute resources grow with your data set size, and columnar, direct-attached storage to dramatically reduce I/O time. Many of our customers, including Pinterest, Euclid, Accordant Media, Asana and Coursera, have seen significant performance improvements with Amazon Redshift.
Reducing I/O is critical to improving data warehouse query performance. One way Amazon Redshift improves I/O performance is by using sorted tables to restrict the range of values that need to be scanned. When you sort a table, we use zone maps (cached in memory) to skip 1 MB blocks without relevant data. For example, if a table has five years of data sorted by date, 98% of the blocks can be eliminated when you query for a particular month.
But what if you need to filter by a column that is not in the sort key? Row-based systems deal with this by creating secondary indices to reduce the number of blocks accessed when filtering on a non-primary key column. Indices are less selective for columnar databases with larger block sizes. Instead, columnar systems often create projections, which are copies of the underlying table sorted in different ways. However, both indices and projections can require significant overhead. You have to maintain not only data you’re loading, but also indices and projections on top of that data. For example, with 3 projections, it may take 2-3 times longer to load your data. What’s more, the number of possible projections increases exponentially with the number of columns. With eight columns, you can have up to 40K possible projections.
New Interleaved Sort Keys
For fast filter queries without the need for indices or projections, Amazon Redshift now supports Interleaved Sort Keys, which will be deployed in every region over the next seven days. A table with interleaved keys arranges your data so each sort key column has equal importance. Interleaved sorts are most effective with highly selective queries that filter on multiple columns. Let’s say you have a table with 100,000 1 MB blocks per column, and you often filter on one or more of four columns (date, customer, product, geography). You can create a compound sort key, sorting first by date, then customer, product, and finally geography. This will work well if your query filters on date, but can require a table scan of all 100,000 blocks if you only filter by geographic region. Interleaved sorting provides fast filtering, no matter which sort key columns you specify in your WHERE clause. If you filter by any one of the four sort key columns, you scan 5,600 blocks, or 100,000(3/4). If you filter by two columns, you reduce the scan to 316 blocks or 100,000(2/4). Finally, if you filter on all four sort keys, you scan a single block.
Sound like magic? No, it’s just math. Let’s walk through another example. Imagine you run a website and want to analyze your top webpages and customers. You have two sort keys (customer ID and page ID) and data split across four blocks. How do you achieve fast analytics across both webpages and customers? You can choose to sort your data by customer ID and then by page ID via a compound sort key (the notation [1, 1] means that customer 1 viewed page 1):
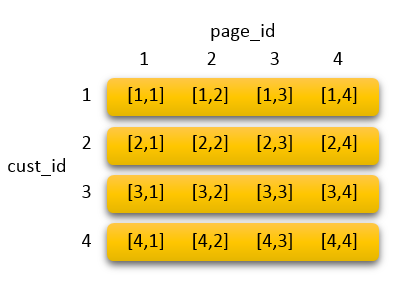
This means pages viewed by a given customer are stored in the same block (orange rectangle). While you only need to scan one block to return the page views of a particular customer, you must scan all four blocks to return all customers that viewed a given page.
Alternatively, if you create an interleaved sort, both customer and page are treated the same:
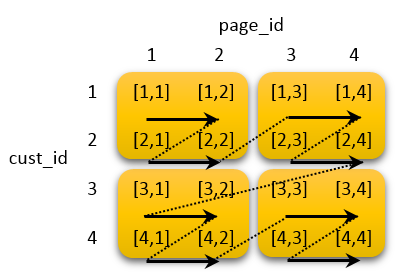
As you can see, the first two customer IDs are stored in the first block, along with the first two page IDs (arrows indicate the sort order). Therefore, you only scan 2 blocks to return data on a given customer or a given webpage.
The performance benefit of interleaved sorting increases with table size. If your table contains 1,000,000 blocks (1 TB per column) with an interleaved sort key of both customer ID and page ID, you scan 1,000 blocks when you filter on a specific customer or page, a speedup of 1000x compared to the unsorted case.
To create an interleaved sort, simply define your sort keys as INTERLEAVED in your CREATE TABLE statement, as shown below. You can specify up to eight sort keys.
CREATE TABLE PageViews (customerID INTEGER, pageURL VARCHAR(300), duration INTEGER)
INTERLEAVED SORTKEY (pageURL, customerID);
When we tuned a 45,000,000 row dataset with interleaved sort keys, queries on a subset of the sort columns ran 12x faster on average compared to using compound sort keys, as shown below.
SELECT COUNT(DISTINCT pageURL) FROM PageViews WHERE customerID = 57285;

Run time...

Compound Sort: 21.7 sec
Interleaved Sort: 1.7 sec
Interleaved sorting can even be useful for single-column keys. Our zone maps store the first eight bytes of sort key column values. When we generate a zone map on the pageURL column above using compound sort keys, the leading eight bytes would only cover “http://w”, which is not very selective. However, interleaved sorting compresses the key column, allowing 264 distinct URLs to fit in the zone map.
There are tradeoffs between using compound and interleaved sort keys. If the columns you query are always the same, you may be better off using compound sort keys. In the example above, a query filtering on the leading sort column, pageURL, runs 0.4 seconds faster using compound sort keys vs. interleaved sorting. This is not surprising, since compound keys favor leading columns. Depending on the nature of the dataset, vacuum time overheads can increase by 10-50% for interleaved sort keys vs. compound keys. If you have data that increases monotonically, such as dates, your interleaved sort order will skew over time, requiring you to run a vacuum operation to re-analyze the distribution and re-sort the data.
The interleaved sorting feature will be deployed in every region over the next seven days. The new cluster version will be 1.0.921.
Learn More
Our tutorial on Optimizing for Star Schemas with Amazon Redshift goes over how to make these trade-offs in more detail. APN business intelligence partner Looker has also written a great blog post about the performance benefits of interleaved sorting. For more information on defining sort keys, please review our documentation on Best Practices for Designing Tables. We’d also appreciate your feedback at redshift-feedback@amazon.com.
Stay Tuned
There’s more to come from Amazon Redshift, so stay tuned. To get the latest feature announcements, log in to the Amazon Redshift Forum and subscribe to the Amazon Redshift Announcements thread. Or use the Developer Guide History and the Management Guide History to track product updates.
— Tina Adams, Senior Product Manager
Export Amazon Mobile Analytics to Redshift Automatically
The user base for a successful mobile app or game can reach in to the hundreds of thousands, millions, or even tens of millions. In order to generate, manage, and understand growth at this scale, a data-driven approach is a necessity. The Amazon Mobile Analytics service can be a big help here. You can include the AWS Mobile SDK in your app, configure purchase and custom events, and then track usage metrics and KPIs in the AWS Management Console.
The built-in metrics include daily and monthly active users, new users, session and revenue information, and retention (see my blog post, New AWS Mobile Services, for more information and a complete list of metrics). The metrics are visible from within the AWS Management Console.
Beyond the Console
As your application becomes increasing successful, you may want to analyze the data in more sophisticated ways. Perhaps you want to run complex SQL queries on the raw data. Maybe you want to combine the data collected by the SDK with information that you captured from your backend or your website. Or, you might want to create a single, unified view of a user, even if they access the same app from more than one device.
Automatic Export to Amazon Redshift
Today we are giving you the ability to automatically export your mobile analytics event data to Amazon Redshift. This is in addition to the existing option to export the data to Amazon Simple Storage Service (S3) (the bucket is a waypoint between Amazon Mobile Analytics and Amazon Redshift; Auto Export to S3 is enabled when you Auto Export to Redshift).
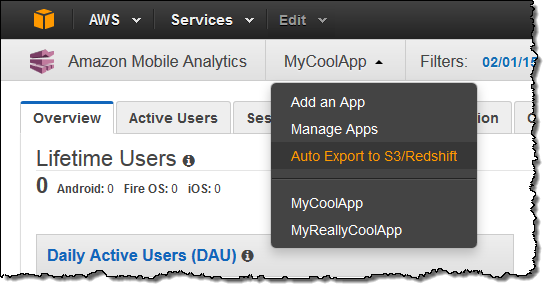
To enable this feature, simply open up the Mobile Analytics Console and choose Auto Export to S3/Redshift from the menu:
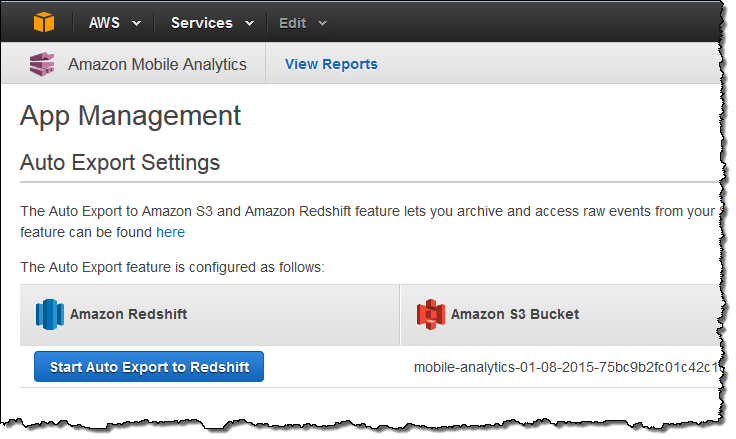
Inspect the existing export settings and then click on Start Auto Export to Redshift:
The console will then ask you for the information that it needs to have in order to create the Amazon Redshift cluster:
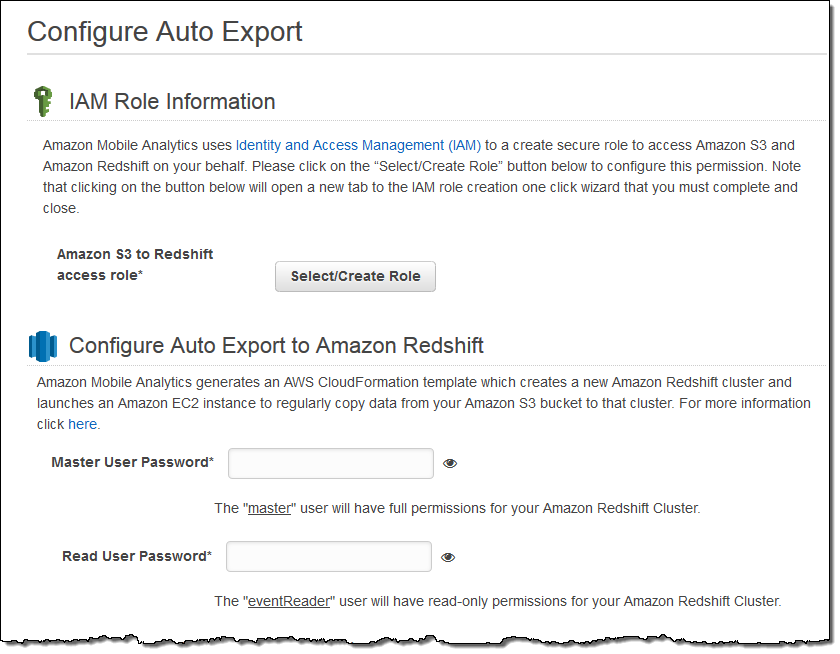
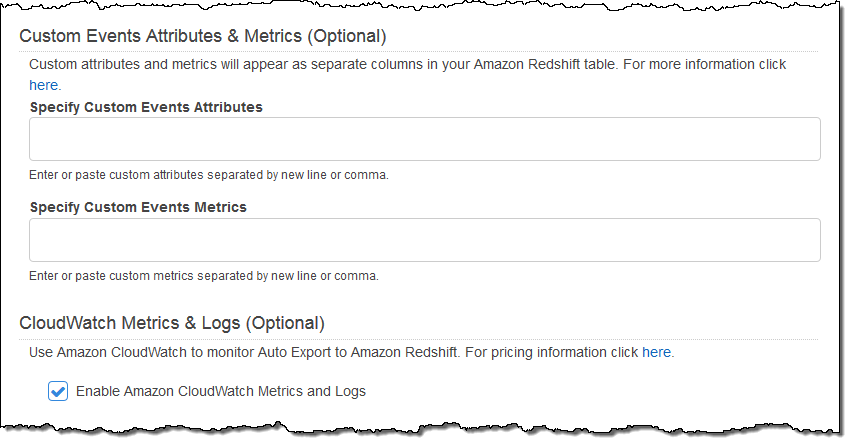
You can choose to include attributes and metrics from your custom events and you can use Amazon CloudWatch to monitor the auto-export process:
You can also set the advanced options for the Amazon Redshift cluster:

When you are ready to go, simply click on the Create Export button:
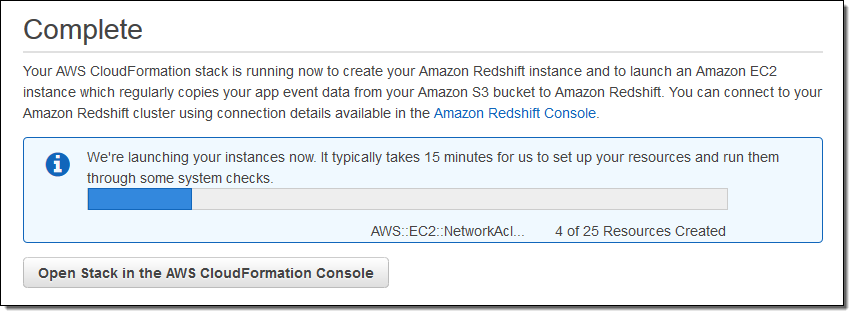
This will start up a AWS CloudFormation stack that creates an Amazon Elastic Compute Cloud (EC2) instance, an Amazon Redshift cluster, and all of the other necessary AWS resources:
You can see the export configuration for each of your mobile apps in the Console:

Inside the Stack
You can visit the CloudFormation Console to learn more about the stack and its components. The EC2 instance and the Amazon Redshift cluster are launched within a freshly created VPC (Virtual Private Cloud) and can be accessed using the IP address(es) specified in the Advanced Options.
Because the S3 bucket serves as a waypoint, you can stop the export to Amazon Redshift at any time and then restart it again later. This will repopulate the cluster with all of the historical data that was already exported to S3.
You can visit the Redshift Console to learn more about your cluster:
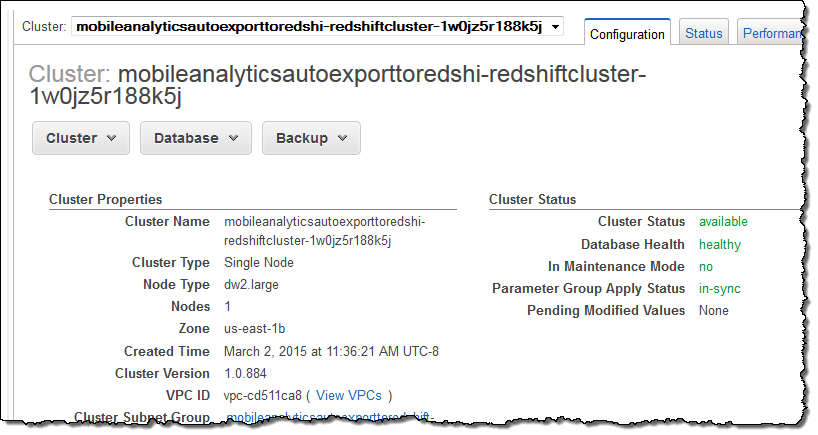
Available Now
This feature is available now and you can start using it today. You will pay the usual charges for S3 storage, the EC2 instance, and the Amazon Redshift cluster. You can turn on the Auto Export feature from your Amazon Mobile Analytics Console. To learn more, visit the Mobile Analytics page and check out the documentation.
— Jeff;
Custom ODBC/JDBC Drivers and Query Visualization for Amazon Redshift
A few months ago, I discussed 20 new features from Amazon Redshift, our petabyte-scale, fully managed data warehouse service that lets you get started for free and costs as little as $1,000 per TB per year.
The Amazon Redshift team has released over 100 new features since the launch, with a focus on price, performance, and ease of use. Customers are continuing to unlock powerful analytics using the service, as you can see from recent posts by IMS Health, Phillips, and GREE.
My colleague Tina Adams sent me a guest post to share some more Amazon Redshift updates. I’ll let her take over from here!
— Jeff;
I am happy to be able to announce two new Amazon Redshift features today!
The first, custom ODBC and JDBC drivers, now makes it easier and faster to connect to and query Amazon Redshift from your BI tool of choice. The second, Query Visualization in the Console, helps you optimize your queries to take full advantage of Amazon Redshift’s Massively Parallel Processing (MPP), columnar architecture.
Custom Amazon Redshift Drivers
We have launched custom JDBC and ODBC drivers optimized for use with Amazon Redshift, making them easier to use, more reliable, and more performant than drivers available on PostgreSQL.org.
Informatica, Microstrategy, Pentaho, Qlik, SAS, and Tableau will be supporting the new drivers with their BI and ETL solutions. Note that Amazon Redshift will continue to support the latest PostgreSQL ODBC drivers as well as JDBC 8.4-703, although JDBC 8.4-703 is no longer being updated. If you need to distribute these drivers to your customers or other third parties, please contact us at redshift-pm@amazon.com so that we can arrange an appropriate license to allow this.
Our JDBC driver features JDBC 4.1 and 4.0 support, up to a 35% performance gain over open source options, keep alive by default, and improved memory management. Specifically, you can set the number of rows to hold in memory and control memory consumption on a statement by statement basis.
Our ODBC driver is available for Linux, Windows, and Mac OS X. The driver features ODBC 3.8 support, better Unicode data and password handling, default keep alive, and a single-row mode that is more memory efficient than using DECLARE/FETCH. The driver is also backwards compatible with ODBC 2.x, supporting both Unicode and 64-bit applications. The driver includes software developed by the OpenSSL Project for use in the OpenSSL Toolkit.
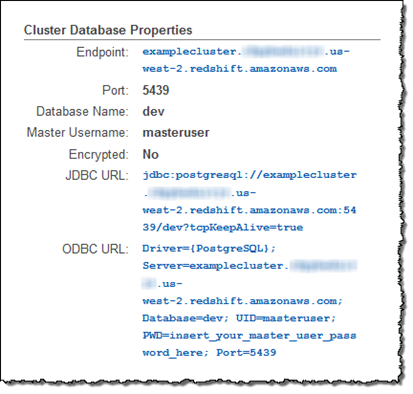
To connect to Amazon Redshift, find your Cluster Connection String by going to the Cluster tab detail view in the Amazon Redshift Console. For more information please see Connecting to a Cluster.
Query Visualization in the Console
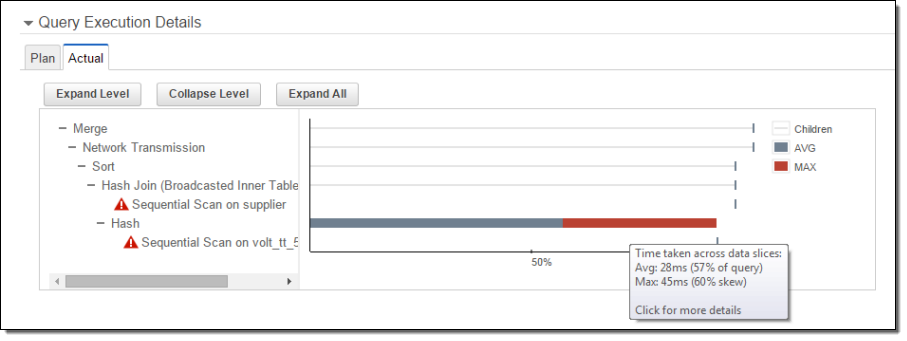
The Console now helps you visualize the time Amazon Redshift spent processing different parts of your query, helping you optimize complex queries more quickly and easily. By going to the Actual tab of the new Query Execution Details section, you can view processing times tied to each stage or “plan node” (e.g. merge, sort, join) of a query execution plan.
This information is pulled from system tables and views, such as STL_EXPLAIN and SVL_QUERY_REPORT. In addition to identifying the parts of your query that took a long time to run, you can also see skew in execution times across your cluster. Plan nodes that caused an alert in the SVL_ALERT_EVENT_LOG system view will show a red exclamation, which you can click to see a recommended solution. For more information please see Analyzing Query Execution.
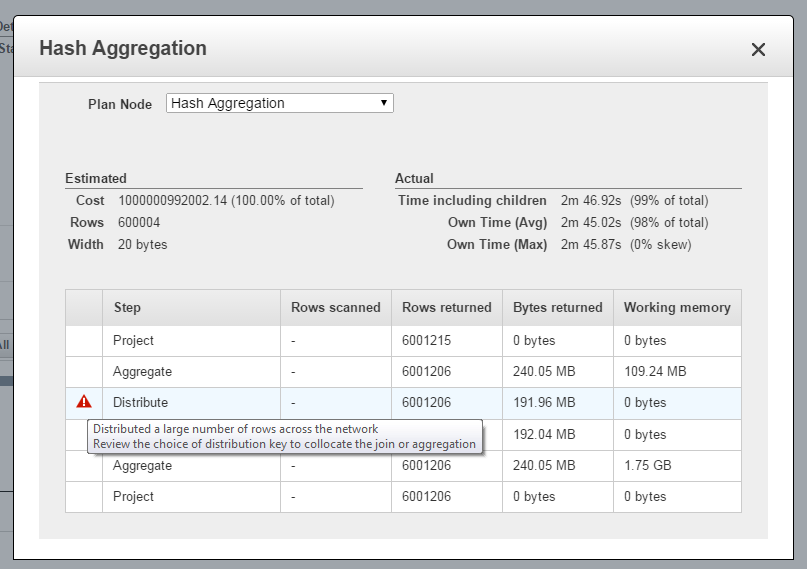
You can also click on each plan node to view the underlying steps and a detailed comparison of estimated and actual execution time:
Keep Following
There’s a lot more to come from Amazon Redshift, so stay tuned. To get the latest feature announcements, log in to the Amazon Redshift Forum and subscribe to the Amazon Redshift Announcements thread. You can also use the Developer Guide History and the Management Guide History to track product updates.
— Tina Adams, Senior Product Manager
New AWS Key Management Service (KMS)
Information security is always of paramount importance, whether data is stored on-premises or in the cloud. Since the early days of AWS, we’ve done our best to provide our customers with the information, services, and features that they need to have in order to make informed decisions about what kinds of applications and what kinds of data they can and should store in the cloud.
I think we can all agree that encryption is one of the principal elements of any data protection strategy. To date we have provided our customers with multiple options including client-side and server-side encryption for Amazon Simple Storage Service (S3), along with server-side encryption for Amazon Elastic Block Store (EBS), Amazon Redshift, Amazon RDS for Oracle, and Amazon RDS for SQL Server. Up until now, the server-side encryption support provided by these services has made use of “master keys” that are generated, stored, and managed within AWS.
Today we are adding a powerful new option for key management, one that can manage keys for applications and services running in the cloud as well as on-premises!
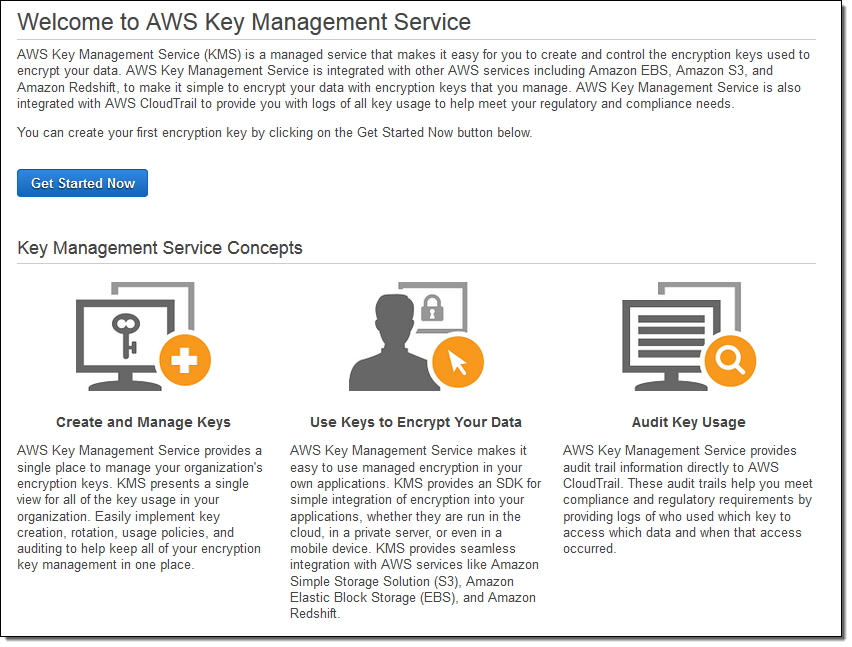
Introducing the AWS Key Management Service (KMS)
The new fully-managed AWS Key Management Service (KMS) provides you with seamless, centralized control over your encryption keys. It gives you a new option for data protection and relieves you of many of the more onerous scalability and availability issues that inevitably surface when you implement key management at enterprise scale. When properly used, AWS Key Management Service can even help to address lingering concerns about moving sensitive data to the cloud.
The service is built on systems that protect your keys with extensive hardening techniques such as never storing keys on disk, not persisting them in memory, and limiting which systems can connect to the device. All access to update software on the service is controlled by a multi-level approval process that is audited and reviewed by an independent group within Amazon. All physical access for maintenance is tightly controlled (multiple, senior-level employees must cooperate) and logged.
S3, EBS, and Redshift can now encrypt data at rest using keys controlled by AWS Key Management Service. You can choose to use the default (master) keys for each service or you can use AWS Key Management Service to create and manage your own keys. You can define keys for each service, application type, or data classification. The service lets you define which master keys protect your data however you choose to organize it. Regardless of the operation that you choose, all of the routine operations on keys (create, rotate, enable, and disable) are accessible from the AWS Management Console and through a set of key management APIs. All operations on keys are logged to AWS CloudTrail. You can use the logs to find out how and when specific keys were used, and which services used them.
In addition to managing keys for AWS services, AWS Key Management Service (KMS) streamlines the process of adding robust, fully-integrated encryption to your AWS and on-premises applications by supplying a rich set of key management and encryption APIs.
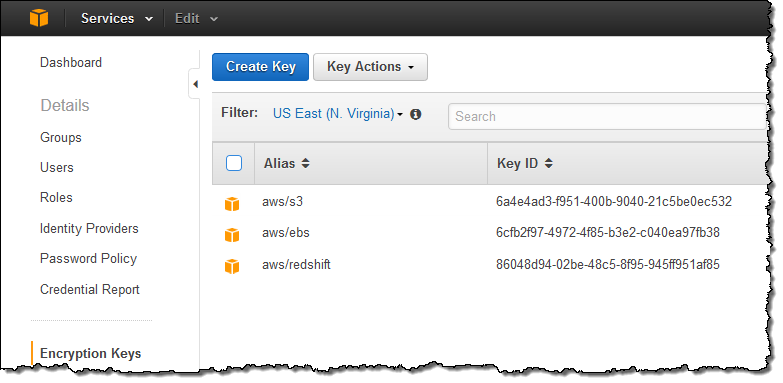
Creating Keys Using AWS Key Management Service
Let’s create a key! I start by opening up the Identity and Access Management Console and clicking on Encryption Keys. At this point I can see my existing keys (KMS created these keys when I opted to encrypt my S3 buckets, EBS volumes, and my Redshift data warehouse):
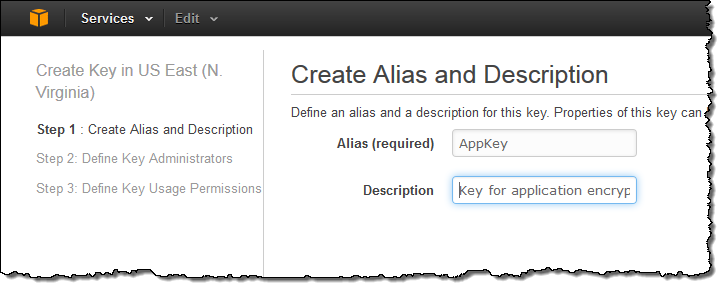
I can click Create Key to start the process of creating a new key. The first step is to define an alias (display name) for the key and to provide a description:
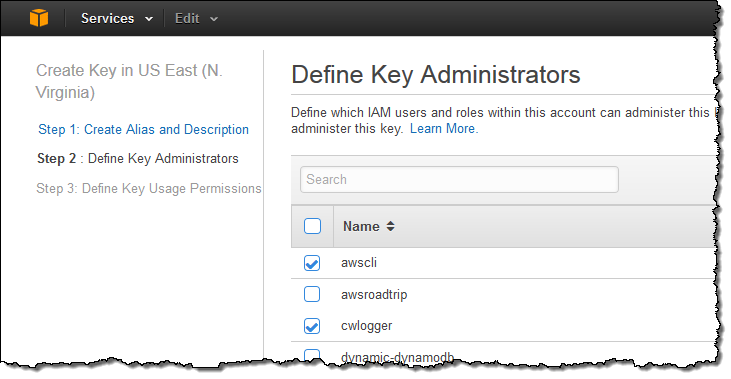
Next, I need to decide who is allowed to administer the new key by choosing one or more IAM users and/or roles:
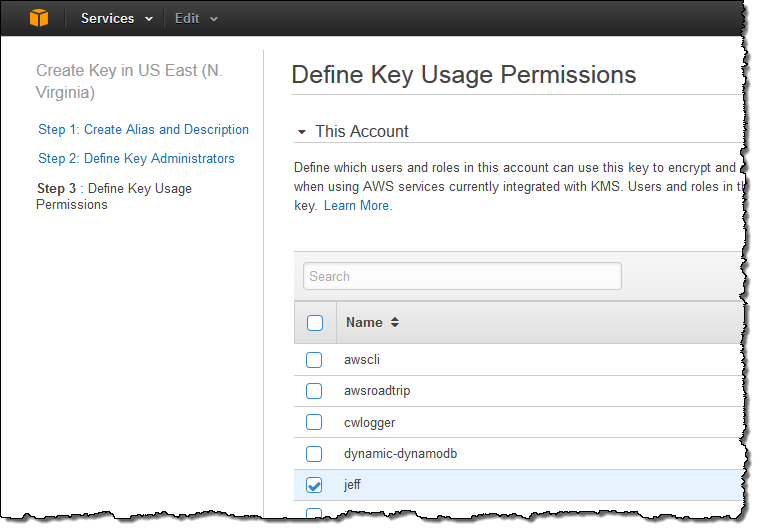
In the third and final step, I decide which users, roles, and other AWS accounts are allowed to use the key to encrypt and decrypt data. The permissions defined in this step apply to direct (API-driven) usage and to usage that originates with an AWS service that is integrated in to KMS:
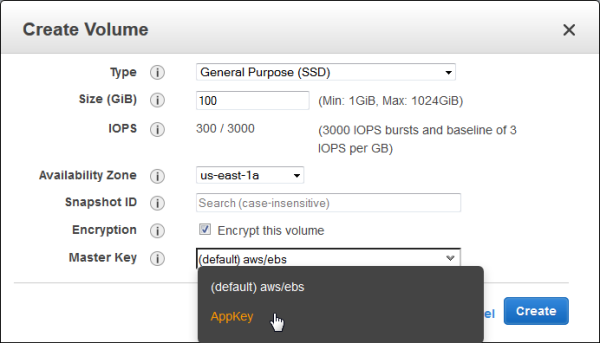
Using Keys with EBS and S3
Now that I have created a key, I can easily use it with any of the AWS services that I mentioned above (and others in the future)! Here’s how I would create an EBS volume that is encrypted with my key:
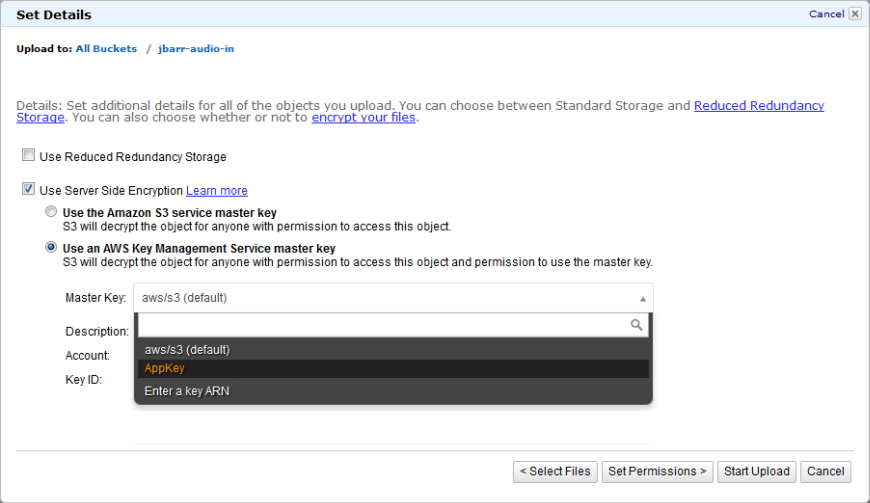
And here’s how I would encrypt an S3 object after it is uploaded:
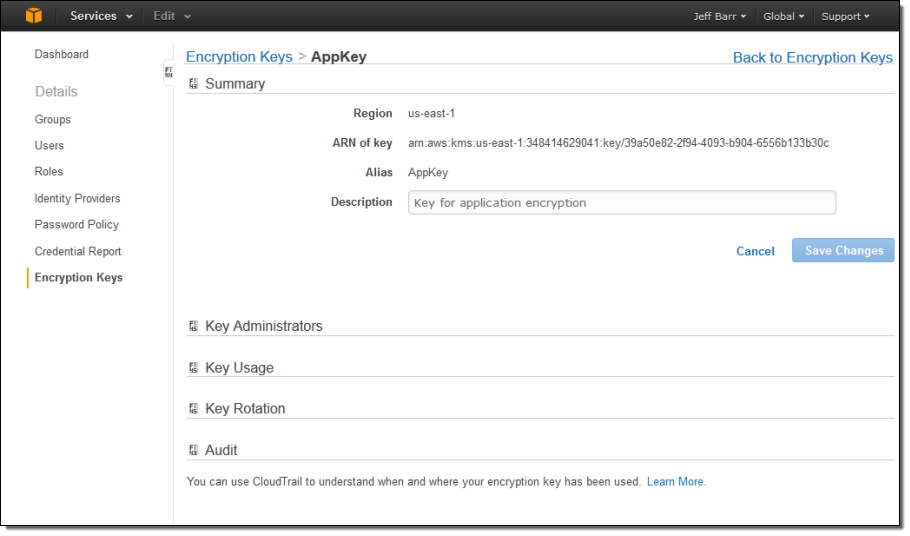
Managing and Auditing Key Usage
I can also get full information on a key with one click:
All API requests against a key are logged to AWS CloudTrail so that you can track and understand how, when, and by whom the keys where used.
Key Management APIs
All of the functions that I described above can also be accessed programmatically. You can create, enable, and disable keys. You can use them to encrypt and decrypt your own data and you can enable and disable rotation. Your AWS and on-premises applications can use these APIs for key management and encryption.
New White Paper
If you would like to learn more about the cryptographic operations that are executed within AWS when you use KMS, download and read our new white paper, AWS KMS – Cryptographic Details.
Pricing and Availability
This new service is available now in all public AWS Regions and you can start using it later today (visit the AWS Key Management Service (KMS) page to get started).
You can create, use, and manage keys at $1 per key version per month. API requests to the service cost $0.03 per 10,000 requests. There is a free tier of 20,000 requests per month.
— Jeff;
Amazon Redshift Update – 4 New Features + 16 New SQL Commands & Functions
It is time for a brief update on Amazon Redshift, our fast, easy-to-use, petabyte-scale, cost-effective (as little as $1000 per Terabyte per year) data warehouse service. We have added resource tagging, better query management, enhancements to data load and unload, and 16 new SQL commands and functions.
Let’s take a look at each of these new features!
New Resource Tagging
You can now tag the following types of Redshift resources for tracking and cost allocation purposes:
- Cluster
- Cluster Security Group
- HSM Connection
- HSM Client Certificate
- Parameter Group
- Snapshot
- Subnet Group
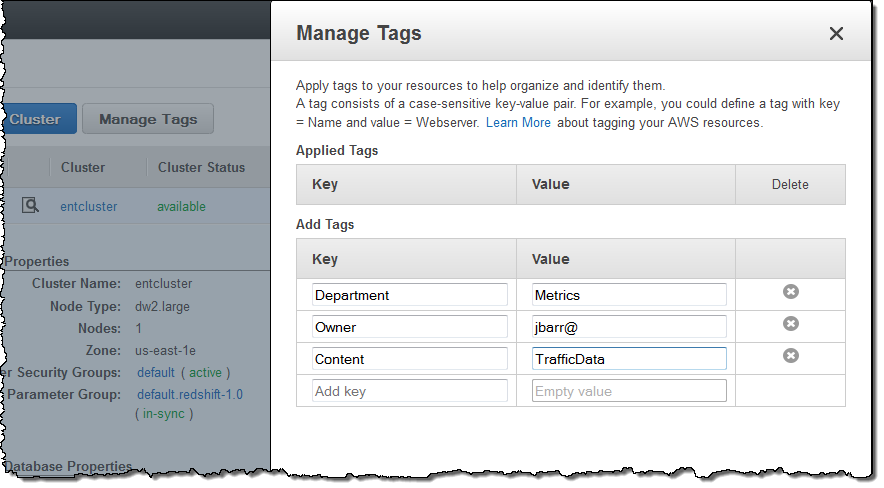
You can view, edit, and manage tags on these Redshift resources by selecting and clicking on the Manage Tags item in the button bar or in the Actions menu:
In order to use tags for cost allocation, you must first activate those tags in the Billing Console as shown here.
New Query Management
You can now cancel running queries or loads. You can view the cluster metrics during query execution and the cluster metrics during load operations to decide when this is appropriate.
Enhanced Data Load and Unload
The COPY command now allows you to load files that have UTF-16 encoding. This is in addition to the existing support for files with UTF-8 encoding.
The UNLOAD command now uses Amazon S3 server-side encryption (SSE) to automatically encrypt all unload data files. Server-side encryption adds another layer of data security with little or no effect on performance.
Enhanced Query Functionality
You can now take advantage of 16 new and enhanced SQL commands and functions. Here’s what you can do (the links will take you directly to the documentation):
- GRANT and REVOKE user privileges for all tables in a schema.
- DROP a TABLE, VIEW, SCHEMA, or USER if it exists.
- CREATE a TABLE or SCHEMA if it does not exist.
- Use new window functions (MEDIAN, CUME_DIST, PERCENT_RANK, and RATIO_TO_REPORT).
- Use new analytic functions (MONTHS_BETWEEN, NVL2, NEXT_DAY, and TRANSLATE).
Larger Clusters
Each of your Redshift clusters can now have up to 128 nodes. This means that you can now create a 2 Petabyte dw1 cluster or a 326 Terabyte dw2 cluster.
Follow Along
Redshift is adding new features rapidly (even by AWS standards). To follow along, log in to the Redshift Forum and subscribe to the Redshift Announcements thread.
You can also use the Developer Guide History and the Management Guide History to track changes. If you will be at AWS re:Invent, check out the Redshift sessions and come to the AWS Booth to meet members of the Redshift team.
— Jeff;
Fast, Easy, Free Data Sync from RDS MySQL to Amazon Redshift
As you know, I’m a big fan of Amazon RDS. I love the fact that it allows you focus on your applications and not on keeping your database up and running. I’m also excited by the disruptive price, performance, and ease of use of Amazon Redshift, our petabyte-scale, fully managed data warehouse service that lets you get started for $0.25 per hour and costs less than $1,000 per TB per year. Many customers agree, as you can see from recent posts by Pinterest, Monetate, and Upworthy.
Many AWS customers want to get their operational and transactional data from RDS into Redshift in order to run analytics. Until recently, it’s been a somewhat complicated process. A few week ago, the RDS team simplified the process by enabling row-based binary logging, which in turn has allowed our AWS Partner Network (APN) partners to build products that continuously replicate data from RDS MySQL to Redshift.
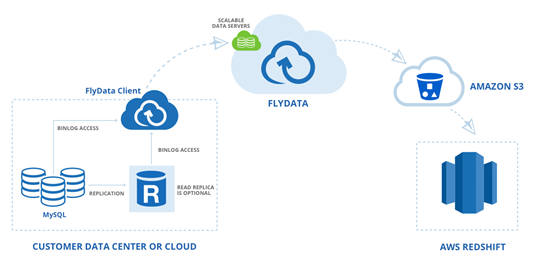
Two APN data integration partners, FlyData and Attunity, currently leverage row-based binary logging to continuously replicate data from RDS MySQL to Redshift. Both offer free trials of their software in conjunction with Redshift’s two month free trial. After a few simple configuration steps, these products will automatically copy schemas and data from RDS MySQL to Redshift and keep them in sync. This will allow you to run high performance reports and analytics on up-to-date data in Redshift without having to design a complex data loading process or put unnecessary load on your RDS database instances.
If you’re using RDS MySQL 5.6, you can replicate directly from your database instance by enabling row-based logging, as shown below. If you’re using RDS MySQL 5.5, you’ll need to set up a MySQL 5.6 read replica and configure the replication tools to use the replica to sync your data to Redshift. To learn more about these two solutions, see FlyData’s Free Trial Guide for RDS MySQL to Redshift as well as Attunity’s Free Trial and the RDS MySQL to Redshift Guide. Attunity’s trial is available through the AWS Marketplace, where you can find and immediately start using software with Redshift with just a few clicks.
Informatica and SnapLogic also enable data integration between RDS and Redshift, using a SQL-based mechanism that queries your database to identify data to transfer to your Amazon Redshift clusters. Informatica is offering a 60-day free trial and SnapLogic has a 30 day free trial.
All four data integration solutions discussed above can be used with all RDS database engines (MySQL, SQL Server, PostgreSQL, and Oracle). You can also use AWS Data Pipeline (which added some recent Redshift enhancements), to move data between your RDS database instances and Redshift clusters. If you have analytics workloads, now is a great time to take advantage of these tools and begin continuously loading and analyzing data in Redshift.
Enabling Amazon RDS MySQL 5.6 Row Based Logging
Here’s how you enable row based logging for MySQL 5.6:
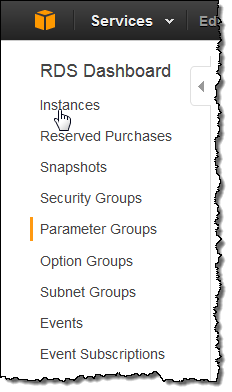
- Go to the Amazon RDS Console and click Parameter Groups in the left pane:
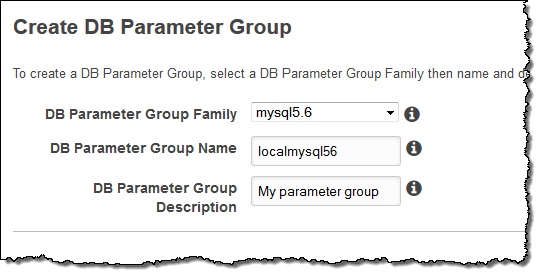
- Click on the Create DB Parameter Group button and create a new parameter group in the mysql5.6 family:
- Once in the detail view, click the Edit Parameters button. Then set the
binlog_formatparameter toROW: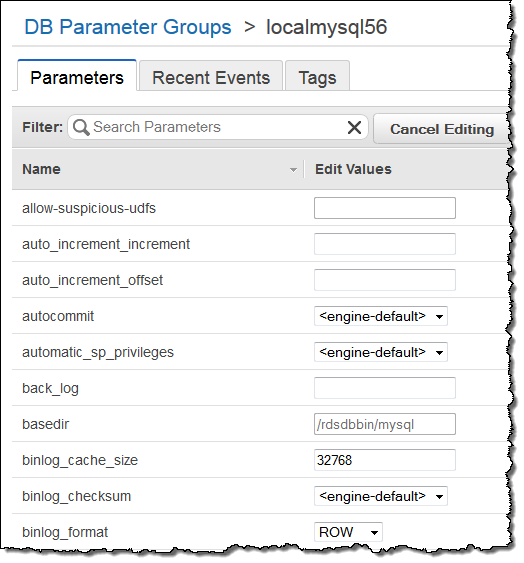
For more details please see Working with MySQL Database Log Files.
Free Trials for Continuous RDS to Redshift Replication from APN Partners
FlyData has published a step by step guide and a video demo in order to show you how to continuously and automatically sync your RDS MySQL 5.6 data to Redshift and you can get started for free for 30 days. You will need to create a new parameter group with binlog_format set to ROW and binlog_checksum set to NONE, and adjust a few other parameters as described in the guide above.
AWS customers are already using FlyData for continuous replication to Redshift from RDS. For example, rideshare startup Sidecar seamlessly syncs tens of millions of records per day to Redshift from two RDS instances in order to analyze how customers utilize Sidecar’s custom ride services. According to Sidecar, their analytics run 3x faster and the near-real-time access to data helps them to provide a great experience for riders and drivers. Here’s the data flow when using FlyData:
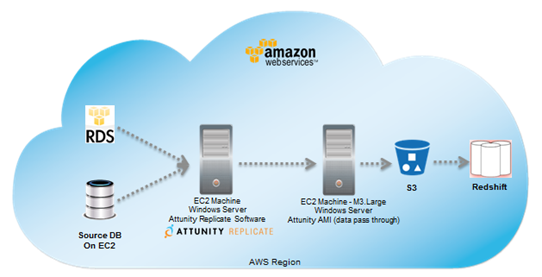
Attunity CloudBeam has published a configuration guide that describes how you can enable continuous, incremental change data capture from RDS MySQL 5.6 to Redshift (you can get started for free for 5 days directly from the AWS Marketplace. You will need to create a new parameter group with binlog_format set to ROW and binlog_checksum set to NONE.
For additional information on configuring Attunity for use with Redshift please see this quick start guide.
Redshift Free Trial
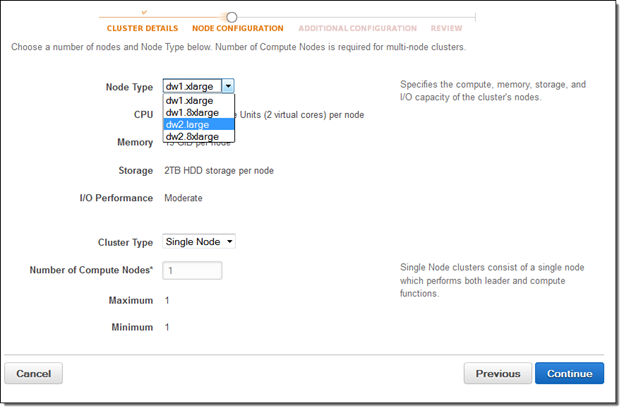
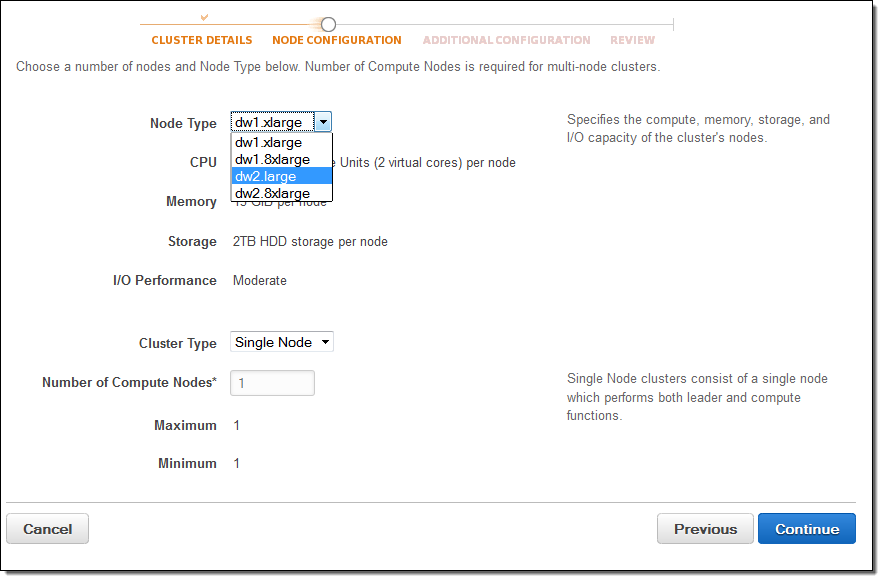
If you are new to Amazon Redshift, youre eligible for a free trial and can get 750 free hours for each of two months to try a dw2.large node (16 GB of RAM, 2 virtual cores, and 160 GB of compressed SSD storage). This gives you enough hours to continuously run a single node for two months. You can also build clusters with multiple dw2.large nodes to test larger data sets; this will consume your free hours more quickly. Each month’s 750 free hours are shared across all running dw2.large nodes in all regions.
To start using Redshift for free, simply go to the Redshift Console, launch a cluster, and select dw2.large for the Node Type:
Big Data Webinar
If you want to learn more, do not miss the AWS Big Data Webinar showcasing how startup Couchsurfing used Attunitys continuous CDC to reduce their ETL process from 3 months to 3 hours and cut costs by nearly $40K.
— Jeff;
Amazon Redshift Free Trial and Price Reductions in Asia Pacific
When Amazon Redshift first launched, I discussed its disruptive price, performance, and ease of use. One year later, we added faster and more cost-effective SSD-based nodes to the Redshift arsenal. The pace of Redshift innovation has only quickened, with over 60 new features added since launch, 12 of which I showcased last month.
Today, I’m happy to let you know you can now try Amazon Redshift’s SSD node for free for two months. You can also take advantage of Redshift’s rich partner ecosystem to help you get started. A number of Business Intelligence and Data Integration partners are also offering free trials to help you ingest and report on your data in Amazon Redshift. Last, but certainly not least, Amazon Redshift’s disruptive prices just got better. Three year Reserved Instance prices in APAC are now over 25% lower.
Two Month Free Trial
If you are new to Amazon Redshift, you get 750 free hours for each of two months to try the dw2.large node, enough hours to continuously run one node with 160GB of compressed SSD storage. You can also build clusters with multiple
To start your free trial, go to the AWS Redshift Console, launch a cluster, and select dw2.large for the Node Type:
You will use trial hours as long as your cluster is running. To stop using trial hours, delete your cluster and create a snapshot to restore later:
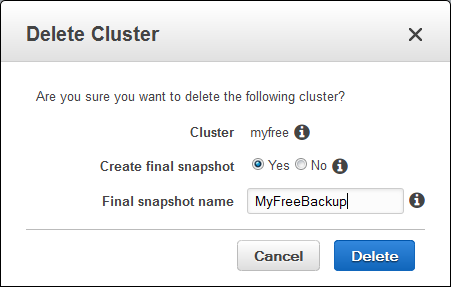
Any free hours that remain unused at the end of each month will expire. Once your two-month free trial ends or your usage exceeds 750 hours per month, you can shut down your cluster, avoiding any charges, or keep it running at our standard On-Demand Rate.
You can launch your two-month free trial right now and experience first-hand the features that have made Amazon Redshift such a big hit. You can see what this columnar, massively parallel processing, clustered data warehouse is all about!
Free Trials From Partners
To help you to start loading and analyzing your data, a number of Business Intelligence and Data Integration partners have launched free trials of their own. Below is a list of partners and links to their trial offers. You can also review the Redshift Getting Started Guides for help on loading data, tuning queries, and connecting your BI tools, or explore comprehensive documentation in our Developer Guide and Management Guide. As you familiarize yourself with Amazon Redshift, please feel free to ask questions on the Redshift Forum.
Free Trials from Business Intelligence Partners
- Looker – Free Trial with two views, one model, and up to five users.
- MicroStrategy – 30 Day Free Trial on AWS Marketplace.
- QlikView – Personal Edition Free Trial.
- Tableau Software – 14 Day Free Trial.
- TIBCO Jaspersoft – 30 Day Free Trial.
Free Trials from Data Integration Partners
- Attunity CloudBeam – 30 Day Free Trial on AWS Marketplace.
- FlyData – 30 Day Free Trial.
- Informatica Cloud – 60 Day Free Trial.
- SnapLogic – 30 Day Free Trial.
Price Reductions in Asia Pacific
If you are interested in running a data warehouse in the Asia Pacific are, you will be happy to hear that prices are coming down. We have reduced the three year Reserved Instance prices in Japan, Singapore, and Sydney for Amazon Redshift by over 25%.
You can now purchase a three year reserved dw1.8xl instance in Japan for $30,000 upfront and $1.326 per hour, down 28% from $30,400 upfront and $2.288 hourly. A three-year reserved dw1.8xl instance in Singapore and Sydney now costs $32,000 upfront and $1.462 per hour, down 26% from $32,000 upfront and $2.40 hourly. The dw1.xl instance price has also decreased and continues to be one eighth the cost of dw1.8xl. See the Redshift Pricing Page for more details.
— Jeff;
Twelve New Features for Amazon Redshift
Amazon Redshift makes it easy for you to launch a data warehouse. Because Redshift is a managed service, you can focus on your data and your analytics, while Redshift takes care of the infrastructure for you.
We have added support for twelve powerful and important features over the past month or so. Let’s take a look at each one…
JSON Support
You can now load data in JSON format directly into Redshift, without preprocessing. Many devices, event handling systems, servers, and games generate data in this format. When you use this new option, you can specify the mapping of JSON elements to Redshift column names in a jsonpaths file. This gives you the power to map the hierarchically data in the JSON file to the flat array of columns used by Redshift. Here’s a sample file:
{
    "jsonpaths":
        [
            "$['id']",
            "$['name']",
            "$['location'][0]",
            "$['location'][1]",
            "$['seats']"
        ]
}
And here’s a COPY command which references the jsonpaths file and the JSON data, both of which are stored in Amazon S3:
COPY venue FROM 's3://mybucket/venue.json'
  credentials 'aws_access_key_id=ACCESS-KEY-ID; aws_secret_access_key=SECRET-ACCESS-KEY'
  JSON AS 's3://mybucket/venue_jsonpaths.json';
Documentation: Copy from JSON Format.
Copy from Elastic MapReduce
You can now copy data from an Elastic MapReduce cluster to a Redshift cluster. In order to do this you first need to transfer your Redshift cluster’s public key and the IP addresses of the cluster nodes to the EC2 hosts in the Elastic MapReduce cluster. Then you can use a Redshift COPY command to copy fixed-width files, character-delimited files, CSV files, and JSON-formatted files to Redshift.
Documentation: Loading Data From Amazon EMR
Unload to a Single File
You can now use UNLOAD to upload the result of a query to one or more Amazon S3 files:
UNLOAD ('select_statement')
  TO 's3://object_path_prefix'
  [ WITH ] CREDENTIALS [AS] 'aws_access_credentials'
  [ option [ ... ] ]
Option can be either PARALLEL ON or PARALLEL OFF.
By default, UNLOAD writes data in parallel to multiple files, according to the number of slices in the cluster. If PARALLEL is OFF or FALSE, UNLOAD writes to one or more data files serially, limiting the size of each S3 object to 6.2 Gigabytes. If, for example, you unload 13.4 GB of data, UNLOAD automatically will create the following three files:
s3://bucket/key000 6.2 GB
s3://bucket/key001 6.2 GB
s3://bucket/key002 1.0 GB
Documentation: UNLOAD command.
Increased Concurrency
You can now configure a maximum of 50 simultaneous queries across all of your queues. Each slot in a queue is allocated an equal, fixed share of the server memory allocated to the queue.
Increasing the level of concurrency will allow you to increase query performance for some types of workloads. For example, workloads that contain a mix of many small, quick queries and a few, long-running queries can be served by a pair of queues, using one with a high level of concurrency for the small, quick queries and another with a different level of concurrency for long-running queries.
Documentation: Defining Query Queues.
Max Result Set Size
You can now configure the cursor counts and result set sizes. Larger values will result in increased memory consumption; be sure to read the documentation on Cursor Constraints before making any changes. We know that this change will be of special interest to Redshift users who are also making use of data visualization and analytical products from Tableau.
Regular Expression Extraction
The new REGEX_SUBSTR function extracts a substring from a string, as specified by a regular expression. For example, the following SELECT statement retrieves the portion of an email address between the “@” character and the top-level domain name:
select email, regexp_substr(email,'@[^.]*')
Documentation: REGEX_SUBSTR function.
The new REGEX_COUNT function returns an integer that indicates the number of times a regular expression pattern occurs in the string. For example, the following SELECT statement counts the number of times a three-letter sequence occurs:
select regexp_count('abcdefghijklmnopqrstuvwxyz', '[a-z]{3}')
Documentation: REGEX_COUNT function.
The new REGEX_INSTR function returns an integer that indicates the beginning position of the matched regular expression. For example, the following SELECT statement searches for the @ character that begins a domain name and returns the starting position of the first match:
select email, regexp_instr(email,'@[^.]*\\.(org|edu)')
Documentation: REGEX_INSTR function.
The new REGEX_REPLACE function replaces every occurrence of a regular expression with the specified string. For example, the following SELECT statement deletes the @ and domain name from email addresses:
select email, regexp_replace(email, '@.*\\.(org|gov|com)$')
Documentation: REGEX_REPLACE function.
FedRAMP Approval
Amazon Redshift has successfully completed the FedRAMP assessment and authorization process and has been added to the list of services covered under our US East/West FedRAMP Agency Authority to Operate granted by the U.S. Department of Health and Human Services (HHS).
Support for ECDHE-RSA and ECDHE-ESDCSA Cipher Suites
SSL connections to Redshift can now choose between a pair of ECDHE key exchange protocols and the associated cipher suites. With this change, SSL clients that specify these cipher suites now provide perfect forward secrecy.
Resize Progress Indicator
You can now monitor the progress of cluster resize operations. The information is displayed in the Redshift console and is also available via the Redshift API:
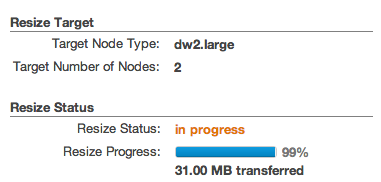
Documentation: DescribeResize.
All of these new features are available now for new clusters and will roll out to existing clusters during maintenance windows in the next two weeks.
To see a complete list of features that we have added to Redshift, please view the Management Guide History and the Developer Guide History.
— Jeff;
AWS CloudTrail Update – Seven New Services & Support From CloudCheckr
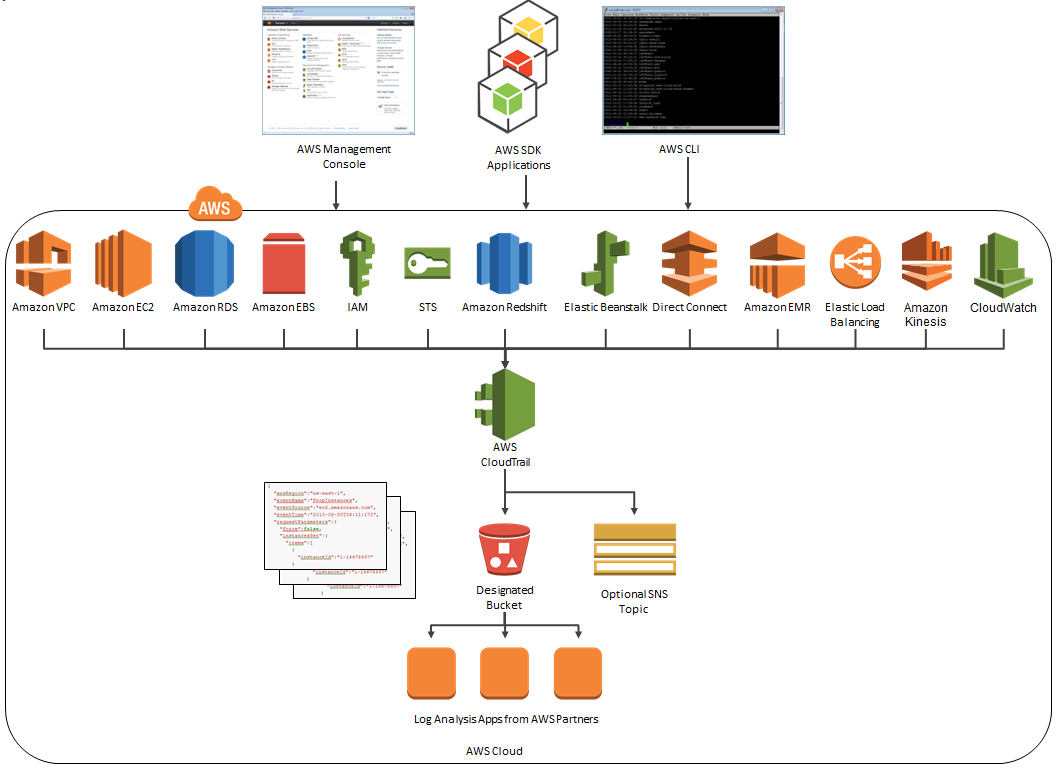
AWS CloudTrail records the API calls made in your AWS account and publishes the resulting log files to an Amazon S3 bucket in JSON format, with optional notification to an Amazon SNS topic each time a file is published.
Our customers use the log files generated CloudTrail in many different ways. Popular use cases include operational troubleshooting, analysis of security incidents, and archival for compliance purposes. If you need to meet the requirements posed by ISO 27001, PCI DSS, or FedRAMP, be sure to read our new white paper, Security at Scale: Logging in AWS, to learn more.
Over the course of the last month or so, we have expanded CloudTrail with support for additional AWS services. I would also like to tell you about the work that AWS partner CloudCheckr has done to support CloudTrail.
New Services
At launch time, CloudTrail supported eight AWS services. We have added support for seven additional services over the past month or so. Here’s the full list:
- Amazon EC2
- Elastic Block Store (EBS)
- Virtual Private Cloud (VPC)
- Relational Database Service (RDS)
- Identity and Access Management (IAM)
- Security Token Service (STS)
- Redshift
- CloudTrail
- Elastic Beanstalk – New!
- Direct Connect – New!
- CloudFormation – New!
- Elastic MapReduce – New!
- Elastic Load Balancing – New!
- Kinesis – New!
- CloudWatch – New!
Here’s an updated version of the diagram that I published when we launched CloudTrail:
News From CloudCheckr
CloudCheckr (an AWS Partner) integrates with CloudTrail to provide visibility and actionable information for your AWS resources. You can use CloudCheckr to analyze, search, and understand changes to AWS resources and the API activity recorded by CloudTrail.
Let’s say that an AWS administrator needs to verify that a particular AWS account is not being accessed from outside a set of dedicated IP addresses. They can open the CloudTrail Events report, select the month of April, and group the results by IP address. This will display the following report:
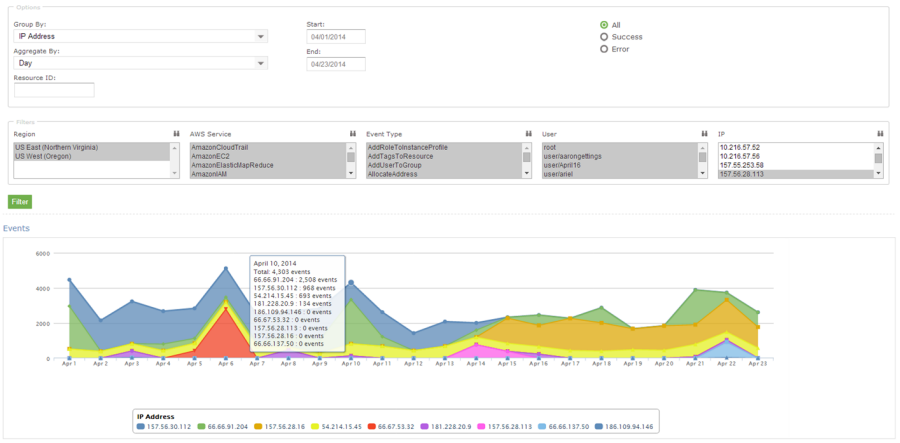
As you can see, the administrator can use the report to identify all the IP addresses that are being used to access the AWS account. If any of the IP addresses were not on the list, the administrator could dig in further to determine the IAM user name being used, the calls being made, and so forth.
CloudCheckr is available in Freemium and Pro versions. You can try CloudCheckr Pro for 14 days at no charge. At the end of the evaluation period you can upgrade to the Pro version or stay with CloudCheckr Freemium.
— Jeff;