Category: Amazon Kinesis
Amazon Kinesis Update – Simplified Capture of Streaming Data
Amazon Kinesis is a managed service designed to handle real-time streaming of big data. It can accept any amount of data, from any number of sources, scaling up and down as needed (see my introductory post for more information on Kinesis). Developers can use the Kinesis Client Library (KCL) to simplify the implementation of apps that consume and process streamed data.
Today we are making the capture of streaming data with Kinesis even easier, with a powerful new Kinesis Producer Library, a big step up in the maximum record size, and a price reduction that makes capture of small-sized records even more cost-effective.
Let’s take a closer look!
Increased Record Size
A Kinesis record is simply a blob of data, also known as the payload. Kinesis does not look inside the data; it simply accepts the record (via PutRecord or PutRecords) from a producer and puts it into a stream.
We launched Kinesis with support records that could be as large as 50 KB. With today’s update we are raising this limit by a factor of 20; individual records can now be as large as 1 MB. This gives you a lot more flexibility and opens the door to some interesting new ways to use Kinesis. For example, you can now send larger log files, semi-structured documents, email messages, and other data types without having to split them in to small chunks.
Price Reduction for Put Calls
Up until now, pricing for Put operations was based on the number of records, with a charge of $0.028 for every million records.
Going forward, pricing for Put operations will be based on the size of the payload, as expressed in “payload units” of 25 KB. The charge will be $0.014 per million units. In other words, Putting small records (25 KB or less) now costs half as much as it did before. The vast majority of our customers use Kinesis in this way today and they’ll benefit from the price reduction.
For more information, take a look at the Kinesis Pricing page.
Kinesis Producer Library (KPL)
I’ve saved the biggest news for last!
You can use Kinesis to handle the data streaming needs of many different types of applications including websites (clickstream data), ad servers (publisher data), mobile apps (customer engagement data), and so forth.
In order to achieve high throughput, you should combine multiple records into a single call to PutRecords. You should also consider aggregating multiple user records into a single Kinesis record, and then de-aggregating them immediately prior to consumption. Finally, you will need code to detect and retry failed calls.
The new Kinesis Producer Library (KPL) will help you with all of the tasks that I identified above. It will allow you to write to one or more Kinesis streams with automatic and configurable retry logic; collect multiple records and write them in batch fashion using PutRecords; aggregate user records to increase payload size and throughput, and submit Amazon CloudWatch metrics (including throughput and error rates) on your behalf.
The KPL plays well with the Kinesis Client Library (KCL). The KCL takes care of many of the more complex tasks associated with consuming and processing streaming data in a distributed fashion, including load balancing across multiple instances, responding to instance failures, checkpointing processed records, and reacting to chances in sharding.
When the KCL receives an aggregated record with multiple KPL user records inside, it will automatically de-aggregate the records before making them available to the client application (you will need to upgrade to the newest version of the KCL in order to take advantage of this feature).
The KPL presents a Java API that is asynchronous and non-blocking; you simply hand records to it and receive a Future object in return Here’s a sample call to the addUserRecord method:
public void run() {
  ByteBuffer data = Utils.generateData(sequenceNumber.get(), DATA_SIZE);
  // TIMESTAMP is our partition key
  ListenableFuture f =
    producer.addUserRecord(STREAM_NAME, TIMESTAMP, Utils.randomExplicitHashKey(), data);
  Futures.addCallback(f, callback);
}
The core of the KPL takes the form of a C++ module; wrappers in other languages will be available soon.
KPL runs on Linux and OSX. Self-contained binaries are available for the Amazon Linux AMI, Ubuntu, RHEL, OSX, and OSX Server. Source code and unit tests are also available (note that the KCL and the KPL are made available in separate packages).
For more information, read about Developing Producers with KPL.
— Jeff;
New – Amazon Cognito Streams
Amazon Cognito makes it easy for you to save user data such as app preferences in the AWS Cloud without writing any backend logic or managing any infrastructure. You can focus on creating a great app instead of worrying about creating server-side code to handle identity management, network state, storage, and sync.
Today we are giving you the ability to receive events (in the form of a Amazon Kinesis stream) when data managed by Cognito is updated or synchronized. You can use this stream to monitor user and app activity in real time. You can also route the event information to Amazon Redshift and analyze it using SQL queries or a wide selection of Business Intelligence (BI) tools.
To learn more about this feature, take a look at Announcing Amazon Cognito Streams on the AWS Mobile Development Blog.
— Jeff;
Amazon Kinesis Update – Reduced Propagation Delay
Amazon Kinesis is at home in situations where data arrives in a continuous stream. It is real-time and elastic and you can use it to reliably deliver any amount of data to your mission-critical applications.
Today we are making an important change to Kinesis. You can now retrieve records (data) immediately after a successful PutRecord or PutRecords call. Until now, records would become accessible to GetRecords after a propagation delay that was typically between two and four seconds. You don’t need to make any changes to your application in order to benefit from this improvement (if you are using the KCL (Kinesis Client Library) you may want to configure it to poll more frequently in order to further reduce latency).
I believe that this improvement will make Kinesis an even better fit for many use cases. For example, some AWS customers use Kinesis as an integral part of their data ingestion and processing workflow. In this model, Kinesis functions as a high-performance elastic buffer between each processing step. Prior to today’s launch, the propagation delays present at each step could significantly increase the time that it takes to process raw data into actionable results. Now that the delays are a thing of the past, applications of this type can digest and process data faster than ever!
KCL Configuration
If you are using the Kinesis Client Library (KCL) the default polling interval is set to one poll per second. This is in accord with our recommended polling rate of one poll per shard per second per application and allows multiple applications to concurrently process a single stream without hitting the Kinesis limit of 5 calls to GetRecord per second per shard. Going beyond this limit will invoke the SDK’s exponential back-off logic and the perceived propagation delay will increase. To reduce the propagation delay your consuming applications observe, you can change the default polling interval to a value between 200 and 250 milliseconds. Read the documentation on Kinesis Low Latency Processing to learn more about the configuration options and settings.
Available Now
This feature is available now. If you are already running Kinesis applications you are already benefiting from it!
— Jeff;
AWS Expansion – WorkSpaces, Directory Service, ElastiCache, GovCloud, Kinesis, Traditional Chinese, More
We’ve  increased the geographic footprint and international relevance of several AWS services this past month. Here’s a summary:
- Amazon WorkSpaces and AWS Directory Service are now available in the Asia Pacific (Singapore) region.
- Amazon ElastiCache is now available in the EU (Frankfurt) region.
- AWS Trusted Advisor, Amazon ElastiCache, and RDS integration with AWS CloudTrail are now available in AWS GovCloud (US).
- We added a second location in Korea for Amazon CloudFront and Amazon Route 53.
- Amazon Kinesis is now available in the US West (Northern California) region.
- The AWS website is now available in Traditional Chinese.
For more information on service availability, please take a look at our Products and Services by Region page.
— Jeff;
Amazon Kinesis Update – New High-Throughput PutRecords API Function
My colleague Adi Krishnan wrote the following guest post to tell you about the newest addition to the Amazon Kinesis API.
— Jeff;
Amazon Kinesis is a fully managed service for real-time processing of streaming data at massive scale. Customers love the fact that they can put any amount of data in to a Kinesis stream and then use it to power real-time dashboards and generate alerts, or route it to big data services such as S3 and Amazon Redshift.
Today, the Amazon Kinesis team is excited to release a new API function, PutRecords, so that you can put data into your Kinesis stream with greater efficiency and less complexity. You can use the new PutRecords function to send up to 500 records to your Kinesis stream in a single HTTP call. Each record in the call can be as large as 50 KB, up to a limit of 4.5 MB for the entire request.
Since we launched last November, customers have used Amazon Kinesis to put data from many different sources, commonly called producers. A producer could be an application server running on EC2, a web browser, or a mobile application. The common theme across these producers is that developers want to get data off of them and into their Kinesis stream as quickly and efficiently as possible.
You can use PutRecords to easily build high-throughput producers that run on EC2 instances. Many customers use multi-threading or local batching to improve the throughput of these producers. PutRecords reduces this complexity by improving the amount of throughput that you can achieve by using a single HTTP call.
For mobile applications, you can use PutRecords to make your application more robust in the face of intermittent network connections and limited battery life. PutRecords reduces the overhead associated with multiple HTTP calls, allowing you to send up to 5 MB of usage and application logs in a single call.
You can learn more about the new operation in the Kinesis Developer Guide and the Kinesis API Reference. We recommend starting out by using one of the AWS SDKs that support the new feature.
— Adi Krishnan (Senior Product Manager) & Ryan Nienhuis (Technical Program Manager)
AWS Lambda – Run Code in the Cloud
We want to make it even easier for you to build applications that run in the Cloud. We want you to be able to focus on your code, and to work within a cloud-centric environment where scalability, reliability, and runtime efficiency are all high enough to be simply taken for granted!
 Today we are launching a preview of AWS Lambda, a brand-new way to build and run applications in the cloud, one that lets you take advantage of your existing programming skills and your knowledge of AWS. With Lambda, you simply create a Lambda function, give it permission to access specific AWS resources, and then connect the function to your AWS resources. Lambda will automatically run code in response to modifications to objects uploaded to Amazon Simple Storage Service (S3) buckets, messages arriving in Amazon Kinesis streams, or table updates in Amazon DynamoDB.
Lambda is a zero-administration compute platform. You don’t have to configure, launch, or monitor EC2 instances. You don’t have to install any operating systems or language environments. You don’t need to think about scale or fault tolerance and you don’t need to request or reserve capacity. A freshly created function is ready and able to handle tens of thousands of requests per hour with absolutely no incremental effort on your part, and on a very cost-effective basis.
Let’s dig in! We’ll take a more in-depth look at Lambda, sneak a peek at the programming model and runtime environment, and then walk through a programming example. As you read through this post, keep in mind that we have plenty of items on the Lambda roadmap and that what I am able to share today is just the first step on what we expect to be an enduring and feature-filled journey.
Lambda Concepts
 The most important Lambda concept is the Lambda function, or function for short. You write your functions in Node.js (an event-driven, server side implementation of JavaScript).
You upload your code and then specify context information to AWS Lambda to create a function. The context information specifies the execution environment (language, memory requirements, a timeout period, and IAM role) and also points to the function you’d like to invoke within your code. The code and the metadata are durably stored in AWS and can later be referred to by name or by ARN (Amazon Resource Name). You an also include any necessary third-party libraries in the upload (which takes the form of a single ZIP file per function).
After uploading, you associate your function with specific AWS resources (a particular S3 bucket, DynamoDB table, or Kinesis stream). Lambda will then arrange to route events (generally signifying that the resource has changed) to your function.
When a resource changes, Lambda will execute any functions that are associated with it. It will launch and manage compute resources as needed in order to keep up with incoming requests. You don’t need to worry about this; Lambda will manage the resources for you and will shut them down if they are no longer needed.
Lambda is accessible from the AWS Management Console, the AWS SDKs and the AWS Command Line Interface (CLI). The Lambda APIs are fully documented and can be used to connect existing code editors and other development tools to Lambda.
Lambda Programming Model
Functions are activated after the associated resource has been changed. Execution starts at the designated Node.js function and proceeds from there. The function has access (via a parameter supplied along with the POST) to a JSON data structure. This structure contains detailed information about the change (or other event) that caused the function to be activated.
Lambda will activate additional copies of function as needed in order to keep pace with changes. The functions cannot store durable state on the compute instance and should use S3 or DynamoDB instead.
Your code can make use of just about any functionality that is intrinsic to Node.js and to the underlying Linux environment. It can also use the AWS SDK for JavaScript in Node.js to make calls to other AWS services.
Lambda Runtime Environment
The context information that you supply for each function specifies a maximum execution time for the function. This is typically set fairly low (you can do a lot of work in a couple of seconds) but can be set to up 60 seconds as your needs dictate.
Lambda uses multiple IAM roles to manage access to your functions and your AWS resources. The invocation role gives Lambda permission to run a particular function. The execution role gives a function permission to access specific AWS resources. You can use distinct roles for each function in order to implement a fine-grained set of permissions.
Lambda monitors the execution of each function and stores request count, latency, availability, and error rate metrics in Amazon CloudWatch. The metrics are retained for 30 days and can be viewed in the Console.
Here are a few things to keep in mind when as you start to think about how you will put Lambda to use:
- The context information for a function specifies the amount of memory needed to run it. You can set this to any desired value between 128 MB and 1 GB. The memory setting also determines the amount of CPU power, network bandwidth, and I/O bandwidth that are made available to the function.
- Each invocation of a function can make use of up to 256 processes or threads. It can consume up to 512 MB of local storage and up to 1,024 file descriptors.
- Lambda imposes a set of administrative limits on each AWS account. During the preview, you can have up to 25 invocation requests underway simultaneously.
Lambda in Action
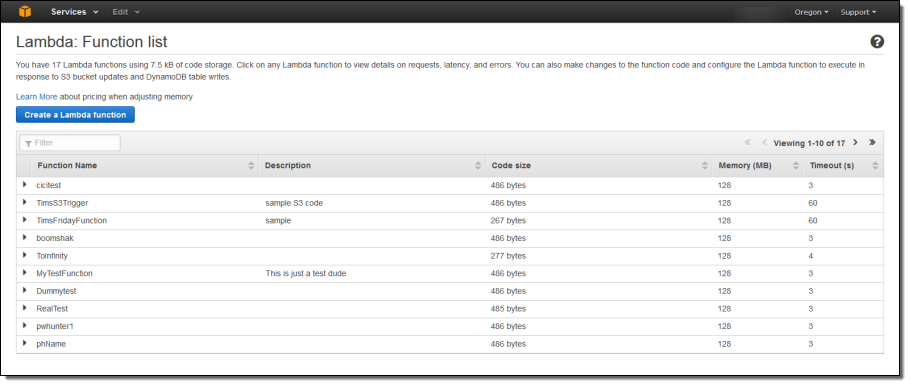
Let’s step through the process of creating a simple function using the AWS Management Console. As I mentioned earlier, you can also do this from the SDKs and the CLI. The console displays all of my functions:
I simply click on Create Function to get started. Then I fill in all of the details:
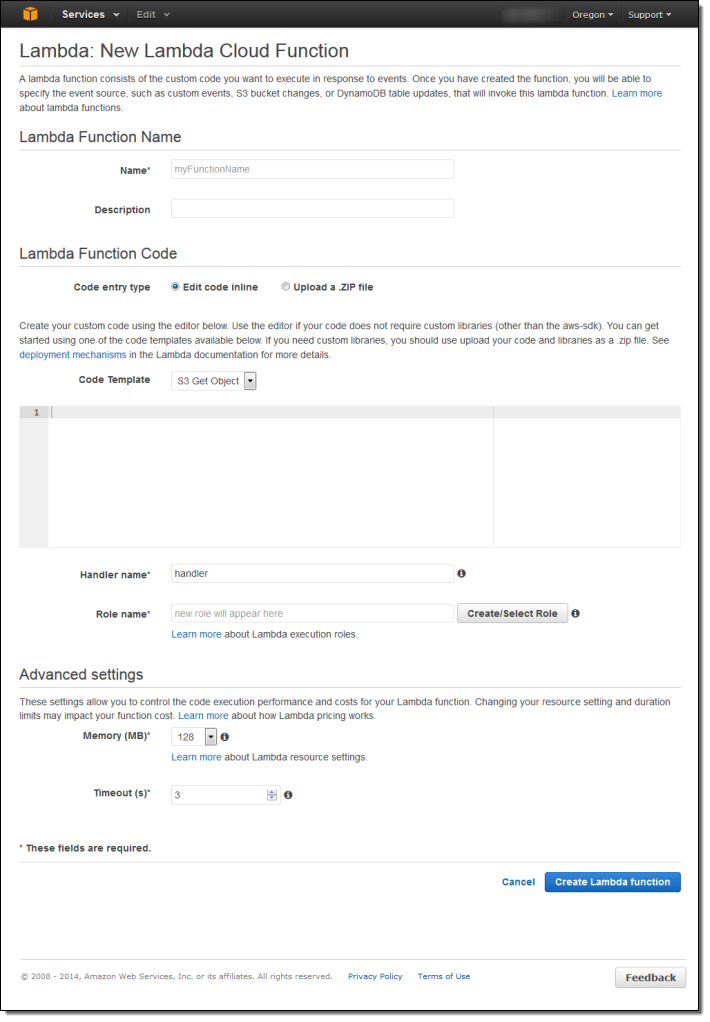
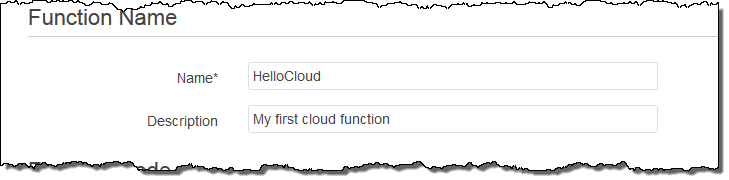
I name and describe my function:
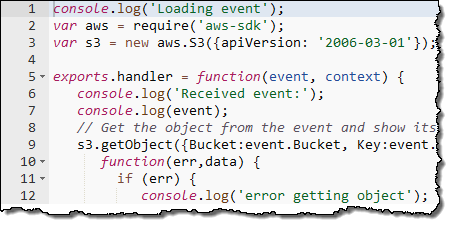
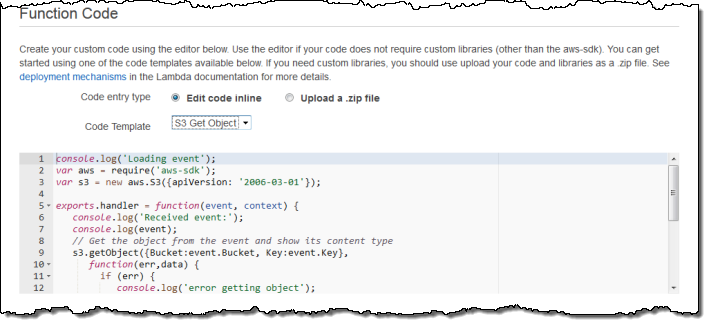
Then I enter the code or upload a ZIP file. The console also offers a choice of sample code snippets to help me to get started:
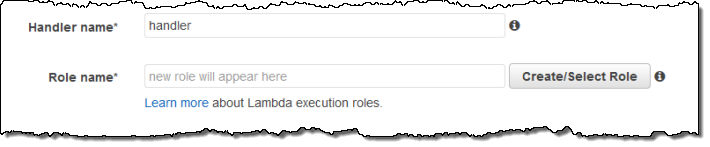
Now I tell Lambda which function to run and which IAM role to use when the code runs:
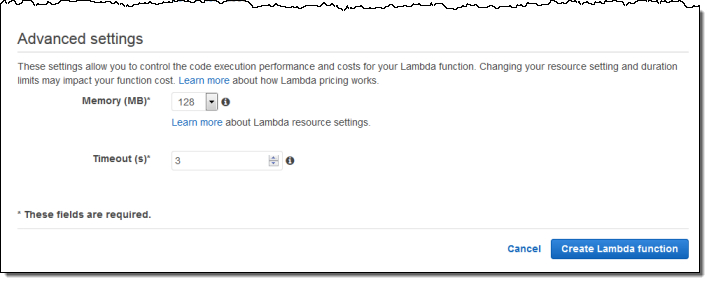
I can also fine-tune the memory requirements and set a limit on execution time:
After I create my function, I can iteratively edit and test it from within the Console. As you can see, the pane on the left shows a sample of the JSON data that will be passed to my function:
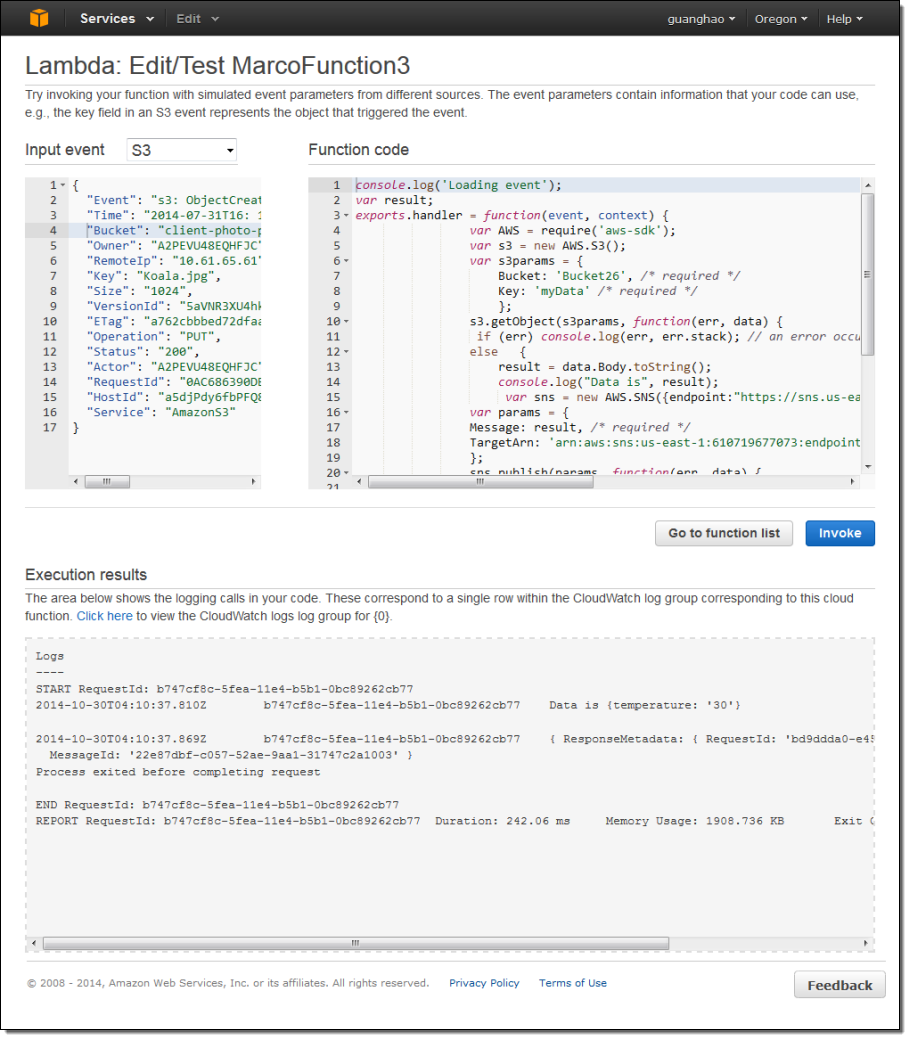
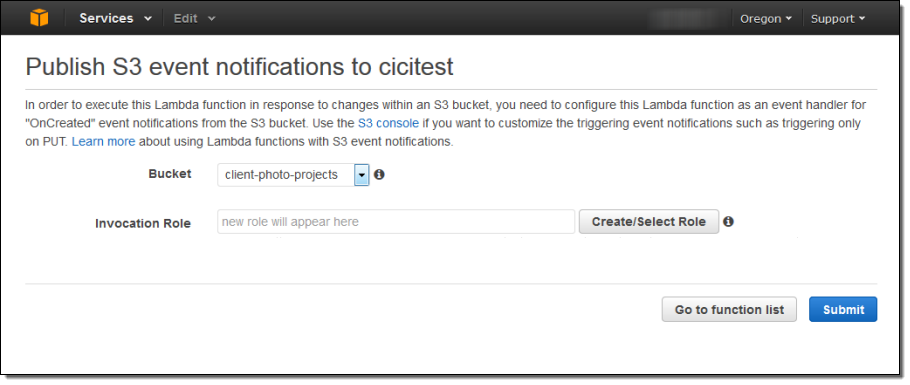
When the function is working as expected, I can attach it to an event source such as Amazon S3 event notification. I will to provide an invocation role in order to give S3 the permission that it needs to have in order to invoke the function:
Lambda collects a set of metrics for each of my functions and sends them to Amazon CloudWatch. I can view the metrics from the Console:

On the Roadmap
We have a great roadmap for Lambda! While I won’t spill all of the beans today, I will tell you that we expect to add support for additional AWS services and other languages. As always, we love your feedback; please leave a note in the Lambda Forum.
Pricing & Availability
Let’s talk about pricing a bit before wrapping up! Lambda uses a fine-grained pricing model. You pay for compute time in units of 100 milliseconds and you pay for each request. The Lambda free tier includes 1 million free requests per month and up to 3.2 million seconds of compute time per month depending on the amount of memory allocated per function.
Lambda is available today in preview form in the US East (Northern Virginia), US West (Oregon), and EU (Ireland) Regions. If you would like to get started, register now.
— Jeff;
Speak to Amazon Kinesis in Python
My colleague Rahul Patil sent me a nice guest post. In the post Rahul shows you how to use the new Kinesis Client Library (KCL) for Python developers.
— Jeff;
The Amazon Kinesis team is excited to release the Kinesis Client Library (KCL) for Python developers! Developers can use the KCL to build distributed applications that process streaming data reliably at scale. The KCL takes care of many of the complex tasks associated with distributed computing, such as load-balancing across multiple instances, responding to instance failures, checkpointing processed records, and reacting to changes in stream volume.
You can download the KCL for Python using Github, or PyPi.
Getting Started
Once you are familiar with key concepts of Kinesis and KCL, you are ready to write your first application. Your code has the following duties:
- Set up application configuration parameters.
- Implement a record processor.
The application configuration parameters are specified by adding a properties file. For example:
# The python executable script
executableName = sample_kclpy_app.py

# The name of an Amazon Kinesis stream to process.
streamName = words

# Unique KCL application name
applicationName = PythonKCLSample

# Read from the beginning of the stream
initialPositionInStream = TRIM_HORIZON
The above example configures KCL to process a Kinesis stream called “words” using the record processor supplied in sample_kclpy_app.py. The unique application name is used to coordinate amongst workers running on multiple instances.
Developers have to implement the following three methods in their record processor:
initialize(self, shard_id)
process_records(self, records, checkpointer)
shutdown(self, checkpointer, reason)
initialize() and shutdown() are self-explanatory; they are called once in the lifecycle of the record processor to initialize and clean up the record processor respectively. If the shutdown reason is TERMINATE (because the shard has ended due to split/merge operations), then you must also take care to checkpoint all of the processed records.
You implement the record processing logic inside the process_records() method. The code should loop through the batch of records and checkpoint at the end of the call. The KCL assumes that all of the records have been processed. In the event the worker fails, the checkpointing information is used by KCL to restart the processing of the shard at the last checkpointed record.
# Process records and checkpoint at the end of the batch
    def process_records(self, records, checkpointer):
        for record in records:
            # record data is base64 encoded
            data = base64.b64decode(record.get('data'))
            ####################################
            # Insert your processing logic here#
            ####################################

        #checkpoint after you are done processing the batch
        checkpointer.checkpoint()
The KCL connects to the stream, enumerates shards, and instantiates a record processor for each shard. It pulls data records from the stream and pushes them into the corresponding record processor. The record processor is also responsible for checkpointing processed records.
Since each record processor is associated with a unique shard, multiple record processors can run in parallel. To take advantage of multiple CPUs on the machine, each Python record processor runs in a separate process. If you run the same KCL application on multiple machines, the record processors will be load-balanced across these machines. This way, KCL enables you to seamlessly change machine types or alter the size of the fleet.
Running the Sample
The release also comes with a sample word counting application. Navigate to the amazon_kclpy directory and install the package.
$ python setup.py download_jars
$ python setup.py install
A sample putter is provided to create a Kinesis stream called “words” and put random words into that stream. To start the sample putter, run:
$ sample_kinesis_wordputter.py --stream words .p 1 -w cat -w dog -w bird
You can now run the sample python application that processes records from the stream we just created:
$ amazon_kclpy_helper.py --print_command --java --properties samples/sample.properties
Before running the samples, you’ll want to make sure that your environment is configured to allow the samples to use your AWS credentials via the default AWS Credentials Provider Chain.
Under the Hood – What You Should Know
KCL for Python uses KCL for Java. We have implemented a Java based daemon, called MultiLangDaemon that does all the heavy lifting. Our approach has the daemon spawn a sub-process, which in turn runs the record processor, which can be written in any language. The MultiLangDaemon process and the record processor sub-process communicate with each other over STDIN and STDOUT using a defined protocol. There will be a one to one correspondence amongst record processors, child processes, and shards. For Python developers specifically, we have abstracted these implementation details away and expose an interface that enables you to focus on writing record processing logic in Python. This approach enables KCL to be language agnostic, while providing identical features and similar parallel processing model across all languages.
Join the Kinesis Team
The Amazon Kinesis team is looking for talented Web Developers and Software Development Engineers to push the boundaries of stream data processing! Here are some of our open positions:
— Rahul Patil
Search and Interact With Your Streaming Data Using the Kinesis Connector to Elasticsearch
My colleague Rahul Patil wrote a guest post to show you how to build an application that loads streaming data from Kinesis into an Elasticsearch cluster in real-time.
— Jeff;
The Amazon Kinesis team is excited to release the Kinesis connector to Elasticsearch! Using the connector, developers can easily write an application that loads streaming data from Kinesis into an Elasticsearch cluster in real-time and reliably at scale.
Elasticsearch is an open-source search and analytics engine. It indexes structured and unstructured data in real-time. Kibana is Elasticsearch’s data visualization engine; it is used by dev-ops and business analysts to setup interactive dashboards. Data in an Elasticsearch cluster can also be accessed programmatically using RESTful API or application SDKs. You can use the CloudFormation template in our sample to quickly create an Elasticsearch cluster on Amazon Elastic Compute Cloud (EC2), fully managed by Auto Scaling.
Wiring Kinesis, Elasticsearch, and Kibana
Here’s a block diagram to help you see how the pieces fit together:
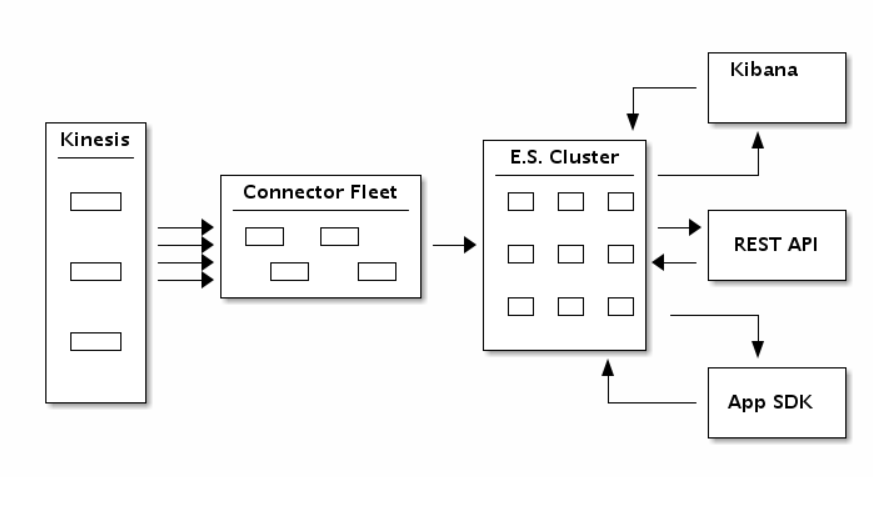
Using the new Kinesis Connector to Elasticsearch, you author an application to consume data from Kinesis Stream and index the data into an Elasticsearch cluster. You can transform, filter, and buffer records before emitting them to Elasticsearch. You can also finely tune Elasticsearch specific indexing operations to add fields like time to live, version number, type, and id on a per record basis. The flow of records is as illustrated in the diagram below.
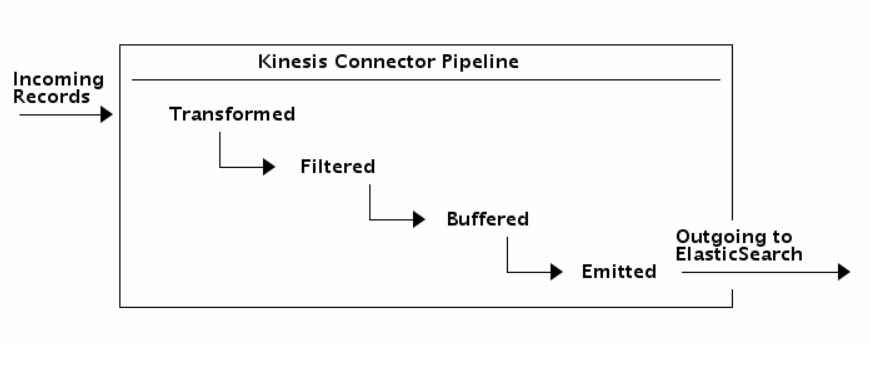
Note that you can also run the entire connector pipeline from within your Elasticsearch cluster using River.
Getting Started
Your code has the following duties:
- Set application specific configurations.
- Create and configure a
KinesisConnectorPipelinewith a Transformer, a Filter, a Buffer, and an Emitter. - Create a KinesisConnectorExecutor that runs the pipeline continuously.
All the above components come with a default implementation, which can easily be replaced with your custom logic.
Configure the Connector Properties
The sample comes with a .properties file and a configurator. There are many settings and you can leave most of them set to their default values. For example, the following settings will:
- Configure the connector to bulk load data into Elasticsearch only after you’ve collect at least 1000 records.
- Use the local Elasticsearch cluster endpoint for testing.
bufferRecordCountLimit = 1000
elasticSearchEndpoint = localhost
Implementing Pipeline Components
In order to wire the Transformer, Filter, Buffer, and Emitter, your code must implement the IKinesisConnectorPipeline interface.
public class ElasticSearchPipeline implements
    IKinesisConnectorPipeline

public IEmitter getEmitter
    (KinesisConnectorConfiguration configuration) {
    return new ElasticSearchEmitter(configuration);
}

public IBuffer getBuffer(
    KinesisConnectorConfiguration configuration) {
    return new BasicMemoryBuffer(configuration);
}

public ITransformerBase  getTransformer
    (KinesisConnectorConfiguration configuration) {
    return new StringToElasticSearchTransformer();
}

public IFilter getFilter
    (KinesisConnectorConfiguration configuration) {
    return new AllPassFilter();
}
The following snippet implements the abstract factory method, indicating the pipeline you wish to use:
public KinesisConnectorRecordProcessorFactory
    getKinesisConnectorRecordProcessorFactory() {
         return new KinesisConnectorRecordProcessorFactory(new ElasticSearchPipeline(), config);
    }
Defining an Executor
The following snippet defines a pipeline where the incoming Kinesis records are strings and outgoing records are an ElasticSearchObject:
public class ElasticSearchExecutor extends
    KinesisConnectorExecutor
The following snippet implements the main method, creates the Executor and starts running it:
public static void main(String[] args) {
    KinesisConnectorExecutor executor
        = new ElasticSearchExecutor(configFile);
    executor.run();
}
 From here, make sure your AWS Credentials are provided correctly. Setup the project dependencies using
 ant setup. To run the app, use ant run and watch it go! All of the code is on GitHub, so you can get started immediately. Please post your questions and suggestions on the Kinesis Forum.
Kinesis Client Library and Kinesis Connector Library
When we launched Kinesis in November of 2013, we also introduced the Kinesis Client Library. You can use the client library to build applications that process streaming data. It will handle complex issues such as load-balancing of streaming data, coordination of distributed services, while adapting to changes in stream volume, all in a fault-tolerant manner.
We know that many developers want to consume and process incoming streams using a variety of other AWS and non-AWS services. In order to meet this need, we released the Kinesis Connector Library late last year with support for Amazon DynamoDB, Amazon Redshift, and Amazon Simple Storage Service (S3). We then followed up that with a Kinesis Storm Spout and Amazon EMR connector earlier this year. Today we are expanding the Kinesis Connector Library with support for Elasticsearch.
— Rahul
All Data Are Belong to AWS: Streaming upload via Fluentd
I’ve got a special treat for you today! Kiyoto Tamura of Treasure Data wrote a really interesting guest post to introduce you to Fluentd and to show you how you can use it with a wide variety of AWS services to collect, store, and process data.
— Jeff;
Data storage is Cheap. Data collection is Not!
Data storage has become incredibly cheap. When I say cheap, I do not mean in terms of hardware but operational, labor cost. Thanks to the advent of IaaS like AWS, many of us no longer spend days and weeks on capacity planning (or better yet, can provision resources in an auto-scalable manner) or worry about our server racks catching fire.
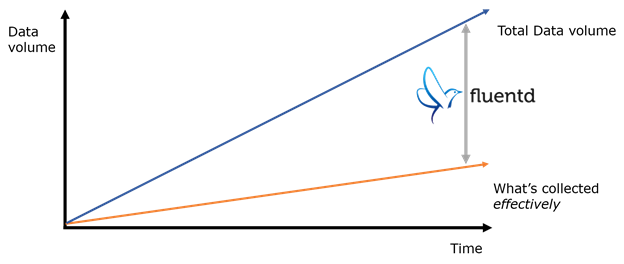
Cheaper storage means that our ideas are no longer bound by how much data we can store. A handful of engineers can run a dozen or so Redshift instances or manage hundreds of billions of log data backed up in Amazon Simple Storage Service (S3) to power their daily EMR batch jobs. Analyzing massive datasets is no longer a privilege exclusive to big, tech-savvy companies.
However, data collection is still a major challenge: data does not magically originate inside storage systems or organize themselves; hence, many (ad hoc) scripts are written to parse and load data. These scripts are brittle, error-prone and near-impossible to extend.
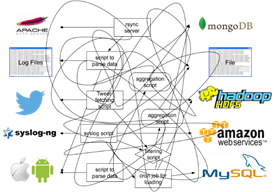
This is the problem Fluentd tries to solve: scalable, flexible data collection in real-time. In the rest of this blog post, I will walk through the basic architecture of Fluentd and share some use cases on AWS.
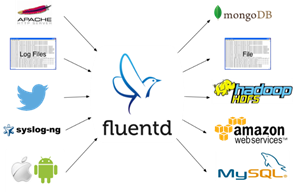
Fluentd: Open Source Data Collector for High-volume Data Streams
Fluentd is an open source data collector originally written at Treasure Data. Open-sourced in October 2011, it has gained traction steadily over the last 2.5 years: today, we have a thriving community of ~50 contributors and 2,100+ Stargazers on GitHub with companies like Slideshare and Nintendo deploying it in production.
Inputs and Outputs
At the highest level, Fluentd consists of inputs and outputs. Inputs specify how and where Fluentd ingests data.
Common inputs are:
- Tailing log files and parsing each line (or multiple lines at a time).
- Listening to syslog messages.
- Accepting HTTP requests and parsing the message body.
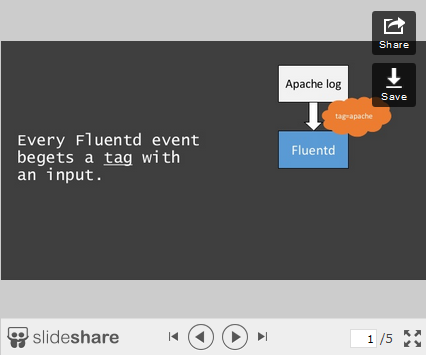
There are two key features about inputs: JSON and tagging.
- Fluentd embraces JSON as its core data format, and each input is responsible for turning incoming data into a series of JSON “events.”
- Each input gives a tag to the data it ingests. Based on the tag, Fluentd decides what to do with data coming from different inputs (see below).
Once data flow into Fluentd via inputs, Fluentd looks at each event’s tag (as explained in 2 above) and routes it to output targets such as a local filesystem, RDBMSs, NoSQL databases and AWS services.
Open and Pluggable Architecture
How does Fluentd have so many inputs and outputs already? The secret is its open, pluggable architecture. With a minimal knowledge of Ruby, one can build a new plugin in a matter of few hours. Unsurprisingly, many Fluentd users are also AWS enthusiasts, so we already have plugins for the following AWS services:
- Amazon Simple Storage Service (S3) (output)
- Amazon Redshift (output)
- Amazon Simple Queue Service (SQS) (input and output)
- Amazon Kinesis (output)
- Amazon DynamoDB (output)
- Amazon CloudWatch (input)
Performance and Reliability
Whenever I “confess” that Fluentd is mostly written in Ruby, people express concerns about performance. Fear not. Fluentd is plenty fast. On a modern server, it can process ~15,000 events/sec on a single core, and you can get better throughput by running Fluentd on multiple cores.
Fluentd gets its speed from using lower-level libraries written in C for performance-critical parts of the software: For example, Fluentd uses Cool.io (maintained by Masahiro Nakagawa, the main maintainer of Fluentd) for event loop and MessagePack for Ruby (maintained by Sadayuki Furuhashi, the original author of Fluentd) for internal data format.
Speed is nice, but reliability is a must for log collection: data loss leads to bad data and worse decisions. Fluentd ensures reliability through buffering. Output plugins can be configured to buffer its data either in-memory or on-disk so that if data transfer fails, it can be retried without data loss. The buffering logic is highly tunable and can be customized for various throughput/latency requirements.
Example: Archiving Apache Logs into S3
Now that I’ve given an overview of Fluentd’s features, let’s dive into an example. We will show you how to set up Fluentd to archive Apache web server logs into S3.
Step 1: Getting Fluentd
Fluentd is available as a Ruby gem (gem install fluentd). Also, Treasure Data packages it with all the dependencies as td-agent. Here, we proceed with td-agent. I assume that you are on Ubuntu Precise (12.04), but td-agent is also available for Ubuntu Lucid and CentOS 5/6 with the support for Ubuntu Trusty forthcoming.
Run the following command:
curl -L http://toolbelt.treasuredata.com/sh/install-ubuntu-precise.sh | shYou can check that td-agent is successfully installed by running the following command:
$ which td-agent

/usr/sbin/td-agent
Step 2: Configuring Input and Output
For td-agent, the configuration file is located at /etc/td-agent/td-agent.conf. Let’s reconfigure it so that it tails the Apache log file.
  type tail
  format apache2
  path /var/log/apache2/access_log
  pos_file /var/log/td-agent/apache2.access_log.pos
  tag s3.apache.access
This snippet configures the Apache log file input. It tells Fluentd to tail the log file located at /var/log/apache2/access_log, parse it according to the Apache combined log format and tag it as s3.apache.access.
Next, we configure the S3 output as follows:
  type s3

  s3_bucket YOUR_BUCKET_NAME
  path logs/
  buffer_path /var/log/td-agent/s3

  time_slice_format %Y%m%d%H
  time_slice_wait 10m
  utc

  format_json true
  include_time_key true
  include_tag_key true

  buffer_chunk_limit 256m
The <match s3.*.*> tells Fluentd to match any event whose tag has 1) three parts and 2) starts with s3. Since all the events coming from the Apache access log have the tag s3.apache.access, it gets matched here and sent to S3.
Finally, let’s start td-agent with the updated configuration:
$ sudo service td-agent start
* Starting td-agent td-agent          [OK]
It might take about 10 minutes for your data to appear in S3 due to buffering (see “time_slice_wait”), but eventually logs should appear in YOUR_BUCKET_NAME/logs/yyyyMMddHH. Also, make sure that Fluentd has write access to your S3 bucket. The following setting should be used for IAM roles:
{
      "Effect": "Allow",
      "Action": [
        "s3:Get*", "s3:List*","s3:Put*", "s3:Post*"
      ],
      "Resource": [
        "arn:aws:s3:::YOUR_BUCKET_NAME/logs/*", "arn:aws:s3::: YOUR_BUCKET_NAME"
      ]
}
What’s Next?
The above overview and example give you only a glimpse of what can be done with Fluentd. You can learn more about Fluentd on its website and documentation and contribute to the project on its GitHub repository. If you have any questions, tweet to us on Twitter or ask us questions on the mailing list!
— Kiyoto
Amazon Kinesis Expansion
Amazon Kinesis is a real-time service for processing streaming data at massive scale. You can process Kinesis data in a variety of ways, including the Kinesis Client Library, Apache Storm, or Elastic Map Reduce. Mobile gaming companies like Supercell ( AWS Case Study) and analytics companies like Snowplow Analytics ( AWS Case Study) accelerate their data analysis and decision making with Kinesis.
We recently announced that AWS CloudTrail provides support for logging of API calls made to Kinesis.
Today we are expanding Kinesis into a pair of new AWS Regions! You can now build and run Kinesis apps in the following locations:
- US East (Northern Virginia)
- EU (Ireland) – New!
- US West (Oregon) – New!
To learn more about Kinesis, start with the Developer Guide. This document describes scenarios where Kinesis can be used and outlines some of the benefits of doing so. It also introduces the all-important Kinesis Client Library and shows you how to use it to build an app.
— Jeff;