AWS Big Data Blog
Launching an edge node for Amazon EMR to run RStudio
RStudio Server provides a browser-based interface for R and a popular tool among data scientists. Data scientist use Apache Spark cluster running on Amazon EMR to perform distributed training. In a previous blog post, the author showed how you can install RStudio Server on Amazon EMR cluster. However, in certain scenarios you might want to install it on a standalone Amazon EC2 instance and connect to a remote Amazon EMR cluster. Benefits of running RStudio on EC2 include the following:
- Running RStudio Server on an EC2 instance, you can keep your scientific models and model artifacts on the instance. You might have to relaunch your EMR cluster to meet your application requirements. By running RStudio Server separately, you have more flexibility and don’t have to depend entirely on an Amazon EMR cluster.
- Installing RStudio on the master node of Amazon EMR requires sharing of resources with the applications running on the same node. By running RStudio on a standalone Amazon EC2 instance, you can use resources as you need without having to share the resources with other applications.
- You might have multiple Amazon EMR clusters in your environment. With RStudio on Edge node, you have the flexibility to connect to any EMR clusters in your environment.
There is one major difference between running RStudio Server on an Amazon EMR cluster vs. running it on a standalone Amazon EC2 instance. In the latter case, the instance needs to be configured as an Amazon EMR client (or edge node). By doing so, you can submit Apache Spark jobs and other Hadoop-based jobs from an instance other than EMR master node.
In this post, I walk you through a list of steps to configure an Amazon EC2 instance as an Amazon EMR edge node with RStudio Server configured for remote workloads.
Solution overview
In the next few sections, I describe creating an edge node, installing RStudio, and connecting to a remote Spark cluster from R running on the edge node.
At a high level, the solution includes the following steps:
- Create an Amazon EC2 instance.
- Install RStudio Server and required dependencies on that instance.
- Install the Apache Spark and Hadoop client libraries and dependencies on the same instance.
- Launch an Amazon EMR cluster with the Apache Spark, Livy, and Hive applications.
- Configure the Amazon EC2 instance as an EMR client.
- Test EMR client functionality by running sample remote jobs.
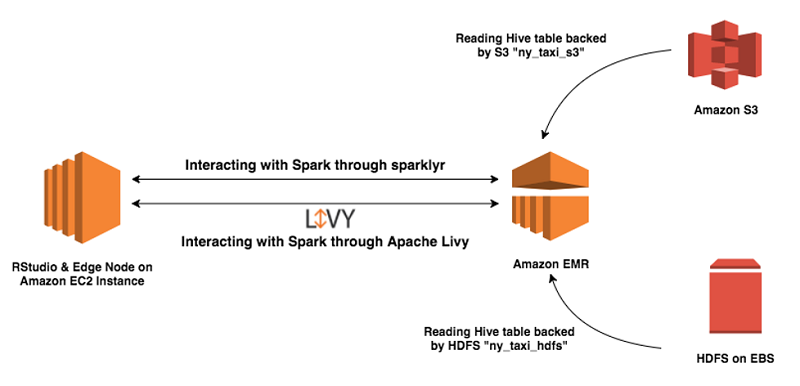
- Connect to the Spark cluster from R using Sparklyr.
- Interact with Hive tables on EMR from RStudio.
- Run R models on the data on the EMR cluster.
Let’s take a look at the steps to configure an Amazon EC2 instance as EMR edge node.
Creating an edge node for Amazon EMR
In this exercise, I create a Spark client on the edge node. Because Spark relies on Hadoop libraries, I also install Hadoop on the edge node. To make sure that the client works properly, I install the same Hadoop and Spark versions as those on the EMR cluster. Because most of the libraries also run on JVM, I recommend that you have the same JVM version as the one on the EMR cluster.
After I install Spark and Hadoop on the edge node, I configure the edge node to talk to the remote Amazon EMR cluster. To do that, several configurations files from the EMR cluster need to copy to the edge node. There are two ways to copy the configuration files from a newly created EMR cluster to the edge node on EC2 instance—manual and automated. In the next section, I discuss those two approaches.
Manual approach
After the EMR cluster is up and running, you can use the secure transfer tool scp to copy the required configuration files from an EMR master node to a local machine. In my case, I used my laptop.
You can also use the same tool to copy those files from that local machine to the edge node:
PC users can use an application like WinSCP to connect and transfer files between an EMR master node and a PC.
Note: Depending on the applications installed on Amazon EMR, you might need to copy other libraries from the cluster. As an example, the open-source distributions of Hadoop and Spark packages that are used in this solution don’t have libraries for EMRFS. So, to use EMRFS, copy the EMRFS libraries to the edge node and update the classpath to include the libraries.
Automated approach (used in this solution)
As you might have noticed in the previous approach, you need to run the copy operation twice:
- From the EMR master node to a local machine
- From the local machine to the edge node
If you use a bastion host to access EMR, then the copy process also needs to go one extra hop. One way to automate this process is to execute a script as an EMR step, which uploads all the required libraries and configuration files to an Amazon S3 location. A second script on the edge node runs through cfn-init, which downloads files from the S3 location and places them in the right application paths. The following diagram illustrates a sequence of steps that take place during this process.

In this solution, the EMR step (CreateEMRClientDeps) executes the script create-emr-client.sh to copy the configuration files to Amazon S3. The script first creates an archive file awsemrdeps.tgz with all the required libraries. It then uploads that file into a temporary S3 bucket with a prefix ending in /emr-client/. On the edge node, the install-client-and-rstudio.sh script is used to copy the awsemrdeps.tgz file from S3 back to the edge node.
Let’s take a look at the AWS CloudFormation steps to create an edge node for Amazon EMR and run RStudio on the edge node.
Walkthrough using AWS CloudFormation
Following are the prerequisites to run the AWS CloudFormation template for this solution:
- Create an Amazon VPC with at least one public subnet and one private subnet.
- Update the IAM policy so that the user has access to create IAM policies, instance profile, roles, and security groups.
- Enable VPC endpoints for Amazon S3.
- Create an EC2 key-pair to connect to EC2 instances.
To set up this entire solution, you need to create a few AWS resources. The attached CloudFormation template creates all those required AWS resources and configures them to create an Amazon EMR edge node and running RStudio on it.
This CloudFormation template requires you to pass the following parameters during launch.
| Parameter | Description |
| EmrSubnet | The subnet where the Amazon EMR cluster is deployed. It can be either a public or private subnet. |
| InstanceType | The Amazon EC2 instance type used for the RStudio Server and edge node, which defaults to m4.xlarge. |
| KeyName | The name of the existing EC2 key pair to access the Amazon EMR and edge node. |
| RStudioServerSubnet | The public subnet where the RStudio Server and edge node are launched. |
| S3RepoPath | The Amazon S3 path where all required files (template, scripts job, sample data, and so on) are stored. |
| S3TempUploadPath | The S3 path in your AWS account for housing temporary dependency files and sample data for Hive. |
| VPC | The ID of the virtual private cloud (VPC) where the EMR and edge node is deployed. |
Important: This template is designed only to show how you can create an EMR edge node and configure RStudio for remote EMR workloads. This setup isn’t intended for production use without modification. If you try this solution outside of the US-East-1 Region, be sure to download the necessary files from s3://aws-data-analytics-blog/rstudio-edge-node. You then upload the files to the buckets in your AWS Region, edit the script as appropriate, and then run it.
To launch the CloudFormation stack, choose Launch Stack:

The following sample screenshot shows the stack parameters.

Launching this stack creates the following AWS resources.
| Logical ID | Resource type | Description |
| EMRCluster | Amazon EMR cluster | The EMR cluster to run the Spark and Hive jobs |
| CreateEMRClientDeps | EMR step job | A job that runs a script to create client dependencies and uploads to S3 |
| CreateHiveTables | EMR step job | A job to copy sample data for Hive and create Hive tables |
| RStudioConfigureWaitCondition | CloudFormation wait condition | A wait condition that works with the wait handler, and waits for the RStudio Server setup process to complete |
| RStudioEIP | Elastic IP address | The elastic IP address for RStudio Server |
| RStudioInstanceProfile | Instance profile | The instance profile for the RStudio and edge node instance (for this solution, I used the default role EMR_EC2_DefaultRole created during EMR launch) |
| RStudioSecGroup | Amazon EC2 security group | The security group that controls incoming traffic to the edge node |
| RStudioServerEC2 | Amazon EC2 instance | The EC2 instance for the edge node and RStudio Server |
| RStudioToEMRSecGroup | Amazon EC2 security group | The security group that controls traffic between EMR and the edge node |
| RStudioWaitHandle | CloudFormation wait handler | The wait handler that gets triggered after RStudio Server is launched |
| SecGroupSelfIngress | Amazon EC2 security group ingress rule | An ingress rule to RStudioToEMRSecGroup that allows the instance to talk an instance with the same security group |
The CloudFormation template used in this solution configures S3 paths and stores files to their respective locations. The EMR client dependencies archive awsemrdeps.tgz is stored at the <<s3-temp-upload-path>>/emr-client/ location. The sample data file tripdata.csv is stored at <<s3-temp-upload-path>>/ny-taxi/.
The following screenshot shows how the S3 paths are configured after deployment. In this example, I passed an S3 full path, s3://<<my-bucket>>/rstudio-edge-node, which is on my Amazon S3 account.

When the CloudFormation template has successfully completed, the DNS address of RStudio Server is displayed on the Outputs tab, as shown following.
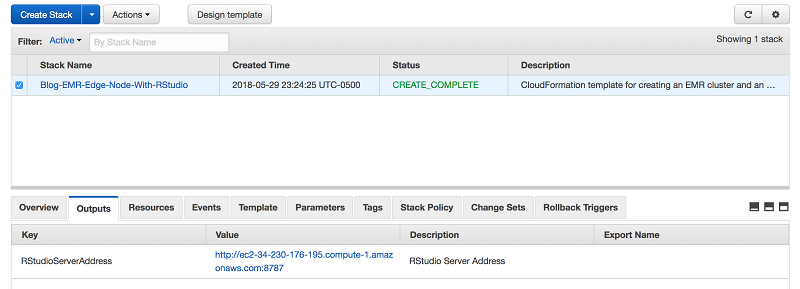
The address shown is the DNS address of the RStudio Server and edge node. A user should be able to connect to this address immediately after enabling FoxyProxy.
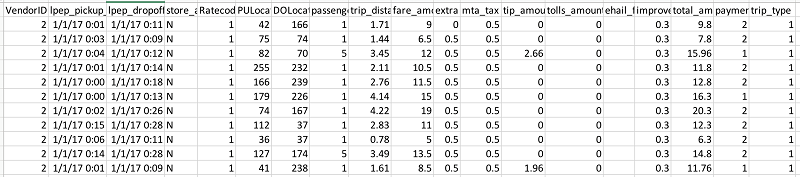
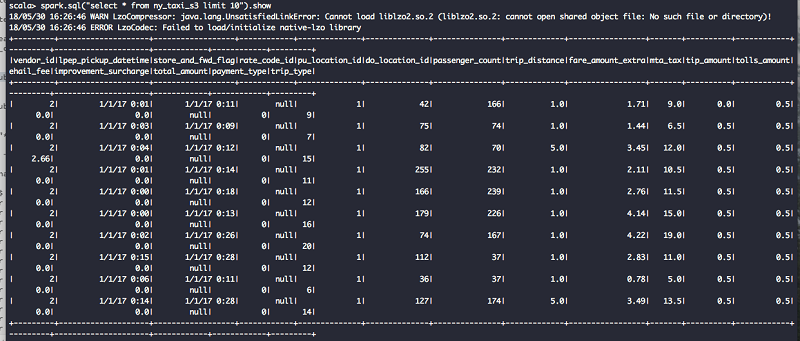
Test data and tables
For the source data, I have used New York City Taxi and Limousine Commission (TLC) trip record data. For a description of the data, see this detailed dictionary of the taxi data. The trip data is in comma-separated value (CSV) format with the first row as a header. The following image shows data from the trip dataset.
A second EMR step, CreateHiveTables, is created as part of the CloudFormation template. This step creates two Hive tables that will be later used by R on RStudio to run sample models. Both are external Hive tables—one is stored in HDFS on the EMR cluster and the other in Amazon S3. The goal is to demonstrate how RStudio can consume data with storage that is backed by HDFS and S3.
| Table name | Storage type | Path |
| ny_taxi_hdfs | HDFS | /user/ruser/ny_taxi |
| ny_taxi_s3 | S3 | s3://<s3-temp-upload-path>/ny_taxi |
The following section shows a list of steps to test Amazon EMR client functionality, which is optional.
Testing EMR client functionality (optional)
If the EMR client is configured correctly on the edge node, you should be able to submit Spark jobs from the edge node to the EMR cluster. You can apply the following few steps to the edge node to verify this functionality:
- Log in to the edge node using the default user ec2-user.
- Choose this host address from the CloudFormation Outputs tab:
- The CloudFormation template also creates a new user, called ruser, that you can use to submit Spark jobs or use the RStudio UI. Switch the user from ec2-user to ruser:
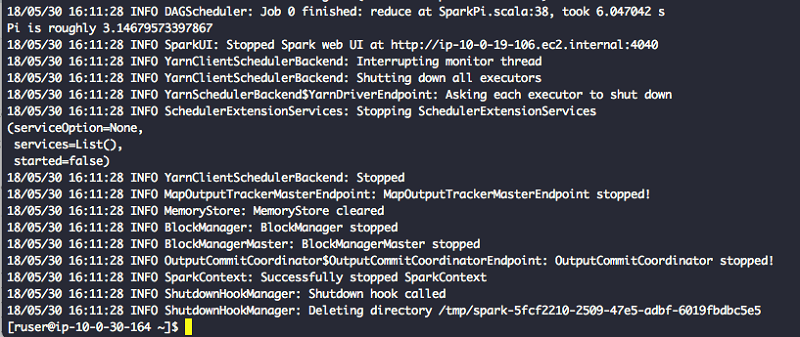
- Submit a Spark example job to the remote EMR cluster:

- Check the job status in the terminal and also on the EMR console. The Spark example job should be able to finish successfully. In the terminal, it should display the value of Pi as shown following.
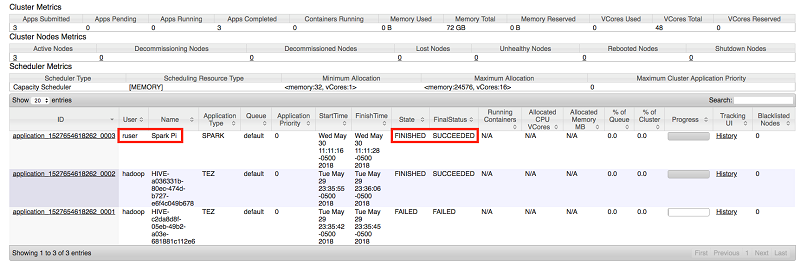
- Check the job status in the Resource Manager UI; notice that the Spark PI job ran as ruser and completed successfully.
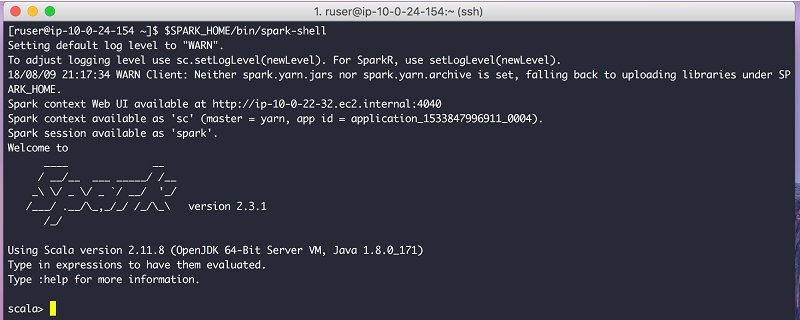
- Test this setup further by running spark-shell, and retrieve Hive table data from the remote EMR cluster:
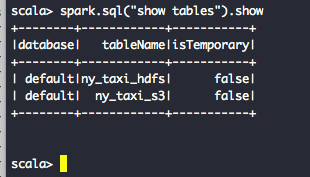
- Check the list of all available Hive tables and their content:
Running R and connecting to Apache Spark
In this section, let’s run some tests and models from RStudio consuming data from Amazon EMR. Locate the RStudio Server address on the Outputs tab on the CloudFormation console. The user name is ruser and the password is BigData26.
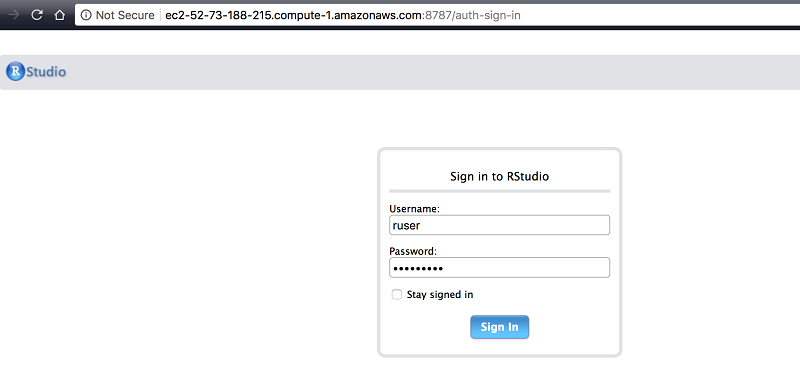
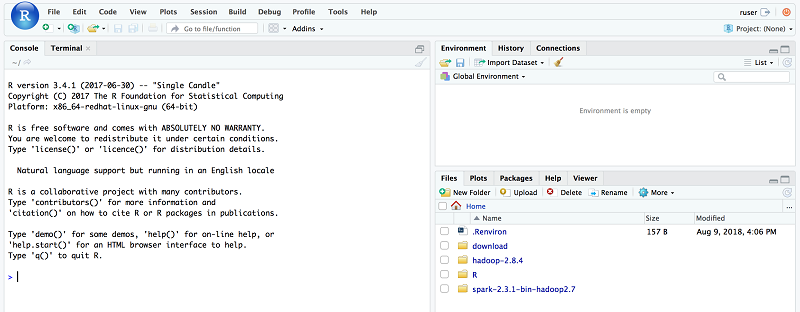
A successful login redirects you to this welcome window. The left big window is the console window, where you write R.
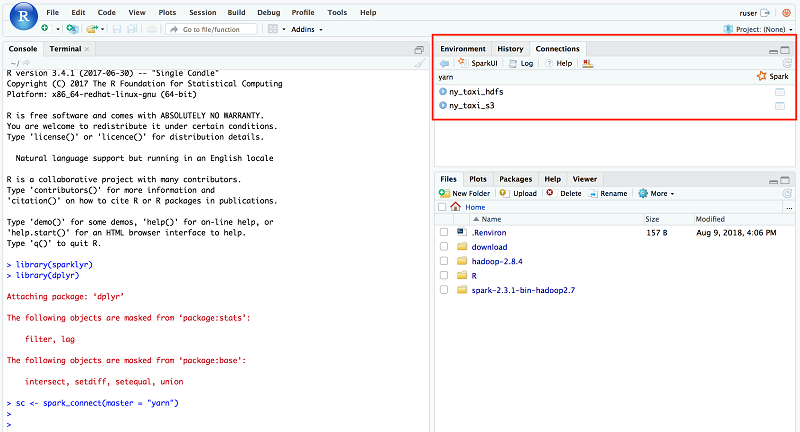
Create a SparkContext on R console. No additional configuration is needed, because RStudio is already set up with the required environment variables and files through the AWS CloudFormation stack. In this solution, Sparklyr is used to connect to Spark. Attach the required R packages before creating SparkContext as follows:
When a connection to Spark is established, it creates a “yarn” connection channel (find this in the RStudio UI, on the Connections tab at the right corner). It also shows Hive metadata on the same widget. Because the CloudFormation template created two Hive tables, they appear under the “yarn” connection as shown following.
A YARN application is also placed under ruser. The status of the application is RUNNING as long as the connection is established. You can find the status of that application on the YARN ResourceManager UI also. Notice that the user is ruser and the name of the application is sparklyr.
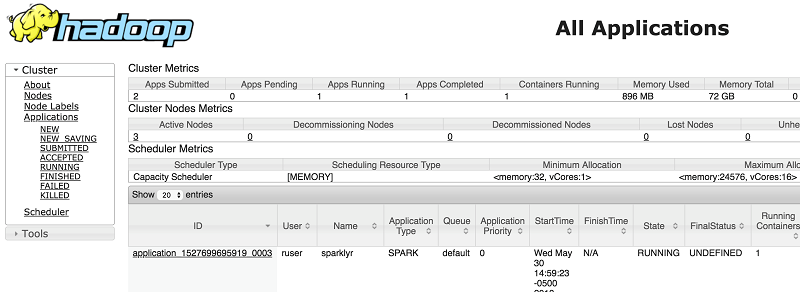
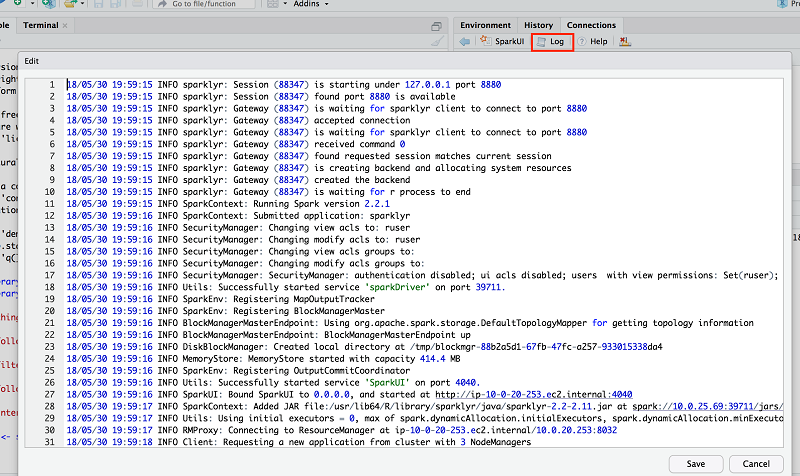
For more information, check the YARN app log by choosing Log on the widget.
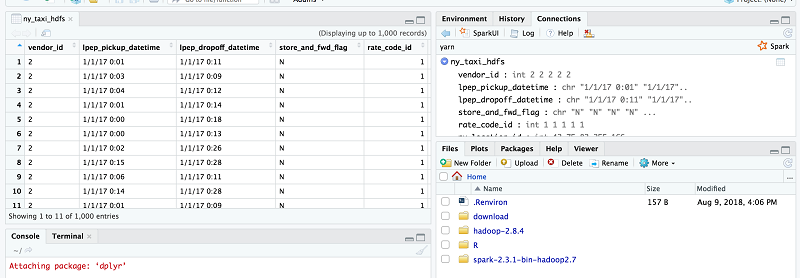
Now, test whether the data for those two Hive tables is accessible. Choose the ny_taxi_hdfs table to sample the data.
Choose the ny_taxi_s3 table to sample the data on S3.
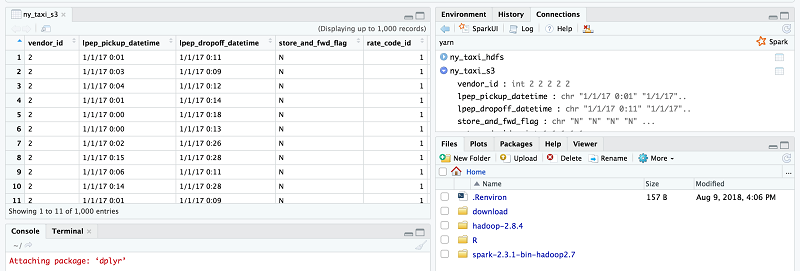
By successfully running these two tests, you can see that RStudio running on an edge node can consume data stored in a remote EMR cluster.
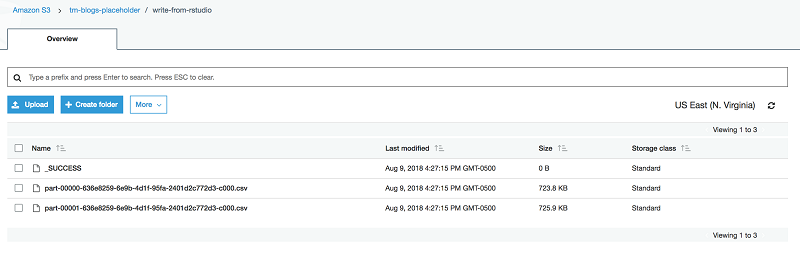
During the development phase, users might want to write some data back to your S3 bucket. So it’s a good idea to verify whether a user can write data directly to S3 using R and Spark. To test this, I read the ny_taxi_hdfs Hive table using the spark_read_table API. Then I write the data to Amazon S3 by calling the spark_write_csv API and passing my S3 target path. For this solution, I used s3://tm-blogs-placeholder/write-from-rstudio as my new S3 path.
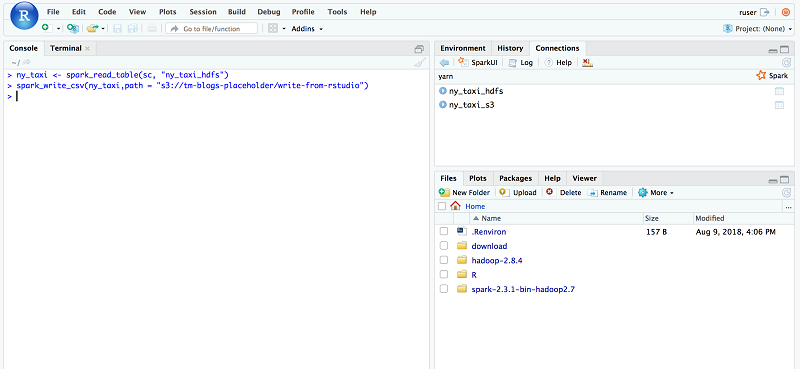
After the write operation, the S3 location appears as follows.
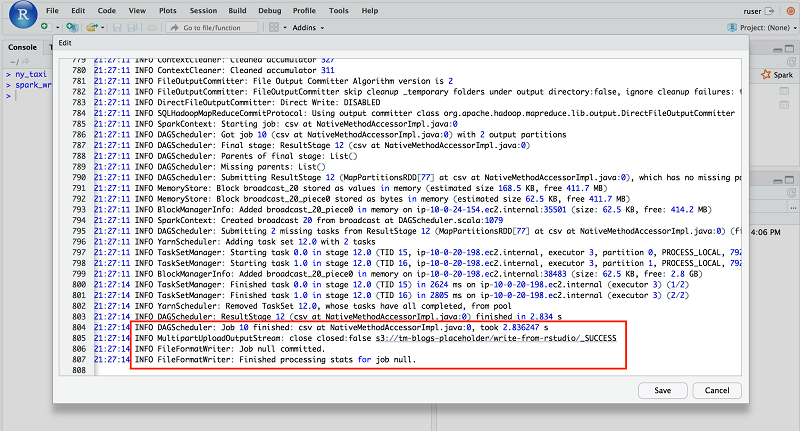
You can also see Spark write logs in the YARN application log.
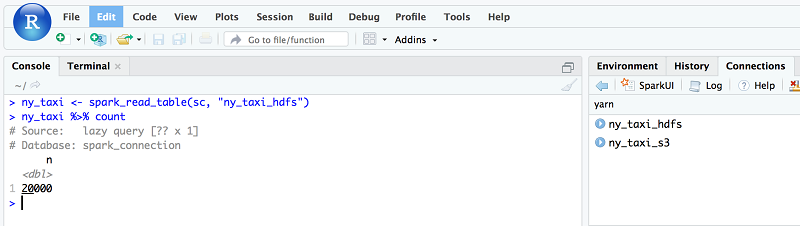
Now analyze the data with R and draw some plots. To do so, first check the count of ny_taxi data. It should return 20,000.
Now, find the number of trips for each rate code type. There are six different rate code types where 1 is the standard rate code and 5 is the negotiated rate. For details, see this detailed dictionary of the taxi data.
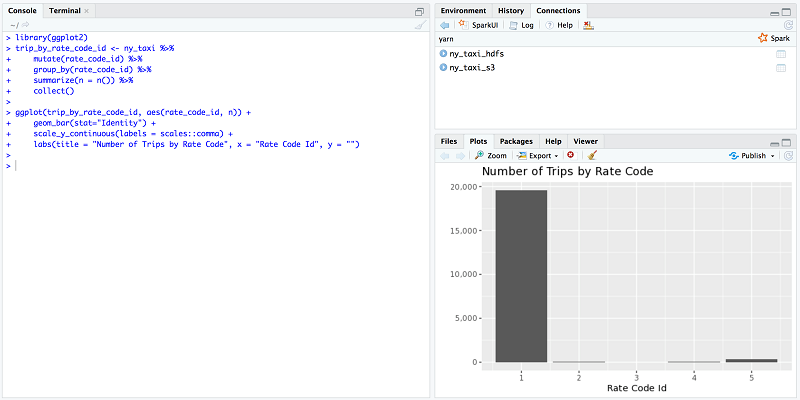
Based on the graph, I can say that (except for some passengers who paid a negotiated rate) the rest of the passengers paid the standard rate during their ride.
Now find the average trip duration between two New York areas—Queens and Manhattan. The pu_location_id value represents the taxi pick-up zone, and do_location_id represents the taxi drop-off zone. For this test, I use 129 as the pick-up zone and 82 as the drop-off zone. Taxi zone 129 represents the Jackson Heights area in Queens, and taxi zone 82 represents the Elmhurst area. For details, see this taxi zone lookup table.
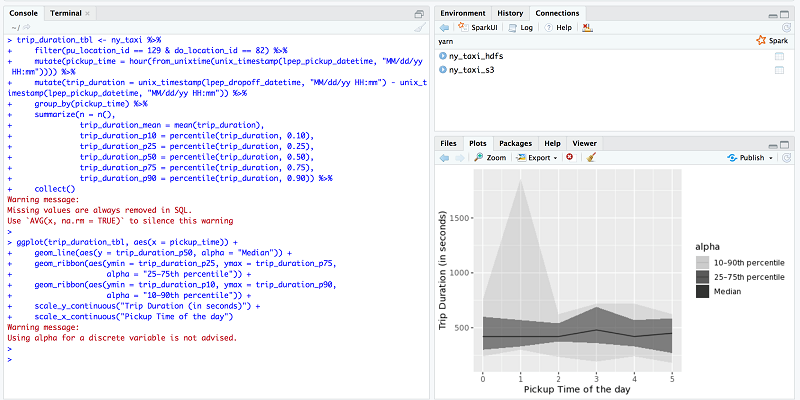
Based on the plot, I can say that on average, each trip duration was about 10–12 minutes. There was a rare peak around 1 a.m. for some days, where the trip duration was more than 30 minutes.
Next steps
The goal of this post is to show, first how to create an edge node or Amazon EMR client on an Amazon EC2 instance. Second, it’s to show how other applications—RStudio in this case—can use that edge node or Amazon EMR client to submit workloads remotely. By following the same approach, you can also create an edge node for other Hadoop applications—Hive client, Oozie client, HBase client, and so on. Data scientists can keep enriching their R environment by adding additional packages and keeping it totally isolated from developers EMR environments. To enhance this solution further and make this production ready, you can explore the following options:
- Use friendly URLs for Amazon EMR interfaces. For example, instead of thrift://ip-10-0-20-253.ec2.internal:9083 for the hive.metastore.uris value, you can use something like thrift://hive-metastore.dev.example.corp:9083. In the same way, instead of using ip-10-0-20-253.ec2.internal:8032 for the yarn.resourcemanager.address property value, you can use dev.emr.example.corp:8032. The benefit of this approach is that, even if you terminate your EMR cluster and recreate it again (with new IP addresses), you don’t have to change your client node’s configuration. This blog post shows how you can create friendly URLs for Amazon EMR.
- If you already integrated Microsoft Active Directory into your Amazon EMR cluster, you can do the same with RStudio. That way, you can achieve single sign-on across your data analytics solutions.
- Enable detailed Amazon CloudWatch logs to monitor your edge node behaviors and trigger alerts for different scenarios (disk space utilization, memory usage, and so on). With this approach, you can proactively notify your data scientists before a possible failure.
- H20 is one of the popular packages used in R. It’s open-source software that allows users to fit thousands of potential models to discover patterns in user data. You can install H20 using CRAN just like the way Sparklyr was installed in this solution. You can execute this on RStudio. Alternatively, you can add the H20 package as part of the installation process by placing it in the install-client-and-rstudio.sh
Common issues
Although it’s hard to cover every possible scenario (because these vary on AWS environments), this section covers some common issues that can occur and ways to fix them.
Issue 1: Clicking the RStudio Server URL returns a There is no Internet connection error.
Solution: Make sure that you configured FoxyProxy in your browser and that you are connecting to the public IP address of the RStudio EC2 instance. You can get this address from the AWS CloudFormation console on the Outputs tab.
Issue 2: The EMR step job CreateClientDeps fails.
Solution: This EMR step job runs the create-emr-client.sh script, which creates an archive with all required dependencies and uploads it to the S3 location. If the edge node doesn’t have write access to S3, this step job fails. In this solution, the default EMR role EMR_EC2_DefaultRole is assigned to the edge node instance also. We assume that EMR_EC2_DefaultRole has write access to the S3 location given through the CloudFormation parameter S3TempUploadPath.
Issue 3: The AWS CloudFormation template Blog-EMR-Edge-Node-With-RStudio times out or fails.
Solution: A script called install-client-and-rstudio.sh runs through cfn-init on the edge node, and it writes logs to the /tmp/edge-node-rstudio-installation.log file. This script contains a sleep clause, where it waits for the awsemrdeps.tgz file to be available on S3. This clause times out after 20 minutes. If the script fails to find that file within that time period, subsequent execution fails. Also, in this solution, RStudio uses http://cran.rstudio.com/ as its repo when installing packages. If the Amazon EC2 instance can’t reach the internet, it can’t download and install those packages, and the template might fail. Make sure that you pick a public subnet or a private subnet with NAT for the edge node.
Issue 4: During Amazon EMR client testing, the Spark sample application fails with a NoClassdefFounderror or UnsupportedOperationException error.
Solution: This blog post uses Amazon EMR 5.16.0. Make sure to use the Hadoop and Spark versions corresponding to the EMR release. If the master node’s application version is different from the edge node’s application version, the client might fail with a NoClassdefFounderror or UnsupportedOperationException error. Make sure that you always install the same version of Hadoop and Spark in both locations.
Cleaning up
When you’ve finished testing this solution, remember to clean up all those AWS resources that you created using AWS CloudFormation. Use the AWS CloudFormation console or AWS CLI to delete the stack named Blog-EMR-Edge-Node-With-RStudio.
Summary
In this post, I show you how to create a client for Amazon EMR. I also show how you can install RStudio on that client node and connect Apache Spark clusters running on Amazon EMR. I used Sparklyr to connect to Spark, consume data from both HDFS and S3, and analyze the data using R models. Go ahead—give this solution a try and share your experience with us!
Additional Reading
If you found this post useful, be sure to check out Running sparklyr – RStudio’s R Interface to Spark on Amazon EMR, Statistical Analysis with Open-Source R and RStudio on Amazon EMR, and Running R on Amazon Athena.
About the Author
 Tanzir Musabbir is an EMR Specialist Solutions Architect with AWS. He is an early adopter of open source Big Data technologies. At AWS, he works with our customers to provide them architectural guidance for running analytics solutions on Amazon EMR, Amazon Athena & AWS Glue. Tanzir is a big Real Madrid fan and he loves to travel in his free time.